How to show a website offer with Web Placement
এই বিষয়বস্তু এখনও আপনার ভাষায় উপলব্ধ নয়।
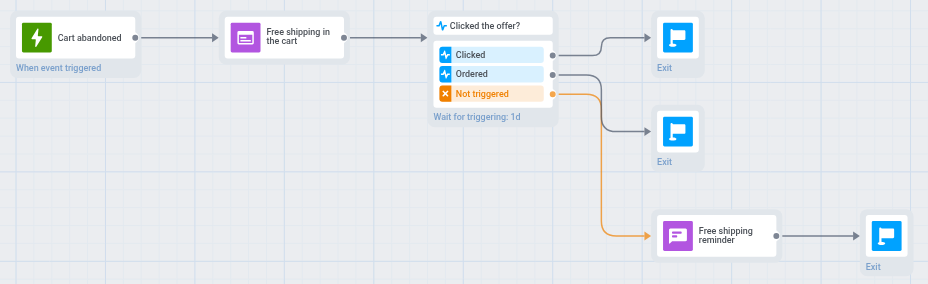
A journey can show an offer right on your website to the users who reach a step, for example a free-shipping banner in the cart of a user who left items there. This guide builds such a journey from start to finish: the offer appears in the cart, users who neither click it nor order within a day get a push, and every order after the offer counts as a conversion.
The finished journey looks like this:
Before you build
Anchor link to- Website. Your developers have prepared the website: Web SDK 3.108.1 or later,
setUserIdfor signed-in visitors, and the element the offer goes into, for example<div id="pw-cart-slot"></div>in the cart. - Events. Your site or backend sends an event when a user leaves items in the cart and when they place an order. This guide uses
PW_AbandonedCartandPW_OrderCreated. Send both events with the same User ID that the website passes tosetUserId: the offer is shown and removed by User ID, so with another ID it never appears on the site or never goes away after the order. - Content. You have web content with the offer and a button or link, for example Free shipping nudge with cart items. Without a button or link, users can’t click the offer, and the click branch never fires.
1. Start the journey when a cart is abandoned
Anchor link to- Go to Campaigns > Customer Journey Builder.
- Click Create campaign, then Build a journey from scratch.
- Double-click the Trigger-based Entry element, which is already on the canvas.
- In Event, select
PW_AbandonedCart. - Click Save.
For details, see How to send a triggered campaign.
2. Show the offer in the cart
Anchor link to- Connect a Web Placement element to the entry.
- Double-click it and set:
- Web pop-up content: your offer, for example Free shipping nudge with cart items.
- Inline instead of Popup.
- CSS selector of the element: the element in the cart, for example
#pw-cart-slot. - Lifetime: how long the offer waits for the user, for example 2 days.
- Hide after an event: turn it on and select
PW_OrderCreated, so the offer disappears once the user places an order.
- In Preview, select a Test device: a browser with your site open.
- Click Show on test device.
- On that device, open the cart page and click the button in the offer. This sends
PW_WebPlacementClickto your application. The event list shows an event only after the application has received it, so without this click you can’t select the event in the next step. - Click Save.
For all settings, see Web Placement.
The user moves on to the next element as soon as the offer is queued for them, not after they see or click it.
3. Branch by what the user did
Anchor link to- Connect a Wait for Trigger element to Web Placement.
- In Waiting period, enter 1 day.
- In Branch 1, enter
Clickedas the branch name and select thePW_WebPlacementClickevent. - Click Add branch. In Branch 2, enter
Orderedas the branch name and select thePW_OrderCreatedevent. - Click Save.
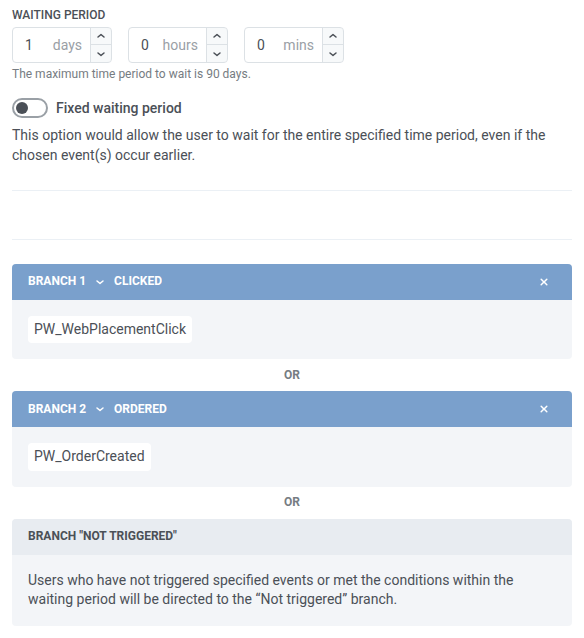
Users who click the offer within a day go to Clicked, and users who place an order without clicking go to Ordered. Everyone else goes to Not triggered after the day ends. Without the Ordered branch, a user who ordered without clicking would still get the reminder: Hide after an event removes only the offer from the site and doesn’t move the user in the journey.
- Connect Exit to the Clicked and Ordered branches.
- Connect a Push element to the Not triggered branch, with a reminder such as “Free shipping on your cart ends soon”, then connect Exit to it. Users with no push-enabled device don’t receive the reminder.
4. Count orders as conversions
Anchor link to- Click Settings, then Conversion goals.
- In Conversion period, enter 3 days. Orders placed within this period after the user exits the journey count too.
- In Event, select
PW_OrderCreated. - Click Apply.
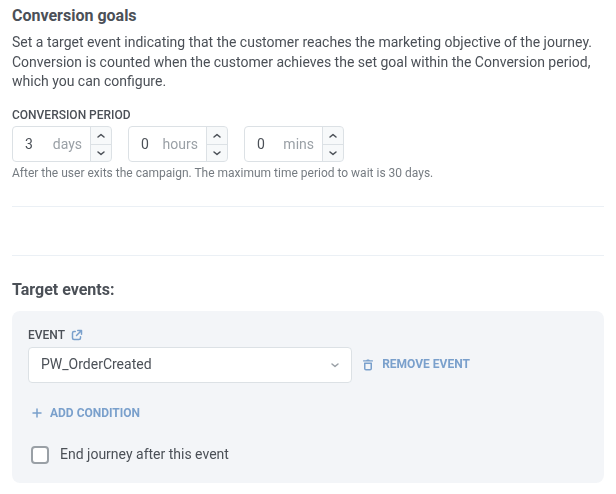
To count clicks on the offer instead of orders, select PW_WebPlacementClick.
5. Launch and check the results
Anchor link to- Click Launch campaign.
- In the journey statistics, check the Web Placement element: Shown is how many times the offer was shown, Interactions is how many times it was clicked. See Placement statistics.