Web 推送 SDK 3.0
获取 Pushwoosh Web Push SDK 并解压。您应该有以下文件:
Anchor link to- pushwoosh-service-worker.js
将所有这些文件放置到您网站目录的顶层根目录。
Anchor link to初始化 SDK:
Anchor link to- 从我们的 CDN 异步 包含 SDK。
<script type="text/javascript" src="//cdn.pushwoosh.com/webpush/v3/pushwoosh-web-notifications.js" async></script>- 初始化 Web Push SDK,并确保将初始化排队,直到 SDK 完全加载。
<script type="text/javascript">var Pushwoosh = Pushwoosh || [];Pushwoosh.push(['init', { logLevel: 'info', // 可选值:error、info、debug applicationCode: 'XXXXX-XXXXX', // 您在 Pushwoosh 控制面板中的应用代码 apiToken: 'XXXXXXX', // Device API Token safariWebsitePushID: 'web.com.example.domain', // 唯一的反向域名字符串,在您的 Apple Developer Portal 中获取。仅当您向 Safari 浏览器发送推送通知时才需要 defaultNotificationTitle: 'Pushwoosh', // 为推送通知设置默认标题 defaultNotificationImage: 'https://yoursite.com/img/logo-medium.png', // 自定义通知图片的 URL autoSubscribe: false, // 或 true。如果为 true,则在 SDK 初始化时提示用户订阅推送 subscribeWidget: { enable: true }, userId: 'user_id', // 可选,设置自定义 User ID tags: { 'Name': '张三' // 可选,设置自定义 Tag }}]);</script>要完成将推送通知集成到您的网站,您需要按照我们的分步指南在您的 Pushwoosh 控制面板中配置 Web 平台:
在不同作用域中注册 service worker
Anchor link to有时您无法将 service worker 文件放置在网站的根目录,而是放在子目录中。
在这种情况下,通过添加参数来修改配置(步骤 4.3)
serviceWorkerUrl: “/push-notifications/pushwoosh-service-worker.js”
其中 /push-notifications/pushwoosh-service-worker.js 是 pushwoosh-service-worker.js 文件的路径。
事件处理程序
Anchor link to在 Pushwoosh Web SDK 3.0 中,您可以订阅某些事件以跟踪它们**,**或者如果您不再需要跟踪它们,可以取消订阅事件。
要跟踪 Web SDK 3.0 的加载,请按如下方式触发 onLoad 事件:
// 加载事件Pushwoosh.push(['onLoad', (api) => { console.log('Pushwoosh 已加载!');}]);要跟踪 Web SDK 的正确初始化,请触发 onReady 事件:
// 就绪事件Pushwoosh.push((api) => { console.log('Pushwoosh 已就绪!');});要在 SDK 加载后订阅或取消订阅任何 SDK 事件,请使用处理程序:
Pushwoosh.push(['onLoad', (api) => {  function onEventNameHandler() {    console.log('触发事件:event-name!');  }
  // 订阅事件:  Pushwoosh.addEventHandler('event-name', onEventNameHandler)
  // 取消订阅事件:  Pushwoosh.removeEventHandler('event-name', onEventNameHandler)}]);
SDK 事件
Anchor link to订阅事件
Anchor link to在用户同意接收推送通知后执行。
Pushwoosh.push(['onLoad', (api) => { Pushwoosh.addEventHandler('subscribe', (payload) => { console.log('触发事件:subscribe'); });}]);取消订阅事件
Anchor link to在设备从通知中注销后执行。
Pushwoosh.push(['onLoad', (api) => { Pushwoosh.addEventHandler('unsubscribe', (payload) => { console.log('触发事件:unsubscribe'); });}]);订阅小部件事件
Anchor link to跟踪订阅提示小部件的显示。
Pushwoosh.push(['onLoad', (api) => {  // 在显示订阅提示小部件时执行  Pushwoosh.addEventHandler('show-subscription-widget', (payload) => {    console.log('触发事件:show-subscription-widget');  });
  // 在隐藏订阅提示小部件时执行  Pushwoosh.addEventHandler('hide-subscription-widget', (payload) => {    console.log('触发事件:hide-subscription-widget');  });}]);
通知权限对话框事件
Anchor link to跟踪原生订阅对话框的显示。
Pushwoosh.push(['onLoad', function (api) {  // 在显示权限对话框时执行  Pushwoosh.addEventHandler('show-notification-permission-dialog', (payload) => {    console.log('触发事件:show-notification-permission-dialog');  });
  // 在隐藏权限对话框时执行,有三种可能的状态:  // 1. default - 对话框已关闭  // 2. granted - 权限已授予  // 3. denied - 权限已拒绝  Pushwoosh.addEventHandler('hide-notification-permission-dialog', (payload) => {    console.log('触发事件:hide-notification-permission-dialog', payload.permission);  });}]);
权限事件
Anchor link to在 SDK 初始化时检查推送通知权限的状态;并在该状态发生变化时跟踪其更新。
Pushwoosh.push(['onLoad', (api) => {  // 在 SDK 初始化期间,如果 'autoSubscribe: false' 或/并且用户忽略推送通知提示时执行。  Pushwoosh.addEventHandler('permission-default', (payload) => {    console.log('触发事件:permission-default');  });
  // 在 SDK 初始化期间,如果通知被阻止或用户阻止推送通知时执行。  Pushwoosh.addEventHandler('permission-denied', (payload) => {    console.log('触发事件:permission-denied');  });
  // 在 SDK 初始化期间,如果通知被允许或用户允许推送通知时执行。  Pushwoosh.addEventHandler('permission-granted', (payload) => {    console.log('触发事件:permission-granted');  });}]);
接收推送事件
Anchor link to跟踪推送到设备的传递情况。
Pushwoosh.push(['onLoad', (api) => { // 当显示推送通知时执行。 Pushwoosh.addEventHandler('receive-push', (payload) => { console.log('触发事件:receive-push', payload.notification); });}]);通知事件
Anchor link to跟踪用户是打开还是关闭了推送通知。
Pushwoosh.push(['onLoad', (api) => {  // 当用户点击通知时执行。  Pushwoosh.addEventHandler('open-notification', (payload) => {    console.log('触发事件:open-notification', payload.notification);  });
  // 当用户关闭推送通知时执行。  Pushwoosh.addEventHandler('hide-notification', (payload) => {    console.log('触发事件:hide-notification', payload.notification);  });}]);
收件箱事件
Anchor link to跟踪发送到收件箱的通知。
Pushwoosh.push(['onLoad', (api) => {  // 在 ServiceWorker 接收到收件箱消息并保存到 indexedDB 后执行。  Pushwoosh.addEventHandler('receive-inbox-message', (payload) => {    console.log('触发事件:receive-inbox-message', payload.message);  });
  // 在页面加载时自动更新收件箱后执行。  Pushwoosh.addEventHandler('update-inbox-messages', (payload) => {    console.log('触发事件:receive-inbox-message', payload.messages);  });}]);
自定义订阅弹窗事件
Anchor link to有关处理自定义订阅弹窗事件的详细信息,请参阅自定义订阅弹窗事件指南。
Web Push SDK 初始化后,您可以对 Pushwoosh API 进行以下调用。所有方法都返回 Promise 对象。
Pushwoosh.push((api) => {  // 为用户设置 Tag  api.setTags({    'Tag Name 1': 'value1',    'Tag Name 2': 'value2'  });
  // 从服务器获取用户的 Tag  api.getTags();
  // 注册 User ID  api.registerUser('user123');
    // 注册用户邮箱  api.registerEmail('user@example.com');
  // 注册短信号码  api.registerSmsNumber('+15551234567');
  // 注册 WhatsApp 号码  api.registerWhatsappNumber('+1234567890');
  // 发布事件  api.postEvent('myEventName', {attributeName: 'attributeValue'});
  //从通知中注销  api.unregisterDevice();
  // 或者使用设备和渠道多重注册用户  api.multiRegisterDevice({    user_id: 'user123',    email: 'user@example.com',    sms_phone_number: '+1234567890',    tags: {      'UserType': { operation: TTagOperationSet, value: 'Premium' },      'Interests': { operation: TTagOperationAppend, values: ['sports', 'technology'] }    }  });});
multiRegisterDevice
Anchor link to增强的注册方法,允许在单个 API 调用中注册具有多个设备和消息传递渠道的用户配置文件。此方法对于跨平台应用程序或实施全渠道消息传递策略特别有用。
Pushwoosh.push((api) => { api.multiRegisterDevice({ user_id: 'user123', // 可选:用户标识符 email: 'user@example.com', // 可选:用于电子邮件消息传递的电子邮件 sms_phone_number: '+1234567890', // 可选:短信电话号码(E.164 格式) whatsapp_phone_number: '+1234567890', // 可选:WhatsApp 号码(E.164 格式) kakao_phone_number: '+1234567890', // 可选:KakaoTalk 号码(E.164 格式) language: 'en', // 可选:语言代码(ISO 639-1) timezone: 'America/New_York', // 可选:时区标识符 city: 'New York', // 可选:用于定位的城市 country: 'US', // 可选:用于定位的国家 state: 'NY', // 可选:用于定位的州 tags: { // 可选:带操作的 Tag 值 'UserType': { operation: TTagOperationSet, // 设置 Tag 值 (0) value: 'Premium' }, 'Interests': { operation: TTagOperationAppend, // 附加到 Tag 值 (1) values: ['sports', 'technology'] }, 'LoginCount': { operation: TTagOperationIncrement, // 递增 Tag 值 (3) value: '1' } }, push_devices: [ // 可选:推送设备数组 { hwid: 'web-device-456', platform: TPlatformChrome, // Chrome 平台 (11) push_token: 'fcm-token-here', app_version: '2.1.0', platformData: { public_key: 'web-push-public-key', auth_token: 'web-push-auth-token', browser: 'chrome' } } ] }) .then((response) => { console.log('多重注册成功:', response); }) .catch((error) => { console.error('多重注册失败:', error); });});平台类型:
TPlatformSafari(10): Safari 平台TPlatformChrome(11): Chrome 平台TPlatformFirefox(12): Firefox 平台
Tag 操作类型:
TTagOperationSet(0): 设置 Tag 值(替换现有值)TTagOperationAppend(1): 附加到 Tag 值(添加到列表)TTagOperationRemove(2): 移除 Tag 值(从列表中移除)TTagOperationIncrement(3): 递增 Tag 值(数值递增)
优点:
- 单一 API 调用:一次性注册多个设备和渠道
- 原子操作:所有注册要么全部成功,要么全部失败
- 以用户为中心:将所有设备与单个用户配置文件关联
- 高级标记:支持复杂的 Tag 操作
- 跨平台:同时处理多个平台
发送 Tag 到 Pushwoosh 的示例:
Pushwoosh.push((api) => { var myCustomTags = { 'Tag 1': 123, 'Tag 2': 'some string' }; api.setTags(myCustomTags) .then((res) => { var skipped = res && res.skipped || []; if (!skipped.length) { console.log('成功'); } else { console.warn('跳过的 Tag:', skipped); } }) .catch((err) => { console.error('setTags 错误:', err); });});递增 Tag 值
Anchor link to要递增一个数字 Tag 的值,请使用 operation 参数和 ‘increment’ 值,如下所示:
Pushwoosh.push((api) => { api.setTags({ 'Tag 1': { operation: 'increment', value: 1 } })});附加 Tag 值
Anchor link to要向现有的列表 Tag 附加新值,请使用 operation 参数和 ‘append’ 值,如下所示:
Pushwoosh.push((api) => { api.setTags({ 'Tag 3': { operation: 'append', value: ['Value3'] } })});移除 Tag 值
Anchor link to要从列表 Tag 中移除一个值,请使用 operation 参数和 ‘remove’ 值,如下所示:
Pushwoosh.push((api) =>{ api.setTags({ 'Tag 3': { operation: 'remove', value: ['Value2'] } })});公共方法
Anchor link toPushwoosh.subscribe()
此方法用于请求用户对推送通知的权限。如果用户已经订阅,该方法将停止执行。
如果用户尚未订阅推送:
- 请求推送通知权限。
- 如果用户允许通知,则触发
onSubscribe事件。
如果在 SDK 初始化期间设置了 autoSubscribe: true,Pushwoosh.subscribe() 会自动执行。
如果您在初始化期间选择使用 autoSubscribe: false 参数手动提示用户订阅推送,请调用此方法:
<button onclick="Pushwoosh.subscribe()">订阅</button><script> Pushwoosh.push(['onSubscribe', (api) => { console.log('用户成功订阅'); }]);</script>Pushwoosh.unsubscribe()
- 执行
/unregisterDevice方法。 - 触发
onUnsubscribe事件。
<button onclick="Pushwoosh.unsubscribe()">取消订阅</button><script type="text/javascript"> Pushwoosh.push(['onUnsubscribe', (api) => { console.log('用户成功取消订阅'); }]);</script>Pushwoosh.isSubscribed()
检查用户是否已订阅,并返回 true/false 标志。
Pushwoosh.isSubscribed().then((isSubscribed) => { console.log('isSubscribed', isSubscribed);});Pushwoosh.getHWID()
返回 Pushwoosh HWID。
Pushwoosh.getHWID().then((hwid) => { console.log('hwid:', hwid);});Pushwoosh.getPushToken()
如果可用,则返回推送令牌。
Pushwoosh.getPushToken().then((pushToken) => { console.log('pushToken:', pushToken);});Pushwoosh.getUserId()
如果可用,则返回 User ID。
Pushwoosh.getUserId().then((userId) => { console.log('userId:', userId);});Pushwoosh.getParams()
返回以下参数列表:
Pushwoosh.getParams().then((params) => { params = params || {}; var hwid = params.hwid; var pushToken = params.pushToken; var userId = params.userId;});Pushwoosh.isAvailableNotifications()
检查浏览器是否支持 Pushwoosh WebSDK 3.0,返回 ‘true’ 或 ‘false’。
Pushwoosh.isAvailableNotifications() // true/falseInboxMessages 方法
Anchor link tomessagesWithNoActionPerformedCount(): Promise<number>
返回已打开消息的数量。
Pushwoosh.pwinbox.messagesWithNoActionPerformedCount() .then((count) => { console.log(`${count} 条消息已打开`); });unreadMessagesCount()
返回未读消息的数量。
Pushwoosh.pwinbox.unreadMessagesCount() .then((count) => { console.log(`${count} 条消息未读`); });messagesCount(): Promise<number>
返回消息总数。
Pushwoosh.pwinbox.messagesCount() .then((count) => { console.log(`${count} 条消息`); });loadMessages(): Promise<Array>
加载未删除消息的列表。
Pushwoosh.pwinbox.loadMessages() .then(() => { console.log('消息已加载'); });readMessagesWithCodes(codes: Array<string>): Promise<void>
按 Inbox_Ids 将消息标记为已读。
Pushwoosh.pwinbox.readMessagesWithCodes(codes) .then(() => { console.log('消息已标记为已读'); });performActionForMessageWithCode(code: string): Promise<void>
执行分配给消息的操作并将消息标记为已读。
Pushwoosh.pwinbox.performActionForMessageWithCode(code) .then(() => { console.log('操作已执行'); });deleteMessagesWithCodes(codes: Array<string>): Promise<void>
将消息标记为已删除。
Pushwoosh.pwinbox.deleteMessagesWithCodes([code]) .then(() => { console.log('消息已删除'); });syncMessages(): Promise<void>
与服务器同步消息。
Pushwoosh.pwinbox.syncMessages() .then(() => { console.log('消息已同步'); });渐进式 Web 应用支持
Anchor link to要将 Pushwoosh 集成到您的渐进式 Web 应用 (PWA) 中,请按照以下步骤操作。
1。复制您的 Service Worker 文件路径:
if ('serviceWorker' in navigator) { window.addEventListener('load', () => { navigator.serviceWorker.register('/service-worker.js') // <- 你的 service worker URL });}然后,在初始化 WebSDK 时使用 serviceWorkerUrl 参数,如下所示:
var Pushwoosh = Pushwoosh || [];Pushwoosh.push(['init', { logLevel: 'error', applicationCode: 'XXXXX-XXXXX', safariWebsitePushID: 'web.com.example.domain', defaultNotificationTitle: 'Pushwoosh', defaultNotificationImage: 'https://yoursite.com/img/logo-medium.png', serviceWorkerUrl: '/service-worker.js', // <- 你的 service worker URL}]);WebSDK 不会立即注册新的 Service Worker;Service Worker 会在需要时注册:
- 当设备收到推送令牌时(在设备注册或重新订阅时),
- 当推送令牌被删除时(从用户群中移除设备时)。
这通过减少服务器请求数量来加快您的页面加载速度。
浏览器不允许同时注册两个不同的 Service Worker(更多信息请阅读:https://github.com/w3c/ServiceWorker/issues/921),因此为了让您的 PWA 正确工作,应为您的代码库和 Pushwoosh 代码库注册一个通用的 Service Worker。
2。将以下字符串添加到您的 Service Worker(在开头或结尾,无所谓):
importScripts('https://cdn.pushwoosh.com/webpush/v3/pushwoosh-service-worker.js' + self.location.search);这样,您就为您的 Service Worker 启用了接收和处理通过 Pushwoosh 服务发送的推送通知的功能。
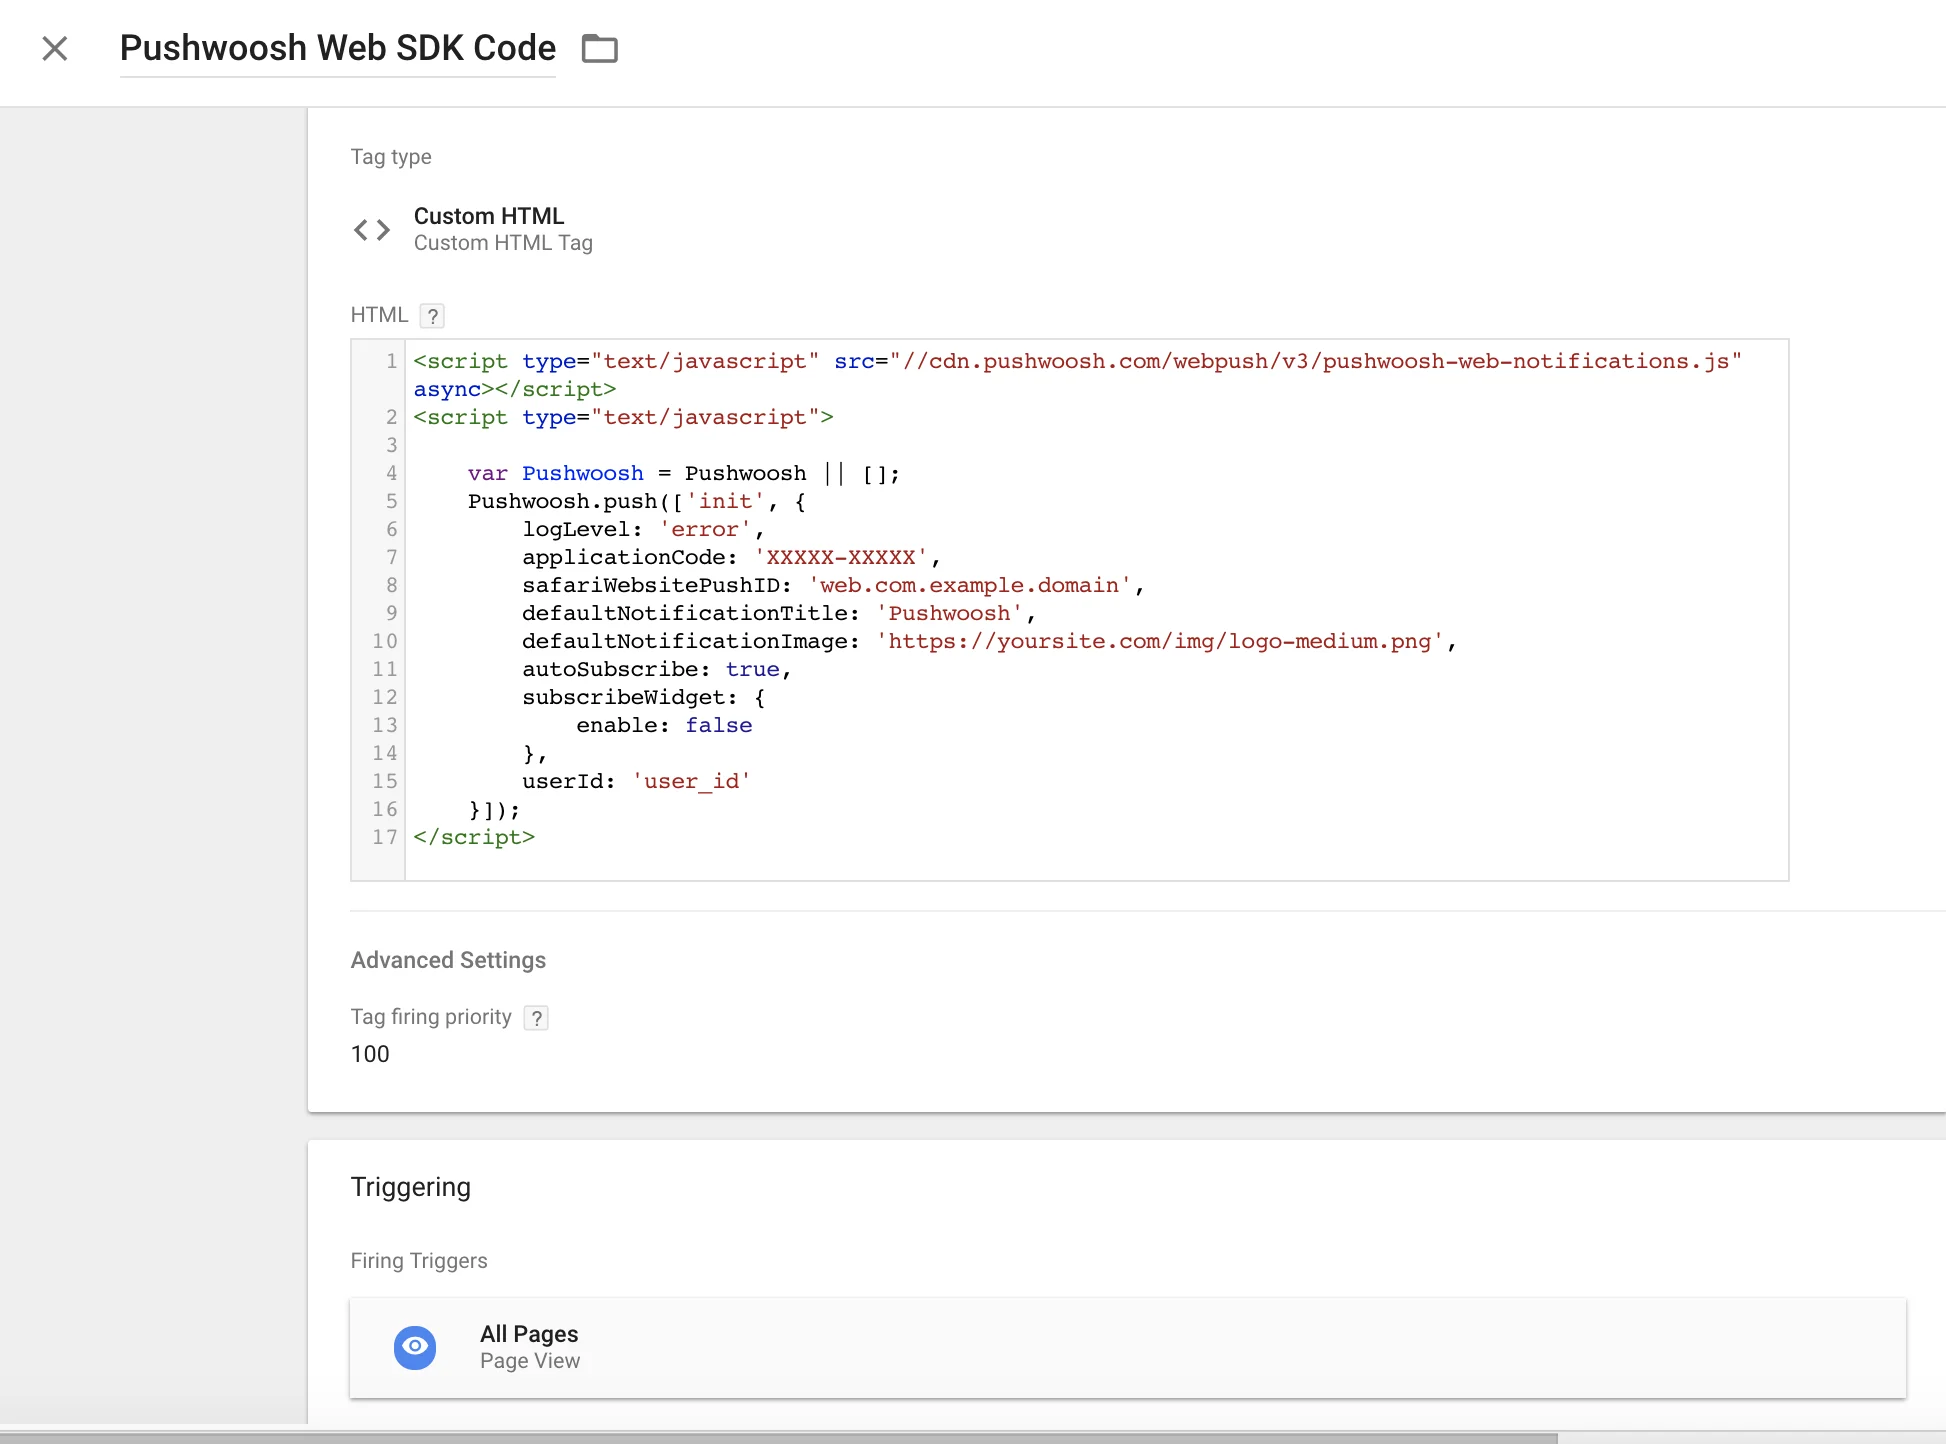
从 Google Tag Manager 安装
Anchor link to在您的 Google Tag Manager 中使用以下代码来初始化 Pushwoosh SDK。创建一个自定义 HTML 标签并粘贴以下代码。请确保更改您的 Pushwoosh Application Code、Safari Website ID 和默认通知图片 URL。
同时设置较高的标签触发优先级(例如:100)并在所有页面上触发它。请参见下面的截图。复制
<script type="text/javascript" src="//cdn.pushwoosh.com/webpush/v3/pushwoosh-web-notifications.js" async></script><script type="text/javascript"> var Pushwoosh = Pushwoosh || []; Pushwoosh.push(['init', { logLevel: 'error', applicationCode: 'XXXXX-XXXXX', safariWebsitePushID: 'web.com.example.domain', defaultNotificationTitle: 'Pushwoosh', defaultNotificationImage: 'https://yoursite.com/img/logo-medium.png', autoSubscribe: true, subscribeWidget: { enable: false }, userId: 'user_id' }]);</script>