iOS 推送自定义
当 iOS 设备收到包含提醒的通知时,系统会分两个阶段显示提醒内容。首先,它会显示一个缩略横幅,其中包含通知的标题、副标题和两到四行的正文文本。如果用户按下缩略横幅,iOS 会显示完整的通知界面,包括任何与通知相关的操作。系统为缩略横幅提供界面,但您可以使用通知内容应用扩展程序自定义完整界面。
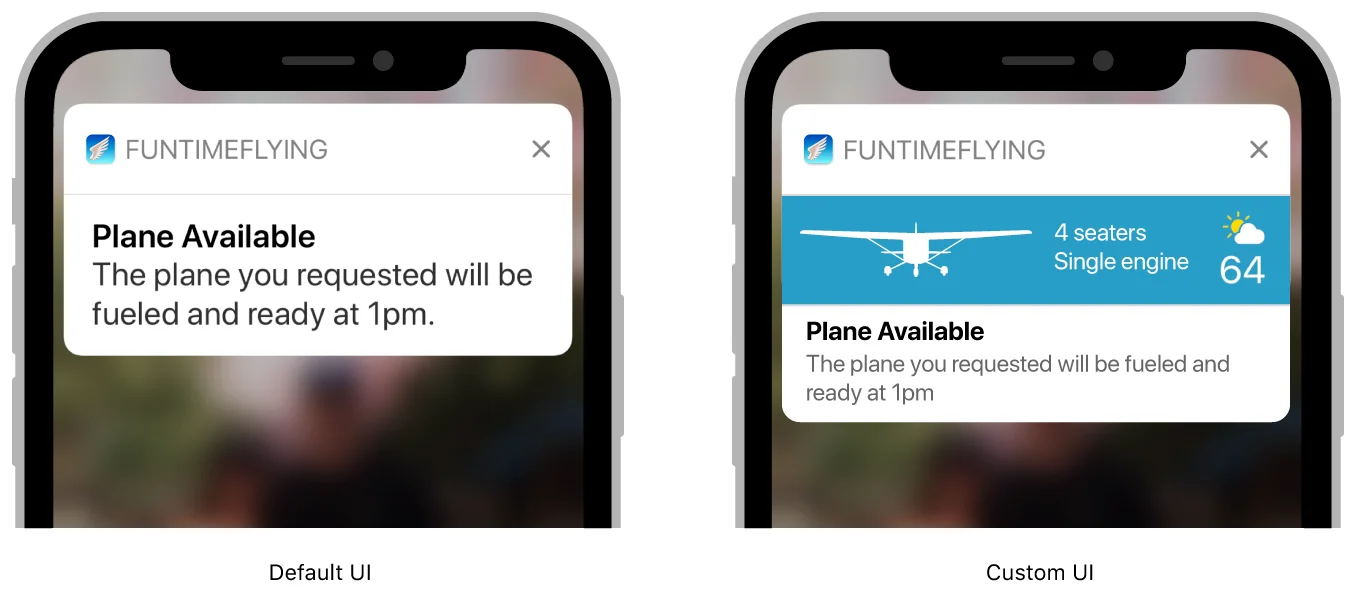
通知内容应用扩展程序管理一个显示自定义通知界面的视图控制器 (view controller)。此视图控制器可以补充或替换通知的默认系统界面。您可以使用视图控制器来:
- 自定义项目的位置,包括提醒的标题、副标题和正文文本。
- 为界面元素替换不同的字体或样式。
- 显示应用特定数据——例如,存储在通知有效负载 (payload) 的应用特定键中的数据。
- 包含自定义图像或品牌元素。
您的应用扩展程序必须使用立即可用的数据来配置其视图控制器,例如通知内容和应用扩展程序包 (bundle) 中存在的文件。如果您使用应用组 (app group) 在应用和应用扩展程序之间共享数据,您也可以使用在应用组中找到的任何文件。为确保您的通知能及时送达,请尽快配置视图。不要执行任何长时间运行的任务,例如尝试通过网络检索数据。
将通知内容应用扩展程序添加到您的项目中
Anchor link to要将通知内容应用扩展程序添加到您的 iOS 应用中:
- 在 Xcode 中选择 File > New > Target。
- 从 iOS Application Extension 中选择 Notification Content Extension。
- 点击 Next。
- 为您的应用扩展程序提供一个名称。
- 点击 Finish。
向您的视图控制器添加视图
Anchor link toXcode 提供的模板包含一个故事板 (storyboard) 和一个视图控制器 (view controller) 供您配置。通过向视图控制器添加视图来构建您的自定义通知界面。例如,使用标签 (labels) 来显示通知的标题、副标题和正文文本。您还可以添加图像视图 (image views) 和显示非交互式内容的视图。您无需为视图提供任何初始内容。
在 iOS 12 及更高版本中,您可以添加交互式控件(例如,按钮或开关)。有关更多信息,请参阅支持交互式控件。
配置您的视图控制器
Anchor link to使用视图控制器的 didReceive(_:) 方法来更新其标签和其他视图。通知有效负载 (payload) 包含配置视图控制器时要使用的数据。您也可以使用来自应用扩展程序其他文件的数据。清单 1 展示了此方法的一个版本,它从通知有效负载中检索标题和正文文本,并将字符串分配给两个 UILabel 控件,这些控件作为出口 (outlets) 存储在视图控制器上。
// Configuring the notification interface at runtime
func didReceive(_ notification: UNNotification) {   self.bodyText?.text = notification.request.content.body   self.headlineText?.text = notification.request.content.title}
如果在您的视图控制器已经可见时有第二条通知到达,系统会再次调用 didReceive(_:) 方法,并传入新的通知有效负载。
支持交互式控件
Anchor link to在 iOS 12 及更高版本中,您可以在自定义通知中启用用户交互。这允许您向自定义界面添加交互式控件,例如按钮和开关。
要启用用户交互:
- 打开您的通知内容扩展程序的
info.plist文件。 - 将
UNNotificationExtensionUserInteractionEnabled键添加到您的扩展程序属性中。为其指定一个布尔值,设置为YES。

将 Apple Pay 添加到您的推送通知扩展程序中(示例视图)
Anchor link to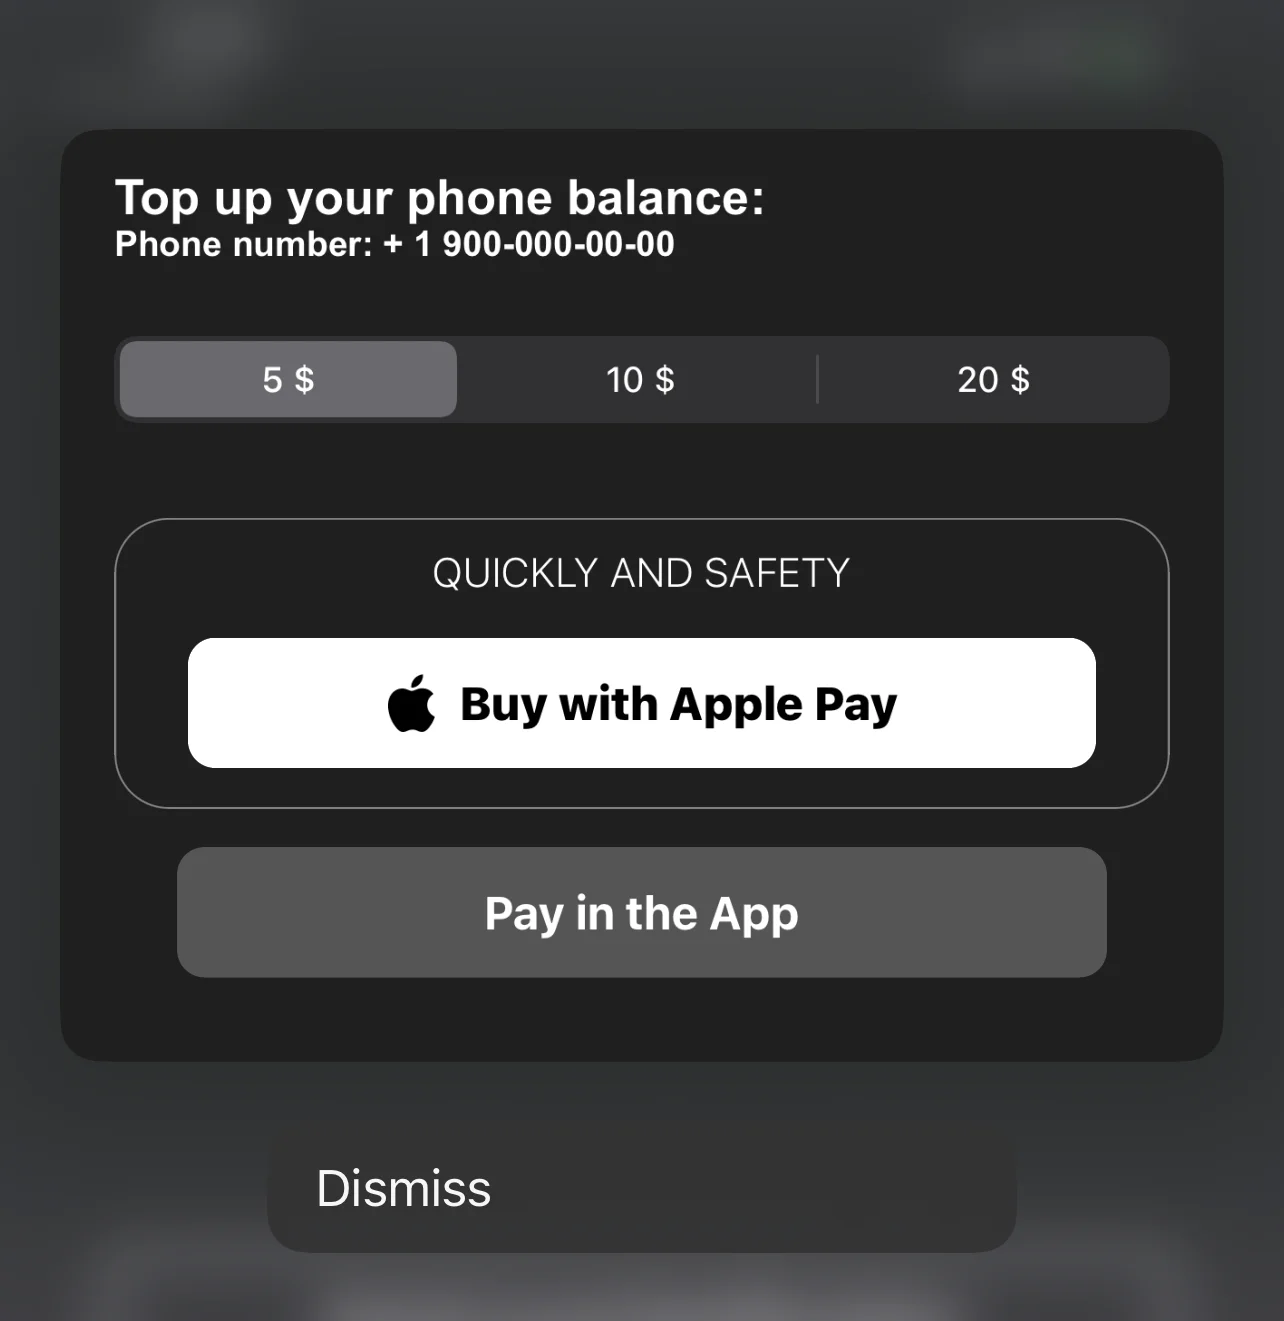
在推送通知扩展程序中使用 Apple Pay 按钮的代码块示例
Anchor link toimport UIKitimport Foundationimport UserNotificationsimport UserNotificationsUIimport PassKit
class NotificationViewController: UIViewController, UNNotificationContentExtension, PKPaymentAuthorizationViewControllerDelegate {
func paymentAuthorizationViewControllerDidFinish(_ controller: PKPaymentAuthorizationViewController) { controller.dismiss(animated: true, completion: nil) }
@IBOutlet weak var buyWithApplePayButton: UIButton! @IBOutlet weak var containerView: UIView! @IBOutlet weak var payInAppButton: UIButton! @IBOutlet weak var segmentCustom: UISegmentedControl!
private var amount: NSDecimalNumber = 0;
override func viewDidLoad() { super.viewDidLoad()
buttonCustomisation()
amount = NSDecimalNumber.init(value: 5) }
func buttonCustomisation () { self.buyWithApplePayButton.layer.masksToBounds = true self.buyWithApplePayButton.layer.cornerRadius = 10 self.payInAppButton.layer.masksToBounds = true self.payInAppButton.layer.cornerRadius = 10 self.containerView.layer.borderColor = UIColor.gray.cgColor self.containerView.layer.borderWidth = 0.7 self.containerView.layer.masksToBounds = true self.containerView.layer.cornerRadius = 20 }
func didReceive(_ notification: UNNotification) { // Configuring the notification interface at runtime }
@IBAction func buyWithApplePayAction(_ sender: Any) { let request = PKPaymentRequest() request.merchantIdentifier = "merchant.com.sample.ApplePayAction" request.supportedNetworks = [PKPaymentNetwork.visa, PKPaymentNetwork.masterCard, PKPaymentNetwork.amex] request.merchantCapabilities = PKMerchantCapability.capability3DS request.countryCode = "US" request.currencyCode = "USD"
request.paymentSummaryItems = [ PKPaymentSummaryItem(label: "Some Product", amount: amount) ]
let applePayController = PKPaymentAuthorizationViewController(paymentRequest: request) applePayController?.delegate = self self.present(applePayController!, animated: true, completion: nil) }
@IBAction func payInAppButtonAction(_ sender: Any) { print("pay in app button tapped") }
@IBAction func segmentAction(_ sender: Any) { switch segmentCustom.selectedSegmentIndex { case 0: amount = NSDecimalNumber.init(value: 5) break case 1: amount = NSDecimalNumber.init(value: 10) break case 2: amount = NSDecimalNumber.init(value: 20) break default: amount = NSDecimalNumber.init(value: 5) break } }}