คู่มือการผสานรวมพื้นฐาน Unity SDK
ส่วนนี้มีข้อมูลเกี่ยวกับวิธีการผสานรวม Pushwoosh Unity SDK เข้ากับแอปพลิเคชันของคุณ
ข้อกำหนดเบื้องต้น
Anchor link toในการผสานรวม Pushwoosh Unity SDK เข้ากับแอปของคุณ คุณจะต้องมีสิ่งต่อไปนี้:
ขั้นตอนการผสานรวม
Anchor link to1. เพิ่ม Pushwoosh Unity SDK Dependency
Anchor link toนำเข้า ปลั๊กอิน push notification ของ Unity ไปยังโฟลเดอร์ Assets ของคุณใน Unity
2. การเริ่มต้น Unity SDK
Anchor link toสร้างสคริปต์ PushNotificator.cs และแนบไปกับ Camera Object ใน scene
ในสคริปต์:
- เริ่มต้น Pushwoosh SDK ด้วย application code และหมายเลขโปรเจกต์ Firebase
- เรียกใช้
RegisterForPushNotifications()ในตรรกะการเริ่มต้นของคุณเพื่อลงทะเบียนสำหรับ push notification - เพิ่มตัวจัดการ event การลงทะเบียนเพื่อจัดการ event การลงทะเบียน push:
using UnityEngine;using UnityEngine.UI;
public class PushNotificator : MonoBehaviour {    void Start () {        Pushwoosh.ApplicationCode = "__YOUR_APP_ID__";        Pushwoosh.FcmProjectNumber = "__YOUR_FCM_SENDER_ID__";        Pushwoosh.Instance.OnRegisteredForPushNotifications += OnRegisteredForPushNotifications;        Pushwoosh.Instance.OnFailedToRegisteredForPushNotifications += OnFailedToRegisteredForPushNotifications;        Pushwoosh.Instance.RegisterForPushNotifications();    }
    void OnRegisteredForPushNotifications(string token) {        Debug.LogFormat(LogType.Log, LogOption.NoStacktrace, null, "Received token: \n{0}", token);    }
    void OnFailedToRegisteredForPushNotifications(string error) {        Debug.LogFormat(LogType.Log, LogOption.NoStacktrace, null, "Error ocurred while registering to push notifications: \n{0}", error);    }}
โดยที่:
__YOUR_APP_ID__คือ application code จาก Pushwoosh Control Panel__YOUR_FCM_SENDER_ID__คือหมายเลขโปรเจกต์ Firebase จาก Firebase Console
3. การตั้งค่า Native ของ iOS
Anchor link to3.1 Capabilities
Anchor link toในการเปิดใช้งาน Push Notifications ในโปรเจกต์ของคุณ คุณต้องเพิ่ม capabilities บางอย่าง
ในส่วน Signing & Capabilities ให้เพิ่ม capabilities ต่อไปนี้:
Push NotificationsBackground Modesหลังจากเพิ่ม capability นี้แล้ว ให้เลือกช่องสำหรับRemote notifications
หากคุณต้องการใช้ Time Sensitive Notifications (iOS 15+) ให้เพิ่ม capability Time Sensitive Notifications ด้วย
3.2 Info.plist
Anchor link toใน Runner/Info.plist ของคุณ ให้ตั้งค่าคีย์ __PUSHWOOSH_DEVICE_API_TOKEN__ เป็น Pushwoosh Device API Token:
<key>Pushwoosh_API_TOKEN</key><string>__PUSHWOOSH_DEVICE_API_TOKEN__</string>3.3 การติดตามการส่งข้อความ
Anchor link toคุณต้องเพิ่ม target Notification Service Extension ในโปรเจกต์ของคุณ นี่เป็นสิ่งสำคัญสำหรับการติดตามการส่งที่แม่นยำและฟีเจอร์ต่างๆ เช่น Rich Media บน iOS
ทำตาม ขั้นตอนในคู่มือ native เพื่อเพิ่ม extension target และโค้ด Pushwoosh ที่จำเป็นภายในนั้น
4. การตั้งค่า Native ของ Android
Anchor link to4.1 เพิ่มไฟล์กำหนดค่า Firebase
Anchor link toวางไฟล์ google-services.json ลงในโฟลเดอร์ Assets ในไดเรกทอรีโปรเจกต์ของคุณ
4.2 ปรับการตั้งค่า build
Anchor link toในส่วน Publishing Settings ของโปรไฟล์ build Android ของคุณ ให้เปิดใช้งานตัวเลือก Custom Main Manifest
4.3 เพิ่ม metadata ของ Pushwoosh
Anchor link toใน Assets/Plugins/Android/AndroidManifest.xml ของคุณ ให้เพิ่ม Pushwoosh Device API Token ภายในแท็ก <application>:
<meta-data android:name="com.pushwoosh.apitoken" android:value="__YOUR_DEVICE_API_TOKEN__" />สำคัญ: ตรวจสอบให้แน่ใจว่าได้ให้สิทธิ์การเข้าถึงของ token กับแอปที่ถูกต้องใน Pushwoosh Control Panel ของคุณ เรียนรู้เพิ่มเติม
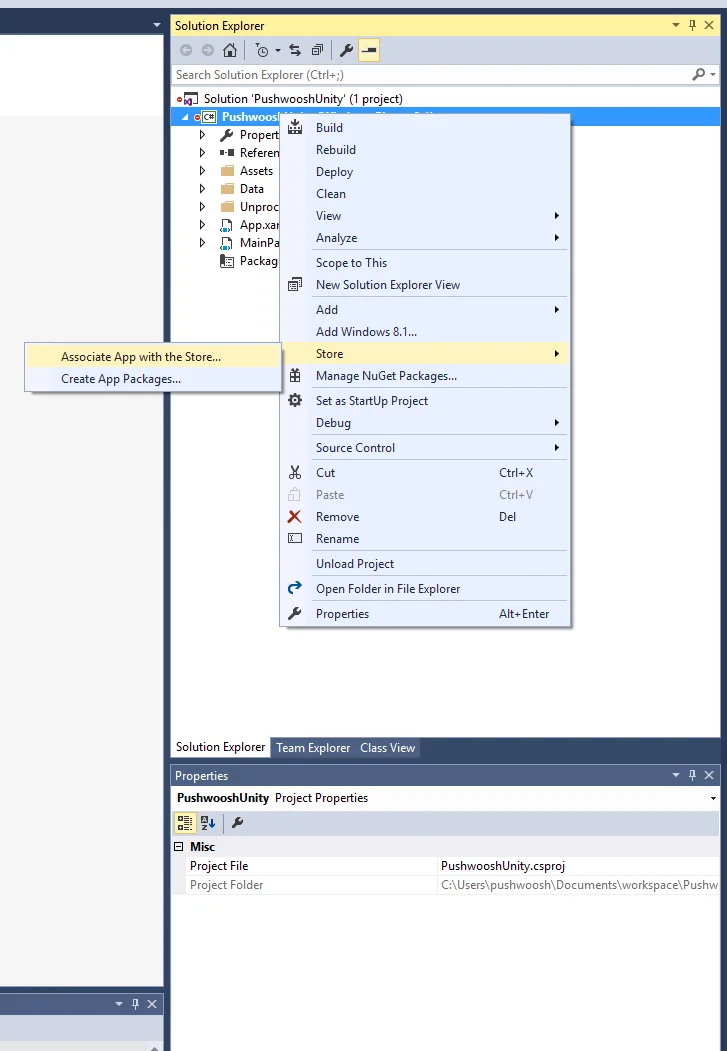
5. การผสานรวม Windows Store
Anchor link to- เพิ่ม
link.xmlไปยังไดเรกทอรีAssets/ของคุณพร้อมเนื้อหาต่อไปนี้:
<linker> <assembly fullname="PushSDK" preserve="all"/></linker>- คุณต้อง Associate App with the Store ในโปรเจกต์ Visual Studio ที่ส่งออกด้วย ตรวจสอบให้แน่ใจว่าแอปของคุณได้รับการลงนามด้วยใบรับรองที่ตรงกับ Publisher Identity ของคุณ
เลือกใช้ capability Internet (Client) ในแท็บ Capabilities ของ .appxmanifest ของคุณในโปรเจกต์ Visual Studio ที่ส่งออก
6. รันโปรเจกต์
Anchor link to- Build และรันโปรเจกต์
- ไปที่ Pushwoosh Control Panel และ ส่ง push notification
- คุณควรจะเห็นการแจ้งเตือนในแอป
การผสานรวมเพิ่มเติม
Anchor link toณ จุดนี้ คุณได้ผสานรวม SDK และสามารถส่งและรับ push notification ได้แล้ว ตอนนี้เรามาสำรวจฟังก์ชันการทำงานหลักกัน
ตัวดักฟัง event ของ Push notification
Anchor link toใน Pushwoosh SDK มีตัวดักฟัง event สองตัวที่ออกแบบมาเพื่อจัดการ push notification:
- event
OnPushNotificationsReceivedจะถูกทริกเกอร์เมื่อได้รับ push notification - event
OnPushNotificationsOpenedจะถูกทริกเกอร์เมื่อผู้ใช้เปิดการแจ้งเตือน
คุณควรตั้งค่าตัวดักฟัง event เหล่านี้ทันทีหลังจากการเริ่มต้น SDK ใน PushNotificator.cs:
using UnityEngine;using UnityEngine.UI;
public class PushNotificator : MonoBehaviour {    void Start () {        Pushwoosh.ApplicationCode = "__YOUR_APP_ID__";        Pushwoosh.FcmProjectNumber = "__YOUR_FCM_SENDER_ID__";        Pushwoosh.Instance.OnPushNotificationsReceived += OnPushNotificationsReceived;        Pushwoosh.Instance.OnPushNotificationsOpened += OnPushNotificationsOpened;        Pushwoosh.Instance.RegisterForPushNotifications();    }
    void OnPushNotificationsReceived(string payload) {        Debug.LogFormat(LogType.Log, LogOption.NoStacktrace, null, "Received push notificaiton: \n{0}", payload);    }
    void OnPushNotificationsOpened(string payload) {        Debug.LogFormat(LogType.Log, LogOption.NoStacktrace, null, "Opened push notificaiton: \n{0}", payload);    }
การกำหนดค่าผู้ใช้
Anchor link toโดยการมุ่งเน้นไปที่พฤติกรรมและความชอบของผู้ใช้แต่ละราย คุณสามารถส่งมอบเนื้อหาที่ปรับให้เหมาะกับแต่ละบุคคล ซึ่งนำไปสู่ความพึงพอใจและความภักดีของผู้ใช้ที่เพิ่มขึ้น
public class Registration {  public void afterUserLogin(User user) {
    // ตั้งค่า ID ผู้ใช้    Pushwoosh.Instance.SetUserId(user.getId());
    // ตั้งค่าอีเมลผู้ใช้    Pushwoosh.Instance.SetEmail(user.getEmail());
    // การตั้งค่าข้อมูลผู้ใช้เพิ่มเติมเป็น tag สำหรับ Pushwoosh    Pushwoosh.Instance.SetIntTag("Age", user.getAge());    Pushwoosh.Instance.SetStringTag("Name", user.getName());    Pushwoosh.Instance.SetStringTag("LastLoginDate", user.getLastLoginDate());  }}
Tags
Anchor link toTags คือคู่ของคีย์-ค่าที่กำหนดให้กับผู้ใช้หรืออุปกรณ์ ช่วยให้สามารถแบ่งกลุ่มตามคุณลักษณะต่างๆ เช่น ความชอบหรือพฤติกรรม ทำให้สามารถส่งข้อความแบบกำหนดเป้าหมายได้
public class UpdateUser {  public void afterUserUpdateProfile(User user) {
    // ตั้งค่ารายการหมวดหมู่โปรด    Pushwoosh.Instance.SetListTag(      "favorite_categories": user.getFavoriteCategoriesList()    );
    // ตั้งค่าข้อมูลการชำระเงิน    Pushwoosh.Instance.SetStringTag("is_subscribed", user.isSubscribed());    Pushwoosh.Instance.SetStringTag("payment_status", user.getPaymentStatus());    Pushwoosh.Instance.SetStringTag("billing_address", user.getBillingAddress());  }}
Events
Anchor link toEvents คือการกระทำหรือเหตุการณ์เฉพาะของผู้ใช้ภายในแอปที่สามารถติดตามเพื่อวิเคราะห์พฤติกรรมและทริกเกอร์ข้อความหรือการกระทำที่สอดคล้องกัน
public class Registration {
  // ติดตาม event การเข้าสู่ระบบ  public void afterUserLogin(User user) {    Pushwoosh.Instance.PostEvent("login", new Dictionary<string, object>() {      { "name", user.getName() },      { "last_login", user.getLastLoginDate() }    });  }
  public void afterUserPurchase(Product product) {    // ติดตาม event การซื้อ    Pushwoosh.Instance.PostEvent("purchase", new Dictionary<string, object>() {      { "product_id", product.getId() },      { "product_name", product.getName() },      { "price", product.getPrice() },      { "quantity", product.getQuantity() }    });  }}
การแก้ไขปัญหา
Anchor link toหากคุณพบปัญหาใดๆ ในระหว่างกระบวนการผสานรวม โปรดดูที่ส่วน การสนับสนุนและชุมชน