यूनिटी एसडीके बेसिक इंटीग्रेशन गाइड
इस सेक्शन में यह जानकारी दी गई है कि आप अपने एप्लिकेशन में पुशवूश यूनिटी एसडीके को कैसे इंटीग्रेट कर सकते हैं।
पूर्वापेक्षाएँ
Anchor link toअपने ऐप में पुशवूश यूनिटी एसडीके को इंटीग्रेट करने के लिए, आपको निम्नलिखित की आवश्यकता होगी:
इंटीग्रेशन के स्टेप्स
Anchor link to1. पुशवूश यूनिटी एसडीके डिपेंडेंसी जोड़ें
Anchor link toयूनिटी में अपने Assets फ़ोल्डर में यूनिटी पुश नोटिफिकेशन प्लगइन इम्पोर्ट करें।
2. यूनिटी एसडीके इनिशियलाइज़ेशन
Anchor link toPushNotificator.cs स्क्रिप्ट बनाएँ और इसे सीन में Camera Object से अटैच करें।
स्क्रिप्ट में:
- एप्लीकेशन कोड और फायरबेस प्रोजेक्ट नंबर के साथ पुशवूश एसडीके को इनिशियलाइज़ करें।
- पुश नोटिफिकेशन के लिए रजिस्टर करने के लिए अपने इनिशियलाइज़ेशन लॉजिक में
RegisterForPushNotifications()को कॉल करें। - पुश रजिस्ट्रेशन इवेंट्स को मैनेज करने के लिए रजिस्ट्रेशन इवेंट हैंडलर जोड़ें:
using UnityEngine;using UnityEngine.UI;
public class PushNotificator : MonoBehaviour {    void Start () {        Pushwoosh.ApplicationCode = "__YOUR_APP_ID__";        Pushwoosh.FcmProjectNumber = "__YOUR_FCM_SENDER_ID__";        Pushwoosh.Instance.OnRegisteredForPushNotifications += OnRegisteredForPushNotifications;        Pushwoosh.Instance.OnFailedToRegisteredForPushNotifications += OnFailedToRegisteredForPushNotifications;        Pushwoosh.Instance.RegisterForPushNotifications();    }
    void OnRegisteredForPushNotifications(string token) {        Debug.LogFormat(LogType.Log, LogOption.NoStacktrace, null, "Received token: \n{0}", token);    }
    void OnFailedToRegisteredForPushNotifications(string error) {        Debug.LogFormat(LogType.Log, LogOption.NoStacktrace, null, "Error ocurred while registering to push notifications: \n{0}", error);    }}
जहाँ:
__YOUR_APP_ID__पुशवूश कंट्रोल पैनल से एप्लीकेशन कोड है।__YOUR_FCM_SENDER_ID__फायरबेस कंसोल से फायरबेस प्रोजेक्ट नंबर है।
3. आईओएस नेटिव सेटअप
Anchor link to3.1 कैपेबिलिटीज़
Anchor link toअपने प्रोजेक्ट में पुश नोटिफिकेशन को इनेबल करने के लिए, आपको कुछ कैपेबिलिटीज़ जोड़नी होंगी।
Signing & Capabilities सेक्शन में, निम्नलिखित कैपेबिलिटीज़ जोड़ें:
Push NotificationsBackground Modes। इस कैपेबिलिटी को जोड़ने के बाद,Remote notificationsके लिए बॉक्स को चेक करें।
यदि आप टाइम सेंसिटिव नोटिफिकेशन (iOS 15+) का उपयोग करना चाहते हैं, तो Time Sensitive Notifications कैपेबिलिटी भी जोड़ें।
3.2 Info.plist
Anchor link toअपने Runner/Info.plist में __PUSHWOOSH_DEVICE_API_TOKEN__ की को Pushwoosh Device API Token पर सेट करें:
<key>Pushwoosh_API_TOKEN</key><string>__PUSHWOOSH_DEVICE_API_TOKEN__</string>3.3 मैसेज डिलीवरी ट्रैकिंग
Anchor link toआपको अपने प्रोजेक्ट में एक नोटिफिकेशन सर्विस एक्सटेंशन टारगेट जोड़ना होगा। यह सटीक डिलीवरी ट्रैकिंग और आईओएस पर रिच मीडिया जैसी सुविधाओं के लिए आवश्यक है।
एक्सटेंशन टारगेट और उसके भीतर आवश्यक पुशवूश कोड जोड़ने के लिए नेटिव गाइड के स्टेप्स का पालन करें।
4. एंड्रॉइड नेटिव सेटअप
Anchor link to4.1 फायरबेस कॉन्फ़िगरेशन फ़ाइल जोड़ें
Anchor link togoogle-services.json फ़ाइल को अपने प्रोजेक्ट डायरेक्टरी में Assets फ़ोल्डर में रखें।
4.2 बिल्ड सेटिंग्स एडजस्ट करें
Anchor link toअपने एंड्रॉइड बिल्ड प्रोफ़ाइल के Publishing Settings सेक्शन में Custom Main Manifest विकल्प को इनेबल करें।
4.3 पुशवूश मेटाडेटा जोड़ें
Anchor link toअपने Assets/Plugins/Android/AndroidManifest.xml में <application> टैग के अंदर Pushwoosh Device API Token जोड़ें:
<meta-data android:name="com.pushwoosh.apitoken" android:value="__YOUR_DEVICE_API_TOKEN__" />महत्वपूर्ण: सुनिश्चित करें कि आप अपने पुशवूश कंट्रोल पैनल में टोकन को सही ऐप का एक्सेस दें। और जानें
5. विंडोज स्टोर इंटीग्रेशन
Anchor link to- निम्नलिखित कंटेंट के साथ अपनी
Assets/डायरेक्टरी मेंlink.xmlजोड़ें:
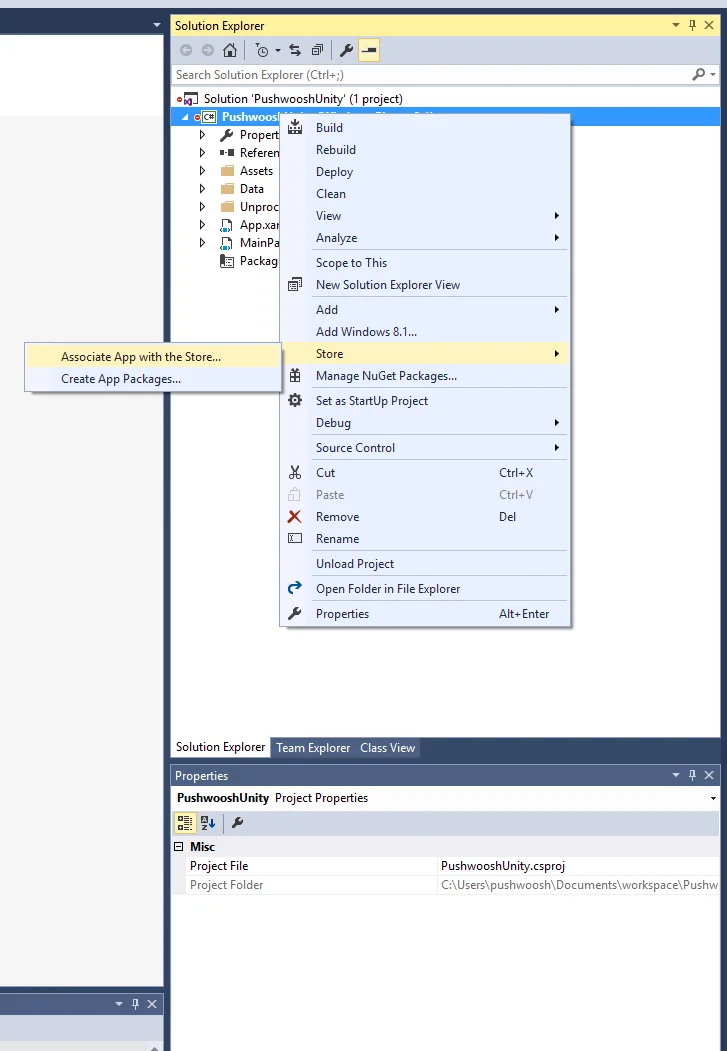
<linker> <assembly fullname="PushSDK" preserve="all"/></linker>- आपको एक्सपोर्ट किए गए विजुअल स्टूडियो प्रोजेक्ट में Associate App with the Store भी करना होगा। सुनिश्चित करें कि आपका ऐप आपकी पब्लिशर आइडेंटिटी से मेल खाने वाले सर्टिफिकेट के साथ साइन्ड है।
एक्सपोर्ट किए गए विजुअल स्टूडियो प्रोजेक्ट में अपने .appxmanifest के Capabilities टैब में इंटरनेट (क्लाइंट) कैपेबिलिटी को चुनें।
6. प्रोजेक्ट चलाएँ
Anchor link to- प्रोजेक्ट को बिल्ड और रन करें।
- पुशवूश कंट्रोल पैनल पर जाएँ और एक पुश नोटिफिकेशन भेजें।
- आपको ऐप में नोटिफिकेशन दिखना चाहिए।
एक्सटेंडेड इंटीग्रेशन
Anchor link toइस स्तर पर, आपने पहले ही एसडीके को इंटीग्रेट कर लिया है और आप पुश नोटिफिकेशन भेज और प्राप्त कर सकते हैं। अब, आइए मुख्य कार्यक्षमता का पता लगाएँ
पुश नोटिफिकेशन इवेंट लिसनर्स
Anchor link toपुशवूश एसडीके में दो इवेंट लिसनर हैं, जो पुश नोटिफिकेशन को हैंडल करने के लिए डिज़ाइन किए गए हैं:
OnPushNotificationsReceivedइवेंट तब ट्रिगर होता है, जब एक पुश नोटिफिकेशन प्राप्त होता हैOnPushNotificationsOpenedइवेंट तब ट्रिगर होता है, जब कोई उपयोगकर्ता नोटिफिकेशन खोलता है
आपको इन इवेंट लिसनर्स को PushNotificator.cs में एसडीके के इनिशियलाइज़ेशन के ठीक बाद सेटअप करना चाहिए:
using UnityEngine;using UnityEngine.UI;
public class PushNotificator : MonoBehaviour {    void Start () {        Pushwoosh.ApplicationCode = "__YOUR_APP_ID__";        Pushwoosh.FcmProjectNumber = "__YOUR_FCM_SENDER_ID__";        Pushwoosh.Instance.OnPushNotificationsReceived += OnPushNotificationsReceived;        Pushwoosh.Instance.OnPushNotificationsOpened += OnPushNotificationsOpened;        Pushwoosh.Instance.RegisterForPushNotifications();    }
    void OnPushNotificationsReceived(string payload) {        Debug.LogFormat(LogType.Log, LogOption.NoStacktrace, null, "Received push notificaiton: \n{0}", payload);    }
    void OnPushNotificationsOpened(string payload) {        Debug.LogFormat(LogType.Log, LogOption.NoStacktrace, null, "Opened push notificaiton: \n{0}", payload);    }
यूज़र कॉन्फ़िगरेशन
Anchor link toव्यक्तिगत उपयोगकर्ता के व्यवहार और प्राथमिकताओं पर ध्यान केंद्रित करके, आप व्यक्तिगत कंटेंट दे सकते हैं, जिससे उपयोगकर्ता की संतुष्टि और वफादारी में वृद्धि होती है
public class Registration {  public void afterUserLogin(User user) {
    // Set user ID    Pushwoosh.Instance.SetUserId(user.getId());
    // Set user email    Pushwoosh.Instance.SetEmail(user.getEmail());
    // Setting additional user information as tags for Pushwoosh    Pushwoosh.Instance.SetIntTag("Age", user.getAge());    Pushwoosh.Instance.SetStringTag("Name", user.getName());    Pushwoosh.Instance.SetStringTag("LastLoginDate", user.getLastLoginDate());  }}
टैग्स
Anchor link toटैग्स उपयोगकर्ताओं या डिवाइसों को असाइन किए गए की-वैल्यू पेयर होते हैं, जो प्राथमिकताओं या व्यवहार जैसे गुणों के आधार पर सेगमेंटेशन की अनुमति देते हैं, जिससे लक्षित मैसेजिंग संभव होती है।
public class UpdateUser {  public void afterUserUpdateProfile(User user) {
    // Set list of favorite categories    Pushwoosh.Instance.SetListTag(      "favorite_categories": user.getFavoriteCategoriesList()    );
    // Set payment information    Pushwoosh.Instance.SetStringTag("is_subscribed", user.isSubscribed());    Pushwoosh.Instance.SetStringTag("payment_status", user.getPaymentStatus());    Pushwoosh.Instance.SetStringTag("billing_address", user.getBillingAddress());  }}
इवेंट्स
Anchor link toइवेंट्स ऐप के भीतर विशिष्ट उपयोगकर्ता क्रियाएँ या घटनाएँ होती हैं जिन्हें व्यवहार का विश्लेषण करने और संबंधित संदेशों या क्रियाओं को ट्रिगर करने के लिए ट्रैक किया जा सकता है
public class Registration {
  // Track login event  public void afterUserLogin(User user) {    Pushwoosh.Instance.PostEvent("login", new Dictionary<string, object>() {      { "name", user.getName() },      { "last_login", user.getLastLoginDate() }    });  }
  public void afterUserPurchase(Product product) {    // Track purchase event    Pushwoosh.Instance.PostEvent("purchase", new Dictionary<string, object>() {      { "product_id", product.getId() },      { "product_name", product.getName() },      { "price", product.getPrice() },      { "quantity", product.getQuantity() }    });  }}
समस्या निवारण
Anchor link toयदि आपको इंटीग्रेशन प्रक्रिया के दौरान कोई समस्या आती है, तो कृपया सपोर्ट और कम्युनिटी सेक्शन देखें।