自定义 Android SDK
深度链接
Anchor link to在将处理深度链接的 activity 中,添加带有 scheme、host 和 pathPrefix 参数的 <data> 标签。
<activity          android:name=".PromoActivity"          android:label="PromoActivity">    <intent-filter>        <action android:name="android.intent.action.VIEW" />        <category android:name="android.intent.category.DEFAULT" />        <category android:name="android.intent.category.BROWSABLE" />
<data android:scheme="com.pushwoosh" android:host="promotion" android:pathPrefix="" /> </intent-filter></activity>在上面的示例中,深度链接将打开 PromoActivity。为简单起见,下面的基本实现会显示一个带有 promo id 值的警报。在您的应用程序中,它当然可以做一些有用的事情!
public class PromoActivity extends Activity{    @Override    protected void onCreate(Bundle savedInstanceState)    {        super.onCreate(savedInstanceState);
        setContentView(R.layout.deep_link);        setTitle("Deep link activity");
        Intent intent = getIntent();        String action = intent.getAction();        Uri data = intent.getData();
        if (TextUtils.equals(action, Intent.ACTION_VIEW))        {            openUrl(data);        }    }
    private void openUrl(Uri uri)    {        String promoId = uri.getQueryParameter("id");        Toast.makeText(getApplicationContext(), promoId, Toast.LENGTH_LONG).show();    }}
应用内购买跟踪
Anchor link to如果您想在 Customer Journeys 中跟踪应用内购买,请通过调用此方法配置向 Pushwoosh 发送购买信息:
Pushwoosh.getInstance().sendInappPurchase(@NonNull String sku, @NonNull BigDecimal price, @NonNull String currency);地理区域推送通知
Anchor link to要使用地理区域推送,请添加 com.pushwoosh:pushwoosh-location 库并调用:
PushwooshLocation.startLocationTracking();在您的 AndroidManifest.xml 中,包含必要的权限:
<manifest ... >  <!-- Required for geolocation-based push notifications -->  <uses-permission android:name="android.permission.ACCESS_COARSE_LOCATION" />
  <!-- Required for precise location tracking -->  <uses-permission android:name="android.permission.ACCESS_FINE_LOCATION" />
  <!-- Required for background location access on Android 10 (API level 29) and higher -->  <uses-permission android:name="android.permission.ACCESS_BACKGROUND_LOCATION" /></manifest>
将本地通知与 Pushwoosh 结合使用
Anchor link to如果您使用 Pushwoosh 本地通知 API,请将 RECEIVE_BOOT_COMPLETED 权限添加到您的 AndroidManifest.xml 中:
<uses-permission android:name="android.permission.RECEIVE_BOOT_COMPLETED"/>x在 Android 上使用角标数字
Anchor link toPushwoosh 支持在以下 Android 启动器的应用图标快捷方式上设置角标数字:
Sony、Samsung、LG、HTC、ASUS、ADW、APEX、NOVA、HUAWEI、ZUK、OPPO。
要使用此功能,只需将 com.pushwoosh:pushwoosh-badge 库添加到您的应用程序中即可。
打开自定义 activity
Anchor link to如果您希望在响应推送通知时启动特定的 activity,请将以下 intent-filter 添加到该 activity 中:
<activity android:name="YourActivity"> <intent-filter> <action android:name="${applicationId}.MESSAGE"/> <category android:name="android.intent.category.DEFAULT"/> </intent-filter></activity>控制日志级别
Anchor link to为了帮助调试和集成,SDK 默认会将所有请求打印到控制台。当您准备好进行生产构建时,请将值为 “ERROR” 的 com.pushwoosh.log_level meta-data 添加到 AndroidManifest.xml 中。这样,只有关于错误的信息会进入控制台。其他选项可以是以下之一:
NONE - SDK 无日志
ERROR - 仅在控制台中显示错误
WARN - 同时显示警告
INFO - 显示信息性消息
DEBUG - 现在甚至显示调试信息
NOISE - SDK 可以打印的所有内容以及更多
<meta-data android:name="com.pushwoosh.log_level" android:value="ERROR" />使用 Proguard
Anchor link to使用 Proguard 时,请添加以下选项:
-keep class com.pushwoosh.** { *; }-dontwarn com.pushwoosh.**在此处查看有关 Proguard 的 Google Play Services 库要求:
https://developers.google.com/android/guides/setup
自定义通知打开行为
Anchor link to如果您需要以编程方式选择在推送通知后显示哪个 activity,您可以创建自定义的 NotificationServiceExtension 并在 com.pushwoosh.notification_service_extension 值的元数据中包含您的 NotificationServiceExtension 的完全限定类名。
<meta-data android:name="com.pushwoosh.notification_service_extension" android:value="com.your.package.YourNotificationServiceExtension" />public class YourNotificationServiceExtension extends NotificationServiceExtension { @Override protected void startActivityForPushMessage(PushMessage message) { // super.startActivityForPushMessage() starts default launcher activity // or activity marked with ${applicationId}.MESSAGE action. // Simply do not call it to override this behaviour. // super.startActivityForPushMessage(message);
// start your activity instead: Intent launchIntent = new Intent(getApplicationContext(), YourActivity.class); launchIntent.setFlags(Intent.FLAG_ACTIVITY_NEW_TASK | Intent.FLAG_ACTIVITY_RESET_TASK_IF_NEEDED);
// (Optional) pass notification data to Activity launchIntent.putExtra(Pushwoosh.PUSH_RECEIVE_EVENT, message.toJson().toString());
context.startActivity(launchIntent); }}自定义推送通知
Anchor link to要自定义推送通知的视图,您需要创建一个自定义工厂,您可以创建自定义的 NotificationFactory 并在 com.pushwoosh.notification_factory 值的元数据中包含您的 NotificationFactory 的完全限定类名。
<meta-data android:name="com.pushwoosh.notification_factory" android:value="com.your.package.YourNotificationFactory" />public class YourNotificationFactory extends PushwooshNotificationFactory { @Override public Notification onGenerateNotification(@NonNull PushMessage pushMessage) { if (customNotification) { // TODO: generate and return custom notification }
// return default Pushwoosh notification return super.onGenerateNotification(pushMessage); }}自定义分组摘要
Anchor link to要自定义分组摘要的外观,请创建一个自定义工厂。您可以创建自定义的 SummaryNotificationFactory 并在 com.pushwoosh.summary_notification_factory 值的元数据中包含您的 SummaryNotificationFactory 的完全限定类名。
<meta-data android:name="com.pushwoosh.summary_notification_factory" android:value="com.your.package.YourSummaryNotificationFactory" />public class YourSummaryNotificationFactory extends PushwooshSummaryNotificationFactory { @Override public String summaryNotificationMessage(int notificationsAmount) { // return the message you want return super.summaryNotificationMessage(notificationsAmount); } @Override public int summaryNotificationIconResId() { // return the icon resource id you want return super.summaryNotificationIconResId(); }}私有端点 URL
Anchor link toPushwoosh 为拥有自定义计划订阅的客户提供私有端点。要为 Android SDK 设置私有端点,您需要将以下内容添加到您的 AndroidManifest.xml 文件中:
<meta-data android:name="com.pushwoosh.base_url" android:value="PUSHWOOSH_PRIVATE_ENDPOINT_URL_PROVIDED" />创建富媒体队列
Anchor link to如果同时有多个富媒体页面需要显示(例如,两个或多个应用内消息的触发事件同时发生,或者在另一个触发事件发生时已经显示了一个富媒体页面),您可以设置一个富媒体页面显示队列。要创建队列,请将以下代码添加到您的项目中:
package com.pushwoosh.testingapp;
import com.pushwoosh.RichMediaManager;import com.pushwoosh.exception.PushwooshException;import com.pushwoosh.richmedia.RichMediaPresentingDelegate;import com.pushwoosh.richmedia.RichMedia;import com.pushwoosh.internal.utils.PWLog;
import java.util.ArrayDeque;import java.util.concurrent.locks.ReentrantLock;
public class DefaultRichMediaPresentingDelegate implements RichMediaPresentingDelegate {    private final String TAG = DefaultRichMediaPresentingDelegate.class.getSimpleName();    private ArrayDeque<RichMedia> richMediaQueue = new ArrayDeque<>();    private RichMedia currentRichMedia = null;    private ReentrantLock reentrantLock;
    public DefaultRichMediaPresentingDelegate() {        PWLog.noise(TAG, "new DefaultRichMediaPresentingDelegate:" + this);        reentrantLock = new ReentrantLock();    }
    @Override    public boolean shouldPresent(RichMedia richMedia) {        PWLog.noise(TAG, "shouldPresent:" + richMedia);        if (currentRichMedia == null) {            PWLog.noise(TAG, "currentRichMedia is null");        }        if (richMedia.isLockScreen()) {            PWLog.noise(TAG, "isLockScreen is true");            return true;        }        try {            reentrantLock.lock();            if (currentRichMedia == null) {                PWLog.noise(TAG, "show:" + richMedia);                currentRichMedia = richMedia;                return true;            } else {                PWLog.noise(TAG, "add to queue:" + richMedia);                richMediaQueue.add(richMedia);                return false;            }        } finally {            reentrantLock.unlock();        }    }
    @Override    public void onPresent(RichMedia richMedia) {        PWLog.noise(TAG, "onPresent" + richMedia);    }
    @Override    public void onError(RichMedia richMedia, PushwooshException pushwooshException) {        PWLog.error(TAG, pushwooshException + " richMedia:"+richMedia.toString());        tryShowNextRichMediaThreadSafety();    }
    @Override    public void onClose(RichMedia richMedia) {        PWLog.noise(TAG, "onClose:" + richMedia);        tryShowNextRichMediaThreadSafety();    }
    private void tryShowNextRichMediaThreadSafety() {        try {            reentrantLock.lock();            tryShowNextRichMedia();        } finally {            reentrantLock.unlock();        }    }
private void tryShowNextRichMedia() { if (!richMediaQueue.isEmpty()) { currentRichMedia = richMediaQueue.poll(); PWLog.noise(TAG, "try manual show:" + currentRichMedia); RichMediaManager.present(currentRichMedia); } else { PWLog.noise(TAG, "richMediaQueue is empty"); currentRichMedia = null; } }}自定义声音推送
Anchor link to- 将您的音频文件放在正确的文件夹中。对于原生 Android 框架,您的文件应放在
/app/src/main/res/raw文件夹中。
-
创建一个通知渠道。
-
在配置推送消息时选择一个声音。
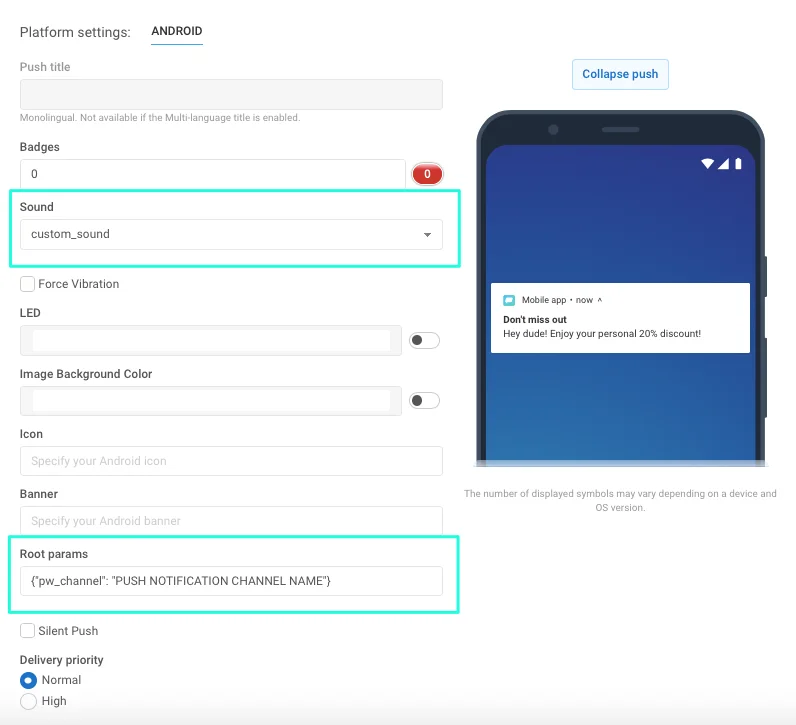
- 设置消息所属的通知渠道。为此,请在“Android root params”字段中指定以下内容:
{"pw_channel": "PUSH NOTIFICATION CHANNEL NAME"} //此处您需要为带有自定义声音的渠道指定名称
如果使用远程 API,请在您的 /createMessage API 请求中按如下方式设置参数:
"android_root_params": {"pw_channel": "push"} // 此处您需要为带有自定义声音的渠道指定名称,例如,对于带有 push.wav 声音的通知,名称为 "push"。"android_sound": "push" // 此处您应指定不带扩展名的文件名一旦您发送了带有这些指定参数的推送,就会为所有 Android 8+ 设备创建带有选定声音的通知渠道。
现在,要发送带有自定义声音的推送,您只需指定与该声音关联的渠道即可。
自定义通知声音的 Proguard 规则
Anchor link to如果您的应用使用 proguard 进行代码和资源压缩,保持您的声音文件完整并可供外部库使用非常重要。如果您在 build.gradle 中使用 minifyEnabled = true 属性,请将以下规则添加到您的 proguard-rules.pro 中:
-keep public class your.package.name.R$raw { *;}如果您通过使用 shrinkResources=true 属性在代码压缩的基础上压缩应用的资源,您应额外指定要保留的资源。为此,创建一个任意名称的新 XML 文件,将其保存在您项目的某个位置(例如,在 res/xml 中),并在 resources 标签的 tools:keep 参数下指定资源名称:
<?xml version="1.0" encoding="utf-8"?><resources xmlns:tools="http://schemas.android.com/tools" tools:keep="@raw/*"/>Android SDK meta-data 标志的完整列表
Anchor link to要设置一个标志,您需要将 meta-data 块添加到您的 AndroidManifest.xml 文件的 application 标签内。例如,如果您想设置 Pushwoosh 应用程序 ID,请将以下代码添加到您的 AndroidManifest.xml 文件中:
<meta-data android:name="com.pushwoosh.appid" android:value="XXXXX-XXXXX" />| 标志 | 描述 | 可能的值 |
|---|---|---|
| com.pushwoosh.appid | 设置 Pushwoosh 应用程序 ID。 | XXXXX-XXXXX |
| com.pushwoosh.senderid | 设置 Firebase 项目发送者 ID。 | 123456789000 |
| com.pushwoosh.log_level | 设置日志记录级别。详情请参阅控制日志级别。 | NONE / ERROR / WARN / INFO / DEBUG (默认) / NOISE |
| com.pushwoosh.base_url | 覆盖 Pushwoosh 服务器基础 URL。 | https://cp.pushwoosh.com/json/1.3/ (默认) |
| com.pushwoosh.notification_service_extension | 自定义 NotificationServiceExtension。详情请参阅自定义通知打开行为。 | com.myapp.MyNotificationServiceExtension |
| com.pushwoosh.notification_factory | 自定义 NotificationFactory。 详情请参阅自定义推送通知。 | com.myapp.MyNotificationFactory |
| com.pushwoosh.summary_notification_factory | 自定义 SummaryNotificationFactory。 | com.myapp.MySummaryNotificationFactory |
| com.pushwoosh.multi_notification_mode | 如果为 true,通知将被分组。如果为 false,则仅显示最后收到的通知。 | true / false (默认) |
| com.pushwoosh.allow_server_communication | 如果为 true,SDK 被允许向 Pushwoosh 服务器发送网络请求。 | true (默认) / false |
| com.pushwoosh.handle_notifications_using_workmanager | 如果为 true,WorkManager 被设置为处理通知。 | true / false (默认) |
| com.pushwoosh.notification_icon | 自定义通知(小)图标资源名称。如果为 null,将使用默认应用程序图标。 | res/drawable-xxhdpi-v11/notification_small_icon.png / null |
| com.pushwoosh.notification_icon_color | 通知(小)图标背景颜色。 | #FFFFFF |
| com.pushwoosh.allow_collecting_device_data | 如果为 true,SDK 被允许收集并向 Pushwoosh 发送设备数据。 | true (默认) / false |
| com.pushwoosh.allow_collecting_device_os_version | 如果为 true,SDK 被允许收集并向 Pushwoosh 发送设备操作系统版本。 | true (默认) / false |
| com.pushwoosh.allow_collecting_device_locale | 如果为 true,SDK 被允许收集并向 Pushwoosh 发送设备区域设置。 | true (默认) / false |
| com.pushwoosh.allow_collecting_device_model | 如果为 true,SDK 被允许收集并向 Pushwoosh 发送设备型号。 | true (默认) / false |
| com.pushwoosh.in_app_business_solutions_capping | 限制 push-unregister 应用内消息在一天内显示的次数。 | 1 (默认), 2, …, n |
| com.pushwoosh.start_foreground_service | 如果为 true,前台服务将与 PushwooshLocation.startLocationTracking() 调用一起启动 | true / false (默认) |
| com.pushwoosh.foreground_service_notification_text | 为“com.pushwoosh.start_foreground_service”键启动前台服务时创建的通知设置文本。 | Work in progress (默认) |
| com.pushwoosh.foreground_service_notification_channel_name | 为“com.pushwoosh.start_foreground_service”键启动前台服务时创建的通知设置渠道名称。 | Foreground service (默认) |
| com.pushwoosh.trusted_package_names | 允许与指定包共享 Pushwoosh HWID | ”com.mycompany.myapp1, com.mycompany.myapp2” |
通过 TTL (Time-To-Live) 删除推送通知
Anchor link to要使用 TTL (Time-to-Live) 在指定时间段后自动删除推送通知,请按照以下步骤操作:
-
创建一个自定义 NotificationFactory。了解更多
-
在
onGenerateNotification()方法中,使用Notification.Builder或NotificationCompat.Builder类创建一个通知,并调用setTimeoutAfter方法:
public class YourNotificationFactory extends PushwooshNotificationFactory {
    @Override    public Notification onGenerateNotification(@NonNull PushMessage pushMessage) {        Notification.Builder builder = new Notification.Builder(getApplicationContext(), addChannel(pushData));
        Notification notification = builder.setContentText(pushData.getMessage())                                           .setContentTitle(title)                                           .setContentText(text)                                           // rest of your notification creation code                                           .setTimeoutAfter(timeout) // time in milliseconds before the notification is canceled                                           .build();    }}
与我们分享您的反馈
Anchor link to您的反馈有助于我们创造更好的体验,因此如果您在 SDK 集成过程中遇到任何问题,我们很乐意听取您的意见。如果您遇到任何困难,请随时通过此表格与我们分享您的想法。