Configuração de botões de ação do iOS
As notificações interativas do iOS permitem que os usuários realizem uma ação a partir do banner de notificação sem abrir o aplicativo. Na Pushwoosh, você configura isso com categorias do iOS: cada categoria contém um ou dois botões que você cria no Painel de Controle e anexa a um push.
Criar uma categoria
Anchor link to- Abra a página Configurar plataformas do seu aplicativo na Pushwoosh.
- Clique em Botões de ação ao lado da plataforma iOS. Você pode fazer isso antes ou depois da configuração principal da plataforma iOS.

- Insira um Nome da categoria. Você usará este nome para encontrar a categoria mais tarde.
- Especifique o Rótulo do botão. Este é o texto no botão. O iOS exibe até duas linhas de texto.
- Selecione um Tipo de botão:
- Destrutivo: para ações como excluir, rejeitar ou dispensar.
- Não destrutivo: para ações positivas ou neutras.
- Defina um ID do botão. Ele deve ser único dentro da categoria. Seu aplicativo recebe este ID quando o usuário toca no botão. Consulte o Guia do Desenvolvedor sobre Notificações Push Interativas do iOS para saber como lê-lo no delegate de notificação.
- Opcionalmente, habilite Iniciar aplicativo na ação para abrir o aplicativo quando o usuário tocar no botão.
- Para adicionar um segundo botão, clique em + ao lado do primeiro botão e repita os passos 4 a 7. Uma categoria suporta até dois botões. Use − para remover o segundo botão.
- Clique em Criar para salvar a categoria. Ela aparecerá na lista abaixo com seu ID da categoria.
Usar a categoria em um push
Anchor link toUma vez criada, anexe a categoria quando enviar um push via API, passe o ID da categoria como ios_category_id em createMessage.
Exemplo
Anchor link toPara um push de reengajamento de fitness, você pode definir uma categoria fitness_reengagement com:
- Resgatar 20% de desconto (
claim_offer): Não destrutivo, Iniciar aplicativo na ação ativado - Talvez mais tarde (
dismiss): Destrutivo, Iniciar aplicativo na ação desativado
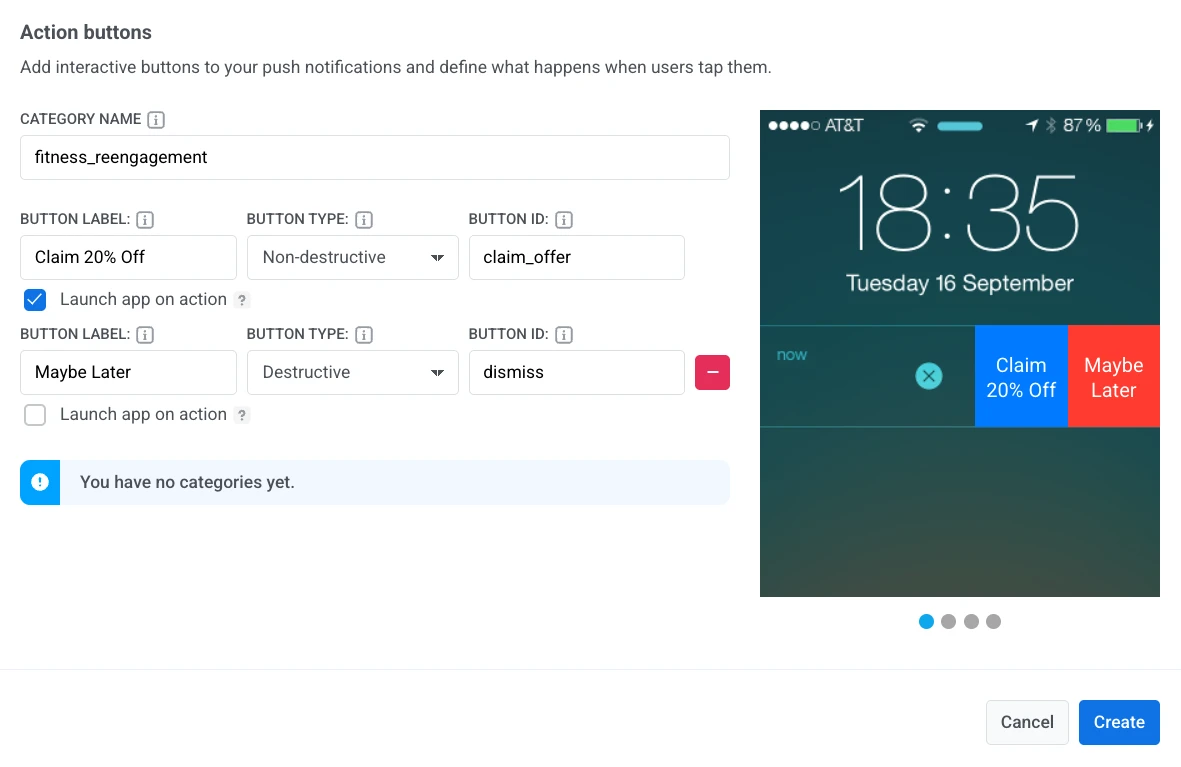
Quando o usuário toca em Resgatar 20% de desconto, o aplicativo abre e seu código recebe claim_offer. Talvez mais tarde dispensa a notificação sem abrir o aplicativo.