# 如何定时发送消息
Pushwoosh 让您可以轻松地在多个渠道上定时发送消息,包括[推送通知](/zh/product/messaging-channels/push-notifications)、[电子邮件](/zh/product/messaging-channels/emails)、[应用内消息](/zh/product/messaging-channels/in-apps)、[WhatsApp](/zh/product/messaging-channels/whatsapp-messages) 和 [SMS](/zh/product/messaging-channels/sms)。
无论您是发送一次性消息、为特定日期安排消息,还是设置重复性营销活动,Customer Journey Builder 都提供了灵活的选项来有效管理您的营销活动时间。对于推送通知,您还可以使用[一次性推送消息表单](/zh/product/messaging-channels/push-notifications/scheduled-push)。对于一次性电子邮件,您可以使用[一次性电子邮件表单](/zh/product/messaging-channels/emails/sending-emails/send-one-time-emails)。
本指南提供了通过 Customer Journey Builder 定时发送消息的详细步骤,适用于所有支持的消息渠道。
## 如何定时发送开启沟通流程的消息
定时发送功能在 [**Audience-based entry**](/zh/product/customer-journey/journey-elements/entry-elements/audience-based-entry/#entry-schedule) 元素中通过 **Entry schedule** 进行配置:
* **One-time entry:** 用户进入旅程一次。选择 **Immediately**(旅程激活后立即进入)或 **Schedule for a specific day**(指定日期和时间)。
* **Recurring entry:** 用户重复进入。选择 **On specific dates**(您选择的多个日期)或 **Periodically**(例如,每 1 天,每 1 周)。
### 配置进入时间表
1. 添加 **Audience-based entry** 元素并定义将进入旅程的用户。选择 **Audience source** 以确定谁将接收消息,或[创建一个细分](/zh/product/audience-data-and-segmentation/segmentation/)。设置好受众后,您就可以继续安排消息发送时间。
2. 在 **Audience-based entry** 元素中,设置 **Entry schedule** 并选择 **One-time entry** 或 **Recurring entry**,然后选择与消息发送时间相匹配的选项。
3. 按照下文所述设置时间和时区。有关详细信息,请参阅 [Audience-based entry](/zh/product/customer-journey/journey-elements/entry-elements/audience-based-entry/)。
### 为特定日期和时间安排消息
要在特定日期和时间发送消息:
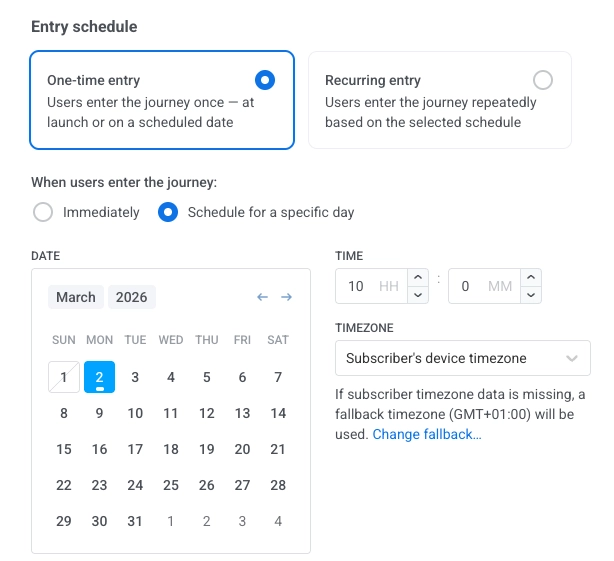
1. 将 **Entry schedule** 设置为 **One-time entry**,然后选择 **Schedule for a specific day**。设置日期和时间。
2. 选择时区:
* **Subscriber's device timezone (default):** 进入时间使用每个订阅者的设备时区。如果缺少时区,则使用备用时区。点击 **Change fallback** 进行更改。
* **Specific timezone:** 从下拉列表中选择一个时区,以固定进入时间。
设置好时间表后,点击 **Apply** 确认。
 ### 为多个特定日期安排消息
要在多个特定日期发送消息:
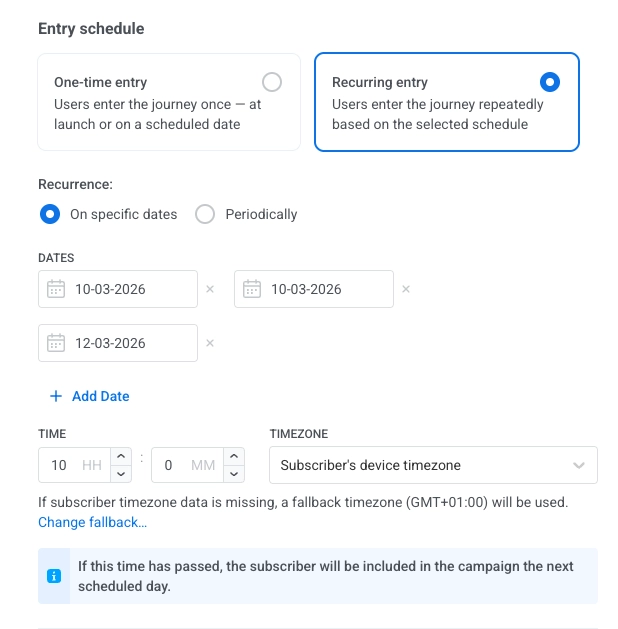
1. 将 **Entry schedule** 设置为 **Recurring entry**,然后选择 **On specific dates**。
2. 在日历中选择日期。点击 **+ Add Date** 添加更多日期。
3. 按照[为特定日期和时间安排消息](#schedule-a-message-for-a-specific-date-and-time)中的相同方式设置时间和时区(Subscriber's device timezone 或 Specific timezone)。
### 为多个特定日期安排消息
要在多个特定日期发送消息:
1. 将 **Entry schedule** 设置为 **Recurring entry**,然后选择 **On specific dates**。
2. 在日历中选择日期。点击 **+ Add Date** 添加更多日期。
3. 按照[为特定日期和时间安排消息](#schedule-a-message-for-a-specific-date-and-time)中的相同方式设置时间和时区(Subscriber's device timezone 或 Specific timezone)。
 设置好时间表后,点击 **Apply** 确认。
### 设置定期发送的重复消息
要按固定间隔(例如,每日、每周)发送消息:
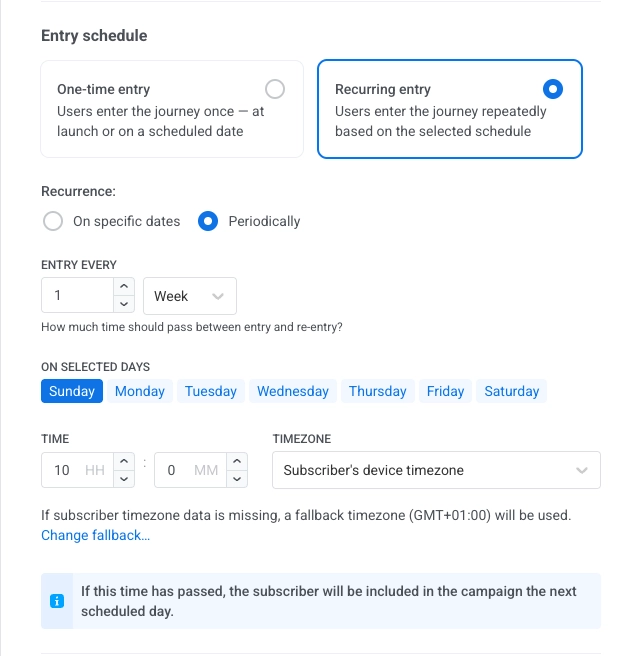
1. 将 **Entry schedule** 设置为 **Recurring entry**,然后选择 **Periodically**。
2. 在 **ENTRY EVERY** 中,设置间隔(例如,每 1 天,每 1 周)并选择日期(星期几或月份中的某天,取决于间隔)。
3. 按照[为特定日期和时间安排消息](#schedule-a-message-for-a-specific-date-and-time)中的相同方式设置时间和时区。
设置好时间表后,点击 **Apply** 确认。
### 设置定期发送的重复消息
要按固定间隔(例如,每日、每周)发送消息:
1. 将 **Entry schedule** 设置为 **Recurring entry**,然后选择 **Periodically**。
2. 在 **ENTRY EVERY** 中,设置间隔(例如,每 1 天,每 1 周)并选择日期(星期几或月份中的某天,取决于间隔)。
3. 按照[为特定日期和时间安排消息](#schedule-a-message-for-a-specific-date-and-time)中的相同方式设置时间和时区。
 设置好时间表后,点击 **Apply** 确认。
设置好定时选项后,添加消息元素并配置旅程的其余部分。在检查完所有配置后,点击 **Launch campaign**。
## 如何定时发送延续沟通流程的消息
如果您的定时消息是正在进行的旅程的一部分,您可以插入一个 Time Delay 元素来控制消息在流程中的发送时间。为此:
1. 在前面的沟通元素和您希望定时发送的消息之间插入 **Time Delay** 元素:
2. 双击 **Time Delay** 元素。在 **Time Delay Option** 字段中,选择 **Specific time**:
设置好时间表后,点击 **Apply** 确认。
设置好定时选项后,添加消息元素并配置旅程的其余部分。在检查完所有配置后,点击 **Launch campaign**。
## 如何定时发送延续沟通流程的消息
如果您的定时消息是正在进行的旅程的一部分,您可以插入一个 Time Delay 元素来控制消息在流程中的发送时间。为此:
1. 在前面的沟通元素和您希望定时发送的消息之间插入 **Time Delay** 元素:
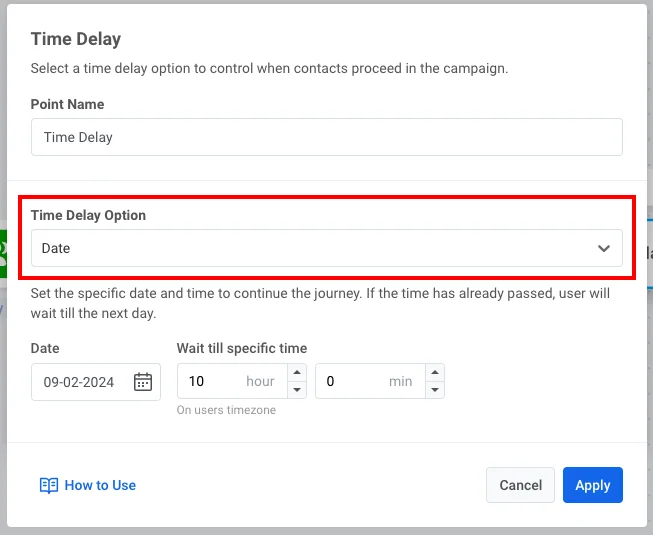
2. 双击 **Time Delay** 元素。在 **Time Delay Option** 字段中,选择 **Specific time**:
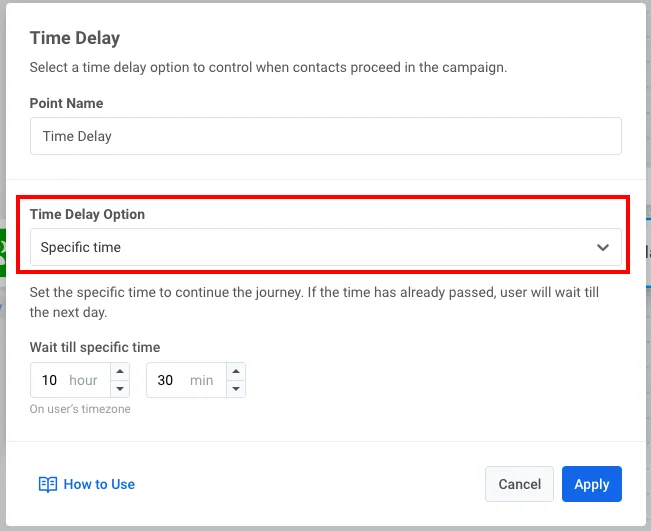 或 **Date**:
 ## 示例场景:为健身应用设置重复性推送通知
假设您正在运营一个健身应用,并希望向用户发送激励性推送通知以保持他们的参与度。您决定在每周一上午 9:00 发送相同的通知,提醒用户记录他们的锻炼进度。
1. **创建一个基本的推送流程。** 将 **Audience-based entry** 添加到旅程画布并选择一个 **Audience source**。
2. **设置重复进入。** 在 **Audience-based entry** 元素中,将 **Entry schedule** 设置为 **Recurring entry**,然后选择 **Periodically**。在 **ENTRY EVERY** 中,设置 **every 1 week** 并选择 **Monday**。
3. **设置时间和时区。** 将时间设置为 **9:00 AM** 并选择 **Subscriber's device timezone**,以便根据每个用户的本地时间发送通知。
4. **审查并最终确定旅程。** 继续配置旅程的其余部分并创建推送通知内容。
要在此处结束旅程,请添加 [**Exit**](/zh/product/customer-journey/journey-elements/flow-controls/exit/) 元素,或者直接让分支没有出站连接。在启动旅程之前,请检查整个设置以确保所有配置都正确无误。
现在,重复性通知已准备就绪,将在每周一上午 9:00(以用户的本地时区为准)提醒用户记录他们的锻炼情况。
## 示例场景:为健身应用设置重复性推送通知
假设您正在运营一个健身应用,并希望向用户发送激励性推送通知以保持他们的参与度。您决定在每周一上午 9:00 发送相同的通知,提醒用户记录他们的锻炼进度。
1. **创建一个基本的推送流程。** 将 **Audience-based entry** 添加到旅程画布并选择一个 **Audience source**。
2. **设置重复进入。** 在 **Audience-based entry** 元素中,将 **Entry schedule** 设置为 **Recurring entry**,然后选择 **Periodically**。在 **ENTRY EVERY** 中,设置 **every 1 week** 并选择 **Monday**。
3. **设置时间和时区。** 将时间设置为 **9:00 AM** 并选择 **Subscriber's device timezone**,以便根据每个用户的本地时间发送通知。
4. **审查并最终确定旅程。** 继续配置旅程的其余部分并创建推送通知内容。
要在此处结束旅程,请添加 [**Exit**](/zh/product/customer-journey/journey-elements/flow-controls/exit/) 元素,或者直接让分支没有出站连接。在启动旅程之前,请检查整个设置以确保所有配置都正确无误。
现在,重复性通知已准备就绪,将在每周一上午 9:00(以用户的本地时区为准)提醒用户记录他们的锻炼情况。