# 通过 Customer Journey 发送 In-App 消息
本指南将引导您完成通过 Customer Journey 发送 in-app 消息的步骤。
## 创建 Journey 并添加元素
1. 前往 **Customer Journey Builder → Create Campaign**。
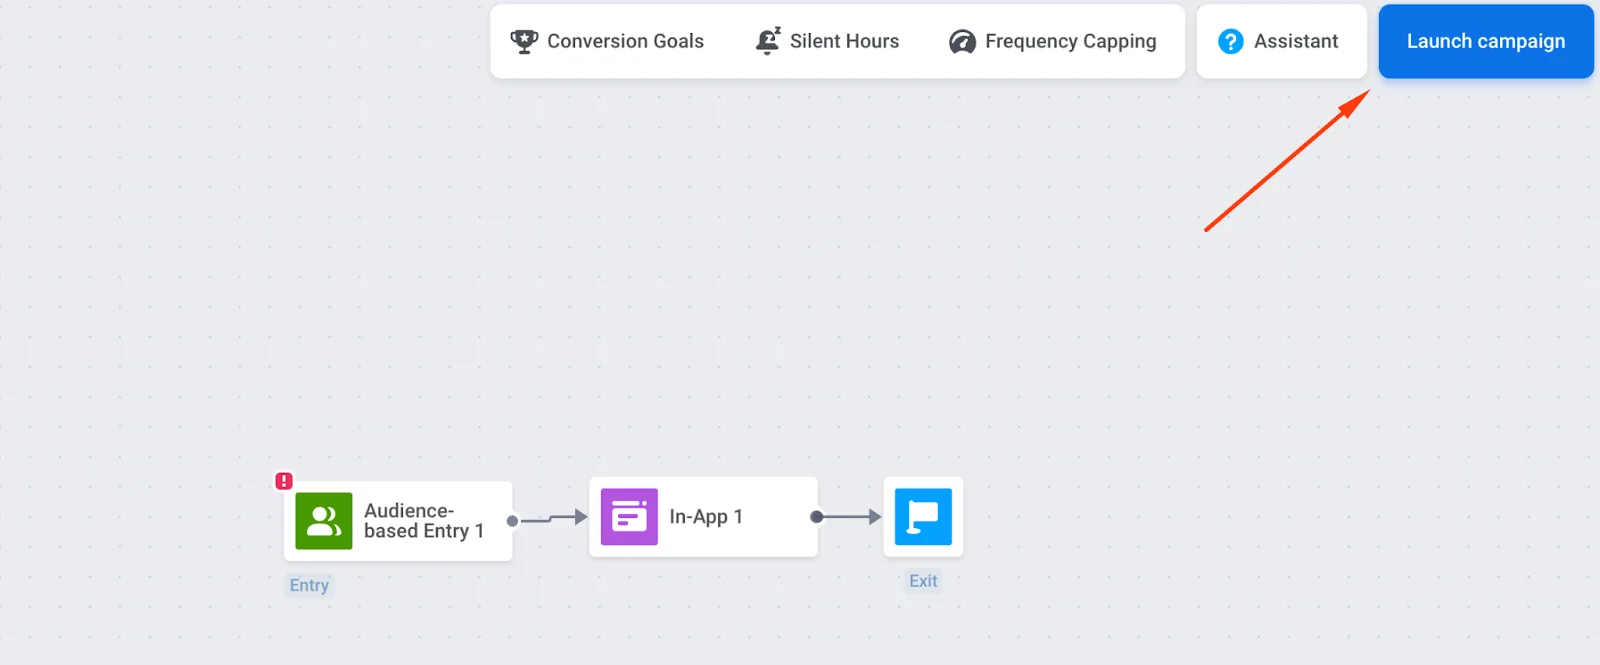
2. 将 **Entry**、**In-App** 和 **Exit** 拖到画布上,并按顺序连接它们。
## 配置进入和受众
您必须配置 **Entry** 元素;否则,in-app 消息将不会被发送。
### 基于触发器的进入
当用户执行特定操作时(例如,进入定价页面),显示 in-app。使用默认的触发器和事件,或[创建您自己的](/zh/product/audience-data-and-segmentation/events/)。
[了解更多关于基于触发器的进入的信息](/zh/product/customer-journey/journey-elements/entry-elements/trigger-based-entry/)。
示例:通过添加平台过滤器,仅向 iOS 用户显示带有折扣的 in-app。
### 基于受众的进入
为一部分用户(例如,您的整个用户群)启动 Journey。通过标签和/或事件创建一个细分,或使用[预构建的细分](/zh/product/audience-data-and-segmentation/segmentation/create-segments)。
[了解更多关于基于受众的进入的信息](/zh/product/customer-journey/journey-elements/entry-elements/audience-based-entry/)。
#### 配置排期
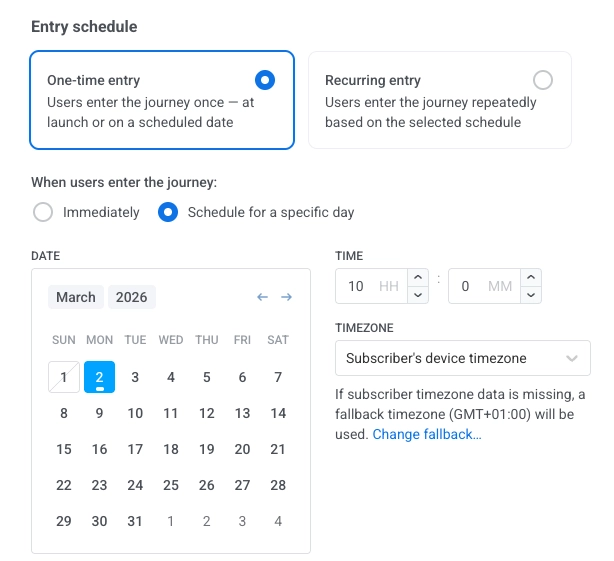
在 [基于受众的进入](/zh/product/customer-journey/journey-elements/entry-elements/audience-based-entry/) 元素中,**Entry schedule** 控制用户何时进入。默认情况下,**One-time entry** 和 **Immediately** 会让用户在 Journey 激活后立即进入。
要在特定日期和时间(带时区)运行,请选择 **One-time entry** → **Schedule for a specific day**。要在多个日期或按固定间隔运行,请选择 **Recurring entry**。[了解更多](/zh/product/customer-journey/journey-elements/entry-elements/audience-based-entry/#entry-schedule)
 ## 配置 In-App 元素
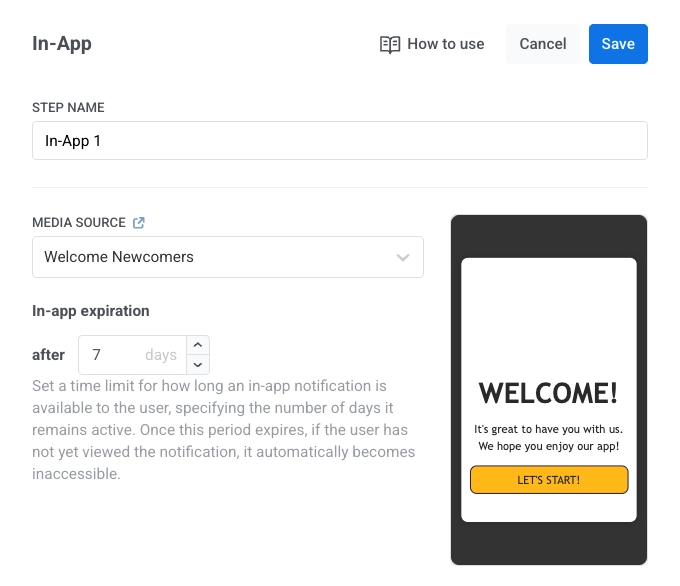
1. 点击 **In-App** 元素 → **Media Source**。选择一个模板(最新的在最前面),然后点击 **Apply**。
2. 设置 **In-app expiration**(消息可用的天数)。例如,如果优惠在一周后到期,则设置为 7 天。
## 配置 In-App 元素
1. 点击 **In-App** 元素 → **Media Source**。选择一个模板(最新的在最前面),然后点击 **Apply**。
2. 设置 **In-app expiration**(消息可用的天数)。例如,如果优惠在一周后到期,则设置为 7 天。
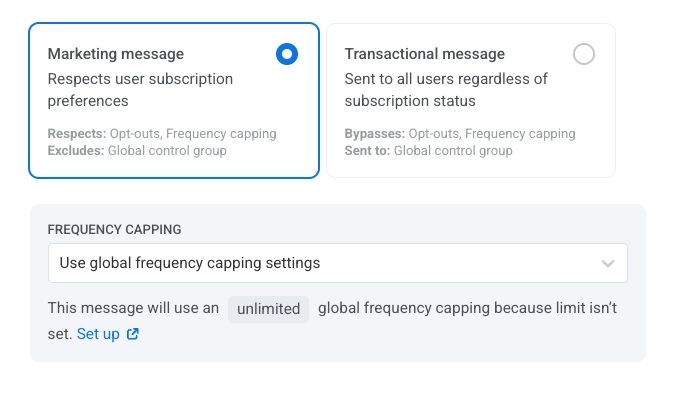
 3. 选择消息类型:
* **营销消息**:用于营销活动和促销。所有规则和限制均适用。遵循:选择退出、频率上限和静默期。排除:[全局控制组](/zh/product/audience-data-and-segmentation/global-control-group/)用户。
* **交易消息**:用于运营或服务消息。规则和限制不适用。绕过:选择退出、频率上限和静默期。发送给:[全局控制组](/zh/product/audience-data-and-segmentation/global-control-group/)用户。
3. 选择消息类型:
* **营销消息**:用于营销活动和促销。所有规则和限制均适用。遵循:选择退出、频率上限和静默期。排除:[全局控制组](/zh/product/audience-data-and-segmentation/global-control-group/)用户。
* **交易消息**:用于运营或服务消息。规则和限制不适用。绕过:选择退出、频率上限和静默期。发送给:[全局控制组](/zh/product/audience-data-and-segmentation/global-control-group/)用户。
 [了解更多关于营销消息和交易消息之间区别的信息](/zh/product/messaging-channels/marketing-vs-transactional/)。
4. 配置频率上限。[了解更多](/zh/product/customer-journey/journey-elements/channels/in-app/#set-frequency-capping)。
5. 点击 **Apply** 保存设置。
## 验证并启动 Journey
1. 完成 Journey 配置,并运行[启动前检查](/zh/product/customer-journey/journey-settings/#pre-launch-check)来验证 Journey。
2. 点击 **Launch campaign**(右上角)向用户发送 in-app 消息。
[了解更多关于营销消息和交易消息之间区别的信息](/zh/product/messaging-channels/marketing-vs-transactional/)。
4. 配置频率上限。[了解更多](/zh/product/customer-journey/journey-elements/channels/in-app/#set-frequency-capping)。
5. 点击 **Apply** 保存设置。
## 验证并启动 Journey
1. 完成 Journey 配置,并运行[启动前检查](/zh/product/customer-journey/journey-settings/#pre-launch-check)来验证 Journey。
2. 点击 **Launch campaign**(右上角)向用户发送 in-app 消息。