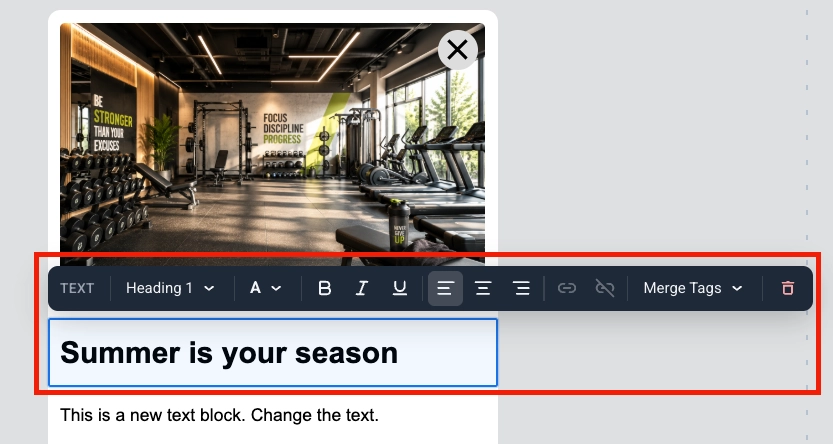
 Merge Tags 是占位符,可将用户个人资料中的 [Tag](/zh/product/audience-data-and-segmentation/user-data-tags/tags/) 值插入到消息中,以便每个订阅者都能看到个性化的文案。要添加一个,请选择文本,在工具栏中单击 **Merge Tags**,然后从您的帐户中选择一个 Tag。[了解有关个性化应用内消息的更多信息](/zh/product/how-to-guides/how-to-send-a-personalized-message/how-to-send-a-personalized-in-app-message/)
### 图片
**Image** 块在应用内模板中显示图片。
Merge Tags 是占位符,可将用户个人资料中的 [Tag](/zh/product/audience-data-and-segmentation/user-data-tags/tags/) 值插入到消息中,以便每个订阅者都能看到个性化的文案。要添加一个,请选择文本,在工具栏中单击 **Merge Tags**,然后从您的帐户中选择一个 Tag。[了解有关个性化应用内消息的更多信息](/zh/product/how-to-guides/how-to-send-a-personalized-message/how-to-send-a-personalized-in-app-message/)
### 图片
**Image** 块在应用内模板中显示图片。
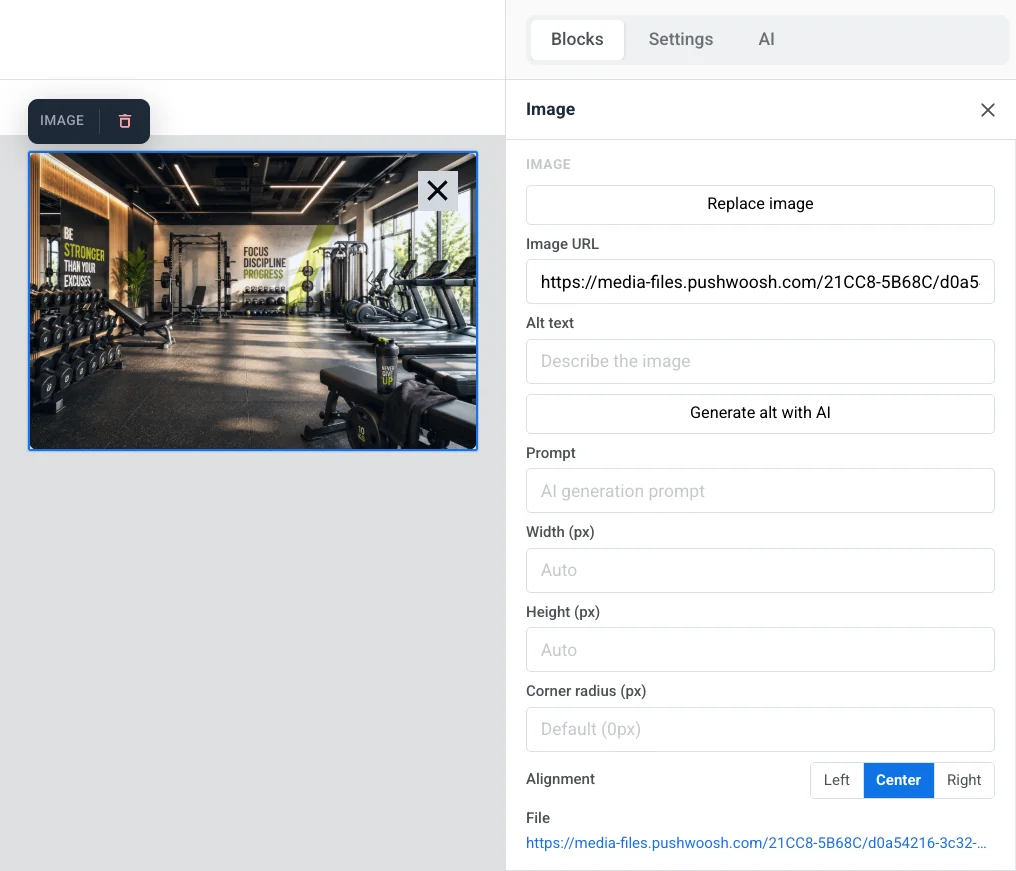 在画布上选择它以在右侧面板中打开 **Image** 设置。
* **Add image** / **Replace image:** 当块为空时单击 **Add image**,或当已设置图片时单击 **Replace image**。您可以上传文件或从您的[媒体库](/zh/product/content/media-store/)中选择一个。
* **Image URL:** 粘贴图片的托管链接。
* **Alt text:** 为无障碍性描述图片。
* **Prompt:** 您使用 **Generate with AI** 创建的图片的 AI 生成提示。
* **Width (px)** / **Height (px):** 将图片固定为像素大小。将字段留空以使其自动调整大小。
* **Corner radius (px):** 使图片边角变圆。
* **Alignment:** 左对齐、居中或右对齐。
在 **Link** 中,设置 **Action Type**(例如 **Open Website** 或 **URL or Deeplink**)及其 **URL**,以便在点击图片时打开某些内容,以及 **Link target** 以在同一选项卡或新选项卡中打开它。
在 **Spacing** 中,打开 **Padding** 以在图片周围添加空间。使用 **All sides** 在每侧应用相同的内边距,或打开 **More options** 以分别设置每侧。
### 视频
**Video** 块将 YouTube 或 Vimeo 视频作为可点击的缩略图添加到消息中。消息显示带有 ▶ 叠加层的静态图片。点击它会在 YouTube 或 Vimeo 应用或浏览器中打开视频。
在画布上选择它以在右侧面板中打开 **Image** 设置。
* **Add image** / **Replace image:** 当块为空时单击 **Add image**,或当已设置图片时单击 **Replace image**。您可以上传文件或从您的[媒体库](/zh/product/content/media-store/)中选择一个。
* **Image URL:** 粘贴图片的托管链接。
* **Alt text:** 为无障碍性描述图片。
* **Prompt:** 您使用 **Generate with AI** 创建的图片的 AI 生成提示。
* **Width (px)** / **Height (px):** 将图片固定为像素大小。将字段留空以使其自动调整大小。
* **Corner radius (px):** 使图片边角变圆。
* **Alignment:** 左对齐、居中或右对齐。
在 **Link** 中,设置 **Action Type**(例如 **Open Website** 或 **URL or Deeplink**)及其 **URL**,以便在点击图片时打开某些内容,以及 **Link target** 以在同一选项卡或新选项卡中打开它。
在 **Spacing** 中,打开 **Padding** 以在图片周围添加空间。使用 **All sides** 在每侧应用相同的内边距,或打开 **More options** 以分别设置每侧。
### 视频
**Video** 块将 YouTube 或 Vimeo 视频作为可点击的缩略图添加到消息中。消息显示带有 ▶ 叠加层的静态图片。点击它会在 YouTube 或 Vimeo 应用或浏览器中打开视频。
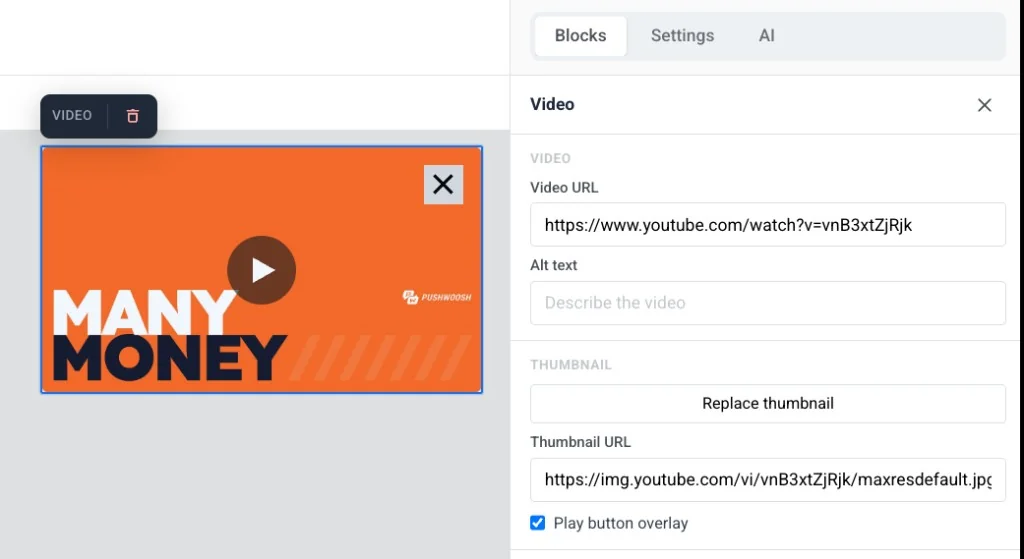 在画布上选择该块以打开其设置:
* **Video URL:** 粘贴 YouTube 或 Vimeo 链接。编辑器会自动获取缩略图。
* **Alt text:** 为无障碍性描述视频。
* **Thumbnail URL:** 保留自动获取的缩略图,或单击 **Add thumbnail** / **Replace thumbnail** 从[媒体库](/zh/product/content/media-store/)中选择一个,或直接粘贴托管链接。
* **Play button overlay:** 默认开启。关闭以显示没有 ▶ 叠加层的纯缩略图。
* **Width (px)**、**Corner radius (px)** 和 **Alignment:** 控制缩略图的外观及其在布局中的位置。
### 卡片
**Card** 块将图片与标题、文本和按钮配对在一个现成的布局中,因此您不必手动放置和对齐四个独立的块。
在画布上选择该块以打开其设置:
* **Video URL:** 粘贴 YouTube 或 Vimeo 链接。编辑器会自动获取缩略图。
* **Alt text:** 为无障碍性描述视频。
* **Thumbnail URL:** 保留自动获取的缩略图,或单击 **Add thumbnail** / **Replace thumbnail** 从[媒体库](/zh/product/content/media-store/)中选择一个,或直接粘贴托管链接。
* **Play button overlay:** 默认开启。关闭以显示没有 ▶ 叠加层的纯缩略图。
* **Width (px)**、**Corner radius (px)** 和 **Alignment:** 控制缩略图的外观及其在布局中的位置。
### 卡片
**Card** 块将图片与标题、文本和按钮配对在一个现成的布局中,因此您不必手动放置和对齐四个独立的块。
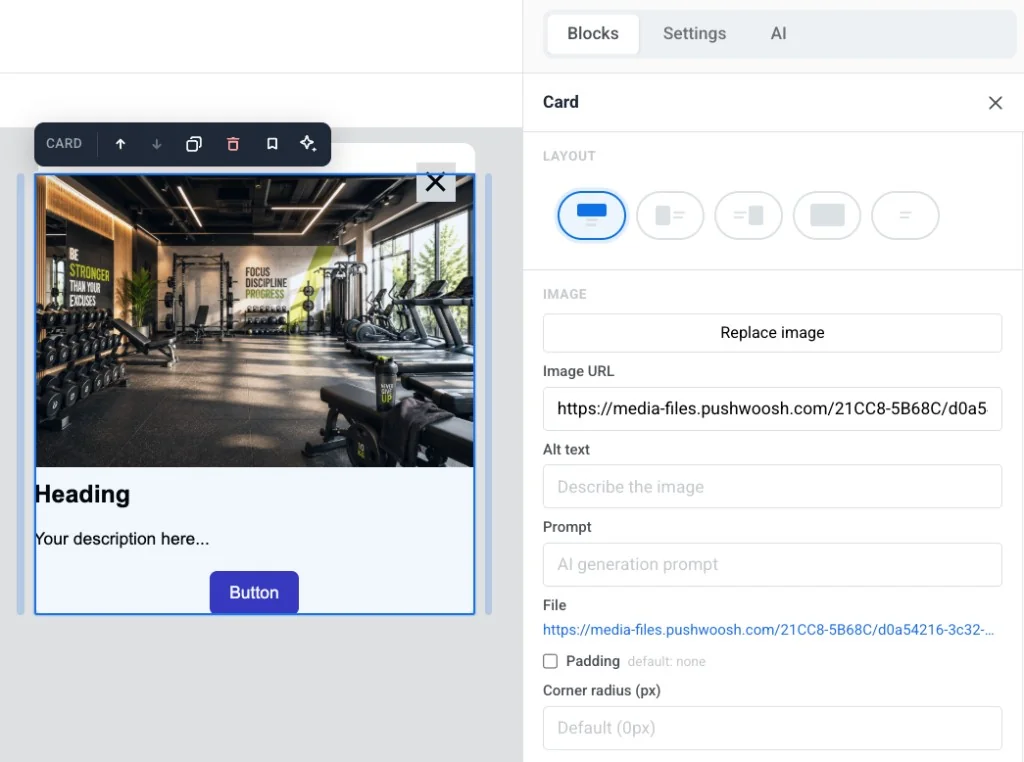 * **Layout:** 选择图片相对于内容的位置,或打开 **Wrap text around image**。
* **Image:** 添加或替换图片,设置替代文本,编辑 AI 生成的 **Prompt**,添加 **Padding**,并设置 **Corner radius (px)**。
* **Size & fit:** 设置图片的 **Width**、**Height**、**Crop**(原始或固定比例)和 **Fit**(覆盖或焦点)。确切的字段取决于您选择的 **Layout**。
* **Link:** 使整个卡片在被点击时打开一个 URL。
编辑卡片的标题、文本和按钮的方式与编辑独立的[标题、文本](#heading-and-text)和[按钮](#button)块相同。
### 按钮
**Button** 是应用内消息中可点击的行动号召。使用它来打开 URL、运行自定义 JavaScript 或关闭消息。
单击 **Button** 块以在画布上编辑其标签。使用工具栏更改字体大小、文本颜色、粗体、斜体、下划线和对齐方式。
要设置用户点击按钮时发生的操作:
1. 单击工具栏中的链接图标以打开 **Insert/Edit Link**。
2. 选择一个 **Action type**:**Open Website**、**URL or Deeplink** 或 **Custom Javascript**。
3. 填写该操作的字段(见下文)。
4. 单击 **Save**。
#### Open Website
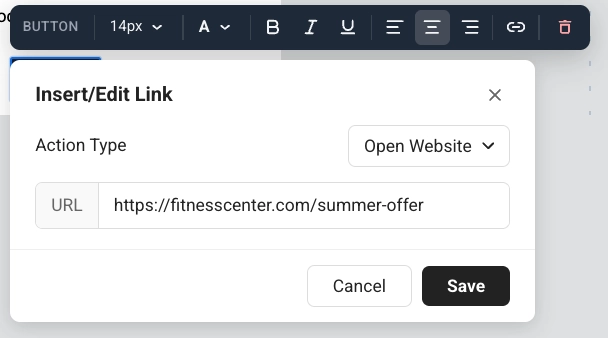
当用户点击按钮时,**Open Website** 会打开一个网页。在 **URL** 中输入地址,例如 `https://example.com`。
* **Layout:** 选择图片相对于内容的位置,或打开 **Wrap text around image**。
* **Image:** 添加或替换图片,设置替代文本,编辑 AI 生成的 **Prompt**,添加 **Padding**,并设置 **Corner radius (px)**。
* **Size & fit:** 设置图片的 **Width**、**Height**、**Crop**(原始或固定比例)和 **Fit**(覆盖或焦点)。确切的字段取决于您选择的 **Layout**。
* **Link:** 使整个卡片在被点击时打开一个 URL。
编辑卡片的标题、文本和按钮的方式与编辑独立的[标题、文本](#heading-and-text)和[按钮](#button)块相同。
### 按钮
**Button** 是应用内消息中可点击的行动号召。使用它来打开 URL、运行自定义 JavaScript 或关闭消息。
单击 **Button** 块以在画布上编辑其标签。使用工具栏更改字体大小、文本颜色、粗体、斜体、下划线和对齐方式。
要设置用户点击按钮时发生的操作:
1. 单击工具栏中的链接图标以打开 **Insert/Edit Link**。
2. 选择一个 **Action type**:**Open Website**、**URL or Deeplink** 或 **Custom Javascript**。
3. 填写该操作的字段(见下文)。
4. 单击 **Save**。
#### Open Website
当用户点击按钮时,**Open Website** 会打开一个网页。在 **URL** 中输入地址,例如 `https://example.com`。
 #### URL or Deeplink
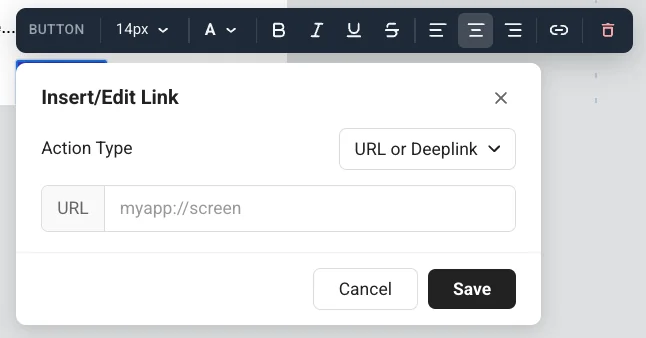
当用户点击按钮时,**URL or Deeplink** 会打开一个链接或深层链接。在 **URL** 中输入地址,例如一个应用屏幕:`myapp://screen`。
#### URL or Deeplink
当用户点击按钮时,**URL or Deeplink** 会打开一个链接或深层链接。在 **URL** 中输入地址,例如一个应用屏幕:`myapp://screen`。
 #### 运行自定义 JavaScript
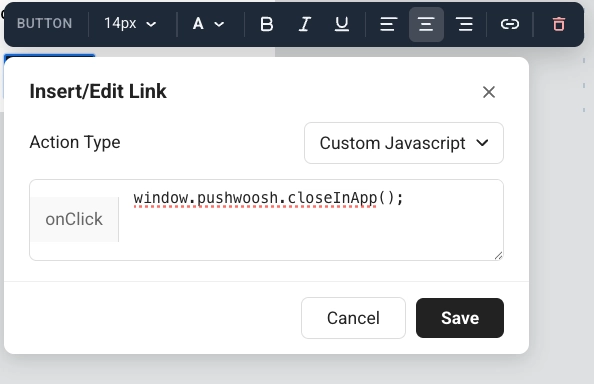
当用户点击按钮时,**Custom Javascript** 会运行代码。在 **onClick** 字段中输入代码。
当点击应该在 Pushwoosh 中执行某些操作,而不仅仅是打开一个链接时,请使用此功能。应用中的人仍然看到一个正常的按钮。他们看不到标签或事件。您决定屏幕上接下来会发生什么:保持消息打开,或在同一个 **onClick** 中关闭它。
#### 运行自定义 JavaScript
当用户点击按钮时,**Custom Javascript** 会运行代码。在 **onClick** 字段中输入代码。
当点击应该在 Pushwoosh 中执行某些操作,而不仅仅是打开一个链接时,请使用此功能。应用中的人仍然看到一个正常的按钮。他们看不到标签或事件。您决定屏幕上接下来会发生什么:保持消息打开,或在同一个 **onClick** 中关闭它。
 **onClick 中可用的方法**
* `pushwoosh.closeInApp()`:关闭应用内消息。省略它以在点击后保持消息打开。
* `pushwoosh.sendTags({...})`:将值保存为[设备标签](/zh/product/audience-data-and-segmentation/user-data-tags/tags/),供以后的营销活动使用。
* `pushwoosh.postEvent(...)`:发送一个[自定义事件](/zh/product/audience-data-and-segmentation/events/custom-events/),例如启动一个 Customer Journey。
* `pushwoosh.getTags(...)`:读取当前标签。在自定义 HTML 中用于更改消息显示的内容很有用。
* `pushwoosh.getCustomData()`:读取从打开此应用内消息的推送中传递的自定义数据。
##### 示例:让用户选择一个兴趣并保存以供以后的营销活动使用
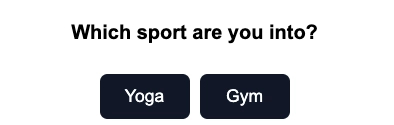
1. 在 **Text** 或 **Heading** 块中添加一个问题,例如:“你喜欢哪种运动?”
2. 为每个选项添加一个 **Button**,例如:**瑜伽**和**健身房**。
**onClick 中可用的方法**
* `pushwoosh.closeInApp()`:关闭应用内消息。省略它以在点击后保持消息打开。
* `pushwoosh.sendTags({...})`:将值保存为[设备标签](/zh/product/audience-data-and-segmentation/user-data-tags/tags/),供以后的营销活动使用。
* `pushwoosh.postEvent(...)`:发送一个[自定义事件](/zh/product/audience-data-and-segmentation/events/custom-events/),例如启动一个 Customer Journey。
* `pushwoosh.getTags(...)`:读取当前标签。在自定义 HTML 中用于更改消息显示的内容很有用。
* `pushwoosh.getCustomData()`:读取从打开此应用内消息的推送中传递的自定义数据。
##### 示例:让用户选择一个兴趣并保存以供以后的营销活动使用
1. 在 **Text** 或 **Heading** 块中添加一个问题,例如:“你喜欢哪种运动?”
2. 为每个选项添加一个 **Button**,例如:**瑜伽**和**健身房**。
 3. 为每个按钮将 **Action type** 设置为 **Custom Javascript**。
4. 对于**瑜伽**按钮,将此代码粘贴到 **onClick** 中:
```js
pushwoosh.sendTags({ interest: "yoga" });
pushwoosh.closeInApp();
```
5. 对于**健身房**按钮,将此代码粘贴到 **onClick** 中:
```js
pushwoosh.sendTags({ interest: "gym" });
pushwoosh.closeInApp();
```
当用户点击**瑜伽**时,Pushwoosh 会在其设备上写入 `interest` 标签并关闭应用内消息。然后,您可以在[分群](/zh/product/audience-data-and-segmentation/segmentation/)或 [Customer Journey](/zh/product/customer-journey/journey-elements/#in-app) 中定位该用户。
3. 为每个按钮将 **Action type** 设置为 **Custom Javascript**。
4. 对于**瑜伽**按钮,将此代码粘贴到 **onClick** 中:
```js
pushwoosh.sendTags({ interest: "yoga" });
pushwoosh.closeInApp();
```
5. 对于**健身房**按钮,将此代码粘贴到 **onClick** 中:
```js
pushwoosh.sendTags({ interest: "gym" });
pushwoosh.closeInApp();
```
当用户点击**瑜伽**时,Pushwoosh 会在其设备上写入 `interest` 标签并关闭应用内消息。然后,您可以在[分群](/zh/product/audience-data-and-segmentation/segmentation/)或 [Customer Journey](/zh/product/customer-journey/journey-elements/#in-app) 中定位该用户。
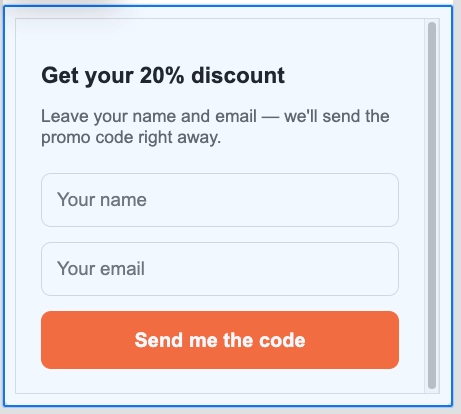
HTML 代码
```htmlGet your 20% discount
Leave your name and email. We'll send the promo code right away.
🎉 Done! Check your inbox for the promo code.
```
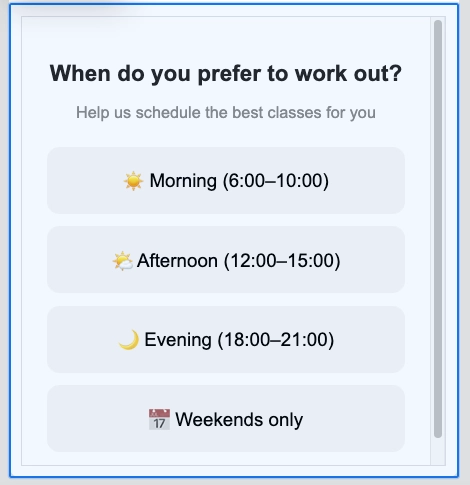
HTML 代码
```htmlWhen do you prefer to work out?
Help us schedule the best classes for you
Got it! We'll send you the best schedule 💪
```
 ### 倒计时器
**Timer** 块是应用内消息中的倒计时。使用它来发布限时优惠、闪购和活动提醒。
要进行设置:
1. 在 **Countdown** 中,设置 **End date** 和 **End time**,然后为计时器标签选择 **Timezone** 和 **Language**。
2. 打开 **Labels** 以在数字下方显示“天 / 小时 / 分钟 / 秒”的标题,或关闭以仅显示数字。
3. 在 **Appearance** 中,设置 **Background**、**Digits color**、**Labels color**,以及数字(默认 40px)和标签(默认 16px)的字体大小。
4. 根据需要调整 **Spacing**(内边距)。
### 倒计时器
**Timer** 块是应用内消息中的倒计时。使用它来发布限时优惠、闪购和活动提醒。
要进行设置:
1. 在 **Countdown** 中,设置 **End date** 和 **End time**,然后为计时器标签选择 **Timezone** 和 **Language**。
2. 打开 **Labels** 以在数字下方显示“天 / 小时 / 分钟 / 秒”的标题,或关闭以仅显示数字。
3. 在 **Appearance** 中,设置 **Background**、**Digits color**、**Labels color**,以及数字(默认 40px)和标签(默认 16px)的字体大小。
4. 根据需要调整 **Spacing**(内边距)。
 ### 列
**Columns** 将画布分割成并排的部分,以便您可以在一行中将内容并排放置。
将以下块之一拖到画布上:
* **2 columns:** 两个等宽列
* **3 columns:** 三个等宽列
* **4 columns:** 四个等宽列
* **33 / 67:** 左列约 33% 宽,右列约 67%
* **67 / 33:** 左列约 67% 宽,右列约 33%
然后向每列添加内容。要更改模板中所有列的间距,请打开 **Settings** → **Columns defaults** 并调整外边距、列内边距和列之间的间距。
### 产品
**Products** 块显示来自一个共享模板的产品卡片网格。每个卡片可以包括图片、标题、描述、价格和一个购买按钮。该模板为每个产品重复。
### 列
**Columns** 将画布分割成并排的部分,以便您可以在一行中将内容并排放置。
将以下块之一拖到画布上:
* **2 columns:** 两个等宽列
* **3 columns:** 三个等宽列
* **4 columns:** 四个等宽列
* **33 / 67:** 左列约 33% 宽,右列约 67%
* **67 / 33:** 左列约 67% 宽,右列约 33%
然后向每列添加内容。要更改模板中所有列的间距,请打开 **Settings** → **Columns defaults** 并调整外边距、列内边距和列之间的间距。
### 产品
**Products** 块显示来自一个共享模板的产品卡片网格。每个卡片可以包括图片、标题、描述、价格和一个购买按钮。该模板为每个产品重复。
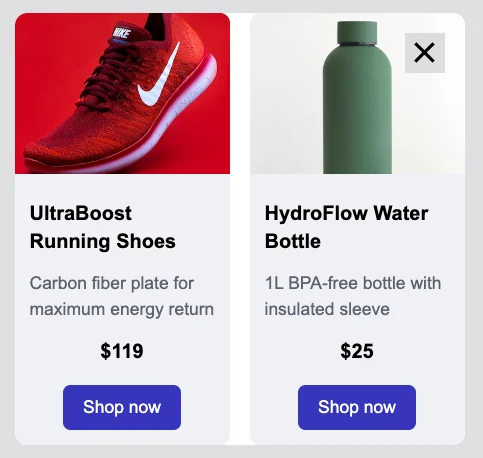 在设置面板的 **Source** 下,选择产品的来源:
* **Manual:** 手动输入产品,或单击 **Pick from catalog…** 从您的[产品目录](/zh/product/content/product-catalog/)中按 ID 选择特定项目。您可以在同一个块中混合使用这两种方式。
* **Catalog rule:** 根据类别和排序顺序自动拉取产品,在消息显示时从目录中实时解析。
* **Cart:** 显示每个用户当前废弃购物车中的项目。[如何设置废弃购物车营销活动](/zh/product/how-to-guides/lifecycle-marketing-campaigns/how-to-set-up-an-abandoned-cart-campaign/)
选择来源后,这些设置控制网格及其卡片的外观:
* **Number of products**(或 **Max products shown** for **Cart**):显示多少张卡片。
* **Columns:** 每行 1、2 或 3 张卡片。
* **Gap:** 卡片之间的空间。
* **Description limit:** 描述文本被修剪到的字符限制,以便卡片保持一致的大小。
* **Card template:** 选择一个布局,然后为每个卡片设置 **Card background**、**Card corner radius** 和 **Content padding**。
## 保存和重用块
保存一个块以便在此或其他应用内模板中重用,而不是每次都重新构建它。
1. 在画布上选择该块。
2. 单击块工具栏中的书签图标(**Save block for reuse**)并给它一个名称。
在设置面板的 **Source** 下,选择产品的来源:
* **Manual:** 手动输入产品,或单击 **Pick from catalog…** 从您的[产品目录](/zh/product/content/product-catalog/)中按 ID 选择特定项目。您可以在同一个块中混合使用这两种方式。
* **Catalog rule:** 根据类别和排序顺序自动拉取产品,在消息显示时从目录中实时解析。
* **Cart:** 显示每个用户当前废弃购物车中的项目。[如何设置废弃购物车营销活动](/zh/product/how-to-guides/lifecycle-marketing-campaigns/how-to-set-up-an-abandoned-cart-campaign/)
选择来源后,这些设置控制网格及其卡片的外观:
* **Number of products**(或 **Max products shown** for **Cart**):显示多少张卡片。
* **Columns:** 每行 1、2 或 3 张卡片。
* **Gap:** 卡片之间的空间。
* **Description limit:** 描述文本被修剪到的字符限制,以便卡片保持一致的大小。
* **Card template:** 选择一个布局,然后为每个卡片设置 **Card background**、**Card corner radius** 和 **Content padding**。
## 保存和重用块
保存一个块以便在此或其他应用内模板中重用,而不是每次都重新构建它。
1. 在画布上选择该块。
2. 单击块工具栏中的书签图标(**Save block for reuse**)并给它一个名称。
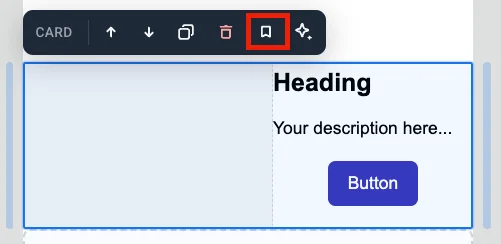 已保存的块出现在 **Blocks** 选项卡底部的 **Saved blocks** 下。
* 将已保存的块拖到画布上,或单击它以将其添加到模板的末尾。
* 单击已保存块磁贴上的 **×** 以删除它。
### 保持副本同步
当您保存一个块时,打开 **Keep copies in sync** 以将每个插入的副本链接到同一个源。一次编辑源,更改将应用于使用该块的所有地方。
同步的副本在画布上被锁定。您不能直接编辑它。选择该副本以打开其设置:
* **Edit synced block:** 解锁此副本以便您可以更改它。顶部会出现一个横幅。单击 **Apply to all** 将您的更改保存到源和所有其他副本,或单击 **Cancel** 放弃它们。您一次只能解锁一个同步的块。
* **Update from source:** 用源的最新版本替换此副本。
* **Detach from source:** 将此副本与源取消链接,以便您可以单独编辑它。
已保存的块出现在 **Blocks** 选项卡底部的 **Saved blocks** 下。
* 将已保存的块拖到画布上,或单击它以将其添加到模板的末尾。
* 单击已保存块磁贴上的 **×** 以删除它。
### 保持副本同步
当您保存一个块时,打开 **Keep copies in sync** 以将每个插入的副本链接到同一个源。一次编辑源,更改将应用于使用该块的所有地方。
同步的副本在画布上被锁定。您不能直接编辑它。选择该副本以打开其设置:
* **Edit synced block:** 解锁此副本以便您可以更改它。顶部会出现一个横幅。单击 **Apply to all** 将您的更改保存到源和所有其他副本,或单击 **Cancel** 放弃它们。您一次只能解锁一个同步的块。
* **Update from source:** 用源的最新版本替换此副本。
* **Detach from source:** 将此副本与源取消链接,以便您可以单独编辑它。