# 使用 Swift Package Manager 设置 InboxKit
*自 iOS SDK [7.0.40](https://github.com/Pushwoosh/pushwoosh-ios-sdk/releases/tag/7.0.40) 起可用。*
InboxKit 作为 `Pushwoosh-XCFramework` Swift 包中的一个独立库产品提供。您需要先集成主 SDK;如果从头开始,请先遵循[基本集成指南](/zh/developer/pushwoosh-sdk/ios-sdk/setting-up-pushwoosh-ios-sdk-7-0/basic-integration-guide/)。
## 添加 InboxKit 包产品
1\. 在 Xcode 中打开您的项目,并导航到项目设置 → **Package Dependencies**,然后按 **+** 按钮。
2\. 输入以下包 URL:
```bash
https://github.com/Pushwoosh/Pushwoosh-XCFramework
```
3\. 将 **Dependency Rule** 设置为 **Up to Next Major Version**,并使用最新的稳定版本,然后点击 **Add Package**。
4\. 在包选择屏幕上,至少选择以下产品并将其添加到您的主应用目标中:
- **PushwooshFramework**(必需)
- **PushwooshCore**(必需)
- **PushwooshBridge**(必需)
- **PushwooshInboxKit**(新模块)
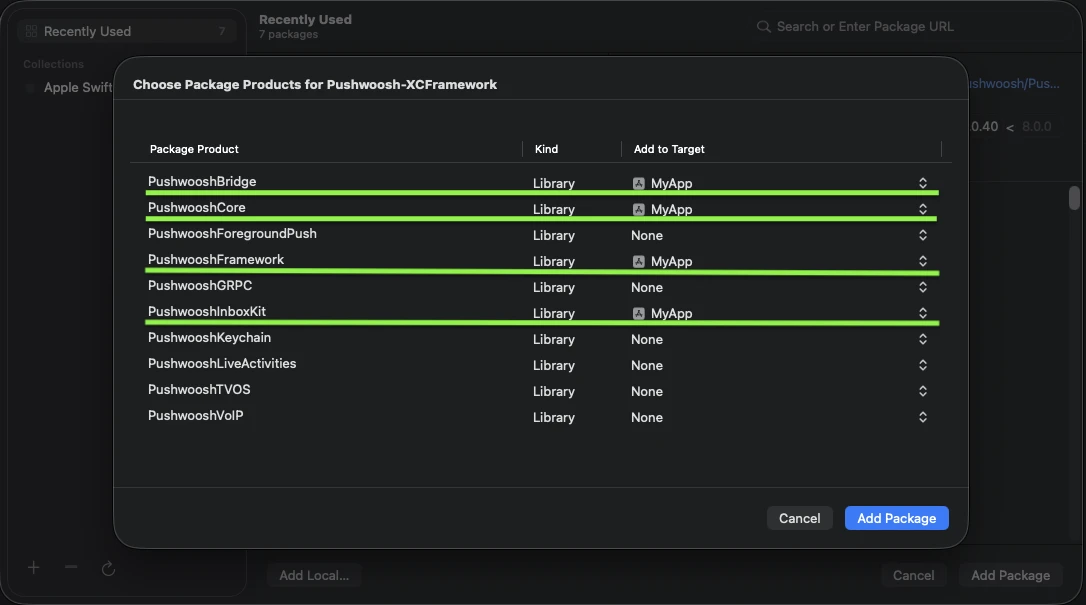
将四个高亮显示的产品添加到您的主应用目标。
5\. 打开您的主应用目标,在 **Frameworks, Libraries, and Embedded Content** 下,确认 `PushwooshInboxKit.xcframework` 已列出并嵌入。
就这样 — InboxKit 现在已与主 SDK 一起链接。
## 显示收件箱
将收件箱控制器添加到任何导航流中。默认配置足以让您获得一个包含三种标准单元格类型的工作收件箱:
```swift
import PushwooshInboxKit
let inboxVC = PushwooshInboxKitViewController()
navigationController?.pushViewController(inboxVC, animated: true)
```
```objective-c
@import PushwooshInboxKit;
PushwooshInboxKitViewController *inboxVC = [PushwooshInboxKitViewController new];
[self.navigationController pushViewController:inboxVC animated:YES];
```
## 自定义收件箱
在 Swift 中,通过 `PushwooshInboxKitAttributes` 值类型配置控制器。在 Objective-C 中,使用控制器上对 `@objc` 友好的设置器 — `PushwooshInboxKitAttributes` 是一个 Swift 结构体,并且没有桥接。
```swift
var attributes = PushwooshInboxKitAttributes()
attributes.pullToRefreshEnabled = true
attributes.swipeToDeleteEnabled = true
attributes.pinningEnabled = true
attributes.style.unreadBadgeColor = .systemBlue
attributes.style.titleFont = .systemFont(ofSize: 17, weight: .semibold)
let inboxVC = PushwooshInboxKitViewController(attributes: attributes)
```
```objective-c
PushwooshInboxKitViewController *inboxVC = [PushwooshInboxKitViewController new];
[inboxVC setBackgroundColor:[UIColor systemBackgroundColor]];
[inboxVC setEmptyMessage:@"You have no messages yet"];
```
`Style` 结构体公开了默认单元格使用的所有颜色、字体、圆角半径和日期格式化程序。默认情况下,每个值都是 Apple 的语义颜色,因此收件箱会自动响应系统的深色模式。
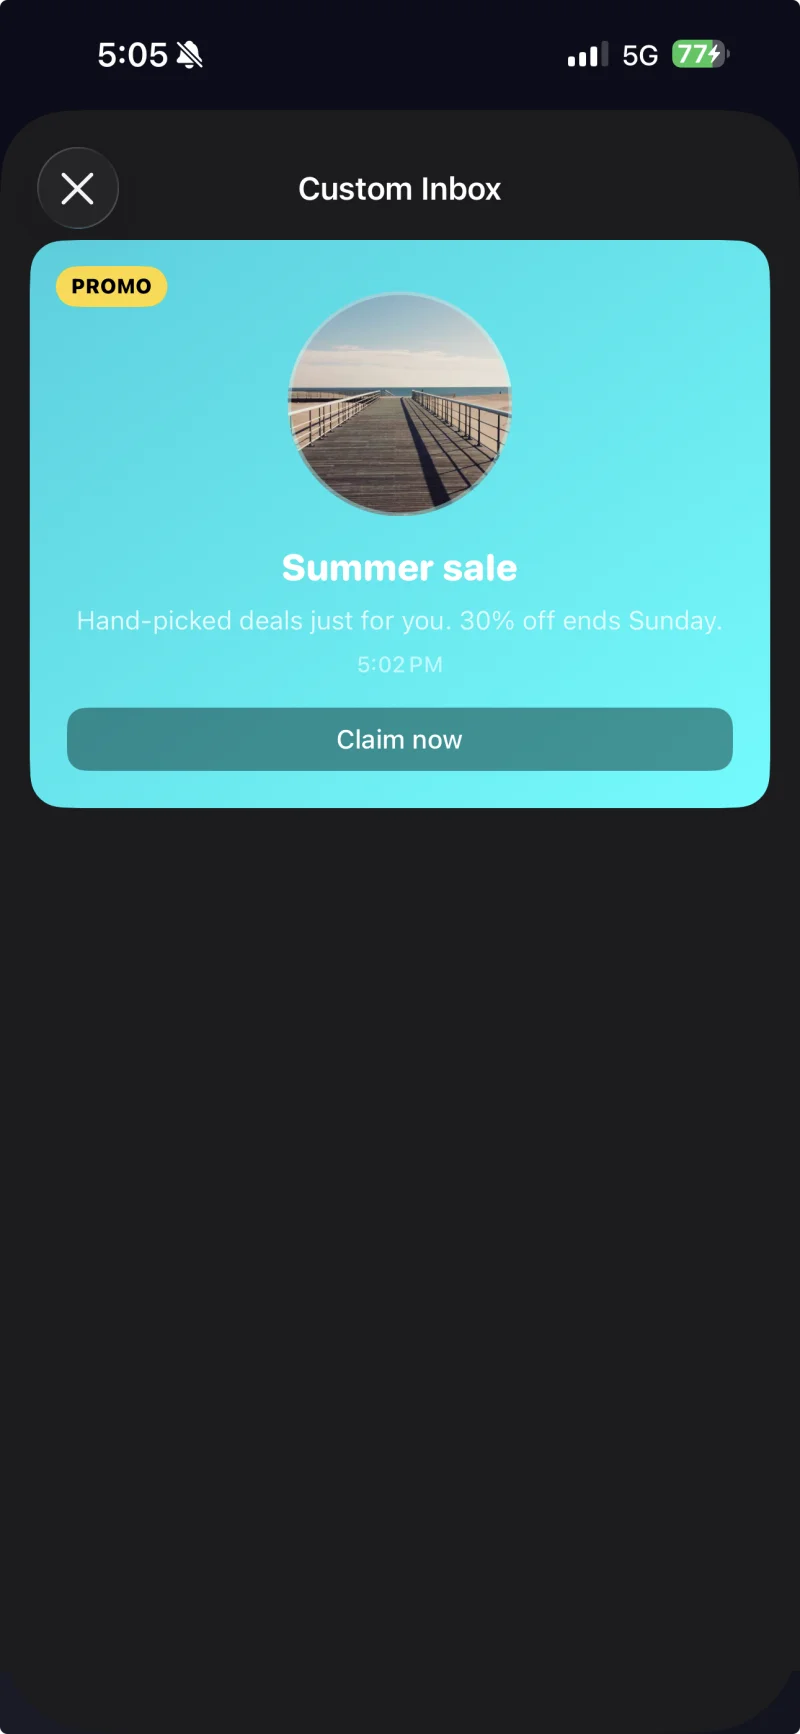
通过 `PushwooshInboxKitAttributes.Style` 应用了自定义主题的带标题单元格。
## 处理点击和刷新
遵循 `PushwooshInboxKitDelegate` 协议以响应用户操作和刷新事件。每个方法都有一个默认实现,因此您只需覆盖所需的方法:
```swift
final class InboxCoordinator: NSObject, PushwooshInboxKitDelegate {
func inboxKit(_ vc: PushwooshInboxKitViewController,
didSelect message: PWInboxMessageProtocol) -> Bool {
// 返回 true 以让 SDK 打开消息 URL 或富媒体。
// 如果您完全处理了点击(例如,路由到自定义屏幕),则返回 false。
return true
}
func inboxKit(_ vc: PushwooshInboxKitViewController,
didRefreshWith messages: [PWInboxMessageProtocol],
error: Error?) {
// 如果需要,可在此处显示您自己的空状态或错误状态。
}
}
inboxVC.delegate = inboxCoordinator
```
## 后续步骤