# 自定义 iOS SDK
## 集成
* [深层链接](#deep-linking)
* [通用链接](#universal-links)
* [应用内购买跟踪](#in-app-purchase-tracking)
* [地理区域推送通知](#geozones-push-notifications)
* [创建富媒体队列](#creating-a-rich-media-queue)
* [通过压力触控自动播放富通知中发送的视频](#autoplay-a-video-sent-in-a-rich-notification-with-force-touch)
* [自定义推送声音](#custom-push-sound)
* [iOS 临时推送](#ios-provisional-push)
### 深层链接
在您的 **Info.plist** 文件中,添加 `URL types` 数组,其中包含 `URL Identifier` 和 `URL Scheme`。\
在下面的示例中,`URL Scheme` 是 _com.pushwoosh_,`URL Identifier` 是 _promotion_。
 在您的 App Delegate 文件中(对于 iOS 12 及更低版本通常是 AppDelegate.m,对于 iOS 13 及更高版本是 SceneDelegate.m),按照下面的示例添加相应的 openURL 委托函数。该示例检查正确的页面,从 URL 中解析 “id” 值,并打开 PromoPageViewController 作为响应。
```AppDelegate.swift```
```swift
func application(_ app: UIApplication, open url: URL, options: [UIApplication.OpenURLOptionsKey : Any] = [:]) -> Bool {
let components = URLComponents(url: url, resolvingAgainstBaseURL: false)
let page = components?.host
var promotionId: String?
if page == "promotion" {
return
}
let items = components?.queryItems ?? []
for item in items {
if item.name == "id" {
promotionId = item.value
}
}
//show PromoPageViewController
}
```
```objective-c
- (BOOL)application:(UIApplication *)application openURL:(NSURL *)url sourceApplication:(NSString *)sourceApplication annotation:(id)annotation {
NSURLComponents *components = [NSURLComponents componentsWithURL:url resolvingAgainstBaseURL:NO];
NSString *page = components.host;
NSString *promotionId = nil;
//return if this is not a promotion deep link
if(![page isEqualToString:@"promotion"])
return NO;
for(NSURLQueryItem *item in components.queryItems)
{
if([item.name isEqualToString:@"id"])
promotionId = item.value;
}
PromoPageViewController *vc = [[PromoPageViewController alloc] init];
vc.promotionId = promotionId
[self presentViewController:vc animated:YES completion:nil];
}
```
```SceneDelegate.swift```
```swift
func scene(_ scene: UIScene, openURLContexts URLContexts: Set) {
guard let urlContext = URLContexts.first else { return }
let components = URLComponents(url: urlContext.url, resolvingAgainstBaseURL: false)
let page = components?.host
var promotionId: String?
guard page == "promotion" else {
return
}
let items = components?.queryItems ?? []
for item in items {
if item.name == "id" {
promotionId = item.value
}
}
//show PromoPageViewController
}
```
```objective-c
- (void)scene:(UIWindowScene *)scene openURLContexts:(NSSet *)URLContexts {
UIOpenURLContext *urlContext = URLContexts.anyObject;
if (!urlContext) {
return;
}
NSURLComponents *components = [NSURLComponents componentsWithURL:urlContext.URL resolvingAgainstBaseURL:NO];
NSString *page = components.host;
NSString *promotionId = nil;
if (![page isEqualToString:@"promotion"]) {
return;
}
for (NSURLQueryItem *item in components.queryItems) {
if ([item.name isEqualToString:@"id"]) {
promotionId = item.value;
}
}
//show PromoPageViewController
}
```
### 通用链接
通用链接允许用户在点击您网站的链接时直接打开您的应用程序。与自定义 URL schemes 不同,通用链接使用标准的 `https://` URL,并提供更无缝的用户体验。
#### 工作原理
当推送通知包含 `https://` URL(在 "url" 或 "l" 参数中)时,SDK 将:
1. 使用该 URL 创建一个 `NSUserActivity`
2. 调用您应用的通用链接处理程序 (`scene:continueUserActivity:` 或 `application:continueUserActivity:restorationHandler:`)
3. 如果您的应用不处理该 URL,它将作为备用方案在 Safari 中打开
#### 设置
1. **在 Xcode 中配置关联域**
将关联域功能添加到您的应用中,并添加您的域名:
```
applinks:yourdomain.com
```
2. **托管 Apple App Site Association 文件**
在您的 Web 服务器上的 `https://yourdomain.com/.well-known/apple-app-site-association` 路径下创建一个 `apple-app-site-association` 文件:
```json
{
"applinks": {
"apps": [],
"details": [
{
"appID": "TEAM_ID.com.your.bundleid",
"paths": ["/path/*", "/promotion/*"]
}
]
}
}
```
将 `TEAM_ID` 替换为您的 Apple Developer Team ID,将 `com.your.bundleid` 替换为您应用的 bundle identifier。
3. **实现通用链接处理程序**
```SceneDelegate.swift``` (iOS 13+)
```swift
func scene(_ scene: UIScene, continue userActivity: NSUserActivity) {
guard userActivity.activityType == NSUserActivityTypeBrowsingWeb,
let url = userActivity.webpageURL else {
return
}
// Handle the Universal Link URL
let components = URLComponents(url: url, resolvingAgainstBaseURL: false)
let path = components?.path
if path?.starts(with: "/promotion") == true {
// Navigate to promotion screen
let promotionId = components?.queryItems?.first(where: { $0.name == "id" })?.value
// Show promotion with promotionId
}
}
```
```objective-c
- (void)scene:(UIScene *)scene continueUserActivity:(NSUserActivity *)userActivity {
if (![userActivity.activityType isEqualToString:NSUserActivityTypeBrowsingWeb]) {
return;
}
NSURL *url = userActivity.webpageURL;
if (!url) {
return;
}
// Handle the Universal Link URL
NSURLComponents *components = [NSURLComponents componentsWithURL:url resolvingAgainstBaseURL:NO];
NSString *path = components.path;
if ([path hasPrefix:@"/promotion"]) {
// Navigate to promotion screen
NSString *promotionId = nil;
for (NSURLQueryItem *item in components.queryItems) {
if ([item.name isEqualToString:@"id"]) {
promotionId = item.value;
break;
}
}
// Show promotion with promotionId
}
}
```
```AppDelegate.swift``` (iOS 12 及更早版本,或作为备用)
```swift
func application(_ application: UIApplication,
continue userActivity: NSUserActivity,
restorationHandler: @escaping ([UIUserActivityRestoring]?) -> Void) -> Bool {
guard userActivity.activityType == NSUserActivityTypeBrowsingWeb,
let url = userActivity.webpageURL else {
return false
}
// Handle the Universal Link URL
let components = URLComponents(url: url, resolvingAgainstBaseURL: false)
let path = components?.path
if path?.starts(with: "/promotion") == true {
// Navigate to promotion screen
return true
}
return false
}
```
```objective-c
- (BOOL)application:(UIApplication *)application
continueUserActivity:(NSUserActivity *)userActivity
restorationHandler:(void (^)(NSArray> *restorableObjects))restorationHandler {
if (![userActivity.activityType isEqualToString:NSUserActivityTypeBrowsingWeb]) {
return NO;
}
NSURL *url = userActivity.webpageURL;
if (!url) {
return NO;
}
// Handle the Universal Link URL
NSURLComponents *components = [NSURLComponents componentsWithURL:url resolvingAgainstBaseURL:NO];
NSString *path = components.path;
if ([path hasPrefix:@"/promotion"]) {
// Navigate to promotion screen
return YES;
}
return NO;
}
```
#### 发送带有通用链接的推送
创建推送通知时,在**操作**字段中使用您的网站 URL:
```
https://yourdomain.com/promotion?id=123
```
SDK 将自动将此 URL 路由到您的通用链接处理程序,让您能够将用户导航到应用中的相应屏幕。
### 应用内购买跟踪
默认情况下,应用内购买跟踪是禁用的。如果您想在配置[客户旅程](/zh/product/customer-journey/pushwoosh-journey-overview)时跟踪应用内购买,请在 _info.plist_ 文件中将 _Pushwoosh\_PURCHASE\_TRACKING\_ENABLED_ 标志设置为 _true_。您可以在[表格](/zh/developer/pushwoosh-sdk/ios-sdk/setting-up-pushwoosh-ios-sdk/advanced-integration-guide/#complete-list-of-infoplist-properties)中找到可用标志的列表。
如果您想手动跟踪应用内购买,可以使用以下代码。
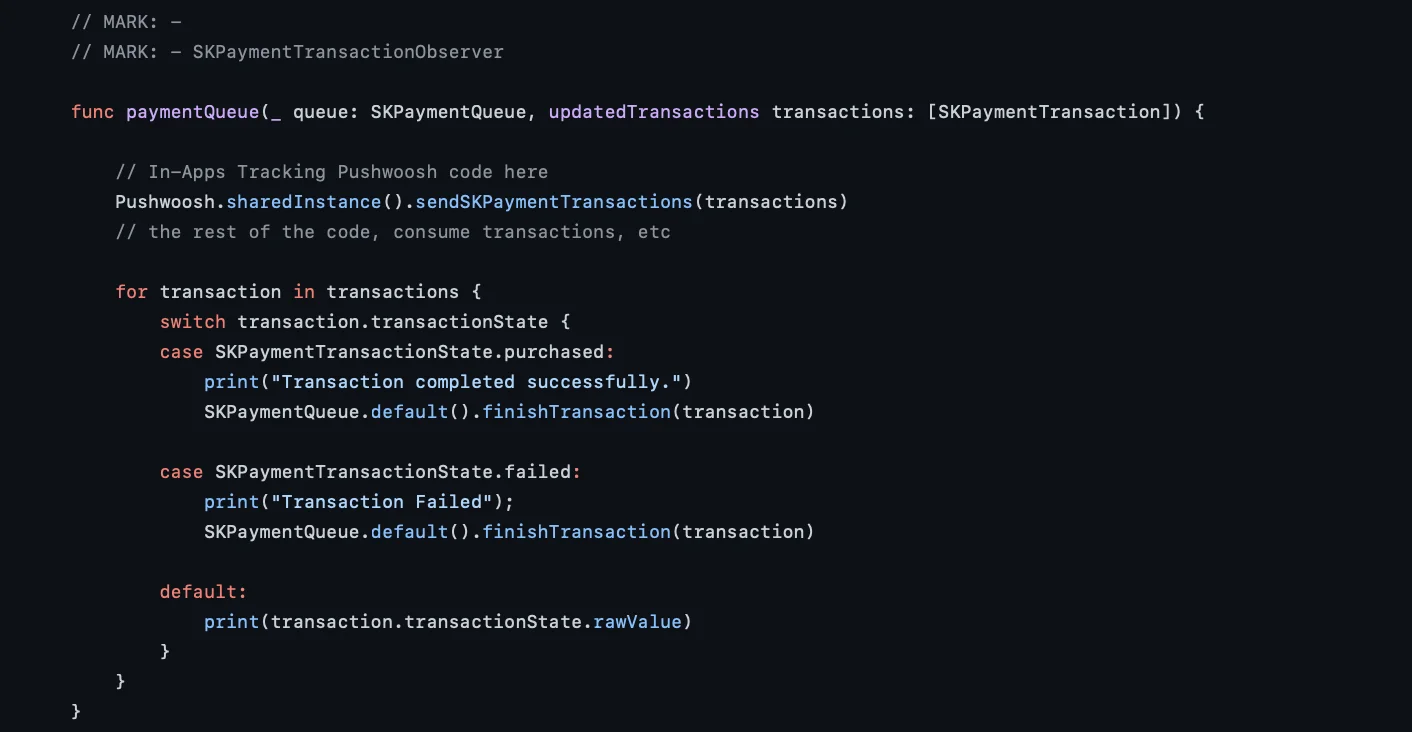
在 `paymentQueue:updatedTransactions: delegate` 方法中调用 `PushManager` 的 `sendSKPaymentTransactions` 方法
```swift
func paymentQueue(_ queue: SKPaymentQueue, updatedTransactions transactions: [SKPaymentTransaction]) {
// In-Apps Tracking Pushwoosh code here
Pushwoosh.sharedInstance().sendSKPaymentTransactions(transactions)
// the rest of the code, consume transactions, etc
}
```
```objective-c
- (void)paymentQueue:(SKPaymentQueue *)queue updatedTransactions:(NSArray *)transactions {
[[PushNotificationManager pushManager] sendSKPaymentTransactions:transactions];
//the rest of the code, consume transactions, etc
}
```
在您的 App Delegate 文件中(对于 iOS 12 及更低版本通常是 AppDelegate.m,对于 iOS 13 及更高版本是 SceneDelegate.m),按照下面的示例添加相应的 openURL 委托函数。该示例检查正确的页面,从 URL 中解析 “id” 值,并打开 PromoPageViewController 作为响应。
```AppDelegate.swift```
```swift
func application(_ app: UIApplication, open url: URL, options: [UIApplication.OpenURLOptionsKey : Any] = [:]) -> Bool {
let components = URLComponents(url: url, resolvingAgainstBaseURL: false)
let page = components?.host
var promotionId: String?
if page == "promotion" {
return
}
let items = components?.queryItems ?? []
for item in items {
if item.name == "id" {
promotionId = item.value
}
}
//show PromoPageViewController
}
```
```objective-c
- (BOOL)application:(UIApplication *)application openURL:(NSURL *)url sourceApplication:(NSString *)sourceApplication annotation:(id)annotation {
NSURLComponents *components = [NSURLComponents componentsWithURL:url resolvingAgainstBaseURL:NO];
NSString *page = components.host;
NSString *promotionId = nil;
//return if this is not a promotion deep link
if(![page isEqualToString:@"promotion"])
return NO;
for(NSURLQueryItem *item in components.queryItems)
{
if([item.name isEqualToString:@"id"])
promotionId = item.value;
}
PromoPageViewController *vc = [[PromoPageViewController alloc] init];
vc.promotionId = promotionId
[self presentViewController:vc animated:YES completion:nil];
}
```
```SceneDelegate.swift```
```swift
func scene(_ scene: UIScene, openURLContexts URLContexts: Set) {
guard let urlContext = URLContexts.first else { return }
let components = URLComponents(url: urlContext.url, resolvingAgainstBaseURL: false)
let page = components?.host
var promotionId: String?
guard page == "promotion" else {
return
}
let items = components?.queryItems ?? []
for item in items {
if item.name == "id" {
promotionId = item.value
}
}
//show PromoPageViewController
}
```
```objective-c
- (void)scene:(UIWindowScene *)scene openURLContexts:(NSSet *)URLContexts {
UIOpenURLContext *urlContext = URLContexts.anyObject;
if (!urlContext) {
return;
}
NSURLComponents *components = [NSURLComponents componentsWithURL:urlContext.URL resolvingAgainstBaseURL:NO];
NSString *page = components.host;
NSString *promotionId = nil;
if (![page isEqualToString:@"promotion"]) {
return;
}
for (NSURLQueryItem *item in components.queryItems) {
if ([item.name isEqualToString:@"id"]) {
promotionId = item.value;
}
}
//show PromoPageViewController
}
```
### 通用链接
通用链接允许用户在点击您网站的链接时直接打开您的应用程序。与自定义 URL schemes 不同,通用链接使用标准的 `https://` URL,并提供更无缝的用户体验。
#### 工作原理
当推送通知包含 `https://` URL(在 "url" 或 "l" 参数中)时,SDK 将:
1. 使用该 URL 创建一个 `NSUserActivity`
2. 调用您应用的通用链接处理程序 (`scene:continueUserActivity:` 或 `application:continueUserActivity:restorationHandler:`)
3. 如果您的应用不处理该 URL,它将作为备用方案在 Safari 中打开
#### 设置
1. **在 Xcode 中配置关联域**
将关联域功能添加到您的应用中,并添加您的域名:
```
applinks:yourdomain.com
```
2. **托管 Apple App Site Association 文件**
在您的 Web 服务器上的 `https://yourdomain.com/.well-known/apple-app-site-association` 路径下创建一个 `apple-app-site-association` 文件:
```json
{
"applinks": {
"apps": [],
"details": [
{
"appID": "TEAM_ID.com.your.bundleid",
"paths": ["/path/*", "/promotion/*"]
}
]
}
}
```
将 `TEAM_ID` 替换为您的 Apple Developer Team ID,将 `com.your.bundleid` 替换为您应用的 bundle identifier。
3. **实现通用链接处理程序**
```SceneDelegate.swift``` (iOS 13+)
```swift
func scene(_ scene: UIScene, continue userActivity: NSUserActivity) {
guard userActivity.activityType == NSUserActivityTypeBrowsingWeb,
let url = userActivity.webpageURL else {
return
}
// Handle the Universal Link URL
let components = URLComponents(url: url, resolvingAgainstBaseURL: false)
let path = components?.path
if path?.starts(with: "/promotion") == true {
// Navigate to promotion screen
let promotionId = components?.queryItems?.first(where: { $0.name == "id" })?.value
// Show promotion with promotionId
}
}
```
```objective-c
- (void)scene:(UIScene *)scene continueUserActivity:(NSUserActivity *)userActivity {
if (![userActivity.activityType isEqualToString:NSUserActivityTypeBrowsingWeb]) {
return;
}
NSURL *url = userActivity.webpageURL;
if (!url) {
return;
}
// Handle the Universal Link URL
NSURLComponents *components = [NSURLComponents componentsWithURL:url resolvingAgainstBaseURL:NO];
NSString *path = components.path;
if ([path hasPrefix:@"/promotion"]) {
// Navigate to promotion screen
NSString *promotionId = nil;
for (NSURLQueryItem *item in components.queryItems) {
if ([item.name isEqualToString:@"id"]) {
promotionId = item.value;
break;
}
}
// Show promotion with promotionId
}
}
```
```AppDelegate.swift``` (iOS 12 及更早版本,或作为备用)
```swift
func application(_ application: UIApplication,
continue userActivity: NSUserActivity,
restorationHandler: @escaping ([UIUserActivityRestoring]?) -> Void) -> Bool {
guard userActivity.activityType == NSUserActivityTypeBrowsingWeb,
let url = userActivity.webpageURL else {
return false
}
// Handle the Universal Link URL
let components = URLComponents(url: url, resolvingAgainstBaseURL: false)
let path = components?.path
if path?.starts(with: "/promotion") == true {
// Navigate to promotion screen
return true
}
return false
}
```
```objective-c
- (BOOL)application:(UIApplication *)application
continueUserActivity:(NSUserActivity *)userActivity
restorationHandler:(void (^)(NSArray> *restorableObjects))restorationHandler {
if (![userActivity.activityType isEqualToString:NSUserActivityTypeBrowsingWeb]) {
return NO;
}
NSURL *url = userActivity.webpageURL;
if (!url) {
return NO;
}
// Handle the Universal Link URL
NSURLComponents *components = [NSURLComponents componentsWithURL:url resolvingAgainstBaseURL:NO];
NSString *path = components.path;
if ([path hasPrefix:@"/promotion"]) {
// Navigate to promotion screen
return YES;
}
return NO;
}
```
#### 发送带有通用链接的推送
创建推送通知时,在**操作**字段中使用您的网站 URL:
```
https://yourdomain.com/promotion?id=123
```
SDK 将自动将此 URL 路由到您的通用链接处理程序,让您能够将用户导航到应用中的相应屏幕。
### 应用内购买跟踪
默认情况下,应用内购买跟踪是禁用的。如果您想在配置[客户旅程](/zh/product/customer-journey/pushwoosh-journey-overview)时跟踪应用内购买,请在 _info.plist_ 文件中将 _Pushwoosh\_PURCHASE\_TRACKING\_ENABLED_ 标志设置为 _true_。您可以在[表格](/zh/developer/pushwoosh-sdk/ios-sdk/setting-up-pushwoosh-ios-sdk/advanced-integration-guide/#complete-list-of-infoplist-properties)中找到可用标志的列表。
如果您想手动跟踪应用内购买,可以使用以下代码。
在 `paymentQueue:updatedTransactions: delegate` 方法中调用 `PushManager` 的 `sendSKPaymentTransactions` 方法
```swift
func paymentQueue(_ queue: SKPaymentQueue, updatedTransactions transactions: [SKPaymentTransaction]) {
// In-Apps Tracking Pushwoosh code here
Pushwoosh.sharedInstance().sendSKPaymentTransactions(transactions)
// the rest of the code, consume transactions, etc
}
```
```objective-c
- (void)paymentQueue:(SKPaymentQueue *)queue updatedTransactions:(NSArray *)transactions {
[[PushNotificationManager pushManager] sendSKPaymentTransactions:transactions];
//the rest of the code, consume transactions, etc
}
```
 ### 地理区域推送通知
地理区域推送通知被封装在一个单独的框架 **PushwooshGeozones** 中。
1. 将 PushwooshGeozones.framework 添加到您的项目中
要使用依赖管理器将 PushwooshGeozones.framework 添加到您的项目中,请将以下几行代码放入您的 `podfile` 或 `cartfile` 中:
```plaintext
pod 'PushwooshXCFramework/Geozones'
```
```plaintext
github "Pushwoosh/pushwoosh-ios-sdk"
```
如果您想使用 **PushwooshGeozones.xcframework**,请输入以下 Package URL:
[PushwooshGeozones-XCFramework](https://github.com/Pushwoosh/PushwooshGeozones-XCFramework)
或者,您可以简单地将框架拖放到项目**构建阶段**的**链接二进制文件与库**中。
2. 将以下键添加到您的 Info.plist 中:
* **NSLocationWhenInUseUsageDescription** – *(必需)* 用于应用仅在前台运行时跟踪地理区域。
* **NSLocationAlwaysAndWhenInUseUsageDescription** – *(必需)* 用于应用**在前台和后台**都跟踪地理区域,并显示权限请求对话框弹出窗口。
* **NSLocationAlwaysUsageDescription** – *(可选)* 用于应用**在任何时候**都跟踪地理区域;如果您的应用目标是 iOS 10 及更早版本,则应使用此项。
```xml
NSLocationAlwaysAndWhenInUseUsageDescription
for app to track Geozones in both conditions and to show a permission request dialog
NSLocationWhenInUseUsageDescription
for app to track Geozones only while running in the foreground
```
![]()
3. 导入框架
```swift
import PushwooshGeozones
```
```objc
#import
```
4. 开始地理区域跟踪
```swift
PWGeozonesManager.shared()?.startLocationTracking()
```
[GitHub 参考](https://github.com/Pushwoosh/pushwoosh-quickstart-ios/blob/main/customizing/customizing/Geozones%20Push%20Notification/GeozonesViewController.swift)
```objc
[[PWGeozonesManager sharedManager] startLocationTracking];
```
[GitHub 参考](https://github.com/Pushwoosh/pushwoosh-quickstart-ios/blob/main/customizing/customizingObjC/customizingObjC/Geozones%20Push%20Notification/PWGeozonesViewController.m)
##### 示例
```swift
override func viewDidLoad() {
super.viewDidLoad()
// Start Geozones tracking when needed
PWGeozonesManager.shared().startLocationTracking()
}
```
```objc
- (void)viewDidLoad {
[super viewDidLoad];
// Do any additional setup after loading the view.
// Start Geozones tracking when needed
[[PWGeozonesManager sharedManager] startLocationTracking];
}
```
### 创建富媒体队列
如果同时有多个富媒体页面需要显示(例如,两个或多个应用内消息的触发事件同时发生,或者在显示一个富媒体页面时另一个触发事件发生),您可以设置一个富媒体页面显示队列。要创建队列,请按照以下步骤操作。
1. 创建一个实现 PWRichMediaPresentingDelegate 的类:
```objective-c
@interface ChainedRichMediaPresentingDelegate ()
@property (nonatomic) NSMutableArray *queue;
@property (nonatomic) BOOL inAppIsPresenting;
@end
@implementation ChainedRichMediaPresentingDelegate
- (instancetype)init {
self = [super init];
if (self) {
_queue = [NSMutableArray new];
}
return self;
}
- (BOOL)richMediaManager:(PWRichMediaManager *)richMediaManager shouldPresentRichMedia:(PWRichMedia *)richMedia {
[_queue addObject:richMedia];
return !_inAppIsPresenting;
}
- (void)richMediaManager:(PWRichMediaManager *)richMediaManager didPresentRichMedia:(PWRichMedia *)richMedia {
_inAppIsPresenting = YES;
}
- (void)richMediaManager:(PWRichMediaManager *)richMediaManager didCloseRichMedia:(PWRichMedia *)richMedia {
_inAppIsPresenting = NO;
[_queue removeObject:richMedia];
if (_queue.count) {
[[PWRichMediaManager sharedManager] presentRichMedia:_queue.firstObject];
}
}
- (void)richMediaManager:(PWRichMediaManager *)richMediaManager presentingDidFailForRichMedia:(PWRichMedia *)richMedia withError:(NSError *)error {
[self richMediaManager:richMediaManager didCloseRichMedia:richMedia];
}
@end
```
2\. 设置委托:
```objective-c
[PWRichMediaManager sharedManager].delegate = [ChainedRichMediaPresentingDelegate new];
```
### 通过压力触控自动播放富通知中发送的视频
要使作为[富通知附件](/zh/developer/pushwoosh-sdk/ios-sdk/ios-rich-notifications-integration/)发送的视频在通知展开时无需任何用户交互即可自动播放,请按照以下步骤操作:
1. 将通知内容扩展添加到您的项目中:
* 在 Xcode 中,选择文件 > 新建 > 目标。
* 选择通知内容扩展。
* 为其分配一个名称并完成设置。
### 地理区域推送通知
地理区域推送通知被封装在一个单独的框架 **PushwooshGeozones** 中。
1. 将 PushwooshGeozones.framework 添加到您的项目中
要使用依赖管理器将 PushwooshGeozones.framework 添加到您的项目中,请将以下几行代码放入您的 `podfile` 或 `cartfile` 中:
```plaintext
pod 'PushwooshXCFramework/Geozones'
```
```plaintext
github "Pushwoosh/pushwoosh-ios-sdk"
```
如果您想使用 **PushwooshGeozones.xcframework**,请输入以下 Package URL:
[PushwooshGeozones-XCFramework](https://github.com/Pushwoosh/PushwooshGeozones-XCFramework)
或者,您可以简单地将框架拖放到项目**构建阶段**的**链接二进制文件与库**中。
2. 将以下键添加到您的 Info.plist 中:
* **NSLocationWhenInUseUsageDescription** – *(必需)* 用于应用仅在前台运行时跟踪地理区域。
* **NSLocationAlwaysAndWhenInUseUsageDescription** – *(必需)* 用于应用**在前台和后台**都跟踪地理区域,并显示权限请求对话框弹出窗口。
* **NSLocationAlwaysUsageDescription** – *(可选)* 用于应用**在任何时候**都跟踪地理区域;如果您的应用目标是 iOS 10 及更早版本,则应使用此项。
```xml
NSLocationAlwaysAndWhenInUseUsageDescription
for app to track Geozones in both conditions and to show a permission request dialog
NSLocationWhenInUseUsageDescription
for app to track Geozones only while running in the foreground
```
![]()
3. 导入框架
```swift
import PushwooshGeozones
```
```objc
#import
```
4. 开始地理区域跟踪
```swift
PWGeozonesManager.shared()?.startLocationTracking()
```
[GitHub 参考](https://github.com/Pushwoosh/pushwoosh-quickstart-ios/blob/main/customizing/customizing/Geozones%20Push%20Notification/GeozonesViewController.swift)
```objc
[[PWGeozonesManager sharedManager] startLocationTracking];
```
[GitHub 参考](https://github.com/Pushwoosh/pushwoosh-quickstart-ios/blob/main/customizing/customizingObjC/customizingObjC/Geozones%20Push%20Notification/PWGeozonesViewController.m)
##### 示例
```swift
override func viewDidLoad() {
super.viewDidLoad()
// Start Geozones tracking when needed
PWGeozonesManager.shared().startLocationTracking()
}
```
```objc
- (void)viewDidLoad {
[super viewDidLoad];
// Do any additional setup after loading the view.
// Start Geozones tracking when needed
[[PWGeozonesManager sharedManager] startLocationTracking];
}
```
### 创建富媒体队列
如果同时有多个富媒体页面需要显示(例如,两个或多个应用内消息的触发事件同时发生,或者在显示一个富媒体页面时另一个触发事件发生),您可以设置一个富媒体页面显示队列。要创建队列,请按照以下步骤操作。
1. 创建一个实现 PWRichMediaPresentingDelegate 的类:
```objective-c
@interface ChainedRichMediaPresentingDelegate ()
@property (nonatomic) NSMutableArray *queue;
@property (nonatomic) BOOL inAppIsPresenting;
@end
@implementation ChainedRichMediaPresentingDelegate
- (instancetype)init {
self = [super init];
if (self) {
_queue = [NSMutableArray new];
}
return self;
}
- (BOOL)richMediaManager:(PWRichMediaManager *)richMediaManager shouldPresentRichMedia:(PWRichMedia *)richMedia {
[_queue addObject:richMedia];
return !_inAppIsPresenting;
}
- (void)richMediaManager:(PWRichMediaManager *)richMediaManager didPresentRichMedia:(PWRichMedia *)richMedia {
_inAppIsPresenting = YES;
}
- (void)richMediaManager:(PWRichMediaManager *)richMediaManager didCloseRichMedia:(PWRichMedia *)richMedia {
_inAppIsPresenting = NO;
[_queue removeObject:richMedia];
if (_queue.count) {
[[PWRichMediaManager sharedManager] presentRichMedia:_queue.firstObject];
}
}
- (void)richMediaManager:(PWRichMediaManager *)richMediaManager presentingDidFailForRichMedia:(PWRichMedia *)richMedia withError:(NSError *)error {
[self richMediaManager:richMediaManager didCloseRichMedia:richMedia];
}
@end
```
2\. 设置委托:
```objective-c
[PWRichMediaManager sharedManager].delegate = [ChainedRichMediaPresentingDelegate new];
```
### 通过压力触控自动播放富通知中发送的视频
要使作为[富通知附件](/zh/developer/pushwoosh-sdk/ios-sdk/ios-rich-notifications-integration/)发送的视频在通知展开时无需任何用户交互即可自动播放,请按照以下步骤操作:
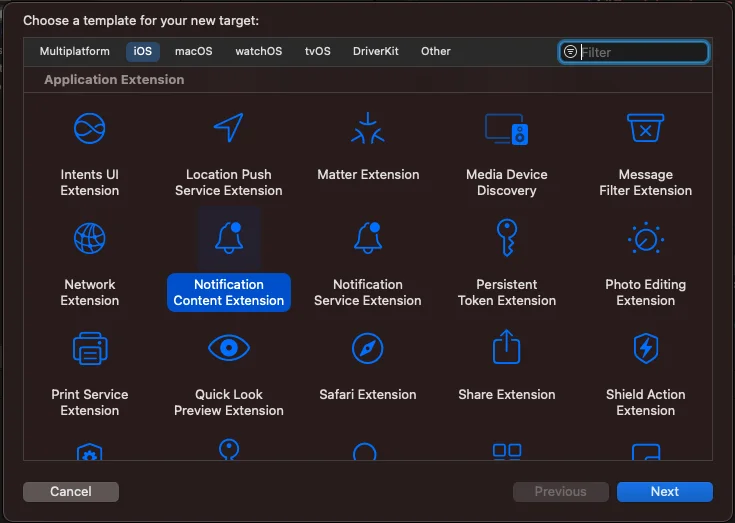
1. 将通知内容扩展添加到您的项目中:
* 在 Xcode 中,选择文件 > 新建 > 目标。
* 选择通知内容扩展。
* 为其分配一个名称并完成设置。
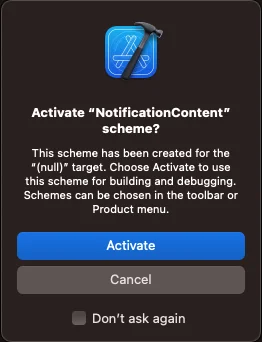
 如果出现“激活方案”消息提示,请选择取消。
 2. 按如下方式调整内容扩展中的属性和方法:
```
import UIKit
import UserNotifications
import UserNotificationsUI
import AVKit
class NotificationViewController: UIViewController, UNNotificationContentExtension {
var playerController: AVPlayerViewController!
@IBOutlet weak var playerBackgroundView: UIView!
override func viewDidLoad() {
super.viewDidLoad()
// Do any required interface initialization here.
}
func didReceive(_ notification: UNNotification) {
let attachment = notification.request.content.attachments.first
playerController = AVPlayerViewController()
// Set height programmatically
// preferredContentSize.height = 250
if let url = attachment?.url {
setupVideoPlayer(url: url)
} else {
print("No valid URL...")
}
}
private func setupVideoPlayer(url: URL) {
guard let playerController = self.playerController else { return }
let player = AVPlayer(url: url)
playerController.player = player
playerController.view.frame = self.playerBackgroundView.bounds
playerBackgroundView.addSubview(playerController.view)
addChild(playerController)
playerController.didMove(toParent: self)
player.play()
}
```
3. 将一个 UIView 合并到 MainInterface.storyboard 中:
2. 按如下方式调整内容扩展中的属性和方法:
```
import UIKit
import UserNotifications
import UserNotificationsUI
import AVKit
class NotificationViewController: UIViewController, UNNotificationContentExtension {
var playerController: AVPlayerViewController!
@IBOutlet weak var playerBackgroundView: UIView!
override func viewDidLoad() {
super.viewDidLoad()
// Do any required interface initialization here.
}
func didReceive(_ notification: UNNotification) {
let attachment = notification.request.content.attachments.first
playerController = AVPlayerViewController()
// Set height programmatically
// preferredContentSize.height = 250
if let url = attachment?.url {
setupVideoPlayer(url: url)
} else {
print("No valid URL...")
}
}
private func setupVideoPlayer(url: URL) {
guard let playerController = self.playerController else { return }
let player = AVPlayer(url: url)
playerController.player = player
playerController.view.frame = self.playerBackgroundView.bounds
playerBackgroundView.addSubview(playerController.view)
addChild(playerController)
playerController.didMove(toParent: self)
player.play()
}
```
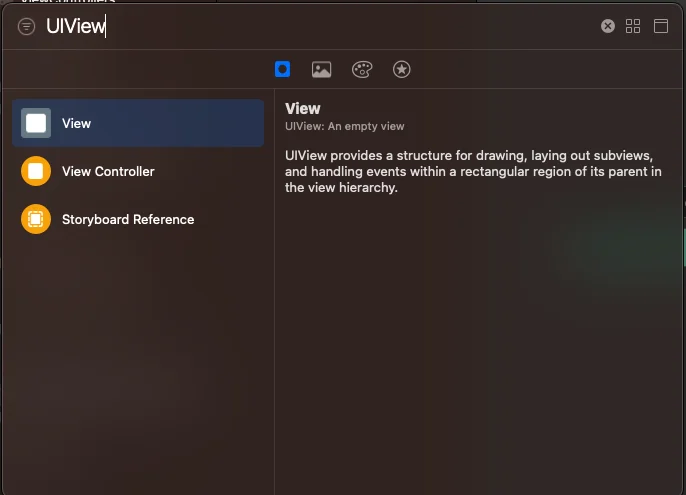
3. 将一个 UIView 合并到 MainInterface.storyboard 中:
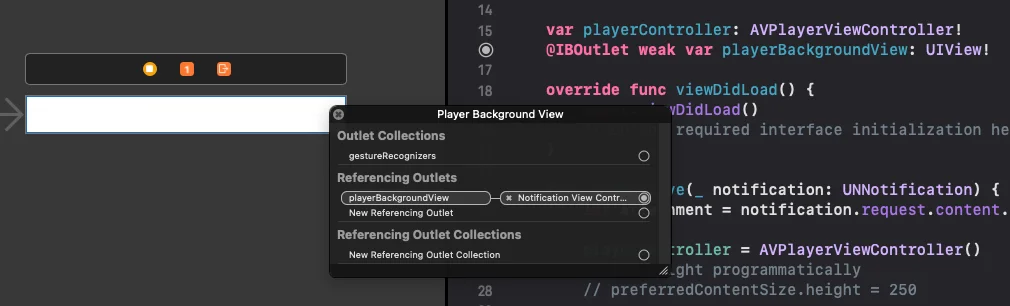
 4. 将 playerBackgroundView IBOutlet 与您刚刚添加的 UIView 连接起来:
 5. 使用以下条目更新 info.plist 文件:
```
UNNotificationExtensionUserInteractionEnabled = true
```
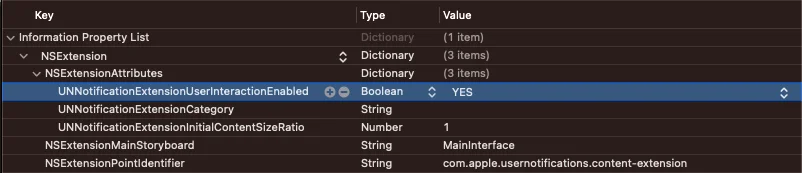
5. 使用以下条目更新 info.plist 文件:
```
UNNotificationExtensionUserInteractionEnabled = true
```
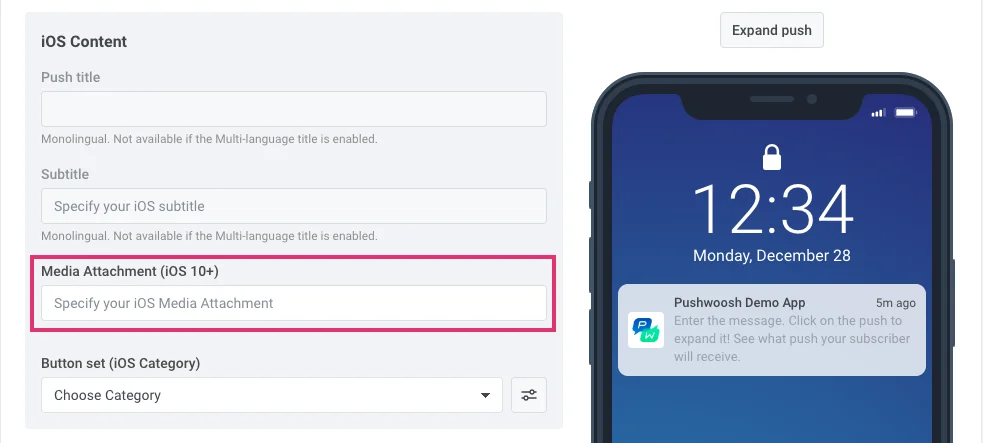
 为了将视频附加到您的通知中,请在控制面板的媒体附件字段中输入视频的 URL:
 通过 API [/createMessage](/zh/developer/api-reference/messages-api#createmessage) 请求发送通知时,请在 "ios\_attachment" 参数中包含 URL,并确保 "mutable-content" 标志设置为 \`1\`。
### 自定义推送声音
要在收到推送通知时播放自定义声音,首先将音频文件放入您项目的根文件夹中。
通过 API [/createMessage](/zh/developer/api-reference/messages-api#createmessage) 请求发送通知时,请在 "ios\_attachment" 参数中包含 URL,并确保 "mutable-content" 标志设置为 \`1\`。
### 自定义推送声音
要在收到推送通知时播放自定义声音,首先将音频文件放入您项目的根文件夹中。
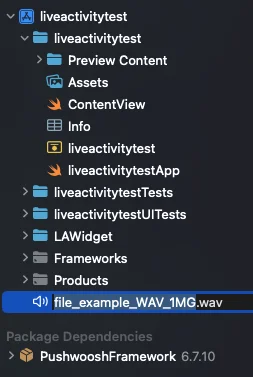 然后,在推送参数中指定声音文件的名称——填写您消息的[iOS 特定设置](/zh/product/messaging-channels/push-notifications/send-push-notifications/one-time-push#ios)中的声音字段,或将文件名指定为 [createMessage API 请求](/zh/developer/api-reference/messages-api/) 的 "ios\_sound" 参数的值。
自定义 iOS 声音的音频文件必须是以下格式之一:**.aif**、**.caf**、**.wav**。**请确保在文件名中指定格式;否则,Pushwoosh iOS SDK 将忽略它。**
### iOS 临时推送
#### 工作原理
临时推送通知会静默地出现在用户的通知中心,但不会出现在锁屏上。这种类型的推送不需要用户明确允许:一旦用户安装并启动您的应用,您就可以开始发送它们。
然而,用户仍然可以订阅您的显式推送通知:当打开临时推送时,他们有两个选项来选择他们的体验——将推送保留在通知中心,没有警报和声音,或者允许您显式地发送推送,以便它们出现在锁屏上。
临时推送旨在让用户就他们是否愿意接收来自您应用的通知做出明智的决定。由于 APN 原生订阅请求只向用户显示一次,之后要订阅,他们必须进入手机的系统设置,一些用户可能因为不了解您的推送能带来什么价值而不会订阅。临时推送让用户了解这一点:他们可以看到您在推送通知中传递的内容,并决定是否需要显式地收到这些内容的通知。
#### 如何实现
1\. 按照[指南](/zh/developer/pushwoosh-sdk/ios-sdk/setting-up-pushwoosh-ios-sdk/quick-start/)集成 Pushwoosh iOS SDK。
2\. 在调用 `registerForPushNotifications()` 方法之前,将以下字符串添加到您项目的 AppDelegate 中:
```swift
if #available(iOS 12.0, *) {
Pushwoosh.sharedInstance().additionalAuthorizationOptions = UNAuthorizationOptions.provisional
}
```
```objective-c
if (@available(iOS 12.0, *)) {
[Pushwoosh sharedInstance].additionalAuthorizationOptions = UNAuthorizationOptionProvisional;
}
```
就是这样!一旦用户安装了应用,他们将直接在通知中心收到消息。
### 与我们分享您的反馈
您的反馈有助于我们创造更好的体验,因此如果您在 SDK 集成过程中遇到任何问题,我们很乐意听取您的意见。如果您遇到任何困难,请随时[通过此表单](https://docs.google.com/forms/d/e/1FAIpQLSd_0b8jwn-V_JmoPLIxIFYbHACCQhrzidOZV3ELywoQPXRSxw/viewform)与我们分享您的想法。
然后,在推送参数中指定声音文件的名称——填写您消息的[iOS 特定设置](/zh/product/messaging-channels/push-notifications/send-push-notifications/one-time-push#ios)中的声音字段,或将文件名指定为 [createMessage API 请求](/zh/developer/api-reference/messages-api/) 的 "ios\_sound" 参数的值。
自定义 iOS 声音的音频文件必须是以下格式之一:**.aif**、**.caf**、**.wav**。**请确保在文件名中指定格式;否则,Pushwoosh iOS SDK 将忽略它。**
### iOS 临时推送
#### 工作原理
临时推送通知会静默地出现在用户的通知中心,但不会出现在锁屏上。这种类型的推送不需要用户明确允许:一旦用户安装并启动您的应用,您就可以开始发送它们。
然而,用户仍然可以订阅您的显式推送通知:当打开临时推送时,他们有两个选项来选择他们的体验——将推送保留在通知中心,没有警报和声音,或者允许您显式地发送推送,以便它们出现在锁屏上。
临时推送旨在让用户就他们是否愿意接收来自您应用的通知做出明智的决定。由于 APN 原生订阅请求只向用户显示一次,之后要订阅,他们必须进入手机的系统设置,一些用户可能因为不了解您的推送能带来什么价值而不会订阅。临时推送让用户了解这一点:他们可以看到您在推送通知中传递的内容,并决定是否需要显式地收到这些内容的通知。
#### 如何实现
1\. 按照[指南](/zh/developer/pushwoosh-sdk/ios-sdk/setting-up-pushwoosh-ios-sdk/quick-start/)集成 Pushwoosh iOS SDK。
2\. 在调用 `registerForPushNotifications()` 方法之前,将以下字符串添加到您项目的 AppDelegate 中:
```swift
if #available(iOS 12.0, *) {
Pushwoosh.sharedInstance().additionalAuthorizationOptions = UNAuthorizationOptions.provisional
}
```
```objective-c
if (@available(iOS 12.0, *)) {
[Pushwoosh sharedInstance].additionalAuthorizationOptions = UNAuthorizationOptionProvisional;
}
```
就是这样!一旦用户安装了应用,他们将直接在通知中心收到消息。
### 与我们分享您的反馈
您的反馈有助于我们创造更好的体验,因此如果您在 SDK 集成过程中遇到任何问题,我们很乐意听取您的意见。如果您遇到任何困难,请随时[通过此表单](https://docs.google.com/forms/d/e/1FAIpQLSd_0b8jwn-V_JmoPLIxIFYbHACCQhrzidOZV3ELywoQPXRSxw/viewform)与我们分享您的想法。