# Outsystems
## 安装 Pushwoosh 插件
首先,从 [OutSystems Forge](https://www.outsystems.com/forge/component-overview/1556/pushwoosh-plugin) 安装 Pushwoosh 插件。最快的方法是进入您的开发环境中的 OutSystems 选项卡,然后从那里安装。
### 配置 Pushwoosh
您需要为您将支持的每个平台配置 Pushwoosh。配置完成后,您将从 Pushwoosh 获得一个 Application Code,该代码将与您的插件一起使用。
#### 针对 iOS
了解如何[为 iOS 配置 Pushwoosh](/zh/developer/first-steps/connect-messaging-services/ios-configuration/ios-platform-configuration/)。
#### 针对 Android
了解如何[为 Android 配置 Pushwoosh](/zh/developer/first-steps/connect-messaging-services/android-configuration/android-firebase-configuration/)。
### 将 Pushwoosh 插件添加到您的应用程序
1. 在您的应用程序中,使用“Manage Dependencies…”添加对 Pushwoosh 插件的引用。
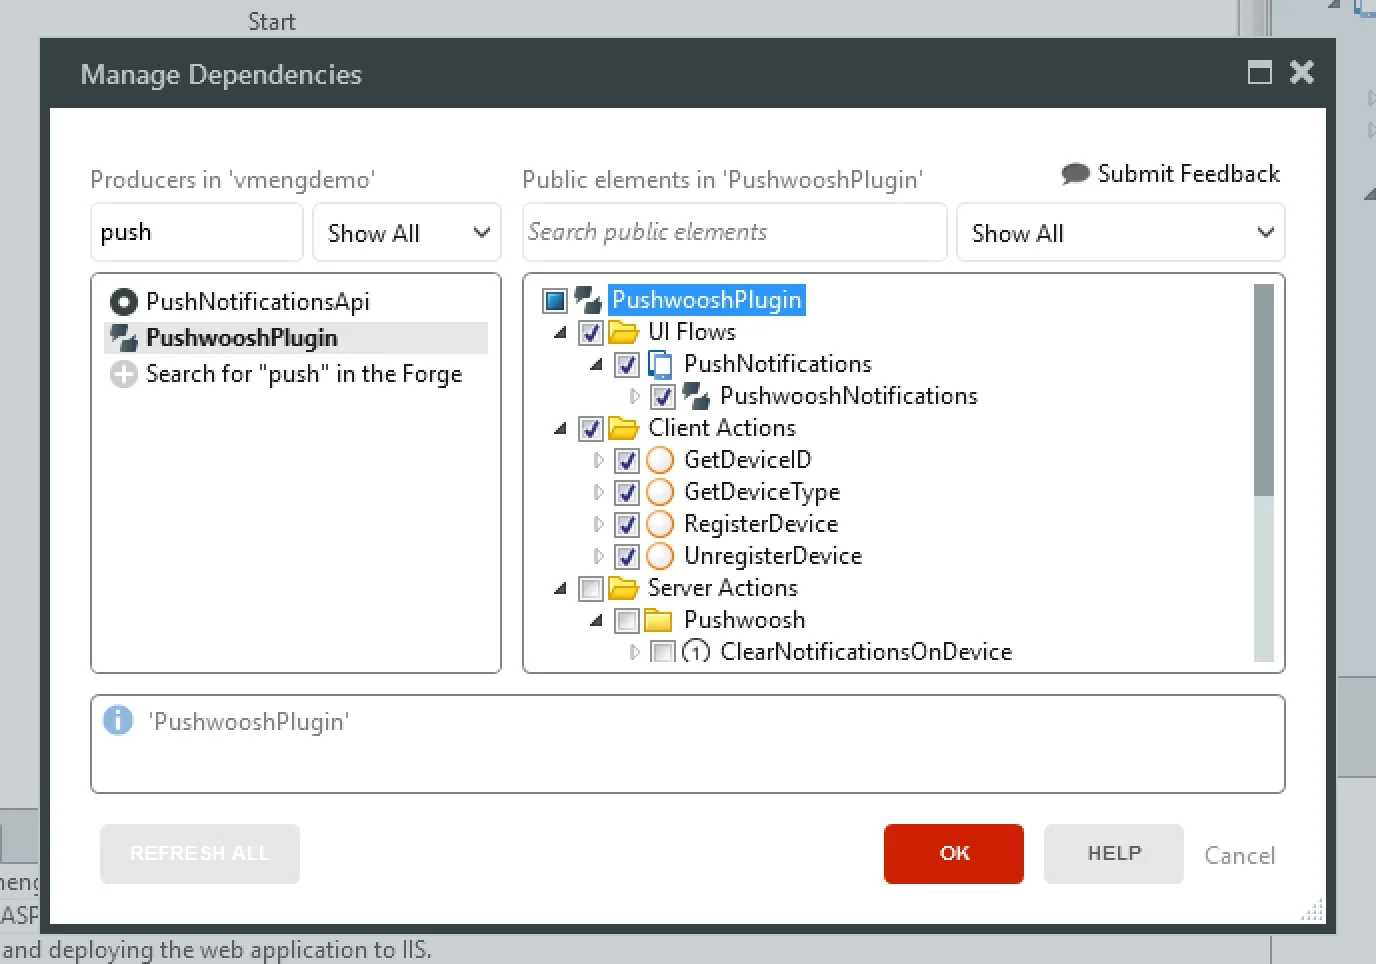 2. 将“PushwooshNotifications”块添加到:
- 如果您的应用程序没有登录功能,则添加到“Layout”块
- 如果您的应用程序有登录功能,则添加到“LayoutBlank”块
添加“PushwooshNotifications”块时,请避免将其添加到占位符 (placeholders) 内,因为有些占位符仅在设计时可用,在运行时 Pushwoosh 将无法工作。
3. 在 PushwooshNotifications 中设置以下参数:
- **PushwooshApplicationCode:** 您在 Pushwoosh 中创建应用程序后获得的 Pushwoosh Code。
- **FCMSenderId:** 您在配置 Android 时获得的标识号。如果您的应用程序仅适用于 iOS,则可以将其留空。
- **NotificationReceivedEvent (可选):** 当应用程序处于前台状态时收到通知时调用的事件。
- **NotificationOpenedEvent (可选):** 当用户点击设备上的通知时调用的事件。
如果您在 Android 应用中使用 Pushwoosh 插件,请执行以下操作:
1. 从 Firebase [获取 `google-services.json`](https://support.google.com/firebase/answer/7015592)。Google 服务的包名 (package name) 必须与正在构建的 OutSystems 应用程序的应用标识符 (app identifier) 相匹配。
2. 创建一个在根目录中包含 `google-services.json` 的 zip 文件。
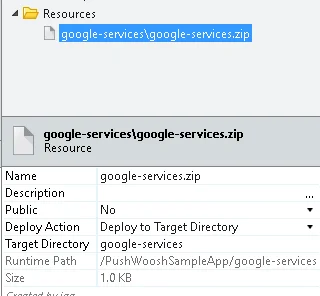
3. 将上一步中的“google-services.zip”文件上传到您的 OutSystems 应用程序,并确保:
- 将“Name”设置为“google-services.zip”
- 将“Deploy to Target Directory”设置为“google-services”
2. 将“PushwooshNotifications”块添加到:
- 如果您的应用程序没有登录功能,则添加到“Layout”块
- 如果您的应用程序有登录功能,则添加到“LayoutBlank”块
添加“PushwooshNotifications”块时,请避免将其添加到占位符 (placeholders) 内,因为有些占位符仅在设计时可用,在运行时 Pushwoosh 将无法工作。
3. 在 PushwooshNotifications 中设置以下参数:
- **PushwooshApplicationCode:** 您在 Pushwoosh 中创建应用程序后获得的 Pushwoosh Code。
- **FCMSenderId:** 您在配置 Android 时获得的标识号。如果您的应用程序仅适用于 iOS,则可以将其留空。
- **NotificationReceivedEvent (可选):** 当应用程序处于前台状态时收到通知时调用的事件。
- **NotificationOpenedEvent (可选):** 当用户点击设备上的通知时调用的事件。
如果您在 Android 应用中使用 Pushwoosh 插件,请执行以下操作:
1. 从 Firebase [获取 `google-services.json`](https://support.google.com/firebase/answer/7015592)。Google 服务的包名 (package name) 必须与正在构建的 OutSystems 应用程序的应用标识符 (app identifier) 相匹配。
2. 创建一个在根目录中包含 `google-services.json` 的 zip 文件。
3. 将上一步中的“google-services.zip”文件上传到您的 OutSystems 应用程序,并确保:
- 将“Name”设置为“google-services.zip”
- 将“Deploy to Target Directory”设置为“google-services”
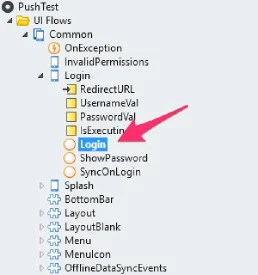
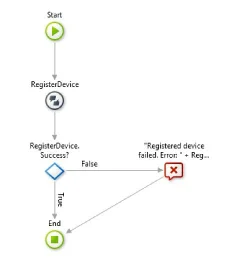
 为了让您的设备接收推送通知,您需要注册它。如果您的用户需要登录才能使用该应用程序,请转到“Login”屏幕并编辑“Login”操作。
 在“DoLogin”操作之后添加注册设备的代码。它应该看起来像这样:
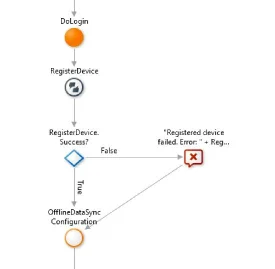 如果您的应用程序没有登录功能,您可以将此代码添加到 `PushwooshNotifications` 块中的 `OnInitializeOver` 事件中。
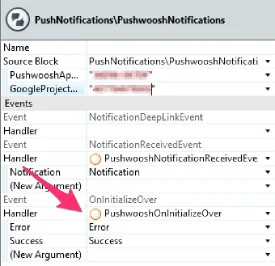 在此事件处理程序中,调用 `RegisterDevice` 操作。
 如果您使用开发者证书生成 iOS 移动应用,则需要将一个偏好设置添加到您的 OutSystems 模块的 Extensibility Configurations 属性中:
```json
{
"preferences": {
"global": [
{
"name": "aps-environment",
"value": "development"
}
]
}
}
```
如果您使用开发者证书生成 iOS 移动应用,则需要将一个偏好设置添加到您的 OutSystems 模块的 Extensibility Configurations 属性中:
```json
{
"preferences": {
"global": [
{
"name": "aps-environment",
"value": "development"
}
]
}
}
```
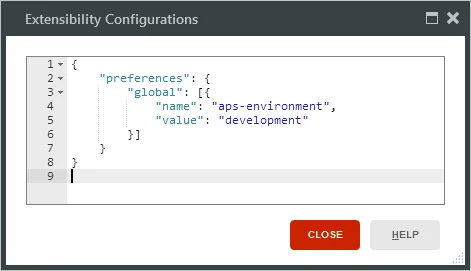 此偏好设置将被添加到您的 entitlements 文件中(在 [Apple 开发者文档](https://developer.apple.com/library/content/documentation/Miscellaneous/Reference/EntitlementKeyReference/Chapters/AboutEntitlements.html)中了解有关 entitlements 的更多信息)。
如果您使用生产证书生成 iOS 移动应用,则无需指定任何偏好设置,因为 OutSystems 中 `aps-environment` 偏好设置的默认值为 `production`。
您的应用程序现在已准备好接收推送通知。[配置并生成您的移动应用](https://success.outsystems.com/documentation/10/delivering_mobile_apps/generate_and_distribute_your_mobile_app/),并将其安装在您的设备上。此时,您可以使用 Pushwoosh 界面向您的应用发送通知,并确保一切都已正确配置。请注意,如果应用正在运行,您将不会看到通知。相反,`NotificationReceivedEvent` 事件会立即被触发。
### 发送通知
要发送通知,您需要一个 Pushwoosh [API Access Token](/zh/developer/api-reference/api-access-token/)。通过访问 Pushwoosh 控制台,转到“API Access”,然后点击“Generate new access token”来创建一个。
此偏好设置将被添加到您的 entitlements 文件中(在 [Apple 开发者文档](https://developer.apple.com/library/content/documentation/Miscellaneous/Reference/EntitlementKeyReference/Chapters/AboutEntitlements.html)中了解有关 entitlements 的更多信息)。
如果您使用生产证书生成 iOS 移动应用,则无需指定任何偏好设置,因为 OutSystems 中 `aps-environment` 偏好设置的默认值为 `production`。
您的应用程序现在已准备好接收推送通知。[配置并生成您的移动应用](https://success.outsystems.com/documentation/10/delivering_mobile_apps/generate_and_distribute_your_mobile_app/),并将其安装在您的设备上。此时,您可以使用 Pushwoosh 界面向您的应用发送通知,并确保一切都已正确配置。请注意,如果应用正在运行,您将不会看到通知。相反,`NotificationReceivedEvent` 事件会立即被触发。
### 发送通知
要发送通知,您需要一个 Pushwoosh [API Access Token](/zh/developer/api-reference/api-access-token/)。通过访问 Pushwoosh 控制台,转到“API Access”,然后点击“Generate new access token”来创建一个。
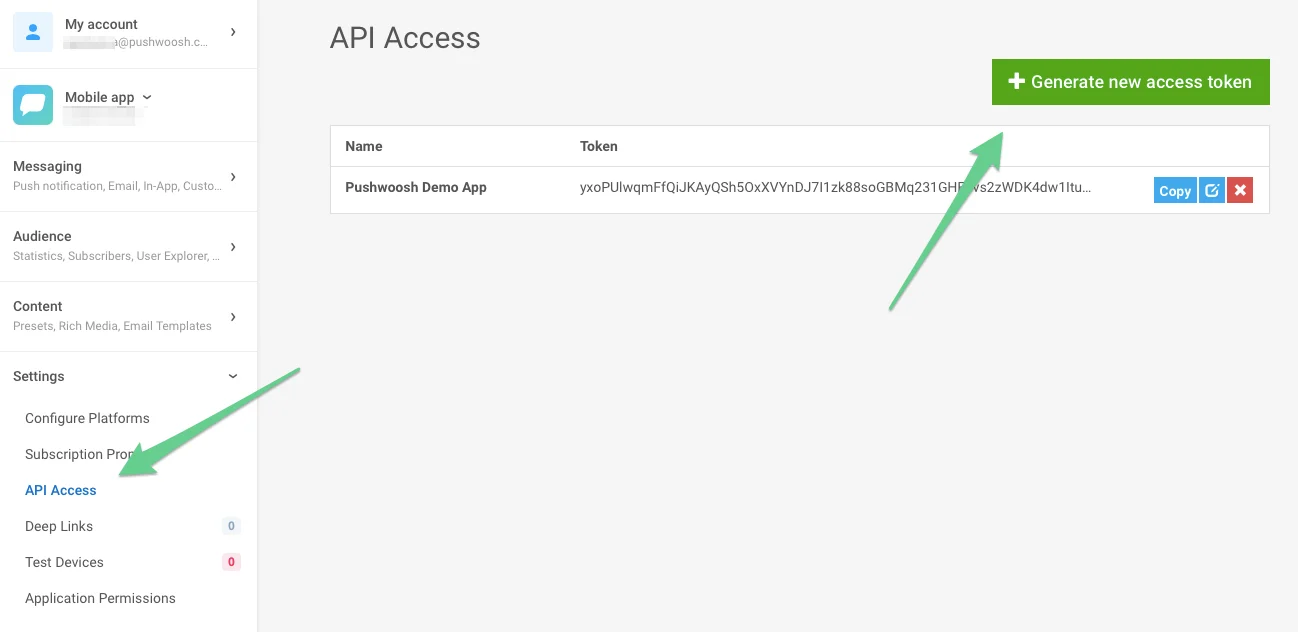 要向所有设备发送通知,请使用 `SendPushNotificationToAll` 操作。
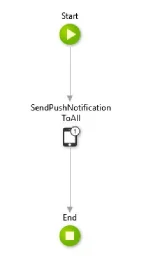 此操作接受以下参数:
- **PushwooshApplicationCode:** 您在 Pushwoosh 中创建应用程序后获得的 Pushwoosh Code。
- **ApiAccessToken:** 先前获得的 Pushwoosh API Access Token。
- **Message:** 您希望发送的消息文本。
- **Badge:** 显示在 iOS 应用程序图标上的数字。
- **Deeplink:** 与通知一起发送的深层链接。了解[如何定义深层链接](https://success.outsystems.com/documentation/how_to_guides/development/how_to_define_mobile_app_deep_links/)。
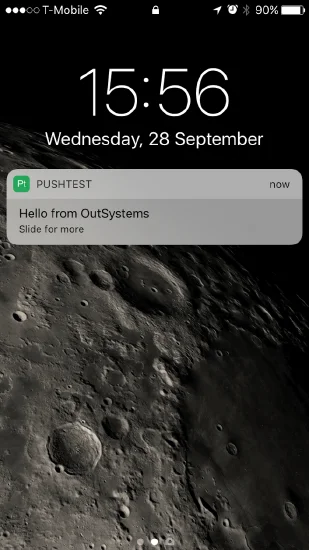
例如,如果您使用此操作向名为“PushTest”的应用程序发送消息“Hello from OutSystems”,则在 iOS 中将显示以下内容:
此操作接受以下参数:
- **PushwooshApplicationCode:** 您在 Pushwoosh 中创建应用程序后获得的 Pushwoosh Code。
- **ApiAccessToken:** 先前获得的 Pushwoosh API Access Token。
- **Message:** 您希望发送的消息文本。
- **Badge:** 显示在 iOS 应用程序图标上的数字。
- **Deeplink:** 与通知一起发送的深层链接。了解[如何定义深层链接](https://success.outsystems.com/documentation/how_to_guides/development/how_to_define_mobile_app_deep_links/)。
例如,如果您使用此操作向名为“PushTest”的应用程序发送消息“Hello from OutSystems”,则在 iOS 中将显示以下内容:
 ### 附加信息
- 如果您的应用正在运行,通知不会显示在设备上。相反,它会被发送到应用,并触发 `NotificationReceivedEvent` 事件。您需要定义在这种情况下您希望应用做什么。
- 推送通知可能需要一段时间才能激活。如果您没有看到通知传来,请等待几分钟再进行进一步的故障排除。
## 与我们分享您的反馈
您的反馈有助于我们创造更好的体验,因此如果您在 SDK 集成过程中遇到任何问题,我们很乐意听取您的意见。如果您遇到任何困难,请随时[通过此表格](https://docs.google.com/forms/d/e/1FAIpQLSd_0b8jwn-V_JmoPLIxIFYbHACCQhrzidOZV3ELywoQPXRSxw/viewform)与我们分享您的想法。
### 附加信息
- 如果您的应用正在运行,通知不会显示在设备上。相反,它会被发送到应用,并触发 `NotificationReceivedEvent` 事件。您需要定义在这种情况下您希望应用做什么。
- 推送通知可能需要一段时间才能激活。如果您没有看到通知传来,请等待几分钟再进行进一步的故障排除。
## 与我们分享您的反馈
您的反馈有助于我们创造更好的体验,因此如果您在 SDK 集成过程中遇到任何问题,我们很乐意听取您的意见。如果您遇到任何困难,请随时[通过此表格](https://docs.google.com/forms/d/e/1FAIpQLSd_0b8jwn-V_JmoPLIxIFYbHACCQhrzidOZV3ELywoQPXRSxw/viewform)与我们分享您的想法。