# MAUI Dotnet
* [**模块源**](https://github.com/Pushwoosh/pushwoosh-dotnet)
* [**下载示例**](https://github.com/Pushwoosh/pushwoosh-dotnet/tree/main/Sample)
### SDK 集成
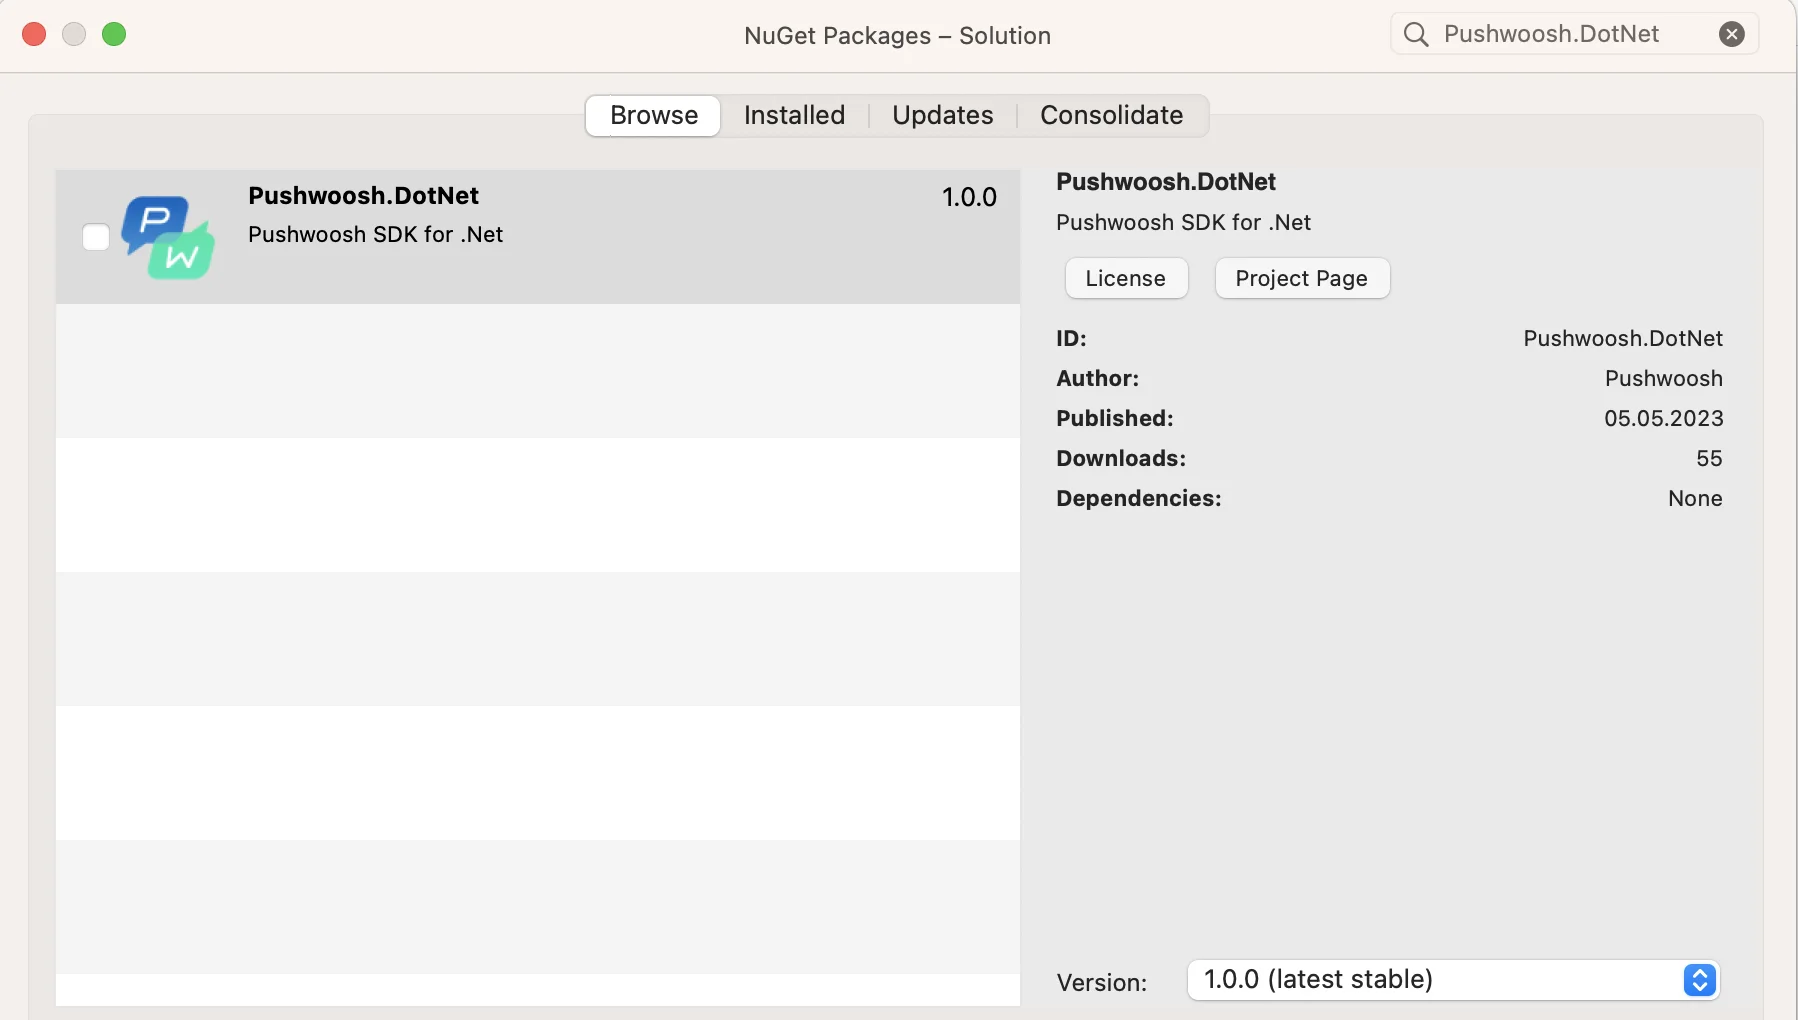
**1.** 将 **Pushwoosh.DotNet** Nuget 包添加到 Android 和 iOS 项目中:
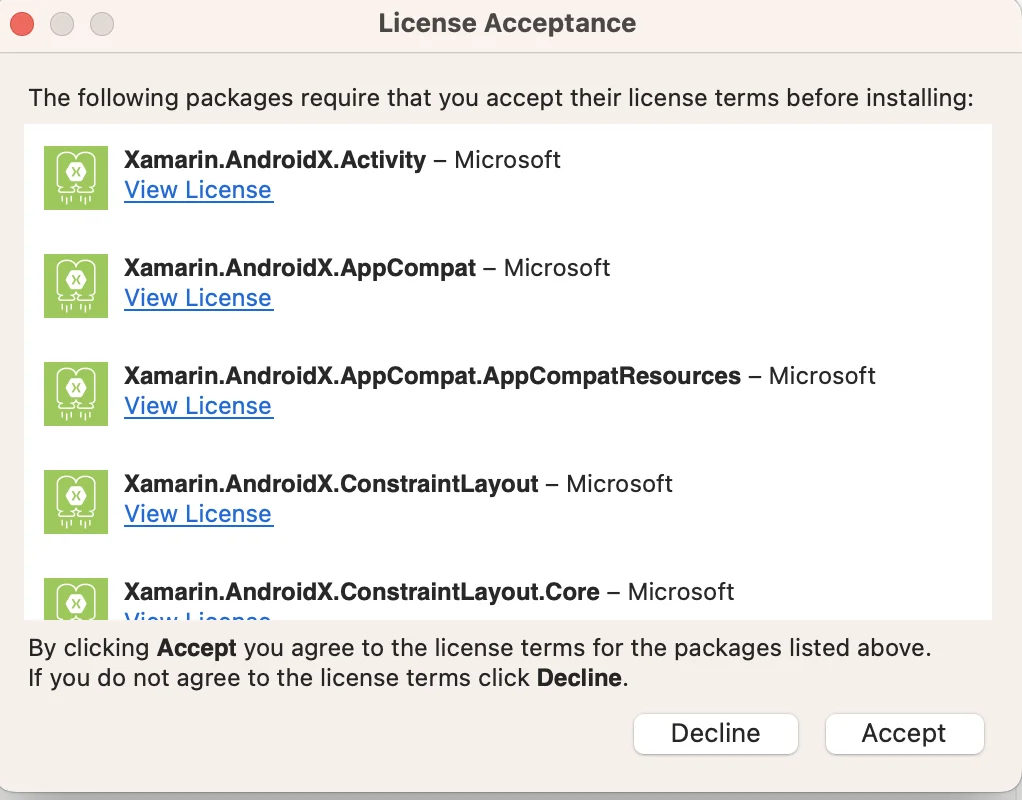
 **2.** 如果需要,请接受传递性 Android 依赖项的许可证:
 **3.** 在 [Firebase Console](https://console.firebase.google.com/u/0/) 中配置您的项目。
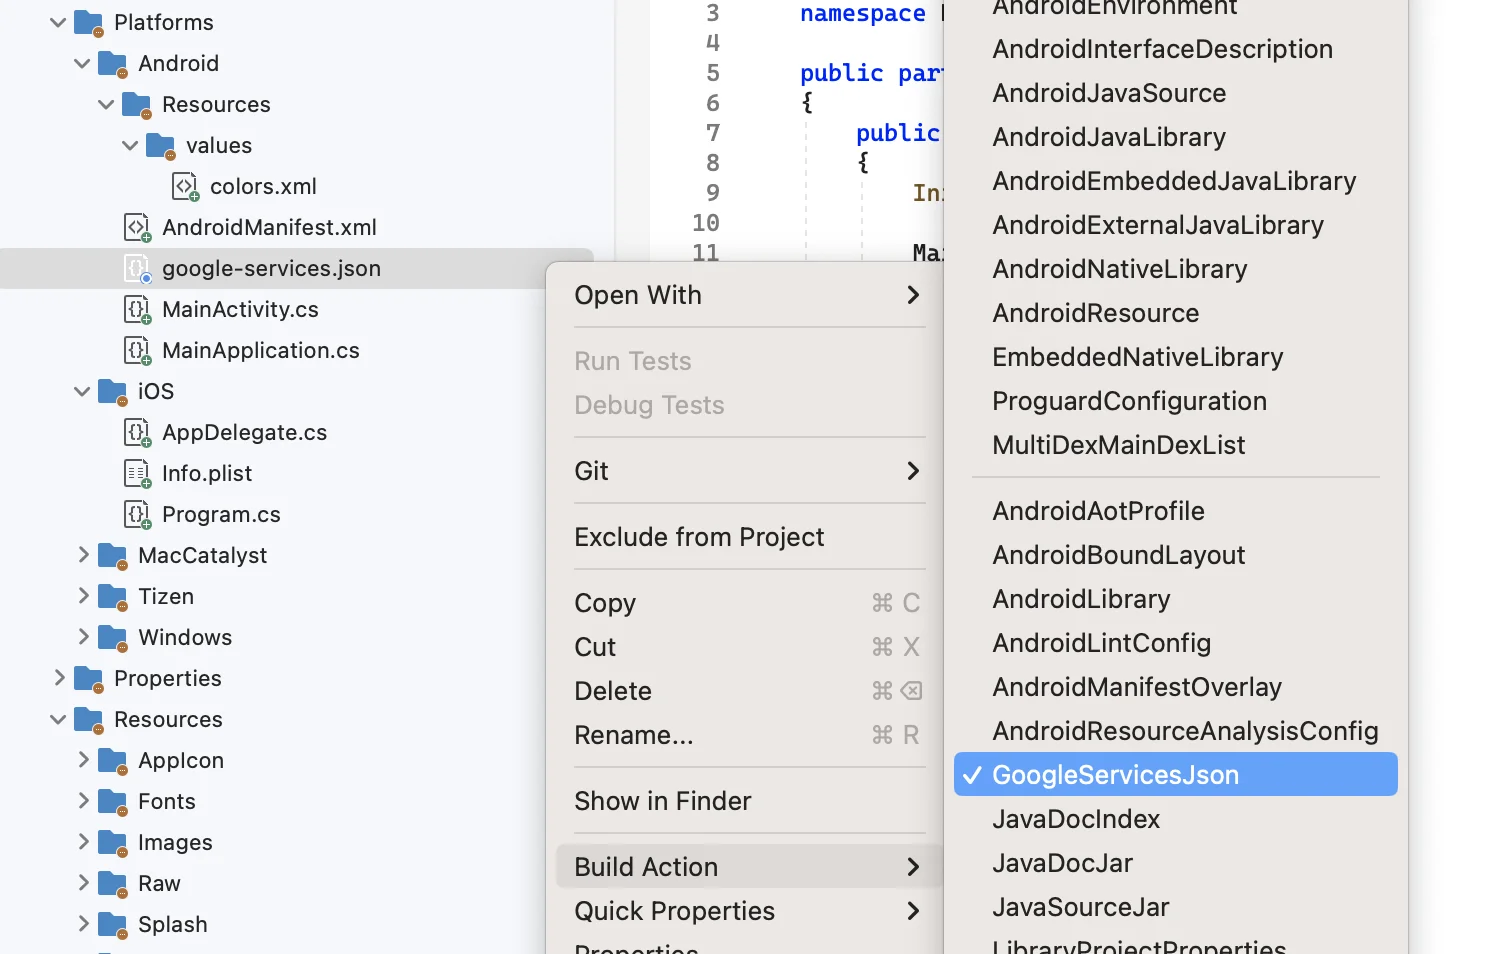
**4.** 将 **google-services.json** 添加到您的 Android 平台目录的根目录。为此文件设置 **GoogleServicesJson** 构建操作:
**3.** 在 [Firebase Console](https://console.firebase.google.com/u/0/) 中配置您的项目。
**4.** 将 **google-services.json** 添加到您的 Android 平台目录的根目录。为此文件设置 **GoogleServicesJson** 构建操作:
 **5.** 在 **MainActivity.cs** 中声明命名空间之前添加以下行(此处的 **XXXXX-XXXXX** 是您的 Pushwoosh Application ID):
```csharp
[assembly: MetaData("com.pushwoosh.appid", Value = "XXXXX-XXXXX")]
[assembly: MetaData("com.pushwoosh.senderid", Value = "@string/fcm_sender_id")]
```
**6.** 在您的 **MainActivity.cs** 中,重写 `OnCreate()` 方法,并在 `base.OnCreate(savedInstanceState);` 之后调用 `PushManager.Init();`
```csharp
using Pushwoosh.Android;
...
public class MainActivity : MauiAppCompatActivity
{
protected override void OnCreate(Bundle savedInstanceState)
{
base.OnCreate(savedInstanceState);
PushManager.Init();
}
}
```
**7.** 在您的 Android 项目中,找到或创建 **Resources/values/strings.xml** 文件。在此处添加您的 Sender ID 字符串:
```txt
YOUR_SENDER_ID
```
**8.** 在您的 `AndroidManifest.xml` 中,添加以下内容:
```xml
```
> **重要提示:** 确保 [Device API token (设备 API 令牌)](/zh/developer/api-reference/api-access-token/#device-api-token) 在您的 Pushwoosh Control Panel 中有权访问正确的应用程序。[了解更多](/zh/developer/api-reference/api-access-token/#edit-token)
**9.** 在您的 iOS 项目的 **AppDelegate.cs** 中进行以下更改:
在 `FinishedLaunching` 方法的开头,放入以下行:\
`PushManager.Init();`
将这些方法添加到 **AppDelegate**(`MauiUIApplicationDelegate` 类默认不导出这些方法,因此您必须手动添加):
```csharp
[Export("application:didReceiveRemoteNotification:fetchCompletionHandler:")]
public void DidReceiveRemoteNotification(UIKit.UIApplication application, NSDictionary userInfo, Action completionHandler)
{
PushManager.Instance.ReceivedRemoteNotification(userInfo);
}
[Export("application:didRegisterForRemoteNotificationsWithDeviceToken:")]
public void RegisteredForRemoteNotifications(UIKit.UIApplication application, NSData deviceToken)
{
PushManager.Instance.RegisteredForRemoteNotifications(deviceToken);
}
[Export("application:didFailToRegisterForRemoteNotificationsWithError:")]
public void FailedToRegisterForRemoteNotifications(UIKit.UIApplication application, NSError error)
{
PushManager.Instance.FailedToRegisterForRemoteNotifications(error);
}
```
**10.** 在 **Info.plist** 中,将 **Pushwoosh\_APPID** 值更改为您的 Pushwoosh Application Code。您可以在您的 Control Panel 中找到它:\
**5.** 在 **MainActivity.cs** 中声明命名空间之前添加以下行(此处的 **XXXXX-XXXXX** 是您的 Pushwoosh Application ID):
```csharp
[assembly: MetaData("com.pushwoosh.appid", Value = "XXXXX-XXXXX")]
[assembly: MetaData("com.pushwoosh.senderid", Value = "@string/fcm_sender_id")]
```
**6.** 在您的 **MainActivity.cs** 中,重写 `OnCreate()` 方法,并在 `base.OnCreate(savedInstanceState);` 之后调用 `PushManager.Init();`
```csharp
using Pushwoosh.Android;
...
public class MainActivity : MauiAppCompatActivity
{
protected override void OnCreate(Bundle savedInstanceState)
{
base.OnCreate(savedInstanceState);
PushManager.Init();
}
}
```
**7.** 在您的 Android 项目中,找到或创建 **Resources/values/strings.xml** 文件。在此处添加您的 Sender ID 字符串:
```txt
YOUR_SENDER_ID
```
**8.** 在您的 `AndroidManifest.xml` 中,添加以下内容:
```xml
```
> **重要提示:** 确保 [Device API token (设备 API 令牌)](/zh/developer/api-reference/api-access-token/#device-api-token) 在您的 Pushwoosh Control Panel 中有权访问正确的应用程序。[了解更多](/zh/developer/api-reference/api-access-token/#edit-token)
**9.** 在您的 iOS 项目的 **AppDelegate.cs** 中进行以下更改:
在 `FinishedLaunching` 方法的开头,放入以下行:\
`PushManager.Init();`
将这些方法添加到 **AppDelegate**(`MauiUIApplicationDelegate` 类默认不导出这些方法,因此您必须手动添加):
```csharp
[Export("application:didReceiveRemoteNotification:fetchCompletionHandler:")]
public void DidReceiveRemoteNotification(UIKit.UIApplication application, NSDictionary userInfo, Action completionHandler)
{
PushManager.Instance.ReceivedRemoteNotification(userInfo);
}
[Export("application:didRegisterForRemoteNotificationsWithDeviceToken:")]
public void RegisteredForRemoteNotifications(UIKit.UIApplication application, NSData deviceToken)
{
PushManager.Instance.RegisteredForRemoteNotifications(deviceToken);
}
[Export("application:didFailToRegisterForRemoteNotificationsWithError:")]
public void FailedToRegisterForRemoteNotifications(UIKit.UIApplication application, NSError error)
{
PushManager.Instance.FailedToRegisterForRemoteNotifications(error);
}
```
**10.** 在 **Info.plist** 中,将 **Pushwoosh\_APPID** 值更改为您的 Pushwoosh Application Code。您可以在您的 Control Panel 中找到它:\
 **11.** 在 `Info.plist` 中,设置:
- `Pushwoosh_API_TOKEN` 键设置为 [Pushwoosh Device API Token (设备 API 令牌)](/zh/developer/api-reference/api-access-token/#device-api-token)
> **重要提示:** 请务必为该令牌授予访问您 Pushwoosh Control Panel 中正确应用程序的权限。[了解更多](/zh/developer/api-reference/api-access-token/#edit-token)
**12.** 在 **App.xaml.cs** 的跨平台部分,将注册代码添加到 `onStart` 方法中:
```csharp
using PushwooshSDK.DotNet.Core;
...
public partial class App : Application
{
...
protected override void OnStart()
{
base.OnStart();
PushManager.Instance.Register();
}
}
```
> **Windows 用户请注意:**
>在构建时,您可能会遇到与文件路径长度相关的问题。
>这是因为 Visual Studio 使用的目录和 Pushwoosh SDK 内的文件路径的组合长度超过了 Windows 260 个字符的最大路径长度限制。
>要解决此问题,请在 Windows 注册表中启用 LongPathsEnabled 设置。
### 与我们分享您的反馈
您的反馈有助于我们创造更好的体验,因此,如果您在 SDK 集成过程中遇到任何问题,我们非常希望听到您的声音。如果您遇到任何困难,请随时[通过此表单](https://docs.google.com/forms/d/e/1FAIpQLSd\_0b8jwn-V\_JmoPLIxIFYbHACCQhrzidOZV3ELywoQPXRSxw/viewform)与我们分享您的想法。
**11.** 在 `Info.plist` 中,设置:
- `Pushwoosh_API_TOKEN` 键设置为 [Pushwoosh Device API Token (设备 API 令牌)](/zh/developer/api-reference/api-access-token/#device-api-token)
> **重要提示:** 请务必为该令牌授予访问您 Pushwoosh Control Panel 中正确应用程序的权限。[了解更多](/zh/developer/api-reference/api-access-token/#edit-token)
**12.** 在 **App.xaml.cs** 的跨平台部分,将注册代码添加到 `onStart` 方法中:
```csharp
using PushwooshSDK.DotNet.Core;
...
public partial class App : Application
{
...
protected override void OnStart()
{
base.OnStart();
PushManager.Instance.Register();
}
}
```
> **Windows 用户请注意:**
>在构建时,您可能会遇到与文件路径长度相关的问题。
>这是因为 Visual Studio 使用的目录和 Pushwoosh SDK 内的文件路径的组合长度超过了 Windows 260 个字符的最大路径长度限制。
>要解决此问题,请在 Windows 注册表中启用 LongPathsEnabled 设置。
### 与我们分享您的反馈
您的反馈有助于我们创造更好的体验,因此,如果您在 SDK 集成过程中遇到任何问题,我们非常希望听到您的声音。如果您遇到任何困难,请随时[通过此表单](https://docs.google.com/forms/d/e/1FAIpQLSd\_0b8jwn-V\_JmoPLIxIFYbHACCQhrzidOZV3ELywoQPXRSxw/viewform)与我们分享您的想法。