# How to issue a wallet pass on signup
Issue an Apple or Google Wallet pass when a loyalty member joins, then deliver the install link by email. This guide builds that journey with the [Issue Wallet Pass](/product/customer-journey/journey-elements/channels/issue-wallet-pass/) element.
## Create a Wallet Pass Campaign
The [Issue Wallet Pass](/product/customer-journey/journey-elements/channels/issue-wallet-pass/) element can only issue passes from an existing campaign, so create one first. A campaign's **Platform** is permanent, so if you support both Apple Wallet and Google Wallet, repeat this section once per platform.
1. Go to **Campaigns → Wallet Passes → Campaigns** and click **Create campaign**.
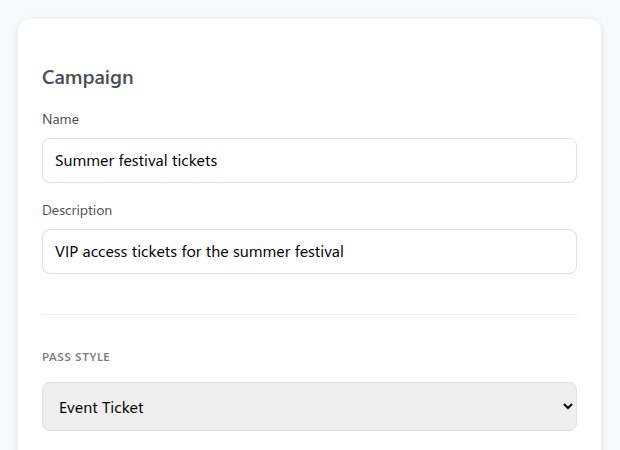
2. Choose **Apple Wallet** or **Google Wallet** as the **Platform**, enter a **Name** for your own reference, for example `Coffee discount` (this labels the campaign in Pushwoosh, it doesn't appear on the pass), and pick a pass style, for example **Store Card** (Apple) or **Loyalty card** (Google).
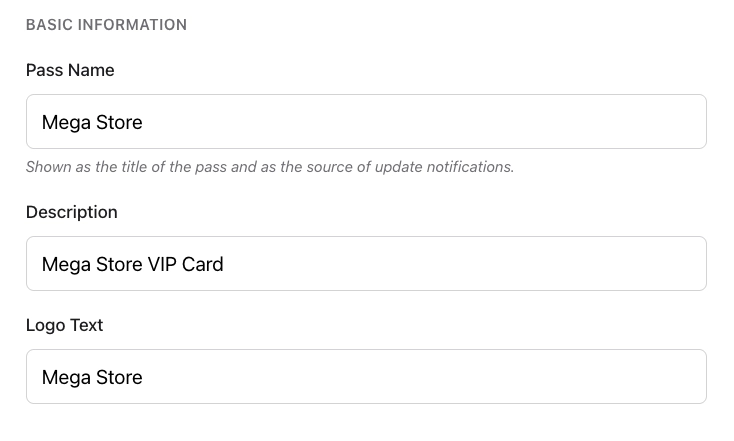
3. Under **Basic Information**, set **Pass Name** to what shows on the pass itself, for example `Coffee Shop`.
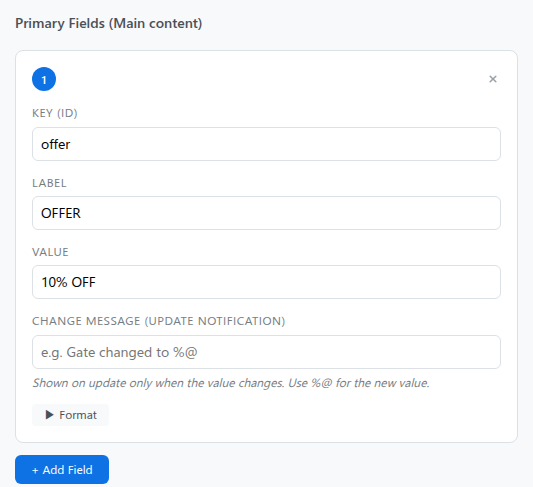
4. Add a field to carry the offer. On Apple Wallet, under **Pass Fields**, this means clicking **Add Field** under **Primary Fields** and setting its **Key (ID)** to `offer` and its **Label** to `OFFER`. Google Wallet's pass types use their own named fields instead of free-form ones. See [Apple Wallet pass fields](/product/messaging-channels/wallet-passes/apple-wallet/pass-builder/#fill-in-pass-fields) or [Google Wallet fields](/product/messaging-channels/wallet-passes/google-wallet/pass-builder/#fill-in-pass-fields) for the exact field names your pass style offers.
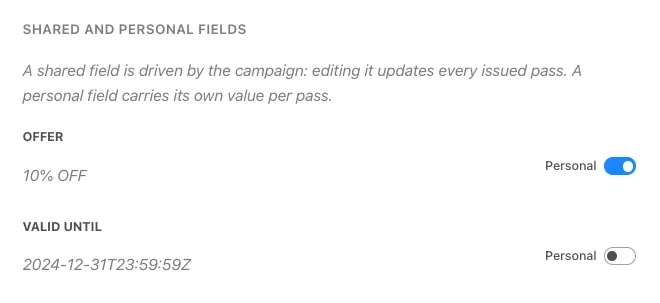
5. In **Shared and personal fields**, that field now appears under its Label. Mark it **Personal**. Later, **Issue Wallet Pass** lists it by that Label (`OFFER` on Apple) and fills it with each member's own `offer_code`.
6. Preview and create the campaign.
Full field-by-field walkthrough: [Create Wallet Pass Campaigns](/product/messaging-channels/wallet-passes/wallet-pass-campaigns/).
## Create the signup event
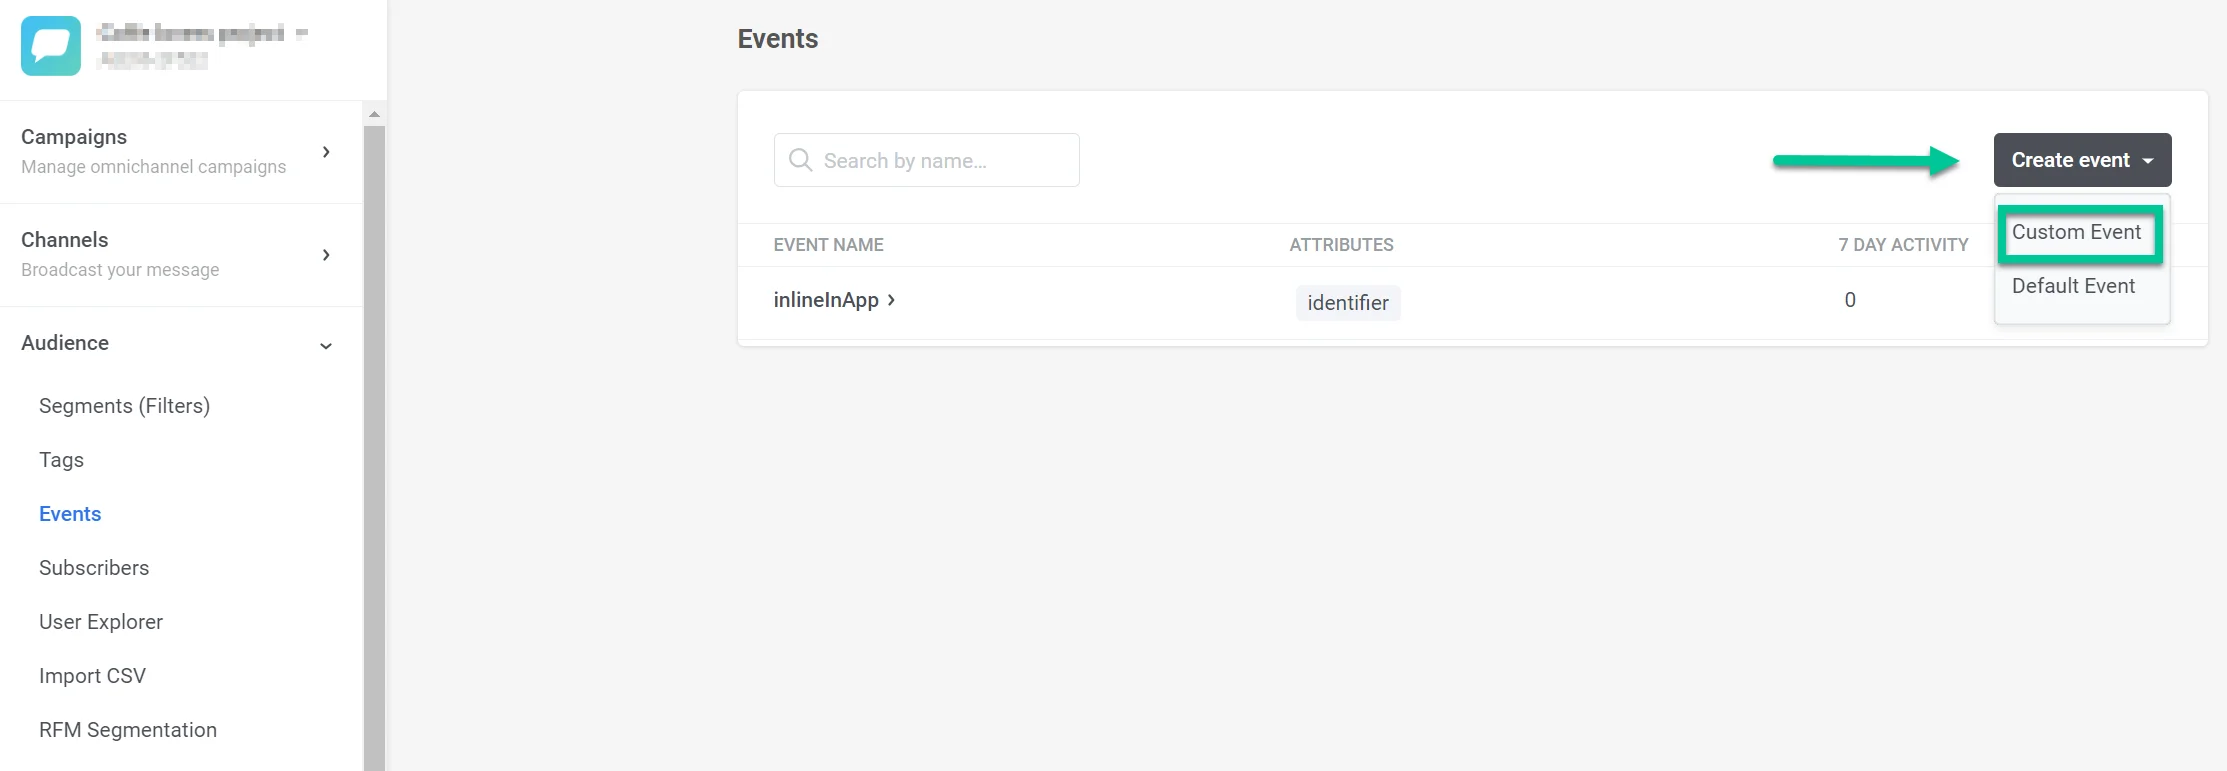
1. Go to **Audience → Events**, click **Create event**, and choose **Custom Event** (not **Default Event**).
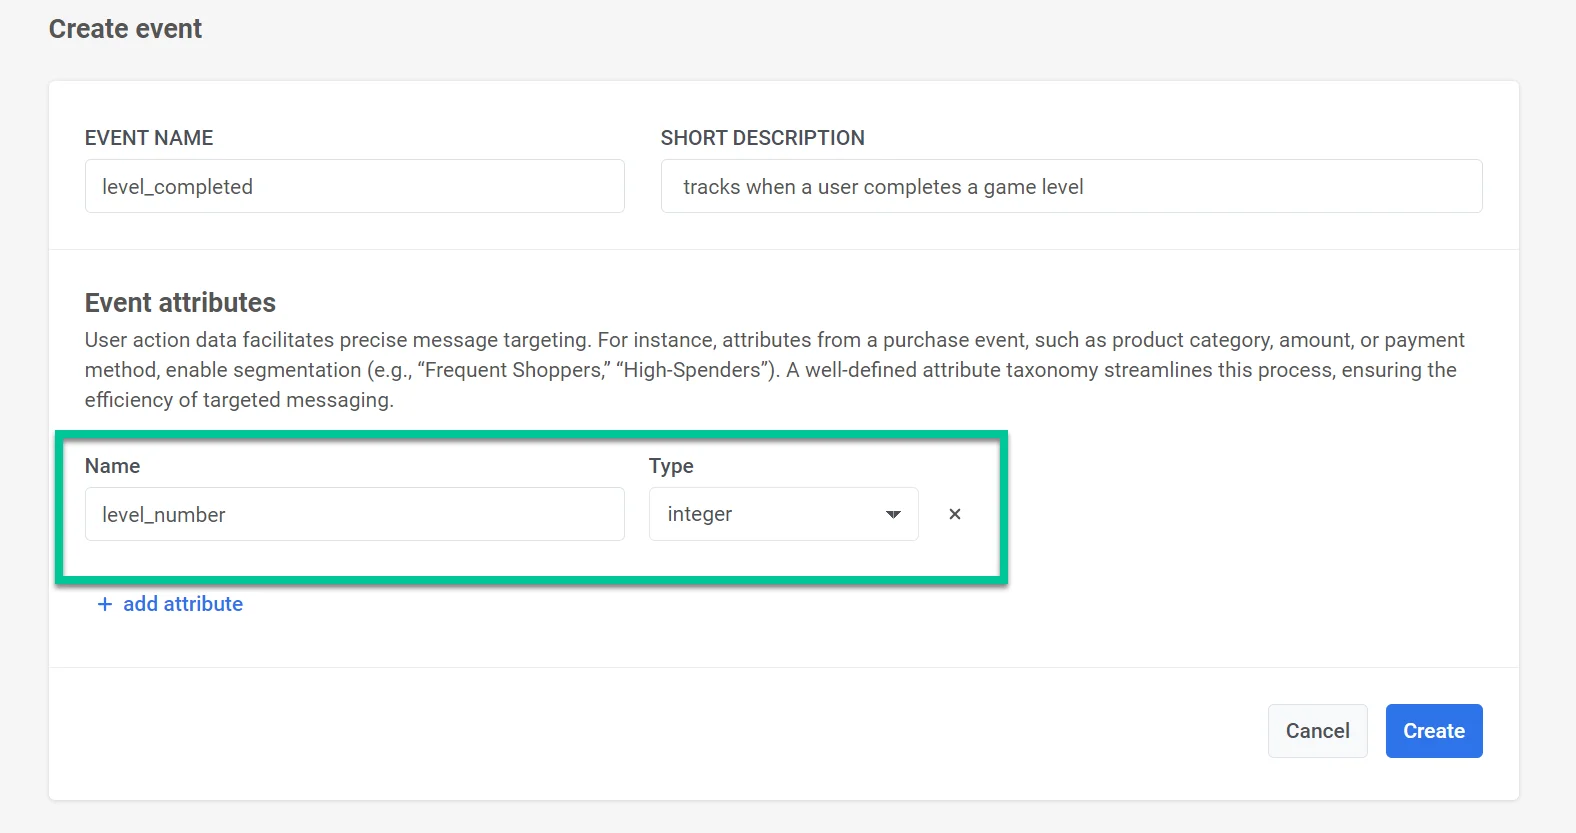
2. Name it `CoffeeClubJoined` and add an attribute for the welcome offer, for example `offer_code`.
3. Ask development to send that event when a member joins, including `offer_code`. [Learn more about creating events](/product/audience-data-and-segmentation/events/#implementation)
## Build the journey
Go to **Campaigns → Customer Journey Builder**, click **Create campaign**, and build everything below on one canvas.
### Set the entry
1. Add a [Trigger-based entry](/product/customer-journey/journey-elements/entry-elements/trigger-based-entry/) element to the canvas.
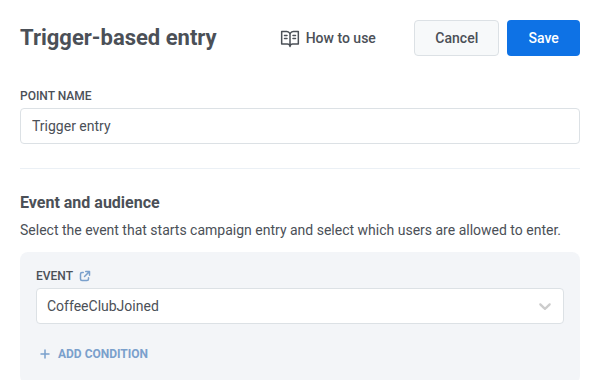
2. Select `CoffeeClubJoined` as the **Event**, so every new member enters as soon as they join.
### Issue the wallet pass
1. Add an [Issue Wallet Pass](/product/customer-journey/journey-elements/channels/issue-wallet-pass/) element after the entry.
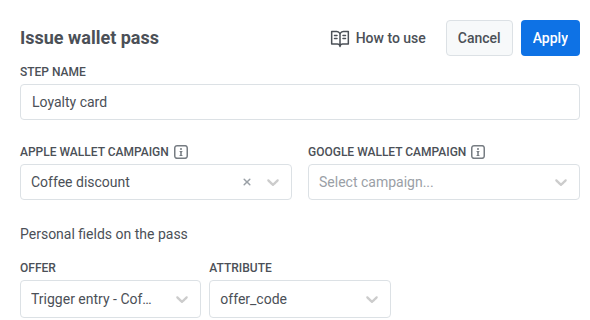
2. Name it `Loyalty card`.
3. In **Apple Wallet campaign**, select the campaign you created for Apple. In **Google Wallet campaign**, select the campaign you created for Google, if you support Android. Each dropdown only lists campaigns for its own platform.
4. Under **Personal fields on the pass**, the list shows the personal field(s) from the campaign(s) you selected. Set **OFFER** (or the field you added on Google Wallet, if you support it) to the trigger entry event and choose `offer_code` as the **Attribute**, so each member's pass carries their own welcome offer.
### Deliver the pass by email
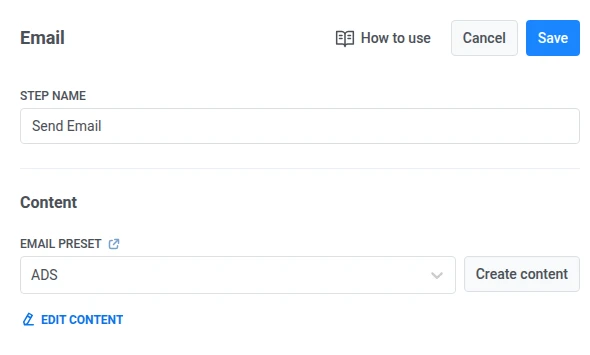
1. Add a [Send Email](/product/customer-journey/journey-elements/channels/email/) element right after **Issue Wallet Pass**.
2. In the message body, insert the install link with vertical bars, for example `{apple_install_link|regular|}` (or `{google_save_link|regular|}`). Do not use a plain `{apple_install_link}`.
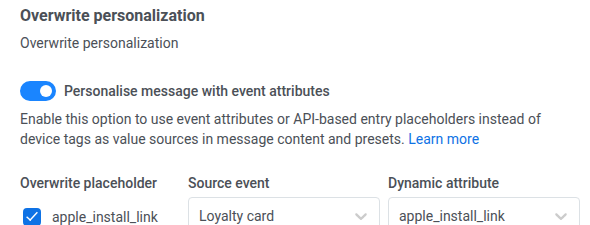
3. Turn on **Personalise message with event attributes**.
4. Check **Overwrite placeholder**, set **Source event** to your **Issue Wallet Pass** **Step Name** (`Loyalty card`), and set **Dynamic attribute** to match the placeholder. Full click path: [Deliver the pass to the user](/product/customer-journey/journey-elements/channels/issue-wallet-pass/#deliver-the-pass-to-the-user).
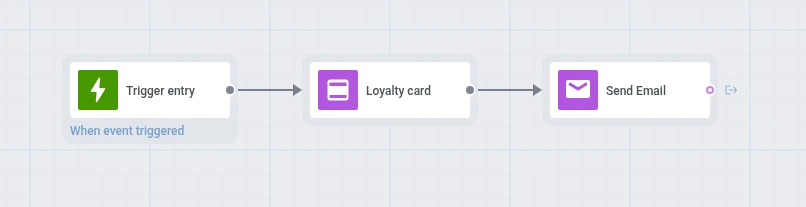
When `CoffeeClubJoined` fires, the member enters the journey, **Issue Wallet Pass** issues their pass with that event's `offer_code`, and **Send Email** sends the welcome message with the link to add it.
### Launch and check
1. Launch the journey when the canvas is ready.
2. After a test signup event, check entries and drop-offs on **Issue Wallet Pass** and the stats on **Send Email**.
 3. Under **Basic Information**, set **Pass Name** to what shows on the pass itself, for example `Coffee Shop`.
 4. Add a field to carry the offer. On Apple Wallet, under **Pass Fields**, this means clicking **Add Field** under **Primary Fields** and setting its **Key (ID)** to `offer` and its **Label** to `OFFER`. Google Wallet's pass types use their own named fields instead of free-form ones. See [Apple Wallet pass fields](/product/messaging-channels/wallet-passes/apple-wallet/pass-builder/#fill-in-pass-fields) or [Google Wallet fields](/product/messaging-channels/wallet-passes/google-wallet/pass-builder/#fill-in-pass-fields) for the exact field names your pass style offers.
 5. In **Shared and personal fields**, that field now appears under its Label. Mark it **Personal**. Later, **Issue Wallet Pass** lists it by that Label (`OFFER` on Apple) and fills it with each member's own `offer_code`.
 6. Preview and create the campaign.
Full field-by-field walkthrough: [Create Wallet Pass Campaigns](/product/messaging-channels/wallet-passes/wallet-pass-campaigns/).
## Create the signup event
1. Go to **Audience → Events**, click **Create event**, and choose **Custom Event** (not **Default Event**).
6. Preview and create the campaign.
Full field-by-field walkthrough: [Create Wallet Pass Campaigns](/product/messaging-channels/wallet-passes/wallet-pass-campaigns/).
## Create the signup event
1. Go to **Audience → Events**, click **Create event**, and choose **Custom Event** (not **Default Event**).
 2. Name it `CoffeeClubJoined` and add an attribute for the welcome offer, for example `offer_code`.
 3. Ask development to send that event when a member joins, including `offer_code`. [Learn more about creating events](/product/audience-data-and-segmentation/events/#implementation)
## Build the journey
Go to **Campaigns → Customer Journey Builder**, click **Create campaign**, and build everything below on one canvas.
### Set the entry
1. Add a [Trigger-based entry](/product/customer-journey/journey-elements/entry-elements/trigger-based-entry/) element to the canvas.
2. Select `CoffeeClubJoined` as the **Event**, so every new member enters as soon as they join.
3. Ask development to send that event when a member joins, including `offer_code`. [Learn more about creating events](/product/audience-data-and-segmentation/events/#implementation)
## Build the journey
Go to **Campaigns → Customer Journey Builder**, click **Create campaign**, and build everything below on one canvas.
### Set the entry
1. Add a [Trigger-based entry](/product/customer-journey/journey-elements/entry-elements/trigger-based-entry/) element to the canvas.
2. Select `CoffeeClubJoined` as the **Event**, so every new member enters as soon as they join.
 ### Issue the wallet pass
1. Add an [Issue Wallet Pass](/product/customer-journey/journey-elements/channels/issue-wallet-pass/) element after the entry.
2. Name it `Loyalty card`.
3. In **Apple Wallet campaign**, select the campaign you created for Apple. In **Google Wallet campaign**, select the campaign you created for Google, if you support Android. Each dropdown only lists campaigns for its own platform.
4. Under **Personal fields on the pass**, the list shows the personal field(s) from the campaign(s) you selected. Set **OFFER** (or the field you added on Google Wallet, if you support it) to the trigger entry event and choose `offer_code` as the **Attribute**, so each member's pass carries their own welcome offer.
### Issue the wallet pass
1. Add an [Issue Wallet Pass](/product/customer-journey/journey-elements/channels/issue-wallet-pass/) element after the entry.
2. Name it `Loyalty card`.
3. In **Apple Wallet campaign**, select the campaign you created for Apple. In **Google Wallet campaign**, select the campaign you created for Google, if you support Android. Each dropdown only lists campaigns for its own platform.
4. Under **Personal fields on the pass**, the list shows the personal field(s) from the campaign(s) you selected. Set **OFFER** (or the field you added on Google Wallet, if you support it) to the trigger entry event and choose `offer_code` as the **Attribute**, so each member's pass carries their own welcome offer.
 ### Deliver the pass by email
1. Add a [Send Email](/product/customer-journey/journey-elements/channels/email/) element right after **Issue Wallet Pass**.
2. In the message body, insert the install link with vertical bars, for example `{apple_install_link|regular|}` (or `{google_save_link|regular|}`). Do not use a plain `{apple_install_link}`.
3. Turn on **Personalise message with event attributes**.
4. Check **Overwrite placeholder**, set **Source event** to your **Issue Wallet Pass** **Step Name** (`Loyalty card`), and set **Dynamic attribute** to match the placeholder. Full click path: [Deliver the pass to the user](/product/customer-journey/journey-elements/channels/issue-wallet-pass/#deliver-the-pass-to-the-user).
### Deliver the pass by email
1. Add a [Send Email](/product/customer-journey/journey-elements/channels/email/) element right after **Issue Wallet Pass**.
2. In the message body, insert the install link with vertical bars, for example `{apple_install_link|regular|}` (or `{google_save_link|regular|}`). Do not use a plain `{apple_install_link}`.
3. Turn on **Personalise message with event attributes**.
4. Check **Overwrite placeholder**, set **Source event** to your **Issue Wallet Pass** **Step Name** (`Loyalty card`), and set **Dynamic attribute** to match the placeholder. Full click path: [Deliver the pass to the user](/product/customer-journey/journey-elements/channels/issue-wallet-pass/#deliver-the-pass-to-the-user).
 When `CoffeeClubJoined` fires, the member enters the journey, **Issue Wallet Pass** issues their pass with that event's `offer_code`, and **Send Email** sends the welcome message with the link to add it.
 ### Launch and check
1. Launch the journey when the canvas is ready.
2. After a test signup event, check entries and drop-offs on **Issue Wallet Pass** and the stats on **Send Email**.
### Launch and check
1. Launch the journey when the canvas is ready.
2. After a test signup event, check entries and drop-offs on **Issue Wallet Pass** and the stats on **Send Email**.