# How to show a website offer with Web Placement
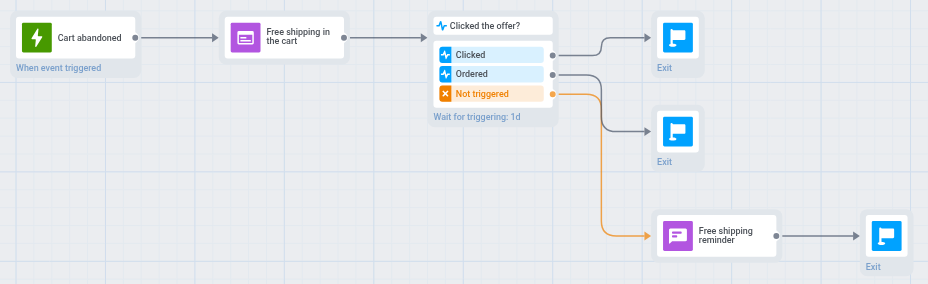
A journey can show an offer right on your website to the users who reach a step, for example a free-shipping banner in the cart of a user who left items there. This guide builds such a journey from start to finish: the offer appears in the cart, users who neither click it nor order within a day get a push, and every order after the offer counts as a conversion.
The finished journey looks like this:
 ## Before you build
* **Website.** Your developers have [prepared the website](/product/customer-journey/journey-elements/channels/web-placement/#prepare-your-website): Web SDK 3.108.1 or later, `setUserId` for signed-in visitors, and the element the offer goes into, for example `` in the cart.
* **Events.** Your site or backend sends an event when a user leaves items in the cart and when they place an order. This guide uses `PW_AbandonedCart` and `PW_OrderCreated`. Send both events with the same User ID that the website passes to `setUserId`: the offer is shown and removed by User ID, so with another ID it never appears on the site or never goes away after the order.
* **Content.** You have [web content](/product/content/web-popup-content/web-content/) with the offer and a button or link, for example **Free shipping nudge with cart items**. Without a button or link, users can't click the offer, and the click branch never fires.
## 1. Start the journey when a cart is abandoned
1. Go to **Campaigns > Customer Journey Builder**.
2. Click **Create campaign**, then **Build a journey from scratch**.
3. Double-click the **Trigger-based Entry** element, which is already on the canvas.
4. In **Event**, select `PW_AbandonedCart`.
5. Click **Save**.
For details, see [How to send a triggered campaign](/tutorials/product-guides/how-to-create-campaigns-in-pushwoosh/how-to-send-a-triggered-campaign/).
## 2. Show the offer in the cart
1. Connect a **Web Placement** element to the entry.
2. Double-click it and set:
* **Web pop-up content:** your offer, for example **Free shipping nudge with cart items**.
* **Inline** instead of **Popup**.
* **CSS selector of the element:** the element in the cart, for example `#pw-cart-slot`.
* **Lifetime:** how long the offer waits for the user, for example 2 days.
* **Hide after an event:** turn it on and select `PW_OrderCreated`, so the offer disappears once the user places an order.
3. In **Preview**, select a **Test device**: a browser with your site open.
4. Click **Show on test device**.
5. On that device, open the cart page and click the button in the offer. This sends `PW_WebPlacementClick` to your application. The event list shows an event only after the application has received it, so without this click you can't select the event in the next step.
6. Click **Save**.
For all settings, see [Web Placement](/product/customer-journey/journey-elements/channels/web-placement/#configure-the-placement).
The user moves on to the next element as soon as the offer is queued for them, not after they see or click it.
## 3. Branch by what the user did
1. Connect a **Wait for Trigger** element to **Web Placement**.
2. In **Waiting period**, enter 1 day.
3. In **Branch 1**, enter `Clicked` as the branch name and select the `PW_WebPlacementClick` event.
4. Click **Add branch**. In **Branch 2**, enter `Ordered` as the branch name and select the `PW_OrderCreated` event.
5. Click **Save**.
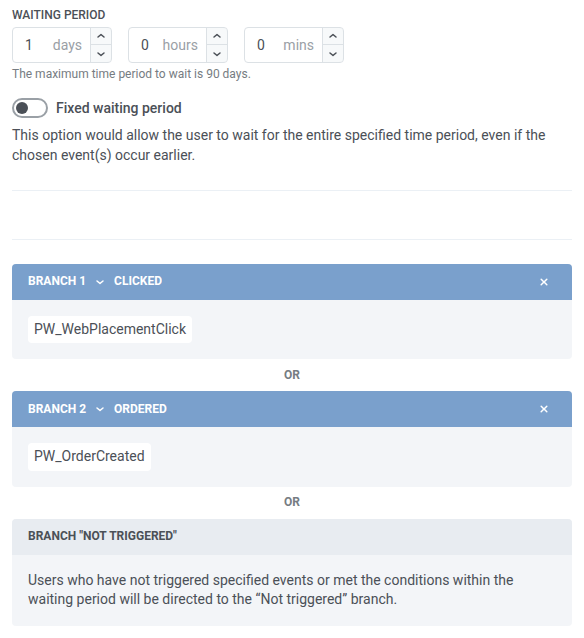 Users who click the offer within a day go to **Clicked**, and users who place an order without clicking go to **Ordered**. Everyone else goes to **Not triggered** after the day ends. Without the **Ordered** branch, a user who ordered without clicking would still get the reminder: **Hide after an event** removes only the offer from the site and doesn't move the user in the journey.
6. Connect **Exit** to the **Clicked** and **Ordered** branches.
7. Connect a **Push** element to the **Not triggered** branch, with a reminder such as "Free shipping on your cart ends soon", then connect **Exit** to it. Users with no push-enabled device don't receive the reminder.
## 4. Count orders as conversions
1. Click **Settings**, then **Conversion goals**.
2. In **Conversion period**, enter 3 days. Orders placed within this period after the user exits the journey count too.
3. In **Event**, select `PW_OrderCreated`.
4. Click **Apply**.
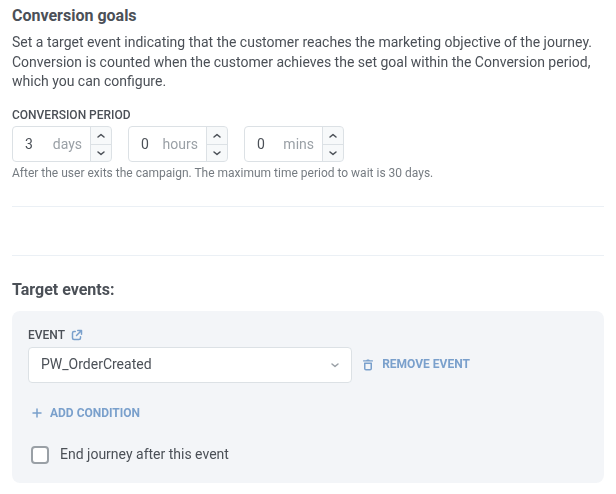 To count clicks on the offer instead of orders, select `PW_WebPlacementClick`.
## 5. Launch and check the results
1. Click **Launch campaign**.
2. In the journey statistics, check the **Web Placement** element: **Shown** is how many times the offer was shown, **Interactions** is how many times it was clicked. See [Placement statistics](/product/customer-journey/journey-elements/channels/web-placement/#placement-statistics).