# How to send a triggered campaign
Pushwoosh lets you message users the moment they take a specific action, such as a signup or a purchase, instead of waiting for a scheduled send. Use cases:
* Welcome a new user right after registration.
* Thank a user after a purchase.
* Remind a user when a custom event fires in your app or on your site.
Unlike a [segmented campaign](/tutorials/product-guides/how-to-create-campaigns-in-pushwoosh/how-to-send-a-segmented-campaign/), a triggered campaign doesn't target a pre-built audience. It starts individually for each user, as soon as their event occurs. [See how segmented and triggered campaigns compare](/tutorials/product-guides/how-to-create-campaigns-in-pushwoosh/#choosing-the-right-campaign-type-for-your-goals).
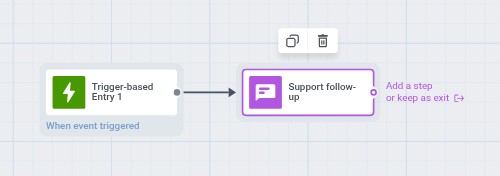
This guide shows a simple path: **Trigger-based entry** → one message → **Launch**. If you need to wait and message only when the user skips a later action, add a [Wait for Trigger](/product/customer-journey/journey-elements/flow-controls/wait-for-trigger/) step after entry.
For journeys started by your backend instead of an in-app event, use [API-based entry](/product/customer-journey/journey-elements/entry-elements/api-based-entry/).
## Before you build
### Event
Your app or backend must send the event (SDK or `/postEvent`). Then pick one path:
* **Default event:** use one already tracked by the Pushwoosh SDK, such as [`PW_InAppPurchase`](/product/audience-data-and-segmentation/events/default-events).
* **Custom event, auto-created:** send the event under a new name. Pushwoosh [creates the event and its attributes](/product/audience-data-and-segmentation/events/#1-create-events-in-pushwoosh-control-panel) from the first call and infers attribute types from the values.
* **Custom event, defined first:** go to **Audience > Events**, add the event and attribute types, then have your app or backend send it. Use this when you need control over attribute types instead of inference.
### Preset
You need message content for the channel you will send. You can:
* Create or reuse a preset under **Content** before you build: [Push](/product/content/push-presets), [Email](/product/content/email-content), [In-app](/product/content/in-apps), [SMS](/product/content/sms-presets), or [WhatsApp](/product/messaging-channels/whatsapp-messages).
* Or create content from the channel step in the journey: open the Push (or other channel) element and use **Create content**. For push, see [Select or create push content](/product/customer-journey/journey-elements/channels/push/#select-or-create-push-content).
## How to build a campaign triggered by a user event
1. Go to **Campaigns > Customer Journey Builder**.
2. Click **Create campaign**.
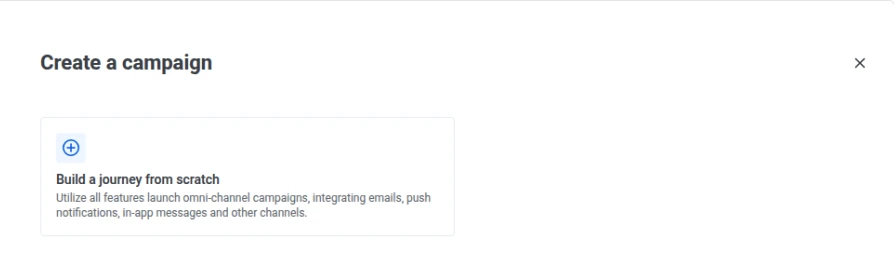
3. Click **Build a journey from scratch**.
4. A **Trigger-based Entry** is already on the canvas when you create the campaign. Double-click it.
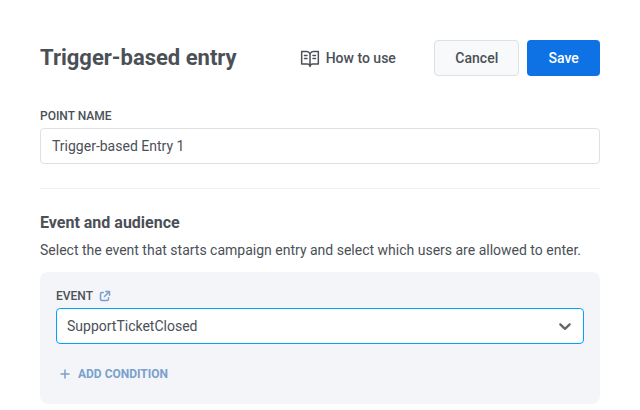
5. Choose the **Event** that should start the campaign. In this example, we use `SupportTicketClosed`, a custom event we defined first in **Audience > Events** (see [Before you build](#before-you-build)).
6. If your event is not in the list yet, click the link icon next to **EVENT** to open **Audience > Events**, [create the event](/product/audience-data-and-segmentation/events/custom-events/) (or wait until tracking has auto-created it), then return here and select it. Your app or backend still needs to send the event for users to enter.
7. Click **Save**.
8. Click **Connect this** on the entry, then choose **Push** as the messaging channel. The Push element appears on the canvas, connected to the entry.
9. Double-click the Push element.
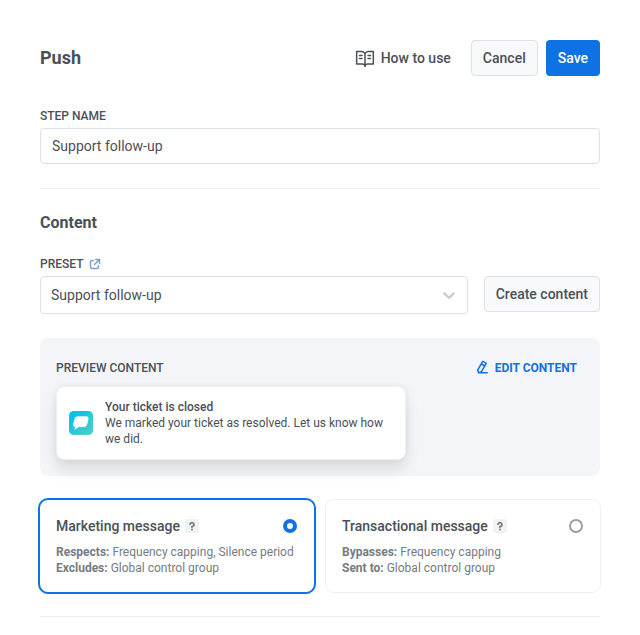
10. Select a **preset**, or click **Create content** to make one in this step. [Learn more about creating push presets](/product/content/push-presets/).
11. Click **Save**.
12. For a one-message campaign, leave the message with no further step, or click the connecting dot on the message and choose **Exit**. Either way, the user leaves after that message.
13. Optional: click the three dots in the upper-left corner, then **Rename**, and name the campaign.
14. Click **Launch**.
## How a triggered campaign behaves once it's running
* **Entry:** each user enters when their own event fires, not on a schedule.
* **Exit:** each user finishes their own run through the campaign as they complete the steps. The whole campaign does not end for everyone at once.
* **Metrics:** opens, clicks, and conversions update as users move through the campaign, rather than only after everyone has exited.
If nobody enters after launch, the event may not be firing, entry conditions may be too narrow, or the user may have no registered device. Review the **Trigger-based Entry** settings and [Trigger-based entry](/product/customer-journey/journey-elements/entry-elements/trigger-based-entry/).
## Common triggered campaign types
* **Welcome and onboarding:** [How to onboard users](/tutorials/product-guides/lifecycle-marketing-campaigns/how-to-onboard-users-with-pushwoosh/)
* **Abandoned cart** (wait for purchase, then message): [How to set up an abandoned cart campaign](/tutorials/product-guides/email-marketing-campaigns/how-to-set-up-an-abandoned-cart-campaign/)
* **Transactional messages** (order confirmations, password resets): [How to send transactional messages](/tutorials/product-guides/how-to-create-campaigns-in-pushwoosh/how-to-send-transactional-messages/)
* **Re-engagement and reminders:** [How to create a re-engagement campaign](/tutorials/product-guides/lifecycle-marketing-campaigns/how-to-create-a-re-engagement-campaign-in-pushwoosh/)
 4. A **Trigger-based Entry** is already on the canvas when you create the campaign. Double-click it.
5. Choose the **Event** that should start the campaign. In this example, we use `SupportTicketClosed`, a custom event we defined first in **Audience > Events** (see [Before you build](#before-you-build)).
6. If your event is not in the list yet, click the link icon next to **EVENT** to open **Audience > Events**, [create the event](/product/audience-data-and-segmentation/events/custom-events/) (or wait until tracking has auto-created it), then return here and select it. Your app or backend still needs to send the event for users to enter.
7. Click **Save**.
4. A **Trigger-based Entry** is already on the canvas when you create the campaign. Double-click it.
5. Choose the **Event** that should start the campaign. In this example, we use `SupportTicketClosed`, a custom event we defined first in **Audience > Events** (see [Before you build](#before-you-build)).
6. If your event is not in the list yet, click the link icon next to **EVENT** to open **Audience > Events**, [create the event](/product/audience-data-and-segmentation/events/custom-events/) (or wait until tracking has auto-created it), then return here and select it. Your app or backend still needs to send the event for users to enter.
7. Click **Save**.
 8. Click **Connect this** on the entry, then choose **Push** as the messaging channel. The Push element appears on the canvas, connected to the entry.
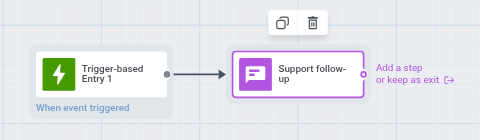 9. Double-click the Push element.
10. Select a **preset**, or click **Create content** to make one in this step. [Learn more about creating push presets](/product/content/push-presets/).
11. Click **Save**.
9. Double-click the Push element.
10. Select a **preset**, or click **Create content** to make one in this step. [Learn more about creating push presets](/product/content/push-presets/).
11. Click **Save**.
 12. For a one-message campaign, leave the message with no further step, or click the connecting dot on the message and choose **Exit**. Either way, the user leaves after that message.
13. Optional: click the three dots in the upper-left corner, then **Rename**, and name the campaign.
14. Click **Launch**.
12. For a one-message campaign, leave the message with no further step, or click the connecting dot on the message and choose **Exit**. Either way, the user leaves after that message.
13. Optional: click the three dots in the upper-left corner, then **Rename**, and name the campaign.
14. Click **Launch**.
 ## How a triggered campaign behaves once it's running
* **Entry:** each user enters when their own event fires, not on a schedule.
* **Exit:** each user finishes their own run through the campaign as they complete the steps. The whole campaign does not end for everyone at once.
* **Metrics:** opens, clicks, and conversions update as users move through the campaign, rather than only after everyone has exited.
If nobody enters after launch, the event may not be firing, entry conditions may be too narrow, or the user may have no registered device. Review the **Trigger-based Entry** settings and [Trigger-based entry](/product/customer-journey/journey-elements/entry-elements/trigger-based-entry/).
## Common triggered campaign types
* **Welcome and onboarding:** [How to onboard users](/tutorials/product-guides/lifecycle-marketing-campaigns/how-to-onboard-users-with-pushwoosh/)
* **Abandoned cart** (wait for purchase, then message): [How to set up an abandoned cart campaign](/tutorials/product-guides/email-marketing-campaigns/how-to-set-up-an-abandoned-cart-campaign/)
* **Transactional messages** (order confirmations, password resets): [How to send transactional messages](/tutorials/product-guides/how-to-create-campaigns-in-pushwoosh/how-to-send-transactional-messages/)
* **Re-engagement and reminders:** [How to create a re-engagement campaign](/tutorials/product-guides/lifecycle-marketing-campaigns/how-to-create-a-re-engagement-campaign-in-pushwoosh/)
## How a triggered campaign behaves once it's running
* **Entry:** each user enters when their own event fires, not on a schedule.
* **Exit:** each user finishes their own run through the campaign as they complete the steps. The whole campaign does not end for everyone at once.
* **Metrics:** opens, clicks, and conversions update as users move through the campaign, rather than only after everyone has exited.
If nobody enters after launch, the event may not be firing, entry conditions may be too narrow, or the user may have no registered device. Review the **Trigger-based Entry** settings and [Trigger-based entry](/product/customer-journey/journey-elements/entry-elements/trigger-based-entry/).
## Common triggered campaign types
* **Welcome and onboarding:** [How to onboard users](/tutorials/product-guides/lifecycle-marketing-campaigns/how-to-onboard-users-with-pushwoosh/)
* **Abandoned cart** (wait for purchase, then message): [How to set up an abandoned cart campaign](/tutorials/product-guides/email-marketing-campaigns/how-to-set-up-an-abandoned-cart-campaign/)
* **Transactional messages** (order confirmations, password resets): [How to send transactional messages](/tutorials/product-guides/how-to-create-campaigns-in-pushwoosh/how-to-send-transactional-messages/)
* **Re-engagement and reminders:** [How to create a re-engagement campaign](/tutorials/product-guides/lifecycle-marketing-campaigns/how-to-create-a-re-engagement-campaign-in-pushwoosh/)