# Prepare for communication
These settings decide how shoppers experience your messages and whether you can tell what works. Set them up before your first message, so shoppers are not asked or messaged at the wrong time and you can measure the results from the first day.
## Ask for push permission at the right moment
Ask for push permission when the shopper has a reason to say yes, not on the first launch, when the shopper is still looking around. A shopper who declines may never turn notifications on. On iOS, the system prompt appears only once per install. If the shopper taps **Don't Allow**, the app can't show it again.
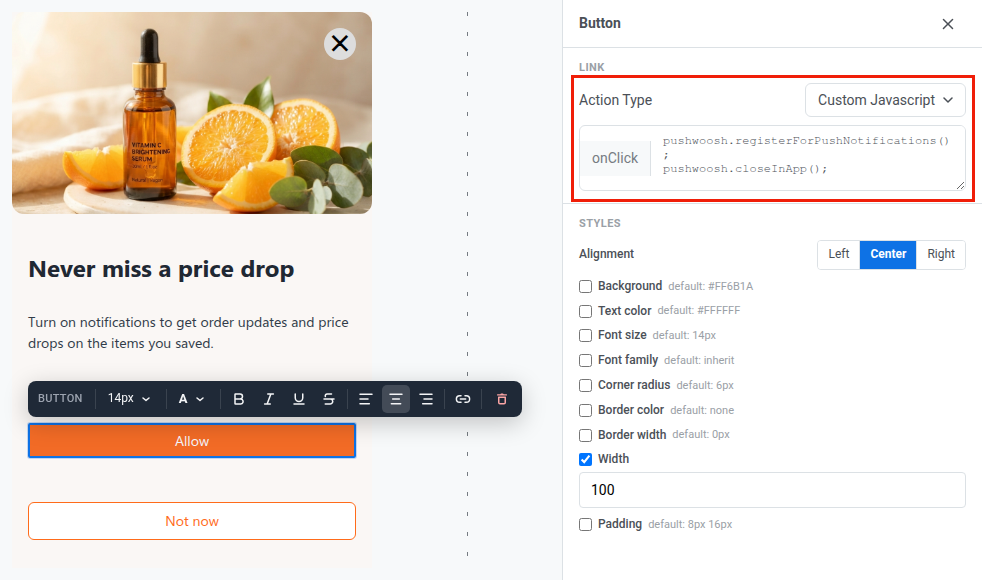
Ask in two steps instead. First, show a custom in-app message that explains what notifications give the shopper, for example order updates and price drops. Second, show the system prompt only when the shopper taps **Allow** in that message.
### Choose the moment
Show the message when the shopper already has a reason to say yes. Choose the event that marks that moment. For example:
* After the first product is saved: the `Product added to wishlist` event, because the shopper can hear about price drops and restocks.
* After the first product is added to the cart: the `Product added to cart` event.
* After the first order: the `Order placed` event, because the shopper can follow the delivery.
### Set it up
First, build the message:
1. Build the in-app message. See [Build the in-app](/product/content/in-apps/show-in-app-before-push-permission-prompt/#build-the-in-app).
2. Skip shoppers who already allowed notifications. See [Skip the prompt for users who already opted in](/product/content/in-apps/show-in-app-before-push-permission-prompt/#skip-the-prompt-for-users-who-already-opted-in).
Then start it with a journey:
3. Create a journey that starts on the event you chose. See [Trigger the in-app before permission is requested](/product/content/in-apps/show-in-app-before-push-permission-prompt/#trigger-the-in-app-before-permission-is-requested). The message appears the next time the shopper opens the app after the event, as **Show in-app** on the In-app element is set to **On next app launch** by default.
4. On the In-app element, choose **Transactional** as the message type, so shoppers in the [control group](#set-up-a-control-group-before-you-launch) are asked too. [Transactional](/product/messaging-channels/marketing-vs-transactional/#choosing-the-right-message-type) is the type for service messages, which skip the control group and frequency capping.
5. On the canvas, click **Settings** and select **Campaign Entry Limit**.
6. Choose **Custom period** and set **Once in** to **a lifetime**. These events repeat, so this limit shows the message to the shopper once.
### If the shopper declines
For shoppers who decline, the [journeys](/tutorials/industry-playbooks/ecommerce/build-the-journeys/) reach them through other channels. A [Reachability check](/product/customer-journey/journey-elements/flow-controls/reachability-check/) sends shoppers down different branches depending on the channels where you can reach them.
## Set delivery rules before you message shoppers
[Delivery rules](/product/messaging-channels/message-delivery-settings/) decide how many messages a shopper gets, at what time, and how fast Pushwoosh sends them. **Settings** → **Message delivery settings** has a tab for each: **Frequency capping**, **Silent hours**, and **Send rate**. Set them before the first journey goes live.
### Limit how many messages shoppers get
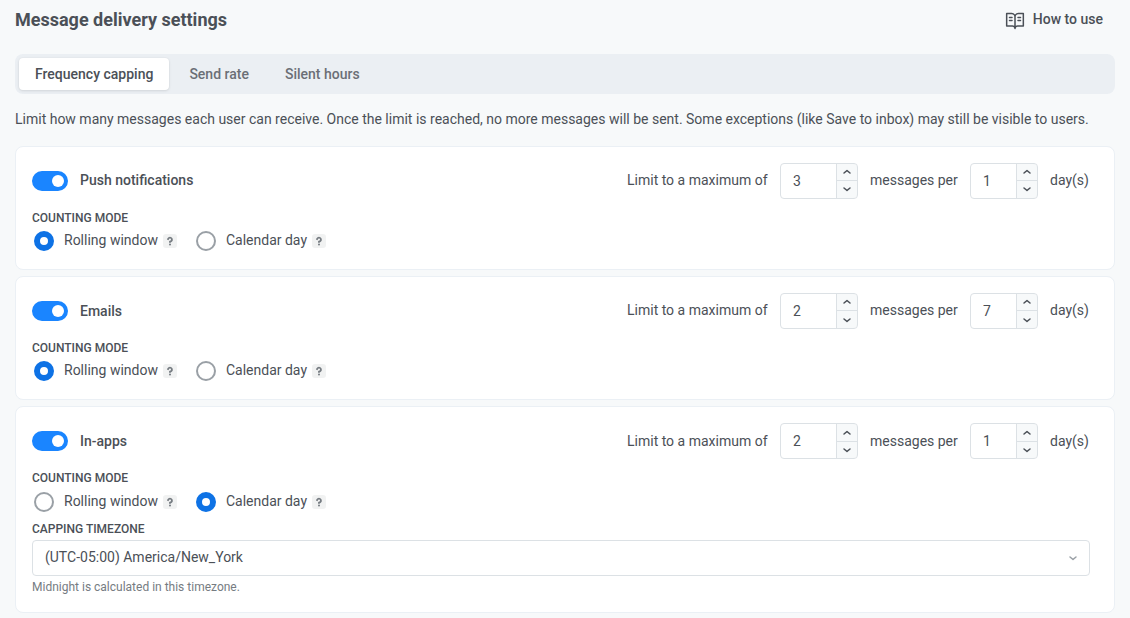
A store runs several journeys at once, and without limits one shopper can receive a cart reminder, a back in stock alert, and a sale announcement on the same evening. Frequency capping sets the limit:
1. Go to **Settings** → **Message delivery settings** → [**Frequency capping**](/product/messaging-channels/message-delivery-settings/frequency-capping/).
2. Turn on the channels you use, such as push, in-app, and email.
3. Set the maximum number of messages and the period for each channel. Allowed values are 1 to 1,000 messages per period, and the period is 1 to 30 days.
4. Choose a counting mode for each channel: **Rolling window** or **Calendar day**. For **Calendar day**, also set **Capping timezone**, the timezone in which the day starts.
5. Click **Apply changes**, then **Confirm**.
Journey messages use the global limits by default. To set other limits for one message, use the **Frequency capping** field of its message element. To change it in a running journey, pause the journey first. See [Global frequency capping](/product/messaging-channels/message-delivery-settings/frequency-capping/).
### Keep marketing messages away from night
To keep marketing messages from arriving at night, set silent hours on the **Silent hours** tab. The hours count in each shopper's time zone. For each channel, choose in **Message behavior** what happens to a message that falls into them: **Send after the silence period ends** (the default) or **Do not send**. These hours apply to one-time campaigns and API sends, not to journeys. For journey messages, set the silence period in each journey. See [Silent hours](/product/messaging-channels/message-delivery-settings/silent-hours/) and [Best practices for every journey](/tutorials/industry-playbooks/ecommerce/build-the-journeys/#best-practices-for-every-journey).
### Send large campaigns at a steady pace
The **Send rate** tab limits how many messages per second Pushwoosh sends on each channel, so a high-volume send goes out at a steady pace instead of all at once. Set it when you plan to send a campaign to a large audience. See [Send rate limits](/product/messaging-channels/message-delivery-settings/send-rate-limits/).
## Set up a control group before you launch
A [control group](/product/audience-data-and-segmentation/control-groups/) holds a share of shoppers out of all marketing messages in the application, or in the countries or tag you limit it to, so you can compare them with everyone else and see what your messaging changes. Create it before you launch the journeys, so the comparison covers them from the first day.
To create a control group, you need permission to modify the application.
1. Go to **Settings** → **Control groups** and click **Add control group**.
2. Enter a name for the group.
3. Set **Group size**: 3%, 5% (recommended), 10%, or **Custom** from 1% to 20%.
4. Choose a mode. **Permanent** keeps the same shoppers out until you turn the group off. **Auto-refresh** picks new shoppers every 1, 2, or 3 months and returns the previous ones to messaging. **Experiment with an end date** returns everyone to messaging on the date you set.
5. Click **Create**.
As soon as the control group is on, the shoppers in it stop receiving marketing messages in any channel, so your journeys reach fewer shoppers by that share. Transactional messages, such as order confirmations and delivery updates, still reach them.
For all the settings, see [Create and manage a control group](/product/audience-data-and-segmentation/control-groups/create-and-manage-control-group/).
 2. Skip shoppers who already allowed notifications. See [Skip the prompt for users who already opted in](/product/content/in-apps/show-in-app-before-push-permission-prompt/#skip-the-prompt-for-users-who-already-opted-in).
Then start it with a journey:
3. Create a journey that starts on the event you chose. See [Trigger the in-app before permission is requested](/product/content/in-apps/show-in-app-before-push-permission-prompt/#trigger-the-in-app-before-permission-is-requested). The message appears the next time the shopper opens the app after the event, as **Show in-app** on the In-app element is set to **On next app launch** by default.
4. On the In-app element, choose **Transactional** as the message type, so shoppers in the [control group](#set-up-a-control-group-before-you-launch) are asked too. [Transactional](/product/messaging-channels/marketing-vs-transactional/#choosing-the-right-message-type) is the type for service messages, which skip the control group and frequency capping.
5. On the canvas, click **Settings** and select **Campaign Entry Limit**.
6. Choose **Custom period** and set **Once in** to **a lifetime**. These events repeat, so this limit shows the message to the shopper once.
### If the shopper declines
For shoppers who decline, the [journeys](/tutorials/industry-playbooks/ecommerce/build-the-journeys/) reach them through other channels. A [Reachability check](/product/customer-journey/journey-elements/flow-controls/reachability-check/) sends shoppers down different branches depending on the channels where you can reach them.
## Set delivery rules before you message shoppers
[Delivery rules](/product/messaging-channels/message-delivery-settings/) decide how many messages a shopper gets, at what time, and how fast Pushwoosh sends them. **Settings** → **Message delivery settings** has a tab for each: **Frequency capping**, **Silent hours**, and **Send rate**. Set them before the first journey goes live.
### Limit how many messages shoppers get
A store runs several journeys at once, and without limits one shopper can receive a cart reminder, a back in stock alert, and a sale announcement on the same evening. Frequency capping sets the limit:
1. Go to **Settings** → **Message delivery settings** → [**Frequency capping**](/product/messaging-channels/message-delivery-settings/frequency-capping/).
2. Turn on the channels you use, such as push, in-app, and email.
3. Set the maximum number of messages and the period for each channel. Allowed values are 1 to 1,000 messages per period, and the period is 1 to 30 days.
4. Choose a counting mode for each channel: **Rolling window** or **Calendar day**. For **Calendar day**, also set **Capping timezone**, the timezone in which the day starts.
 5. Click **Apply changes**, then **Confirm**.
Journey messages use the global limits by default. To set other limits for one message, use the **Frequency capping** field of its message element. To change it in a running journey, pause the journey first. See [Global frequency capping](/product/messaging-channels/message-delivery-settings/frequency-capping/).
### Keep marketing messages away from night
To keep marketing messages from arriving at night, set silent hours on the **Silent hours** tab. The hours count in each shopper's time zone. For each channel, choose in **Message behavior** what happens to a message that falls into them: **Send after the silence period ends** (the default) or **Do not send**. These hours apply to one-time campaigns and API sends, not to journeys. For journey messages, set the silence period in each journey. See [Silent hours](/product/messaging-channels/message-delivery-settings/silent-hours/) and [Best practices for every journey](/tutorials/industry-playbooks/ecommerce/build-the-journeys/#best-practices-for-every-journey).
### Send large campaigns at a steady pace
The **Send rate** tab limits how many messages per second Pushwoosh sends on each channel, so a high-volume send goes out at a steady pace instead of all at once. Set it when you plan to send a campaign to a large audience. See [Send rate limits](/product/messaging-channels/message-delivery-settings/send-rate-limits/).
## Set up a control group before you launch
A [control group](/product/audience-data-and-segmentation/control-groups/) holds a share of shoppers out of all marketing messages in the application, or in the countries or tag you limit it to, so you can compare them with everyone else and see what your messaging changes. Create it before you launch the journeys, so the comparison covers them from the first day.
To create a control group, you need permission to modify the application.
1. Go to **Settings** → **Control groups** and click **Add control group**.
2. Enter a name for the group.
3. Set **Group size**: 3%, 5% (recommended), 10%, or **Custom** from 1% to 20%.
4. Choose a mode. **Permanent** keeps the same shoppers out until you turn the group off. **Auto-refresh** picks new shoppers every 1, 2, or 3 months and returns the previous ones to messaging. **Experiment with an end date** returns everyone to messaging on the date you set.
5. Click **Create**.
As soon as the control group is on, the shoppers in it stop receiving marketing messages in any channel, so your journeys reach fewer shoppers by that share. Transactional messages, such as order confirmations and delivery updates, still reach them.
For all the settings, see [Create and manage a control group](/product/audience-data-and-segmentation/control-groups/create-and-manage-control-group/).