# ส่งข้อความ Telegram ใน Customer Journey
ใช้คู่มือนี้เพื่อส่งข้อความ Telegram ใน [Customer Journey Builder](/th/product/customer-journey/pushwoosh-journey-overview/)
การใช้ Telegram ผ่าน Pushwoosh ช่วยให้คุณใช้งาน Telegram เป็นส่วนหนึ่งของ journeys, การแบ่งกลุ่ม และการวิเคราะห์แบบ omnichannel ของคุณได้ในที่เดียว
## ก่อนที่คุณจะเริ่ม
1. สร้างบอท Telegram ใน **@BotFather** หรือใช้บอทที่มีอยู่แล้ว
2. กำหนดค่า Telegram ใน **Settings > Configure platforms** และยืนยันโทเค็น [เรียนรู้เพิ่มเติม](/th/product/first-steps/start-with-your-project/configure-platforms/telegram-configuration/)
## สร้าง Journey
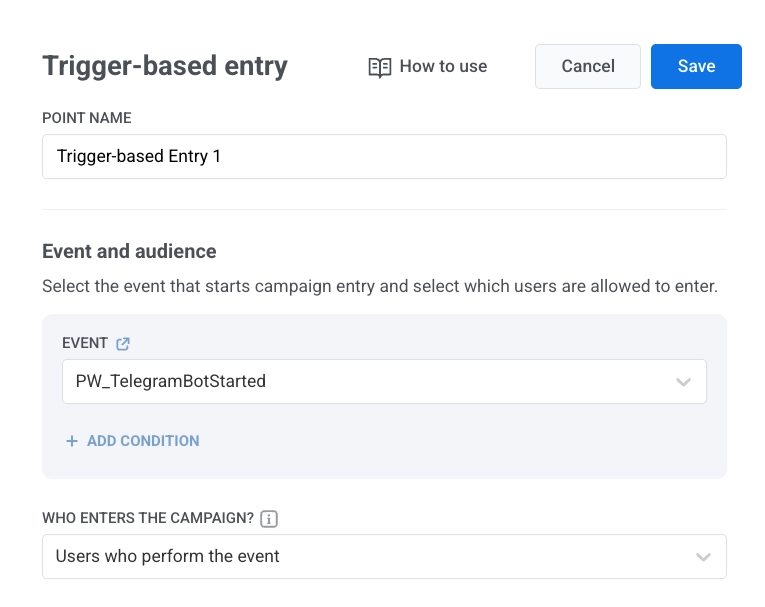
1. เพิ่มองค์ประกอบ [**Trigger-based entry**](/th/product/customer-journey/journey-elements/entry-elements/trigger-based-entry/)
2. เลือก **TelegramBotStarted** เป็น event
 3. เพิ่มองค์ประกอบ **Telegram** ลงในผืนผ้าใบ
## กำหนดค่าเนื้อหาข้อความ
ในองค์ประกอบ Telegram:
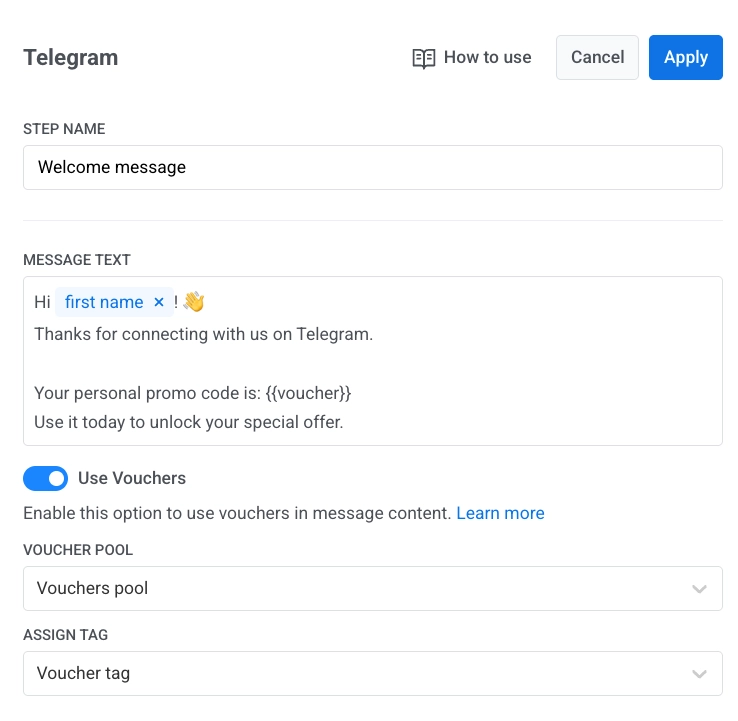
1. ป้อนชื่อองค์ประกอบ
2. ป้อนข้อความของคุณใน **Message text** ให้ข้อความเป็นแบบข้อความเท่านั้นและมีความยาวไม่เกิน 4096 ตัวอักษร
3. (ไม่บังคับ) เพิ่ม tags หรือ Liquid placeholders เพื่อปรับแต่งเนื้อหาในแบบของคุณ [เนื้อหาแบบไดนามิกและ Liquid ใน journeys](/th/product/customer-journey/journey-elements/dynamic-content-and-liquid-templates-in-journeys/)
4. (ไม่บังคับ) เปิดใช้งาน **Use vouchers** เลือก **Voucher pool** และตั้งค่า **Assign tag** [เรียนรู้เพิ่มเติม](/th/product/content/vouchers/)
5. คลิก **Apply**
3. เพิ่มองค์ประกอบ **Telegram** ลงในผืนผ้าใบ
## กำหนดค่าเนื้อหาข้อความ
ในองค์ประกอบ Telegram:
1. ป้อนชื่อองค์ประกอบ
2. ป้อนข้อความของคุณใน **Message text** ให้ข้อความเป็นแบบข้อความเท่านั้นและมีความยาวไม่เกิน 4096 ตัวอักษร
3. (ไม่บังคับ) เพิ่ม tags หรือ Liquid placeholders เพื่อปรับแต่งเนื้อหาในแบบของคุณ [เนื้อหาแบบไดนามิกและ Liquid ใน journeys](/th/product/customer-journey/journey-elements/dynamic-content-and-liquid-templates-in-journeys/)
4. (ไม่บังคับ) เปิดใช้งาน **Use vouchers** เลือก **Voucher pool** และตั้งค่า **Assign tag** [เรียนรู้เพิ่มเติม](/th/product/content/vouchers/)
5. คลิก **Apply**
 ## สรุปและเปิดใช้งาน Journey
ทำให้ Journey สมบูรณ์และเพิ่ม [**Exit element**](/th/product/customer-journey/journey-elements#exit-from-journey)
เมื่อแคมเปญพร้อมแล้ว ให้คลิก **Launch campaign**
## การเข้าถึงและสถิติ
หากการส่งล้มเหลวเนื่องจากปัญหาเครือข่ายชั่วคราว Pushwoosh จะลองส่งใหม่อัตโนมัติ
หาก Telegram ส่งคืนค่า `bot blocked` หรือ `chat not found` Pushwoosh จะทำเครื่องหมายผู้ใช้ว่าไม่สามารถเข้าถึงได้สำหรับ Telegram:
* `bot blocked` จะปรากฏใน **Statistics** เป็น **Skipped who blocked the bot**
* `chat not found` จะปรากฏใน **Statistics** เป็น **Skipped for those whose chat was not found**
[เรียนรู้เพิ่มเติมเกี่ยวกับสถิติ Telegram](/th/product/statistics-and-analytics/journey-statistics/journey-element-statistics/#telegram)
## ดูข้อมูลผู้ใช้ใน User Explorer
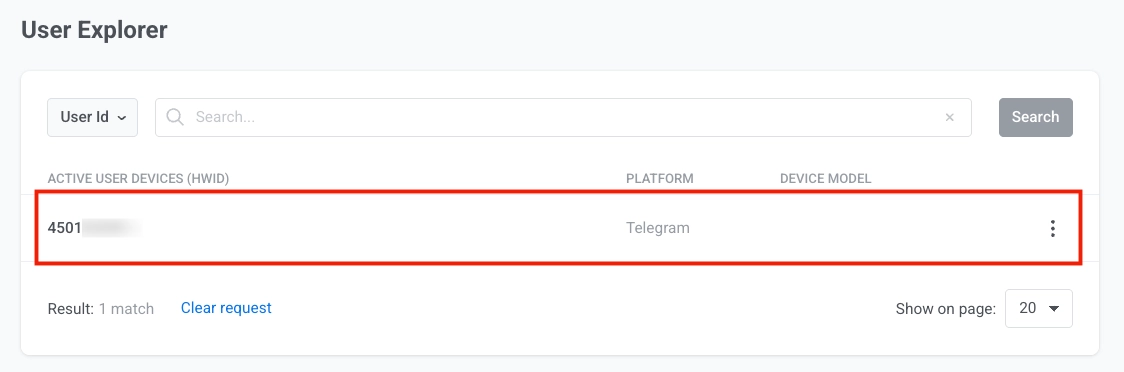
เมื่อผู้ใช้เริ่มการสนทนากับบอทของคุณ Pushwoosh จะสร้างโปรไฟล์ใน **User Explorer** โดยมี **Telegram** เป็นแพลตฟอร์มและมี ID ผู้ใช้ Telegram
## สรุปและเปิดใช้งาน Journey
ทำให้ Journey สมบูรณ์และเพิ่ม [**Exit element**](/th/product/customer-journey/journey-elements#exit-from-journey)
เมื่อแคมเปญพร้อมแล้ว ให้คลิก **Launch campaign**
## การเข้าถึงและสถิติ
หากการส่งล้มเหลวเนื่องจากปัญหาเครือข่ายชั่วคราว Pushwoosh จะลองส่งใหม่อัตโนมัติ
หาก Telegram ส่งคืนค่า `bot blocked` หรือ `chat not found` Pushwoosh จะทำเครื่องหมายผู้ใช้ว่าไม่สามารถเข้าถึงได้สำหรับ Telegram:
* `bot blocked` จะปรากฏใน **Statistics** เป็น **Skipped who blocked the bot**
* `chat not found` จะปรากฏใน **Statistics** เป็น **Skipped for those whose chat was not found**
[เรียนรู้เพิ่มเติมเกี่ยวกับสถิติ Telegram](/th/product/statistics-and-analytics/journey-statistics/journey-element-statistics/#telegram)
## ดูข้อมูลผู้ใช้ใน User Explorer
เมื่อผู้ใช้เริ่มการสนทนากับบอทของคุณ Pushwoosh จะสร้างโปรไฟล์ใน **User Explorer** โดยมี **Telegram** เป็นแพลตฟอร์มและมี ID ผู้ใช้ Telegram
 โปรไฟล์ประกอบด้วย:
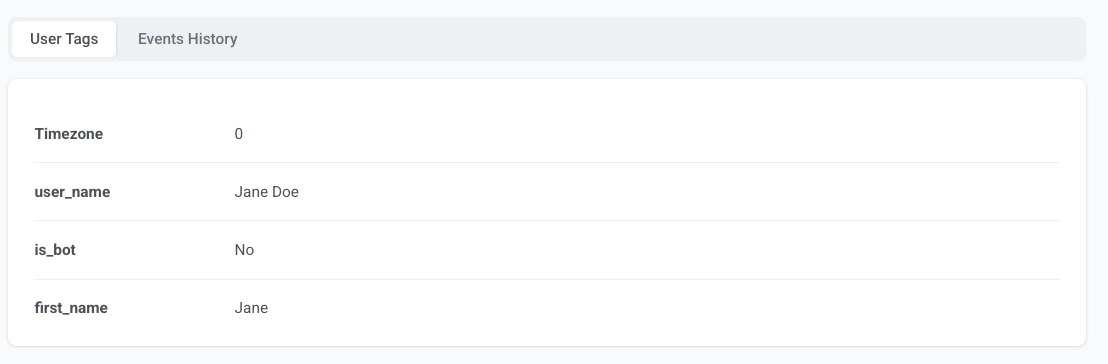
- user tags ที่ได้รับจาก Telegram
- events เช่น `PW_TelegramBotStarted`
โปรไฟล์ประกอบด้วย:
- user tags ที่ได้รับจาก Telegram
- events เช่น `PW_TelegramBotStarted`