# การส่ง push ครั้งเดียวผ่าน Customer Journey
คุณสามารถส่ง push notification แบบครั้งเดียวผ่าน Customer Journey Builder แทนการใช้ [แบบฟอร์มส่ง push ครั้งเดียว](/th/product/messaging-channels/push-notifications/send-push-notifications/one-time-push/) ได้ กระบวนการนี้เหมือนกันทั้งสำหรับมือถือและเว็บ
## สร้าง Journey
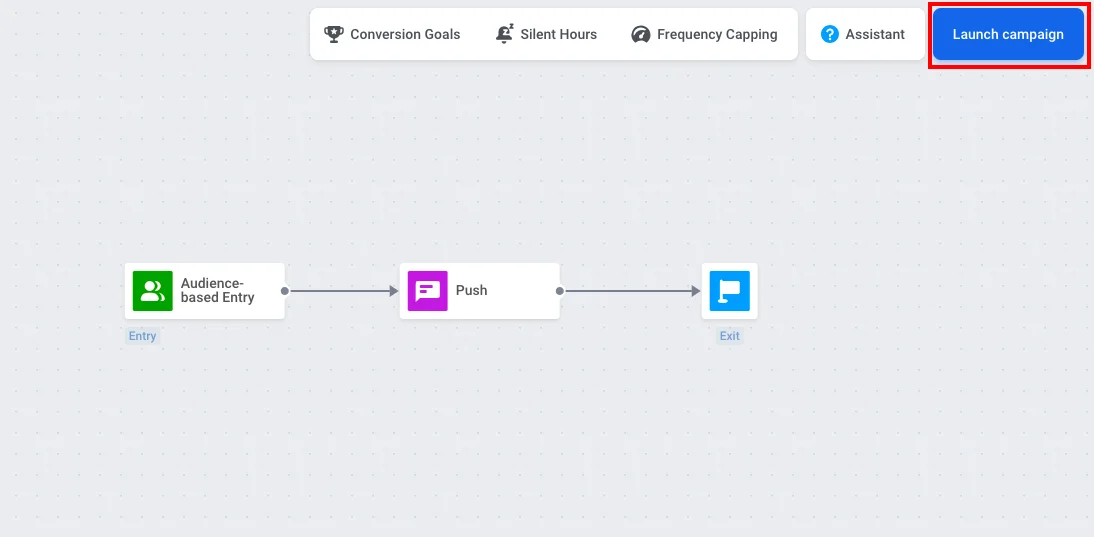
เมื่อคุณสร้างแคมเปญ push ใน Customer Journey Builder ให้เลือกเทมเพลต **One-time campaign** ซึ่งจะเพิ่มองค์ประกอบ [Audience-based Entry](/th/product/customer-journey/journey-elements/entry-elements/audience-based-entry/), [Push](/th/product/customer-journey/journey-elements/channels/push/) และ [Exit](/th/product/customer-journey/journey-elements/flow-controls/exit/) ลงใน canvas และเชื่อมต่อองค์ประกอบเหล่านั้นให้คุณโดยอัตโนมัติ
คุณยังสามารถสร้าง Journey ด้วยตนเองได้โดยการลากองค์ประกอบทั้งสามนี้ลงบน canvas และเชื่อมต่อตามลำดับ
## กำหนดกลุ่มเป้าหมาย (Audience)
ดับเบิลคลิกที่องค์ประกอบ **Audience-based Entry** เพื่อเลือกผู้ที่จะได้รับ push ในองค์ประกอบเดียวกันนี้ คุณสามารถตั้งค่า **Scheduled Launch** เพื่อส่ง push ในวันที่และเวลาที่กำหนดได้ [เรียนรู้เพิ่มเติมเกี่ยวกับ Audience-based Entry](/th/product/customer-journey/journey-elements/entry-elements/audience-based-entry/) รวมถึง [Scheduled launch](/th/product/customer-journey/journey-elements/entry-elements/audience-based-entry/#scheduled-launch)
หากคุณมี segment ของผู้ใช้ที่เลือกรับการแจ้งเตือนอยู่แล้ว (เช่น Push Alerts Enabled) ในส่วน **Audience Source** ให้เลือก segment นั้น
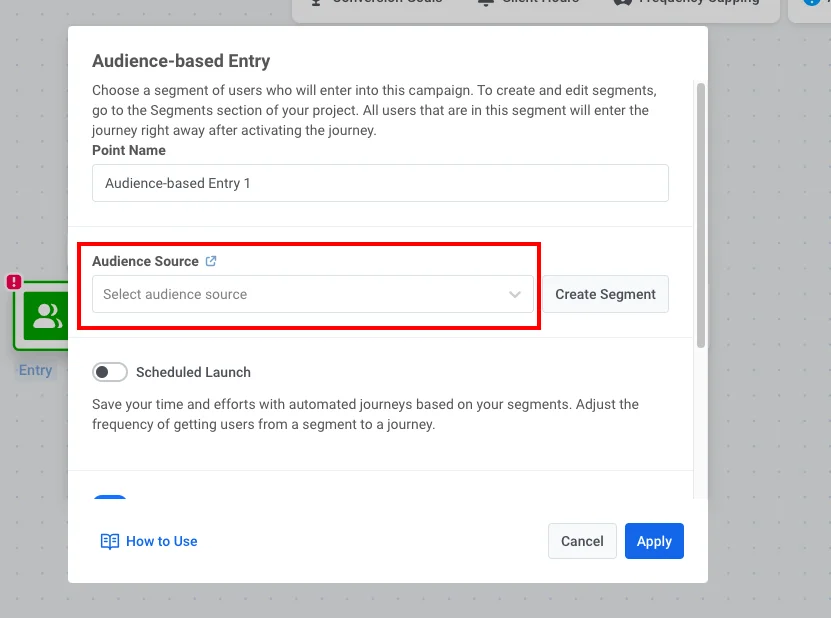 หากคุณต้องการสร้าง segment:
1. คลิก **Create Segment**
2. ในเครื่องมือสร้าง segment ให้เพิ่มตัวกรอง: tag **Push Alerts Enabled** เป็น true
3. คลิก **Save segment**
## กำหนดค่า push และเปิดใช้งาน
1. ดับเบิลคลิกที่องค์ประกอบ **Push** และเลือกหรือ [สร้างเนื้อหา push](/th/product/content/push-presets/)
[เรียนรู้เพิ่มเติมเกี่ยวกับองค์ประกอบ Push ใน Customer Journey](/th/product/customer-journey/journey-elements/channels/push/)
2. เมื่อ Journey พร้อมแล้ว ให้คลิก **Launch campaign**
หากคุณต้องการสร้าง segment:
1. คลิก **Create Segment**
2. ในเครื่องมือสร้าง segment ให้เพิ่มตัวกรอง: tag **Push Alerts Enabled** เป็น true
3. คลิก **Save segment**
## กำหนดค่า push และเปิดใช้งาน
1. ดับเบิลคลิกที่องค์ประกอบ **Push** และเลือกหรือ [สร้างเนื้อหา push](/th/product/content/push-presets/)
[เรียนรู้เพิ่มเติมเกี่ยวกับองค์ประกอบ Push ใน Customer Journey](/th/product/customer-journey/journey-elements/channels/push/)
2. เมื่อ Journey พร้อมแล้ว ให้คลิก **Launch campaign**