อีเมล
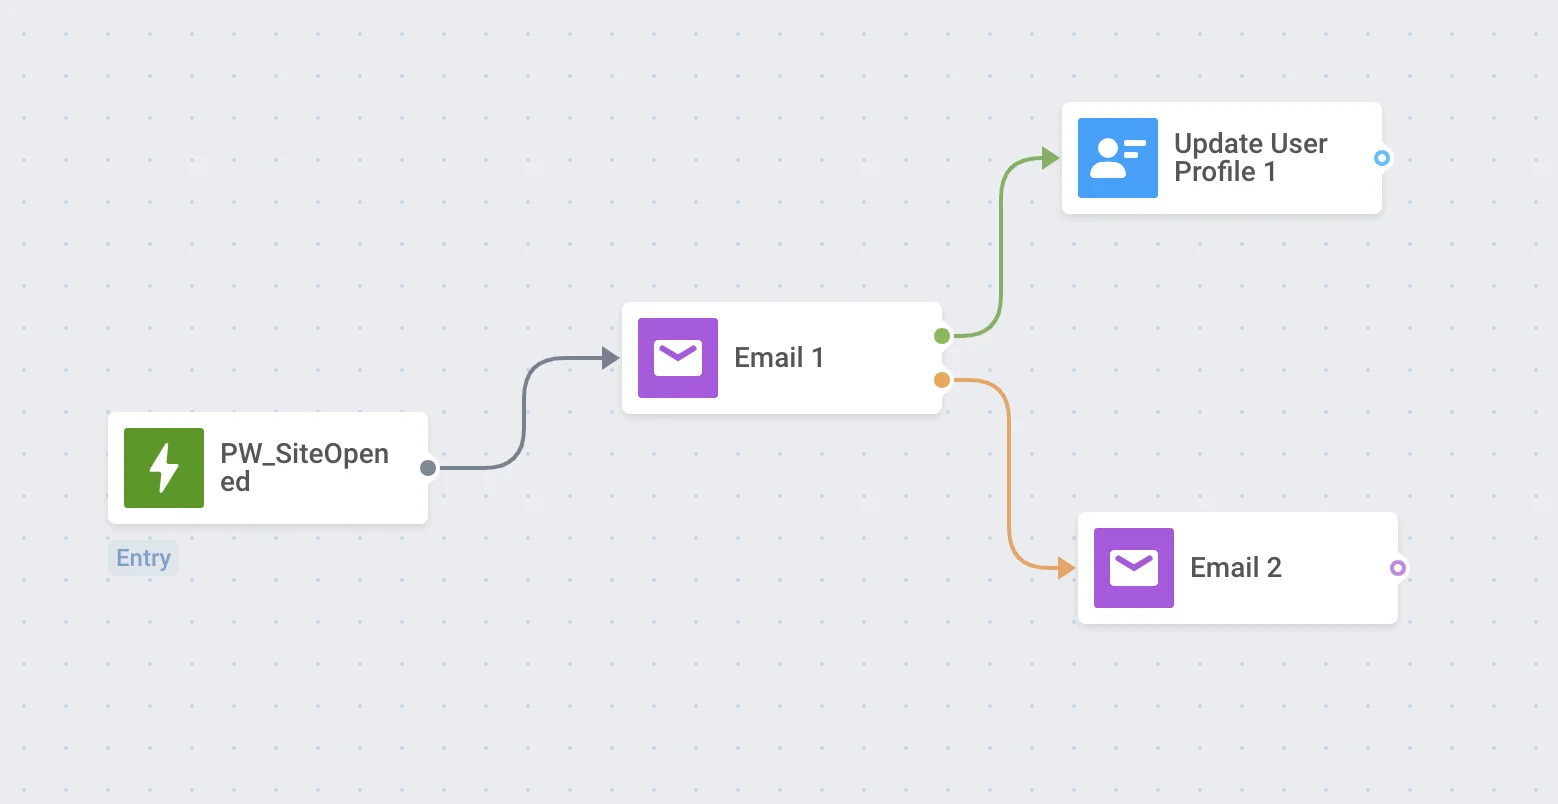
องค์ประกอบอีเมล (Email element) ระบุจุดที่จะสื่อสารกับลูกค้าด้วยข้อความอีเมล
หากต้องการส่งอีเมลในช่วงเวลาใดเวลาหนึ่งของ Customer Journey ให้เพิ่มองค์ประกอบอีเมล (Email element) ลงใน canvas ตามหลังองค์ประกอบที่คุณพิจารณาว่าเป็นพื้นฐานที่เหมาะสมสำหรับการสื่อสาร
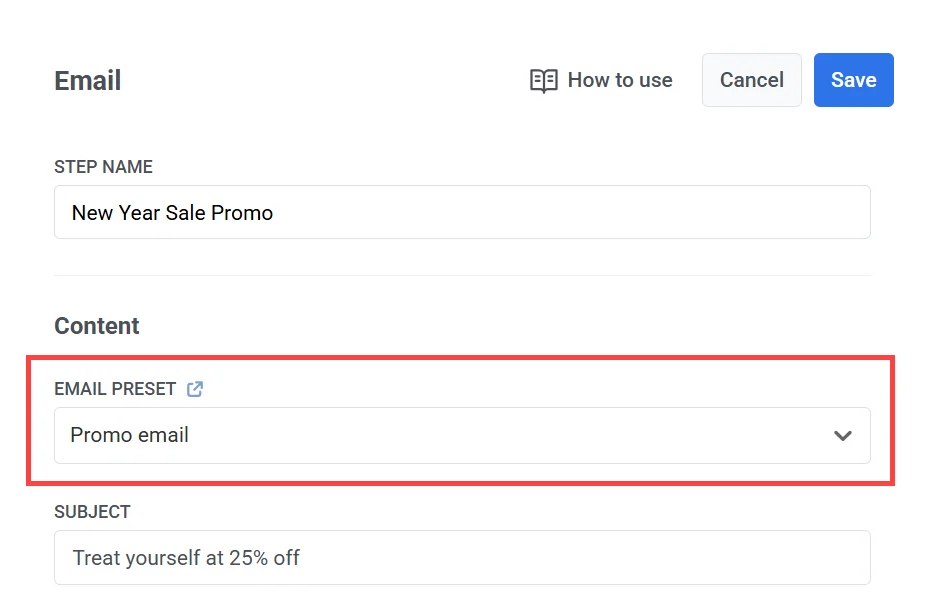
เลือกเนื้อหาอีเมล
Anchor link toเลือกเนื้อหาอีเมลที่คุณต้องการใช้
ตั้งค่าประเภทข้อความ
Anchor link toเลือก Marketing message หรือ Transactional message:
- Marketing message: เคารพการตั้งค่าการสมัครรับข้อมูล, การเลือกไม่รับ และการจำกัดความถี่ (frequency capping) จะไม่ถูกส่งไปยัง กลุ่มควบคุมส่วนกลาง (global control group) หากคุณเลือกตัวเลือกนี้ ให้เลือกหมวดหมู่การสมัครรับข้อมูล (เช่น Product Updates, Newsletter) จากเมนูแบบเลื่อนลงเพื่อให้ข้อความสอดคล้องกับความต้องการของผู้สมัครรับข้อมูล
- Transactional message: ส่งถึงผู้ใช้ทุกคนโดยไม่คำนึงถึงสถานะการสมัครรับข้อมูล จะถูกส่งไปยังกลุ่มควบคุม เรียนรู้วิธีที่ประเภทข้อความส่งผลต่อการจัดส่ง
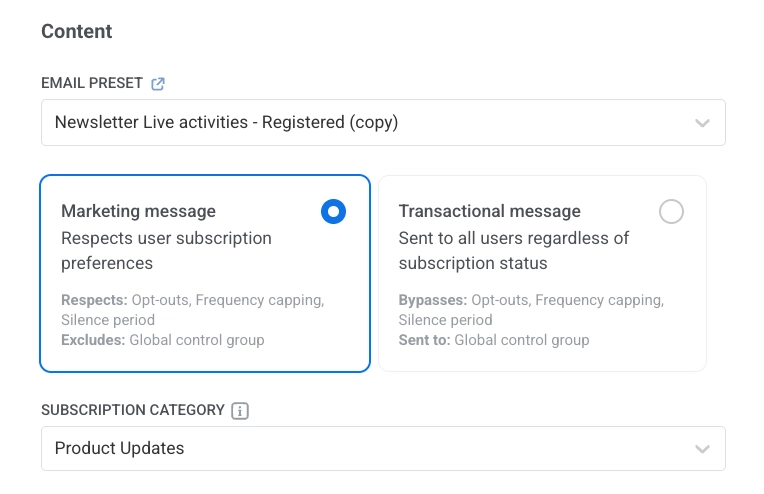
เลือกหมวดหมู่การสมัครรับข้อมูล
Anchor link toหากคุณเลือก Marketing message ให้เลือกหมวดหมู่จากเมนูแบบเลื่อนลง (เช่น Product Updates, Newsletter, Promotional) เพื่อให้ข้อความสอดคล้องกับความต้องการของผู้สมัครรับข้อมูลของคุณ
หมวดหมู่ต่างๆ ถูกกำหนดไว้ในศูนย์การตั้งค่าการสมัครรับข้อมูล
ตั้งค่าหัวเรื่อง
Anchor link toเมื่อคุณเลือกค่าที่ตั้งไว้ล่วงหน้าสำหรับอีเมล หัวเรื่องจะปรากฏขึ้นโดยอัตโนมัติในช่อง Subject หากค่าที่ตั้งไว้ล่วงหน้านั้นมีหัวเรื่องอยู่แล้ว
- หากมีหัวเรื่องที่กรอกไว้ล่วงหน้า คุณสามารถเก็บไว้หรือแก้ไขเพื่อให้เข้ากับแคมเปญของคุณได้ดียิ่งขึ้น
- หากค่าที่ตั้งไว้ล่วงหน้าไม่มีหัวเรื่อง ช่องจะว่างเปล่า และคุณสามารถป้อนหัวเรื่องใหม่ได้ด้วยตนเอง
ตรวจสอบให้แน่ใจว่าหัวเรื่องของคุณสั้น ชัดเจน และน่าสนใจ เนื่องจากเป็นสิ่งแรกที่ผู้รับจะเห็นในกล่องจดหมายของพวกเขา
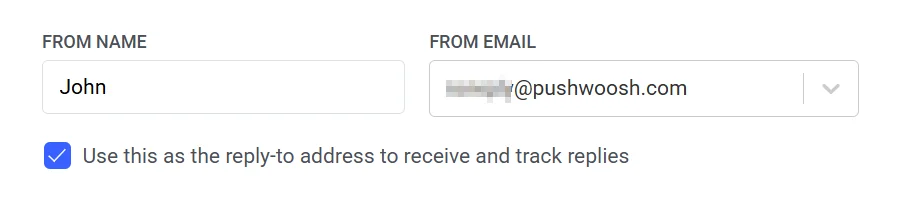
กำหนดรายละเอียดผู้ส่งและที่อยู่สำหรับตอบกลับ
Anchor link toคุณสามารถปรับแต่งที่อยู่ From Email สำหรับข้อความที่ส่งผ่าน Customer Journey ได้ ซึ่งจะช่วยให้คุณควบคุมตัวตนของผู้ส่งให้สอดคล้องกับแบรนด์แคมเปญหรือกลยุทธ์การสื่อสารของคุณ
ในการตั้งค่าที่อยู่อีเมลผู้ส่ง:
- ป้อนที่อยู่ผู้ส่งที่ต้องการในช่อง From Email (เช่น
marketing@testdomain.com) - ป้อนชื่อที่จะปรากฏเป็นผู้ส่งในช่อง From Name
- (ไม่บังคับ) เปิดใช้งานช่องทำเครื่องหมาย Use this as the reply-to address to receive and track replies หากคุณต้องการให้การตอบกลับส่งไปยังที่อยู่เดียวกัน
หมายเหตุ: ที่อยู่อีเมลต้องเป็นของโดเมนที่ได้รับการยืนยันในโปรเจกต์ Pushwoosh ของคุณ โปรดดูขั้นตอนการยืนยันโดเมนในคู่มือการกำหนดค่าอีเมล
กำหนดการตั้งค่าการจัดส่งข้อความ
Anchor link toตั้งค่าการจำกัดความถี่ (Frequency capping)
Anchor link toใช้ Frequency capping เพื่อควบคุมความถี่ที่ผู้ใช้จะได้รับข้อความอีเมล ซึ่งช่วยป้องกันการส่งข้อความมากเกินไปและลดการยกเลิกการสมัคร
เลือกหนึ่งในตัวเลือกต่อไปนี้:
-
Use global frequency capping settings ใช้ขีดจำกัดอีเมลทั่วทั้งโปรเจกต์ที่ตั้งค่าไว้ในการตั้งค่า Global frequency capping ตัวอย่าง: หากขีดจำกัดคือ 3 อีเมลใน 9 วัน อีเมลเพิ่มเติมใดๆ ในช่วงเวลานั้นจะถูกข้ามไป
-
Ignore global frequency capping ส่งอีเมลโดยไม่คำนึงว่าผู้ใช้ได้รับข้อความไปแล้วกี่ฉบับ ใช้ตัวเลือกนี้ด้วยความระมัดระวังเพื่อหลีกเลี่ยงการทำให้ผู้รับรู้สึกท่วมท้น
-
Use custom frequency capping แทนที่การตั้งค่าส่วนกลางด้วยขีดจำกัดที่กำหนดเองสำหรับขั้นตอนอีเมลนี้ หากผู้ใช้เกินขีดจำกัดที่คุณกำหนดเอง อีเมลจะไม่ถูกส่ง และพวกเขาจะย้ายไปยังขั้นตอนถัดไปใน Journey เรียนรู้เพิ่มเติม
ตั้งค่าขีดจำกัดอัตราการส่ง
Anchor link toการตั้งค่า Send rate ควบคุมความเร็วในการส่งข้อความไปยังกลุ่มเป้าหมายของคุณ การปรับอัตราการส่งช่วยให้คุณจัดการความเร็วในการจัดส่ง ป้องกันการโอเวอร์โหลดของแบ็กเอนด์ และปรับปรุงความสามารถในการจัดส่งโดยรวม
เลือกหนึ่งในตัวเลือกต่อไปนี้:
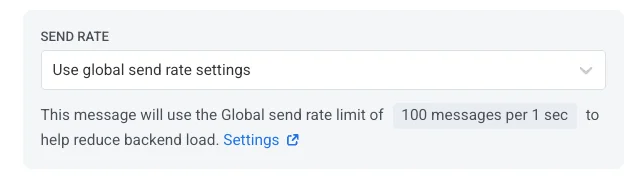
- Use global send rate settings
ใช้ขีดจำกัดอัตราการส่งที่กำหนดค่าไว้ในการตั้งค่าการจัดส่งข้อความของโปรเจกต์ของคุณ หากไม่มีการตั้งค่าขีดจำกัด ข้อความทั้งหมดจะถูกส่งทันที ใช้ตัวเลือกนี้เมื่อคุณต้องการให้ความเร็วในการจัดส่งเป็นไปตามกฎเริ่มต้นของโปรเจกต์ของคุณ เรียนรู้เพิ่มเติมเกี่ยวกับขีดจำกัดอัตราการส่งส่วนกลาง
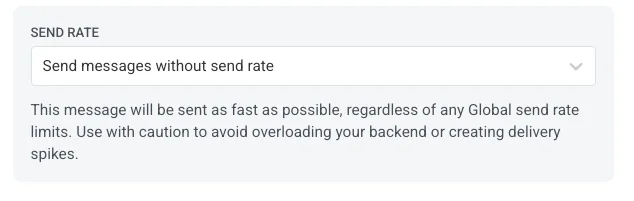
- Send messages without send rate
ส่งข้อความให้เร็วที่สุดเท่าที่จะทำได้ โดยไม่สนใจขีดจำกัดอัตราการส่งส่วนกลางใดๆ ใช้ด้วยความระมัดระวังเพื่อหลีกเลี่ยงการโอเวอร์โหลดแบ็กเอนด์ของคุณหรือสร้างการพุ่งสูงขึ้นของการจัดส่ง
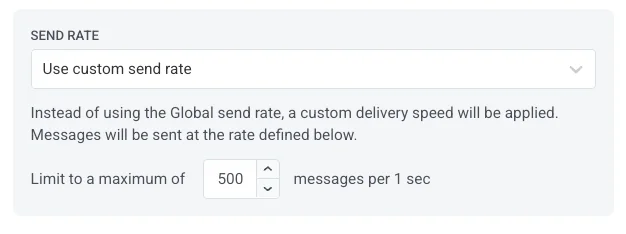
- Use custom send rate
แทนที่อัตราการส่งส่วนกลางสำหรับข้อความนี้เท่านั้น ช่วยให้คุณสามารถระบุจำนวนข้อความที่ส่งต่อนาที ทำให้คุณควบคุมความเร็วในการจัดส่งได้อย่างเต็มที่ ข้อความจะถูกส่งในอัตราที่กำหนดเองที่คุณกำหนดในองค์ประกอบข้อความ
เปิดใช้งาน Best time to send
Anchor link toหากคุณต้องการให้ผู้ใช้แต่ละคนได้รับอีเมลในเวลาที่พวกเขามีแนวโน้มที่จะเปิดและมีส่วนร่วมกับอีเมลมากที่สุด ให้เปิดใช้งานตัวเลือก Best time to send เวลาจัดส่งที่เหมาะสมที่สุดสำหรับผู้ใช้แต่ละคนจะคำนวณจากพฤติกรรมในอดีตและประสิทธิภาพของอีเมลที่ส่งไปก่อนหน้านี้
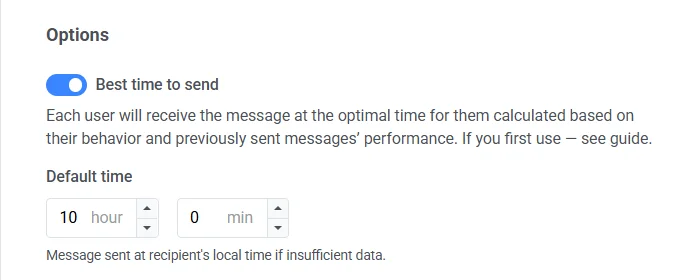
ความแม่นยำของ Best time to send ขึ้นอยู่กับปริมาณข้อมูลการมีส่วนร่วมในอดีตที่มีอยู่สำหรับผู้รับแต่ละราย หากมีข้อมูลเกี่ยวกับผู้ใช้ไม่เพียงพอ พวกเขาจะได้รับอีเมลในเวลา Default time ที่คุณระบุตามเขตเวลาของพวกเขา
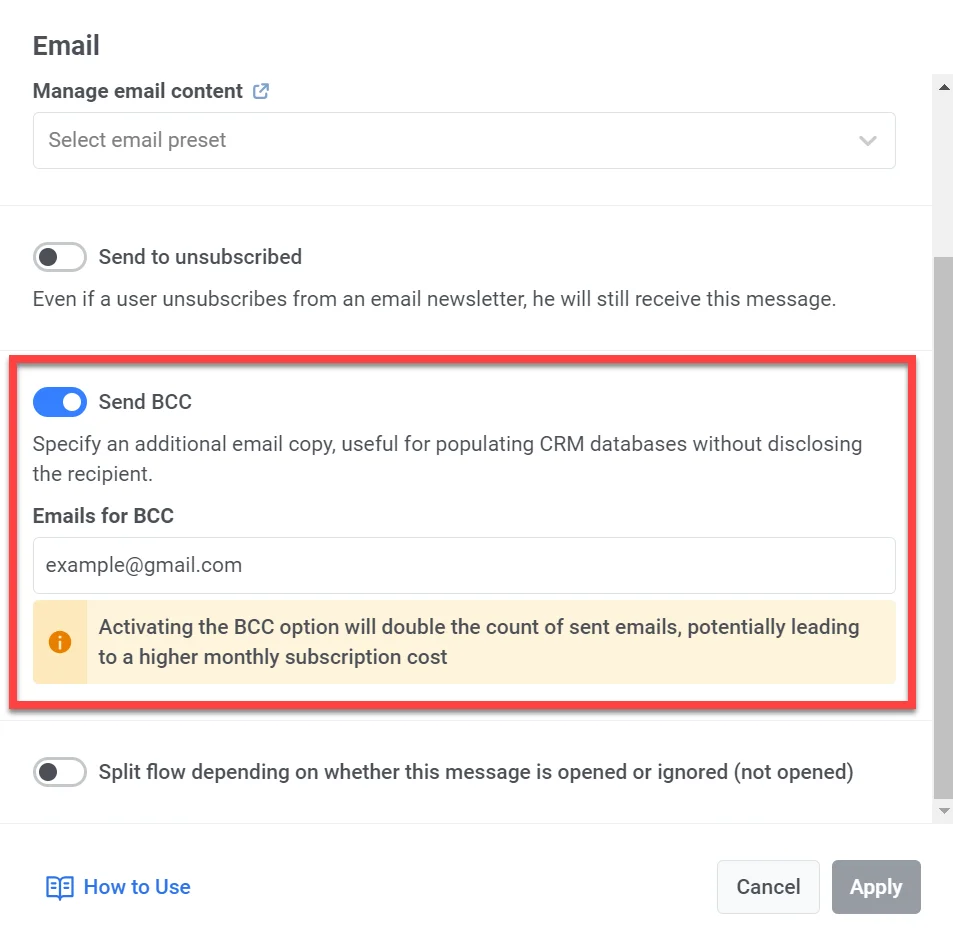
เปิดใช้งาน BCC (Blind Carbon Copy)
Anchor link toคุณสามารถเปิดใช้งานตัวเลือก BCC (Blind Carbon Copy) เมื่อส่งอีเมลใน Customer Journey ได้ BCC ช่วยให้คุณสามารถส่งสำเนาของอีเมลไปยังผู้รับเพิ่มเติมโดยไม่เปิดเผยที่อยู่ของพวกเขาให้ผู้รับหลักทราบ
คุณลักษณะนี้ช่วยให้คุณสามารถ:
- เก็บประวัติการโต้ตอบกับลูกค้าในระบบ CRM ของคุณเพื่อการบริการลูกค้าที่ดีขึ้น
- ตรวจสอบให้แน่ใจว่าทีมภายใน (เช่น ผู้จัดการฝ่ายกำกับดูแลและฝ่ายขาย) ได้รับสำเนาเพื่อใช้อ้างอิง
วิธีเปิดใช้งาน BCC
Anchor link to- ในองค์ประกอบอีเมล ให้สลับสวิตช์ Send BCC
- ป้อนที่อยู่อีเมลที่คุณต้องการให้ได้รับสำเนา BCC คุณสามารถเพิ่มได้หลายที่อยู่
- คลิก Apply
ใช้บัตรกำนัล (Vouchers)
Anchor link toคุณสามารถปรับแต่งข้อความอีเมลให้เป็นส่วนตัวได้โดยการแนบรหัสบัตรกำนัลที่ไม่ซ้ำกันจากกลุ่มที่กำหนดไว้ล่วงหน้า ซึ่งมีประโยชน์สำหรับโปรโมชัน ส่วนลด และแคมเปญความภักดี
ก่อนเริ่มต้น ตรวจสอบให้แน่ใจว่าเนื้อหาอีเมลของคุณมีตัวยึดตำแหน่ง {{voucher}} ในตำแหน่งที่ควรปรากฏรหัส
ในการรวมบัตรกำนัลในอีเมล:
- สลับ Use Vouchers เป็น ON
- ในช่อง Voucher Pool ให้เลือกกลุ่มที่มีรหัสบัตรกำนัลของคุณอยู่ กลุ่มจะต้องถูกสร้างขึ้นล่วงหน้า
- (ไม่บังคับ) ในช่อง Assign Tag ให้ระบุแท็กที่จะนำไปใช้กับผู้ใช้ที่ได้รับบัตรกำนัล ซึ่งสามารถช่วยในการแบ่งกลุ่มและการรายงานได้
เรียนรู้เพิ่มเติมเกี่ยวกับบัตรกำนัล
แบ่งเส้นทางตามการเปิดหรือเพิกเฉยต่อข้อความนี้
Anchor link toคุณสามารถแบ่งเส้นทาง Journey ที่เหลือตามการเปิดหรือเพิกเฉยต่ออีเมลได้ ตัวอย่างเช่น อาจเป็นประโยชน์ที่จะลองเข้าถึงผู้ใช้ผ่านพุชหรือ In-Apps หรือส่งอีเมลอีกฉบับที่ให้คุณค่ามากขึ้น
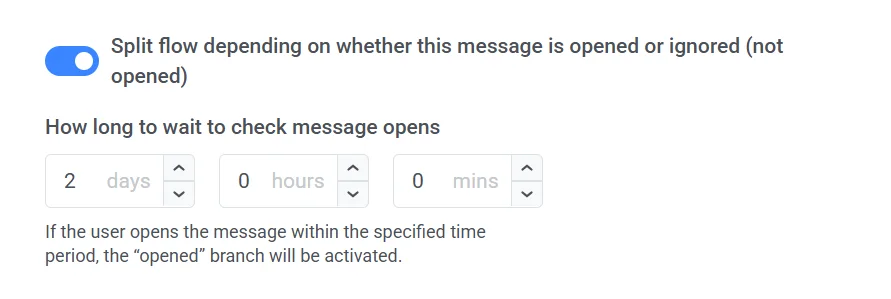
ตั้งค่าระยะเวลาที่ต้องรอหลังจากส่งอีเมล – หลังจากช่วงเวลานั้น ผู้ใช้ทุกคนที่เปิดอีเมลจะไปที่สาขา Opened ของ Journey และคนอื่นๆ จะผ่านไปยังสาขา Not opened
ระยะเวลารอสามารถตั้งค่าได้สูงสุด 7 วัน