# Web push SDK 3.0
## การผสานรวม
[**ตัวอย่างการผสานรวมบน GitHub**](https://github.com/Pushwoosh/web-push-notifications-sample)
### รับ Pushwoosh Web Push SDK และแตกไฟล์ คุณควรมีไฟล์ต่อไปนี้:
* **pushwoosh-service-worker.js**
### วางไฟล์ทั้งหมดนี้ไว้ที่ไดเรกทอรีราก (root) ระดับบนสุดของเว็บไซต์ของคุณ
### เริ่มต้น SDK:
1. รวม SDK จาก CDN ของเราแบบ _อะซิงโครนัส_
```txt
```
2. เริ่มต้น Web Push SDK และตรวจสอบให้แน่ใจว่าได้จัดคิวการเริ่มต้นจนกว่า SDK จะโหลดเต็มที่
```html
```
#### Web popups
เพิ่ม `webPopups` ไปยังอ็อบเจกต์ `init` ของคุณเพื่อเปิดใช้งาน [แคมเปญ Web popup](/th/product/messaging-channels/web-popups/#start-working-with-web-popups) บนเว็บไซต์ของคุณ
```javascript
webPopups: {
enable: true,
},
```
แคมเปญ Web popup จะแสดงโอเวอร์เลย์ที่คุณกำหนดค่าใน Control Panel เช่น โปรโมชั่น, ประกาศ, หรือแบบฟอร์มเก็บข้อมูลลูกค้า ซึ่งแตกต่างจาก [ป๊อปอัปการสมัครสมาชิกแบบกำหนดเอง](/th/developer/pushwoosh-sdk/web-push-notifications/custom-subscription-popup/) (`subscribePopup`) ซึ่งจัดการเฉพาะการเลือกรับการแจ้งเตือนแบบพุชบนเว็บเท่านั้น แคมเปญ Web popup สามารถแสดงเนื้อหาใดๆ ที่คุณกำหนดค่าได้
สำหรับการตั้งค่าใน Control Panel โปรดดู [ทำความเข้าใจ Web popups](/th/product/messaging-channels/web-popups/)
#### ปุ่มสมัครรับการแจ้งเตือนแบบพุช
เพื่อกระตุ้นให้ผู้ใช้ของคุณสมัครรับการแจ้งเตือนแบบพุช เราขอแนะนำให้ใช้ [ปุ่มสมัครรับการแจ้งเตือนแบบพุช](/th/developer/pushwoosh-sdk/web-push-notifications/push-subscription-button/) บนเว็บไซต์ของคุณ เพื่อเพิ่มประสบการณ์ผู้ใช้และรับผู้ติดตามมากขึ้น!
## การกำหนดค่า
เพื่อให้การใช้งานการแจ้งเตือนแบบพุชบนเว็บไซต์ของคุณเสร็จสมบูรณ์ คุณต้องกำหนดค่าแพลตฟอร์มเว็บใน Pushwoosh Control Panel ของคุณตามคำแนะนำทีละขั้นตอนของเรา:
* [การกำหนดค่า Chrome](/th/developer/first-steps/connect-messaging-services/chrome-configuration/)
* [การกำหนดค่า Firefox](/th/developer/first-steps/connect-messaging-services/chrome-configuration/)
* [การกำหนดค่า Safari](/th/developer/first-steps/connect-messaging-services/safari-configuration/)
## การลงทะเบียน service worker ในขอบเขตที่แตกต่างกัน
บางครั้งคุณไม่สามารถวางไฟล์ service worker ในไดเรกทอรีรากของเว็บไซต์ได้ แต่อยู่ในไดเรกทอรีย่อย
ในกรณีนี้ ให้แก้ไขการกำหนดค่า (**ขั้นตอนที่ 4.3**) โดยการเพิ่มพารามิเตอร์
`serviceWorkerUrl: “/push-notifications/pushwoosh-service-worker.js”`
โดยที่ `/push-notifications/pushwoosh-service-worker.js` คือพาธไปยังไฟล์ `pushwoosh-service-worker.js`
## ตัวจัดการเหตุการณ์ (Event handlers)
ใน Pushwoosh Web SDK 3.0 คุณสามารถสมัครรับเหตุการณ์บางอย่างเพื่อติดตาม**หรือ**ยกเลิกการสมัครจากเหตุการณ์หากคุณไม่ต้องการติดตามอีกต่อไป
ในการติดตามการโหลดของ Web SDK 3.0 ให้เรียกเหตุการณ์ `onLoad` ดังนี้:
```javascript
// Load Event
Pushwoosh.push(['onLoad', (api) => {
console.log('Pushwoosh load!');
}]);
```
ในการติดตามการเริ่มต้น Web SDK ที่ถูกต้อง ให้เรียกเหตุการณ์ `onReady`:
```javascript
// Ready Event
Pushwoosh.push((api) => {
console.log('Pushwoosh ready!');
});
```
ในการสมัครหรือยกเลิกการสมัครจากเหตุการณ์ SDK ใดๆ ให้ใช้ตัวจัดการหลังจาก SDK โหลด:
```javascript
Pushwoosh.push(['onLoad', (api) => {
function onEventNameHandler() {
console.log('Triggered event: event-name!');
}
// To subscribe to an event:
Pushwoosh.addEventHandler('event-name', onEventNameHandler)
// To unsubscribe from an event:
Pushwoosh.removeEventHandler('event-name', onEventNameHandler)
}]);
```
### เหตุการณ์ SDK
#### เหตุการณ์ Subscribe
ทำงานหลังจากผู้ใช้ตกลงที่จะรับการแจ้งเตือนแบบพุช
```javascript
Pushwoosh.push(['onLoad', (api) => {
Pushwoosh.addEventHandler('subscribe', (payload) => {
console.log('Triggered event: subscribe');
});
}]);
```
#### เหตุการณ์ Unsubscribe
ทำงานหลังจากอุปกรณ์ถูกยกเลิกการลงทะเบียนจากการแจ้งเตือน
```javascript
Pushwoosh.push(['onLoad', (api) => {
Pushwoosh.addEventHandler('unsubscribe', (payload) => {
console.log('Triggered event: unsubscribe');
});
}]);
```
#### เหตุการณ์วิดเจ็ตการสมัครสมาชิก
ติดตามการแสดงผลของวิดเจ็ต Subscription Prompt
```javascript
Pushwoosh.push(['onLoad', (api) => {
// Executed on displaying of the Subscription Prompt widget
Pushwoosh.addEventHandler('show-subscription-widget', (payload) => {
console.log('Triggered event: show-subscription-widget');
});
// Executed on hiding of the Subscription Prompt widget
Pushwoosh.addEventHandler('hide-subscription-widget', (payload) => {
console.log('Triggered event: hide-subscription-widget');
});
}]);
```
#### เหตุการณ์ไดอะล็อกการอนุญาตการแจ้งเตือน
ติดตามการแสดงผลของไดอะล็อกการสมัครสมาชิกแบบเนทีฟ
```javascript
Pushwoosh.push(['onLoad', function (api) {
// Executed on permission dialog displaying
Pushwoosh.addEventHandler('show-notification-permission-dialog', (payload) => {
console.log('Triggered event: show-notification-permission-dialog');
});
// Executed on hiding the permission dialog with one of three possible statuses:
// 1. default - the dialog is closed
// 2. granted - permission is granted
// 3. denied - permission is denied
Pushwoosh.addEventHandler('hide-notification-permission-dialog', (payload) => {
console.log('Triggered event: hide-notification-permission-dialog', payload.permission);
});
}]);
```
#### เหตุการณ์การอนุญาต
ตรวจสอบสถานะการอนุญาตการแจ้งเตือนแบบพุชเมื่อเริ่มต้น SDK; ติดตามการอัปเดตสถานะนี้เมื่อใดก็ตามที่เกิดขึ้น
```javascript
Pushwoosh.push(['onLoad', (api) => {
// Executed during the SDK initialization if 'autoSubscribe: false' or/and if a user ignores a push notification prompt.
Pushwoosh.addEventHandler('permission-default', (payload) => {
console.log('Triggered event: permission-default');
});
// Executed during the SDK initialization if notifications are blocked or once a user blocks push notifications.
Pushwoosh.addEventHandler('permission-denied', (payload) => {
console.log('Triggered event: permission-denied');
});
// Executed during the SDK initialization if notifications are allowed or once a user allows push notifications.
Pushwoosh.addEventHandler('permission-granted', (payload) => {
console.log('Triggered event: permission-granted');
});
}]);
```
#### เหตุการณ์รับพุช
ติดตามการส่งพุชไปยังอุปกรณ์
```javascript
Pushwoosh.push(['onLoad', (api) => {
// Executed when a push notification is displayed.
Pushwoosh.addEventHandler('receive-push', (payload) => {
console.log('Triggered event: receive-push', payload.notification);
});
}]);
```
#### เหตุการณ์การแจ้งเตือน
ติดตามว่าการแจ้งเตือนแบบพุชถูกเปิดหรือปิดโดยผู้ใช้
```javascript
Pushwoosh.push(['onLoad', (api) => {
// Executed when a user clicks on notification.
Pushwoosh.addEventHandler('open-notification', (payload) => {
console.log('Triggered event: open-notification', payload.notification);
});
// Executed when a user closes a push notification.
Pushwoosh.addEventHandler('hide-notification', (payload) => {
console.log('Triggered event: hide-notification', payload.notification);
});
}]);
```
#### เหตุการณ์ Inbox
ติดตามการแจ้งเตือนที่ส่งไปยัง Inbox
```javascript
Pushwoosh.push(['onLoad', (api) => {
// Executed by ServiceWorker after the Inbox Message is received and saved to indexedDB.
Pushwoosh.addEventHandler('receive-inbox-message', (payload) => {
console.log('Triggered event: receive-inbox-message', payload.message);
});
// Executed after the Inbox is updated automatically while the page is loading.
Pushwoosh.addEventHandler('update-inbox-messages', (payload) => {
console.log('Triggered event: receive-inbox-message', payload.messages);
});
}]);
```
#### เหตุการณ์ป๊อปอัปการสมัครสมาชิกแบบกำหนดเอง
สำหรับรายละเอียดเกี่ยวกับการจัดการเหตุการณ์ป๊อปอัปการสมัครสมาชิกแบบกำหนดเอง โปรดดูที่ [คู่มือเหตุการณ์ป๊อปอัปการสมัครสมาชิกแบบกำหนดเอง](/th/developer/pushwoosh-sdk/web-push-notifications/custom-subscription-popup/#custom-subscription-popup-events)
## API
หลังจากที่ Web Push SDK เริ่มต้นแล้ว คุณสามารถเรียกใช้ Pushwoosh API ต่อไปนี้ได้ เมธอดทั้งหมดจะคืนค่าอ็อบเจกต์ [**Promise**](https://developer.mozilla.org/en/docs/Web/JavaScript/Reference/Global_Objects/Promise)
```javascript
Pushwoosh.push((api) => {
// Set tags for a user
api.setTags({
'Tag Name 1': 'value1',
'Tag Name 2': 'value2'
});
// Get tags for a user from server
api.getTags();
// Register user ID
api.registerUser('user123');
// Register user email
api.registerEmail('user@example.com');
// Register SMS number
api.registerSmsNumber('+15551234567');
// Register WhatsApp number
api.registerWhatsappNumber('+1234567890');
// Post an Event
api.postEvent('myEventName', {attributeName: 'attributeValue'});
//Unregister from notifications
api.unregisterDevice();
// Set the device language (overrides the value in the "Language" Tag)
api.setLanguage('es');
// Alternatively Multi-register user with devices and channels
api.multiRegisterDevice({
user_id: 'user123',
email: 'user@example.com',
sms_phone_number: '+1234567890',
tags: {
'UserType': { operation: TTagOperationSet, value: 'Premium' },
'Interests': { operation: TTagOperationAppend, values: ['sports', 'technology'] }
}
});
});
```
### multiRegisterDevice
เมธอดการลงทะเบียนที่ปรับปรุงแล้วซึ่งอนุญาตให้ลงทะเบียนโปรไฟล์ผู้ใช้กับอุปกรณ์และช่องทางการส่งข้อความหลายช่องทางในการเรียก API เพียงครั้งเดียว เมธอดนี้มีประโยชน์อย่างยิ่งสำหรับแอปพลิเคชันข้ามแพลตฟอร์มหรือเมื่อใช้กลยุทธ์การส่งข้อความแบบ omnichannel
```javascript
Pushwoosh.push((api) => {
api.multiRegisterDevice({
user_id: 'user123', // Optional: User identifier
email: 'user@example.com', // Optional: Email for email messaging
sms_phone_number: '+1234567890', // Optional: SMS phone number (E.164 format)
whatsapp_phone_number: '+1234567890', // Optional: WhatsApp number (E.164 format)
kakao_phone_number: '+1234567890', // Optional: KakaoTalk number (E.164 format)
language: 'en', // Optional: Language code (ISO 639-1)
timezone: 'America/New_York', // Optional: Timezone identifier
city: 'New York', // Optional: City for targeting
country: 'US', // Optional: Country for targeting
state: 'NY', // Optional: State for targeting
tags: { // Optional: Tag values with operations
'UserType': {
operation: TTagOperationSet, // Set tag value (0)
value: 'Premium'
},
'Interests': {
operation: TTagOperationAppend, // Append to tag value (1)
values: ['sports', 'technology']
},
'LoginCount': {
operation: TTagOperationIncrement, // Increment tag value (3)
value: '1'
}
},
push_devices: [ // Optional: Array of push devices
{
hwid: 'web-device-456',
platform: TPlatformChrome, // Chrome platform (11)
push_token: 'fcm-token-here',
app_version: '2.1.0',
platformData: {
public_key: 'web-push-public-key',
auth_token: 'web-push-auth-token',
browser: 'chrome'
}
}
]
})
.then((response) => {
console.log('Multi-registration successful:', response);
})
.catch((error) => {
console.error('Multi-registration failed:', error);
});
});
```
**ประเภทแพลตฟอร์ม:**
- `TPlatformSafari` (10): แพลตฟอร์ม Safari
- `TPlatformChrome` (11): แพลตฟอร์ม Chrome
- `TPlatformFirefox` (12): แพลตฟอร์ม Firefox
**ประเภทการดำเนินการของแท็ก:**
- `TTagOperationSet` (0): ตั้งค่าแท็ก (แทนที่ค่าที่มีอยู่)
- `TTagOperationAppend` (1): เพิ่มค่าในแท็ก (เพิ่มในรายการ)
- `TTagOperationRemove` (2): ลบค่าแท็ก (ลบออกจากรายการ)
- `TTagOperationIncrement` (3): เพิ่มค่าแท็ก (เพิ่มค่าตัวเลข)
**ประโยชน์:**
- **การเรียก API ครั้งเดียว**: ลงทะเบียนอุปกรณ์และช่องทางหลายรายการพร้อมกัน
- **การดำเนินการแบบอะตอม**: การลงทะเบียนทั้งหมดจะสำเร็จหรือล้มเหลวพร้อมกัน
- **เน้นผู้ใช้เป็นศูนย์กลาง**: เชื่อมโยงอุปกรณ์ทั้งหมดกับโปรไฟล์ผู้ใช้เดียว
- **การแท็กขั้นสูง**: รองรับการดำเนินการแท็กที่ซับซ้อน
- **ข้ามแพลตฟอร์ม**: จัดการหลายแพลตฟอร์มพร้อมกัน
ตัวอย่างการส่ง Tags ไปยัง Pushwoosh:
```javascript
Pushwoosh.push((api) => {
var myCustomTags = {
'Tag 1': 123,
'Tag 2': 'some string'
};
api.setTags(myCustomTags)
.then((res) => {
var skipped = res && res.skipped || [];
if (!skipped.length) {
console.log('success');
}
else {
console.warn('skipped tags:', skipped);
}
})
.catch((err) => {
console.error('setTags error:', err);
});
});
```
### เพิ่มค่าแท็ก
ในการ**เพิ่มค่า**ของ Number Tag ให้ใช้พารามิเตอร์ `operation` ที่มีค่า ‘increment’ ดังนี้:
```javascript
Pushwoosh.push((api) => {
api.setTags({
'Tag 1': {
operation: 'increment',
value: 1
}
})
});
```
### เพิ่มค่าแท็ก
ในการ**เพิ่มค่าใหม่**ลงใน List Tag ที่มีอยู่ ให้ใช้พารามิเตอร์ `operation` ที่มีค่า ‘append’ ดังนี้:
```javascript
Pushwoosh.push((api) => {
api.setTags({
'Tag 3': {
operation: 'append',
value: ['Value3']
}
})
});
```
### ลบค่าแท็ก
ในการ**ลบค่า**ออกจาก List Tag ให้ใช้พารามิเตอร์ `operation` ที่มีค่า ‘remove’ ดังนี้:
```javascript
Pushwoosh.push((api) =>{
api.setTags({
'Tag 3': {
operation: 'remove',
value: ['Value2']
}
})
});
```
## เมธอดสาธารณะ
**Pushwoosh.subscribe()**
เมธอดนี้ใช้เพื่อขออนุญาตจากผู้ใช้สำหรับการแจ้งเตือนแบบพุช หากผู้ใช้สมัครสมาชิกแล้ว เมธอดจะหยุดทำงาน
หากผู้ใช้ยังไม่ได้สมัครรับพุช:
1. ขออนุญาตสำหรับการแจ้งเตือนแบบพุช
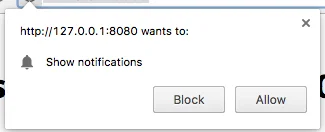 2. หากผู้ใช้อนุญาตการแจ้งเตือน เหตุการณ์ `onSubscribe` จะถูกเรียก
`Pushwoosh.subscribe()` จะทำงานโดยอัตโนมัติหากตั้งค่า `autoSubscribe: true` ระหว่างการเริ่มต้น SDK
เรียกเมธอดนี้หากคุณเลือกที่จะแจ้งให้ผู้ใช้สมัครรับพุชด้วยตนเองโดยใช้พารามิเตอร์ `autoSubscribe: false` ระหว่างการเริ่มต้น:
```html
```
**Pushwoosh.unsubscribe()**
1. เมธอด `/unregisterDevice` จะทำงาน
2. เหตุการณ์ `onUnsubscribe` จะถูกเรียก
```html
```
**Pushwoosh.isSubscribed()**
ตรวจสอบว่าผู้ใช้สมัครสมาชิกหรือไม่และคืนค่าแฟล็ก true/false
```javascript
Pushwoosh.isSubscribed().then((isSubscribed) => {
console.log('isSubscribed', isSubscribed);
});
```
**Pushwoosh.getHWID()**
คืนค่า Pushwoosh HWID
```javascript
Pushwoosh.getHWID().then((hwid) => {
console.log('hwid:', hwid);
});
```
**Pushwoosh.getPushToken()**
คืนค่า push token หากมี
```javascript
Pushwoosh.getPushToken().then((pushToken) => {
console.log('pushToken:', pushToken);
});
```
**Pushwoosh.getUserId()**
คืนค่า [**User ID**](/th/developer/pushwoosh-knowledge-hub/users-userids/users-userids/) หากมี
```javascript
Pushwoosh.getUserId().then((userId) => {
console.log('userId:', userId);
});
```
**Pushwoosh.getParams()**
คืนค่ารายการพารามิเตอร์ต่อไปนี้:
```javascript
Pushwoosh.getParams().then((params) => {
params = params || {};
var hwid = params.hwid;
var pushToken = params.pushToken;
var userId = params.userId;
});
```
**Pushwoosh.isAvailableNotifications()**
ตรวจสอบว่าเบราว์เซอร์รองรับ Pushwoosh WebSDK 3.0 หรือไม่ คืนค่า ‘true’ หรือ ‘false’
```
Pushwoosh.isAvailableNotifications() // true/false
```
### เมธอด InboxMessages
**messagesWithNoActionPerformedCount(): Promise\**
คืนค่าจำนวนข้อความที่เปิดแล้ว
```javascript
Pushwoosh.pwinbox.messagesWithNoActionPerformedCount()
.then((count) => {
console.log(`${count} messages opened`);
});
```
**unreadMessagesCount()**
คืนค่าจำนวนข้อความที่ยังไม่ได้อ่าน
```javascript
Pushwoosh.pwinbox.unreadMessagesCount()
.then((count) => {
console.log(`${count} messages unread`);
});
```
**messagesCount(): Promise\**
คืนค่าจำนวนข้อความทั้งหมด
```javascript
Pushwoosh.pwinbox.messagesCount()
.then((count) => {
console.log(`${count} messages`);
});
```
**loadMessages(): Promise\**
โหลดรายการข้อความที่ยังไม่ถูกลบ
```javascript
Pushwoosh.pwinbox.loadMessages()
.then(() => {
console.log('Messages have been loaded');
});
```
**readMessagesWithCodes(codes: Array\): Promise\**
ทำเครื่องหมายข้อความว่าอ่านแล้วโดยใช้ Inbox_Ids
```javascript
Pushwoosh.pwinbox.readMessagesWithCodes(codes)
.then(() => {
console.log('Messages have been read');
});
```
**performActionForMessageWithCode(code: string): Promise\**
ดำเนินการที่กำหนดให้กับข้อความและทำเครื่องหมายข้อความว่าอ่านแล้ว
```javascript
Pushwoosh.pwinbox.performActionForMessageWithCode(code)
.then(() => {
console.log('Action has been performed');
});
```
**deleteMessagesWithCodes(codes: Array\): Promise\**
ทำเครื่องหมายข้อความว่าถูกลบแล้ว
```javascript
Pushwoosh.pwinbox.deleteMessagesWithCodes([code])
.then(() => {
console.log('Messages have been deleted');
});
```
**syncMessages(): Promise\**
ซิงโครไนซ์ข้อความกับเซิร์ฟเวอร์
```javascript
Pushwoosh.pwinbox.syncMessages()
.then(() => {
console.log('Messages have been synchronized');
});
```
## การรองรับ Progressive Web App
ในการผสานรวม Pushwoosh เข้ากับ Progressive Web Application (PWA) ของคุณ ให้ทำตามขั้นตอนที่อธิบายไว้ด้านล่าง
**1**. คัดลอกพาธไปยังไฟล์ Service Worker ของคุณ:
```javascript
if ('serviceWorker' in navigator) {
window.addEventListener('load', () => {
navigator.serviceWorker.register('/service-worker.js') // <- your service worker url
});
}
```
จากนั้น ใช้พารามิเตอร์ serviceWorkerUrl ขณะเริ่มต้น WebSDK ดังนี้:
```javascript
var Pushwoosh = Pushwoosh || [];
Pushwoosh.push(['init', {
logLevel: 'error',
applicationCode: 'XXXXX-XXXXX',
safariWebsitePushID: 'web.com.example.domain',
defaultNotificationTitle: 'Pushwoosh',
defaultNotificationImage: 'https://yoursite.com/img/logo-medium.png',
serviceWorkerUrl: '/service-worker.js', // <- your service worker url
}]);
```
WebSDK ไม่ได้ลงทะเบียน Service Worker ใหม่ทันที; Service Worker จะถูกลงทะเบียนเมื่อจำเป็น:
* เมื่ออุปกรณ์ได้รับ push token (ในการลงทะเบียนอุปกรณ์หรือการสมัครสมาชิกใหม่),
* เมื่อ push token ถูกลบ (เมื่อลบอุปกรณ์ออกจากฐานผู้ใช้)
ซึ่งจะช่วยให้หน้าเว็บของคุณโหลดเร็วขึ้นโดยลดจำนวนคำขอไปยังเซิร์ฟเวอร์
เบราว์เซอร์ไม่อนุญาตให้ลงทะเบียน Service Worker สองตัวที่แตกต่างกันในเวลาเดียวกัน (อ่านเพิ่มเติม: [https://github.com/w3c/ServiceWorker/issues/921](https://github.com/w3c/ServiceWorker/issues/921)) ดังนั้นเพื่อให้ PWA ของคุณทำงานได้อย่างถูกต้อง ควรลงทะเบียน Service Worker ร่วมกันสำหรับ codebase ของคุณและ codebase ของ Pushwoosh
**2**. เพิ่มสตริงต่อไปนี้ไปยัง Service Worker ของคุณ (ที่จุดเริ่มต้นหรือท้ายสุด ไม่สำคัญ):
```javascript
importScripts('https://cdn.pushwoosh.com/webpush/v3/pushwoosh-service-worker.js' + self.location.search);
```
ดังนั้นคุณจึงเปิดใช้งานการรับและประมวลผลการแจ้งเตือนแบบพุชที่ส่งผ่านบริการของ Pushwoosh สำหรับ Service Worker ของคุณ
## การติดตั้งจาก Google Tag Manager
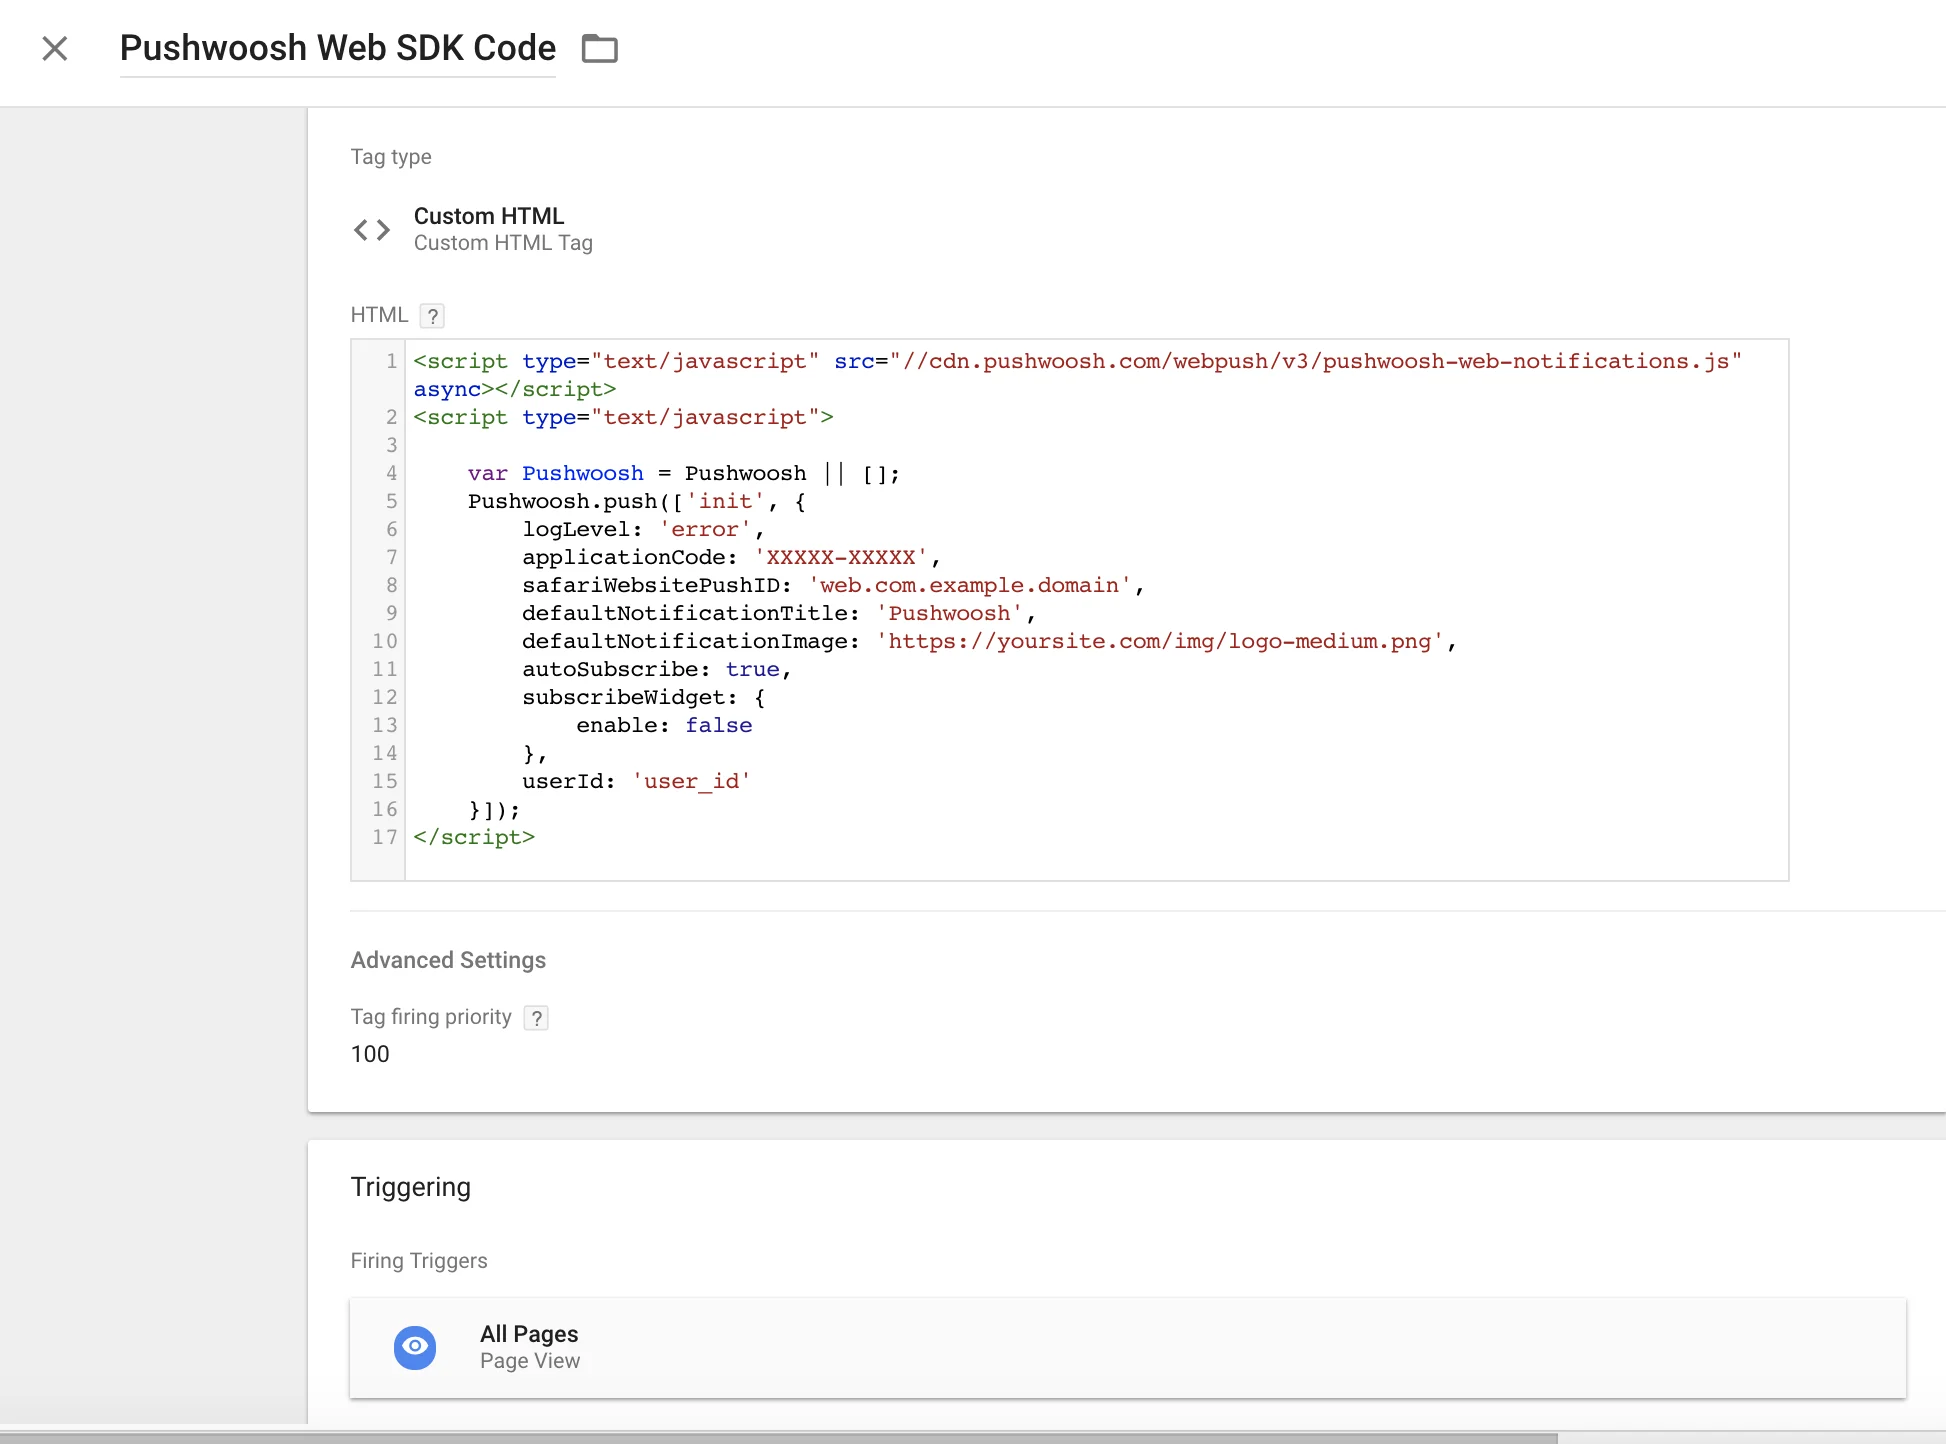
ใช้โค้ดต่อไปนี้ใน **Google Tag Manager** ของคุณเพื่อเริ่มต้น Pushwoosh SDK สร้าง Custom HTML Tag และวางโค้ดด้านล่าง ตรวจสอบให้แน่ใจว่าได้เปลี่ยน Pushwoosh Application Code, Safari Website ID และ URL รูปภาพการแจ้งเตือนเริ่มต้นของคุณ\
นอกจากนี้ให้ตั้งค่าลำดับความสำคัญของ **Tag Firing** ให้สูง (เช่น 100) และทริกเกอร์บน **All Pages** ดูภาพหน้าจอด้านล่างคัดลอก
```html
```
2. หากผู้ใช้อนุญาตการแจ้งเตือน เหตุการณ์ `onSubscribe` จะถูกเรียก
`Pushwoosh.subscribe()` จะทำงานโดยอัตโนมัติหากตั้งค่า `autoSubscribe: true` ระหว่างการเริ่มต้น SDK
เรียกเมธอดนี้หากคุณเลือกที่จะแจ้งให้ผู้ใช้สมัครรับพุชด้วยตนเองโดยใช้พารามิเตอร์ `autoSubscribe: false` ระหว่างการเริ่มต้น:
```html
```
**Pushwoosh.unsubscribe()**
1. เมธอด `/unregisterDevice` จะทำงาน
2. เหตุการณ์ `onUnsubscribe` จะถูกเรียก
```html
```
**Pushwoosh.isSubscribed()**
ตรวจสอบว่าผู้ใช้สมัครสมาชิกหรือไม่และคืนค่าแฟล็ก true/false
```javascript
Pushwoosh.isSubscribed().then((isSubscribed) => {
console.log('isSubscribed', isSubscribed);
});
```
**Pushwoosh.getHWID()**
คืนค่า Pushwoosh HWID
```javascript
Pushwoosh.getHWID().then((hwid) => {
console.log('hwid:', hwid);
});
```
**Pushwoosh.getPushToken()**
คืนค่า push token หากมี
```javascript
Pushwoosh.getPushToken().then((pushToken) => {
console.log('pushToken:', pushToken);
});
```
**Pushwoosh.getUserId()**
คืนค่า [**User ID**](/th/developer/pushwoosh-knowledge-hub/users-userids/users-userids/) หากมี
```javascript
Pushwoosh.getUserId().then((userId) => {
console.log('userId:', userId);
});
```
**Pushwoosh.getParams()**
คืนค่ารายการพารามิเตอร์ต่อไปนี้:
```javascript
Pushwoosh.getParams().then((params) => {
params = params || {};
var hwid = params.hwid;
var pushToken = params.pushToken;
var userId = params.userId;
});
```
**Pushwoosh.isAvailableNotifications()**
ตรวจสอบว่าเบราว์เซอร์รองรับ Pushwoosh WebSDK 3.0 หรือไม่ คืนค่า ‘true’ หรือ ‘false’
```
Pushwoosh.isAvailableNotifications() // true/false
```
### เมธอด InboxMessages
**messagesWithNoActionPerformedCount(): Promise\**
คืนค่าจำนวนข้อความที่เปิดแล้ว
```javascript
Pushwoosh.pwinbox.messagesWithNoActionPerformedCount()
.then((count) => {
console.log(`${count} messages opened`);
});
```
**unreadMessagesCount()**
คืนค่าจำนวนข้อความที่ยังไม่ได้อ่าน
```javascript
Pushwoosh.pwinbox.unreadMessagesCount()
.then((count) => {
console.log(`${count} messages unread`);
});
```
**messagesCount(): Promise\**
คืนค่าจำนวนข้อความทั้งหมด
```javascript
Pushwoosh.pwinbox.messagesCount()
.then((count) => {
console.log(`${count} messages`);
});
```
**loadMessages(): Promise\**
โหลดรายการข้อความที่ยังไม่ถูกลบ
```javascript
Pushwoosh.pwinbox.loadMessages()
.then(() => {
console.log('Messages have been loaded');
});
```
**readMessagesWithCodes(codes: Array\): Promise\**
ทำเครื่องหมายข้อความว่าอ่านแล้วโดยใช้ Inbox_Ids
```javascript
Pushwoosh.pwinbox.readMessagesWithCodes(codes)
.then(() => {
console.log('Messages have been read');
});
```
**performActionForMessageWithCode(code: string): Promise\**
ดำเนินการที่กำหนดให้กับข้อความและทำเครื่องหมายข้อความว่าอ่านแล้ว
```javascript
Pushwoosh.pwinbox.performActionForMessageWithCode(code)
.then(() => {
console.log('Action has been performed');
});
```
**deleteMessagesWithCodes(codes: Array\): Promise\**
ทำเครื่องหมายข้อความว่าถูกลบแล้ว
```javascript
Pushwoosh.pwinbox.deleteMessagesWithCodes([code])
.then(() => {
console.log('Messages have been deleted');
});
```
**syncMessages(): Promise\**
ซิงโครไนซ์ข้อความกับเซิร์ฟเวอร์
```javascript
Pushwoosh.pwinbox.syncMessages()
.then(() => {
console.log('Messages have been synchronized');
});
```
## การรองรับ Progressive Web App
ในการผสานรวม Pushwoosh เข้ากับ Progressive Web Application (PWA) ของคุณ ให้ทำตามขั้นตอนที่อธิบายไว้ด้านล่าง
**1**. คัดลอกพาธไปยังไฟล์ Service Worker ของคุณ:
```javascript
if ('serviceWorker' in navigator) {
window.addEventListener('load', () => {
navigator.serviceWorker.register('/service-worker.js') // <- your service worker url
});
}
```
จากนั้น ใช้พารามิเตอร์ serviceWorkerUrl ขณะเริ่มต้น WebSDK ดังนี้:
```javascript
var Pushwoosh = Pushwoosh || [];
Pushwoosh.push(['init', {
logLevel: 'error',
applicationCode: 'XXXXX-XXXXX',
safariWebsitePushID: 'web.com.example.domain',
defaultNotificationTitle: 'Pushwoosh',
defaultNotificationImage: 'https://yoursite.com/img/logo-medium.png',
serviceWorkerUrl: '/service-worker.js', // <- your service worker url
}]);
```
WebSDK ไม่ได้ลงทะเบียน Service Worker ใหม่ทันที; Service Worker จะถูกลงทะเบียนเมื่อจำเป็น:
* เมื่ออุปกรณ์ได้รับ push token (ในการลงทะเบียนอุปกรณ์หรือการสมัครสมาชิกใหม่),
* เมื่อ push token ถูกลบ (เมื่อลบอุปกรณ์ออกจากฐานผู้ใช้)
ซึ่งจะช่วยให้หน้าเว็บของคุณโหลดเร็วขึ้นโดยลดจำนวนคำขอไปยังเซิร์ฟเวอร์
เบราว์เซอร์ไม่อนุญาตให้ลงทะเบียน Service Worker สองตัวที่แตกต่างกันในเวลาเดียวกัน (อ่านเพิ่มเติม: [https://github.com/w3c/ServiceWorker/issues/921](https://github.com/w3c/ServiceWorker/issues/921)) ดังนั้นเพื่อให้ PWA ของคุณทำงานได้อย่างถูกต้อง ควรลงทะเบียน Service Worker ร่วมกันสำหรับ codebase ของคุณและ codebase ของ Pushwoosh
**2**. เพิ่มสตริงต่อไปนี้ไปยัง Service Worker ของคุณ (ที่จุดเริ่มต้นหรือท้ายสุด ไม่สำคัญ):
```javascript
importScripts('https://cdn.pushwoosh.com/webpush/v3/pushwoosh-service-worker.js' + self.location.search);
```
ดังนั้นคุณจึงเปิดใช้งานการรับและประมวลผลการแจ้งเตือนแบบพุชที่ส่งผ่านบริการของ Pushwoosh สำหรับ Service Worker ของคุณ
## การติดตั้งจาก Google Tag Manager
ใช้โค้ดต่อไปนี้ใน **Google Tag Manager** ของคุณเพื่อเริ่มต้น Pushwoosh SDK สร้าง Custom HTML Tag และวางโค้ดด้านล่าง ตรวจสอบให้แน่ใจว่าได้เปลี่ยน Pushwoosh Application Code, Safari Website ID และ URL รูปภาพการแจ้งเตือนเริ่มต้นของคุณ\
นอกจากนี้ให้ตั้งค่าลำดับความสำคัญของ **Tag Firing** ให้สูง (เช่น 100) และทริกเกอร์บน **All Pages** ดูภาพหน้าจอด้านล่างคัดลอก
```html
```