# คู่มือการผสานการทำงานพื้นฐานของ iOS SDK 7.0+
ส่วนนี้มีข้อมูลเกี่ยวกับวิธีการผสานการทำงาน Pushwoosh SDK เข้ากับแอปพลิเคชัน iOS ของคุณ
## ข้อกำหนดเบื้องต้น
ในการผสานการทำงาน Pushwoosh iOS SDK เข้ากับแอปของคุณ คุณจะต้องมีสิ่งต่อไปนี้:
## ขั้นตอนการผสานการทำงาน
### 1. การติดตั้ง
คุณสามารถผสานการทำงาน Pushwoosh SDK เข้ากับแอปพลิเคชันของคุณได้โดยใช้ **Swift Package Manager** หรือ **CocoaPods**
#### Swift Package Manager
ในส่วน **Package Dependencies** ให้เพิ่มแพ็คเกจต่อไปนี้:
```
https://github.com/Pushwoosh/Pushwoosh-XCFramework
```
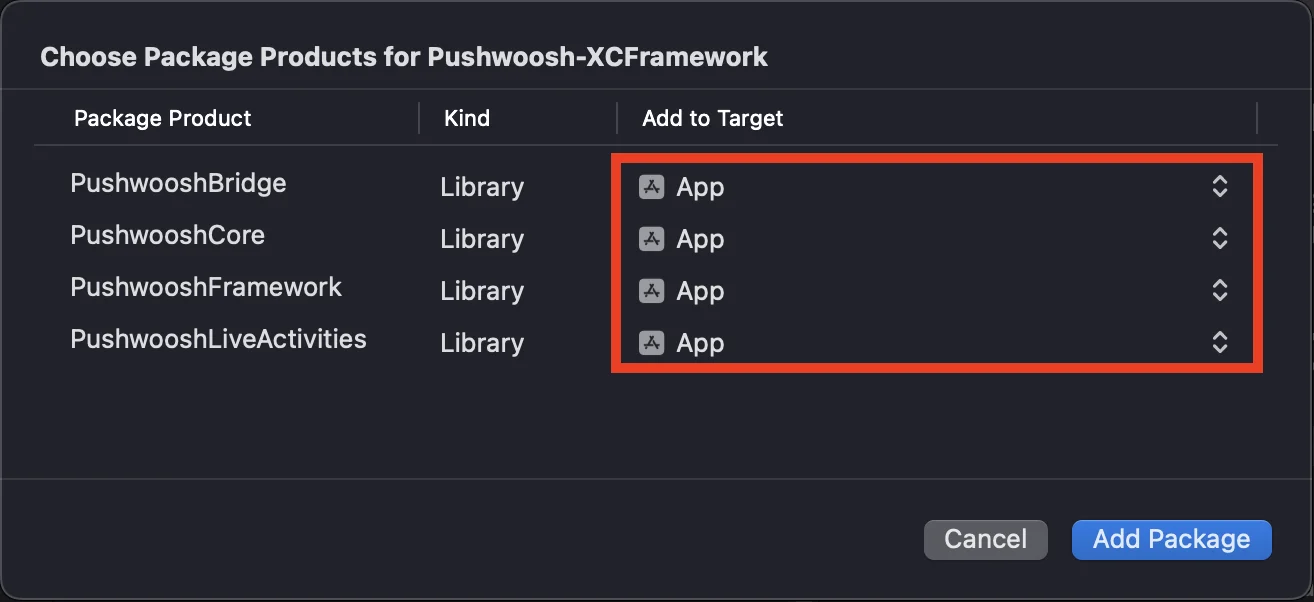
ในการใช้ Pushwoosh iOS SDK ตรวจสอบให้แน่ใจว่าได้เพิ่มเฟรมเวิร์กสามตัวต่อไปนี้ไปยัง target ของแอปของคุณเมื่อทำการผสานการทำงานผ่าน Swift Package Manager:
* ```PushwooshFramework```
* ```PushwooshCore```
* ```PushwooshBridge```
 #### CocoaPods
เปิด `Podfile` ของคุณและเพิ่ม dependency:
```bash
# Uncomment the next line to define a global platform for your project
# platform :ios, '9.0'
target 'MyApp' do
# Comment the next line if you don't want to use dynamic frameworks
use_frameworks!
pod 'PushwooshXCFramework'
end
```
จากนั้นใน terminal ให้รันคำสั่งต่อไปนี้เพื่อติดตั้ง dependency:
```bash
pod install
```
### 2. Capabilities
ในการเปิดใช้งาน Push Notifications ในโปรเจกต์ของคุณ คุณต้องเพิ่ม capabilities บางอย่าง
ในส่วน Signing & Capabilities ให้เพิ่ม capabilities ต่อไปนี้:
- `Push Notifications`
- `Background Modes` หลังจากเพิ่ม capability นี้แล้ว ให้เลือกช่องสำหรับ `Remote notifications`
หากคุณต้องการใช้ Time Sensitive Notifications (iOS 15+) ให้เพิ่ม capability `Time Sensitive Notifications` ด้วย
### 3. โค้ดสำหรับ Initialization
#### AppDelegate
เพิ่มโค้ดต่อไปนี้ลงในคลาส AppDelegate ของคุณ:
```swift
import SwiftUI
import PushwooshFramework
@main
struct MyApp: App {
// ลงทะเบียน AppDelegate เป็น UIApplicationDelegate
@UIApplicationDelegateAdaptor(AppDelegate.self) var appDelegate
var body: some Scene {
WindowGroup {
ContentView()
}
}
}
class AppDelegate: NSObject, UIApplicationDelegate, PWMessagingDelegate {
func application(_ application: UIApplication, didFinishLaunchingWithOptions launchOptions: [UIApplication.LaunchOptionsKey: Any]?) -> Bool {
// โค้ดสำหรับ Initialization
// ตั้งค่า delegate แบบกำหนดเองสำหรับการจัดการ push
Pushwoosh.configure.delegate = self
// ลงทะเบียนสำหรับ push notification
Pushwoosh.configure.registerForPushNotifications()
return true
}
// จัดการ token ที่ได้รับจาก APNS
func application(_ application: UIApplication, didRegisterForRemoteNotificationsWithDeviceToken deviceToken: Data) {
Pushwoosh.configure.handlePushRegistration(deviceToken)
}
// จัดการข้อผิดพลาดในการรับ token
func application(_ application: UIApplication, didFailToRegisterForRemoteNotificationsWithError error: Error) {
Pushwoosh.configure.handlePushRegistrationFailure(error)
}
// สำหรับ silent push notification
func application(_ application: UIApplication, didReceiveRemoteNotification userInfo: [AnyHashable: Any], fetchCompletionHandler completionHandler: @escaping (UIBackgroundFetchResult) -> Void) {
Pushwoosh.configure.handlePushReceived(userInfo)
completionHandler(.noData)
}
// ทำงานเมื่อได้รับ push
func pushwoosh(_ pushwoosh: Pushwoosh, onMessageReceived message: PWMessage) {
print("onMessageReceived: ", message.payload!.description)
}
// ทำงานเมื่อผู้ใช้แตะที่การแจ้งเตือน
func pushwoosh(_ pushwoosh: Pushwoosh, onMessageOpened message: PWMessage) {
print("onMessageOpened: ", message.payload!.description)
}
}
struct ContentView: View {
var body: some View {
Text("Pushwoosh with SwiftUI")
.padding()
}
}
```
```swift
import PushwooshFramework
@UIApplicationMain
class AppDelegate: UIResponder, UIApplicationDelegate, PWMessagingDelegate {
var window: UIWindow?
func application(_ application: UIApplication, didFinishLaunchingWithOptions launchOptions: [UIApplication.LaunchOptionsKey: Any]?) -> Bool {
//โค้ดสำหรับ Initialization
//ตั้งค่า delegate แบบกำหนดเองสำหรับการจัดการ push ในกรณีของเราคือ AppDelegate
Pushwoosh.configure.delegate = self;
//ลงทะเบียนสำหรับ push notification
Pushwoosh.configure.registerForPushNotifications()
return true
}
//จัดการ token ที่ได้รับจาก APNS
func application(_ application: UIApplication, didRegisterForRemoteNotificationsWithDeviceToken deviceToken: Data) {
Pushwoosh.configure.handlePushRegistration(deviceToken)
}
//จัดการข้อผิดพลาดในการรับ token
func application(_ application: UIApplication, didFailToRegisterForRemoteNotificationsWithError error: Error) {
Pushwoosh.configure.handlePushRegistrationFailure(error);
}
//สำหรับ silent push notification
func application(_ application: UIApplication, didReceiveRemoteNotification userInfo: [AnyHashable : Any], fetchCompletionHandler completionHandler: @escaping (UIBackgroundFetchResult) -> Void) {
Pushwoosh.configure.handlePushReceived(userInfo)
completionHandler(.noData)
}
//event นี้จะทำงานเมื่อได้รับ push
func pushwoosh(_ pushwoosh: Pushwoosh, onMessageReceived message: PWMessage) {
print("onMessageReceived: ", message.payload!.description)
}
// ทำงานเมื่อผู้ใช้แตะที่การแจ้งเตือน
func pushwoosh(_ pushwoosh: Pushwoosh, onMessageOpened message: PWMessage) {
print("onMessageOpened: ", message.payload!.description)
}
}
```
```objective-c
#import
@implementation AppDelegate
- (BOOL)application:(UIApplication *)application didFinishLaunchingWithOptions:(NSDictionary *)launchOptions {
//-----------PUSHWOOSH PART-----------
// ตั้งค่า delegate แบบกำหนดเองสำหรับการจัดการ push ในกรณีของเราคือ AppDelegate
[Pushwoosh configure].delegate = self;
//ลงทะเบียนสำหรับ push notification!
[[Pushwoosh configure] registerForPushNotifications];
return YES;
}
//จัดการ token ที่ได้รับจาก APNS
- (void)application:(UIApplication *)application
didRegisterForRemoteNotificationsWithDeviceToken:(NSData *)deviceToken {
[[Pushwoosh configure] handlePushRegistration:deviceToken];
}
//จัดการข้อผิดพลาดในการรับ token
- (void)application:(UIApplication *)application didFailToRegisterForRemoteNotificationsWithError:(NSError *)error {
[[Pushwoosh configure] handlePushRegistrationFailure:error];
}
//สำหรับ silent push notification
- (void)application:(UIApplication *)application
didReceiveRemoteNotification:(NSDictionary *)userInfo
fetchCompletionHandler:(void (^)(UIBackgroundFetchResult))completionHandler {
[[Pushwoosh configure] handlePushReceived:userInfo];
completionHandler(UIBackgroundFetchResultNoData);
}
//event นี้จะทำงานเมื่อได้รับ push
- (void)pushwoosh:(Pushwoosh *)pushwoosh onMessageReceived:(PWMessage *)message {
NSLog(@"onMessageReceived: %@", message.payload);
}
//event นี้จะทำงานเมื่อผู้ใช้แตะที่การแจ้งเตือน
- (void)pushwoosh:(Pushwoosh *)pushwoosh onMessageOpened:(PWMessage *)message {
NSLog(@"onMessageOpened: %@", message.payload);
}
@end
```
#### Info.plist
ใน `Info.plist` ของคุณ:
- ตั้งค่าคีย์ `Pushwoosh_APPID` เป็น Pushwoosh Application Code
- ตั้งค่าคีย์ `Pushwoosh_API_TOKEN` เป็น [Pushwoosh Device API Token](/th/developer/api-reference/api-access-token/#device-api-token)
### 4. การติดตามการส่งข้อความ
Pushwoosh รองรับการติดตาม event การส่งสำหรับ push notification ผ่าน Notification Service Extension
#### เพิ่ม Notification Service Extension
1. ใน Xcode เลือก **File** > **New** > **Target...**
2. เลือก **Notification Service Extension** และกด **Next**
3. ป้อนชื่อ target และกด **Finish**
4. เมื่อถูกถามเกี่ยวกับการเปิดใช้งาน ให้กด **Cancel**
#### Dependencies สำหรับ Notification Service Extension (สำหรับ CocoaPods เท่านั้น)
หมายเหตุ: หากคุณใช้ Swift Package Manager ในการจัดการ dependency คุณสามารถข้ามขั้นตอนนี้ได้ เนื่องจาก dependency จะถูกเพิ่มโดยอัตโนมัติ
เปิด `Podfile` ของคุณและเพิ่ม dependency สำหรับ target:
```ruby title="Podfile"
# Uncomment the next line to define a global platform for your project
# platform :ios, '9.0'
target 'MyApp' do
# Comment the next line if you don't want to use dynamic frameworks
use_frameworks!
pod 'PushwooshXCFramework'
end
target 'MyAppNotificationExtension' do
use_frameworks!
pod 'PushwooshXCFramework'
end
```
รันคำสั่งต่อไปนี้ใน terminal เพื่ออัปเดต dependency:
```shell
pod update
```
#### เพิ่ม Pushwoosh SDK ไปยัง Notification Service Extension
แทนที่คลาส `NotificationService` ที่สร้างขึ้นด้วย subclass ของ `PushwooshNotificationServiceExtension` จากนั้น Pushwoosh จะจัดการทุกอย่างที่ push ต้องการ — การส่ง event การส่ง, การนับ badge, การดาวน์โหลด media attachment และ `serviceExtensionTimeWillExpire` timeout fallback ที่จำเป็น ไม่จำเป็นต้องมีโค้ดอื่นใด
```swift
import PushwooshFramework
class NotificationService: PushwooshNotificationServiceExtension {}
```
```objective-c
#import
@interface NotificationService : PushwooshNotificationServiceExtension
@end
@implementation NotificationService
@end
```
หมายเหตุ: คุณสามารถข้ามซอร์สไฟล์ทั้งหมดได้ โดยตั้งค่า `NSExtensionPrincipalClass` ของ extension เป็น `PushwooshNotificationServiceExtension` ใน Info.plist ของมัน และไม่ต้องเขียนโค้ดใดๆ เลย
หากต้องการแก้ไขการแจ้งเตือนก่อนที่จะแสดง ให้ override `didReceive(_:withContentHandler:)` เรียก `super` ด้วย content handler ของคุณเอง แก้ไข content ภายในนั้น แล้วส่งต่อไปยัง handler เดิม Pushwoosh จะยังคงรัน event การส่ง, badge, attachment และ timeout fallback
```swift
import UserNotifications
import PushwooshFramework
class NotificationService: PushwooshNotificationServiceExtension {
override func didReceive(_ request: UNNotificationRequest,
withContentHandler contentHandler: @escaping (UNNotificationContent) -> Void) {
super.didReceive(request) { content in
let mutable = (content.mutableCopy() as? UNMutableNotificationContent) ?? content
// แก้ไขเนื้อหาการแจ้งเตือนที่นี่...
contentHandler(mutable)
}
}
}
```
```objective-c
#import
@interface NotificationService : PushwooshNotificationServiceExtension
@end
@implementation NotificationService
- (void)didReceiveNotificationRequest:(UNNotificationRequest *)request
withContentHandler:(void (^)(UNNotificationContent * _Nonnull))contentHandler {
[super didReceiveNotificationRequest:request withContentHandler:^(UNNotificationContent *content) {
UNMutableNotificationContent *mutable = [content mutableCopy];
// แก้ไขเนื้อหาการแจ้งเตือนที่นี่...
contentHandler(mutable);
}];
}
@end
```
#### Info.plist
extension จะสืบทอด `Pushwoosh_APPID` (และคีย์ `Pushwoosh_*` อื่นๆ) จากแอปโฮสต์ ดังนั้นคุณไม่จำเป็นต้องทำซ้ำใน Info.plist ของ extension เพิ่มคีย์ที่นั่นเฉพาะเมื่อคุณต้องการ override ค่าของโฮสต์
ในการซิงค์การนับ badge และการตั้งค่า reverse-proxy กับแอป ให้แชร์ [App Group](/th/developer/pushwoosh-sdk/ios-sdk/setting-up-badges) ระหว่างแอปและ extension เพิ่ม capability App Groups ไปยังทั้งสอง target จากนั้นตั้งค่า App Group ID ใน Info.plist ของ **แอปหลัก**:
- `PW_APP_GROUPS_NAME` - ตัวระบุ App Group ของคุณ (ตัวอย่างเช่น `group.com.example.app`)
extension จะสืบทอดค่านี้จากแอปโฮสต์ ดังนั้นคุณไม่จำเป็นต้องทำซ้ำใน Info.plist ของ extension — เพิ่มที่นั่นเฉพาะเพื่อ override โฮสต์ หรืออีกทางหนึ่งคือให้ระบุในโค้ดโดยการ override `pushwooshAppGroupsName`
### 5. รันโปรเจกต์
1. Build และรันโปรเจกต์
2. ไปที่ Pushwoosh Control Panel และ [ส่ง push notification](/th/product/messaging-channels/push-notifications/send-push-notifications/one-time-push)
3. คุณควรเห็นการแจ้งเตือนในแอป
## การผสานการทำงาน Pushwoosh iOS แบบขยาย
ณ จุดนี้ คุณได้ผสานการทำงาน SDK เรียบร้อยแล้วและสามารถส่งและรับ push notification ได้ ตอนนี้เรามาดูฟังก์ชันการทำงานหลักกัน
### Push notifications
ใน Pushwoosh SDK มี callback สองตัวที่ออกแบบมาเพื่อจัดการ push notification:
- `onMessageReceived`: เมธอดนี้จะถูกเรียกเมื่อได้รับ push notification
- `onMessageOpened`: เมธอดนี้จะถูกเรียกเมื่อผู้ใช้โต้ตอบกับ (เปิด) การแจ้งเตือน
callback เหล่านี้ช่วยให้นักพัฒนาสามารถจัดการการรับและการโต้ตอบของผู้ใช้กับ push notification ภายในแอปพลิเคชันของตนได้
```swift
import PushwooshFramework
class AppDelegate: NSObject, UIApplicationDelegate, PWMessagingDelegate {
func application(_ application: UIApplication, didFinishLaunchingWithOptions launchOptions: [UIApplication.LaunchOptionsKey : Any]? = nil) -> Bool {
Pushwoosh.configure.delegate = self;
}
func pushwoosh(_ pushwoosh: Pushwoosh, onMessageOpened message: PWMessage) {
if let payload = message.payload {
print("onMessageOpened: \(payload)")
}
}
func pushwoosh(_ pushwoosh: Pushwoosh, onMessageReceived message: PWMessage) {
if let payload = message.payload {
print("onMessageReceived: \(payload)")
}
}
}
```
```objective-c
#import
@interface AppDelegate ()
@end
@implementation AppDelegate
- (BOOL)application:(UIApplication *)application didFinishLaunchingWithOptions:(NSDictionary *)launchOptions {
[[Pushwoosh configure] setDelegate:self];
return YES;
}
- (void)pushwoosh:(Pushwoosh *)pushwoosh onMessageOpened:(PWMessage *)message {
if (message.payload) {
NSLog(@"onMessageOpened: %@", message.payload);
}
}
- (void)pushwoosh:(Pushwoosh *)pushwoosh onMessageReceived:(PWMessage *)message {
if (message.payload) {
NSLog(@"onMessageReceived: %@", message.payload);
}
}
@end
```
### การกำหนดค่าผู้ใช้
โดยการมุ่งเน้นไปที่พฤติกรรมและความชอบของผู้ใช้แต่ละคน คุณสามารถส่งมอบเนื้อหาที่เป็นส่วนตัว ซึ่งนำไปสู่ความพึงพอใจและความภักดีของผู้ใช้ที่เพิ่มขึ้น
```swift
import PushwooshFramework
class Registration {
func afterUserLogin(user: User) {
let pushwoosh = Pushwoosh.configure
// ตั้งค่า user ID
if let userId = user.userId {
pushwoosh.setUserId(userId)
}
// ตั้งค่า user email
if let userEmail = user.email {
pushwoosh.setEmail(userEmail)
}
// ตั้งค่าหมายเลข SMS ของผู้ใช้
if let userSmsNumber = user.SmsNumber {
pushwoosh.registerSmsNumber(userSmsNumber)
}
// ตั้งค่าหมายเลข WhatsApp ของผู้ใช้
if let userWhatsAppNumber = user.WhatsAppNumber {
pushwoosh.registerSmsNumber(userWhatsAppNumber)
}
// การตั้งค่าข้อมูลผู้ใช้เพิ่มเติมเป็น tag สำหรับ Pushwoosh
if let age = user.userDetails.age,
let name = user.userDetails.userName,
let lastLogin = user.userDetails.lastLoginDate {
pushwoosh.setTags([
"age": age,
"name": name,
"last_login": lastLogin
])
}
}
}
```
```objective-c
#import
@implementation Registration
- (void)afterUserLogin:(User *)user {
Pushwoosh *pushwoosh = [Pushwoosh configure];
// ตั้งค่า user ID
if (user.userId) {
[pushwoosh setUserId:user.userId];
}
// ตั้งค่า user email
if (user.email) {
[pushwoosh setEmail:user.email];
}
// การตั้งค่าข้อมูลผู้ใช้เพิ่มเติมเป็น tag สำหรับ Pushwoosh
if (user.userDetails.age && user.userDetails.userName && user.userDetails.lastLoginDate) {
NSDictionary *tags = @{
@"age": user.userDetails.age,
@"name": user.userDetails.userName,
@"last_login": user.userDetails.lastLoginDate
};
[pushwoosh setTags:tags];
}
}
@end
```
### Tags
Tags คือคู่ key-value ที่กำหนดให้กับผู้ใช้หรืออุปกรณ์ ช่วยให้สามารถแบ่งกลุ่มตามคุณลักษณะต่างๆ เช่น ความชอบหรือพฤติกรรม ทำให้สามารถส่งข้อความแบบกำหนดเป้าหมายได้
```swift
import PushwooshFramework
class UpdateUser {
func afterUserUpdateProfile(user: User) {
let pushwoosh = Pushwoosh.configure
// ตั้งค่ารายการหมวดหมู่ที่ชื่นชอบ
pushwoosh.setTags(["favorite_categories" : user.getFavoriteCategories()])
// ตั้งค่าข้อมูลการชำระเงิน
pushwoosh.setTags([
"is_subscribed": user.isSubscribed(),
"payment_status": user.getPaymentStatus(),
"billing_address": user.getBillingAddress()
])
}
}
```
```objective-c
#import
@implementation UpdateUser
- (void)afterUserUpdateProfile:(User *)user {
Pushwoosh *pushwoosh = [Pushwoosh configure];
// ตั้งค่ารายการหมวดหมู่ที่ชื่นชอบ
[pushwoosh setTags:@{@"favorite_categories" : user.getFavoriteCategories}];
// ตั้งค่าข้อมูลการชำระเงิน
NSDictionary *tags = @{
@"is_subscribed": @(user.isSubscribed),
@"payment_status": user.getPaymentStatus,
@"billing_address": user.getBillingAddress
};
[pushwoosh setTags:tags];
}
@end
```
### Events
Events คือการกระทำหรือเหตุการณ์ที่เกิดขึ้นโดยผู้ใช้ภายในแอป ซึ่งสามารถติดตามเพื่อวิเคราะห์พฤติกรรมและกระตุ้นข้อความหรือการกระทำที่สอดคล้องกัน
```swift
import PushwooshFramework
class Registration {
func afterUserLogin(user: User) {
if let userName = user.getUserName(), let lastLogin = user.getLastLoginDate() {
PWInAppManager.shared().postEvent("login", withAttributes: [
"name": userName,
"last_login": lastLogin
])
}
}
func afterUserPurchase(user: User, product: Product) {
let pushwoosh = Pushwoosh.configure
// ติดตาม event การซื้อ
PWInAppManager.shared().postEvent("purchase", withAttributes: [
"product_id": product.getId(),
"product_name": product.getName(),
"price": product.getPrice(),
"quantity": product.getQuantity()
])
// ตั้งค่า tag ของผู้ใช้
let lastPurchaseDate = Date().timeIntervalSince1970
let lifetimeSpend = getCurrentLifetimeSpend() + product.getPrice()
pushwoosh.setTags([
"last_purchase_date": lastPurchaseDate,
"lifetime_spend": lifetimeSpend
])
}
}
```
```objective-c
#import
#import
@implementation Registration
- (void)afterUserLogin:(User *)user {
NSString *userName = [user getUserName];
NSDate *lastLogin = [user getLastLoginDate];
if (userName && lastLogin) {
[[PWInAppManager sharedManager] postEvent:@"login" withAttributes:@{
@"name": userName,
@"last_login": lastLogin
}];
}
}
- (void)afterUserPurchase:(User *)user product:(Product *)product {
Pushwoosh *pushwoosh = [Pushwoosh configure];
// ติดตาม event การซื้อ
[[PWInAppManager sharedManager] postEvent:@"purchase" withAttributes:@{
@"product_id": [product getId],
@"product_name": [product getName],
@"price": @([product getPrice]),
@"quantity": @([product getQuantity])
}];
// ตั้งค่า tag ของผู้ใช้
NSTimeInterval lastPurchaseDate = [[NSDate date] timeIntervalSince1970];
double lifetimeSpend = /* fetch current lifetime spend */ + [product getPrice];
NSDictionary *tags = @{
@"last_purchase_date": @(lastPurchaseDate),
@"lifetime_spend": @(lifetimeSpend)
};
[pushwoosh setTags:tags];
}
@end
```
### Rich Media
Rich media หมายถึงเนื้อหาแบบโต้ตอบและมัลติมีเดีย เช่น รูปภาพ วิดีโอ หรือ HTML ที่ใช้ในการแจ้งเตือนและข้อความในแอปเพื่อเพิ่มการมีส่วนร่วมของผู้ใช้
```swift
import PushwooshFramework
class ViewController: UIViewController, PWRichMediaPresentingDelegate {
override func viewDidLoad() {
super.viewDidLoad()
let richMediaConfiguration = PWModalWindowConfiguration.shared()
PWRichMediaManager.shared().delegate = self
richMediaConfiguration.configureModalWindow(with: .PWModalWindowPositionBottom,
present: .PWAnimationPresentFromBottom,
dismiss: .PWAnimationDismissDown)
}
func richMediaManager(_ richMediaManager: PWRichMediaManager!, shouldPresent richMedia: PWRichMedia!) -> Bool {
print("Rich media will be presented with: \(richMedia.pushPayload!)")
return true
}
func richMediaManager(_ richMediaManager: PWRichMediaManager!, didPresent richMedia: PWRichMedia!) {
print("Rich media has been presented with: \(richMedia.pushPayload!)")
}
func richMediaManager(_ richMediaManager: PWRichMediaManager!, didClose richMedia: PWRichMedia!) {
print("Rich media has been closed with: \(richMedia.pushPayload!)")
}
func richMediaManager(_ richMediaManager: PWRichMediaManager!, presentingDidFailFor richMedia: PWRichMedia!, withError error: (any Error)!) {
print("Failed to present rich media with: \(richMedia.pushPayload!). Error: \(error.localizedDescription)")
}
}
```
```objective-c
#import "ViewController.h"
#import
#import
#import
@interface ViewController ()
@end
@implementation ViewController
- (void)viewDidLoad {
[super viewDidLoad];
[[PWRichMediaManager sharedManager] setDelegate:self];
[[PWModalWindowConfiguration shared] configureModalWindowWith:PWModalWindowPositionBottom
presentAnimation:PWAnimationPresentFromBottom
dismissAnimation:PWAnimationDismissDown];
}
- (BOOL)richMediaManager:(PWRichMediaManager *)richMediaManager shouldPresentRichMedia:(PWRichMedia *)richMedia {
NSLog(@"Rich media will be presented with: %@", richMedia.pushPayload);
return YES;
}
- (void)richMediaManager:(PWRichMediaManager *)richMediaManager didPresentRichMedia:(PWRichMedia *)richMedia {
NSLog(@"Rich media has been presented with: %@", richMedia.pushPayload);
}
- (void)richMediaManager:(PWRichMediaManager *)richMediaManager didCloseRichMedia:(PWRichMedia *)richMedia {
NSLog(@"Rich media has been closed with:: %@", richMedia.pushPayload);
}
- (void)richMediaManager:(PWRichMediaManager *)richMediaManager presentingDidFailForRichMedia:(PWRichMedia *)richMedia withError:(NSError *)error {
NSLog(@"Failed to present rich media with: %@. Error: %@", richMedia.pushPayload, error.localizedDescription);
}
@end
```
## การแก้ไขปัญหา
### Failed to build module 'PushwooshFramework'
เมื่อ build โปรเจกต์ของคุณ คุณอาจพบข้อผิดพลาดคล้ายกับ:
```
Failed to build module 'PushwooshFramework'; this SDK is not supported by the compiler
(the SDK is built with 'Apple Swift version 5.10 (swiftlang-5.10.0.13 clang-1500.3.9.4)',
while this compiler is 'Apple Swift version 6.1.2 effective-5.10 (swiftlang-6.1.2.1.2 clang-1700.0.13.5)')
```
**สาเหตุ:** ข้อผิดพลาดนี้ไม่เกี่ยวข้องกับความไม่เข้ากันของเวอร์ชัน Swift compiler ตั้งแต่ Pushwoosh iOS SDK เวอร์ชัน 6.8.0 เป็นต้นไป SDK ได้ถูกแบ่งออกเป็นส่วนประกอบหลายส่วนที่ทำงานร่วมกัน ข้อผิดพลาดนี้เกิดขึ้นเมื่อไม่ได้เพิ่มเฟรมเวิร์กที่จำเป็นทั้งหมดลงในโปรเจกต์ของคุณ
**วิธีแก้ไข:** ตรวจสอบให้แน่ใจว่าได้เพิ่มเฟรมเวิร์กที่จำเป็นทั้งสี่ตัวไปยัง target ของแอปของคุณเมื่อทำการผสานการทำงานผ่าน Swift Package Manager:
* ```PushwooshFramework```
* ```PushwooshCore```
* ```PushwooshBridge```
* ```PushwooshLiveActivities```
ในการตรวจสอบสิ่งนี้ใน Xcode:
1. เลือกโปรเจกต์ของคุณใน Project Navigator
2. เลือก target ของแอปของคุณ
3. ไปที่ **General** > **Frameworks, Libraries, and Embedded Content**
4. ยืนยันว่ามีเฟรมเวิร์กทั้งสี่ตัวอยู่ในรายการ
---
หากคุณพบปัญหาใดๆ ในระหว่างกระบวนการผสานการทำงาน โปรดดูที่ส่วน [การสนับสนุนและชุมชน](/th/developer/pushwoosh-sdk/support-and-community)
#### CocoaPods
เปิด `Podfile` ของคุณและเพิ่ม dependency:
```bash
# Uncomment the next line to define a global platform for your project
# platform :ios, '9.0'
target 'MyApp' do
# Comment the next line if you don't want to use dynamic frameworks
use_frameworks!
pod 'PushwooshXCFramework'
end
```
จากนั้นใน terminal ให้รันคำสั่งต่อไปนี้เพื่อติดตั้ง dependency:
```bash
pod install
```
### 2. Capabilities
ในการเปิดใช้งาน Push Notifications ในโปรเจกต์ของคุณ คุณต้องเพิ่ม capabilities บางอย่าง
ในส่วน Signing & Capabilities ให้เพิ่ม capabilities ต่อไปนี้:
- `Push Notifications`
- `Background Modes` หลังจากเพิ่ม capability นี้แล้ว ให้เลือกช่องสำหรับ `Remote notifications`
หากคุณต้องการใช้ Time Sensitive Notifications (iOS 15+) ให้เพิ่ม capability `Time Sensitive Notifications` ด้วย
### 3. โค้ดสำหรับ Initialization
#### AppDelegate
เพิ่มโค้ดต่อไปนี้ลงในคลาส AppDelegate ของคุณ:
```swift
import SwiftUI
import PushwooshFramework
@main
struct MyApp: App {
// ลงทะเบียน AppDelegate เป็น UIApplicationDelegate
@UIApplicationDelegateAdaptor(AppDelegate.self) var appDelegate
var body: some Scene {
WindowGroup {
ContentView()
}
}
}
class AppDelegate: NSObject, UIApplicationDelegate, PWMessagingDelegate {
func application(_ application: UIApplication, didFinishLaunchingWithOptions launchOptions: [UIApplication.LaunchOptionsKey: Any]?) -> Bool {
// โค้ดสำหรับ Initialization
// ตั้งค่า delegate แบบกำหนดเองสำหรับการจัดการ push
Pushwoosh.configure.delegate = self
// ลงทะเบียนสำหรับ push notification
Pushwoosh.configure.registerForPushNotifications()
return true
}
// จัดการ token ที่ได้รับจาก APNS
func application(_ application: UIApplication, didRegisterForRemoteNotificationsWithDeviceToken deviceToken: Data) {
Pushwoosh.configure.handlePushRegistration(deviceToken)
}
// จัดการข้อผิดพลาดในการรับ token
func application(_ application: UIApplication, didFailToRegisterForRemoteNotificationsWithError error: Error) {
Pushwoosh.configure.handlePushRegistrationFailure(error)
}
// สำหรับ silent push notification
func application(_ application: UIApplication, didReceiveRemoteNotification userInfo: [AnyHashable: Any], fetchCompletionHandler completionHandler: @escaping (UIBackgroundFetchResult) -> Void) {
Pushwoosh.configure.handlePushReceived(userInfo)
completionHandler(.noData)
}
// ทำงานเมื่อได้รับ push
func pushwoosh(_ pushwoosh: Pushwoosh, onMessageReceived message: PWMessage) {
print("onMessageReceived: ", message.payload!.description)
}
// ทำงานเมื่อผู้ใช้แตะที่การแจ้งเตือน
func pushwoosh(_ pushwoosh: Pushwoosh, onMessageOpened message: PWMessage) {
print("onMessageOpened: ", message.payload!.description)
}
}
struct ContentView: View {
var body: some View {
Text("Pushwoosh with SwiftUI")
.padding()
}
}
```
```swift
import PushwooshFramework
@UIApplicationMain
class AppDelegate: UIResponder, UIApplicationDelegate, PWMessagingDelegate {
var window: UIWindow?
func application(_ application: UIApplication, didFinishLaunchingWithOptions launchOptions: [UIApplication.LaunchOptionsKey: Any]?) -> Bool {
//โค้ดสำหรับ Initialization
//ตั้งค่า delegate แบบกำหนดเองสำหรับการจัดการ push ในกรณีของเราคือ AppDelegate
Pushwoosh.configure.delegate = self;
//ลงทะเบียนสำหรับ push notification
Pushwoosh.configure.registerForPushNotifications()
return true
}
//จัดการ token ที่ได้รับจาก APNS
func application(_ application: UIApplication, didRegisterForRemoteNotificationsWithDeviceToken deviceToken: Data) {
Pushwoosh.configure.handlePushRegistration(deviceToken)
}
//จัดการข้อผิดพลาดในการรับ token
func application(_ application: UIApplication, didFailToRegisterForRemoteNotificationsWithError error: Error) {
Pushwoosh.configure.handlePushRegistrationFailure(error);
}
//สำหรับ silent push notification
func application(_ application: UIApplication, didReceiveRemoteNotification userInfo: [AnyHashable : Any], fetchCompletionHandler completionHandler: @escaping (UIBackgroundFetchResult) -> Void) {
Pushwoosh.configure.handlePushReceived(userInfo)
completionHandler(.noData)
}
//event นี้จะทำงานเมื่อได้รับ push
func pushwoosh(_ pushwoosh: Pushwoosh, onMessageReceived message: PWMessage) {
print("onMessageReceived: ", message.payload!.description)
}
// ทำงานเมื่อผู้ใช้แตะที่การแจ้งเตือน
func pushwoosh(_ pushwoosh: Pushwoosh, onMessageOpened message: PWMessage) {
print("onMessageOpened: ", message.payload!.description)
}
}
```
```objective-c
#import
@implementation AppDelegate
- (BOOL)application:(UIApplication *)application didFinishLaunchingWithOptions:(NSDictionary *)launchOptions {
//-----------PUSHWOOSH PART-----------
// ตั้งค่า delegate แบบกำหนดเองสำหรับการจัดการ push ในกรณีของเราคือ AppDelegate
[Pushwoosh configure].delegate = self;
//ลงทะเบียนสำหรับ push notification!
[[Pushwoosh configure] registerForPushNotifications];
return YES;
}
//จัดการ token ที่ได้รับจาก APNS
- (void)application:(UIApplication *)application
didRegisterForRemoteNotificationsWithDeviceToken:(NSData *)deviceToken {
[[Pushwoosh configure] handlePushRegistration:deviceToken];
}
//จัดการข้อผิดพลาดในการรับ token
- (void)application:(UIApplication *)application didFailToRegisterForRemoteNotificationsWithError:(NSError *)error {
[[Pushwoosh configure] handlePushRegistrationFailure:error];
}
//สำหรับ silent push notification
- (void)application:(UIApplication *)application
didReceiveRemoteNotification:(NSDictionary *)userInfo
fetchCompletionHandler:(void (^)(UIBackgroundFetchResult))completionHandler {
[[Pushwoosh configure] handlePushReceived:userInfo];
completionHandler(UIBackgroundFetchResultNoData);
}
//event นี้จะทำงานเมื่อได้รับ push
- (void)pushwoosh:(Pushwoosh *)pushwoosh onMessageReceived:(PWMessage *)message {
NSLog(@"onMessageReceived: %@", message.payload);
}
//event นี้จะทำงานเมื่อผู้ใช้แตะที่การแจ้งเตือน
- (void)pushwoosh:(Pushwoosh *)pushwoosh onMessageOpened:(PWMessage *)message {
NSLog(@"onMessageOpened: %@", message.payload);
}
@end
```
#### Info.plist
ใน `Info.plist` ของคุณ:
- ตั้งค่าคีย์ `Pushwoosh_APPID` เป็น Pushwoosh Application Code
- ตั้งค่าคีย์ `Pushwoosh_API_TOKEN` เป็น [Pushwoosh Device API Token](/th/developer/api-reference/api-access-token/#device-api-token)
### 4. การติดตามการส่งข้อความ
Pushwoosh รองรับการติดตาม event การส่งสำหรับ push notification ผ่าน Notification Service Extension
#### เพิ่ม Notification Service Extension
1. ใน Xcode เลือก **File** > **New** > **Target...**
2. เลือก **Notification Service Extension** และกด **Next**
3. ป้อนชื่อ target และกด **Finish**
4. เมื่อถูกถามเกี่ยวกับการเปิดใช้งาน ให้กด **Cancel**
#### Dependencies สำหรับ Notification Service Extension (สำหรับ CocoaPods เท่านั้น)
หมายเหตุ: หากคุณใช้ Swift Package Manager ในการจัดการ dependency คุณสามารถข้ามขั้นตอนนี้ได้ เนื่องจาก dependency จะถูกเพิ่มโดยอัตโนมัติ
เปิด `Podfile` ของคุณและเพิ่ม dependency สำหรับ target:
```ruby title="Podfile"
# Uncomment the next line to define a global platform for your project
# platform :ios, '9.0'
target 'MyApp' do
# Comment the next line if you don't want to use dynamic frameworks
use_frameworks!
pod 'PushwooshXCFramework'
end
target 'MyAppNotificationExtension' do
use_frameworks!
pod 'PushwooshXCFramework'
end
```
รันคำสั่งต่อไปนี้ใน terminal เพื่ออัปเดต dependency:
```shell
pod update
```
#### เพิ่ม Pushwoosh SDK ไปยัง Notification Service Extension
แทนที่คลาส `NotificationService` ที่สร้างขึ้นด้วย subclass ของ `PushwooshNotificationServiceExtension` จากนั้น Pushwoosh จะจัดการทุกอย่างที่ push ต้องการ — การส่ง event การส่ง, การนับ badge, การดาวน์โหลด media attachment และ `serviceExtensionTimeWillExpire` timeout fallback ที่จำเป็น ไม่จำเป็นต้องมีโค้ดอื่นใด
```swift
import PushwooshFramework
class NotificationService: PushwooshNotificationServiceExtension {}
```
```objective-c
#import
@interface NotificationService : PushwooshNotificationServiceExtension
@end
@implementation NotificationService
@end
```
หมายเหตุ: คุณสามารถข้ามซอร์สไฟล์ทั้งหมดได้ โดยตั้งค่า `NSExtensionPrincipalClass` ของ extension เป็น `PushwooshNotificationServiceExtension` ใน Info.plist ของมัน และไม่ต้องเขียนโค้ดใดๆ เลย
หากต้องการแก้ไขการแจ้งเตือนก่อนที่จะแสดง ให้ override `didReceive(_:withContentHandler:)` เรียก `super` ด้วย content handler ของคุณเอง แก้ไข content ภายในนั้น แล้วส่งต่อไปยัง handler เดิม Pushwoosh จะยังคงรัน event การส่ง, badge, attachment และ timeout fallback
```swift
import UserNotifications
import PushwooshFramework
class NotificationService: PushwooshNotificationServiceExtension {
override func didReceive(_ request: UNNotificationRequest,
withContentHandler contentHandler: @escaping (UNNotificationContent) -> Void) {
super.didReceive(request) { content in
let mutable = (content.mutableCopy() as? UNMutableNotificationContent) ?? content
// แก้ไขเนื้อหาการแจ้งเตือนที่นี่...
contentHandler(mutable)
}
}
}
```
```objective-c
#import
@interface NotificationService : PushwooshNotificationServiceExtension
@end
@implementation NotificationService
- (void)didReceiveNotificationRequest:(UNNotificationRequest *)request
withContentHandler:(void (^)(UNNotificationContent * _Nonnull))contentHandler {
[super didReceiveNotificationRequest:request withContentHandler:^(UNNotificationContent *content) {
UNMutableNotificationContent *mutable = [content mutableCopy];
// แก้ไขเนื้อหาการแจ้งเตือนที่นี่...
contentHandler(mutable);
}];
}
@end
```
#### Info.plist
extension จะสืบทอด `Pushwoosh_APPID` (และคีย์ `Pushwoosh_*` อื่นๆ) จากแอปโฮสต์ ดังนั้นคุณไม่จำเป็นต้องทำซ้ำใน Info.plist ของ extension เพิ่มคีย์ที่นั่นเฉพาะเมื่อคุณต้องการ override ค่าของโฮสต์
ในการซิงค์การนับ badge และการตั้งค่า reverse-proxy กับแอป ให้แชร์ [App Group](/th/developer/pushwoosh-sdk/ios-sdk/setting-up-badges) ระหว่างแอปและ extension เพิ่ม capability App Groups ไปยังทั้งสอง target จากนั้นตั้งค่า App Group ID ใน Info.plist ของ **แอปหลัก**:
- `PW_APP_GROUPS_NAME` - ตัวระบุ App Group ของคุณ (ตัวอย่างเช่น `group.com.example.app`)
extension จะสืบทอดค่านี้จากแอปโฮสต์ ดังนั้นคุณไม่จำเป็นต้องทำซ้ำใน Info.plist ของ extension — เพิ่มที่นั่นเฉพาะเพื่อ override โฮสต์ หรืออีกทางหนึ่งคือให้ระบุในโค้ดโดยการ override `pushwooshAppGroupsName`
### 5. รันโปรเจกต์
1. Build และรันโปรเจกต์
2. ไปที่ Pushwoosh Control Panel และ [ส่ง push notification](/th/product/messaging-channels/push-notifications/send-push-notifications/one-time-push)
3. คุณควรเห็นการแจ้งเตือนในแอป
## การผสานการทำงาน Pushwoosh iOS แบบขยาย
ณ จุดนี้ คุณได้ผสานการทำงาน SDK เรียบร้อยแล้วและสามารถส่งและรับ push notification ได้ ตอนนี้เรามาดูฟังก์ชันการทำงานหลักกัน
### Push notifications
ใน Pushwoosh SDK มี callback สองตัวที่ออกแบบมาเพื่อจัดการ push notification:
- `onMessageReceived`: เมธอดนี้จะถูกเรียกเมื่อได้รับ push notification
- `onMessageOpened`: เมธอดนี้จะถูกเรียกเมื่อผู้ใช้โต้ตอบกับ (เปิด) การแจ้งเตือน
callback เหล่านี้ช่วยให้นักพัฒนาสามารถจัดการการรับและการโต้ตอบของผู้ใช้กับ push notification ภายในแอปพลิเคชันของตนได้
```swift
import PushwooshFramework
class AppDelegate: NSObject, UIApplicationDelegate, PWMessagingDelegate {
func application(_ application: UIApplication, didFinishLaunchingWithOptions launchOptions: [UIApplication.LaunchOptionsKey : Any]? = nil) -> Bool {
Pushwoosh.configure.delegate = self;
}
func pushwoosh(_ pushwoosh: Pushwoosh, onMessageOpened message: PWMessage) {
if let payload = message.payload {
print("onMessageOpened: \(payload)")
}
}
func pushwoosh(_ pushwoosh: Pushwoosh, onMessageReceived message: PWMessage) {
if let payload = message.payload {
print("onMessageReceived: \(payload)")
}
}
}
```
```objective-c
#import
@interface AppDelegate ()
@end
@implementation AppDelegate
- (BOOL)application:(UIApplication *)application didFinishLaunchingWithOptions:(NSDictionary *)launchOptions {
[[Pushwoosh configure] setDelegate:self];
return YES;
}
- (void)pushwoosh:(Pushwoosh *)pushwoosh onMessageOpened:(PWMessage *)message {
if (message.payload) {
NSLog(@"onMessageOpened: %@", message.payload);
}
}
- (void)pushwoosh:(Pushwoosh *)pushwoosh onMessageReceived:(PWMessage *)message {
if (message.payload) {
NSLog(@"onMessageReceived: %@", message.payload);
}
}
@end
```
### การกำหนดค่าผู้ใช้
โดยการมุ่งเน้นไปที่พฤติกรรมและความชอบของผู้ใช้แต่ละคน คุณสามารถส่งมอบเนื้อหาที่เป็นส่วนตัว ซึ่งนำไปสู่ความพึงพอใจและความภักดีของผู้ใช้ที่เพิ่มขึ้น
```swift
import PushwooshFramework
class Registration {
func afterUserLogin(user: User) {
let pushwoosh = Pushwoosh.configure
// ตั้งค่า user ID
if let userId = user.userId {
pushwoosh.setUserId(userId)
}
// ตั้งค่า user email
if let userEmail = user.email {
pushwoosh.setEmail(userEmail)
}
// ตั้งค่าหมายเลข SMS ของผู้ใช้
if let userSmsNumber = user.SmsNumber {
pushwoosh.registerSmsNumber(userSmsNumber)
}
// ตั้งค่าหมายเลข WhatsApp ของผู้ใช้
if let userWhatsAppNumber = user.WhatsAppNumber {
pushwoosh.registerSmsNumber(userWhatsAppNumber)
}
// การตั้งค่าข้อมูลผู้ใช้เพิ่มเติมเป็น tag สำหรับ Pushwoosh
if let age = user.userDetails.age,
let name = user.userDetails.userName,
let lastLogin = user.userDetails.lastLoginDate {
pushwoosh.setTags([
"age": age,
"name": name,
"last_login": lastLogin
])
}
}
}
```
```objective-c
#import
@implementation Registration
- (void)afterUserLogin:(User *)user {
Pushwoosh *pushwoosh = [Pushwoosh configure];
// ตั้งค่า user ID
if (user.userId) {
[pushwoosh setUserId:user.userId];
}
// ตั้งค่า user email
if (user.email) {
[pushwoosh setEmail:user.email];
}
// การตั้งค่าข้อมูลผู้ใช้เพิ่มเติมเป็น tag สำหรับ Pushwoosh
if (user.userDetails.age && user.userDetails.userName && user.userDetails.lastLoginDate) {
NSDictionary *tags = @{
@"age": user.userDetails.age,
@"name": user.userDetails.userName,
@"last_login": user.userDetails.lastLoginDate
};
[pushwoosh setTags:tags];
}
}
@end
```
### Tags
Tags คือคู่ key-value ที่กำหนดให้กับผู้ใช้หรืออุปกรณ์ ช่วยให้สามารถแบ่งกลุ่มตามคุณลักษณะต่างๆ เช่น ความชอบหรือพฤติกรรม ทำให้สามารถส่งข้อความแบบกำหนดเป้าหมายได้
```swift
import PushwooshFramework
class UpdateUser {
func afterUserUpdateProfile(user: User) {
let pushwoosh = Pushwoosh.configure
// ตั้งค่ารายการหมวดหมู่ที่ชื่นชอบ
pushwoosh.setTags(["favorite_categories" : user.getFavoriteCategories()])
// ตั้งค่าข้อมูลการชำระเงิน
pushwoosh.setTags([
"is_subscribed": user.isSubscribed(),
"payment_status": user.getPaymentStatus(),
"billing_address": user.getBillingAddress()
])
}
}
```
```objective-c
#import
@implementation UpdateUser
- (void)afterUserUpdateProfile:(User *)user {
Pushwoosh *pushwoosh = [Pushwoosh configure];
// ตั้งค่ารายการหมวดหมู่ที่ชื่นชอบ
[pushwoosh setTags:@{@"favorite_categories" : user.getFavoriteCategories}];
// ตั้งค่าข้อมูลการชำระเงิน
NSDictionary *tags = @{
@"is_subscribed": @(user.isSubscribed),
@"payment_status": user.getPaymentStatus,
@"billing_address": user.getBillingAddress
};
[pushwoosh setTags:tags];
}
@end
```
### Events
Events คือการกระทำหรือเหตุการณ์ที่เกิดขึ้นโดยผู้ใช้ภายในแอป ซึ่งสามารถติดตามเพื่อวิเคราะห์พฤติกรรมและกระตุ้นข้อความหรือการกระทำที่สอดคล้องกัน
```swift
import PushwooshFramework
class Registration {
func afterUserLogin(user: User) {
if let userName = user.getUserName(), let lastLogin = user.getLastLoginDate() {
PWInAppManager.shared().postEvent("login", withAttributes: [
"name": userName,
"last_login": lastLogin
])
}
}
func afterUserPurchase(user: User, product: Product) {
let pushwoosh = Pushwoosh.configure
// ติดตาม event การซื้อ
PWInAppManager.shared().postEvent("purchase", withAttributes: [
"product_id": product.getId(),
"product_name": product.getName(),
"price": product.getPrice(),
"quantity": product.getQuantity()
])
// ตั้งค่า tag ของผู้ใช้
let lastPurchaseDate = Date().timeIntervalSince1970
let lifetimeSpend = getCurrentLifetimeSpend() + product.getPrice()
pushwoosh.setTags([
"last_purchase_date": lastPurchaseDate,
"lifetime_spend": lifetimeSpend
])
}
}
```
```objective-c
#import
#import
@implementation Registration
- (void)afterUserLogin:(User *)user {
NSString *userName = [user getUserName];
NSDate *lastLogin = [user getLastLoginDate];
if (userName && lastLogin) {
[[PWInAppManager sharedManager] postEvent:@"login" withAttributes:@{
@"name": userName,
@"last_login": lastLogin
}];
}
}
- (void)afterUserPurchase:(User *)user product:(Product *)product {
Pushwoosh *pushwoosh = [Pushwoosh configure];
// ติดตาม event การซื้อ
[[PWInAppManager sharedManager] postEvent:@"purchase" withAttributes:@{
@"product_id": [product getId],
@"product_name": [product getName],
@"price": @([product getPrice]),
@"quantity": @([product getQuantity])
}];
// ตั้งค่า tag ของผู้ใช้
NSTimeInterval lastPurchaseDate = [[NSDate date] timeIntervalSince1970];
double lifetimeSpend = /* fetch current lifetime spend */ + [product getPrice];
NSDictionary *tags = @{
@"last_purchase_date": @(lastPurchaseDate),
@"lifetime_spend": @(lifetimeSpend)
};
[pushwoosh setTags:tags];
}
@end
```
### Rich Media
Rich media หมายถึงเนื้อหาแบบโต้ตอบและมัลติมีเดีย เช่น รูปภาพ วิดีโอ หรือ HTML ที่ใช้ในการแจ้งเตือนและข้อความในแอปเพื่อเพิ่มการมีส่วนร่วมของผู้ใช้
```swift
import PushwooshFramework
class ViewController: UIViewController, PWRichMediaPresentingDelegate {
override func viewDidLoad() {
super.viewDidLoad()
let richMediaConfiguration = PWModalWindowConfiguration.shared()
PWRichMediaManager.shared().delegate = self
richMediaConfiguration.configureModalWindow(with: .PWModalWindowPositionBottom,
present: .PWAnimationPresentFromBottom,
dismiss: .PWAnimationDismissDown)
}
func richMediaManager(_ richMediaManager: PWRichMediaManager!, shouldPresent richMedia: PWRichMedia!) -> Bool {
print("Rich media will be presented with: \(richMedia.pushPayload!)")
return true
}
func richMediaManager(_ richMediaManager: PWRichMediaManager!, didPresent richMedia: PWRichMedia!) {
print("Rich media has been presented with: \(richMedia.pushPayload!)")
}
func richMediaManager(_ richMediaManager: PWRichMediaManager!, didClose richMedia: PWRichMedia!) {
print("Rich media has been closed with: \(richMedia.pushPayload!)")
}
func richMediaManager(_ richMediaManager: PWRichMediaManager!, presentingDidFailFor richMedia: PWRichMedia!, withError error: (any Error)!) {
print("Failed to present rich media with: \(richMedia.pushPayload!). Error: \(error.localizedDescription)")
}
}
```
```objective-c
#import "ViewController.h"
#import
#import
#import
@interface ViewController ()
@end
@implementation ViewController
- (void)viewDidLoad {
[super viewDidLoad];
[[PWRichMediaManager sharedManager] setDelegate:self];
[[PWModalWindowConfiguration shared] configureModalWindowWith:PWModalWindowPositionBottom
presentAnimation:PWAnimationPresentFromBottom
dismissAnimation:PWAnimationDismissDown];
}
- (BOOL)richMediaManager:(PWRichMediaManager *)richMediaManager shouldPresentRichMedia:(PWRichMedia *)richMedia {
NSLog(@"Rich media will be presented with: %@", richMedia.pushPayload);
return YES;
}
- (void)richMediaManager:(PWRichMediaManager *)richMediaManager didPresentRichMedia:(PWRichMedia *)richMedia {
NSLog(@"Rich media has been presented with: %@", richMedia.pushPayload);
}
- (void)richMediaManager:(PWRichMediaManager *)richMediaManager didCloseRichMedia:(PWRichMedia *)richMedia {
NSLog(@"Rich media has been closed with:: %@", richMedia.pushPayload);
}
- (void)richMediaManager:(PWRichMediaManager *)richMediaManager presentingDidFailForRichMedia:(PWRichMedia *)richMedia withError:(NSError *)error {
NSLog(@"Failed to present rich media with: %@. Error: %@", richMedia.pushPayload, error.localizedDescription);
}
@end
```
## การแก้ไขปัญหา
### Failed to build module 'PushwooshFramework'
เมื่อ build โปรเจกต์ของคุณ คุณอาจพบข้อผิดพลาดคล้ายกับ:
```
Failed to build module 'PushwooshFramework'; this SDK is not supported by the compiler
(the SDK is built with 'Apple Swift version 5.10 (swiftlang-5.10.0.13 clang-1500.3.9.4)',
while this compiler is 'Apple Swift version 6.1.2 effective-5.10 (swiftlang-6.1.2.1.2 clang-1700.0.13.5)')
```
**สาเหตุ:** ข้อผิดพลาดนี้ไม่เกี่ยวข้องกับความไม่เข้ากันของเวอร์ชัน Swift compiler ตั้งแต่ Pushwoosh iOS SDK เวอร์ชัน 6.8.0 เป็นต้นไป SDK ได้ถูกแบ่งออกเป็นส่วนประกอบหลายส่วนที่ทำงานร่วมกัน ข้อผิดพลาดนี้เกิดขึ้นเมื่อไม่ได้เพิ่มเฟรมเวิร์กที่จำเป็นทั้งหมดลงในโปรเจกต์ของคุณ
**วิธีแก้ไข:** ตรวจสอบให้แน่ใจว่าได้เพิ่มเฟรมเวิร์กที่จำเป็นทั้งสี่ตัวไปยัง target ของแอปของคุณเมื่อทำการผสานการทำงานผ่าน Swift Package Manager:
* ```PushwooshFramework```
* ```PushwooshCore```
* ```PushwooshBridge```
* ```PushwooshLiveActivities```
ในการตรวจสอบสิ่งนี้ใน Xcode:
1. เลือกโปรเจกต์ของคุณใน Project Navigator
2. เลือก target ของแอปของคุณ
3. ไปที่ **General** > **Frameworks, Libraries, and Embedded Content**
4. ยืนยันว่ามีเฟรมเวิร์กทั้งสี่ตัวอยู่ในรายการ
---
หากคุณพบปัญหาใดๆ ในระหว่างกระบวนการผสานการทำงาน โปรดดูที่ส่วน [การสนับสนุนและชุมชน](/th/developer/pushwoosh-sdk/support-and-community)