# ตั้งค่า InboxKit ด้วย Swift Package Manager
*ใช้งานได้ตั้งแต่ iOS SDK [7.0.40](https://github.com/Pushwoosh/pushwoosh-ios-sdk/releases/tag/7.0.40)*
InboxKit จัดส่งเป็นผลิตภัณฑ์ไลบรารีแยกต่างหากภายในแพ็คเกจ Swift `Pushwoosh-XCFramework` คุณจำเป็นต้องผสานรวม SDK หลักไว้แล้ว หากคุณเริ่มต้นจากศูนย์ ให้ทำตาม [คู่มือการผสานรวมพื้นฐาน](/th/developer/pushwoosh-sdk/ios-sdk/setting-up-pushwoosh-ios-sdk-7-0/basic-integration-guide/) ก่อน
## เพิ่มผลิตภัณฑ์แพ็คเกจ InboxKit
1. เปิดโปรเจกต์ของคุณใน Xcode และไปที่การตั้งค่าของโปรเจกต์ → **Package Dependencies** จากนั้นกดปุ่ม **+**
2. ป้อน Package URL ต่อไปนี้:
```bash
https://github.com/Pushwoosh/Pushwoosh-XCFramework
```
3. ตั้งค่า **Dependency Rule** เป็น **Up to Next Major Version** พร้อมกับเวอร์ชันเสถียรล่าสุด จากนั้นคลิก **Add Package**
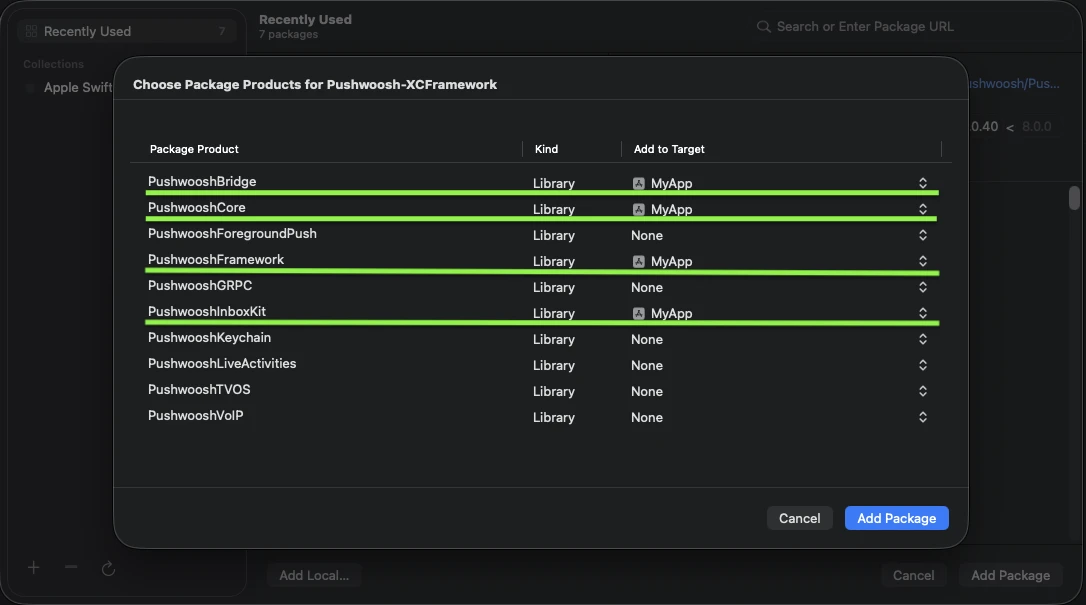
4. บนหน้าจอการเลือกแพ็คเกจ ให้เลือกผลิตภัณฑ์ต่อไปนี้เป็นอย่างน้อย และเพิ่มไปยัง target หลักของแอปของคุณ:
- **PushwooshFramework** (จำเป็น)
- **PushwooshCore** (จำเป็น)
- **PushwooshBridge** (จำเป็น)
- **PushwooshInboxKit** (โมดูลใหม่)
เพิ่มผลิตภัณฑ์ที่ไฮไลต์ทั้งสี่ไปยัง target หลักของแอปของคุณ
5. เปิด target หลักของแอปของคุณ และภายใต้ **Frameworks, Libraries, and Embedded Content** ยืนยันว่า `PushwooshInboxKit.xcframework` อยู่ในรายการและถูกฝัง (embedded)
เพียงเท่านี้ — InboxKit ก็ถูกเชื่อมโยงเข้ากับ SDK หลักแล้ว
## แสดงอินบ็อกซ์
เพิ่ม inbox controller ไปยัง navigation flow ใดก็ได้ การกำหนดค่าเริ่มต้นก็เพียงพอที่จะทำให้อินบ็อกซ์ทำงานได้ด้วยเซลล์มาตรฐานสามประเภท:
```swift
import PushwooshInboxKit
let inboxVC = PushwooshInboxKitViewController()
navigationController?.pushViewController(inboxVC, animated: true)
```
```objective-c
@import PushwooshInboxKit;
PushwooshInboxKitViewController *inboxVC = [PushwooshInboxKitViewController new];
[self.navigationController pushViewController:inboxVC animated:YES];
```
## ปรับแต่งอินบ็อกซ์
ใน Swift ให้กำหนดค่า controller ผ่าน value type `PushwooshInboxKitAttributes` ใน Objective-C ให้ใช้ setters ที่เป็นมิตรกับ `@objc` บน controller — `PushwooshInboxKitAttributes` เป็น Swift struct และไม่ได้ถูก bridge
```swift
var attributes = PushwooshInboxKitAttributes()
attributes.pullToRefreshEnabled = true
attributes.swipeToDeleteEnabled = true
attributes.pinningEnabled = true
attributes.style.unreadBadgeColor = .systemBlue
attributes.style.titleFont = .systemFont(ofSize: 17, weight: .semibold)
let inboxVC = PushwooshInboxKitViewController(attributes: attributes)
```
```objective-c
PushwooshInboxKitViewController *inboxVC = [PushwooshInboxKitViewController new];
[inboxVC setBackgroundColor:[UIColor systemBackgroundColor]];
[inboxVC setEmptyMessage:@"You have no messages yet"];
```
struct `Style` เปิดเผยสี, ฟอนต์, corner radii และ date formatter ทั้งหมดที่ใช้โดยเซลล์เริ่มต้น ทุกค่าเป็นสี semantic ของ Apple ตามค่าเริ่มต้น ดังนั้นอินบ็อกซ์จึงตอบสนองต่อ dark mode ของระบบโดยอัตโนมัติ
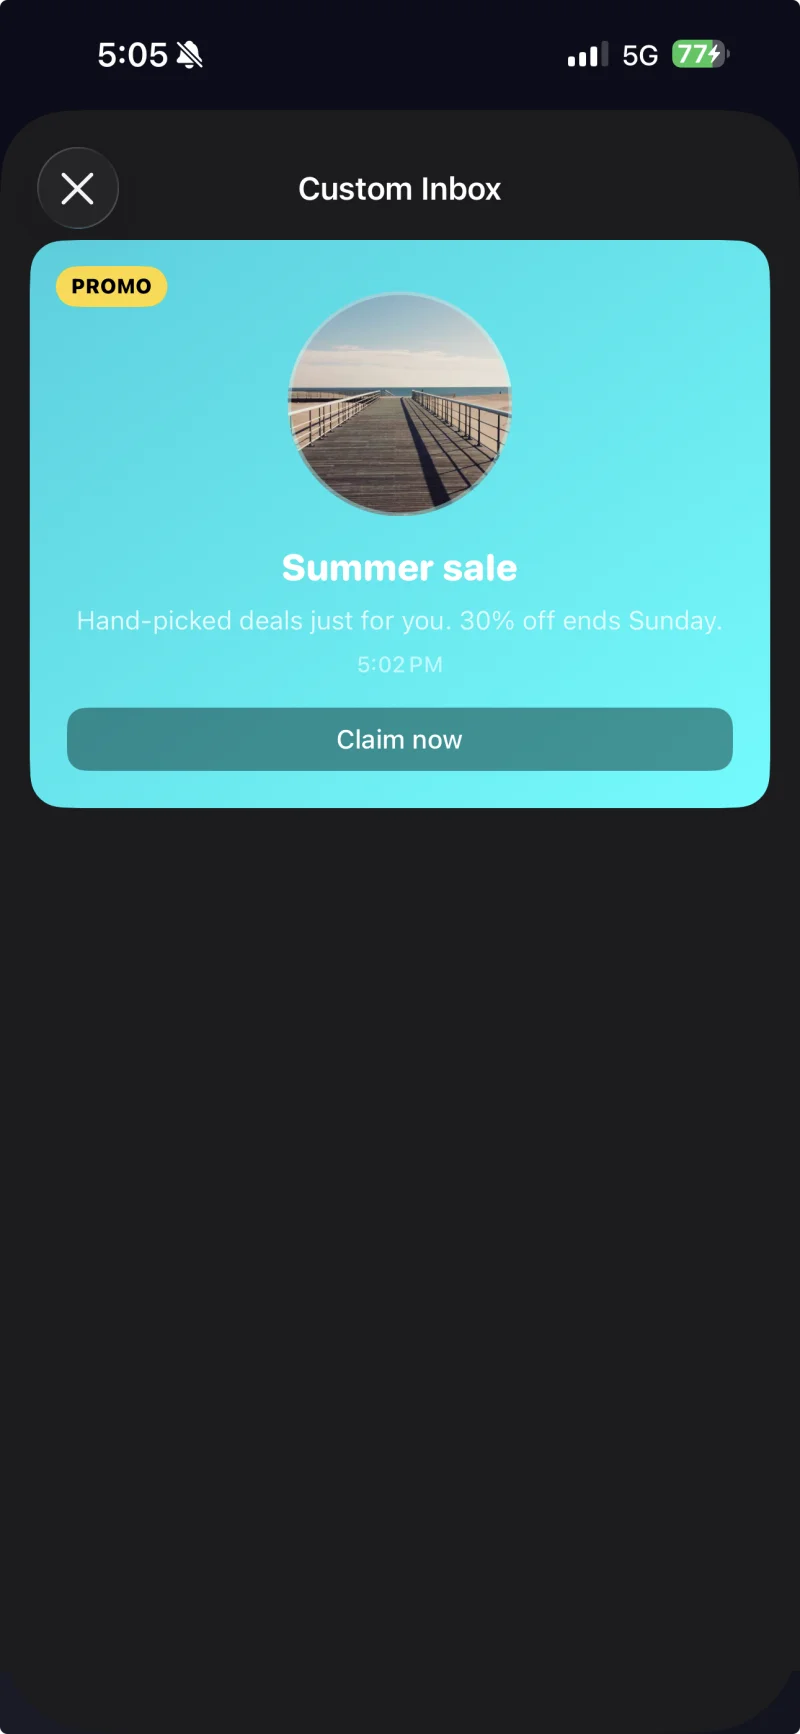
เซลล์ที่มีคำบรรยายพร้อมธีมที่กำหนดเองซึ่งใช้ผ่าน PushwooshInboxKitAttributes.Style
## จัดการการแตะและการรีเฟรช
ปฏิบัติตาม `PushwooshInboxKitDelegate` เพื่อตอบสนองต่อการกระทำของผู้ใช้และเหตุการณ์การรีเฟรช ทุกเมธอดมีการใช้งานเริ่มต้น ดังนั้นคุณจึง override เฉพาะสิ่งที่คุณต้องการ:
```swift
final class InboxCoordinator: NSObject, PushwooshInboxKitDelegate {
func inboxKit(_ vc: PushwooshInboxKitViewController,
didSelect message: PWInboxMessageProtocol) -> Bool {
// Return true to let the SDK open the message URL or richmedia.
// Return false if you handled the tap entirely (e.g. routed to a custom screen).
return true
}
func inboxKit(_ vc: PushwooshInboxKitViewController,
didRefreshWith messages: [PWInboxMessageProtocol],
error: Error?) {
// Show your own empty / error state here if needed.
}
}
inboxVC.delegate = inboxCoordinator
```
การทำเครื่องหมายว่าอ่านแล้ว, ทำเครื่องหมายทั้งหมดว่าอ่านแล้ว, ลบ, และล้างรายการที่อ่านแล้ว ทั้งหมดจะถูกบันทึกลงในที่จัดเก็บอินบ็อกซ์ Pushwoosh ในเครื่องก่อนที่จะส่งคำขอเครือข่าย สถานะจะยังคงอยู่แม้จะรีสตาร์ทโปรเซส แม้ว่าแบ็กเอนด์จะยังไม่รับทราบการเปลี่ยนแปลงก็ตาม
## ขั้นตอนต่อไป