# การผสานการทำงาน Rich Notifications ของ iOS
ตั้งแต่ iOS 10 เป็นต้นไป คุณสามารถแนบรูปภาพนิ่งหรือภาพเคลื่อนไหว หรือแม้แต่วิดีโอไปกับการแจ้งเตือนแบบพุชได้ ซึ่งจะแสดงผลในการแจ้งเตือนทันทีเมื่อผู้ใช้ทำการ force-tap
การเปิดใช้งานฟังก์ชันนี้ทำได้ง่ายมาก โดยมีการเขียนโค้ดเพียงเล็กน้อย มาเริ่มกันเลย!
## 1. การสร้าง Notification Service Extension
ขั้นแรกให้สร้าง [Notification Service Extension](https://developer.apple.com/reference/usernotifications/unnotificationserviceextension) ส่วนขยายนี้จะดาวน์โหลดเนื้อหาที่จะแสดงให้ผู้ใช้เห็น
เพิ่ม target ใหม่ไปยังโปรเจกต์ของคุณ (File -> New -> Target) และสร้าง _Notification Service Extension_
 ## 2. โค้ด Notification Service Extension
โค้ดนี้จะดาวน์โหลดไฟล์แนบและเรียกใช้ตัวจัดการเนื้อหาการแจ้งเตือน
เพียงแค่คัดลอกและวางลงในส่วนขยายของคุณ
```swift
import UserNotifications
import PushwooshFramework
class NotificationService: UNNotificationServiceExtension {
var contentHandler: ((UNNotificationContent) -> Void)?
var bestAttemptContent: UNMutableNotificationContent?
override func didReceive(_ request: UNNotificationRequest, withContentHandler contentHandler: @escaping (UNNotificationContent) -> Void) {
PWNotificationExtensionManager.shared().handle(request, contentHandler: contentHandler)
}
}
```
```objective-c
#import "PWNotificationExtensionManager.h"
@interface NotificationService : UNNotificationServiceExtension
@end
@implementation NotificationService
- (void)didReceiveNotificationRequest:(UNNotificationRequest *)request withContentHandler:(void (^)(UNNotificationContent * _Nonnull))contentHandler {
[[PWNotificationExtensionManager sharedManager] handleNotificationRequest:request contentHandler:contentHandler];
}
@end
```
## 3. การอนุญาต URL ของไฟล์แนบที่ไม่ปลอดภัย
Notification Service Extension เป็นไบนารีแยกต่างหากและ**มีไฟล์ Info.plist ของตัวเอง**
เพิ่ม **App Transport Security Settings** พร้อมกับตั้งค่าแฟล็ก **Allow Arbitrary Loads** เป็น ```true``` ในไฟล์ **Info.plist ของส่วนขยาย**
**Info.plist**:
```xml
NSAppTransportSecurity
NSAllowsArbitraryLoads
```
## 4. การส่ง Rich Notification
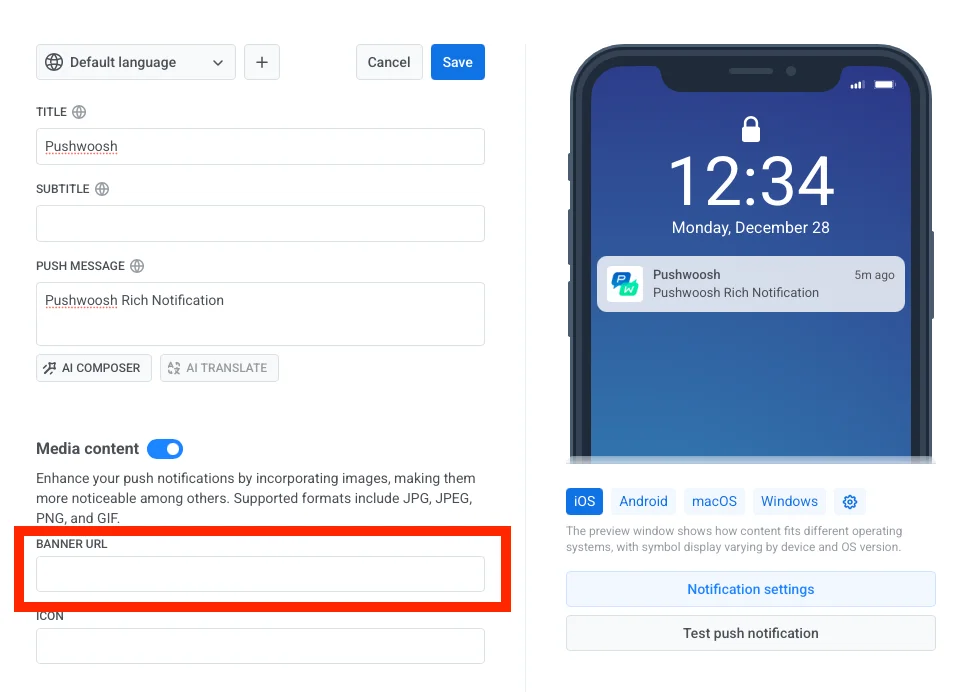
หากต้องการส่ง rich notification เพียงระบุ URL ของไฟล์ในช่อง **BANNER URL**
## 2. โค้ด Notification Service Extension
โค้ดนี้จะดาวน์โหลดไฟล์แนบและเรียกใช้ตัวจัดการเนื้อหาการแจ้งเตือน
เพียงแค่คัดลอกและวางลงในส่วนขยายของคุณ
```swift
import UserNotifications
import PushwooshFramework
class NotificationService: UNNotificationServiceExtension {
var contentHandler: ((UNNotificationContent) -> Void)?
var bestAttemptContent: UNMutableNotificationContent?
override func didReceive(_ request: UNNotificationRequest, withContentHandler contentHandler: @escaping (UNNotificationContent) -> Void) {
PWNotificationExtensionManager.shared().handle(request, contentHandler: contentHandler)
}
}
```
```objective-c
#import "PWNotificationExtensionManager.h"
@interface NotificationService : UNNotificationServiceExtension
@end
@implementation NotificationService
- (void)didReceiveNotificationRequest:(UNNotificationRequest *)request withContentHandler:(void (^)(UNNotificationContent * _Nonnull))contentHandler {
[[PWNotificationExtensionManager sharedManager] handleNotificationRequest:request contentHandler:contentHandler];
}
@end
```
## 3. การอนุญาต URL ของไฟล์แนบที่ไม่ปลอดภัย
Notification Service Extension เป็นไบนารีแยกต่างหากและ**มีไฟล์ Info.plist ของตัวเอง**
เพิ่ม **App Transport Security Settings** พร้อมกับตั้งค่าแฟล็ก **Allow Arbitrary Loads** เป็น ```true``` ในไฟล์ **Info.plist ของส่วนขยาย**
**Info.plist**:
```xml
NSAppTransportSecurity
NSAllowsArbitraryLoads
```
## 4. การส่ง Rich Notification
หากต้องการส่ง rich notification เพียงระบุ URL ของไฟล์ในช่อง **BANNER URL**
 เรียบร้อย! Force-tap ที่การแจ้งเตือนก็เป็นอันเสร็จสิ้น!
## แบ่งปันความคิดเห็นของคุณกับเรา
ความคิดเห็นของคุณช่วยให้เราสร้างประสบการณ์ที่ดียิ่งขึ้น ดังนั้นเรายินดีที่จะรับฟังจากคุณหากคุณมีปัญหาใดๆ ในระหว่างขั้นตอนการผสานการทำงาน SDK หากคุณประสบปัญหาใดๆ โปรดอย่าลังเลที่จะแบ่งปันความคิดเห็นของคุณกับเรา [ผ่านแบบฟอร์มนี้](https://docs.google.com/forms/d/e/1FAIpQLSd\_0b8jwn-V\_JmoPLIxIFYbHACCQhrzidOZV3ELywoQPXRSxw/viewform)
เรียบร้อย! Force-tap ที่การแจ้งเตือนก็เป็นอันเสร็จสิ้น!
## แบ่งปันความคิดเห็นของคุณกับเรา
ความคิดเห็นของคุณช่วยให้เราสร้างประสบการณ์ที่ดียิ่งขึ้น ดังนั้นเรายินดีที่จะรับฟังจากคุณหากคุณมีปัญหาใดๆ ในระหว่างขั้นตอนการผสานการทำงาน SDK หากคุณประสบปัญหาใดๆ โปรดอย่าลังเลที่จะแบ่งปันความคิดเห็นของคุณกับเรา [ผ่านแบบฟอร์มนี้](https://docs.google.com/forms/d/e/1FAIpQLSd\_0b8jwn-V\_JmoPLIxIFYbHACCQhrzidOZV3ELywoQPXRSxw/viewform)