# การปรับแต่ง Push Notification ของ iOS
เมื่ออุปกรณ์ iOS ได้รับการแจ้งเตือนที่มี alert ระบบจะแสดงเนื้อหาของ alert ในสองขั้นตอน ในขั้นแรก ระบบจะแสดงแบนเนอร์แบบย่อพร้อม title, subtitle และข้อความเนื้อหา (body text) สองถึงสี่บรรทัดจากการแจ้งเตือน หากผู้ใช้กดที่แบนเนอร์แบบย่อ iOS จะแสดงอินเทอร์เฟซการแจ้งเตือนแบบเต็ม รวมถึงการดำเนินการใดๆ ที่เกี่ยวข้องกับการแจ้งเตือน ระบบเป็นผู้จัดเตรียมอินเทอร์เฟซสำหรับแบนเนอร์แบบย่อ แต่คุณสามารถปรับแต่งอินเทอร์เฟซแบบเต็มได้โดยใช้ส่วนขยายเนื้อหาการแจ้งเตือน (notification content app extension)
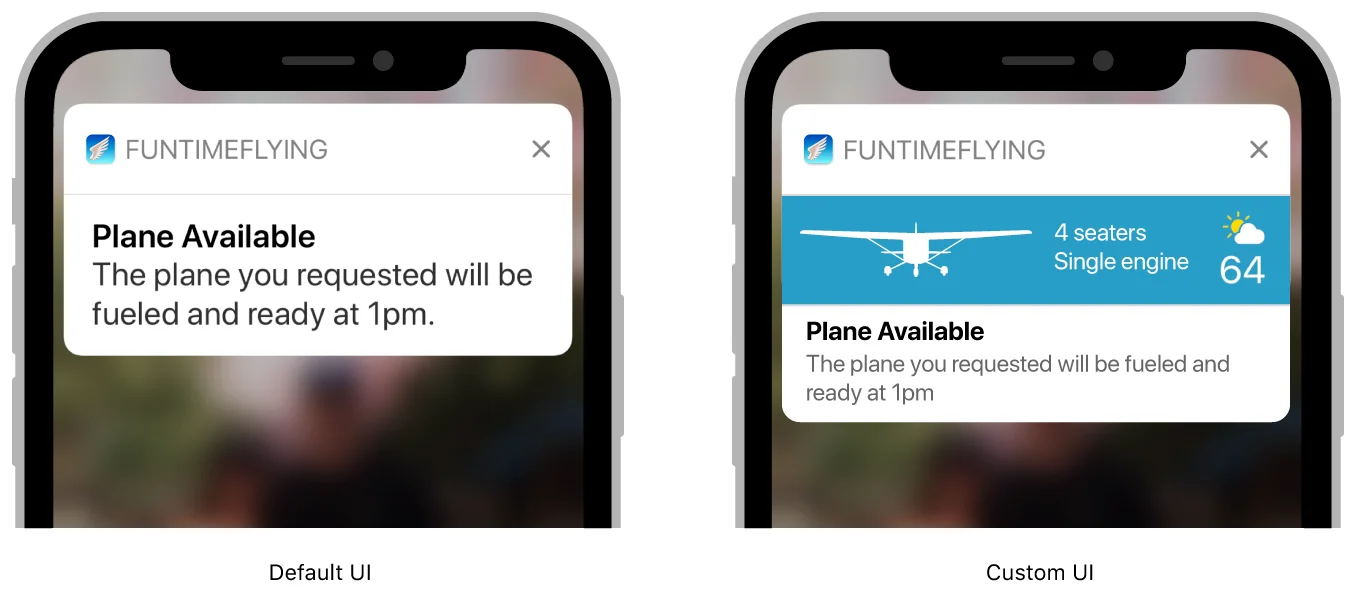 ส่วนขยายเนื้อหาการแจ้งเตือน (notification content app extension) จะจัดการ view controller ที่แสดงอินเทอร์เฟซการแจ้งเตือนที่คุณกำหนดเอง view controller นี้สามารถเสริมหรือแทนที่อินเทอร์เฟซระบบเริ่มต้นสำหรับการแจ้งเตือนของคุณได้ คุณสามารถใช้ view controller ของคุณเพื่อ:
* ปรับแต่งการวางตำแหน่งของรายการต่างๆ รวมถึง title, subtitle และ body text ของ alert
* แทนที่ฟอนต์หรือสไตล์ที่แตกต่างกันสำหรับองค์ประกอบของอินเทอร์เฟซ
* แสดงข้อมูลเฉพาะของแอป—ตัวอย่างเช่น ข้อมูลที่จัดเก็บในคีย์เฉพาะของแอปใน payload ของการแจ้งเตือน
* รวมรูปภาพหรือแบรนด์ที่กำหนดเอง
ส่วนขยายแอปของคุณต้องกำหนดค่า view controller โดยใช้ข้อมูลที่มีอยู่ทันที เช่น เนื้อหาของการแจ้งเตือนและไฟล์ที่มีอยู่ใน bundle ของส่วนขยายแอปของคุณ หากคุณใช้ app group เพื่อแชร์ข้อมูลระหว่างแอปและส่วนขยายแอปของคุณ คุณยังสามารถใช้ไฟล์ใดๆ ที่พบใน app group ได้อีกด้วย เพื่อให้แน่ใจว่าการแจ้งเตือนของคุณจะถูกส่งอย่างทันท่วงที ให้กำหนดค่า views โดยเร็วที่สุด อย่าทำงานที่ใช้เวลานาน เช่น การพยายามดึงข้อมูลผ่านเครือข่าย
### เพิ่มส่วนขยายเนื้อหาการแจ้งเตือน (notification content app extension) ไปยังโปรเจกต์ของคุณ
ในการเพิ่มส่วนขยายเนื้อหาการแจ้งเตือนไปยังแอป iOS ของคุณ:
1. เลือก **File** > **New** > **Target** ใน Xcode
2. เลือก **Notification Content Extension** จาก iOS Application Extension
3. คลิก **Next**
4. ระบุ **name** สำหรับส่วนขยายแอปของคุณ
5. คลิก **Finish**
### เพิ่ม Views ไปยัง View Controller ของคุณ
เทมเพลตที่ Xcode จัดเตรียมไว้ให้มี storyboard และ view controller ให้คุณกำหนดค่า สร้างอินเทอร์เฟซการแจ้งเตือนที่คุณกำหนดเองโดยการเพิ่ม views ไปยัง view controller ของคุณ ตัวอย่างเช่น ใช้ labels เพื่อแสดง title, subtitle และ body text ของการแจ้งเตือน คุณยังสามารถเพิ่ม image views และ views ที่แสดงเนื้อหาที่ไม่สามารถโต้ตอบได้ คุณไม่จำเป็นต้องให้เนื้อหาเริ่มต้นใดๆ สำหรับ views ของคุณ
คุณสามารถเพิ่มการควบคุมแบบโต้ตอบได้ (เช่น ปุ่มหรือสวิตช์) ใน iOS 12 และใหม่กว่า สำหรับข้อมูลเพิ่มเติม โปรดดูที่ Support Interactive Controls
### กำหนดค่า View Controller ของคุณ
ใช้เมธอด `didReceive(_:)` ของ view controller ของคุณเพื่ออัปเดต labels และ views อื่นๆ notification payload จะมีข้อมูลที่จะใช้ในการกำหนดค่า view controller ของคุณ คุณยังสามารถใช้ข้อมูลจากไฟล์อื่นๆ ของส่วนขยายแอปของคุณได้อีกด้วย [รายการที่ 1](https://developer.apple.com/documentation/usernotificationsui/customizing_the_appearance_of_notifications#2950663) แสดงเวอร์ชันของเมธอดนี้ที่ดึง title และ body text จาก notification payload และกำหนดสตริงให้กับคอนโทรล [`UILabel`](https://developer.apple.com/documentation/uikit/uilabel) สองตัว ซึ่งจัดเก็บเป็น outlets บน view controller
```swift
// Configuring the notification interface at runtime
func didReceive(_ notification: UNNotification) {
self.bodyText?.text = notification.request.content.body
self.headlineText?.text = notification.request.content.title
}
```
หากมีการแจ้งเตือนครั้งที่สองมาถึงในขณะที่ view controller ของคุณแสดงอยู่แล้ว ระบบจะเรียกเมธอด `didReceive(_:)` อีกครั้งพร้อมกับ notification payload ใหม่
### รองรับการควบคุมแบบโต้ตอบ (Interactive Controls)
ใน iOS 12 และใหม่กว่า คุณสามารถเปิดใช้งานการโต้ตอบของผู้ใช้ในการแจ้งเตือนที่คุณกำหนดเองได้ ซึ่งจะช่วยให้คุณสามารถเพิ่มการควบคุมแบบโต้ตอบ เช่น ปุ่มและสวิตช์ ไปยังอินเทอร์เฟซที่คุณกำหนดเองได้
ในการเปิดใช้งานการโต้ตอบของผู้ใช้:
1. เปิดไฟล์ `info.plist` ของ Notification Content Extension ของคุณ
2. เพิ่มคีย์ `UNNotificationExtensionUserInteractionEnabled` ไปยังแอตทริบิวต์ส่วนขยายของคุณ กำหนดค่าเป็น Boolean โดยตั้งค่าเป็น `YES`
ส่วนขยายเนื้อหาการแจ้งเตือน (notification content app extension) จะจัดการ view controller ที่แสดงอินเทอร์เฟซการแจ้งเตือนที่คุณกำหนดเอง view controller นี้สามารถเสริมหรือแทนที่อินเทอร์เฟซระบบเริ่มต้นสำหรับการแจ้งเตือนของคุณได้ คุณสามารถใช้ view controller ของคุณเพื่อ:
* ปรับแต่งการวางตำแหน่งของรายการต่างๆ รวมถึง title, subtitle และ body text ของ alert
* แทนที่ฟอนต์หรือสไตล์ที่แตกต่างกันสำหรับองค์ประกอบของอินเทอร์เฟซ
* แสดงข้อมูลเฉพาะของแอป—ตัวอย่างเช่น ข้อมูลที่จัดเก็บในคีย์เฉพาะของแอปใน payload ของการแจ้งเตือน
* รวมรูปภาพหรือแบรนด์ที่กำหนดเอง
ส่วนขยายแอปของคุณต้องกำหนดค่า view controller โดยใช้ข้อมูลที่มีอยู่ทันที เช่น เนื้อหาของการแจ้งเตือนและไฟล์ที่มีอยู่ใน bundle ของส่วนขยายแอปของคุณ หากคุณใช้ app group เพื่อแชร์ข้อมูลระหว่างแอปและส่วนขยายแอปของคุณ คุณยังสามารถใช้ไฟล์ใดๆ ที่พบใน app group ได้อีกด้วย เพื่อให้แน่ใจว่าการแจ้งเตือนของคุณจะถูกส่งอย่างทันท่วงที ให้กำหนดค่า views โดยเร็วที่สุด อย่าทำงานที่ใช้เวลานาน เช่น การพยายามดึงข้อมูลผ่านเครือข่าย
### เพิ่มส่วนขยายเนื้อหาการแจ้งเตือน (notification content app extension) ไปยังโปรเจกต์ของคุณ
ในการเพิ่มส่วนขยายเนื้อหาการแจ้งเตือนไปยังแอป iOS ของคุณ:
1. เลือก **File** > **New** > **Target** ใน Xcode
2. เลือก **Notification Content Extension** จาก iOS Application Extension
3. คลิก **Next**
4. ระบุ **name** สำหรับส่วนขยายแอปของคุณ
5. คลิก **Finish**
### เพิ่ม Views ไปยัง View Controller ของคุณ
เทมเพลตที่ Xcode จัดเตรียมไว้ให้มี storyboard และ view controller ให้คุณกำหนดค่า สร้างอินเทอร์เฟซการแจ้งเตือนที่คุณกำหนดเองโดยการเพิ่ม views ไปยัง view controller ของคุณ ตัวอย่างเช่น ใช้ labels เพื่อแสดง title, subtitle และ body text ของการแจ้งเตือน คุณยังสามารถเพิ่ม image views และ views ที่แสดงเนื้อหาที่ไม่สามารถโต้ตอบได้ คุณไม่จำเป็นต้องให้เนื้อหาเริ่มต้นใดๆ สำหรับ views ของคุณ
คุณสามารถเพิ่มการควบคุมแบบโต้ตอบได้ (เช่น ปุ่มหรือสวิตช์) ใน iOS 12 และใหม่กว่า สำหรับข้อมูลเพิ่มเติม โปรดดูที่ Support Interactive Controls
### กำหนดค่า View Controller ของคุณ
ใช้เมธอด `didReceive(_:)` ของ view controller ของคุณเพื่ออัปเดต labels และ views อื่นๆ notification payload จะมีข้อมูลที่จะใช้ในการกำหนดค่า view controller ของคุณ คุณยังสามารถใช้ข้อมูลจากไฟล์อื่นๆ ของส่วนขยายแอปของคุณได้อีกด้วย [รายการที่ 1](https://developer.apple.com/documentation/usernotificationsui/customizing_the_appearance_of_notifications#2950663) แสดงเวอร์ชันของเมธอดนี้ที่ดึง title และ body text จาก notification payload และกำหนดสตริงให้กับคอนโทรล [`UILabel`](https://developer.apple.com/documentation/uikit/uilabel) สองตัว ซึ่งจัดเก็บเป็น outlets บน view controller
```swift
// Configuring the notification interface at runtime
func didReceive(_ notification: UNNotification) {
self.bodyText?.text = notification.request.content.body
self.headlineText?.text = notification.request.content.title
}
```
หากมีการแจ้งเตือนครั้งที่สองมาถึงในขณะที่ view controller ของคุณแสดงอยู่แล้ว ระบบจะเรียกเมธอด `didReceive(_:)` อีกครั้งพร้อมกับ notification payload ใหม่
### รองรับการควบคุมแบบโต้ตอบ (Interactive Controls)
ใน iOS 12 และใหม่กว่า คุณสามารถเปิดใช้งานการโต้ตอบของผู้ใช้ในการแจ้งเตือนที่คุณกำหนดเองได้ ซึ่งจะช่วยให้คุณสามารถเพิ่มการควบคุมแบบโต้ตอบ เช่น ปุ่มและสวิตช์ ไปยังอินเทอร์เฟซที่คุณกำหนดเองได้
ในการเปิดใช้งานการโต้ตอบของผู้ใช้:
1. เปิดไฟล์ `info.plist` ของ Notification Content Extension ของคุณ
2. เพิ่มคีย์ `UNNotificationExtensionUserInteractionEnabled` ไปยังแอตทริบิวต์ส่วนขยายของคุณ กำหนดค่าเป็น Boolean โดยตั้งค่าเป็น `YES`
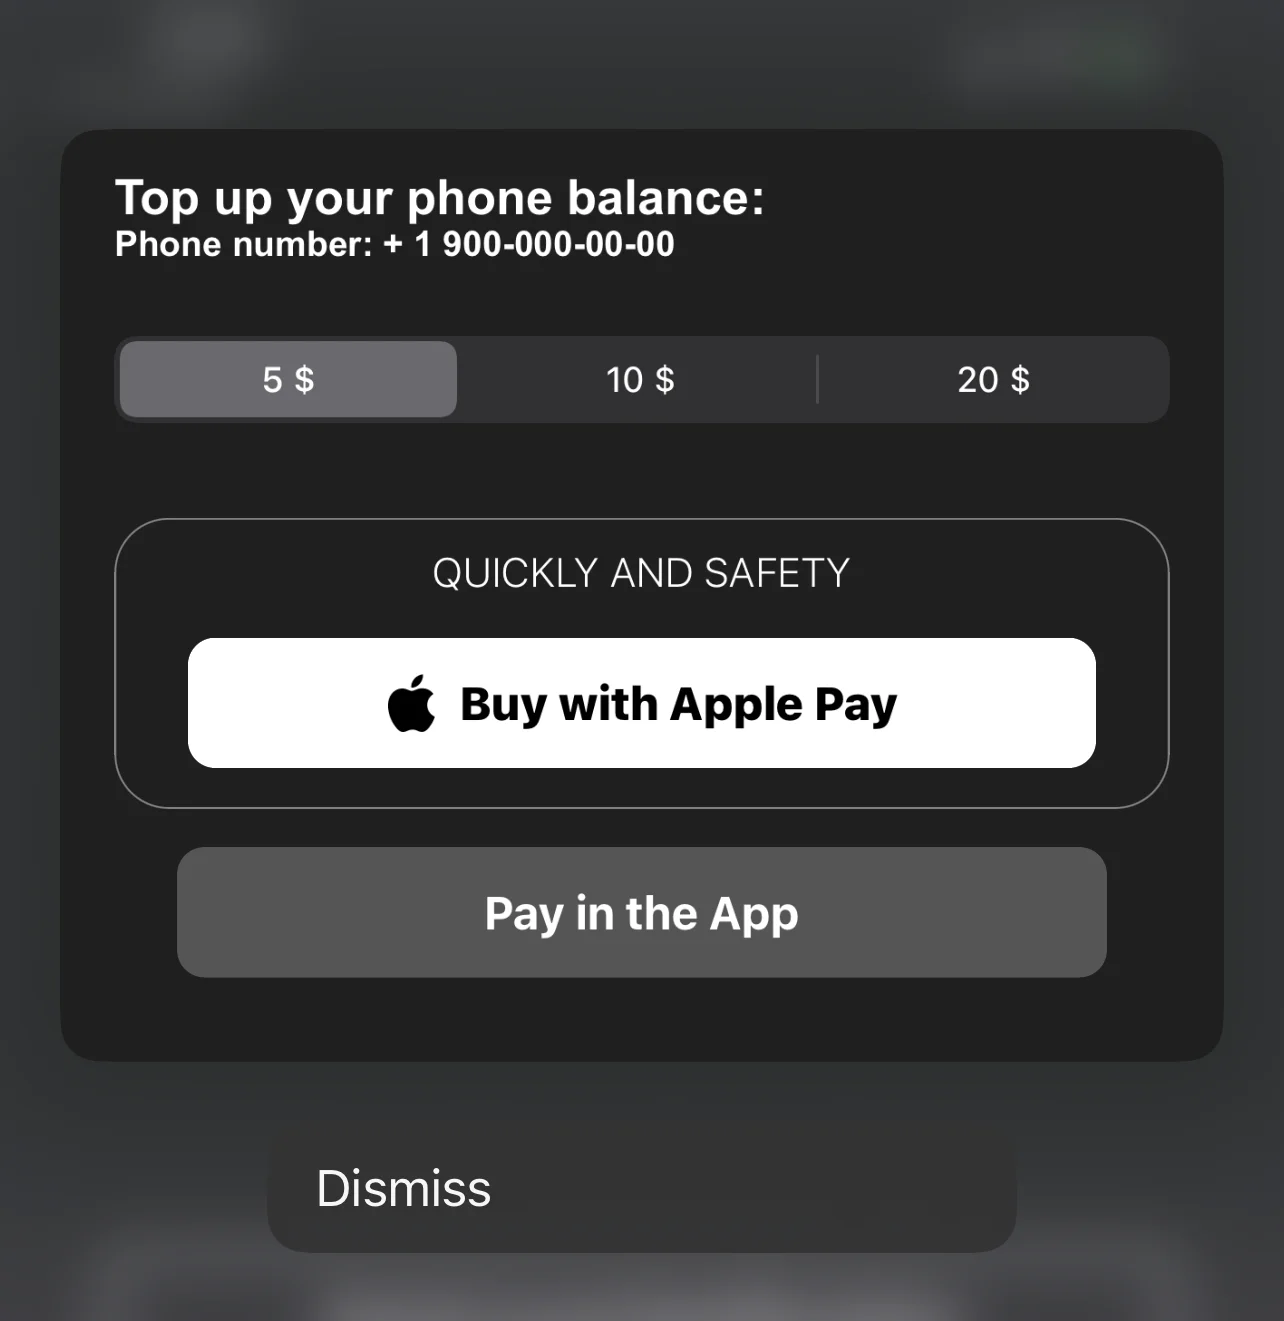
 ### เพิ่ม Apple Pay ไปยังส่วนขยาย Push Notification ของคุณ (ตัวอย่าง View)
 ### ตัวอย่างบล็อกโค้ดพร้อมปุ่ม Apple Pay ในส่วนขยาย Push Notification
```swift
import UIKit
import Foundation
import UserNotifications
import UserNotificationsUI
import PassKit
class NotificationViewController: UIViewController, UNNotificationContentExtension, PKPaymentAuthorizationViewControllerDelegate {
func paymentAuthorizationViewControllerDidFinish(_ controller: PKPaymentAuthorizationViewController) {
controller.dismiss(animated: true, completion: nil)
}
@IBOutlet weak var buyWithApplePayButton: UIButton!
@IBOutlet weak var containerView: UIView!
@IBOutlet weak var payInAppButton: UIButton!
@IBOutlet weak var segmentCustom: UISegmentedControl!
private var amount: NSDecimalNumber = 0;
override func viewDidLoad() {
super.viewDidLoad()
buttonCustomisation()
amount = NSDecimalNumber.init(value: 5)
}
func buttonCustomisation () {
self.buyWithApplePayButton.layer.masksToBounds = true
self.buyWithApplePayButton.layer.cornerRadius = 10
self.payInAppButton.layer.masksToBounds = true
self.payInAppButton.layer.cornerRadius = 10
self.containerView.layer.borderColor = UIColor.gray.cgColor
self.containerView.layer.borderWidth = 0.7
self.containerView.layer.masksToBounds = true
self.containerView.layer.cornerRadius = 20
}
func didReceive(_ notification: UNNotification) {
// Configuring the notification interface at runtime
}
@IBAction func buyWithApplePayAction(_ sender: Any) {
let request = PKPaymentRequest()
request.merchantIdentifier = "merchant.com.sample.ApplePayAction"
request.supportedNetworks = [PKPaymentNetwork.visa, PKPaymentNetwork.masterCard, PKPaymentNetwork.amex]
request.merchantCapabilities = PKMerchantCapability.capability3DS
request.countryCode = "US"
request.currencyCode = "USD"
request.paymentSummaryItems = [
PKPaymentSummaryItem(label: "Some Product", amount: amount)
]
let applePayController = PKPaymentAuthorizationViewController(paymentRequest: request)
applePayController?.delegate = self
self.present(applePayController!, animated: true, completion: nil)
}
@IBAction func payInAppButtonAction(_ sender: Any) {
print("pay in app button tapped")
}
@IBAction func segmentAction(_ sender: Any) {
switch segmentCustom.selectedSegmentIndex {
case 0:
amount = NSDecimalNumber.init(value: 5)
break
case 1:
amount = NSDecimalNumber.init(value: 10)
break
case 2:
amount = NSDecimalNumber.init(value: 20)
break
default:
amount = NSDecimalNumber.init(value: 5)
break
}
}
}
```
### ตัวอย่างบล็อกโค้ดพร้อมปุ่ม Apple Pay ในส่วนขยาย Push Notification
```swift
import UIKit
import Foundation
import UserNotifications
import UserNotificationsUI
import PassKit
class NotificationViewController: UIViewController, UNNotificationContentExtension, PKPaymentAuthorizationViewControllerDelegate {
func paymentAuthorizationViewControllerDidFinish(_ controller: PKPaymentAuthorizationViewController) {
controller.dismiss(animated: true, completion: nil)
}
@IBOutlet weak var buyWithApplePayButton: UIButton!
@IBOutlet weak var containerView: UIView!
@IBOutlet weak var payInAppButton: UIButton!
@IBOutlet weak var segmentCustom: UISegmentedControl!
private var amount: NSDecimalNumber = 0;
override func viewDidLoad() {
super.viewDidLoad()
buttonCustomisation()
amount = NSDecimalNumber.init(value: 5)
}
func buttonCustomisation () {
self.buyWithApplePayButton.layer.masksToBounds = true
self.buyWithApplePayButton.layer.cornerRadius = 10
self.payInAppButton.layer.masksToBounds = true
self.payInAppButton.layer.cornerRadius = 10
self.containerView.layer.borderColor = UIColor.gray.cgColor
self.containerView.layer.borderWidth = 0.7
self.containerView.layer.masksToBounds = true
self.containerView.layer.cornerRadius = 20
}
func didReceive(_ notification: UNNotification) {
// Configuring the notification interface at runtime
}
@IBAction func buyWithApplePayAction(_ sender: Any) {
let request = PKPaymentRequest()
request.merchantIdentifier = "merchant.com.sample.ApplePayAction"
request.supportedNetworks = [PKPaymentNetwork.visa, PKPaymentNetwork.masterCard, PKPaymentNetwork.amex]
request.merchantCapabilities = PKMerchantCapability.capability3DS
request.countryCode = "US"
request.currencyCode = "USD"
request.paymentSummaryItems = [
PKPaymentSummaryItem(label: "Some Product", amount: amount)
]
let applePayController = PKPaymentAuthorizationViewController(paymentRequest: request)
applePayController?.delegate = self
self.present(applePayController!, animated: true, completion: nil)
}
@IBAction func payInAppButtonAction(_ sender: Any) {
print("pay in app button tapped")
}
@IBAction func segmentAction(_ sender: Any) {
switch segmentCustom.selectedSegmentIndex {
case 0:
amount = NSDecimalNumber.init(value: 5)
break
case 1:
amount = NSDecimalNumber.init(value: 10)
break
case 2:
amount = NSDecimalNumber.init(value: 20)
break
default:
amount = NSDecimalNumber.init(value: 5)
break
}
}
}
```