# การปรับแต่ง iOS SDK
## การผสานรวม
* [Deep linking](#deep-linking)
* [Universal Links](#universal-links)
* [การติดตามการซื้อในแอป](#in-app-purchase-tracking)
* [การแจ้งเตือนพุช Geozones](#geozones-push-notifications)
* [การสร้างคิว Rich Media](#creating-a-rich-media-queue)
* [เล่นวิดีโอที่ส่งมาใน Rich Notification อัตโนมัติด้วย force touch](#autoplay-a-video-sent-in-a-rich-notification-with-force-touch)
* [เสียงพุชที่กำหนดเอง](#custom-push-sound)
* [iOS Provisional Push](#ios-provisional-push)
### Deep linking
ในไฟล์ **Info.plist** ของคุณ ให้เพิ่มอาร์เรย์ `URL types` พร้อมด้วย `URL Identifier` และ `URL Scheme`\
ในตัวอย่างด้านล่าง `URL Scheme` คือ _com.pushwoosh_ และ `URL Identifier` คือ _promotion_
 ในไฟล์ App Delegate ของคุณ (โดยปกติคือ AppDelegate.m สำหรับ iOS 12 และต่ำกว่า หรือ SceneDelegate.m สำหรับ iOS 13 และสูงกว่า) ให้เพิ่มฟังก์ชัน openURL delegate ที่เหมาะสมตามที่ระบุไว้ในตัวอย่างด้านล่าง ตัวอย่างจะตรวจสอบหน้าเว็บที่ถูกต้อง แยกวิเคราะห์ค่า "id" จาก URL และเปิด PromoPageViewController เพื่อตอบสนอง
```AppDelegate.swift```
```swift
func application(_ app: UIApplication, open url: URL, options: [UIApplication.OpenURLOptionsKey : Any] = [:]) -> Bool {
let components = URLComponents(url: url, resolvingAgainstBaseURL: false)
let page = components?.host
var promotionId: String?
if page == "promotion" {
return
}
let items = components?.queryItems ?? []
for item in items {
if item.name == "id" {
promotionId = item.value
}
}
//show PromoPageViewController
}
```
```objective-c
- (BOOL)application:(UIApplication *)application openURL:(NSURL *)url sourceApplication:(NSString *)sourceApplication annotation:(id)annotation {
NSURLComponents *components = [NSURLComponents componentsWithURL:url resolvingAgainstBaseURL:NO];
NSString *page = components.host;
NSString *promotionId = nil;
//return if this is not a promotion deep link
if(![page isEqualToString:@"promotion"])
return NO;
for(NSURLQueryItem *item in components.queryItems)
{
if([item.name isEqualToString:@"id"])
promotionId = item.value;
}
PromoPageViewController *vc = [[PromoPageViewController alloc] init];
vc.promotionId = promotionId
[self presentViewController:vc animated:YES completion:nil];
}
```
```SceneDelegate.swift```
```swift
func scene(_ scene: UIScene, openURLContexts URLContexts: Set) {
guard let urlContext = URLContexts.first else { return }
let components = URLComponents(url: urlContext.url, resolvingAgainstBaseURL: false)
let page = components?.host
var promotionId: String?
guard page == "promotion" else {
return
}
let items = components?.queryItems ?? []
for item in items {
if item.name == "id" {
promotionId = item.value
}
}
//show PromoPageViewController
}
```
```objective-c
- (void)scene:(UIWindowScene *)scene openURLContexts:(NSSet *)URLContexts {
UIOpenURLContext *urlContext = URLContexts.anyObject;
if (!urlContext) {
return;
}
NSURLComponents *components = [NSURLComponents componentsWithURL:urlContext.URL resolvingAgainstBaseURL:NO];
NSString *page = components.host;
NSString *promotionId = nil;
if (![page isEqualToString:@"promotion"]) {
return;
}
for (NSURLQueryItem *item in components.queryItems) {
if ([item.name isEqualToString:@"id"]) {
promotionId = item.value;
}
}
//show PromoPageViewController
}
```
### Universal Links
Universal Links ช่วยให้ผู้ใช้สามารถเปิดแอปของคุณได้โดยตรงเมื่อแตะลิงก์ไปยังเว็บไซต์ของคุณ ซึ่งแตกต่างจาก URL schemes ที่กำหนดเอง Universal Links ใช้ URL `https://` มาตรฐานและมอบประสบการณ์ผู้ใช้ที่ราบรื่นยิ่งขึ้น
#### วิธีการทำงาน
เมื่อการแจ้งเตือนพุชมี URL `https://` (ในพารามิเตอร์ "url" หรือ "l") SDK จะ:
1. สร้าง `NSUserActivity` พร้อมกับ URL
2. เรียกตัวจัดการ Universal Links ของแอปของคุณ (`scene:continueUserActivity:` หรือ `application:continueUserActivity:restorationHandler:`)
3. หากแอปของคุณไม่จัดการ URL นั้น มันจะเปิดใน Safari เป็นทางเลือกสำรอง
#### การตั้งค่า
1. **กำหนดค่า Associated Domains ใน Xcode**
เพิ่มความสามารถ Associated Domains ให้กับแอปของคุณและเพิ่มโดเมนของคุณ:
```
applinks:yourdomain.com
```
2. **โฮสต์ไฟล์ Apple App Site Association**
สร้างไฟล์ `apple-app-site-association` บนเว็บเซิร์ฟเวอร์ของคุณที่ `https://yourdomain.com/.well-known/apple-app-site-association`:
```json
{
"applinks": {
"apps": [],
"details": [
{
"appID": "TEAM_ID.com.your.bundleid",
"paths": ["/path/*", "/promotion/*"]
}
]
}
}
```
แทนที่ `TEAM_ID` ด้วย Apple Developer Team ID ของคุณ และ `com.your.bundleid` ด้วย bundle identifier ของแอปของคุณ
3. **ใช้งานตัวจัดการ Universal Links**
```SceneDelegate.swift``` (iOS 13+)
```swift
func scene(_ scene: UIScene, continue userActivity: NSUserActivity) {
guard userActivity.activityType == NSUserActivityTypeBrowsingWeb,
let url = userActivity.webpageURL else {
return
}
// Handle the Universal Link URL
let components = URLComponents(url: url, resolvingAgainstBaseURL: false)
let path = components?.path
if path?.starts(with: "/promotion") == true {
// Navigate to promotion screen
let promotionId = components?.queryItems?.first(where: { $0.name == "id" })?.value
// Show promotion with promotionId
}
}
```
```objective-c
- (void)scene:(UIScene *)scene continueUserActivity:(NSUserActivity *)userActivity {
if (![userActivity.activityType isEqualToString:NSUserActivityTypeBrowsingWeb]) {
return;
}
NSURL *url = userActivity.webpageURL;
if (!url) {
return;
}
// Handle the Universal Link URL
NSURLComponents *components = [NSURLComponents componentsWithURL:url resolvingAgainstBaseURL:NO];
NSString *path = components.path;
if ([path hasPrefix:@"/promotion"]) {
// Navigate to promotion screen
NSString *promotionId = nil;
for (NSURLQueryItem *item in components.queryItems) {
if ([item.name isEqualToString:@"id"]) {
promotionId = item.value;
break;
}
}
// Show promotion with promotionId
}
}
```
```AppDelegate.swift``` (iOS 12 และเก่ากว่า หรือเป็นทางเลือกสำรอง)
```swift
func application(_ application: UIApplication,
continue userActivity: NSUserActivity,
restorationHandler: @escaping ([UIUserActivityRestoring]?) -> Void) -> Bool {
guard userActivity.activityType == NSUserActivityTypeBrowsingWeb,
let url = userActivity.webpageURL else {
return false
}
// Handle the Universal Link URL
let components = URLComponents(url: url, resolvingAgainstBaseURL: false)
let path = components?.path
if path?.starts(with: "/promotion") == true {
// Navigate to promotion screen
return true
}
return false
}
```
```objective-c
- (BOOL)application:(UIApplication *)application
continueUserActivity:(NSUserActivity *)userActivity
restorationHandler:(void (^)(NSArray> *restorableObjects))restorationHandler {
if (![userActivity.activityType isEqualToString:NSUserActivityTypeBrowsingWeb]) {
return NO;
}
NSURL *url = userActivity.webpageURL;
if (!url) {
return NO;
}
// Handle the Universal Link URL
NSURLComponents *components = [NSURLComponents componentsWithURL:url resolvingAgainstBaseURL:NO];
NSString *path = components.path;
if ([path hasPrefix:@"/promotion"]) {
// Navigate to promotion screen
return YES;
}
return NO;
}
```
#### การส่งพุชด้วย Universal Link
เมื่อสร้างการแจ้งเตือนพุช ให้ใช้ URL เว็บไซต์ของคุณในช่อง **Action**:
```
https://yourdomain.com/promotion?id=123
```
SDK จะกำหนดเส้นทาง URL นี้ไปยังตัวจัดการ Universal Links ของคุณโดยอัตโนมัติ ช่วยให้คุณสามารถนำทางผู้ใช้ไปยังหน้าจอที่เหมาะสมในแอปของคุณได้
### การติดตามการซื้อในแอป
โดยค่าเริ่มต้น การติดตามการซื้อในแอปจะถูกปิดใช้งาน หากคุณต้องการติดตามการซื้อในแอปเมื่อกำหนดค่า [Customer Journeys](/th/product/customer-journey/pushwoosh-journey-overview) ให้ตั้งค่าแฟล็ก _Pushwoosh\_PURCHASE\_TRACKING\_ENABLED_ เป็น _true_ ในไฟล์ _info.plist_ คุณสามารถดูรายการแฟล็กที่มีอยู่ได้ใน [ตาราง](/th/developer/pushwoosh-sdk/ios-sdk/setting-up-pushwoosh-ios-sdk/advanced-integration-guide/#complete-list-of-infoplist-properties)
หากคุณต้องการติดตามการซื้อในแอปด้วยตนเอง คุณสามารถใช้โค้ดด้านล่าง
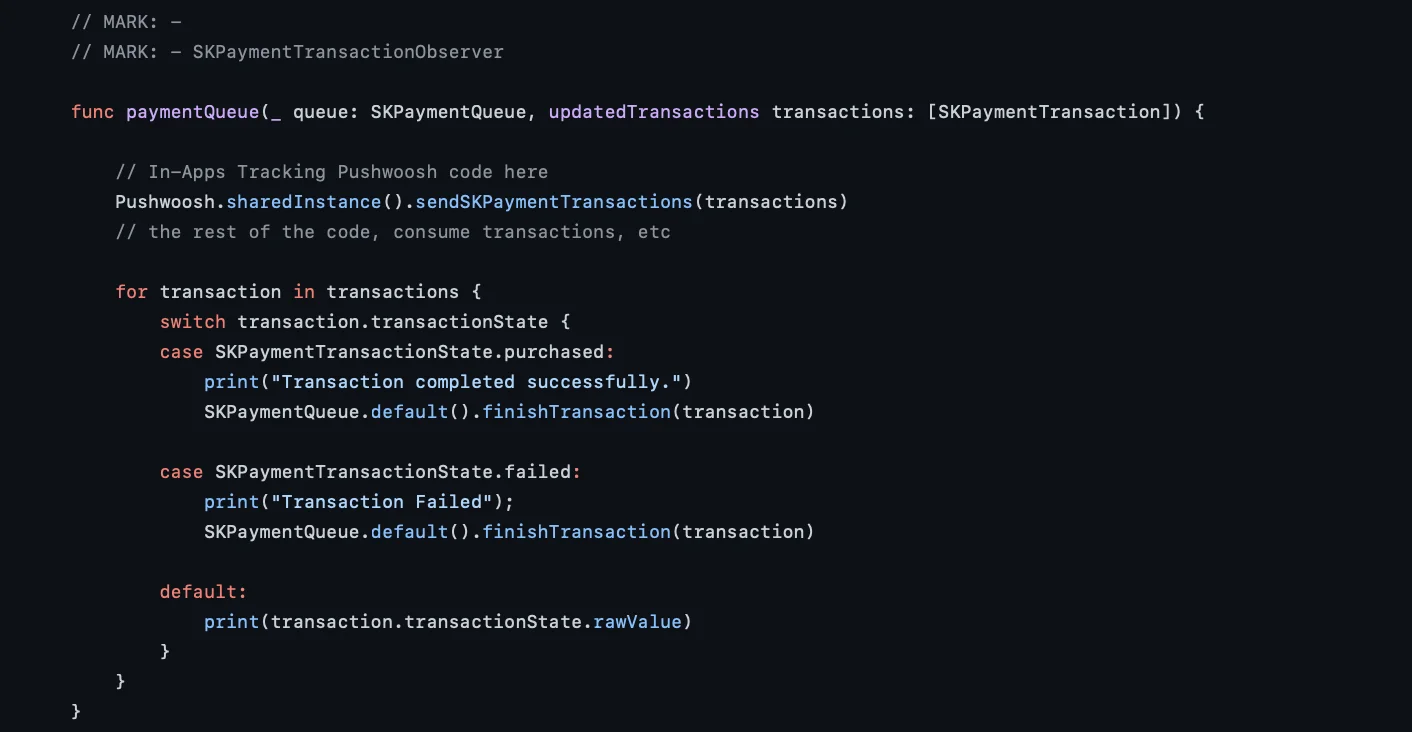
ในเมธอด `paymentQueue:updatedTransactions: delegate` ให้เรียกเมธอด `sendSKPaymentTransactions` ของ `PushManager`
```swift
func paymentQueue(_ queue: SKPaymentQueue, updatedTransactions transactions: [SKPaymentTransaction]) {
// In-Apps Tracking Pushwoosh code here
Pushwoosh.sharedInstance().sendSKPaymentTransactions(transactions)
// the rest of the code, consume transactions, etc
}
```
```objective-c
- (void)paymentQueue:(SKPaymentQueue *)queue updatedTransactions:(NSArray *)transactions {
[[PushNotificationManager pushManager] sendSKPaymentTransactions:transactions];
//the rest of the code, consume transactions, etc
}
```
ในไฟล์ App Delegate ของคุณ (โดยปกติคือ AppDelegate.m สำหรับ iOS 12 และต่ำกว่า หรือ SceneDelegate.m สำหรับ iOS 13 และสูงกว่า) ให้เพิ่มฟังก์ชัน openURL delegate ที่เหมาะสมตามที่ระบุไว้ในตัวอย่างด้านล่าง ตัวอย่างจะตรวจสอบหน้าเว็บที่ถูกต้อง แยกวิเคราะห์ค่า "id" จาก URL และเปิด PromoPageViewController เพื่อตอบสนอง
```AppDelegate.swift```
```swift
func application(_ app: UIApplication, open url: URL, options: [UIApplication.OpenURLOptionsKey : Any] = [:]) -> Bool {
let components = URLComponents(url: url, resolvingAgainstBaseURL: false)
let page = components?.host
var promotionId: String?
if page == "promotion" {
return
}
let items = components?.queryItems ?? []
for item in items {
if item.name == "id" {
promotionId = item.value
}
}
//show PromoPageViewController
}
```
```objective-c
- (BOOL)application:(UIApplication *)application openURL:(NSURL *)url sourceApplication:(NSString *)sourceApplication annotation:(id)annotation {
NSURLComponents *components = [NSURLComponents componentsWithURL:url resolvingAgainstBaseURL:NO];
NSString *page = components.host;
NSString *promotionId = nil;
//return if this is not a promotion deep link
if(![page isEqualToString:@"promotion"])
return NO;
for(NSURLQueryItem *item in components.queryItems)
{
if([item.name isEqualToString:@"id"])
promotionId = item.value;
}
PromoPageViewController *vc = [[PromoPageViewController alloc] init];
vc.promotionId = promotionId
[self presentViewController:vc animated:YES completion:nil];
}
```
```SceneDelegate.swift```
```swift
func scene(_ scene: UIScene, openURLContexts URLContexts: Set) {
guard let urlContext = URLContexts.first else { return }
let components = URLComponents(url: urlContext.url, resolvingAgainstBaseURL: false)
let page = components?.host
var promotionId: String?
guard page == "promotion" else {
return
}
let items = components?.queryItems ?? []
for item in items {
if item.name == "id" {
promotionId = item.value
}
}
//show PromoPageViewController
}
```
```objective-c
- (void)scene:(UIWindowScene *)scene openURLContexts:(NSSet *)URLContexts {
UIOpenURLContext *urlContext = URLContexts.anyObject;
if (!urlContext) {
return;
}
NSURLComponents *components = [NSURLComponents componentsWithURL:urlContext.URL resolvingAgainstBaseURL:NO];
NSString *page = components.host;
NSString *promotionId = nil;
if (![page isEqualToString:@"promotion"]) {
return;
}
for (NSURLQueryItem *item in components.queryItems) {
if ([item.name isEqualToString:@"id"]) {
promotionId = item.value;
}
}
//show PromoPageViewController
}
```
### Universal Links
Universal Links ช่วยให้ผู้ใช้สามารถเปิดแอปของคุณได้โดยตรงเมื่อแตะลิงก์ไปยังเว็บไซต์ของคุณ ซึ่งแตกต่างจาก URL schemes ที่กำหนดเอง Universal Links ใช้ URL `https://` มาตรฐานและมอบประสบการณ์ผู้ใช้ที่ราบรื่นยิ่งขึ้น
#### วิธีการทำงาน
เมื่อการแจ้งเตือนพุชมี URL `https://` (ในพารามิเตอร์ "url" หรือ "l") SDK จะ:
1. สร้าง `NSUserActivity` พร้อมกับ URL
2. เรียกตัวจัดการ Universal Links ของแอปของคุณ (`scene:continueUserActivity:` หรือ `application:continueUserActivity:restorationHandler:`)
3. หากแอปของคุณไม่จัดการ URL นั้น มันจะเปิดใน Safari เป็นทางเลือกสำรอง
#### การตั้งค่า
1. **กำหนดค่า Associated Domains ใน Xcode**
เพิ่มความสามารถ Associated Domains ให้กับแอปของคุณและเพิ่มโดเมนของคุณ:
```
applinks:yourdomain.com
```
2. **โฮสต์ไฟล์ Apple App Site Association**
สร้างไฟล์ `apple-app-site-association` บนเว็บเซิร์ฟเวอร์ของคุณที่ `https://yourdomain.com/.well-known/apple-app-site-association`:
```json
{
"applinks": {
"apps": [],
"details": [
{
"appID": "TEAM_ID.com.your.bundleid",
"paths": ["/path/*", "/promotion/*"]
}
]
}
}
```
แทนที่ `TEAM_ID` ด้วย Apple Developer Team ID ของคุณ และ `com.your.bundleid` ด้วย bundle identifier ของแอปของคุณ
3. **ใช้งานตัวจัดการ Universal Links**
```SceneDelegate.swift``` (iOS 13+)
```swift
func scene(_ scene: UIScene, continue userActivity: NSUserActivity) {
guard userActivity.activityType == NSUserActivityTypeBrowsingWeb,
let url = userActivity.webpageURL else {
return
}
// Handle the Universal Link URL
let components = URLComponents(url: url, resolvingAgainstBaseURL: false)
let path = components?.path
if path?.starts(with: "/promotion") == true {
// Navigate to promotion screen
let promotionId = components?.queryItems?.first(where: { $0.name == "id" })?.value
// Show promotion with promotionId
}
}
```
```objective-c
- (void)scene:(UIScene *)scene continueUserActivity:(NSUserActivity *)userActivity {
if (![userActivity.activityType isEqualToString:NSUserActivityTypeBrowsingWeb]) {
return;
}
NSURL *url = userActivity.webpageURL;
if (!url) {
return;
}
// Handle the Universal Link URL
NSURLComponents *components = [NSURLComponents componentsWithURL:url resolvingAgainstBaseURL:NO];
NSString *path = components.path;
if ([path hasPrefix:@"/promotion"]) {
// Navigate to promotion screen
NSString *promotionId = nil;
for (NSURLQueryItem *item in components.queryItems) {
if ([item.name isEqualToString:@"id"]) {
promotionId = item.value;
break;
}
}
// Show promotion with promotionId
}
}
```
```AppDelegate.swift``` (iOS 12 และเก่ากว่า หรือเป็นทางเลือกสำรอง)
```swift
func application(_ application: UIApplication,
continue userActivity: NSUserActivity,
restorationHandler: @escaping ([UIUserActivityRestoring]?) -> Void) -> Bool {
guard userActivity.activityType == NSUserActivityTypeBrowsingWeb,
let url = userActivity.webpageURL else {
return false
}
// Handle the Universal Link URL
let components = URLComponents(url: url, resolvingAgainstBaseURL: false)
let path = components?.path
if path?.starts(with: "/promotion") == true {
// Navigate to promotion screen
return true
}
return false
}
```
```objective-c
- (BOOL)application:(UIApplication *)application
continueUserActivity:(NSUserActivity *)userActivity
restorationHandler:(void (^)(NSArray> *restorableObjects))restorationHandler {
if (![userActivity.activityType isEqualToString:NSUserActivityTypeBrowsingWeb]) {
return NO;
}
NSURL *url = userActivity.webpageURL;
if (!url) {
return NO;
}
// Handle the Universal Link URL
NSURLComponents *components = [NSURLComponents componentsWithURL:url resolvingAgainstBaseURL:NO];
NSString *path = components.path;
if ([path hasPrefix:@"/promotion"]) {
// Navigate to promotion screen
return YES;
}
return NO;
}
```
#### การส่งพุชด้วย Universal Link
เมื่อสร้างการแจ้งเตือนพุช ให้ใช้ URL เว็บไซต์ของคุณในช่อง **Action**:
```
https://yourdomain.com/promotion?id=123
```
SDK จะกำหนดเส้นทาง URL นี้ไปยังตัวจัดการ Universal Links ของคุณโดยอัตโนมัติ ช่วยให้คุณสามารถนำทางผู้ใช้ไปยังหน้าจอที่เหมาะสมในแอปของคุณได้
### การติดตามการซื้อในแอป
โดยค่าเริ่มต้น การติดตามการซื้อในแอปจะถูกปิดใช้งาน หากคุณต้องการติดตามการซื้อในแอปเมื่อกำหนดค่า [Customer Journeys](/th/product/customer-journey/pushwoosh-journey-overview) ให้ตั้งค่าแฟล็ก _Pushwoosh\_PURCHASE\_TRACKING\_ENABLED_ เป็น _true_ ในไฟล์ _info.plist_ คุณสามารถดูรายการแฟล็กที่มีอยู่ได้ใน [ตาราง](/th/developer/pushwoosh-sdk/ios-sdk/setting-up-pushwoosh-ios-sdk/advanced-integration-guide/#complete-list-of-infoplist-properties)
หากคุณต้องการติดตามการซื้อในแอปด้วยตนเอง คุณสามารถใช้โค้ดด้านล่าง
ในเมธอด `paymentQueue:updatedTransactions: delegate` ให้เรียกเมธอด `sendSKPaymentTransactions` ของ `PushManager`
```swift
func paymentQueue(_ queue: SKPaymentQueue, updatedTransactions transactions: [SKPaymentTransaction]) {
// In-Apps Tracking Pushwoosh code here
Pushwoosh.sharedInstance().sendSKPaymentTransactions(transactions)
// the rest of the code, consume transactions, etc
}
```
```objective-c
- (void)paymentQueue:(SKPaymentQueue *)queue updatedTransactions:(NSArray *)transactions {
[[PushNotificationManager pushManager] sendSKPaymentTransactions:transactions];
//the rest of the code, consume transactions, etc
}
```
 ### การแจ้งเตือนพุช Geozones
การแจ้งเตือนพุช Geozones ถูกรวมอยู่ในเฟรมเวิร์กแยกต่างหาก **PushwooshGeozones**
1. เพิ่ม PushwooshGeozones.framework ไปยังโปรเจกต์ของคุณ
เพื่อเพิ่ม PushwooshGeozones.framework ไปยังโปรเจกต์ของคุณโดยใช้ตัวจัดการ dependency ให้ใส่บรรทัดต่อไปนี้
ใน `podfile` หรือ `cartfile` ของคุณ:
```plaintext
pod 'PushwooshXCFramework/Geozones'
```
```plaintext
github "Pushwoosh/pushwoosh-ios-sdk"
```
หากคุณต้องการใช้ **PushwooshGeozones.xcframework** ให้ป้อน Package URL ต่อไปนี้:
[PushwooshGeozones-XCFramework](https://github.com/Pushwoosh/PushwooshGeozones-XCFramework)
อีกทางเลือกหนึ่ง คุณสามารถลากและวางเฟรมเวิร์กเข้าไปใน **Link Binaries With Libraries** ใน **Build Phases** ของโปรเจกต์ของคุณได้
2. เพิ่มคีย์ต่อไปนี้ลงใน Info.plist ของคุณ:
- **NSLocationWhenInUseUsageDescription** – *(จำเป็น)* เพื่อให้แอปติดตาม Geozones เฉพาะเมื่อทำงานในเบื้องหน้าเท่านั้น
- **NSLocationAlwaysAndWhenInUseUsageDescription** – *(จำเป็น)* เพื่อให้แอปติดตาม Geozones **ทั้งในเบื้องหน้าและเบื้องหลัง** และเพื่อแสดงกล่องโต้ตอบขออนุญาต
- **NSLocationAlwaysUsageDescription** – *(ทางเลือก)* เพื่อให้แอปติดตาม Geozones **ตลอดเวลา**; ควรใช้หากแอปของคุณกำหนดเป้าหมายเป็น iOS 10 และเวอร์ชันก่อนหน้า
```xml
NSLocationAlwaysAndWhenInUseUsageDescription
for app to track Geozones in both conditions and to show a permission request dialog
NSLocationWhenInUseUsageDescription
for app to track Geozones only while running in the foreground
```
![]()
3. นำเข้าเฟรมเวิร์ก
```swift
import PushwooshGeozones
```
```objc
#import
```
4. เริ่มการติดตาม Geozones
```swift
PWGeozonesManager.shared()?.startLocationTracking()
```
[อ้างอิง GitHub](https://github.com/Pushwoosh/pushwoosh-quickstart-ios/blob/main/customizing/customizing/Geozones%20Push%20Notification/GeozonesViewController.swift)
```objc
[[PWGeozonesManager sharedManager] startLocationTracking];
```
[อ้างอิง GitHub](https://github.com/Pushwoosh/pushwoosh-quickstart-ios/blob/main/customizing/customizingObjC/customizingObjC/Geozones%20Push%20Notification/PWGeozonesViewController.m)
##### ตัวอย่าง
```swift
override func viewDidLoad() {
super.viewDidLoad()
// Start Geozones tracking when needed
PWGeozonesManager.shared().startLocationTracking()
}
```
```objc
- (void)viewDidLoad {
[super viewDidLoad];
// Do any additional setup after loading the view.
// Start Geozones tracking when needed
[[PWGeozonesManager sharedManager] startLocationTracking];
}
```
### การสร้างคิว Rich Media
ในกรณีที่มีหน้า Rich Media หลายหน้าที่ต้องแสดงพร้อมกัน (ตัวอย่างเช่น เหตุการณ์ทริกเกอร์สำหรับ In-Apps สองรายการขึ้นไปเกิดขึ้นในเวลาเดียวกัน หรือหน้า Rich Media กำลังแสดงอยู่แล้วในขณะที่เหตุการณ์ทริกเกอร์อื่นเกิดขึ้น) คุณสามารถตั้งค่าคิวสำหรับการแสดงหน้า Rich Media ได้ หากต้องการสร้างคิว ให้ทำตามขั้นตอนที่อธิบายไว้ด้านล่าง
1. สร้างคลาสที่ใช้งาน PWRichMediaPresentingDelegate:
```objective-c
@interface ChainedRichMediaPresentingDelegate ()
@property (nonatomic) NSMutableArray *queue;
@property (nonatomic) BOOL inAppIsPresenting;
@end
@implementation ChainedRichMediaPresentingDelegate
- (instancetype)init {
self = [super init];
if (self) {
_queue = [NSMutableArray new];
}
return self;
}
- (BOOL)richMediaManager:(PWRichMediaManager *)richMediaManager shouldPresentRichMedia:(PWRichMedia *)richMedia {
[_queue addObject:richMedia];
return !_inAppIsPresenting;
}
- (void)richMediaManager:(PWRichMediaManager *)richMediaManager didPresentRichMedia:(PWRichMedia *)richMedia {
_inAppIsPresenting = YES;
}
- (void)richMediaManager:(PWRichMediaManager *)richMediaManager didCloseRichMedia:(PWRichMedia *)richMedia {
_inAppIsPresenting = NO;
[_queue removeObject:richMedia];
if (_queue.count) {
[[PWRichMediaManager sharedManager] presentRichMedia:_queue.firstObject];
}
}
- (void)richMediaManager:(PWRichMediaManager *)richMediaManager presentingDidFailForRichMedia:(PWRichMedia *)richMedia withError:(NSError *)error {
[self richMediaManager:richMediaManager didCloseRichMedia:richMedia];
}
@end
```
2\. ตั้งค่า delegate:
```objective-c
[PWRichMediaManager sharedManager].delegate = [ChainedRichMediaPresentingDelegate new];
```
### เล่นวิดีโอที่ส่งมาใน Rich Notification อัตโนมัติด้วย force touch
เพื่อให้วิดีโอที่ส่งมาเป็น [ไฟล์แนบ Rich Notification](/th/developer/pushwoosh-sdk/ios-sdk/ios-rich-notifications-integration/) เล่นอัตโนมัติเมื่อการแจ้งเตือนถูกขยายโดยไม่มีการโต้ตอบจากผู้ใช้ ให้ทำตามขั้นตอนด้านล่าง:
1. เพิ่ม Notification Content Extension ไปยังโปรเจกต์ของคุณ:
* ใน Xcode เลือก File > New > Target
* เลือก Notification Content Extension
* กำหนดชื่อและทำการตั้งค่าให้เสร็จสิ้น
### การแจ้งเตือนพุช Geozones
การแจ้งเตือนพุช Geozones ถูกรวมอยู่ในเฟรมเวิร์กแยกต่างหาก **PushwooshGeozones**
1. เพิ่ม PushwooshGeozones.framework ไปยังโปรเจกต์ของคุณ
เพื่อเพิ่ม PushwooshGeozones.framework ไปยังโปรเจกต์ของคุณโดยใช้ตัวจัดการ dependency ให้ใส่บรรทัดต่อไปนี้
ใน `podfile` หรือ `cartfile` ของคุณ:
```plaintext
pod 'PushwooshXCFramework/Geozones'
```
```plaintext
github "Pushwoosh/pushwoosh-ios-sdk"
```
หากคุณต้องการใช้ **PushwooshGeozones.xcframework** ให้ป้อน Package URL ต่อไปนี้:
[PushwooshGeozones-XCFramework](https://github.com/Pushwoosh/PushwooshGeozones-XCFramework)
อีกทางเลือกหนึ่ง คุณสามารถลากและวางเฟรมเวิร์กเข้าไปใน **Link Binaries With Libraries** ใน **Build Phases** ของโปรเจกต์ของคุณได้
2. เพิ่มคีย์ต่อไปนี้ลงใน Info.plist ของคุณ:
- **NSLocationWhenInUseUsageDescription** – *(จำเป็น)* เพื่อให้แอปติดตาม Geozones เฉพาะเมื่อทำงานในเบื้องหน้าเท่านั้น
- **NSLocationAlwaysAndWhenInUseUsageDescription** – *(จำเป็น)* เพื่อให้แอปติดตาม Geozones **ทั้งในเบื้องหน้าและเบื้องหลัง** และเพื่อแสดงกล่องโต้ตอบขออนุญาต
- **NSLocationAlwaysUsageDescription** – *(ทางเลือก)* เพื่อให้แอปติดตาม Geozones **ตลอดเวลา**; ควรใช้หากแอปของคุณกำหนดเป้าหมายเป็น iOS 10 และเวอร์ชันก่อนหน้า
```xml
NSLocationAlwaysAndWhenInUseUsageDescription
for app to track Geozones in both conditions and to show a permission request dialog
NSLocationWhenInUseUsageDescription
for app to track Geozones only while running in the foreground
```
![]()
3. นำเข้าเฟรมเวิร์ก
```swift
import PushwooshGeozones
```
```objc
#import
```
4. เริ่มการติดตาม Geozones
```swift
PWGeozonesManager.shared()?.startLocationTracking()
```
[อ้างอิง GitHub](https://github.com/Pushwoosh/pushwoosh-quickstart-ios/blob/main/customizing/customizing/Geozones%20Push%20Notification/GeozonesViewController.swift)
```objc
[[PWGeozonesManager sharedManager] startLocationTracking];
```
[อ้างอิง GitHub](https://github.com/Pushwoosh/pushwoosh-quickstart-ios/blob/main/customizing/customizingObjC/customizingObjC/Geozones%20Push%20Notification/PWGeozonesViewController.m)
##### ตัวอย่าง
```swift
override func viewDidLoad() {
super.viewDidLoad()
// Start Geozones tracking when needed
PWGeozonesManager.shared().startLocationTracking()
}
```
```objc
- (void)viewDidLoad {
[super viewDidLoad];
// Do any additional setup after loading the view.
// Start Geozones tracking when needed
[[PWGeozonesManager sharedManager] startLocationTracking];
}
```
### การสร้างคิว Rich Media
ในกรณีที่มีหน้า Rich Media หลายหน้าที่ต้องแสดงพร้อมกัน (ตัวอย่างเช่น เหตุการณ์ทริกเกอร์สำหรับ In-Apps สองรายการขึ้นไปเกิดขึ้นในเวลาเดียวกัน หรือหน้า Rich Media กำลังแสดงอยู่แล้วในขณะที่เหตุการณ์ทริกเกอร์อื่นเกิดขึ้น) คุณสามารถตั้งค่าคิวสำหรับการแสดงหน้า Rich Media ได้ หากต้องการสร้างคิว ให้ทำตามขั้นตอนที่อธิบายไว้ด้านล่าง
1. สร้างคลาสที่ใช้งาน PWRichMediaPresentingDelegate:
```objective-c
@interface ChainedRichMediaPresentingDelegate ()
@property (nonatomic) NSMutableArray *queue;
@property (nonatomic) BOOL inAppIsPresenting;
@end
@implementation ChainedRichMediaPresentingDelegate
- (instancetype)init {
self = [super init];
if (self) {
_queue = [NSMutableArray new];
}
return self;
}
- (BOOL)richMediaManager:(PWRichMediaManager *)richMediaManager shouldPresentRichMedia:(PWRichMedia *)richMedia {
[_queue addObject:richMedia];
return !_inAppIsPresenting;
}
- (void)richMediaManager:(PWRichMediaManager *)richMediaManager didPresentRichMedia:(PWRichMedia *)richMedia {
_inAppIsPresenting = YES;
}
- (void)richMediaManager:(PWRichMediaManager *)richMediaManager didCloseRichMedia:(PWRichMedia *)richMedia {
_inAppIsPresenting = NO;
[_queue removeObject:richMedia];
if (_queue.count) {
[[PWRichMediaManager sharedManager] presentRichMedia:_queue.firstObject];
}
}
- (void)richMediaManager:(PWRichMediaManager *)richMediaManager presentingDidFailForRichMedia:(PWRichMedia *)richMedia withError:(NSError *)error {
[self richMediaManager:richMediaManager didCloseRichMedia:richMedia];
}
@end
```
2\. ตั้งค่า delegate:
```objective-c
[PWRichMediaManager sharedManager].delegate = [ChainedRichMediaPresentingDelegate new];
```
### เล่นวิดีโอที่ส่งมาใน Rich Notification อัตโนมัติด้วย force touch
เพื่อให้วิดีโอที่ส่งมาเป็น [ไฟล์แนบ Rich Notification](/th/developer/pushwoosh-sdk/ios-sdk/ios-rich-notifications-integration/) เล่นอัตโนมัติเมื่อการแจ้งเตือนถูกขยายโดยไม่มีการโต้ตอบจากผู้ใช้ ให้ทำตามขั้นตอนด้านล่าง:
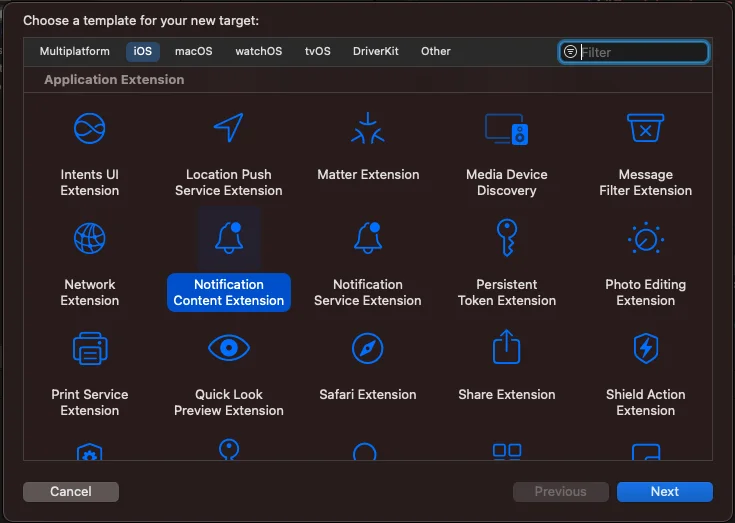
1. เพิ่ม Notification Content Extension ไปยังโปรเจกต์ของคุณ:
* ใน Xcode เลือก File > New > Target
* เลือก Notification Content Extension
* กำหนดชื่อและทำการตั้งค่าให้เสร็จสิ้น
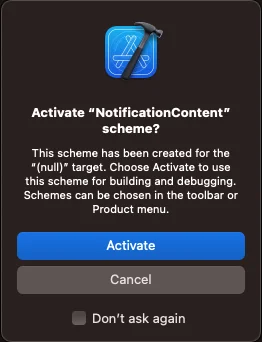
 หากได้รับข้อความ "Activate scheme" ให้เลือก Cancel
 2. ปรับคุณสมบัติและเมธอดใน Content Extension ดังนี้:
```
import UIKit
import UserNotifications
import UserNotificationsUI
import AVKit
class NotificationViewController: UIViewController, UNNotificationContentExtension {
var playerController: AVPlayerViewController!
@IBOutlet weak var playerBackgroundView: UIView!
override func viewDidLoad() {
super.viewDidLoad()
// Do any required interface initialization here.
}
func didReceive(_ notification: UNNotification) {
let attachment = notification.request.content.attachments.first
playerController = AVPlayerViewController()
// Set height programmatically
// preferredContentSize.height = 250
if let url = attachment?.url {
setupVideoPlayer(url: url)
} else {
print("No valid URL...")
}
}
private func setupVideoPlayer(url: URL) {
guard let playerController = self.playerController else { return }
let player = AVPlayer(url: url)
playerController.player = player
playerController.view.frame = self.playerBackgroundView.bounds
playerBackgroundView.addSubview(playerController.view)
addChild(playerController)
playerController.didMove(toParent: self)
player.play()
}
```
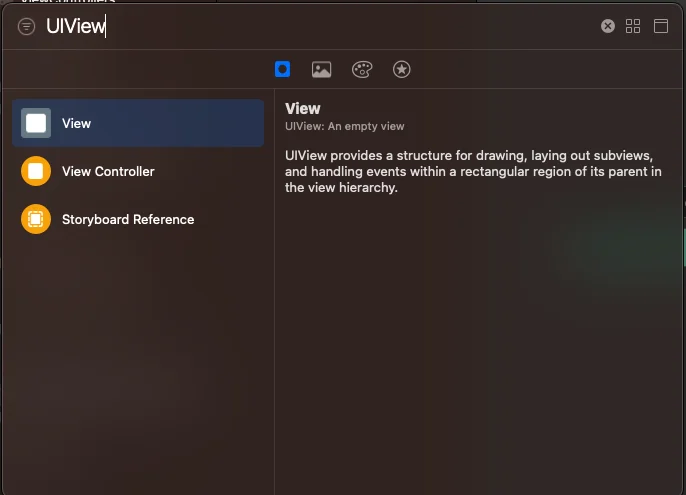
3. รวม UIView เข้าไปใน MainInterface.storyboard:
2. ปรับคุณสมบัติและเมธอดใน Content Extension ดังนี้:
```
import UIKit
import UserNotifications
import UserNotificationsUI
import AVKit
class NotificationViewController: UIViewController, UNNotificationContentExtension {
var playerController: AVPlayerViewController!
@IBOutlet weak var playerBackgroundView: UIView!
override func viewDidLoad() {
super.viewDidLoad()
// Do any required interface initialization here.
}
func didReceive(_ notification: UNNotification) {
let attachment = notification.request.content.attachments.first
playerController = AVPlayerViewController()
// Set height programmatically
// preferredContentSize.height = 250
if let url = attachment?.url {
setupVideoPlayer(url: url)
} else {
print("No valid URL...")
}
}
private func setupVideoPlayer(url: URL) {
guard let playerController = self.playerController else { return }
let player = AVPlayer(url: url)
playerController.player = player
playerController.view.frame = self.playerBackgroundView.bounds
playerBackgroundView.addSubview(playerController.view)
addChild(playerController)
playerController.didMove(toParent: self)
player.play()
}
```
3. รวม UIView เข้าไปใน MainInterface.storyboard:
 4. เชื่อมโยง playerBackgroundView IBOutlet กับ UIView ที่คุณเพิ่งเพิ่ม:
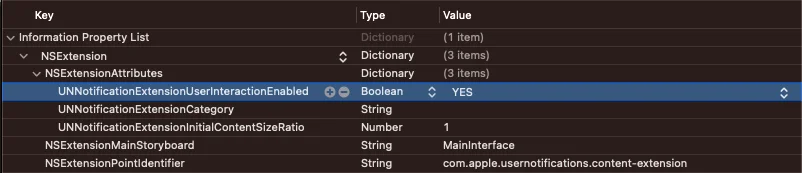
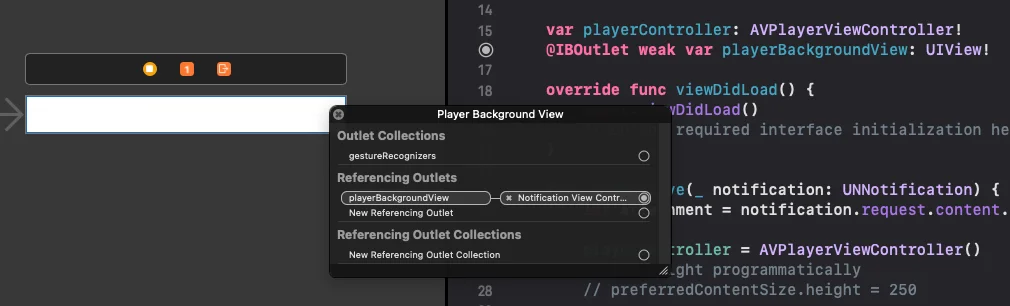 5. อัปเดตไฟล์ info.plist ด้วยรายการต่อไปนี้:
```
UNNotificationExtensionUserInteractionEnabled = true
```
5. อัปเดตไฟล์ info.plist ด้วยรายการต่อไปนี้:
```
UNNotificationExtensionUserInteractionEnabled = true
```
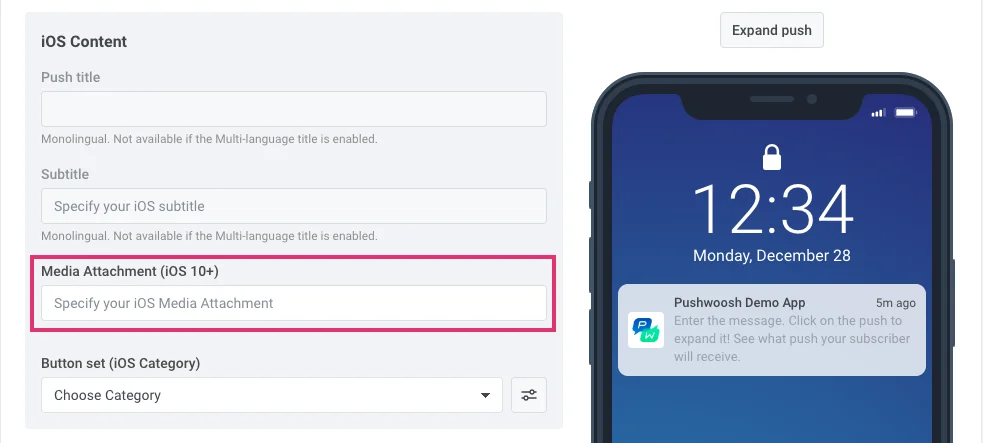
 ในการแนบวิดีโอไปกับการแจ้งเตือนของคุณ ให้ป้อน URL ของวิดีโอในช่อง Media Attachment ใน Control Panel:
 เมื่อส่งการแจ้งเตือนผ่าน API request [/createMessage](/th/developer/api-reference/messages-api#createmessage) ให้รวม URL ในพารามิเตอร์ "ios\_attachment" และตรวจสอบให้แน่ใจว่าแฟล็ก "mutable-content" ถูกตั้งค่าเป็น \`1\`
### เสียงพุชที่กำหนดเอง
ในการเล่นเสียงที่กำหนดเองเมื่อได้รับการแจ้งเตือนพุช ก่อนอื่นให้ใส่ไฟล์เสียงลงในโฟลเดอร์รากของโปรเจกต์ของคุณ
เมื่อส่งการแจ้งเตือนผ่าน API request [/createMessage](/th/developer/api-reference/messages-api#createmessage) ให้รวม URL ในพารามิเตอร์ "ios\_attachment" และตรวจสอบให้แน่ใจว่าแฟล็ก "mutable-content" ถูกตั้งค่าเป็น \`1\`
### เสียงพุชที่กำหนดเอง
ในการเล่นเสียงที่กำหนดเองเมื่อได้รับการแจ้งเตือนพุช ก่อนอื่นให้ใส่ไฟล์เสียงลงในโฟลเดอร์รากของโปรเจกต์ของคุณ
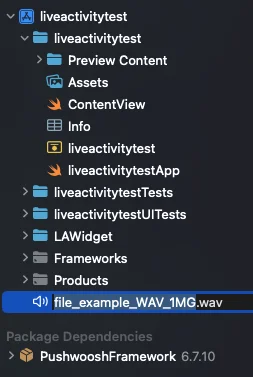 จากนั้น ระบุชื่อไฟล์เสียงในพารามิเตอร์พุช – กรอกข้อมูลในช่อง Sound ของ [การตั้งค่าเฉพาะของ iOS](/th/product/messaging-channels/push-notifications/send-push-notifications/one-time-push#ios) ของข้อความของคุณ หรือระบุชื่อไฟล์เป็นค่าสำหรับพารามิเตอร์ "ios\_sound" ของ [API request createMessage](/th/developer/api-reference/messages-api/)
ไฟล์เสียงสำหรับเสียง iOS ที่กำหนดเองต้องอยู่ในรูปแบบใดรูปแบบหนึ่งต่อไปนี้: **.aif**, **.caf**, **.wav** **โปรดตรวจสอบให้แน่ใจว่าได้ระบุรูปแบบในชื่อไฟล์ มิฉะนั้น Pushwoosh iOS SDK จะไม่สนใจ**
### iOS Provisional Push
#### วิธีการทำงาน
การแจ้งเตือนพุชแบบชั่วคราว (Provisional push notifications) จะปรากฏอย่างเงียบๆ ใน Notification Center ของผู้ใช้ แต่จะไม่ปรากฏบนหน้าจอล็อก พุชประเภทนี้ไม่จำเป็นต้องได้รับอนุญาตจากผู้ใช้อย่างชัดเจน: คุณสามารถเริ่มส่งได้ทันทีที่ผู้ใช้ติดตั้งและเปิดแอปของคุณ
อย่างไรก็ตาม ผู้ใช้ยังคงสามารถสมัครรับการแจ้งเตือนพุชที่โดดเด่นของคุณได้: เมื่อเปิด Provisional Push พวกเขามีสองทางเลือกในการเลือกประสบการณ์ของตนเอง – คือเก็บพุชไว้ใน Notification Center โดยไม่มีการแจ้งเตือนและเสียง หรืออนุญาตให้คุณส่งพุชอย่างโดดเด่นเพื่อให้ปรากฏบนหน้าจอล็อก
Provisional Pushes ถูกออกแบบมาเพื่อให้ผู้ใช้ตัดสินใจอย่างมีข้อมูลว่าพวกเขาต้องการรับการแจ้งเตือนจากแอปของคุณหรือไม่ เนื่องจากคำขอสมัครสมาชิก APN แบบเนทีฟจะแสดงให้ผู้ใช้เห็นเพียงครั้งเดียว และหากต้องการสมัครในภายหลัง พวกเขาจะต้องไปที่การตั้งค่าระบบของโทรศัพท์ ซึ่งผู้ใช้บางคนอาจไม่สมัครเนื่องจากพวกเขาไม่ทราบว่าพวกเขาจะได้รับประโยชน์อะไรจากพุชของคุณ Provisional Pushes ให้ความเข้าใจนี้แก่ผู้ใช้: พวกเขาสามารถเห็นเนื้อหาที่คุณส่งในการแจ้งเตือนพุชและตัดสินใจว่าพวกเขาต้องการได้รับการแจ้งเตือนเกี่ยวกับเนื้อหานี้อย่างโดดเด่นหรือไม่
#### วิธีการใช้งาน
1\. ผสานรวม Pushwoosh iOS SDK โดยทำตาม [คู่มือ](/th/developer/pushwoosh-sdk/ios-sdk/setting-up-pushwoosh-ios-sdk/quick-start/)
2\. เพิ่มสตริงต่อไปนี้ลงใน AppDelegate ของโปรเจกต์ของคุณก่อนที่จะเรียกเมธอด `registerForPushNotifications()`:
```swift
if #available(iOS 12.0, *) {
Pushwoosh.sharedInstance().additionalAuthorizationOptions = UNAuthorizationOptions.provisional
}
```
```objective-c
if (@available(iOS 12.0, *)) {
[Pushwoosh sharedInstance].additionalAuthorizationOptions = UNAuthorizationOptionProvisional;
}
```
เท่านี้ก็เรียบร้อย! ผู้ใช้แอปจะได้รับข้อความโดยตรงไปยัง Notification Center ของพวกเขาทันทีที่ติดตั้งแอป
### แบ่งปันความคิดเห็นของคุณกับเรา
ความคิดเห็นของคุณช่วยให้เราสร้างประสบการณ์ที่ดีขึ้น ดังนั้นเราจึงอยากรับฟังจากคุณหากคุณมีปัญหาใดๆ ในระหว่างกระบวนการผสานรวม SDK หากคุณประสบปัญหาใดๆ โปรดอย่าลังเลที่จะแบ่งปันความคิดของคุณกับเรา [ผ่านแบบฟอร์มนี้](https://docs.google.com/forms/d/e/1FAIpQLSd\_0b8jwn-V\_JmoPLIxIFYbHACCQhrzidOZV3ELywoQPXRSxw/viewform)
จากนั้น ระบุชื่อไฟล์เสียงในพารามิเตอร์พุช – กรอกข้อมูลในช่อง Sound ของ [การตั้งค่าเฉพาะของ iOS](/th/product/messaging-channels/push-notifications/send-push-notifications/one-time-push#ios) ของข้อความของคุณ หรือระบุชื่อไฟล์เป็นค่าสำหรับพารามิเตอร์ "ios\_sound" ของ [API request createMessage](/th/developer/api-reference/messages-api/)
ไฟล์เสียงสำหรับเสียง iOS ที่กำหนดเองต้องอยู่ในรูปแบบใดรูปแบบหนึ่งต่อไปนี้: **.aif**, **.caf**, **.wav** **โปรดตรวจสอบให้แน่ใจว่าได้ระบุรูปแบบในชื่อไฟล์ มิฉะนั้น Pushwoosh iOS SDK จะไม่สนใจ**
### iOS Provisional Push
#### วิธีการทำงาน
การแจ้งเตือนพุชแบบชั่วคราว (Provisional push notifications) จะปรากฏอย่างเงียบๆ ใน Notification Center ของผู้ใช้ แต่จะไม่ปรากฏบนหน้าจอล็อก พุชประเภทนี้ไม่จำเป็นต้องได้รับอนุญาตจากผู้ใช้อย่างชัดเจน: คุณสามารถเริ่มส่งได้ทันทีที่ผู้ใช้ติดตั้งและเปิดแอปของคุณ
อย่างไรก็ตาม ผู้ใช้ยังคงสามารถสมัครรับการแจ้งเตือนพุชที่โดดเด่นของคุณได้: เมื่อเปิด Provisional Push พวกเขามีสองทางเลือกในการเลือกประสบการณ์ของตนเอง – คือเก็บพุชไว้ใน Notification Center โดยไม่มีการแจ้งเตือนและเสียง หรืออนุญาตให้คุณส่งพุชอย่างโดดเด่นเพื่อให้ปรากฏบนหน้าจอล็อก
Provisional Pushes ถูกออกแบบมาเพื่อให้ผู้ใช้ตัดสินใจอย่างมีข้อมูลว่าพวกเขาต้องการรับการแจ้งเตือนจากแอปของคุณหรือไม่ เนื่องจากคำขอสมัครสมาชิก APN แบบเนทีฟจะแสดงให้ผู้ใช้เห็นเพียงครั้งเดียว และหากต้องการสมัครในภายหลัง พวกเขาจะต้องไปที่การตั้งค่าระบบของโทรศัพท์ ซึ่งผู้ใช้บางคนอาจไม่สมัครเนื่องจากพวกเขาไม่ทราบว่าพวกเขาจะได้รับประโยชน์อะไรจากพุชของคุณ Provisional Pushes ให้ความเข้าใจนี้แก่ผู้ใช้: พวกเขาสามารถเห็นเนื้อหาที่คุณส่งในการแจ้งเตือนพุชและตัดสินใจว่าพวกเขาต้องการได้รับการแจ้งเตือนเกี่ยวกับเนื้อหานี้อย่างโดดเด่นหรือไม่
#### วิธีการใช้งาน
1\. ผสานรวม Pushwoosh iOS SDK โดยทำตาม [คู่มือ](/th/developer/pushwoosh-sdk/ios-sdk/setting-up-pushwoosh-ios-sdk/quick-start/)
2\. เพิ่มสตริงต่อไปนี้ลงใน AppDelegate ของโปรเจกต์ของคุณก่อนที่จะเรียกเมธอด `registerForPushNotifications()`:
```swift
if #available(iOS 12.0, *) {
Pushwoosh.sharedInstance().additionalAuthorizationOptions = UNAuthorizationOptions.provisional
}
```
```objective-c
if (@available(iOS 12.0, *)) {
[Pushwoosh sharedInstance].additionalAuthorizationOptions = UNAuthorizationOptionProvisional;
}
```
เท่านี้ก็เรียบร้อย! ผู้ใช้แอปจะได้รับข้อความโดยตรงไปยัง Notification Center ของพวกเขาทันทีที่ติดตั้งแอป
### แบ่งปันความคิดเห็นของคุณกับเรา
ความคิดเห็นของคุณช่วยให้เราสร้างประสบการณ์ที่ดีขึ้น ดังนั้นเราจึงอยากรับฟังจากคุณหากคุณมีปัญหาใดๆ ในระหว่างกระบวนการผสานรวม SDK หากคุณประสบปัญหาใดๆ โปรดอย่าลังเลที่จะแบ่งปันความคิดของคุณกับเรา [ผ่านแบบฟอร์มนี้](https://docs.google.com/forms/d/e/1FAIpQLSd\_0b8jwn-V\_JmoPLIxIFYbHACCQhrzidOZV3ELywoQPXRSxw/viewform)