# ปรับแต่ง Android SDK

<Aside type="note">
ตรวจสอบให้แน่ใจว่าคุณได้ผสานรวม Pushwoosh Android SDK เข้ากับโปรเจกต์ของคุณแล้ว:

* [การผสานรวม Firebase](/th/developer/pushwoosh-sdk/android-sdk/firebase-integration/quick-start/)
* [การผสานรวม Amazon](/th/developer/pushwoosh-sdk/android-sdk/amazon/)
</Aside>

## Deep linking

ใน activity ของคุณที่จะจัดการกับ deep link ให้เพิ่มแท็ก \<data> พร้อมด้วยพารามิเตอร์ scheme, host และ pathPrefix

```txt
<activity
          android:name=".PromoActivity"
          android:label="PromoActivity">
    <intent-filter>
        <action android:name="android.intent.action.VIEW" />
        <category android:name="android.intent.category.DEFAULT" />
        <category android:name="android.intent.category.BROWSABLE" />

        <data android:scheme="com.pushwoosh"
          android:host="promotion"
          android:pathPrefix="" />
    </intent-filter>
</activity>
```

<Aside type="note">
ชื่อหน้า deep link (_promotion_ ในตัวอย่างที่ให้มา) จะอยู่ในฟิลด์ **host** **ไม่ใช่ pathPrefix**
</Aside>

ในตัวอย่างข้างต้น deep link จะเปิด PromoActivity การใช้งานพื้นฐานด้านล่างจะแสดงการแจ้งเตือนพร้อมค่า promo id เพื่อความเรียบง่าย ในแอปพลิเคชันของคุณ มันสามารถทำสิ่งที่มีประโยชน์ได้อย่างแน่นอน!

```java
public class PromoActivity extends Activity
{
		@Override
		protected void onCreate(Bundle savedInstanceState)
		{
				super.onCreate(savedInstanceState);

				setContentView(R.layout.deep_link);
				setTitle("Deep link activity");

				Intent intent = getIntent();
	  	  String action = intent.getAction();
	    	Uri data = intent.getData();

		    if (TextUtils.equals(action, Intent.ACTION_VIEW))
		    {
	  		  	openUrl(data);
		    }
		}

		private void openUrl(Uri uri)
		{
				String promoId = uri.getQueryParameter("id");
				Toast.makeText(getApplicationContext(), promoId, Toast.LENGTH_LONG).show();
		}
}
```

## การติดตามการซื้อในแอป (In-app purchase tracking)

หากคุณต้องการติดตามการซื้อในแอปใน [Customer Journeys](/th/product/customer-journey/pushwoosh-journey-overview) ให้กำหนดค่าการส่งข้อมูลการซื้อไปยัง Pushwoosh โดยเรียกใช้เมธอดนี้:


```java
Pushwoosh.getInstance().sendInappPurchase(@NonNull String sku, @NonNull BigDecimal price, @NonNull String currency);
```
## การแจ้งเตือนพุช Geozones

หากต้องการใช้ Geozone pushes ให้เพิ่มไลบรารี `com.pushwoosh:pushwoosh-location` และเรียกใช้:

```java
PushwooshLocation.startLocationTracking();
```

ใน **AndroidManifest.xml** ของคุณ ให้ใส่สิทธิ์ที่จำเป็น:


```xml
<manifest ... >
  <!-- Required for geolocation-based push notifications -->
  <uses-permission android:name="android.permission.ACCESS_COARSE_LOCATION" />

  <!-- Required for precise location tracking -->
  <uses-permission android:name="android.permission.ACCESS_FINE_LOCATION" />

  <!-- Required for background location access on Android 10 (API level 29) and higher -->
  <uses-permission android:name="android.permission.ACCESS_BACKGROUND_LOCATION" />
</manifest>
```

## การใช้การแจ้งเตือนในเครื่องกับ Pushwoosh

หากคุณใช้ Pushwoosh Local Notifications API ให้เพิ่มสิทธิ์ RECEIVE\_BOOT\_COMPLETED ใน AndroidManifest.xml ของคุณ:

```txt title="AndroidManifest.xml"
<uses-permission android:name="android.permission.RECEIVE_BOOT_COMPLETED"/>x
```


## การใช้หมายเลข badge บน Android

Pushwoosh รองรับการตั้งค่าหมายเลข badge บนทางลัดไอคอนแอปสำหรับ Android launchers ต่อไปนี้:\
Sony, Samsung, LG, HTC, ASUS, ADW, APEX, NOVA, HUAWEI, ZUK, OPPO\
หากต้องการใช้ฟังก์ชันนี้ เพียงเพิ่มไลบรารี `com.pushwoosh:pushwoosh-badge` ในแอปพลิเคชันของคุณ

## การเปิด activity ที่กำหนดเอง

หากคุณต้องการเริ่ม activity เฉพาะเพื่อตอบสนองต่อการแจ้งเตือนพุช ให้เพิ่ม intent-filter ต่อไปนี้ใน activity นั้น:

```txt title="AndroidManifest.xml"
<activity android:name="YourActivity">
    <intent-filter>
        <action android:name="${applicationId}.MESSAGE"/>
        <category android:name="android.intent.category.DEFAULT"/>
    </intent-filter>
</activity>
```

## การควบคุมระดับ Log

เพื่อช่วยในการดีบักและการผสานรวม SDK จะพิมพ์คำขอทั้งหมดไปยังคอนโซลโดยค่าเริ่มต้น เมื่อคุณพร้อมสำหรับ production build ให้เพิ่ม `com.pushwoosh.log_level` meta-data ที่มีค่า "ERROR" ใน AndroidManifest.xml ด้วยวิธีนี้ เฉพาะข้อมูลเกี่ยวกับข้อผิดพลาดเท่านั้นที่จะไปที่คอนโซล ตัวเลือกอื่นอาจเป็นหนึ่งในรายการต่อไปนี้:

_NONE_ - ไม่มี log จาก SDK\
_ERROR_ - แสดงเฉพาะข้อผิดพลาดในคอนโซล\
_WARN_ - แสดงคำเตือนด้วย\
_INFO_ - แสดงข้อความข้อมูล\
_DEBUG_ - แม้แต่ข้อมูลดีบักก็แสดงตอนนี้\
_NOISE_ - ทุกสิ่งที่ SDK สามารถพิมพ์ได้และอีกมากมาย

```txt title="AndroidManifest.xml"
<meta-data android:name="com.pushwoosh.log_level" android:value="ERROR" />
```

## การใช้ Proguard

เมื่อใช้ Proguard ให้เพิ่มตัวเลือกต่อไปนี้:

```txt title="proguard-rules.pro"
-keep class com.pushwoosh.** { *; }
-dontwarn com.pushwoosh.**
```

ดูข้อกำหนดของไลบรารี **Google Play Services** เกี่ยวกับ Proguard ที่นี่:\
[https://developers.google.com/android/guides/setup](https://developers.google.com/android/guides/setup)

## การปรับแต่งพฤติกรรมการเปิดการแจ้งเตือน

หากคุณต้องการเลือกว่าจะแสดง activity ใดเป็นผลมาจากการแจ้งเตือนพุชโดยทางโปรแกรม คุณสามารถสร้าง [NotificationServiceExtension](https://github.com/Pushwoosh/pushwoosh-android-sdk/blob/master/Documentation/notification/NotificationServiceExtension.md) ที่กำหนดเองและรวมชื่อคลาสที่สมบูรณ์ของ NotificationServiceExtension ของคุณใน metadata ภายใต้ค่า `com.pushwoosh.notification_service_extension`

```txt title="AndroidManifest.xml"
<meta-data
    android:name="com.pushwoosh.notification_service_extension"
    android:value="com.your.package.YourNotificationServiceExtension" />
```

```java title="YourNotificationServiceExtension.java"
public class YourNotificationServiceExtension extends NotificationServiceExtension {
    @Override
    protected void startActivityForPushMessage(PushMessage message) {
      // super.startActivityForPushMessage() starts default launcher activity
      // or activity marked with ${applicationId}.MESSAGE action.
      // Simply do not call it to override this behaviour.
        // super.startActivityForPushMessage(message);

        // start your activity instead:
        Intent launchIntent  = new Intent(getApplicationContext(), YourActivity.class);
        launchIntent.setFlags(Intent.FLAG_ACTIVITY_NEW_TASK | Intent.FLAG_ACTIVITY_RESET_TASK_IF_NEEDED);

        // (Optional) pass notification data to Activity
        launchIntent.putExtra(Pushwoosh.PUSH_RECEIVE_EVENT, message.toJson().toString());

        context.startActivity(launchIntent);
    }
}
```

<Aside type="note">
**สำคัญ**

หากคุณใช้ proguard ใน production builds ตรวจสอบให้แน่ใจว่า NotificationServiceExtension ที่คุณกำหนดเองไม่ถูก obfuscate (โดยการเพิ่มกฎ `-keep class`) มิฉะนั้นจะทำให้เกิด ClassNotFoundException
</Aside>

## การปรับแต่งการแจ้งเตือนพุช

ในการปรับแต่งมุมมองของการแจ้งเตือนพุช คุณต้องสร้าง Factory ที่กำหนดเอง คุณสามารถสร้าง [NotificationFactory](https://pushwoosh.github.io/pushwoosh-android-sdk/pushwoosh/com.pushwoosh.notification/-notification-factory/index.html) ที่กำหนดเองและรวมชื่อคลาสที่สมบูรณ์ของ NotificationFactory ของคุณใน metadata ภายใต้ค่า `com.pushwoosh.notification_factory`

```txt title="AndroidManifest.xml"
<meta-data
    android:name="com.pushwoosh.notification_factory"
    android:value="com.your.package.YourNotificationFactory" />
```

```java title="YourNotificationFactory"
public class YourNotificationFactory extends PushwooshNotificationFactory {
	@Override
	public Notification onGenerateNotification(@NonNull PushMessage pushMessage) {
		if (customNotification) {
       // TODO: generate and return custom notification
    }

    // return default Pushwoosh notification
		return super.onGenerateNotification(pushMessage);
	}
}
```

## การปรับแต่งสรุปกลุ่ม

ในการปรับแต่งลักษณะที่ปรากฏของ [สรุปกลุ่ม](https://developer.android.com/training/notify-user/group#set_a_group_summary) ให้สร้าง Factory ที่กำหนดเอง คุณสามารถสร้าง SummaryNotificationFactory ที่กำหนดเองและรวมชื่อคลาสที่สมบูรณ์ของ SummaryNotificationFactory ของคุณใน metadata ภายใต้ค่า com.pushwoosh.summary\_notification\_factory

```java title="AndroidManifest.xml"
<meta-data
    android:name="com.pushwoosh.summary_notification_factory"
    android:value="com.your.package.YourSummaryNotificationFactory" />
```

```java title="YourSummaryNotificationFactory"
public class YourSummaryNotificationFactory extends PushwooshSummaryNotificationFactory {
    @Override
    public String summaryNotificationMessage(int notificationsAmount) {
	      // return the message you want
        return super.summaryNotificationMessage(notificationsAmount);
    }
    @Override
    public int summaryNotificationIconResId() {
	      // return the icon resource id you want
        return super.summaryNotificationIconResId();
    }
}
```

## URL ปลายทางส่วนตัว

<Aside>
สำหรับสมาชิก **Custom Plan** เท่านั้น สำหรับรายละเอียดเพิ่มเติม โปรดติดต่อ [ทีมขาย](https://www.pushwoosh.com/demo/?utm_source=docs&utm_medium=post&utm_campaign=customizing-android-sdk) ของเรา
</Aside>

Pushwoosh ให้บริการ Private endpoints สำหรับลูกค้าที่มีการสมัครสมาชิก Custom Plan ในการตั้งค่า Private endpoint สำหรับ Android SDK คุณต้องเพิ่มสิ่งต่อไปนี้ในไฟล์ **AndroidManifest.xml** ของคุณ:

```txt title="AndroidManifest.xml"
<meta-data android:name="com.pushwoosh.base_url" android:value="PUSHWOOSH_PRIVATE_ENDPOINT_URL_PROVIDED" />
```

## การสร้างคิว Rich Media

ในกรณีที่มีหน้า Rich Media หลายหน้าที่ต้องแสดงพร้อมกัน (ตัวอย่างเช่น เหตุการณ์ทริกเกอร์สำหรับ In-Apps สองรายการขึ้นไปเกิดขึ้นในเวลาเดียวกัน หรือหน้า Rich Media กำลังแสดงอยู่แล้วในขณะที่เหตุการณ์ทริกเกอร์อื่นเกิดขึ้น) คุณสามารถตั้งค่าคิวสำหรับการแสดงหน้า Rich Media ได้ ในการสร้างคิว ให้เพิ่มโค้ดต่อไปนี้ในโปรเจกต์ของคุณ:

```java title="Application.java"
package com.pushwoosh.testingapp;

import com.pushwoosh.RichMediaManager;
import com.pushwoosh.exception.PushwooshException;
import com.pushwoosh.richmedia.RichMediaPresentingDelegate;
import com.pushwoosh.richmedia.RichMedia;
import com.pushwoosh.internal.utils.PWLog;

import java.util.ArrayDeque;
import java.util.concurrent.locks.ReentrantLock;

public class DefaultRichMediaPresentingDelegate implements RichMediaPresentingDelegate {
    private final String TAG = DefaultRichMediaPresentingDelegate.class.getSimpleName();
    private ArrayDeque<RichMedia> richMediaQueue = new ArrayDeque<>();
    private RichMedia currentRichMedia = null;
    private ReentrantLock reentrantLock;

    public DefaultRichMediaPresentingDelegate() {
        PWLog.noise(TAG, "new DefaultRichMediaPresentingDelegate:" + this);
        reentrantLock = new ReentrantLock();
    }

    @Override
    public boolean shouldPresent(RichMedia richMedia) {
        PWLog.noise(TAG, "shouldPresent:" + richMedia);
        if (currentRichMedia == null) {
            PWLog.noise(TAG, "currentRichMedia is null");
        }
        if (richMedia.isLockScreen()) {
            PWLog.noise(TAG, "isLockScreen is true");
            return true;
        }
        try {
            reentrantLock.lock();
            if (currentRichMedia == null) {
                PWLog.noise(TAG, "show:" + richMedia);
                currentRichMedia = richMedia;
                return true;
            } else {
                PWLog.noise(TAG, "add to queue:" + richMedia);
                richMediaQueue.add(richMedia);
                return false;
            }
        } finally {
            reentrantLock.unlock();
        }
    }

    @Override
    public void onPresent(RichMedia richMedia) {
        PWLog.noise(TAG, "onPresent" + richMedia);
    }

    @Override
    public void onError(RichMedia richMedia, PushwooshException pushwooshException) {
        PWLog.error(TAG, pushwooshException + " richMedia:"+richMedia.toString());
        tryShowNextRichMediaThreadSafety();
    }

    @Override
    public void onClose(RichMedia richMedia) {
        PWLog.noise(TAG, "onClose:" + richMedia);
        tryShowNextRichMediaThreadSafety();
    }

    private void tryShowNextRichMediaThreadSafety() {
        try {
            reentrantLock.lock();
            tryShowNextRichMedia();
        } finally {
            reentrantLock.unlock();
        }
    }

    private void tryShowNextRichMedia() {
        if (!richMediaQueue.isEmpty()) {
			currentRichMedia = richMediaQueue.poll();
			PWLog.noise(TAG, "try manual show:" + currentRichMedia);
			RichMediaManager.present(currentRichMedia);
		} else {
			PWLog.noise(TAG, "richMediaQueue is empty");
			currentRichMedia = null;
		}
    }
}
```

<Aside type="caution" title="สำคัญ">
เราขอแนะนำอย่างยิ่งให้ตั้งค่าคิวใน **Application** แทนที่จะเป็น **Activity** มิฉะนั้น อาจสร้างคิวหลายคิวได้
</Aside>

<Aside type="note">
การเรียกเมธอด [postEvent](/th/developer/api-reference/user-centric-api/#postevent) แต่ละครั้งอนุญาตให้แสดง In-App เพียงหนึ่งรายการเท่านั้น และแต่ละ Push สามารถเชื่อมโยงกับ Rich Media ได้เพียงหนึ่งรายการเท่านั้น หากคุณต้องการแสดง In-Apps หลายรายการ ให้เรียกเมธอด [postEvent](/th/developer/api-reference/user-centric-api/#postevent) ตามจำนวนครั้งที่ต้องการ
</Aside>

## พุชเสียงที่กำหนดเอง

<Aside>
ใช้ได้สำหรับอุปกรณ์ Android 8+
</Aside>

1. วางไฟล์เสียงของคุณในโฟลเดอร์ที่เหมาะสม สำหรับเฟรมเวิร์ก Android ดั้งเดิม ไฟล์ของคุณควรอยู่ในโฟลเดอร์ `/app/src/main/res/raw`

<Aside type="note">
โปรดอ้างอิงคู่มือที่เกี่ยวข้องเพื่อค้นหาตำแหน่งที่จะวางไฟล์เสียงในโปรเจกต์ที่สร้างในเฟรมเวิร์กอื่น
</Aside>

2\. สร้าง [Notification Channel](/th/developer/pushwoosh-sdk/android-sdk/notification-channels/)

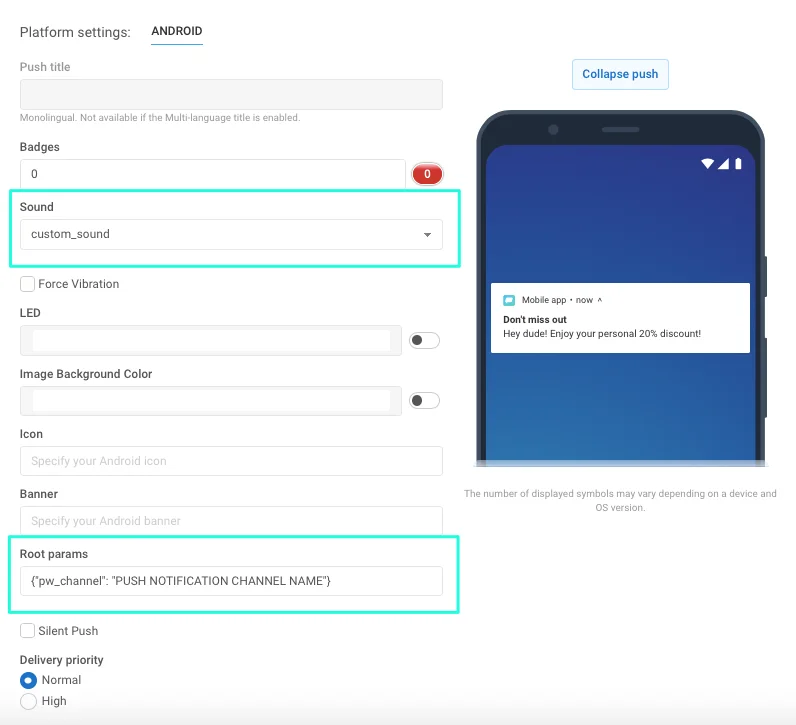
3\. เลือกเสียงขณะกำหนดค่าข้อความพุช

<img src="/android-push-notifications-customizing-android-sdk-5.0-1.webp" alt=""/>

4\. ตั้งค่า Notification Channel ที่ข้อความจะอยู่ ในการทำเช่นนั้น ให้ระบุสิ่งต่อไปนี้ในฟิลด์ “Android root params”:`{"pw_channel": "PUSH NOTIFICATION CHANNEL NAME"} //`` `_`ที่นี่คุณต้องระบุชื่อสำหรับช่องของคุณด้วยเสียงที่กำหนดเอง`_

ในกรณีที่ใช้ remote API ให้ตั้งค่าพารามิเตอร์ดังต่อไปนี้ภายในคำขอ /createMessage API ของคุณ:

```java
"android_root_params": {"pw_channel": "push"} // ที่นี่คุณต้องระบุชื่อสำหรับช่องของคุณด้วยเสียงที่กำหนดเอง เช่น "push" สำหรับการแจ้งเตือนด้วยเสียง push.wav
"android_sound": "push" // ที่นี่คุณควรระบุชื่อไฟล์โดยไม่มีนามสกุล
```

เมื่อคุณส่งพุชพร้อมพารามิเตอร์เหล่านั้นที่ระบุแล้ว Notification Channel พร้อมเสียงที่เลือกจะถูกสร้างขึ้นสำหรับอุปกรณ์ทั้งหมดที่มี Android 8+

ตอนนี้ หากต้องการส่งพุชด้วยเสียงที่กำหนดเอง คุณต้องระบุเฉพาะช่องที่เชื่อมโยงกับเสียงนั้นเท่านั้น

### กฎ Proguard สำหรับเสียงการแจ้งเตือนที่กำหนดเอง

หากแอปของคุณใช้ proguard สำหรับการลดขนาดโค้ดและทรัพยากร สิ่งสำคัญคือต้องเก็บไฟล์เสียงของคุณไว้เหมือนเดิมและพร้อมใช้งานสำหรับไลบรารีภายนอก หากคุณใช้คุณสมบัติ **`minifyEnabled = true`** กับ **build.gradle** ของคุณ ให้เพิ่มกฎต่อไปนี้ใน **proguard-rules.pro** ของคุณ:

```
-keep public class your.package.name.R$raw {
 *;
}
```

หากคุณลดขนาดทรัพยากรของแอปของคุณนอกเหนือจากการลดขนาดโค้ดโดยใช้คุณสมบัติ **`shrinkResources=true`** คุณควรระบุเพิ่มเติมว่าต้องการเก็บทรัพยากรใดไว้ ในการทำเช่นนั้น ให้สร้างไฟล์ XML ใหม่ที่มีชื่อใดก็ได้ บันทึกไว้ที่ใดที่หนึ่งในโปรเจกต์ของคุณ (เช่น ใน res/xml) และระบุชื่อทรัพยากรภายใต้พารามิเตอร์ **`tools:keep`** ในแท็ก **`resources`**:

```
<?xml version="1.0" encoding="utf-8"?>
<resources xmlns:tools="http://schemas.android.com/tools"
 tools:keep="@raw/*"
/>
```

## รายการแฟล็ก meta-data ของ Android SDK ทั้งหมด

ในการตั้งค่าแฟล็ก คุณต้องเพิ่มบล็อก meta-data ในไฟล์ **AndroidManifest.xml** ของคุณภายในแท็ก **application** ตัวอย่างเช่น หากคุณต้องการตั้งค่า ID แอปพลิเคชัน Pushwoosh ให้เพิ่มโค้ดต่อไปนี้ในไฟล์ **AndroidManifest.xml** ของคุณ:

```txt title="AndroidManifest.xml"
<meta-data
    android:name="com.pushwoosh.appid"
    android:value="XXXXX-XXXXX" />
```

<table><thead><tr><th width="262.33243208828077" align="center">Flag</th><th width="284" align="center">คำอธิบาย</th><th align="center">Possible values</th></tr></thead><tbody><tr><td align="center">com.pushwoosh.appid</td><td align="center">ตั้งค่า ID แอปพลิเคชัน Pushwoosh</td><td align="center">XXXXX-XXXXX</td></tr><tr><td align="center">com.pushwoosh.log_level</td><td align="center">ตั้งค่าระดับการบันทึก สำหรับรายละเอียด โปรดดูที่ <a href="#controlling-log-level">การควบคุมระดับ Log</a></td><td align="center">NONE / ERROR / WARN / INFO / <strong>DEBUG</strong> (<em>default</em>) / NOISE</td></tr><tr><td align="center">com.pushwoosh.base_url</td><td align="center">แทนที่ URL พื้นฐานของเซิร์ฟเวอร์ Pushwoosh</td><td align="center"><a href="https://cp.pushwoosh.com/json/1.3/">https://cp.pushwoosh.com/json/1.3/</a> (<em>default</em>)</td></tr><tr><td align="center">com.pushwoosh.notification_service_extension</td><td align="center">NotificationServiceExtension ที่กำหนดเอง สำหรับรายละเอียด โปรดดูที่ <a href="#customising-notification-open-behaviour">การปรับแต่งพฤติกรรมการเปิดการแจ้งเตือน</a></td><td align="center">com.myapp.MyNotificationServiceExtension</td></tr><tr><td align="center">com.pushwoosh.notification_factory</td><td align="center"><p>NotificationFactory ที่กำหนดเอง</p><p>สำหรับรายละเอียด โปรดดูที่ <a href="#customizing-push-notifications">การปรับแต่งการแจ้งเตือนพุช</a></p></td><td align="center">com.myapp.MyNotificationFactory</td></tr><tr><td align="center">com.pushwoosh.summary_notification_factory</td><td align="center">SummaryNotificationFactory ที่กำหนดเอง</td><td align="center">com.myapp.MySummaryNotificationFactory</td></tr><tr><td align="center">com.pushwoosh.multi_notification_mode</td><td align="center">หากเป็น true การแจ้งเตือนจะถูกจัดกลุ่ม หากเป็น false จะแสดงเฉพาะการแจ้งเตือนที่ได้รับล่าสุดเท่านั้น</td><td align="center">true / <strong>false</strong> (<em>default</em>)</td></tr><tr><td align="center">com.pushwoosh.allow_server_communication</td><td align="center">หากเป็น true SDK จะได้รับอนุญาตให้ส่งคำขอเครือข่ายไปยังเซิร์ฟเวอร์ Pushwoosh</td><td align="center"><strong>true</strong> (<em>default</em>) / false</td></tr><tr><td align="center">com.pushwoosh.handle_notifications_using_workmanager</td><td align="center">หากเป็น true WorkManager จะถูกตั้งค่าให้จัดการการแจ้งเตือน</td><td align="center">true / <strong>false</strong> (<em>default</em>)</td></tr><tr><td align="center">com.pushwoosh.notification_icon</td><td align="center">ชื่อทรัพยากรไอคอนการแจ้งเตือน (ขนาดเล็ก) ที่กำหนดเอง หากเป็น null จะใช้ไอคอนแอปพลิเคชันเริ่มต้น</td><td align="center">res/drawable-xxhdpi-v11/notification_small_icon.png / null</td></tr><tr><td align="center">com.pushwoosh.notification_icon_color</td><td align="center">สีพื้นหลังไอคอนการแจ้งเตือน (ขนาดเล็ก)</td><td align="center">#FFFFFF</td></tr><tr><td align="center">com.pushwoosh.allow_collecting_device_data</td><td align="center">หากเป็น true SDK จะได้รับอนุญาตให้รวบรวมและส่งข้อมูลอุปกรณ์ไปยัง Pushwoosh</td><td align="center"><strong>true</strong> (<em>default</em>) / false</td></tr><tr><td align="center">com.pushwoosh.allow_collecting_device_os_version</td><td align="center">หากเป็น true SDK จะได้รับอนุญาตให้รวบรวมและส่งเวอร์ชัน OS ของอุปกรณ์ไปยัง Pushwoosh</td><td align="center"><strong>true</strong> (<em>default</em>) / false</td></tr><tr><td align="center">com.pushwoosh.allow_collecting_device_locale</td><td align="center">หากเป็น true SDK จะได้รับอนุญาตให้รวบรวมและส่งตำแหน่งของอุปกรณ์ไปยัง Pushwoosh</td><td align="center"><strong>true</strong> (<em>default</em>) / false</td></tr><tr><td align="center">com.pushwoosh.allow_collecting_device_model</td><td align="center">หากเป็น true SDK จะได้รับอนุญาตให้รวบรวมและส่งโมเดลของอุปกรณ์ไปยัง Pushwoosh</td><td align="center"><strong>true</strong> (<em>default</em>) / false</td></tr><tr><td align="center">com.pushwoosh.in_app_business_solutions_capping</td><td align="center">จำกัดจำนวนครั้งที่ In-App <em>push-unregister</em> สามารถแสดงได้ในหนึ่งวัน</td><td align="center"><strong>1</strong> (<em>default</em>), 2, ..., n</td></tr><tr><td align="center">com.pushwoosh.start_foreground_service</td><td align="center">หากเป็น true Foreground Service จะเปิดตัวพร้อมกับการเรียก PushwooshLocation.startLocationTracking()</td><td align="center">true / <strong>false</strong> (<em>default</em>)</td></tr><tr><td align="center">com.pushwoosh.foreground_service_notification_text</td><td align="center">ตั้งค่าข้อความของการแจ้งเตือนที่สร้างขึ้นเมื่อ Foreground Service เปิดตัวสำหรับคีย์ “com.pushwoosh.start_foreground_service”</td><td align="center"><strong>Work in progress</strong> (<em>default</em>)</td></tr><tr><td align="center">com.pushwoosh.foreground_service_notification_channel_name</td><td align="center">ตั้งค่าชื่อช่องสำหรับการแจ้งเตือนที่สร้างขึ้นเมื่อ Foreground Service เปิดตัวสำหรับคีย์ “com.pushwoosh.start_foreground_service”</td><td align="center"><strong>Foreground service</strong> (<em>default)</em></td></tr><tr><td align="center">com.pushwoosh.trusted_package_names</td><td align="center">อนุญาตให้แชร์ Pushwoosh HWID กับแพ็คเกจที่ระบุ</td><td align="center">"com.mycompany.myapp1, com.mycompany.myapp2"</td></tr></tbody></table>


## การลบการแจ้งเตือนพุชผ่าน TTL (Time-To-Live)

ในการลบการแจ้งเตือนพุชโดยอัตโนมัติหลังจากช่วงเวลาที่กำหนดโดยใช้ TTL (Time-to-Live) ให้ทำตามขั้นตอนเหล่านี้:

1. สร้าง Custom NotificationFactory [เรียนรู้เพิ่มเติม](#customizing-push-notifications)

2. ในเมธอด `onGenerateNotification()` ให้สร้างการแจ้งเตือนโดยใช้คลาส `Notification.Builder` หรือ `NotificationCompat.Builder` และเรียกเมธอด `setTimeoutAfter`:

```java
public class YourNotificationFactory extends PushwooshNotificationFactory {

    @Override
    public Notification onGenerateNotification(@NonNull PushMessage pushMessage) {
        Notification.Builder builder = new Notification.Builder(getApplicationContext(), addChannel(pushData));

        Notification notification = builder.setContentText(pushData.getMessage())
                                           .setContentTitle(title)
                                           .setContentText(text)
                                           // rest of your notification creation code
                                           .setTimeoutAfter(timeout) // time in milliseconds before the notification is canceled
                                           .build();
    }
}

```

## แบ่งปันความคิดเห็นของคุณกับเรา

ความคิดเห็นของคุณช่วยให้เราสร้างประสบการณ์ที่ดีขึ้น ดังนั้นเรายินดีที่จะรับฟังจากคุณหากคุณมีปัญหาใดๆ ในระหว่างกระบวนการผสานรวม SDK หากคุณประสบปัญหาใดๆ โปรดอย่าลังเลที่จะแบ่งปันความคิดเห็นของคุณกับเราผ่าน [ฟอร์มนี้](https://docs.google.com/forms/d/e/1FAIpQLSd_0b8jwn-V_JmoPLIxIFYbHACCQhrzidOZV3ELywoQPXRSxw/viewform)