# Настройка бейджей для Unity
Поскольку плагин Unity не содержит заголовочный файл PWNotificationExtensionManager, вам необходимо выполнить несколько дополнительных шагов для внедрения бейджей в ваш проект Unity.
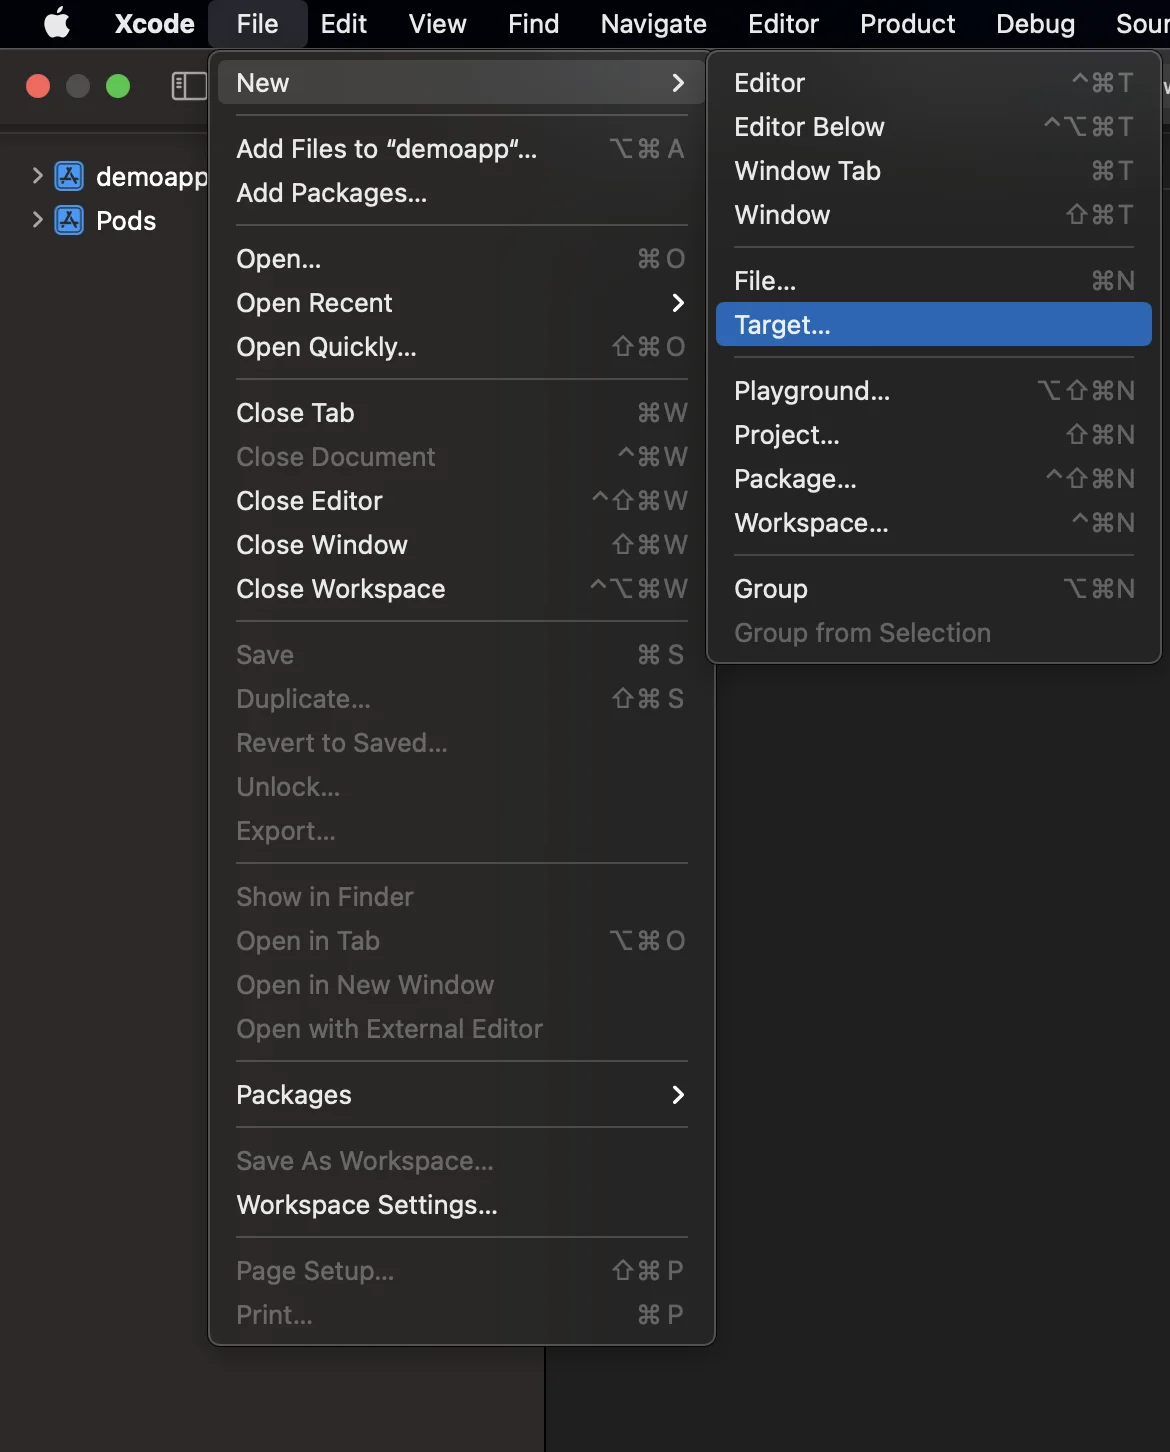
### 1. Добавьте Notification Service Extension (File -> New -> Target...)
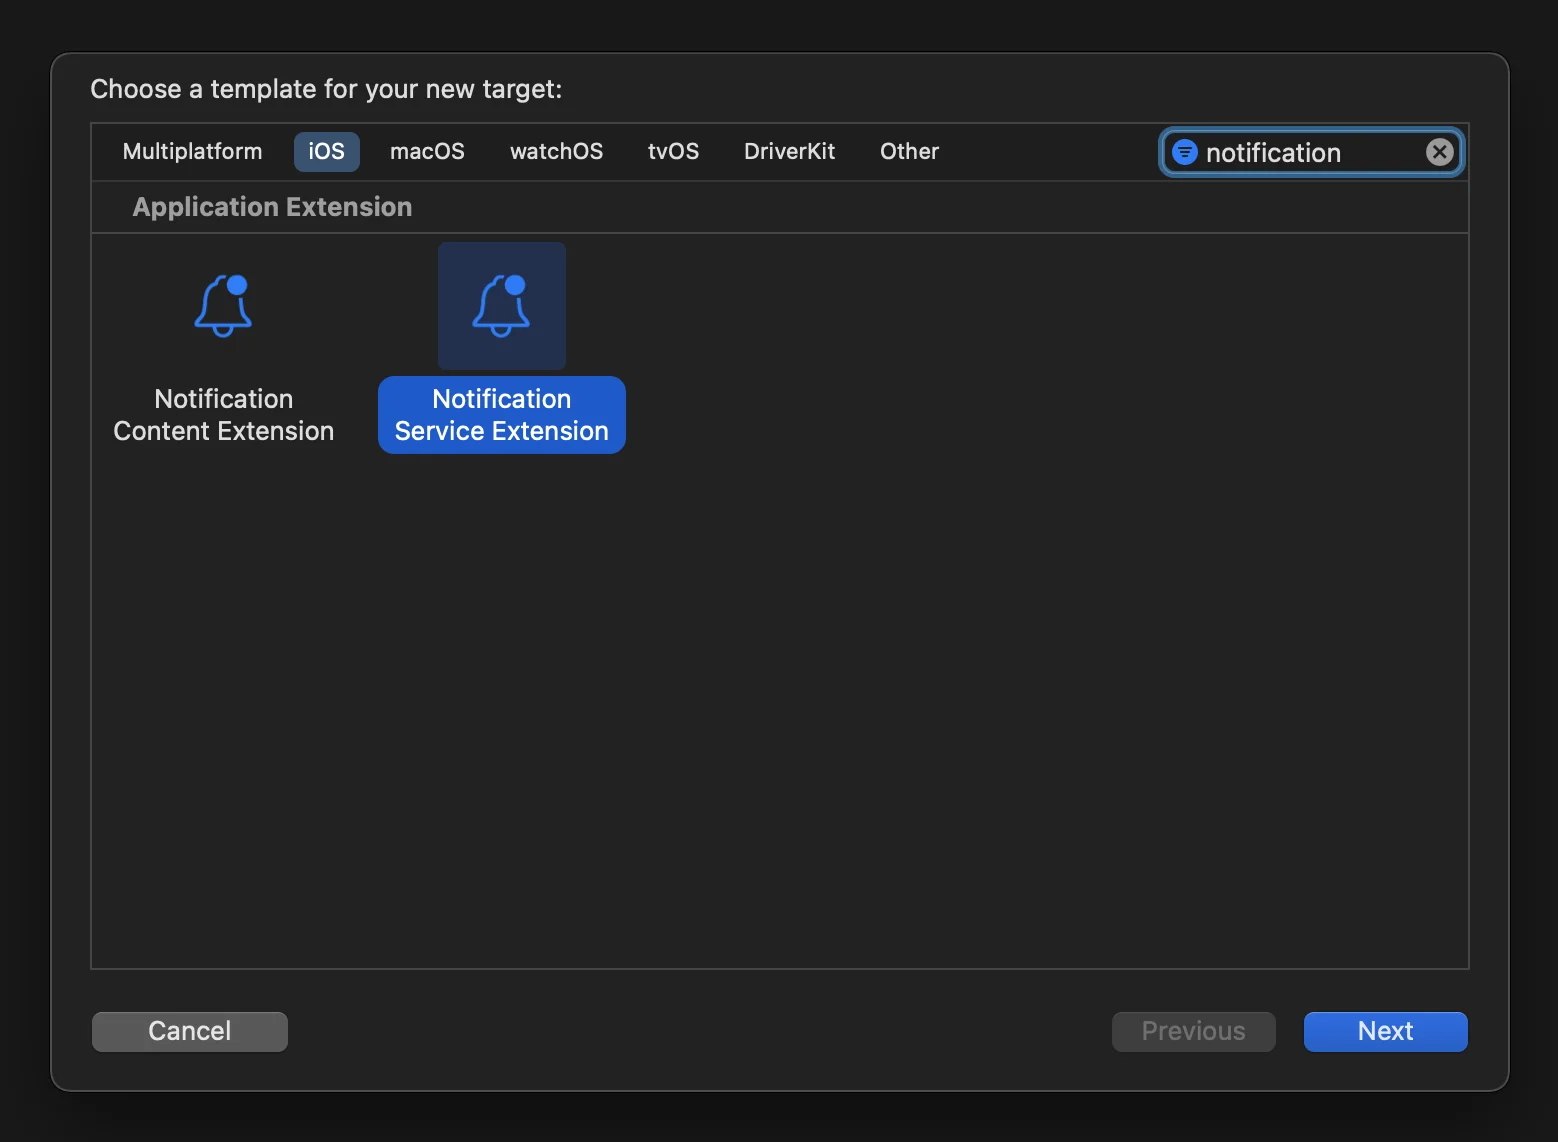
### 2. Выберите "Notification Service Extension"
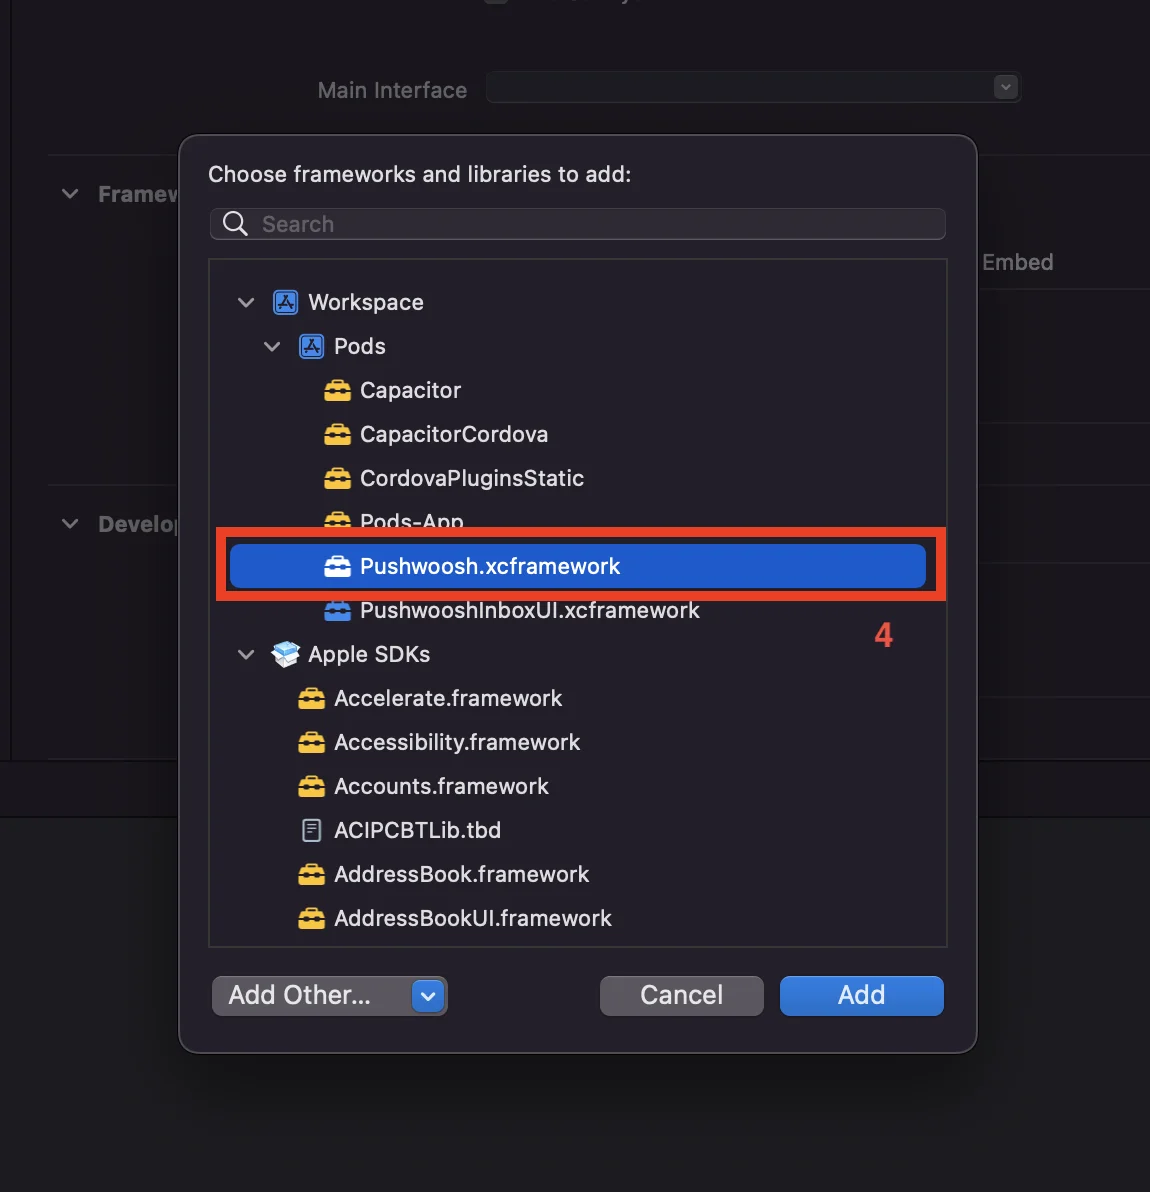
### 3. Добавьте Pushwoosh.xcframework в таргет расширения NotificationService следующим образом:
1. Выберите таргет расширения **NotificationService**.
2. Перейдите на вкладку "**General**".
3. Найдите раздел '**Framework and Libraries**' и нажмите кнопку '**+**'.
4. Выберите **Pushwoosh.xcframework.**
### 4. Обновите код Notification Service Extension следующим образом:
```
#import "NotificationService.h"
#import "PWNotificationExtensionManager.h"
@interface NotificationService ()
@property (nonatomic, strong) void (^contentHandler)(UNNotificationContent *contentToDeliver);
@property (nonatomic, strong) UNMutableNotificationContent *bestAttemptContent;
@end
@implementation NotificationService
- (void)didReceiveNotificationRequest:(UNNotificationRequest *)request withContentHandler:(void (^)(UNNotificationContent * _Nonnull))contentHandler {
self.contentHandler = contentHandler;
self.bestAttemptContent = [request.content mutableCopy];
[[PWNotificationExtensionManager sharedManager] handleNotificationRequest:request contentHandler:contentHandler];
}
- (void)serviceExtensionTimeWillExpire {
// Called just before the extension will be terminated by the system.
// Use this as an opportunity to deliver your "best attempt" at modified content, otherwise the original push payload will be used.
self.contentHandler(self.bestAttemptContent);
}
@end
```
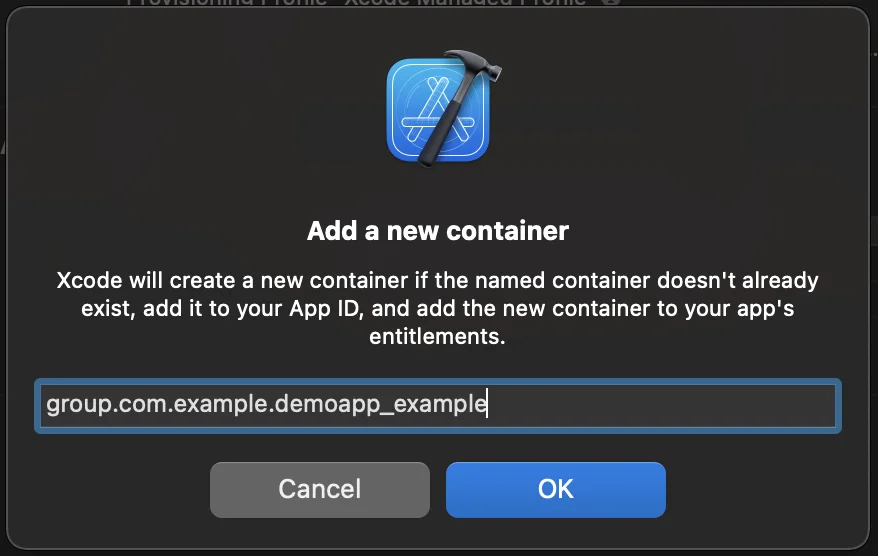
### 5. Добавьте "App Groups Capability" для каждого таргета вашего приложения
### 6. Добавьте App Groups ID в ваш info.plist для каждого таргета вашего приложения
```
PW_APP_GROUPS_NAMEgroup.com.example.demoapp_example
```
## Поделитесь с нами своим мнением
Ваши отзывы помогают нам улучшать продукт, поэтому мы будем рады, если вы поделитесь с нами любыми проблемами, возникшими в процессе интеграции SDK. Если вы столкнетесь с какими-либо трудностями, пожалуйста, не стесняйтесь поделиться своими мыслями с нами [через эту форму](https://docs.google.com/forms/d/e/1FAIpQLSd\_0b8jwn-V\_JmoPLIxIFYbHACCQhrzidOZV3ELywoQPXRSxw/viewform).
 ### 2. Выберите "Notification Service Extension"
 ### 3. Добавьте Pushwoosh.xcframework в таргет расширения NotificationService следующим образом:
1. Выберите таргет расширения **NotificationService**.
2. Перейдите на вкладку "**General**".
3. Найдите раздел '**Framework and Libraries**' и нажмите кнопку '**+**'.
4. Выберите **Pushwoosh.xcframework.**
### 3. Добавьте Pushwoosh.xcframework в таргет расширения NotificationService следующим образом:
1. Выберите таргет расширения **NotificationService**.
2. Перейдите на вкладку "**General**".
3. Найдите раздел '**Framework and Libraries**' и нажмите кнопку '**+**'.
4. Выберите **Pushwoosh.xcframework.**
 ### 4. Обновите код Notification Service Extension следующим образом:
```
#import "NotificationService.h"
#import "PWNotificationExtensionManager.h"
@interface NotificationService ()
@property (nonatomic, strong) void (^contentHandler)(UNNotificationContent *contentToDeliver);
@property (nonatomic, strong) UNMutableNotificationContent *bestAttemptContent;
@end
@implementation NotificationService
- (void)didReceiveNotificationRequest:(UNNotificationRequest *)request withContentHandler:(void (^)(UNNotificationContent * _Nonnull))contentHandler {
self.contentHandler = contentHandler;
self.bestAttemptContent = [request.content mutableCopy];
[[PWNotificationExtensionManager sharedManager] handleNotificationRequest:request contentHandler:contentHandler];
}
- (void)serviceExtensionTimeWillExpire {
// Called just before the extension will be terminated by the system.
// Use this as an opportunity to deliver your "best attempt" at modified content, otherwise the original push payload will be used.
self.contentHandler(self.bestAttemptContent);
}
@end
```
### 5. Добавьте "App Groups Capability" для каждого таргета вашего приложения
### 4. Обновите код Notification Service Extension следующим образом:
```
#import "NotificationService.h"
#import "PWNotificationExtensionManager.h"
@interface NotificationService ()
@property (nonatomic, strong) void (^contentHandler)(UNNotificationContent *contentToDeliver);
@property (nonatomic, strong) UNMutableNotificationContent *bestAttemptContent;
@end
@implementation NotificationService
- (void)didReceiveNotificationRequest:(UNNotificationRequest *)request withContentHandler:(void (^)(UNNotificationContent * _Nonnull))contentHandler {
self.contentHandler = contentHandler;
self.bestAttemptContent = [request.content mutableCopy];
[[PWNotificationExtensionManager sharedManager] handleNotificationRequest:request contentHandler:contentHandler];
}
- (void)serviceExtensionTimeWillExpire {
// Called just before the extension will be terminated by the system.
// Use this as an opportunity to deliver your "best attempt" at modified content, otherwise the original push payload will be used.
self.contentHandler(self.bestAttemptContent);
}
@end
```
### 5. Добавьте "App Groups Capability" для каждого таргета вашего приложения

 ### 6. Добавьте App Groups ID в ваш info.plist для каждого таргета вашего приложения
```
### 6. Добавьте App Groups ID в ваш info.plist для каждого таргета вашего приложения
```