# Guia de integração básica do SDK para iOS 7.0+
Esta seção contém informações sobre como integrar o SDK da Pushwoosh em seu aplicativo iOS.
## Pré-requisitos
Para integrar o SDK da Pushwoosh para iOS em seu aplicativo, você precisará do seguinte:
## Etapas de integração
### 1. Instalação
Você pode integrar o SDK da Pushwoosh em seu aplicativo usando o **Swift Package Manager** ou o **CocoaPods**.
#### Swift Package Manager
Na seção **Package Dependencies**, adicione o seguinte pacote:
```
https://github.com/Pushwoosh/Pushwoosh-XCFramework
```
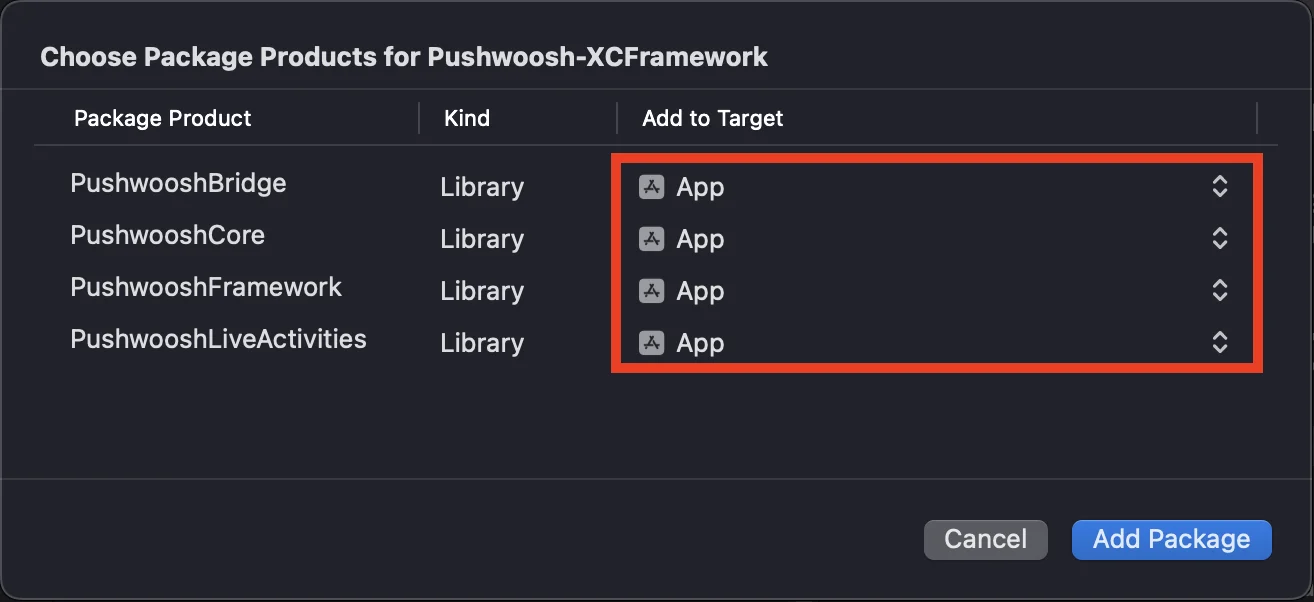
Para usar o SDK da Pushwoosh para iOS, certifique-se de adicionar os três frameworks a seguir ao seu alvo de aplicativo ao integrar via Swift Package Manager:
* ```PushwooshFramework```
* ```PushwooshCore```
* ```PushwooshBridge```
 #### CocoaPods
Abra seu `Podfile` e adicione a dependência:
```bash
# Uncomment the next line to define a global platform for your project
# platform :ios, '9.0'
target 'MyApp' do
# Comment the next line if you don't want to use dynamic frameworks
use_frameworks!
pod 'PushwooshXCFramework'
end
```
Em seguida, no terminal, execute o seguinte comando para instalar as dependências:
```bash
pod install
```
### 2. Capabilities
Para habilitar as Notificações Push em seu projeto, você precisa adicionar certos recursos (capabilities).
Na seção Signing & Capabilities, adicione os seguintes recursos:
- `Push Notifications`
- `Background Modes`. Após adicionar este recurso, marque a caixa para `Remote notifications`.
Se você pretende usar Notificações Sensíveis ao Tempo (iOS 15+), adicione também o recurso `Time Sensitive Notifications`.
### 3. Código de inicialização
#### AppDelegate
Adicione o seguinte código à sua classe AppDelegate:
```swift
import SwiftUI
import PushwooshFramework
@main
struct MyApp: App {
// Registra o AppDelegate como UIApplicationDelegate
@UIApplicationDelegateAdaptor(AppDelegate.self) var appDelegate
var body: some Scene {
WindowGroup {
ContentView()
}
}
}
class AppDelegate: NSObject, UIApplicationDelegate, PWMessagingDelegate {
func application(_ application: UIApplication, didFinishLaunchingWithOptions launchOptions: [UIApplication.LaunchOptionsKey: Any]?) -> Bool {
// Código de inicialização
// Define um delegate personalizado para o tratamento de pushes
Pushwoosh.configure.delegate = self
// Registra para notificações push
Pushwoosh.configure.registerForPushNotifications()
return true
}
// Lida com o token recebido do APNS
func application(_ application: UIApplication, didRegisterForRemoteNotificationsWithDeviceToken deviceToken: Data) {
Pushwoosh.configure.handlePushRegistration(deviceToken)
}
// Lida com o erro ao receber o token
func application(_ application: UIApplication, didFailToRegisterForRemoteNotificationsWithError error: Error) {
Pushwoosh.configure.handlePushRegistrationFailure(error)
}
//para notificações push silenciosas
func application(_ application: UIApplication, didReceiveRemoteNotification userInfo: [AnyHashable: Any], fetchCompletionHandler completionHandler: @escaping (UIBackgroundFetchResult) -> Void) {
Pushwoosh.configure.handlePushReceived(userInfo)
completionHandler(.noData)
}
// Disparado quando um push é recebido
func pushwoosh(_ pushwoosh: Pushwoosh, onMessageReceived message: PWMessage) {
print("onMessageReceived: ", message.payload!.description)
}
// Disparado quando um usuário toca na notificação
func pushwoosh(_ pushwoosh: Pushwoosh, onMessageOpened message: PWMessage) {
print("onMessageOpened: ", message.payload!.description)
}
}
struct ContentView: View {
var body: some View {
Text("Pushwoosh with SwiftUI")
.padding()
}
}
```
```swift
import PushwooshFramework
@UIApplicationMain
class AppDelegate: UIResponder, UIApplicationDelegate, PWMessagingDelegate {
var window: UIWindow?
func application(_ application: UIApplication, didFinishLaunchingWithOptions launchOptions: [UIApplication.LaunchOptionsKey: Any]?) -> Bool {
//código de inicialização
//define um delegate personalizado para o tratamento de pushes, no nosso caso o AppDelegate
Pushwoosh.configure.delegate = self;
//registra para notificações push
Pushwoosh.configure.registerForPushNotifications()
return true
}
//lida com o token recebido do APNS
func application(_ application: UIApplication, didRegisterForRemoteNotificationsWithDeviceToken deviceToken: Data) {
Pushwoosh.configure.handlePushRegistration(deviceToken)
}
//lida com o erro ao receber o token
func application(_ application: UIApplication, didFailToRegisterForRemoteNotificationsWithError error: Error) {
Pushwoosh.configure.handlePushRegistrationFailure(error);
}
//para notificações push silenciosas
func application(_ application: UIApplication, didReceiveRemoteNotification userInfo: [AnyHashable : Any], fetchCompletionHandler completionHandler: @escaping (UIBackgroundFetchResult) -> Void) {
Pushwoosh.configure.handlePushReceived(userInfo)
completionHandler(.noData)
}
//este evento é disparado quando o push é recebido
func pushwoosh(_ pushwoosh: Pushwoosh, onMessageReceived message: PWMessage) {
print("onMessageReceived: ", message.payload!.description)
}
// Disparado quando um usuário toca na notificação
func pushwoosh(_ pushwoosh: Pushwoosh, onMessageOpened message: PWMessage) {
print("onMessageOpened: ", message.payload!.description)
}
}
```
```objective-c
#import
@implementation AppDelegate
- (BOOL)application:(UIApplication *)application didFinishLaunchingWithOptions:(NSDictionary *)launchOptions {
//-----------PARTE DO PUSHWOOSH-----------
// define um delegate personalizado para o tratamento de pushes, no nosso caso o AppDelegate
[Pushwoosh configure].delegate = self;
//registra para notificações push!
[[Pushwoosh configure] registerForPushNotifications];
return YES;
}
//lida com o token recebido do APNS
- (void)application:(UIApplication *)application
didRegisterForRemoteNotificationsWithDeviceToken:(NSData *)deviceToken {
[[Pushwoosh configure] handlePushRegistration:deviceToken];
}
//lida com o erro ao receber o token
- (void)application:(UIApplication *)application didFailToRegisterForRemoteNotificationsWithError:(NSError *)error {
[[Pushwoosh configure] handlePushRegistrationFailure:error];
}
//para notificações push silenciosas
- (void)application:(UIApplication *)application
didReceiveRemoteNotification:(NSDictionary *)userInfo
fetchCompletionHandler:(void (^)(UIBackgroundFetchResult))completionHandler {
[[Pushwoosh configure] handlePushReceived:userInfo];
completionHandler(UIBackgroundFetchResultNoData);
}
//este evento é disparado quando o push é recebido
- (void)pushwoosh:(Pushwoosh *)pushwoosh onMessageReceived:(PWMessage *)message {
NSLog(@"onMessageReceived: %@", message.payload);
}
//este evento é disparado quando o usuário toca na notificação
- (void)pushwoosh:(Pushwoosh *)pushwoosh onMessageOpened:(PWMessage *)message {
NSLog(@"onMessageOpened: %@", message.payload);
}
@end
```
#### Info.plist
No seu `Info.plist`:
- defina a chave `Pushwoosh_APPID` para o Código de Aplicação Pushwoosh.
- defina a chave `Pushwoosh_API_TOKEN` para o [Token de API de Dispositivo Pushwoosh](/pt/developer/api-reference/api-access-token/#device-api-token)
### 4. Rastreamento de entrega de mensagens
O Pushwoosh suporta o rastreamento de eventos de entrega para notificações push através da Notification Service Extension
#### Adicionar Notification Service Extension
1. No Xcode, selecione **File** > **New** > **Target...**
2. Escolha **Notification Service Extension** e pressione **Next.**
3. Insira o nome do alvo e pressione **Finish.**
4. Quando solicitado para ativação, pressione **Cancel.**
#### Dependências para a Notification Service Extension (somente CocoaPods)
Nota: Se você estiver usando o Swift Package Manager para gerenciar dependências, pode pular esta etapa, pois as dependências são adicionadas automaticamente.
Abra seu `Podfile` e adicione a dependência para o alvo:
```ruby title="Podfile"
# Uncomment the next line to define a global platform for your project
# platform :ios, '9.0'
target 'MyApp' do
# Comment the next line if you don't want to use dynamic frameworks
use_frameworks!
pod 'PushwooshXCFramework'
end
target 'MyAppNotificationExtension' do
use_frameworks!
pod 'PushwooshXCFramework'
end
```
Execute o seguinte comando no terminal para atualizar as dependências:
```shell
pod update
```
#### Adicionar o SDK da Pushwoosh à Notification Service Extension
Substitua a classe `NotificationService` gerada por uma subclasse de `PushwooshNotificationServiceExtension`. O Pushwoosh então lida com tudo que um push precisa — envio do evento de entrega, contagem de badges, download do anexo de mídia e o fallback obrigatório de timeout `serviceExtensionTimeWillExpire`. Nenhum outro código é necessário.
```swift
import PushwooshFramework
class NotificationService: PushwooshNotificationServiceExtension {}
```
```objective-c
#import
@interface NotificationService : PushwooshNotificationServiceExtension
@end
@implementation NotificationService
@end
```
Nota: você pode pular o arquivo de origem completamente — defina o `NSExtensionPrincipalClass` da extensão para `PushwooshNotificationServiceExtension` em seu Info.plist e não escreva nenhum código.
Para modificar a notificação antes de ser exibida, sobrescreva `didReceive(_:withContentHandler:)`, chame `super` com seu próprio content handler, modifique o conteúdo dentro dele e, em seguida, encaminhe-o para o handler original. O Pushwoosh ainda executa o evento de entrega, badge, anexo e o fallback de timeout.
```swift
import UserNotifications
import PushwooshFramework
class NotificationService: PushwooshNotificationServiceExtension {
override func didReceive(_ request: UNNotificationRequest,
withContentHandler contentHandler: @escaping (UNNotificationContent) -> Void) {
super.didReceive(request) { content in
let mutable = (content.mutableCopy() as? UNMutableNotificationContent) ?? content
// Modifique o conteúdo da notificação aqui...
contentHandler(mutable)
}
}
}
```
```objective-c
#import
@interface NotificationService : PushwooshNotificationServiceExtension
@end
@implementation NotificationService
- (void)didReceiveNotificationRequest:(UNNotificationRequest *)request
withContentHandler:(void (^)(UNNotificationContent * _Nonnull))contentHandler {
[super didReceiveNotificationRequest:request withContentHandler:^(UNNotificationContent *content) {
UNMutableNotificationContent *mutable = [content mutableCopy];
// Modifique o conteúdo da notificação aqui...
contentHandler(mutable);
}];
}
@end
```
#### Info.plist
A extensão herda `Pushwoosh_APPID` (e outras chaves `Pushwoosh_*`) do aplicativo hospedeiro, então você não precisa duplicá-las no Info.plist da extensão. Adicione uma chave lá apenas quando quiser sobrescrever o valor do hospedeiro.
Para sincronizar a contagem de badges e as configurações de proxy reverso com o aplicativo, compartilhe um [App Group](/pt/developer/pushwoosh-sdk/ios-sdk/setting-up-badges) entre o aplicativo e a extensão. Adicione o recurso App Groups a ambos os alvos e, em seguida, defina o ID do App Group no Info.plist do **aplicativo principal**:
- `PW_APP_GROUPS_NAME` - o identificador do seu App Group (por exemplo, `group.com.example.app`).
A extensão herda este valor do aplicativo hospedeiro, então você não precisa repeti-lo no Info.plist da extensão — adicione-o lá apenas para sobrescrever o do hospedeiro. Alternativamente, forneça-o no código sobrescrevendo `pushwooshAppGroupsName`.
### 5. Execute o projeto
1. Compile e execute o projeto.
2. Vá para o Painel de Controle da Pushwoosh e [envie uma notificação push](/pt/product/messaging-channels/push-notifications/send-push-notifications/one-time-push).
3. Você deve ver a notificação no aplicativo.
## Integração estendida do Pushwoosh para iOS
Neste ponto, você já integrou o SDK e pode enviar e receber notificações push. Agora, vamos explorar a funcionalidade principal
### Notificações push
No SDK da Pushwoosh, existem dois callbacks projetados para lidar com notificações push:
- `onMessageReceived`: Este método é invocado quando uma notificação push é recebida.
- `onMessageOpened`: Este método é chamado quando o usuário interage com (abre) a notificação
Esses callbacks permitem que os desenvolvedores gerenciem o recebimento e a interação do usuário com as notificações push em seus aplicativos
```swift
import PushwooshFramework
class AppDelegate: NSObject, UIApplicationDelegate, PWMessagingDelegate {
func application(_ application: UIApplication, didFinishLaunchingWithOptions launchOptions: [UIApplication.LaunchOptionsKey : Any]? = nil) -> Bool {
Pushwoosh.configure.delegate = self;
}
func pushwoosh(_ pushwoosh: Pushwoosh, onMessageOpened message: PWMessage) {
if let payload = message.payload {
print("onMessageOpened: \(payload)")
}
}
func pushwoosh(_ pushwoosh: Pushwoosh, onMessageReceived message: PWMessage) {
if let payload = message.payload {
print("onMessageReceived: \(payload)")
}
}
}
```
```objective-c
#import
@interface AppDelegate ()
@end
@implementation AppDelegate
- (BOOL)application:(UIApplication *)application didFinishLaunchingWithOptions:(NSDictionary *)launchOptions {
[[Pushwoosh configure] setDelegate:self];
return YES;
}
- (void)pushwoosh:(Pushwoosh *)pushwoosh onMessageOpened:(PWMessage *)message {
if (message.payload) {
NSLog(@"onMessageOpened: %@", message.payload);
}
}
- (void)pushwoosh:(Pushwoosh *)pushwoosh onMessageReceived:(PWMessage *)message {
if (message.payload) {
NSLog(@"onMessageReceived: %@", message.payload);
}
}
@end
```
### Configuração do usuário
Ao focar no comportamento e nas preferências individuais do usuário, você pode entregar conteúdo personalizado, levando a um aumento da satisfação e lealdade do usuário
```swift
import PushwooshFramework
class Registration {
func afterUserLogin(user: User) {
let pushwoosh = Pushwoosh.configure
// define o ID do usuário
if let userId = user.userId {
pushwoosh.setUserId(userId)
}
// define o e-mail do usuário
if let userEmail = user.email {
pushwoosh.setEmail(userEmail)
}
// define o número de SMS do usuário
if let userSmsNumber = user.SmsNumber {
pushwoosh.registerSmsNumber(userSmsNumber)
}
// define o número de WhatsApp do usuário
if let userWhatsAppNumber = user.WhatsAppNumber {
pushwoosh.registerSmsNumber(userWhatsAppNumber)
}
// definindo informações adicionais do usuário como tags para o Pushwoosh
if let age = user.userDetails.age,
let name = user.userDetails.userName,
let lastLogin = user.userDetails.lastLoginDate {
pushwoosh.setTags([
"age": age,
"name": name,
"last_login": lastLogin
])
}
}
}
```
```objective-c
#import
@implementation Registration
- (void)afterUserLogin:(User *)user {
Pushwoosh *pushwoosh = [Pushwoosh configure];
// define o ID do usuário
if (user.userId) {
[pushwoosh setUserId:user.userId];
}
// define o e-mail do usuário
if (user.email) {
[pushwoosh setEmail:user.email];
}
// definindo informações adicionais do usuário como tags para o Pushwoosh
if (user.userDetails.age && user.userDetails.userName && user.userDetails.lastLoginDate) {
NSDictionary *tags = @{
@"age": user.userDetails.age,
@"name": user.userDetails.userName,
@"last_login": user.userDetails.lastLoginDate
};
[pushwoosh setTags:tags];
}
}
@end
```
### Tags
Tags são pares de chave-valor atribuídos a usuários ou dispositivos, permitindo a segmentação com base em atributos como preferências ou comportamento, o que possibilita o envio de mensagens direcionadas.
```swift
import PushwooshFramework
class UpdateUser {
func afterUserUpdateProfile(user: User) {
let pushwoosh = Pushwoosh.configure
// define a lista de categorias favoritas
pushwoosh.setTags(["favorite_categories" : user.getFavoriteCategories()])
// define as informações de pagamento
pushwoosh.setTags([
"is_subscribed": user.isSubscribed(),
"payment_status": user.getPaymentStatus(),
"billing_address": user.getBillingAddress()
])
}
}
```
```objective-c
#import
@implementation UpdateUser
- (void)afterUserUpdateProfile:(User *)user {
Pushwoosh *pushwoosh = [Pushwoosh configure];
// define a lista de categorias favoritas
[pushwoosh setTags:@{@"favorite_categories" : user.getFavoriteCategories}];
// define as informações de pagamento
NSDictionary *tags = @{
@"is_subscribed": @(user.isSubscribed),
@"payment_status": user.getPaymentStatus,
@"billing_address": user.getBillingAddress
};
[pushwoosh setTags:tags];
}
@end
```
### Eventos
Eventos são ações ou ocorrências específicas do usuário dentro do aplicativo que podem ser rastreadas para analisar o comportamento e acionar mensagens ou ações correspondentes
```swift
import PushwooshFramework
class Registration {
func afterUserLogin(user: User) {
if let userName = user.getUserName(), let lastLogin = user.getLastLoginDate() {
PWInAppManager.shared().postEvent("login", withAttributes: [
"name": userName,
"last_login": lastLogin
])
}
}
func afterUserPurchase(user: User, product: Product) {
let pushwoosh = Pushwoosh.configure
// Rastreia o evento de compra
PWInAppManager.shared().postEvent("purchase", withAttributes: [
"product_id": product.getId(),
"product_name": product.getName(),
"price": product.getPrice(),
"quantity": product.getQuantity()
])
// Define as tags do usuário
let lastPurchaseDate = Date().timeIntervalSince1970
let lifetimeSpend = getCurrentLifetimeSpend() + product.getPrice()
pushwoosh.setTags([
"last_purchase_date": lastPurchaseDate,
"lifetime_spend": lifetimeSpend
])
}
}
```
```objective-c
#import
#import
@implementation Registration
- (void)afterUserLogin:(User *)user {
NSString *userName = [user getUserName];
NSDate *lastLogin = [user getLastLoginDate];
if (userName && lastLogin) {
[[PWInAppManager sharedManager] postEvent:@"login" withAttributes:@{
@"name": userName,
@"last_login": lastLogin
}];
}
}
- (void)afterUserPurchase:(User *)user product:(Product *)product {
Pushwoosh *pushwoosh = [Pushwoosh configure];
// Rastreia o evento de compra
[[PWInAppManager sharedManager] postEvent:@"purchase" withAttributes:@{
@"product_id": [product getId],
@"product_name": [product getName],
@"price": @([product getPrice]),
@"quantity": @([product getQuantity])
}];
// Define as tags do usuário
NSTimeInterval lastPurchaseDate = [[NSDate date] timeIntervalSince1970];
double lifetimeSpend = /* busca o gasto total atual */ + [product getPrice];
NSDictionary *tags = @{
@"last_purchase_date": @(lastPurchaseDate),
@"lifetime_spend": @(lifetimeSpend)
};
[pushwoosh setTags:tags];
}
@end
```
### Rich Media
Rich media refere-se a conteúdo interativo e multimídia, como imagens, vídeos ou HTML, usado em notificações e mensagens in-app para aumentar o engajamento do usuário
```swift
import PushwooshFramework
class ViewController: UIViewController, PWRichMediaPresentingDelegate {
override func viewDidLoad() {
super.viewDidLoad()
let richMediaConfiguration = PWModalWindowConfiguration.shared()
PWRichMediaManager.shared().delegate = self
richMediaConfiguration.configureModalWindow(with: .PWModalWindowPositionBottom,
present: .PWAnimationPresentFromBottom,
dismiss: .PWAnimationDismissDown)
}
func richMediaManager(_ richMediaManager: PWRichMediaManager!, shouldPresent richMedia: PWRichMedia!) -> Bool {
print("Rich media will be presented with: \(richMedia.pushPayload!)")
return true
}
func richMediaManager(_ richMediaManager: PWRichMediaManager!, didPresent richMedia: PWRichMedia!) {
print("Rich media has been presented with: \(richMedia.pushPayload!)")
}
func richMediaManager(_ richMediaManager: PWRichMediaManager!, didClose richMedia: PWRichMedia!) {
print("Rich media has been closed with: \(richMedia.pushPayload!)")
}
func richMediaManager(_ richMediaManager: PWRichMediaManager!, presentingDidFailFor richMedia: PWRichMedia!, withError error: (any Error)!) {
print("Failed to present rich media with: \(richMedia.pushPayload!). Error: \(error.localizedDescription)")
}
}
```
```objective-c
#import "ViewController.h"
#import
#import
#import
@interface ViewController ()
@end
@implementation ViewController
- (void)viewDidLoad {
[super viewDidLoad];
[[PWRichMediaManager sharedManager] setDelegate:self];
[[PWModalWindowConfiguration shared] configureModalWindowWith:PWModalWindowPositionBottom
presentAnimation:PWAnimationPresentFromBottom
dismissAnimation:PWAnimationDismissDown];
}
- (BOOL)richMediaManager:(PWRichMediaManager *)richMediaManager shouldPresentRichMedia:(PWRichMedia *)richMedia {
NSLog(@"Rich media will be presented with: %@", richMedia.pushPayload);
return YES;
}
- (void)richMediaManager:(PWRichMediaManager *)richMediaManager didPresentRichMedia:(PWRichMedia *)richMedia {
NSLog(@"Rich media has been presented with: %@", richMedia.pushPayload);
}
- (void)richMediaManager:(PWRichMediaManager *)richMediaManager didCloseRichMedia:(PWRichMedia *)richMedia {
NSLog(@"Rich media has been closed with:: %@", richMedia.pushPayload);
}
- (void)richMediaManager:(PWRichMediaManager *)richMediaManager presentingDidFailForRichMedia:(PWRichMedia *)richMedia withError:(NSError *)error {
NSLog(@"Failed to present rich media with: %@. Error: %@", richMedia.pushPayload, error.localizedDescription);
}
@end
```
## Solução de problemas
### Falha ao compilar o módulo 'PushwooshFramework'
Ao compilar seu projeto, você pode encontrar um erro semelhante a:
```
Failed to build module 'PushwooshFramework'; this SDK is not supported by the compiler
(the SDK is built with 'Apple Swift version 5.10 (swiftlang-5.10.0.13 clang-1500.3.9.4)',
while this compiler is 'Apple Swift version 6.1.2 effective-5.10 (swiftlang-6.1.2.1.2 clang-1700.0.13.5)')
```
**Causa:** Este erro não está relacionado à incompatibilidade da versão do compilador Swift. A partir da versão 6.8.0 do SDK Pushwoosh para iOS, o SDK é modularizado em vários componentes que interagem entre si. O erro ocorre quando nem todos os frameworks necessários são adicionados ao seu projeto.
**Solução:** Certifique-se de que todos os quatro frameworks necessários sejam adicionados ao seu alvo de aplicativo ao integrar via Swift Package Manager:
* ```PushwooshFramework```
* ```PushwooshCore```
* ```PushwooshBridge```
* ```PushwooshLiveActivities```
Para verificar isso no Xcode:
1. Selecione seu projeto no Project Navigator
2. Selecione o alvo do seu aplicativo
3. Vá para **General** > **Frameworks, Libraries, and Embedded Content**
4. Confirme que todos os quatro frameworks estão listados
---
Se você encontrar algum problema durante o processo de integração, consulte a seção de [suporte e comunidade](/pt/developer/pushwoosh-sdk/support-and-community).
#### CocoaPods
Abra seu `Podfile` e adicione a dependência:
```bash
# Uncomment the next line to define a global platform for your project
# platform :ios, '9.0'
target 'MyApp' do
# Comment the next line if you don't want to use dynamic frameworks
use_frameworks!
pod 'PushwooshXCFramework'
end
```
Em seguida, no terminal, execute o seguinte comando para instalar as dependências:
```bash
pod install
```
### 2. Capabilities
Para habilitar as Notificações Push em seu projeto, você precisa adicionar certos recursos (capabilities).
Na seção Signing & Capabilities, adicione os seguintes recursos:
- `Push Notifications`
- `Background Modes`. Após adicionar este recurso, marque a caixa para `Remote notifications`.
Se você pretende usar Notificações Sensíveis ao Tempo (iOS 15+), adicione também o recurso `Time Sensitive Notifications`.
### 3. Código de inicialização
#### AppDelegate
Adicione o seguinte código à sua classe AppDelegate:
```swift
import SwiftUI
import PushwooshFramework
@main
struct MyApp: App {
// Registra o AppDelegate como UIApplicationDelegate
@UIApplicationDelegateAdaptor(AppDelegate.self) var appDelegate
var body: some Scene {
WindowGroup {
ContentView()
}
}
}
class AppDelegate: NSObject, UIApplicationDelegate, PWMessagingDelegate {
func application(_ application: UIApplication, didFinishLaunchingWithOptions launchOptions: [UIApplication.LaunchOptionsKey: Any]?) -> Bool {
// Código de inicialização
// Define um delegate personalizado para o tratamento de pushes
Pushwoosh.configure.delegate = self
// Registra para notificações push
Pushwoosh.configure.registerForPushNotifications()
return true
}
// Lida com o token recebido do APNS
func application(_ application: UIApplication, didRegisterForRemoteNotificationsWithDeviceToken deviceToken: Data) {
Pushwoosh.configure.handlePushRegistration(deviceToken)
}
// Lida com o erro ao receber o token
func application(_ application: UIApplication, didFailToRegisterForRemoteNotificationsWithError error: Error) {
Pushwoosh.configure.handlePushRegistrationFailure(error)
}
//para notificações push silenciosas
func application(_ application: UIApplication, didReceiveRemoteNotification userInfo: [AnyHashable: Any], fetchCompletionHandler completionHandler: @escaping (UIBackgroundFetchResult) -> Void) {
Pushwoosh.configure.handlePushReceived(userInfo)
completionHandler(.noData)
}
// Disparado quando um push é recebido
func pushwoosh(_ pushwoosh: Pushwoosh, onMessageReceived message: PWMessage) {
print("onMessageReceived: ", message.payload!.description)
}
// Disparado quando um usuário toca na notificação
func pushwoosh(_ pushwoosh: Pushwoosh, onMessageOpened message: PWMessage) {
print("onMessageOpened: ", message.payload!.description)
}
}
struct ContentView: View {
var body: some View {
Text("Pushwoosh with SwiftUI")
.padding()
}
}
```
```swift
import PushwooshFramework
@UIApplicationMain
class AppDelegate: UIResponder, UIApplicationDelegate, PWMessagingDelegate {
var window: UIWindow?
func application(_ application: UIApplication, didFinishLaunchingWithOptions launchOptions: [UIApplication.LaunchOptionsKey: Any]?) -> Bool {
//código de inicialização
//define um delegate personalizado para o tratamento de pushes, no nosso caso o AppDelegate
Pushwoosh.configure.delegate = self;
//registra para notificações push
Pushwoosh.configure.registerForPushNotifications()
return true
}
//lida com o token recebido do APNS
func application(_ application: UIApplication, didRegisterForRemoteNotificationsWithDeviceToken deviceToken: Data) {
Pushwoosh.configure.handlePushRegistration(deviceToken)
}
//lida com o erro ao receber o token
func application(_ application: UIApplication, didFailToRegisterForRemoteNotificationsWithError error: Error) {
Pushwoosh.configure.handlePushRegistrationFailure(error);
}
//para notificações push silenciosas
func application(_ application: UIApplication, didReceiveRemoteNotification userInfo: [AnyHashable : Any], fetchCompletionHandler completionHandler: @escaping (UIBackgroundFetchResult) -> Void) {
Pushwoosh.configure.handlePushReceived(userInfo)
completionHandler(.noData)
}
//este evento é disparado quando o push é recebido
func pushwoosh(_ pushwoosh: Pushwoosh, onMessageReceived message: PWMessage) {
print("onMessageReceived: ", message.payload!.description)
}
// Disparado quando um usuário toca na notificação
func pushwoosh(_ pushwoosh: Pushwoosh, onMessageOpened message: PWMessage) {
print("onMessageOpened: ", message.payload!.description)
}
}
```
```objective-c
#import
@implementation AppDelegate
- (BOOL)application:(UIApplication *)application didFinishLaunchingWithOptions:(NSDictionary *)launchOptions {
//-----------PARTE DO PUSHWOOSH-----------
// define um delegate personalizado para o tratamento de pushes, no nosso caso o AppDelegate
[Pushwoosh configure].delegate = self;
//registra para notificações push!
[[Pushwoosh configure] registerForPushNotifications];
return YES;
}
//lida com o token recebido do APNS
- (void)application:(UIApplication *)application
didRegisterForRemoteNotificationsWithDeviceToken:(NSData *)deviceToken {
[[Pushwoosh configure] handlePushRegistration:deviceToken];
}
//lida com o erro ao receber o token
- (void)application:(UIApplication *)application didFailToRegisterForRemoteNotificationsWithError:(NSError *)error {
[[Pushwoosh configure] handlePushRegistrationFailure:error];
}
//para notificações push silenciosas
- (void)application:(UIApplication *)application
didReceiveRemoteNotification:(NSDictionary *)userInfo
fetchCompletionHandler:(void (^)(UIBackgroundFetchResult))completionHandler {
[[Pushwoosh configure] handlePushReceived:userInfo];
completionHandler(UIBackgroundFetchResultNoData);
}
//este evento é disparado quando o push é recebido
- (void)pushwoosh:(Pushwoosh *)pushwoosh onMessageReceived:(PWMessage *)message {
NSLog(@"onMessageReceived: %@", message.payload);
}
//este evento é disparado quando o usuário toca na notificação
- (void)pushwoosh:(Pushwoosh *)pushwoosh onMessageOpened:(PWMessage *)message {
NSLog(@"onMessageOpened: %@", message.payload);
}
@end
```
#### Info.plist
No seu `Info.plist`:
- defina a chave `Pushwoosh_APPID` para o Código de Aplicação Pushwoosh.
- defina a chave `Pushwoosh_API_TOKEN` para o [Token de API de Dispositivo Pushwoosh](/pt/developer/api-reference/api-access-token/#device-api-token)
### 4. Rastreamento de entrega de mensagens
O Pushwoosh suporta o rastreamento de eventos de entrega para notificações push através da Notification Service Extension
#### Adicionar Notification Service Extension
1. No Xcode, selecione **File** > **New** > **Target...**
2. Escolha **Notification Service Extension** e pressione **Next.**
3. Insira o nome do alvo e pressione **Finish.**
4. Quando solicitado para ativação, pressione **Cancel.**
#### Dependências para a Notification Service Extension (somente CocoaPods)
Nota: Se você estiver usando o Swift Package Manager para gerenciar dependências, pode pular esta etapa, pois as dependências são adicionadas automaticamente.
Abra seu `Podfile` e adicione a dependência para o alvo:
```ruby title="Podfile"
# Uncomment the next line to define a global platform for your project
# platform :ios, '9.0'
target 'MyApp' do
# Comment the next line if you don't want to use dynamic frameworks
use_frameworks!
pod 'PushwooshXCFramework'
end
target 'MyAppNotificationExtension' do
use_frameworks!
pod 'PushwooshXCFramework'
end
```
Execute o seguinte comando no terminal para atualizar as dependências:
```shell
pod update
```
#### Adicionar o SDK da Pushwoosh à Notification Service Extension
Substitua a classe `NotificationService` gerada por uma subclasse de `PushwooshNotificationServiceExtension`. O Pushwoosh então lida com tudo que um push precisa — envio do evento de entrega, contagem de badges, download do anexo de mídia e o fallback obrigatório de timeout `serviceExtensionTimeWillExpire`. Nenhum outro código é necessário.
```swift
import PushwooshFramework
class NotificationService: PushwooshNotificationServiceExtension {}
```
```objective-c
#import
@interface NotificationService : PushwooshNotificationServiceExtension
@end
@implementation NotificationService
@end
```
Nota: você pode pular o arquivo de origem completamente — defina o `NSExtensionPrincipalClass` da extensão para `PushwooshNotificationServiceExtension` em seu Info.plist e não escreva nenhum código.
Para modificar a notificação antes de ser exibida, sobrescreva `didReceive(_:withContentHandler:)`, chame `super` com seu próprio content handler, modifique o conteúdo dentro dele e, em seguida, encaminhe-o para o handler original. O Pushwoosh ainda executa o evento de entrega, badge, anexo e o fallback de timeout.
```swift
import UserNotifications
import PushwooshFramework
class NotificationService: PushwooshNotificationServiceExtension {
override func didReceive(_ request: UNNotificationRequest,
withContentHandler contentHandler: @escaping (UNNotificationContent) -> Void) {
super.didReceive(request) { content in
let mutable = (content.mutableCopy() as? UNMutableNotificationContent) ?? content
// Modifique o conteúdo da notificação aqui...
contentHandler(mutable)
}
}
}
```
```objective-c
#import
@interface NotificationService : PushwooshNotificationServiceExtension
@end
@implementation NotificationService
- (void)didReceiveNotificationRequest:(UNNotificationRequest *)request
withContentHandler:(void (^)(UNNotificationContent * _Nonnull))contentHandler {
[super didReceiveNotificationRequest:request withContentHandler:^(UNNotificationContent *content) {
UNMutableNotificationContent *mutable = [content mutableCopy];
// Modifique o conteúdo da notificação aqui...
contentHandler(mutable);
}];
}
@end
```
#### Info.plist
A extensão herda `Pushwoosh_APPID` (e outras chaves `Pushwoosh_*`) do aplicativo hospedeiro, então você não precisa duplicá-las no Info.plist da extensão. Adicione uma chave lá apenas quando quiser sobrescrever o valor do hospedeiro.
Para sincronizar a contagem de badges e as configurações de proxy reverso com o aplicativo, compartilhe um [App Group](/pt/developer/pushwoosh-sdk/ios-sdk/setting-up-badges) entre o aplicativo e a extensão. Adicione o recurso App Groups a ambos os alvos e, em seguida, defina o ID do App Group no Info.plist do **aplicativo principal**:
- `PW_APP_GROUPS_NAME` - o identificador do seu App Group (por exemplo, `group.com.example.app`).
A extensão herda este valor do aplicativo hospedeiro, então você não precisa repeti-lo no Info.plist da extensão — adicione-o lá apenas para sobrescrever o do hospedeiro. Alternativamente, forneça-o no código sobrescrevendo `pushwooshAppGroupsName`.
### 5. Execute o projeto
1. Compile e execute o projeto.
2. Vá para o Painel de Controle da Pushwoosh e [envie uma notificação push](/pt/product/messaging-channels/push-notifications/send-push-notifications/one-time-push).
3. Você deve ver a notificação no aplicativo.
## Integração estendida do Pushwoosh para iOS
Neste ponto, você já integrou o SDK e pode enviar e receber notificações push. Agora, vamos explorar a funcionalidade principal
### Notificações push
No SDK da Pushwoosh, existem dois callbacks projetados para lidar com notificações push:
- `onMessageReceived`: Este método é invocado quando uma notificação push é recebida.
- `onMessageOpened`: Este método é chamado quando o usuário interage com (abre) a notificação
Esses callbacks permitem que os desenvolvedores gerenciem o recebimento e a interação do usuário com as notificações push em seus aplicativos
```swift
import PushwooshFramework
class AppDelegate: NSObject, UIApplicationDelegate, PWMessagingDelegate {
func application(_ application: UIApplication, didFinishLaunchingWithOptions launchOptions: [UIApplication.LaunchOptionsKey : Any]? = nil) -> Bool {
Pushwoosh.configure.delegate = self;
}
func pushwoosh(_ pushwoosh: Pushwoosh, onMessageOpened message: PWMessage) {
if let payload = message.payload {
print("onMessageOpened: \(payload)")
}
}
func pushwoosh(_ pushwoosh: Pushwoosh, onMessageReceived message: PWMessage) {
if let payload = message.payload {
print("onMessageReceived: \(payload)")
}
}
}
```
```objective-c
#import
@interface AppDelegate ()
@end
@implementation AppDelegate
- (BOOL)application:(UIApplication *)application didFinishLaunchingWithOptions:(NSDictionary *)launchOptions {
[[Pushwoosh configure] setDelegate:self];
return YES;
}
- (void)pushwoosh:(Pushwoosh *)pushwoosh onMessageOpened:(PWMessage *)message {
if (message.payload) {
NSLog(@"onMessageOpened: %@", message.payload);
}
}
- (void)pushwoosh:(Pushwoosh *)pushwoosh onMessageReceived:(PWMessage *)message {
if (message.payload) {
NSLog(@"onMessageReceived: %@", message.payload);
}
}
@end
```
### Configuração do usuário
Ao focar no comportamento e nas preferências individuais do usuário, você pode entregar conteúdo personalizado, levando a um aumento da satisfação e lealdade do usuário
```swift
import PushwooshFramework
class Registration {
func afterUserLogin(user: User) {
let pushwoosh = Pushwoosh.configure
// define o ID do usuário
if let userId = user.userId {
pushwoosh.setUserId(userId)
}
// define o e-mail do usuário
if let userEmail = user.email {
pushwoosh.setEmail(userEmail)
}
// define o número de SMS do usuário
if let userSmsNumber = user.SmsNumber {
pushwoosh.registerSmsNumber(userSmsNumber)
}
// define o número de WhatsApp do usuário
if let userWhatsAppNumber = user.WhatsAppNumber {
pushwoosh.registerSmsNumber(userWhatsAppNumber)
}
// definindo informações adicionais do usuário como tags para o Pushwoosh
if let age = user.userDetails.age,
let name = user.userDetails.userName,
let lastLogin = user.userDetails.lastLoginDate {
pushwoosh.setTags([
"age": age,
"name": name,
"last_login": lastLogin
])
}
}
}
```
```objective-c
#import
@implementation Registration
- (void)afterUserLogin:(User *)user {
Pushwoosh *pushwoosh = [Pushwoosh configure];
// define o ID do usuário
if (user.userId) {
[pushwoosh setUserId:user.userId];
}
// define o e-mail do usuário
if (user.email) {
[pushwoosh setEmail:user.email];
}
// definindo informações adicionais do usuário como tags para o Pushwoosh
if (user.userDetails.age && user.userDetails.userName && user.userDetails.lastLoginDate) {
NSDictionary *tags = @{
@"age": user.userDetails.age,
@"name": user.userDetails.userName,
@"last_login": user.userDetails.lastLoginDate
};
[pushwoosh setTags:tags];
}
}
@end
```
### Tags
Tags são pares de chave-valor atribuídos a usuários ou dispositivos, permitindo a segmentação com base em atributos como preferências ou comportamento, o que possibilita o envio de mensagens direcionadas.
```swift
import PushwooshFramework
class UpdateUser {
func afterUserUpdateProfile(user: User) {
let pushwoosh = Pushwoosh.configure
// define a lista de categorias favoritas
pushwoosh.setTags(["favorite_categories" : user.getFavoriteCategories()])
// define as informações de pagamento
pushwoosh.setTags([
"is_subscribed": user.isSubscribed(),
"payment_status": user.getPaymentStatus(),
"billing_address": user.getBillingAddress()
])
}
}
```
```objective-c
#import
@implementation UpdateUser
- (void)afterUserUpdateProfile:(User *)user {
Pushwoosh *pushwoosh = [Pushwoosh configure];
// define a lista de categorias favoritas
[pushwoosh setTags:@{@"favorite_categories" : user.getFavoriteCategories}];
// define as informações de pagamento
NSDictionary *tags = @{
@"is_subscribed": @(user.isSubscribed),
@"payment_status": user.getPaymentStatus,
@"billing_address": user.getBillingAddress
};
[pushwoosh setTags:tags];
}
@end
```
### Eventos
Eventos são ações ou ocorrências específicas do usuário dentro do aplicativo que podem ser rastreadas para analisar o comportamento e acionar mensagens ou ações correspondentes
```swift
import PushwooshFramework
class Registration {
func afterUserLogin(user: User) {
if let userName = user.getUserName(), let lastLogin = user.getLastLoginDate() {
PWInAppManager.shared().postEvent("login", withAttributes: [
"name": userName,
"last_login": lastLogin
])
}
}
func afterUserPurchase(user: User, product: Product) {
let pushwoosh = Pushwoosh.configure
// Rastreia o evento de compra
PWInAppManager.shared().postEvent("purchase", withAttributes: [
"product_id": product.getId(),
"product_name": product.getName(),
"price": product.getPrice(),
"quantity": product.getQuantity()
])
// Define as tags do usuário
let lastPurchaseDate = Date().timeIntervalSince1970
let lifetimeSpend = getCurrentLifetimeSpend() + product.getPrice()
pushwoosh.setTags([
"last_purchase_date": lastPurchaseDate,
"lifetime_spend": lifetimeSpend
])
}
}
```
```objective-c
#import
#import
@implementation Registration
- (void)afterUserLogin:(User *)user {
NSString *userName = [user getUserName];
NSDate *lastLogin = [user getLastLoginDate];
if (userName && lastLogin) {
[[PWInAppManager sharedManager] postEvent:@"login" withAttributes:@{
@"name": userName,
@"last_login": lastLogin
}];
}
}
- (void)afterUserPurchase:(User *)user product:(Product *)product {
Pushwoosh *pushwoosh = [Pushwoosh configure];
// Rastreia o evento de compra
[[PWInAppManager sharedManager] postEvent:@"purchase" withAttributes:@{
@"product_id": [product getId],
@"product_name": [product getName],
@"price": @([product getPrice]),
@"quantity": @([product getQuantity])
}];
// Define as tags do usuário
NSTimeInterval lastPurchaseDate = [[NSDate date] timeIntervalSince1970];
double lifetimeSpend = /* busca o gasto total atual */ + [product getPrice];
NSDictionary *tags = @{
@"last_purchase_date": @(lastPurchaseDate),
@"lifetime_spend": @(lifetimeSpend)
};
[pushwoosh setTags:tags];
}
@end
```
### Rich Media
Rich media refere-se a conteúdo interativo e multimídia, como imagens, vídeos ou HTML, usado em notificações e mensagens in-app para aumentar o engajamento do usuário
```swift
import PushwooshFramework
class ViewController: UIViewController, PWRichMediaPresentingDelegate {
override func viewDidLoad() {
super.viewDidLoad()
let richMediaConfiguration = PWModalWindowConfiguration.shared()
PWRichMediaManager.shared().delegate = self
richMediaConfiguration.configureModalWindow(with: .PWModalWindowPositionBottom,
present: .PWAnimationPresentFromBottom,
dismiss: .PWAnimationDismissDown)
}
func richMediaManager(_ richMediaManager: PWRichMediaManager!, shouldPresent richMedia: PWRichMedia!) -> Bool {
print("Rich media will be presented with: \(richMedia.pushPayload!)")
return true
}
func richMediaManager(_ richMediaManager: PWRichMediaManager!, didPresent richMedia: PWRichMedia!) {
print("Rich media has been presented with: \(richMedia.pushPayload!)")
}
func richMediaManager(_ richMediaManager: PWRichMediaManager!, didClose richMedia: PWRichMedia!) {
print("Rich media has been closed with: \(richMedia.pushPayload!)")
}
func richMediaManager(_ richMediaManager: PWRichMediaManager!, presentingDidFailFor richMedia: PWRichMedia!, withError error: (any Error)!) {
print("Failed to present rich media with: \(richMedia.pushPayload!). Error: \(error.localizedDescription)")
}
}
```
```objective-c
#import "ViewController.h"
#import
#import
#import
@interface ViewController ()
@end
@implementation ViewController
- (void)viewDidLoad {
[super viewDidLoad];
[[PWRichMediaManager sharedManager] setDelegate:self];
[[PWModalWindowConfiguration shared] configureModalWindowWith:PWModalWindowPositionBottom
presentAnimation:PWAnimationPresentFromBottom
dismissAnimation:PWAnimationDismissDown];
}
- (BOOL)richMediaManager:(PWRichMediaManager *)richMediaManager shouldPresentRichMedia:(PWRichMedia *)richMedia {
NSLog(@"Rich media will be presented with: %@", richMedia.pushPayload);
return YES;
}
- (void)richMediaManager:(PWRichMediaManager *)richMediaManager didPresentRichMedia:(PWRichMedia *)richMedia {
NSLog(@"Rich media has been presented with: %@", richMedia.pushPayload);
}
- (void)richMediaManager:(PWRichMediaManager *)richMediaManager didCloseRichMedia:(PWRichMedia *)richMedia {
NSLog(@"Rich media has been closed with:: %@", richMedia.pushPayload);
}
- (void)richMediaManager:(PWRichMediaManager *)richMediaManager presentingDidFailForRichMedia:(PWRichMedia *)richMedia withError:(NSError *)error {
NSLog(@"Failed to present rich media with: %@. Error: %@", richMedia.pushPayload, error.localizedDescription);
}
@end
```
## Solução de problemas
### Falha ao compilar o módulo 'PushwooshFramework'
Ao compilar seu projeto, você pode encontrar um erro semelhante a:
```
Failed to build module 'PushwooshFramework'; this SDK is not supported by the compiler
(the SDK is built with 'Apple Swift version 5.10 (swiftlang-5.10.0.13 clang-1500.3.9.4)',
while this compiler is 'Apple Swift version 6.1.2 effective-5.10 (swiftlang-6.1.2.1.2 clang-1700.0.13.5)')
```
**Causa:** Este erro não está relacionado à incompatibilidade da versão do compilador Swift. A partir da versão 6.8.0 do SDK Pushwoosh para iOS, o SDK é modularizado em vários componentes que interagem entre si. O erro ocorre quando nem todos os frameworks necessários são adicionados ao seu projeto.
**Solução:** Certifique-se de que todos os quatro frameworks necessários sejam adicionados ao seu alvo de aplicativo ao integrar via Swift Package Manager:
* ```PushwooshFramework```
* ```PushwooshCore```
* ```PushwooshBridge```
* ```PushwooshLiveActivities```
Para verificar isso no Xcode:
1. Selecione seu projeto no Project Navigator
2. Selecione o alvo do seu aplicativo
3. Vá para **General** > **Frameworks, Libraries, and Embedded Content**
4. Confirme que todos os quatro frameworks estão listados
---
Se você encontrar algum problema durante o processo de integração, consulte a seção de [suporte e comunidade](/pt/developer/pushwoosh-sdk/support-and-community).