Send WhatsApp messages using Customer Journey
Send WhatsApp messages through Pushwoosh Customer Journey. You can select between audience-based and trigger-based campaigns, use templates from your Meta account, or create custom content within Pushwoosh.
Prerequisites
Anchor link toTo send WhatsApp messages, ensure the following requirements are met:
- WhatsApp configuration completed: Make sure your WhatsApp Business Account is integrated with Pushwoosh. Learn more
- A payment method for WhatsApp added: Meta charges for each message sent via WhatsApp. Pushwoosh does not handle these charges, so make sure your payment information is updated in your WhatsApp account.
- Templates available: Ensure that the required templates are already created and approved in your WhatsApp Manager account. Learn more
- WhatsApp contact list uploaded.
Create a new WhatsApp campaign
Anchor link toTo create a campaign:
- Go to Campaigns > Customer Journey Builder > Create campaign > WhatsApp.
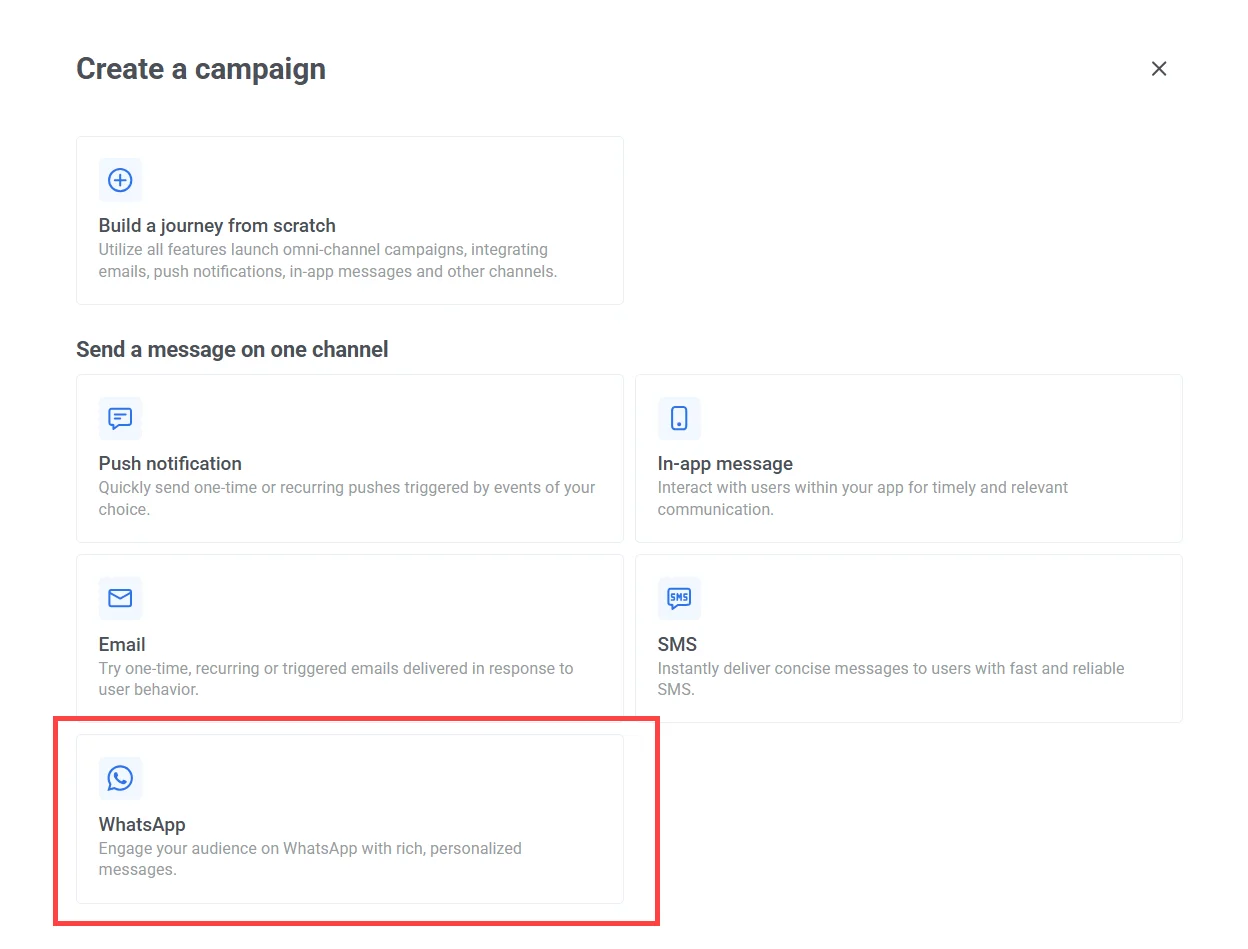
- On the journey canvas, choose the appropriate entry type based on your campaign goal:
Audience-based entry
Anchor link toTarget a predefined group of users based on filters like location, last activity, or purchase history. Ideal for planned, recurring, or re-engagement campaigns. Learn more
Examples:
- Send a promo to users inactive for 30 days
- Announce a seasonal offer to loyal customers
Trigger-based entry
Anchor link toLaunch the journey when a specific event occurs, such as a user completing a purchase or booking. Ideal for real-time transactional messages or behavior-driven updates. Learn more
Examples:
- Confirm an order when status changes to “Ready for pickup”
- Send a reminder 24 hours before an appointment
API-based entry
Anchor link toStart the campaign programmatically by sending a POST request from your backend or external system. Ideal for automating messages based on external data or events. Learn more
Examples:
- Notify a user after a CRM update
- Send a WhatsApp offer after a survey completion
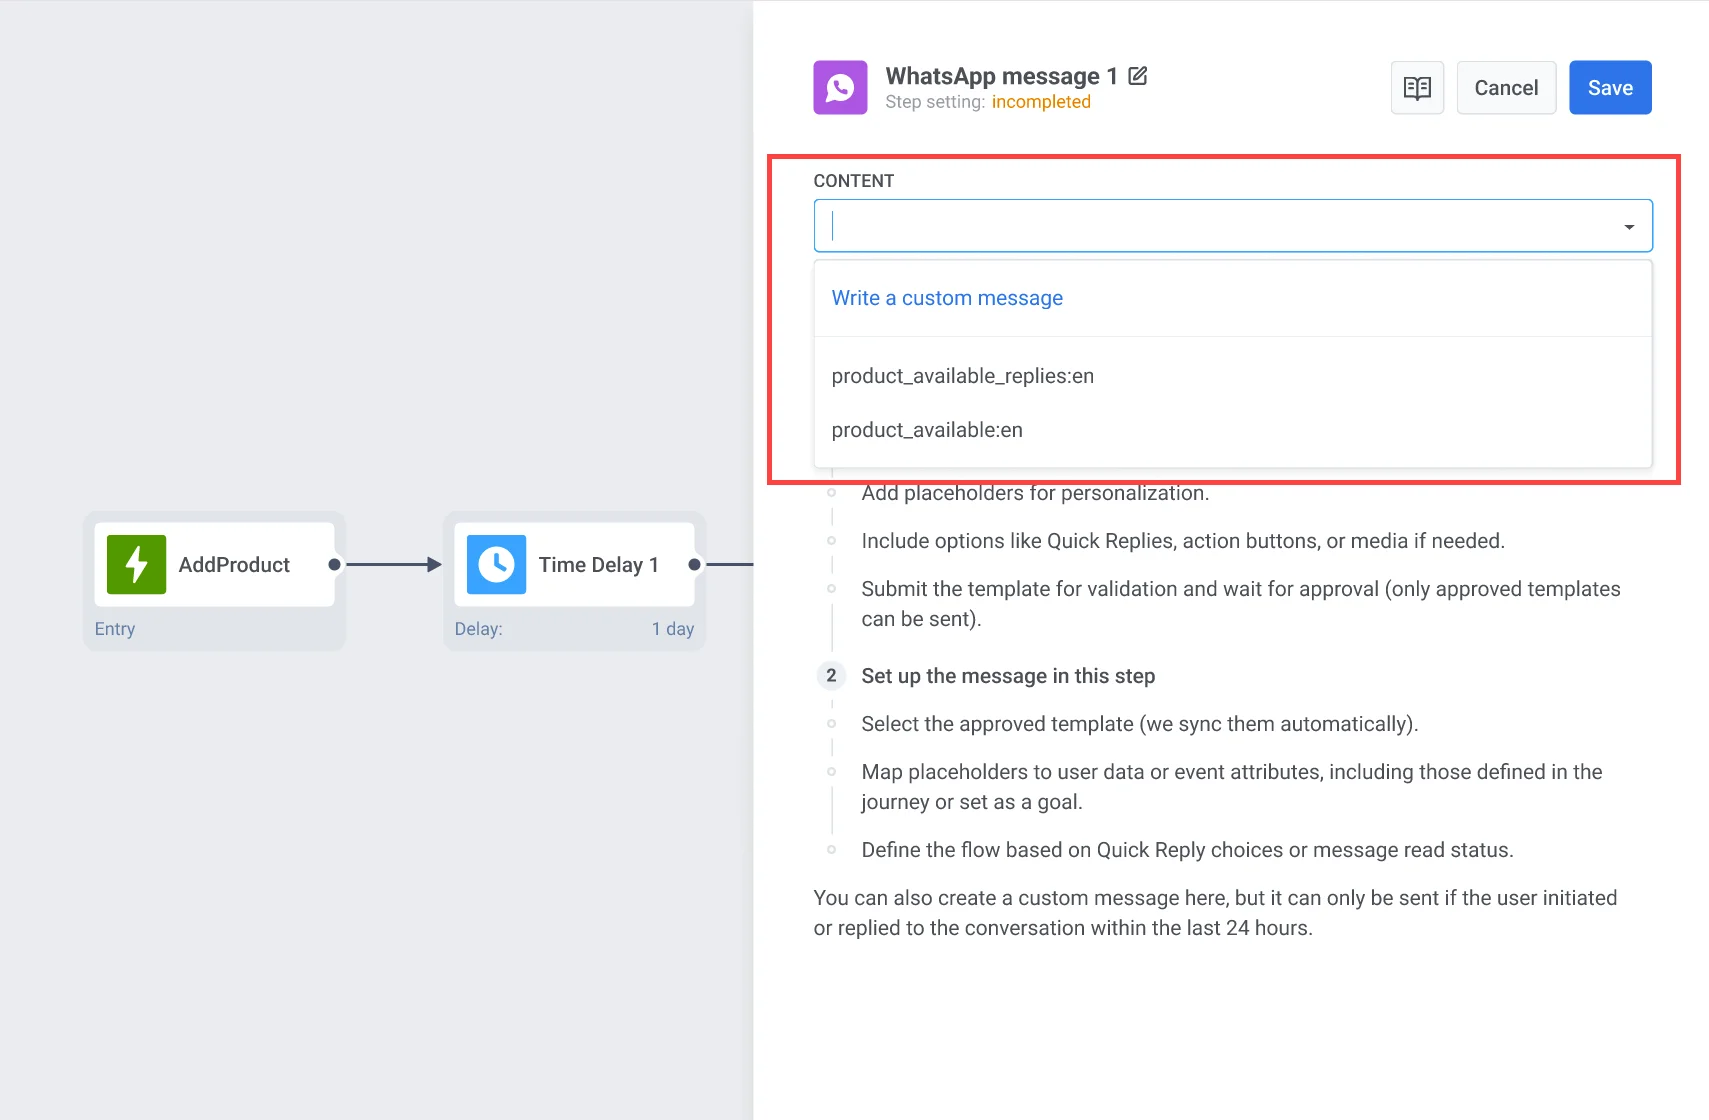
Set up a WhatsApp message element
Anchor link toAdd the WhatsApp message element to the canvas, and provide a unique name to identify the message step.
Next, configure the Whatsapp content in one of two ways:
-
Write a custom message.
-
Select a pre-approved WhatsApp message template from the dropdown. The template must be available in the selected language and approved by WhatsApp.
Learn more about creating templates or explore options in the Templates library.
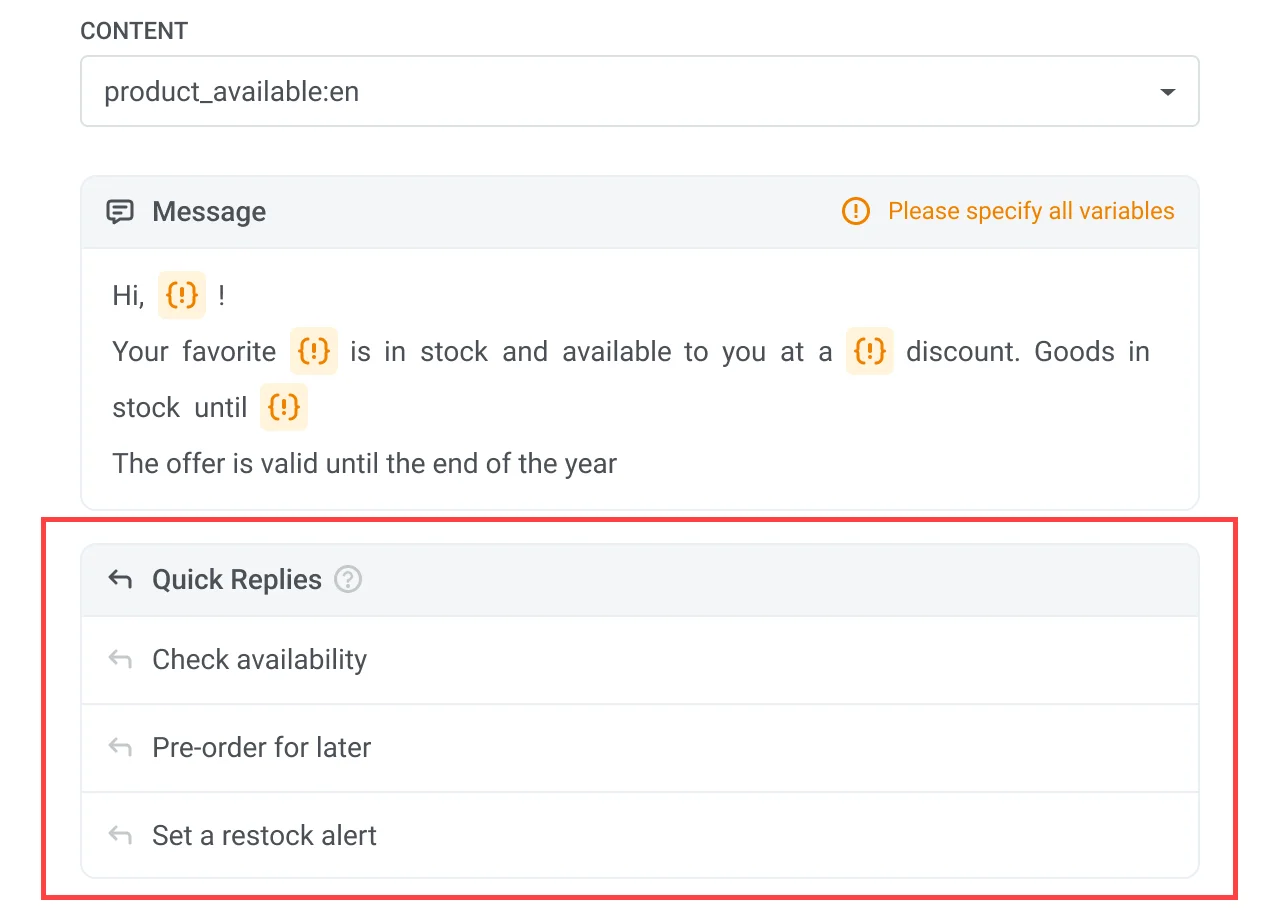
Configure dynamic variables
Anchor link toAfter selecting a template, Pushwoosh displays a preview of the message content. If the template contains placeholders, each one represents a dynamic variable that must be configured before the message can be sent.
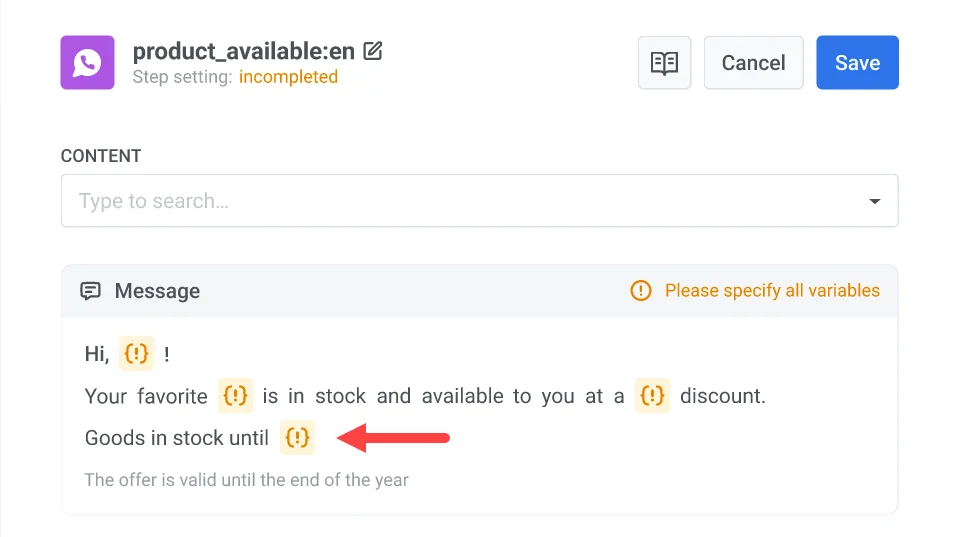
To insert a variable:
- Click the
{}placeholder in the message preview. - Select the Variable Type:
- User property: Value from the user’s profile (e.g.,
first_name,email). - Event property: Value from a triggered event (e.g.,
product_name,order_status). - Custom text: Manually entered static value.
- User property: Value from the user’s profile (e.g.,
- Select the relevant tag.
- Set the Text Case:
- CapitalizeFirst: Capitalizes the first word only (
"john doe"→"John doe"). - CapitalizeAllFirst: Capitalizes each word (
"john doe"→"John Doe"). - UPPERCASE: All uppercase (
"john doe"→"JOHN DOE"). - lowercase: All lowercase (
"JOHN DOE"→"john doe"). - regular: No formatting changes.
- CapitalizeFirst: Capitalizes the first word only (
- (Optional) Enter Fallback Text to be used if the variable is empty.
- Click Insert.
Template example with fallback
Hi, {first_name}!Your {product_name} is now available with a {discount} discount.If first_name is missing and fallback is "there":
Hi, there!Your shoes are now available with a 20% discount.Configure action URLs
Anchor link toWhatsApp message templates can include action buttons (e.g., “Buy Now”) that open a URL when tapped. These buttons can be personalized using dynamic variables inserted as placeholders in the URL.
The action URL is defined during template creation in your Meta Business account. If the URL includes placeholders (e.g., {product_id}), you must assign a value to each placeholder in Pushwoosh before sending the message.
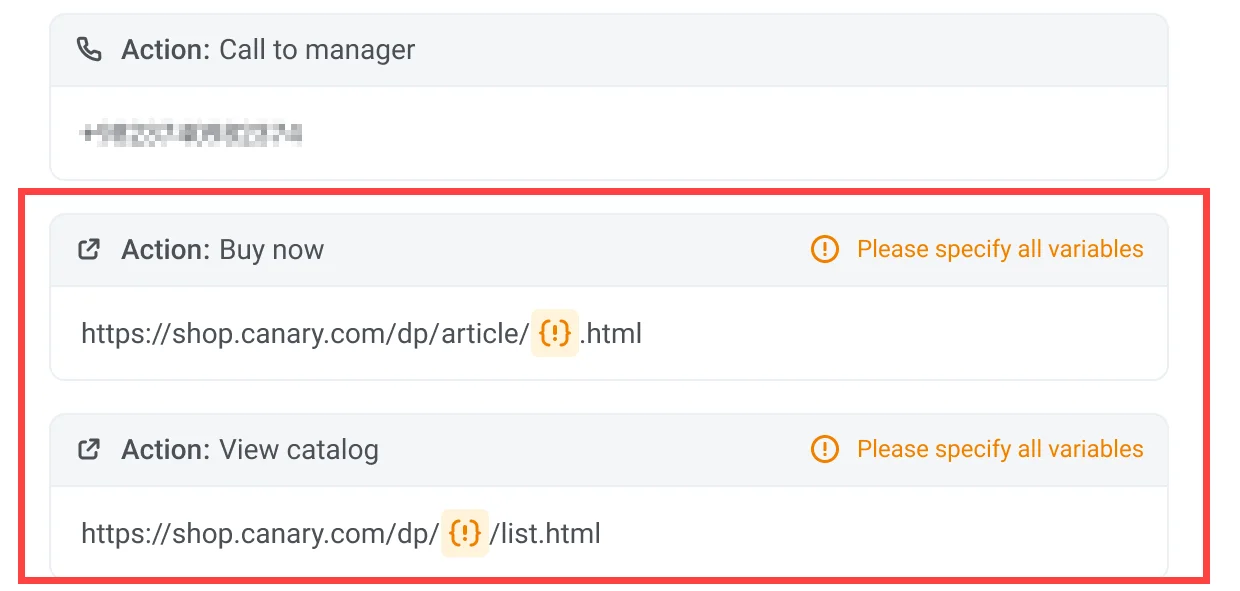
To assign value to the placeholder:
- Click the placeholder
{}in the URL. - Choose the correct Variable Type (e.g., User property or Event property).
- Select the appropriate variable (e.g.,
product_id). - (Optional) Add fallback text in case the variable is missing.
- Click Insert to apply it.
Important: Make sure all placeholders in the action URL are assigned variables. The message won’t be sent if any placeholders are left unconfigured.
Add media attachments
Anchor link toWhen using a template that includes a media file (image, video, or PDF), please note that the media is not stored in the template itself. These files are uploaded only as examples during template submission to Meta for validation purposes. To successfully send the message in a live campaign, you must specify the actual file URL in Pushwoosh.
To add media, enter a valid, publicly accessible URL pointing to the actual media file in the Image field.
Example: https://yourdomain.com/files/offer-banner.jpg
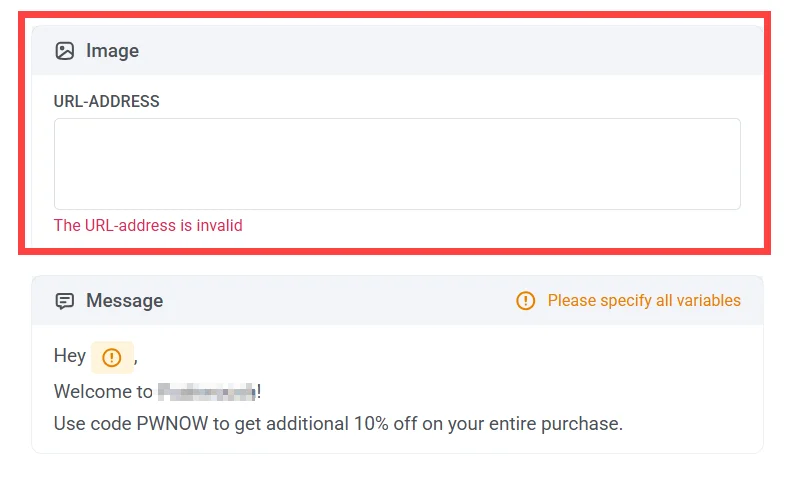
Important: The message will not be sent if the media file URL is missing or inaccessible.
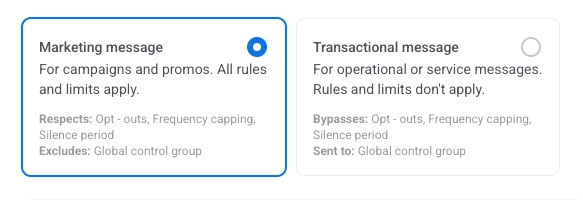
Choose the message type
Anchor link toIn the WhatsApp element, select Marketing message or Transactional message:
- Marketing message: For campaigns and promos. It respects opt-outs, frequency capping, and the silence period. It excludes the global control group.
- Transactional message: For operational or service messages. Rules and limits don’t apply. It bypasses opt-outs, frequency capping, and the silence period. It is sent to the global control group.
Set frequency capping
Anchor link toLimit how often users receive WhatsApp messages using global frequency capping or a custom limit for the step.
Split the flow based on message read status (optional)
Anchor link toYou can split the journey based on whether the message was read or based on user interaction with message buttons (e.g., Quick Replies or Call-to-Action buttons).
- To split by read status, enable the Split flow based on message read status option and configure the waiting time (up to 7 days).
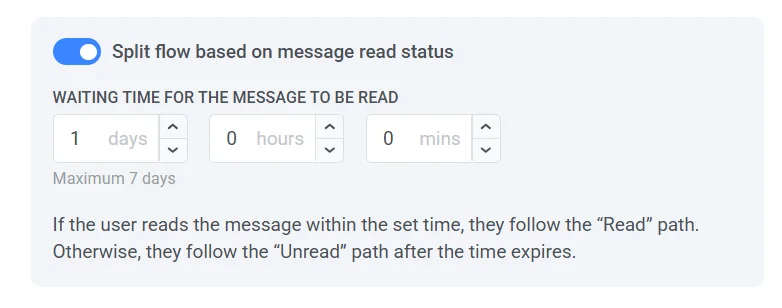
- To branch based on Quick Reply or Button interaction, configure the journey accordingly. Learn more
Use vouchers
Anchor link toYou can personalize WhatsApp messages by attaching a voucher code from a predefined pool. This is useful for promotions, discounts, and loyalty incentives.
For this, create a WhatsApp template that includes the placeholder {{voucher}}.
To include a voucher in your WhatsApp message:
- Toggle Vouchers to ON in the WhatsApp message step.
- In the Voucher Pool field, select the pool containing your available voucher codes. Make sure to add the pool of vouchers in advance. Learn more
- (Optional) Use the Assign Tag field to apply a tag to users who receive a voucher. This tag can be used for segmentation or reporting.
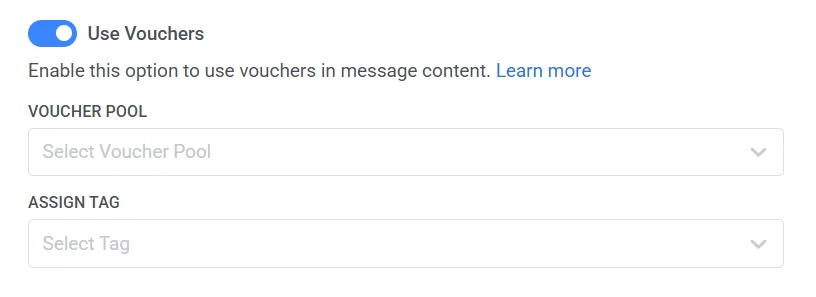
Important: Make sure the selected voucher pool has enough codes for your campaign. If the pool runs out, the message will not be sent.
Learn more about creating and managing voucher pools.
Once the WhatsApp element is configured, click Save and continue setting up your journey. Learn more
Configure quick replies
Anchor link toQuick replies in WhatsApp allow you to offer users predefined response options. With Pushwoosh Customer Journey Builder, you can set each quick reply to lead to a separate user journey flow, providing personalized follow-ups.
This approach improves the user experience by offering clear, simple choices that match each user’s level of interest, making interactions smooth and personalized.
To set up quick replies in your WhatsApp messaging flow:
- In your Meta account, select an existing WhatsApp template or create a new one that includes Quick Reply buttons.
For example, if your message is: “Are you interested in learning more about our new offer?” You could configure quick reply options like:
- “Yes, I’m interested”
- “No, thanks”
- “Tell me more”
- Next, after adding and configuring the WhatsApp element with a pre-approved template from Meta, set up a unique journey path for each quick reply option.
For example:
- If a user selects “Yes, I’m interested”, they receive a follow-up message with details about the special offer or promotion.
- If a user selects “No, thanks”, the journey ends for them.
- If a user selects “Tell me more”, they receive a message with additional product information.
- If a user does not respond within a set timeframe (e.g., 24 hours), set up an additional path to send a reminder message or end the journey.
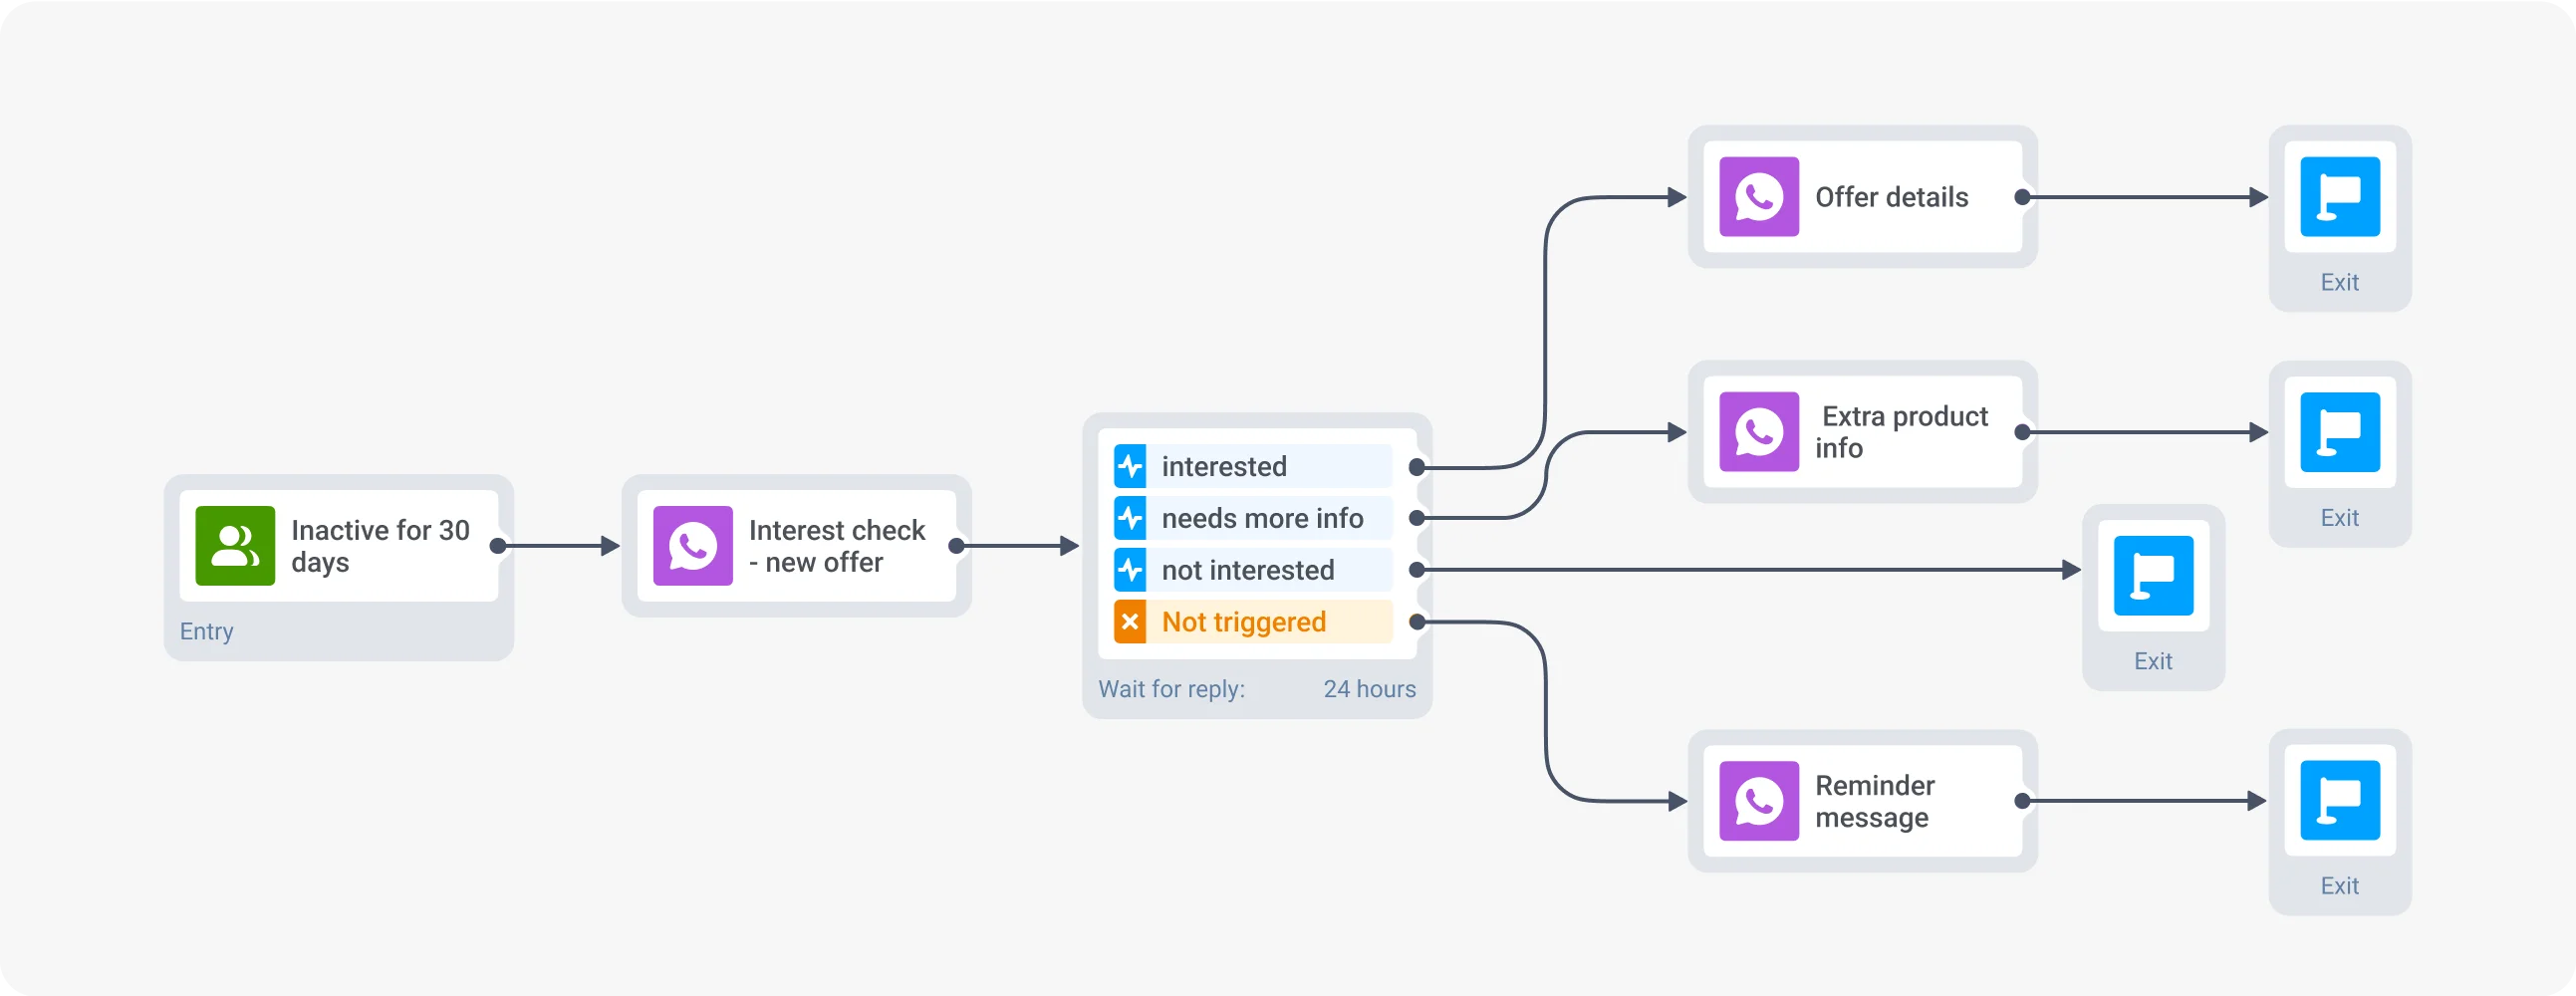
Important: Make sure to configure all remaining steps of your journey before launching the campaign. Learn more
Send free-form messages and view your WhatsApp conversations
Anchor link toTo send free-form messages and view your WhatsApp conversations, navigate to the WhatsApp Messages section in Pushwoosh.
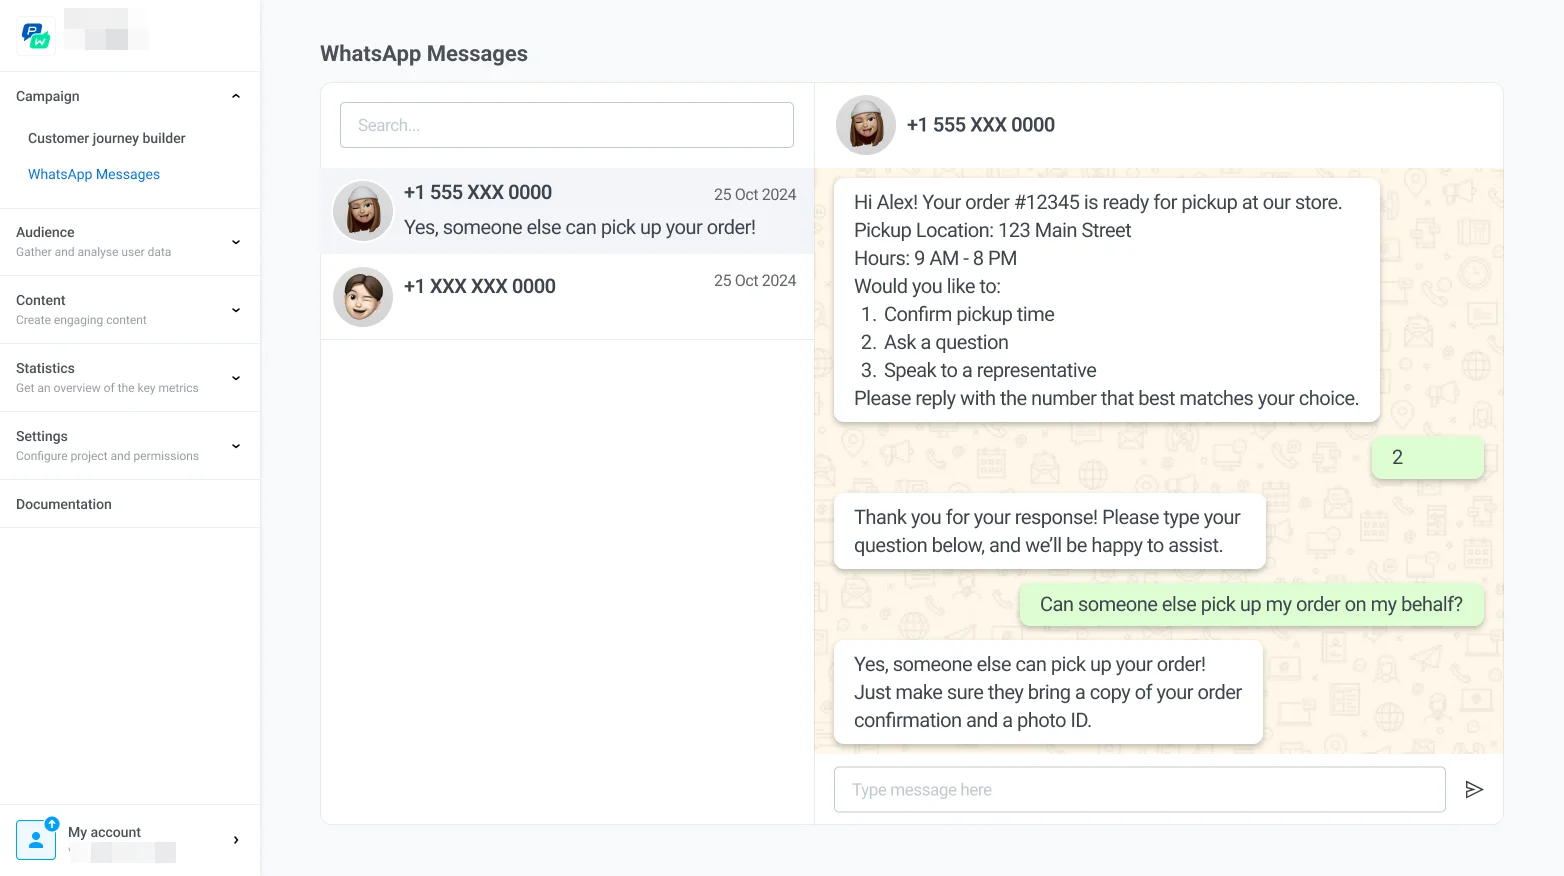
- View all active and past conversations with customers to review message history and engagement details.
- Send messages directly to customers by typing your message and clicking Send.