# Register phone numbers for WhatsApp
For a customer to receive WhatsApp messages, they must have a valid phone number and be registered as a WhatsApp platform subscriber in Pushwoosh.
Additionally, WhatsApp requires businesses to obtain opt-in consent from customers before messaging them. For guidelines on obtaining consent, refer to [WhatsApp Opt-In Best Practices](https://business.whatsapp.com/policy#best_practices).
## Methods to register WhatsApp subscribers
There are three main methods to register phone numbers as WhatsApp subscribers:
* Using Pushwoosh SDK. [Learn more](/developer/first-steps/subscribe-users#register-a-whatsapp-number)
* Using Pushwoosh API. [Learn more](/developer/first-steps/subscribe-users#whatsapp)
* Importing WhatsApp contacts from a CSV file
## How to import WhatsApp contacts from a CSV file
To import WhatsApp contacts, upload a CSV file containing the contact list. The imported numbers will be registered as WhatsApp subscribers, enabling personalized messaging and audience segmentation.
### Prepare your CSV file
#### CSV formatting rules
##### General structure
- The first row must contain column headers describing the data in each column.
- Each subsequent row represents a single contact, with values corresponding to the headers.
- Values must be separated by commas.
- Save the file in UTF-8 encoding to ensure proper character display.
- The maximum allowable file size is 100 MB.
##### Required columns
- **Phone Number** – Must be in [**E.164**](https://en.wikipedia.org/wiki/e.164) format, including the `+` sign and country code.
- **User ID** – A unique identifier for the user (e.g., name or email).
##### Optional columns
Adding optional columns allows for more advanced segmentation and personalization in your WhatsApp campaigns.
- **Name** – First name or full name of the user.
- **Location** – Specifies the user’s city, state, or country. Useful for sending location-based promotions (e.g., *Get 20% off at our Los Angeles store today!*).
- **Birthday** – Enables sending birthday messages with special discounts (e.g., *Happy Birthday, Sarah! Here’s a 10% discount just for you!*). Can trigger automated birthday campaigns.
- **Language** – Stores the user's language preference (e.g., English, Spanish, French). Helps send messages in the recipient's language for better engagement.
- **Customer Type** – Identifies whether the user is a **new customer, VIP, or inactive**. Enables targeted messaging (e.g., *Exclusive VIP offer just for you!*).
- **Custom Tags** – Any additional data relevant to your campaign (e.g., user preferences, purchase history). These can be mapped to system tags and used for segmentation in Pushwoosh.
##### Example CSV file
Here’s an example of a properly formatted CSV file:
```csv
Phone Number,User ID,Name,Location
+1XXXXXXXXXX,john.doe@email.com,John Doe,New York
+1XXXXXXXXXX,jane.smith@email.com,Jane Smith,Los Angeles
```
### Upload the CSV file
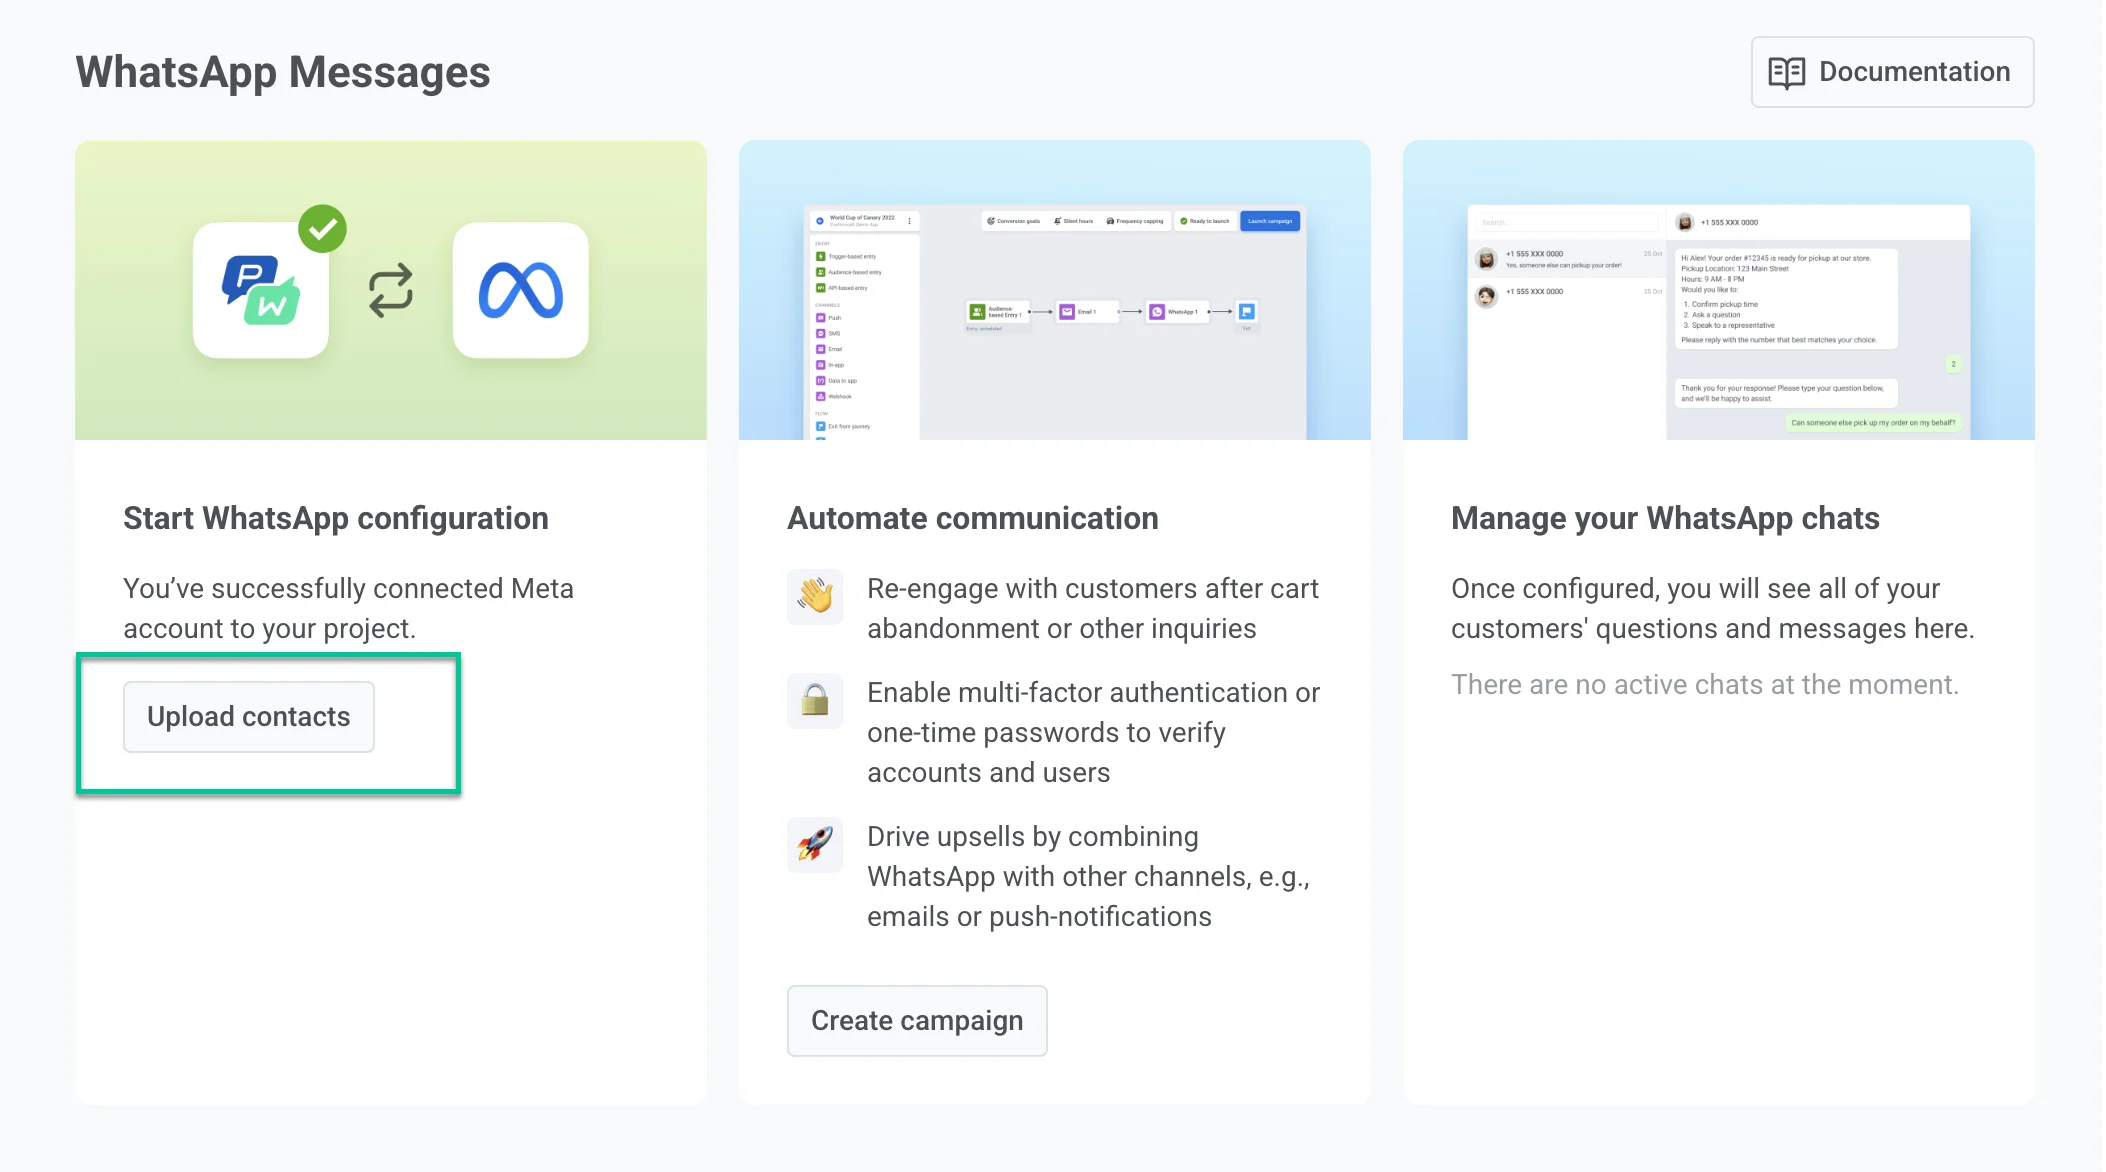
1. Go to **Campaigns** > **WhatsApp messages** > **Upload contacts**.
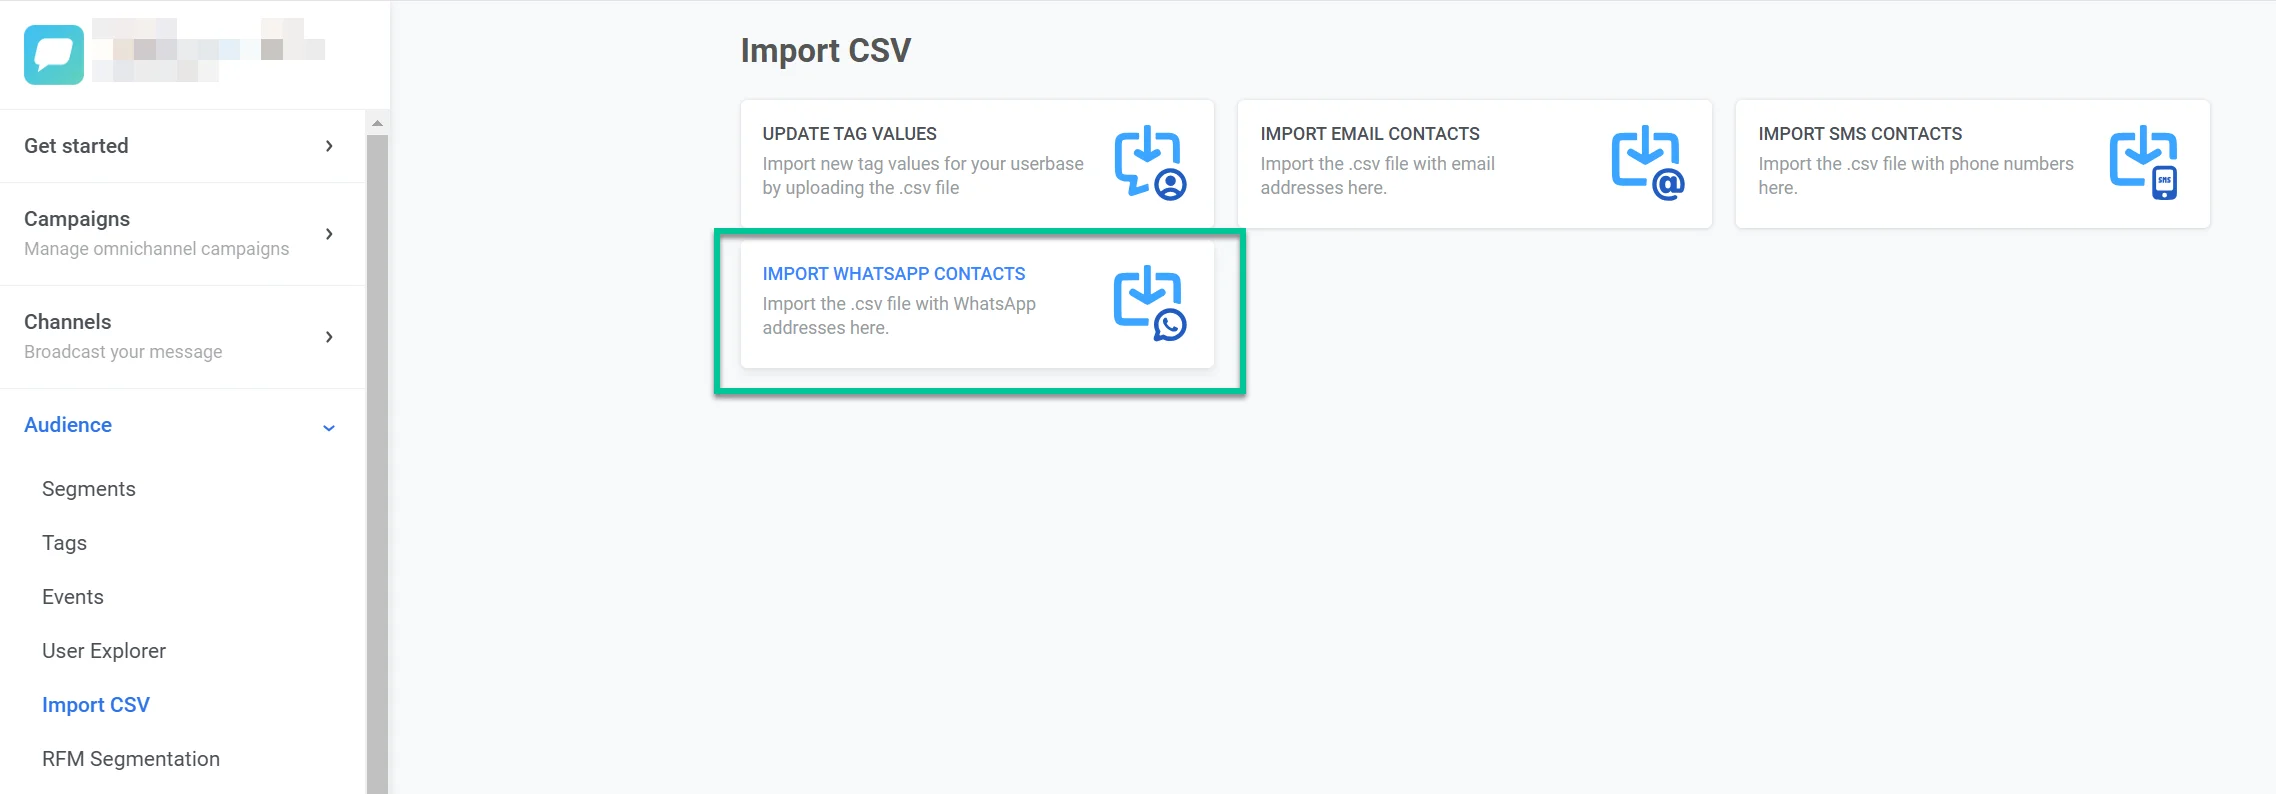
Alternatively, go to **Audience > Import CSV > Import WhatsApp contacts > Upload CSV**.
2. Select your CSV file from your computer.
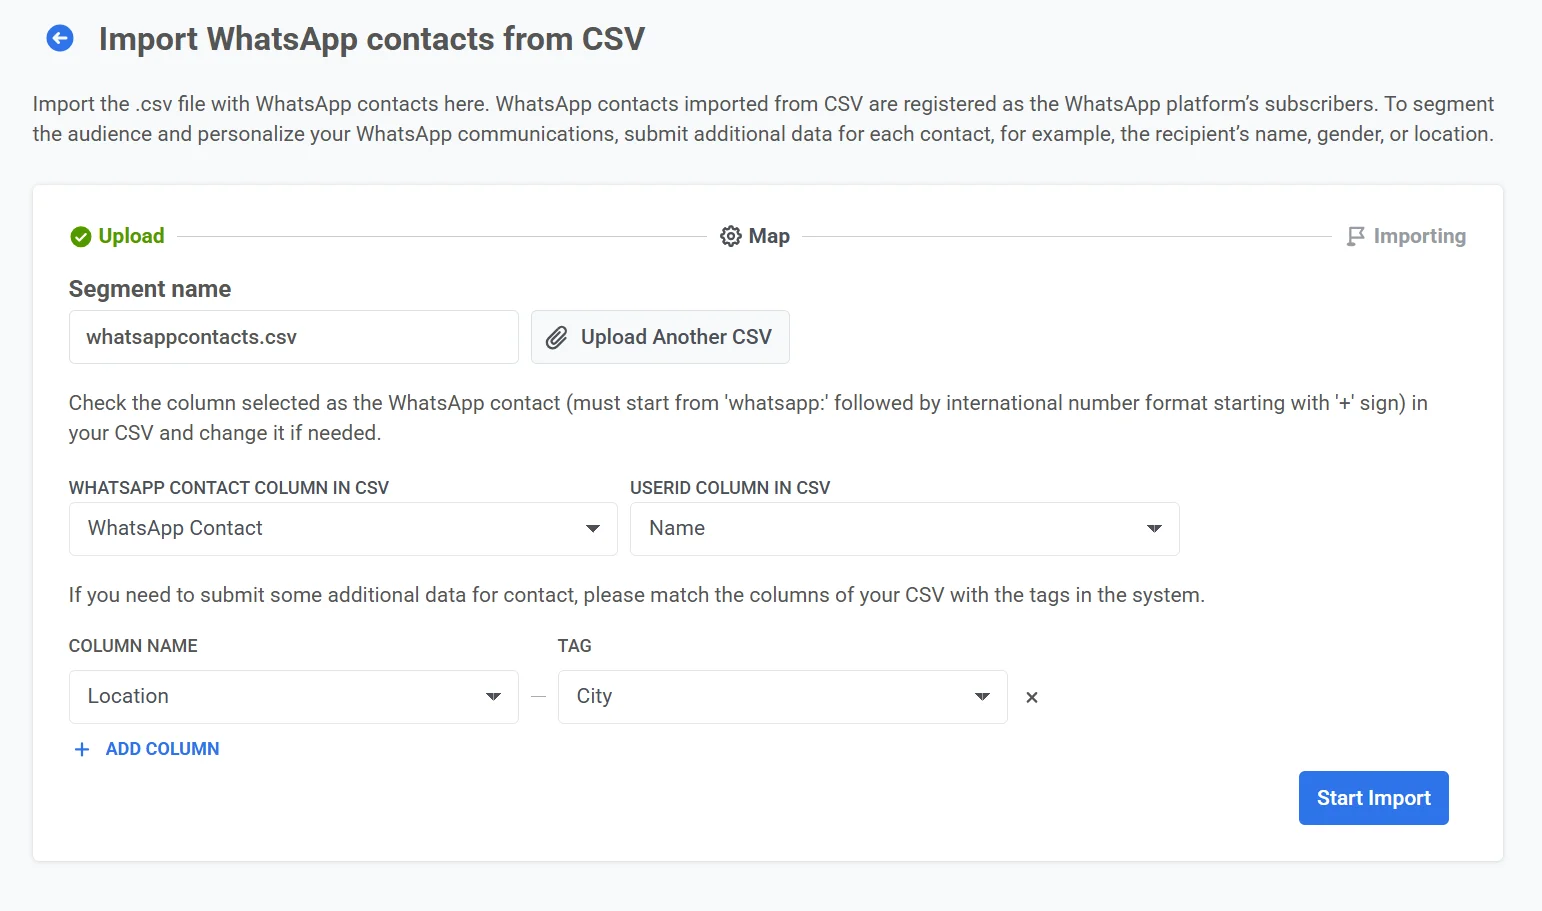
3. Map columns:
* **WhatsApp Contact Column in CSV:** Choose the column containing phone numbers formatted as `whatsapp:+`.
* **User ID Column in CSV:** Select the column with unique user identifiers (e.g., email or name).
4. Add additional data (optional)
If you want to include extra details for segmentation:
* Select a **Column Name** from your CSV.
* Assign it a **Tag** to link it with user data in the system.
* Click **\+ Add Column** to include more attributes.
4\. Click **Start Import** to begin processing the file.
Once the CSV import is complete, the contacts will appear as a new segment in the [Segments list](/product/audience-data-and-segmentation/segmentation/) and will also be available in [User explorer](/product/audience-data-and-segmentation/user-explorer/).
You can then use this data to create segmented and personalized WhatsApp campaigns.
 2. Select your CSV file from your computer.
3. Map columns:
* **WhatsApp Contact Column in CSV:** Choose the column containing phone numbers formatted as `whatsapp:+`.
* **User ID Column in CSV:** Select the column with unique user identifiers (e.g., email or name).
4. Add additional data (optional)
If you want to include extra details for segmentation:
* Select a **Column Name** from your CSV.
* Assign it a **Tag** to link it with user data in the system.
* Click **\+ Add Column** to include more attributes.
4\. Click **Start Import** to begin processing the file.
2. Select your CSV file from your computer.
3. Map columns:
* **WhatsApp Contact Column in CSV:** Choose the column containing phone numbers formatted as `whatsapp:+`.
* **User ID Column in CSV:** Select the column with unique user identifiers (e.g., email or name).
4. Add additional data (optional)
If you want to include extra details for segmentation:
* Select a **Column Name** from your CSV.
* Assign it a **Tag** to link it with user data in the system.
* Click **\+ Add Column** to include more attributes.
4\. Click **Start Import** to begin processing the file.
 Once the CSV import is complete, the contacts will appear as a new segment in the [Segments list](/product/audience-data-and-segmentation/segmentation/) and will also be available in [User explorer](/product/audience-data-and-segmentation/user-explorer/).
You can then use this data to create segmented and personalized WhatsApp campaigns.
Once the CSV import is complete, the contacts will appear as a new segment in the [Segments list](/product/audience-data-and-segmentation/segmentation/) and will also be available in [User explorer](/product/audience-data-and-segmentation/user-explorer/).
You can then use this data to create segmented and personalized WhatsApp campaigns.