# Create Wallet Pass Campaigns
A Wallet Pass Campaign lets you design a single Apple Wallet or Google Wallet pass template, issue it to multiple users, and centrally manage updates.
You choose which fields are [**Shared**](#set-shared-and-personal-fields) (syncing changes to all user devices simultaneously) and which are [**Personal**](#set-shared-and-personal-fields) (preserving unique values like names, barcodes, or balances for each user).
## What you can do with Wallet Pass Campaigns
* Design one pass in a campaign, instead of setting up each pass by hand in the [Apple Wallet](/product/messaging-channels/wallet-passes/apple-wallet/pass-builder/) or [Google Wallet](/product/messaging-channels/wallet-passes/google-wallet/pass-builder/) pass builder.
* Choose which fields update everywhere (shared) and which stay per pass (personal).
* See how many issued passes a field edit affects before you save it.
* Override a shared field on one pass, then hand control back to the campaign later.
* Attach passes issued outside a campaign so they start following its shared fields.
* Track campaign revisions and the delivery status of each update.
## Prerequisites
A campaign uses the same one-time setup as a standalone pass:
**Apple Wallet:**
* Active [Apple Developer Program](https://developer.apple.com/programs/) membership
* [iOS platform](/developer/first-steps/connect-messaging-services/ios-configuration/) connected to the application
* [Pass signing certificate](/developer/first-steps/connect-messaging-services/ios-configuration/ios-wallet-pass-configuration/) uploaded to Pushwoosh
**Google Wallet:**
* Active [Google Pay & Wallet Console](https://pay.google.com/business/console) issuer account
* [Google Wallet configured](/developer/first-steps/connect-messaging-services/android-configuration/android-google-wallet-configuration/) for the application (Issuer ID and Google Cloud service account key)
## Create a campaign
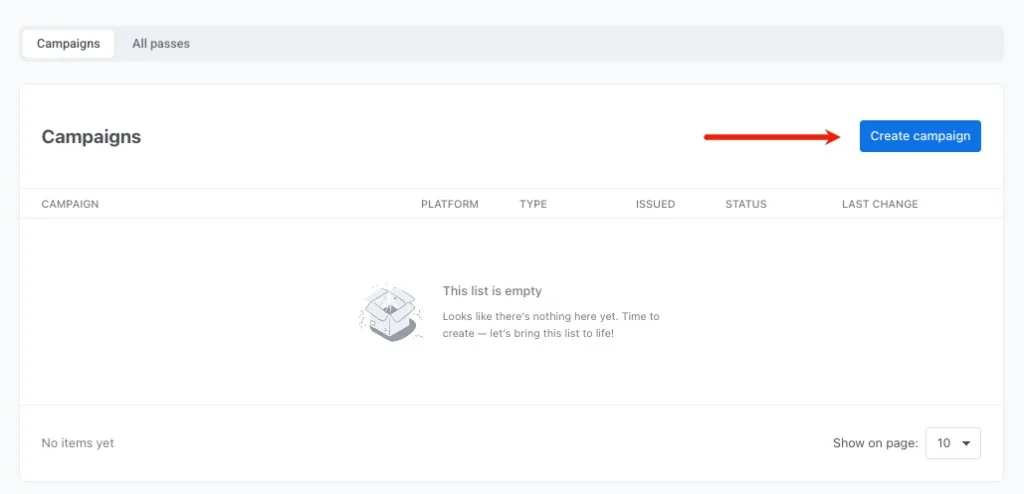
To start creating a campaign, go to **Campaigns → Wallet Passes → Campaigns** and click **Create campaign**.
### Set campaign details and platform
* **Platform:** select **Apple Wallet** or **Google Wallet** at the top of the page. This choice is permanent for the campaign.
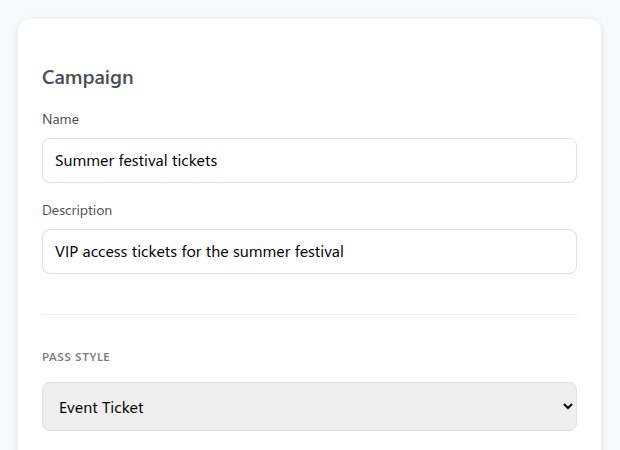
* **Campaign:** enter a **Name** and an optional **Description** for your internal reference. Neither appears on the pass.
* **Pass format:** under **Pass Style** (Apple) or **Pass Type** (Google), choose the layout for your pass:
* **Apple Wallet:** Boarding Pass, Coupon, Event Ticket, Store Card, Generic. See [Choose a pass style](/product/messaging-channels/wallet-passes/apple-wallet/pass-builder/#choose-a-pass-style).
* **Google Wallet:** Generic, Offer, Loyalty card, Event ticket, Gift card, Flight, Transit. This cannot be changed after creation. See [Choose a pass type](/product/messaging-channels/wallet-passes/google-wallet/pass-builder/#choose-a-pass-type).
### Configure pass design and branding
Configure the standard sections of the pass:
* **Basic Information, Colors, and Barcode:** set the pass title, background and text colors, and barcode type. For detailed guidance on each section, see [Design passes in the Apple Wallet pass builder](/product/messaging-channels/wallet-passes/apple-wallet/pass-builder/) or [Design Google Wallet passes in the pass builder](/product/messaging-channels/wallet-passes/google-wallet/pass-builder/).
* **Pass fields:** add the fields that should appear on the card (see [Apple Wallet pass fields](/product/messaging-channels/wallet-passes/apple-wallet/pass-builder/#fill-in-pass-fields) or [Google Wallet fields and details](/product/messaging-channels/wallet-passes/google-wallet/pass-builder/#fill-in-pass-fields)).
* **Expiration:** set relevant dates and expiration rules (see [Apple Wallet expiration](/product/messaging-channels/wallet-passes/apple-wallet/pass-builder/#set-expiration-and-status) or [Google Wallet expiration](/product/messaging-channels/wallet-passes/google-wallet/pass-builder/#expiration)).
* **Locations:** set location-based relevance (see [Apple Wallet locations](/product/messaging-channels/wallet-passes/apple-wallet/pass-builder/#location-based-relevance-optional) or [Google Wallet locations](/product/messaging-channels/wallet-passes/google-wallet/pass-builder/#add-locations-optional)).
### Set shared and personal fields
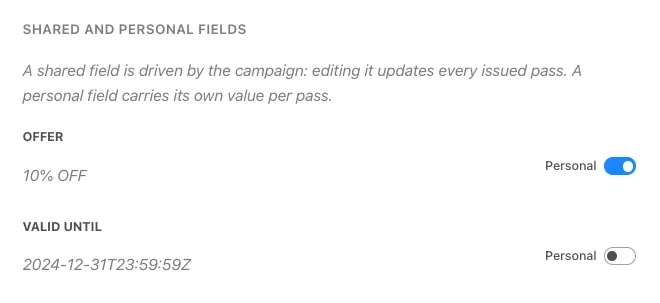
In the **Shared and personal fields** section, configure which fields update globally across all passes and which keep unique values per user. This controls what happens when you edit the campaign later: shared fields update on every issued pass, while personal fields remain unchanged.
Turn on the **Personal** toggle for any field that should hold unique values per user.
| Field type | Behavior | Examples |
| :--- | :--- | :--- |
| **Shared** | Driven by the campaign. Updating this field syncs the new value to every pass on users' devices. | Event date, Gate number, Store address, Discount percentage |
| **Personal** | Unique per user. The campaign does not overwrite these values when updated. | User name, Seat number, Membership ID, Points balance |
A personal field's value can include a tag placeholder, `{tag}` or `{tag|format|fallback}` (for example, `{Seat}`). Pushwoosh fills it in from the recipient's [tag](/product/audience-data-and-segmentation/user-data-tags/tags/) when it serves the pass. If the recipient has no value for that tag, Pushwoosh uses the fallback from the placeholder, or leaves the field blank when the placeholder has none.
* **Just the tag, nothing else, like `{Seat}`:** the field doesn't appear in the **Issue pass** dialog.
* **The tag mixed with other text, like `Seat {Seat}`, or no tag at all:** the field appears as an editable input in the **Issue pass** dialog, prefilled with that value. Any tag inside it still resolves per recipient when Pushwoosh serves the pass.
### Upload campaign images
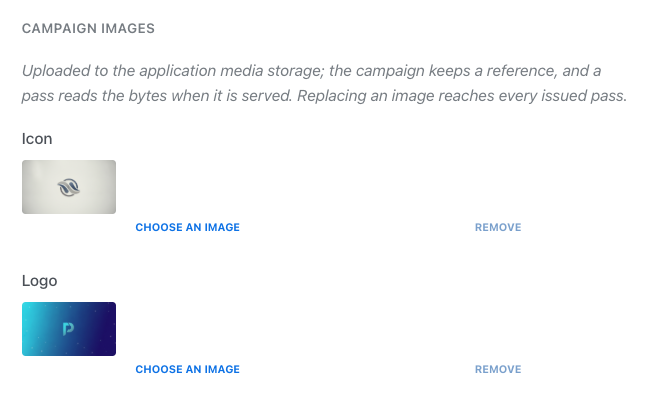
1. In the **Campaign images** section, click **Choose an image** next to an image slot.
2. Select an existing image from your [Media Store](/product/content/media-store/) or drag and drop a new file to upload.
3. Repeat for each available image slot:
* **Apple Wallet:** Icon, Logo, Background, Footer, Strip, and Thumbnail (see [Apple Wallet images](/product/messaging-channels/wallet-passes/apple-wallet/pass-builder/#images)).
* **Google Wallet:** Logo and Hero image.
### Preview and create the campaign
1. Check the **Preview as user** panel on the right to see how the card looks. You can enter a test User ID to preview personalized fields.
2. Click **Create campaign** at the bottom of the page.
Pushwoosh creates the campaign in **Draft** status and opens its workspace, with **Design**, **Passes**, and **History** tabs.
## Issue passes to users
### Issue a pass from the campaign
1. On the **Passes** tab, click **Issue pass**.
2. Enter the recipient's Pushwoosh [User ID](/product/pushwoosh-knowledge-hub/users-userids/).
3. Click **Issue pass** to confirm.
Depending on how you configured **Personal fields**, the modal handles them as follows:
* **Editable fields:** appear with default values that you can change for this user.
* **Tag placeholders (like `{Seat}`):** do not appear in the dialog. Pushwoosh automatically populates them from the user's tags.
You can also edit any personal field on an individual pass at any time after issuance.
Pushwoosh generates the pass from the campaign's current design and lists it on the [**Passes** tab](#passes-tab) and in the application's **All passes** table ([Apple Wallet](/product/messaging-channels/wallet-passes/apple-wallet/#view-and-manage-existing-passes) or [Google Wallet](/product/messaging-channels/wallet-passes/google-wallet/#view-and-manage-existing-passes)).
### Attach an existing pass to a campaign
You can attach standalone passes (created outside any campaign) to a campaign so they start receiving shared updates.
1. On the **Passes** tab, click **Attach passes**.
2. Search for passes by User ID, serial number, or barcode.
3. Select the passes and confirm.
Once attached:
* **Shared fields** start following the campaign and update whenever you change the pass template.
* **Personal values** already on the pass (such as user details or unique balances) are preserved.
## Manage an existing campaign
Opening a created campaign from **Campaigns → Wallet Passes → Campaigns** displays its status, revision counter, live pass preview, and three main tabs: **Design**, **Passes**, and **History**.
### Change the campaign status
Use status to track where each campaign stands: still being designed, actively issuing passes, or done and archived.
To change the status, select an option from the **Status** dropdown in the campaign header. The change saves immediately without a separate confirmation step:
* **Draft** or **Active:** allows you to issue new passes, attach existing ones, and push design updates.
* **Archived:** pauses new pass issuance. You cannot issue or attach passes while the campaign is archived, but previously issued passes continue working and receiving shared updates.
### Design tab
On the **Design** tab, you can update the pass template, change colors, modify shared and personal fields, or upload new campaign images.
#### Update design and push changes to passes
When you edit a shared field or replace a campaign image and click **Save changes**, Pushwoosh displays a confirmation dialog showing how many issued passes will be updated.
* **If no passes have overrides:** click **Update** to push the changes to all issued passes.
* **If some passes have overrides:** choose whether to update only standard passes (preserving user overrides) or overwrite all passes.
Confirming the update increments the campaign's revision counter (for example, to **Revision 2**) and automatically syncs the changes to users' devices.
#### Override a shared field on an individual pass
If you need to customize a shared field for a specific user, edit that field directly on their individual pass (from the **Passes** tab or **All passes**):
* **Create an override:** saving a custom value on an individual pass detaches that field from campaign-wide updates. Future updates to the campaign will skip this pass for that specific field.
* **Remove an override:** to restore campaign control, edit the pass and click **Use the campaign value** next to the overridden field.
You can track which passes have customized values on the [**Passes** tab](#passes-tab) under the **Overrides** column.
### Passes tab
The **Passes** tab lists every pass issued by the campaign, including its serial number, recipient User ID, active overrides, current revision, and last update date.
Use table filters to find specific passes:
* **With overrides:** shows passes that have at least one custom-edited field.
* **Behind the revision:** shows passes that have not yet received the latest campaign update.
To issue new passes or attach existing ones, see [Issue passes to users](#issue-passes-to-users).
### History tab
The **History** tab lists all revisions of the campaign in chronological order, showing which fields were modified in each version.
The delivery status of the most recent update appears below the tabs:
* **Cancel:** stops sending the update to passes it has not reached yet. These passes remain on their previous revision.
* **Retry failed:** re-attempts delivery for passes that failed to update (marked as failed after 5 attempts).
Once a new revision is saved, older updates can no longer be retried or canceled.
## Delete a campaign
Open the campaign and click **Delete campaign** at the top right of the page.
Deleting a campaign does not delete or invalidate already issued passes. Issued passes retain their current content and images, but stop receiving shared updates. Any future changes must be made on each pass individually.
 ### Set campaign details and platform
* **Platform:** select **Apple Wallet** or **Google Wallet** at the top of the page. This choice is permanent for the campaign.
* **Campaign:** enter a **Name** and an optional **Description** for your internal reference. Neither appears on the pass.
* **Pass format:** under **Pass Style** (Apple) or **Pass Type** (Google), choose the layout for your pass:
* **Apple Wallet:** Boarding Pass, Coupon, Event Ticket, Store Card, Generic. See [Choose a pass style](/product/messaging-channels/wallet-passes/apple-wallet/pass-builder/#choose-a-pass-style).
* **Google Wallet:** Generic, Offer, Loyalty card, Event ticket, Gift card, Flight, Transit. This cannot be changed after creation. See [Choose a pass type](/product/messaging-channels/wallet-passes/google-wallet/pass-builder/#choose-a-pass-type).
### Set campaign details and platform
* **Platform:** select **Apple Wallet** or **Google Wallet** at the top of the page. This choice is permanent for the campaign.
* **Campaign:** enter a **Name** and an optional **Description** for your internal reference. Neither appears on the pass.
* **Pass format:** under **Pass Style** (Apple) or **Pass Type** (Google), choose the layout for your pass:
* **Apple Wallet:** Boarding Pass, Coupon, Event Ticket, Store Card, Generic. See [Choose a pass style](/product/messaging-channels/wallet-passes/apple-wallet/pass-builder/#choose-a-pass-style).
* **Google Wallet:** Generic, Offer, Loyalty card, Event ticket, Gift card, Flight, Transit. This cannot be changed after creation. See [Choose a pass type](/product/messaging-channels/wallet-passes/google-wallet/pass-builder/#choose-a-pass-type).
 ### Configure pass design and branding
Configure the standard sections of the pass:
* **Basic Information, Colors, and Barcode:** set the pass title, background and text colors, and barcode type. For detailed guidance on each section, see [Design passes in the Apple Wallet pass builder](/product/messaging-channels/wallet-passes/apple-wallet/pass-builder/) or [Design Google Wallet passes in the pass builder](/product/messaging-channels/wallet-passes/google-wallet/pass-builder/).
* **Pass fields:** add the fields that should appear on the card (see [Apple Wallet pass fields](/product/messaging-channels/wallet-passes/apple-wallet/pass-builder/#fill-in-pass-fields) or [Google Wallet fields and details](/product/messaging-channels/wallet-passes/google-wallet/pass-builder/#fill-in-pass-fields)).
* **Expiration:** set relevant dates and expiration rules (see [Apple Wallet expiration](/product/messaging-channels/wallet-passes/apple-wallet/pass-builder/#set-expiration-and-status) or [Google Wallet expiration](/product/messaging-channels/wallet-passes/google-wallet/pass-builder/#expiration)).
* **Locations:** set location-based relevance (see [Apple Wallet locations](/product/messaging-channels/wallet-passes/apple-wallet/pass-builder/#location-based-relevance-optional) or [Google Wallet locations](/product/messaging-channels/wallet-passes/google-wallet/pass-builder/#add-locations-optional)).
### Set shared and personal fields
In the **Shared and personal fields** section, configure which fields update globally across all passes and which keep unique values per user. This controls what happens when you edit the campaign later: shared fields update on every issued pass, while personal fields remain unchanged.
Turn on the **Personal** toggle for any field that should hold unique values per user.
### Configure pass design and branding
Configure the standard sections of the pass:
* **Basic Information, Colors, and Barcode:** set the pass title, background and text colors, and barcode type. For detailed guidance on each section, see [Design passes in the Apple Wallet pass builder](/product/messaging-channels/wallet-passes/apple-wallet/pass-builder/) or [Design Google Wallet passes in the pass builder](/product/messaging-channels/wallet-passes/google-wallet/pass-builder/).
* **Pass fields:** add the fields that should appear on the card (see [Apple Wallet pass fields](/product/messaging-channels/wallet-passes/apple-wallet/pass-builder/#fill-in-pass-fields) or [Google Wallet fields and details](/product/messaging-channels/wallet-passes/google-wallet/pass-builder/#fill-in-pass-fields)).
* **Expiration:** set relevant dates and expiration rules (see [Apple Wallet expiration](/product/messaging-channels/wallet-passes/apple-wallet/pass-builder/#set-expiration-and-status) or [Google Wallet expiration](/product/messaging-channels/wallet-passes/google-wallet/pass-builder/#expiration)).
* **Locations:** set location-based relevance (see [Apple Wallet locations](/product/messaging-channels/wallet-passes/apple-wallet/pass-builder/#location-based-relevance-optional) or [Google Wallet locations](/product/messaging-channels/wallet-passes/google-wallet/pass-builder/#add-locations-optional)).
### Set shared and personal fields
In the **Shared and personal fields** section, configure which fields update globally across all passes and which keep unique values per user. This controls what happens when you edit the campaign later: shared fields update on every issued pass, while personal fields remain unchanged.
Turn on the **Personal** toggle for any field that should hold unique values per user.
 | Field type | Behavior | Examples |
| :--- | :--- | :--- |
| **Shared** | Driven by the campaign. Updating this field syncs the new value to every pass on users' devices. | Event date, Gate number, Store address, Discount percentage |
| **Personal** | Unique per user. The campaign does not overwrite these values when updated. | User name, Seat number, Membership ID, Points balance |
A personal field's value can include a tag placeholder, `{tag}` or `{tag|format|fallback}` (for example, `{Seat}`). Pushwoosh fills it in from the recipient's [tag](/product/audience-data-and-segmentation/user-data-tags/tags/) when it serves the pass. If the recipient has no value for that tag, Pushwoosh uses the fallback from the placeholder, or leaves the field blank when the placeholder has none.
* **Just the tag, nothing else, like `{Seat}`:** the field doesn't appear in the **Issue pass** dialog.
* **The tag mixed with other text, like `Seat {Seat}`, or no tag at all:** the field appears as an editable input in the **Issue pass** dialog, prefilled with that value. Any tag inside it still resolves per recipient when Pushwoosh serves the pass.
### Upload campaign images
1. In the **Campaign images** section, click **Choose an image** next to an image slot.
2. Select an existing image from your [Media Store](/product/content/media-store/) or drag and drop a new file to upload.
3. Repeat for each available image slot:
* **Apple Wallet:** Icon, Logo, Background, Footer, Strip, and Thumbnail (see [Apple Wallet images](/product/messaging-channels/wallet-passes/apple-wallet/pass-builder/#images)).
* **Google Wallet:** Logo and Hero image.
| Field type | Behavior | Examples |
| :--- | :--- | :--- |
| **Shared** | Driven by the campaign. Updating this field syncs the new value to every pass on users' devices. | Event date, Gate number, Store address, Discount percentage |
| **Personal** | Unique per user. The campaign does not overwrite these values when updated. | User name, Seat number, Membership ID, Points balance |
A personal field's value can include a tag placeholder, `{tag}` or `{tag|format|fallback}` (for example, `{Seat}`). Pushwoosh fills it in from the recipient's [tag](/product/audience-data-and-segmentation/user-data-tags/tags/) when it serves the pass. If the recipient has no value for that tag, Pushwoosh uses the fallback from the placeholder, or leaves the field blank when the placeholder has none.
* **Just the tag, nothing else, like `{Seat}`:** the field doesn't appear in the **Issue pass** dialog.
* **The tag mixed with other text, like `Seat {Seat}`, or no tag at all:** the field appears as an editable input in the **Issue pass** dialog, prefilled with that value. Any tag inside it still resolves per recipient when Pushwoosh serves the pass.
### Upload campaign images
1. In the **Campaign images** section, click **Choose an image** next to an image slot.
2. Select an existing image from your [Media Store](/product/content/media-store/) or drag and drop a new file to upload.
3. Repeat for each available image slot:
* **Apple Wallet:** Icon, Logo, Background, Footer, Strip, and Thumbnail (see [Apple Wallet images](/product/messaging-channels/wallet-passes/apple-wallet/pass-builder/#images)).
* **Google Wallet:** Logo and Hero image.
 ### Preview and create the campaign
1. Check the **Preview as user** panel on the right to see how the card looks. You can enter a test User ID to preview personalized fields.
### Preview and create the campaign
1. Check the **Preview as user** panel on the right to see how the card looks. You can enter a test User ID to preview personalized fields.
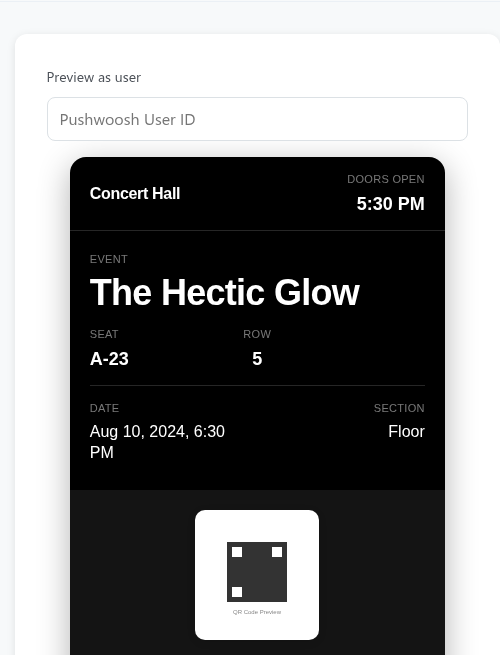 2. Click **Create campaign** at the bottom of the page.
Pushwoosh creates the campaign in **Draft** status and opens its workspace, with **Design**, **Passes**, and **History** tabs.
## Issue passes to users
### Issue a pass from the campaign
1. On the **Passes** tab, click **Issue pass**.
2. Enter the recipient's Pushwoosh [User ID](/product/pushwoosh-knowledge-hub/users-userids/).
2. Click **Create campaign** at the bottom of the page.
Pushwoosh creates the campaign in **Draft** status and opens its workspace, with **Design**, **Passes**, and **History** tabs.
## Issue passes to users
### Issue a pass from the campaign
1. On the **Passes** tab, click **Issue pass**.
2. Enter the recipient's Pushwoosh [User ID](/product/pushwoosh-knowledge-hub/users-userids/).
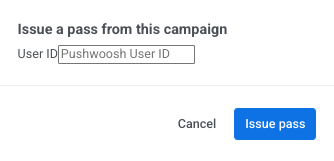 3. Click **Issue pass** to confirm.
Depending on how you configured **Personal fields**, the modal handles them as follows:
* **Editable fields:** appear with default values that you can change for this user.
* **Tag placeholders (like `{Seat}`):** do not appear in the dialog. Pushwoosh automatically populates them from the user's tags.
You can also edit any personal field on an individual pass at any time after issuance.
Pushwoosh generates the pass from the campaign's current design and lists it on the [**Passes** tab](#passes-tab) and in the application's **All passes** table ([Apple Wallet](/product/messaging-channels/wallet-passes/apple-wallet/#view-and-manage-existing-passes) or [Google Wallet](/product/messaging-channels/wallet-passes/google-wallet/#view-and-manage-existing-passes)).
### Attach an existing pass to a campaign
You can attach standalone passes (created outside any campaign) to a campaign so they start receiving shared updates.
1. On the **Passes** tab, click **Attach passes**.
2. Search for passes by User ID, serial number, or barcode.
3. Select the passes and confirm.
Once attached:
* **Shared fields** start following the campaign and update whenever you change the pass template.
* **Personal values** already on the pass (such as user details or unique balances) are preserved.
## Manage an existing campaign
Opening a created campaign from **Campaigns → Wallet Passes → Campaigns** displays its status, revision counter, live pass preview, and three main tabs: **Design**, **Passes**, and **History**.
3. Click **Issue pass** to confirm.
Depending on how you configured **Personal fields**, the modal handles them as follows:
* **Editable fields:** appear with default values that you can change for this user.
* **Tag placeholders (like `{Seat}`):** do not appear in the dialog. Pushwoosh automatically populates them from the user's tags.
You can also edit any personal field on an individual pass at any time after issuance.
Pushwoosh generates the pass from the campaign's current design and lists it on the [**Passes** tab](#passes-tab) and in the application's **All passes** table ([Apple Wallet](/product/messaging-channels/wallet-passes/apple-wallet/#view-and-manage-existing-passes) or [Google Wallet](/product/messaging-channels/wallet-passes/google-wallet/#view-and-manage-existing-passes)).
### Attach an existing pass to a campaign
You can attach standalone passes (created outside any campaign) to a campaign so they start receiving shared updates.
1. On the **Passes** tab, click **Attach passes**.
2. Search for passes by User ID, serial number, or barcode.
3. Select the passes and confirm.
Once attached:
* **Shared fields** start following the campaign and update whenever you change the pass template.
* **Personal values** already on the pass (such as user details or unique balances) are preserved.
## Manage an existing campaign
Opening a created campaign from **Campaigns → Wallet Passes → Campaigns** displays its status, revision counter, live pass preview, and three main tabs: **Design**, **Passes**, and **History**.
 ### Change the campaign status
Use status to track where each campaign stands: still being designed, actively issuing passes, or done and archived.
To change the status, select an option from the **Status** dropdown in the campaign header. The change saves immediately without a separate confirmation step:
* **Draft** or **Active:** allows you to issue new passes, attach existing ones, and push design updates.
* **Archived:** pauses new pass issuance. You cannot issue or attach passes while the campaign is archived, but previously issued passes continue working and receiving shared updates.
### Design tab
On the **Design** tab, you can update the pass template, change colors, modify shared and personal fields, or upload new campaign images.
#### Update design and push changes to passes
When you edit a shared field or replace a campaign image and click **Save changes**, Pushwoosh displays a confirmation dialog showing how many issued passes will be updated.
* **If no passes have overrides:** click **Update** to push the changes to all issued passes.
* **If some passes have overrides:** choose whether to update only standard passes (preserving user overrides) or overwrite all passes.
Confirming the update increments the campaign's revision counter (for example, to **Revision 2**) and automatically syncs the changes to users' devices.
#### Override a shared field on an individual pass
If you need to customize a shared field for a specific user, edit that field directly on their individual pass (from the **Passes** tab or **All passes**):
* **Create an override:** saving a custom value on an individual pass detaches that field from campaign-wide updates. Future updates to the campaign will skip this pass for that specific field.
* **Remove an override:** to restore campaign control, edit the pass and click **Use the campaign value** next to the overridden field.
### Change the campaign status
Use status to track where each campaign stands: still being designed, actively issuing passes, or done and archived.
To change the status, select an option from the **Status** dropdown in the campaign header. The change saves immediately without a separate confirmation step:
* **Draft** or **Active:** allows you to issue new passes, attach existing ones, and push design updates.
* **Archived:** pauses new pass issuance. You cannot issue or attach passes while the campaign is archived, but previously issued passes continue working and receiving shared updates.
### Design tab
On the **Design** tab, you can update the pass template, change colors, modify shared and personal fields, or upload new campaign images.
#### Update design and push changes to passes
When you edit a shared field or replace a campaign image and click **Save changes**, Pushwoosh displays a confirmation dialog showing how many issued passes will be updated.
* **If no passes have overrides:** click **Update** to push the changes to all issued passes.
* **If some passes have overrides:** choose whether to update only standard passes (preserving user overrides) or overwrite all passes.
Confirming the update increments the campaign's revision counter (for example, to **Revision 2**) and automatically syncs the changes to users' devices.
#### Override a shared field on an individual pass
If you need to customize a shared field for a specific user, edit that field directly on their individual pass (from the **Passes** tab or **All passes**):
* **Create an override:** saving a custom value on an individual pass detaches that field from campaign-wide updates. Future updates to the campaign will skip this pass for that specific field.
* **Remove an override:** to restore campaign control, edit the pass and click **Use the campaign value** next to the overridden field.
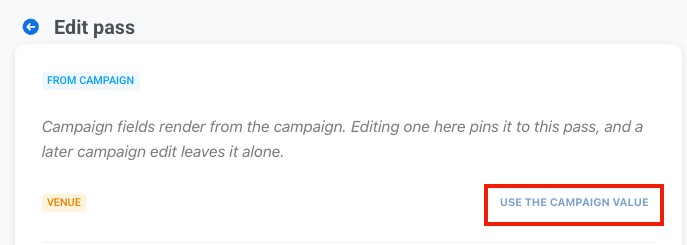 You can track which passes have customized values on the [**Passes** tab](#passes-tab) under the **Overrides** column.
### Passes tab
The **Passes** tab lists every pass issued by the campaign, including its serial number, recipient User ID, active overrides, current revision, and last update date.
You can track which passes have customized values on the [**Passes** tab](#passes-tab) under the **Overrides** column.
### Passes tab
The **Passes** tab lists every pass issued by the campaign, including its serial number, recipient User ID, active overrides, current revision, and last update date.
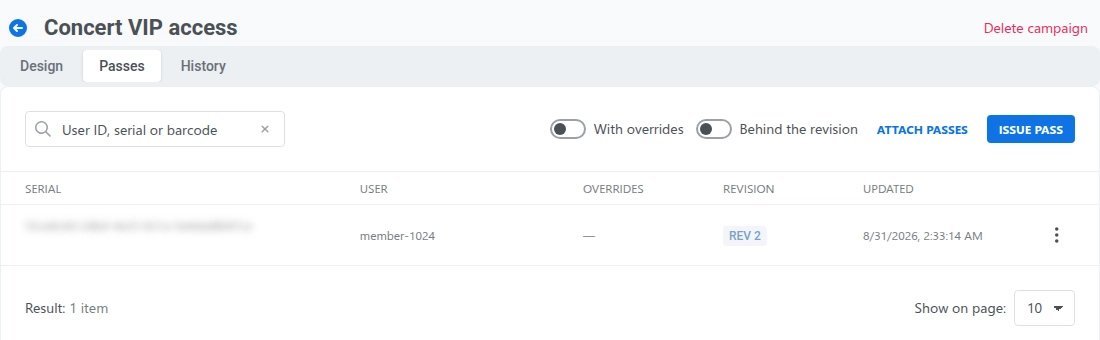 Use table filters to find specific passes:
* **With overrides:** shows passes that have at least one custom-edited field.
* **Behind the revision:** shows passes that have not yet received the latest campaign update.
To issue new passes or attach existing ones, see [Issue passes to users](#issue-passes-to-users).
### History tab
The **History** tab lists all revisions of the campaign in chronological order, showing which fields were modified in each version.
Use table filters to find specific passes:
* **With overrides:** shows passes that have at least one custom-edited field.
* **Behind the revision:** shows passes that have not yet received the latest campaign update.
To issue new passes or attach existing ones, see [Issue passes to users](#issue-passes-to-users).
### History tab
The **History** tab lists all revisions of the campaign in chronological order, showing which fields were modified in each version.
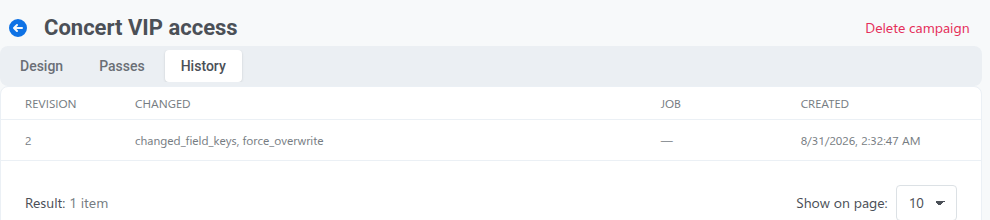 The delivery status of the most recent update appears below the tabs:
* **Cancel:** stops sending the update to passes it has not reached yet. These passes remain on their previous revision.
* **Retry failed:** re-attempts delivery for passes that failed to update (marked as failed after 5 attempts).
Once a new revision is saved, older updates can no longer be retried or canceled.
## Delete a campaign
Open the campaign and click **Delete campaign** at the top right of the page.
The delivery status of the most recent update appears below the tabs:
* **Cancel:** stops sending the update to passes it has not reached yet. These passes remain on their previous revision.
* **Retry failed:** re-attempts delivery for passes that failed to update (marked as failed after 5 attempts).
Once a new revision is saved, older updates can no longer be retried or canceled.
## Delete a campaign
Open the campaign and click **Delete campaign** at the top right of the page.
 Deleting a campaign does not delete or invalidate already issued passes. Issued passes retain their current content and images, but stop receiving shared updates. Any future changes must be made on each pass individually.