# Message Wallet pass holders
Once a user adds your pass, Pushwoosh registers it as a platform subscription (Apple Wallet or Google Wallet) tied to that [User ID](/product/pushwoosh-knowledge-hub/users-userids/).
You can reach holders in several ways: send a pass update, send a one-time push, automate messages from a Customer Journey, or notify holders of a specific pass via API.
## Send a pass update
Editing a pass and saving pushes the new version to every device that added it, without a separate message. The way you alert holders about the change differs by platform.
### Apple Wallet
Set a **Change message** on any field you want holders alerted about; iOS shows it as a lock-screen message. Fields without a change message update silently.
1. In **Campaigns → Wallet Passes → Apple Wallet**, find the pass and click **Edit** in the actions menu.
2. Change the fields you need, and add a change message to any field you want holders to be alerted about.
3. Click **Save**.
### Google Wallet
For loyalty, event ticket, and flight passes, enable **Notify about changed fields** to have Google send an Android notification alongside the sync. Other pass types sync silently.
1. In **Campaigns → Wallet Passes → Google Wallet**, find the pass and click **Edit** in the actions menu.
2. Change the fields you need.
3. Make sure [**Notify about changed fields**](/product/messaging-channels/wallet-passes/google-wallet/#view-and-manage-existing-passes) is enabled.
4. Click **Save changes**.
## Send a one-time push to pass holders
Send a standalone push to one pass holder or to a wider audience. It appears as a lock-screen message on an Apple Wallet pass, or a notification on a Google Wallet pass.
1. Open the one-time push composer. Either click **Send message** in **Campaigns → Wallet Passes → Apple Wallet** or **Google Wallet**, or go to **Campaigns → One-Time Messages** and click **Send message → One-time push**.
2. On the **Content** step, write the message or select a preset.
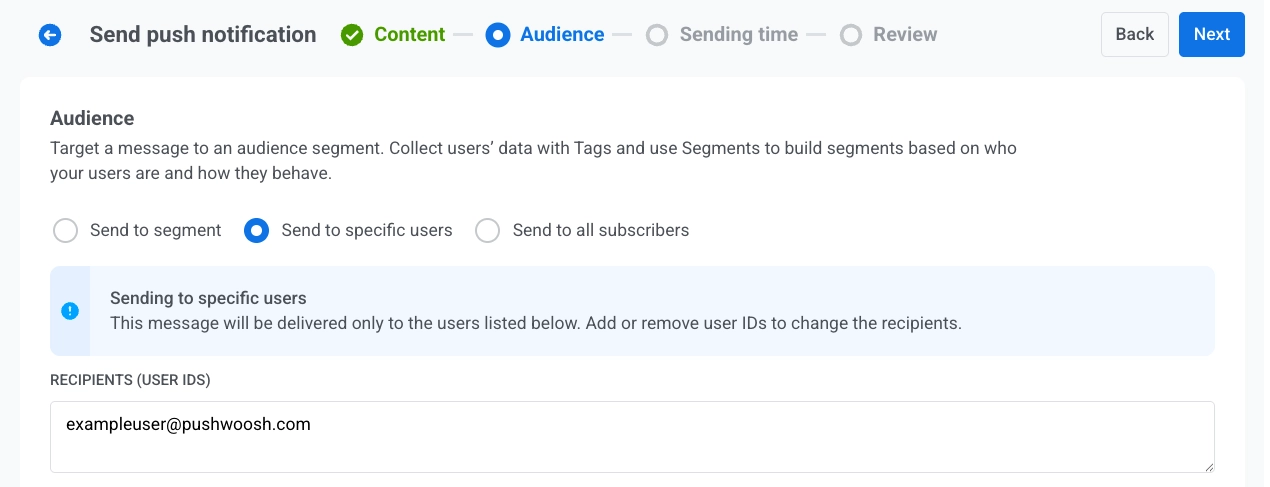
3. On the **Audience** step, set who receives the message. The default depends on where you opened the composer:
* **From Send message on a pass:** **Send to specific users** is selected, and **Recipients (User IDs)** already lists that pass holder's [User ID](/product/pushwoosh-knowledge-hub/users-userids/). Send as is to reach that one holder, or change the audience:
* Add more User IDs in **Recipients (User IDs)**
* Switch to **Send to segment**
* Choose **Send to all subscribers**
* **From One-Time Messages:** Set the audience as in a regular [one-time push](/product/messaging-channels/push-notifications/send-push-notifications/one-time-push/#select-audience-for-push-notification): **Send to specific users**, **Send to segment**, or **Send to all subscribers**.
4. Under **Target platforms**, select **Apple Wallet**, **Google Wallet**, or both.
5. Send or schedule the message.
## Automate messages from a Customer Journey
Send messages automatically based on events or segments.
### Trigger-based entry journey
1. Create a [Customer Journey](/product/customer-journey/pushwoosh-journey-overview/) and add a [**Trigger-based entry**](/product/customer-journey/journey-elements/entry-elements/trigger-based-entry/).
2. Select the event that should start the Journey. Create a custom event in the Control Panel first if you haven't already, for example `RewardAvailable`.
3. Add and configure a push element. Enable [**Send by User ID**](/product/customer-journey/journey-elements/channels/push/#send-by-user-id) so the push reaches every device tied to the user, including the saved pass.
4. Finish configuring and activate the Journey.
When the entry event fires, Pushwoosh sends the push to every device tied to the user. Pass holders receive it as a lock-screen message on Apple Wallet, or a notification on Google Wallet. Users without a wallet pass receive it on their other devices.
**Example: Notify a user that a reward is available**
`POST https://api.pushwoosh.com/json/1.3/postEvent`
```json
{
"request": {
"application": "XXXXX-XXXXX",
"userId": "u12345",
"event": "RewardAvailable",
"attributes": {
"reward": "Free coffee",
"expires": "2026-07-01"
}
}
}
```
The `event` name must match an event created in your Control Panel.
### Other ways to build the journey
The trigger-based flow above is one option. Depending on what should start the journey, choose a different [entry element](/product/customer-journey/journey-elements/entry-elements/):
* **[Audience-based entry](/product/customer-journey/journey-elements/entry-elements/audience-based-entry/):** start the journey for a whole segment instead of a single event. Run it once, on a schedule, or periodically (for example, every week to everyone holding an active pass), with new users entering as they join the segment.
* **[API-based entry](/product/customer-journey/journey-elements/entry-elements/api-based-entry/):** start the journey from a business event that happens outside the app, such as a flight delay or gate change. Your external system calls the entry element's request template and passes a filter to target the right users, for example everyone who has a tag `flightNumber = SU1234` set when the pass was issued. A good fit for boarding passes and event tickets.
## Notify holders of a specific pass via API
To message everyone who saved one specific pass, call **Update a pass**. It updates the pass and notifies devices. On Google Wallet, set `notifyMessage` to send a custom notification alongside the update; without it, the pass syncs silently.
* **Apple Wallet:**
* **Google Wallet:**
 4. Under **Target platforms**, select **Apple Wallet**, **Google Wallet**, or both.
5. Send or schedule the message.
## Automate messages from a Customer Journey
Send messages automatically based on events or segments.
### Trigger-based entry journey
1. Create a [Customer Journey](/product/customer-journey/pushwoosh-journey-overview/) and add a [**Trigger-based entry**](/product/customer-journey/journey-elements/entry-elements/trigger-based-entry/).
2. Select the event that should start the Journey. Create a custom event in the Control Panel first if you haven't already, for example `RewardAvailable`.
3. Add and configure a push element. Enable [**Send by User ID**](/product/customer-journey/journey-elements/channels/push/#send-by-user-id) so the push reaches every device tied to the user, including the saved pass.
4. Finish configuring and activate the Journey.
When the entry event fires, Pushwoosh sends the push to every device tied to the user. Pass holders receive it as a lock-screen message on Apple Wallet, or a notification on Google Wallet. Users without a wallet pass receive it on their other devices.
**Example: Notify a user that a reward is available**
`POST https://api.pushwoosh.com/json/1.3/postEvent`
```json
{
"request": {
"application": "XXXXX-XXXXX",
"userId": "u12345",
"event": "RewardAvailable",
"attributes": {
"reward": "Free coffee",
"expires": "2026-07-01"
}
}
}
```
The `event` name must match an event created in your Control Panel.
### Other ways to build the journey
The trigger-based flow above is one option. Depending on what should start the journey, choose a different [entry element](/product/customer-journey/journey-elements/entry-elements/):
* **[Audience-based entry](/product/customer-journey/journey-elements/entry-elements/audience-based-entry/):** start the journey for a whole segment instead of a single event. Run it once, on a schedule, or periodically (for example, every week to everyone holding an active pass), with new users entering as they join the segment.
* **[API-based entry](/product/customer-journey/journey-elements/entry-elements/api-based-entry/):** start the journey from a business event that happens outside the app, such as a flight delay or gate change. Your external system calls the entry element's request template and passes a filter to target the right users, for example everyone who has a tag `flightNumber = SU1234` set when the pass was issued. A good fit for boarding passes and event tickets.
## Notify holders of a specific pass via API
To message everyone who saved one specific pass, call **Update a pass**. It updates the pass and notifies devices. On Google Wallet, set `notifyMessage` to send a custom notification alongside the update; without it, the pass syncs silently.
* **Apple Wallet:**
4. Under **Target platforms**, select **Apple Wallet**, **Google Wallet**, or both.
5. Send or schedule the message.
## Automate messages from a Customer Journey
Send messages automatically based on events or segments.
### Trigger-based entry journey
1. Create a [Customer Journey](/product/customer-journey/pushwoosh-journey-overview/) and add a [**Trigger-based entry**](/product/customer-journey/journey-elements/entry-elements/trigger-based-entry/).
2. Select the event that should start the Journey. Create a custom event in the Control Panel first if you haven't already, for example `RewardAvailable`.
3. Add and configure a push element. Enable [**Send by User ID**](/product/customer-journey/journey-elements/channels/push/#send-by-user-id) so the push reaches every device tied to the user, including the saved pass.
4. Finish configuring and activate the Journey.
When the entry event fires, Pushwoosh sends the push to every device tied to the user. Pass holders receive it as a lock-screen message on Apple Wallet, or a notification on Google Wallet. Users without a wallet pass receive it on their other devices.
**Example: Notify a user that a reward is available**
`POST https://api.pushwoosh.com/json/1.3/postEvent`
```json
{
"request": {
"application": "XXXXX-XXXXX",
"userId": "u12345",
"event": "RewardAvailable",
"attributes": {
"reward": "Free coffee",
"expires": "2026-07-01"
}
}
}
```
The `event` name must match an event created in your Control Panel.
### Other ways to build the journey
The trigger-based flow above is one option. Depending on what should start the journey, choose a different [entry element](/product/customer-journey/journey-elements/entry-elements/):
* **[Audience-based entry](/product/customer-journey/journey-elements/entry-elements/audience-based-entry/):** start the journey for a whole segment instead of a single event. Run it once, on a schedule, or periodically (for example, every week to everyone holding an active pass), with new users entering as they join the segment.
* **[API-based entry](/product/customer-journey/journey-elements/entry-elements/api-based-entry/):** start the journey from a business event that happens outside the app, such as a flight delay or gate change. Your external system calls the entry element's request template and passes a filter to target the right users, for example everyone who has a tag `flightNumber = SU1234` set when the pass was issued. A good fit for boarding passes and event tickets.
## Notify holders of a specific pass via API
To message everyone who saved one specific pass, call **Update a pass**. It updates the pass and notifies devices. On Google Wallet, set `notifyMessage` to send a custom notification alongside the update; without it, the pass syncs silently.
* **Apple Wallet:**