# Send one-time SMS
To send a one-time SMS in Pushwoosh, navigate to the **Campaigns** section, select **One-time messages**, and click **Send message** > **SMS**.
## Select SMS content
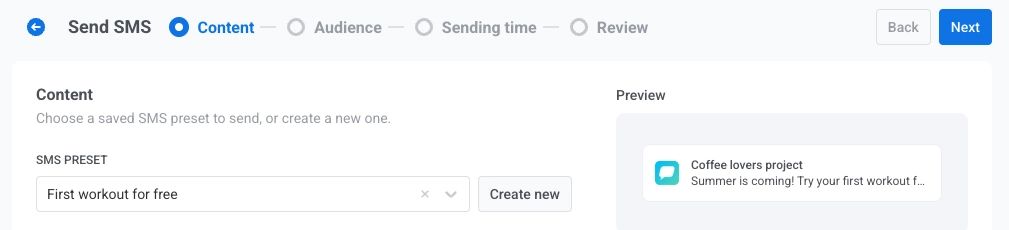
In the **Content** step, choose the [SMS preset](/product/content/sms-presets/) you want to send. The message text comes from the preset, so a preset is required.
* To find an existing preset, use the search field or open the dropdown and select a preset. The preview on the right shows how the message will look, including thumbnails of any [MMS attachments](/product/content/sms-presets/#add-mms-attachments) the preset has.
* To create a new preset, click **Create new**, build the preset, and save it. The new preset is then selected automatically.
### Select message type
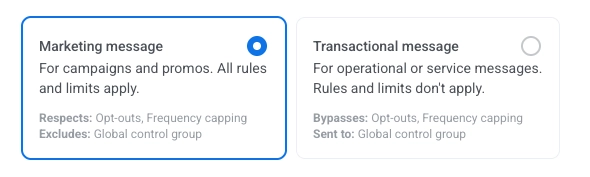
Choose how this SMS is treated for subscription and delivery rules:
* **Marketing message**: Respects user opt-outs and frequency capping. Not sent to [global control group](/product/audience-data-and-segmentation/global-control-group/) users.
* **Transactional message**: Sent to all users regardless of subscription status. Bypasses opt-outs and frequency capping. Delivered to control group users.
[Learn how message type affects delivery](/product/messaging-channels/marketing-vs-transactional/).
## Select the audience for your SMS campaign
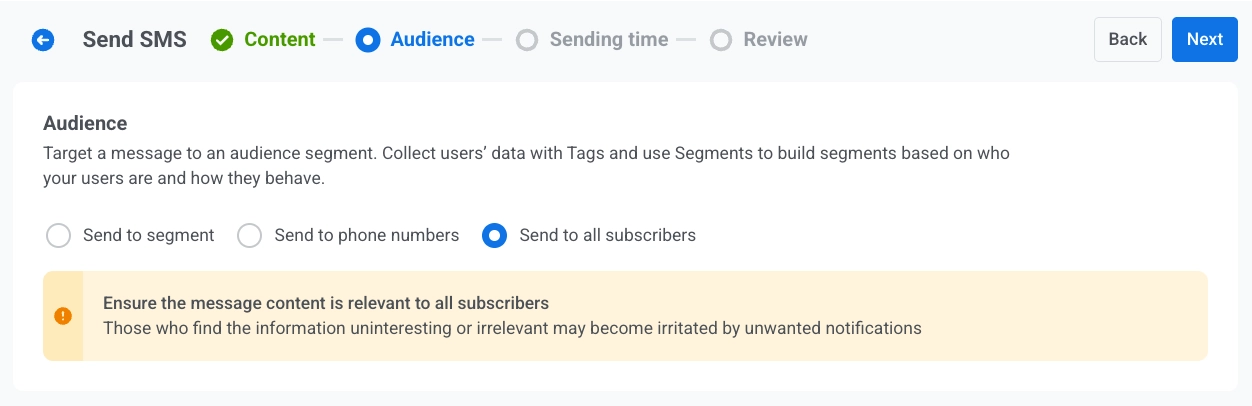
In the **Audience** step, define who will receive your SMS.
### Send to segment
Target a predefined [segment](/product/audience-data-and-segmentation/segmentation/) of your audience based on tags, events, or behavior. Select a segment from the dropdown, or click **Create segment** to [build](/product/audience-data-and-segmentation/segmentation/create-segments/) or [import](/product/audience-data-and-segmentation/segmentation/create-segments/by-import/#how-to-import-a-segment) one.
### Send to a list of phone numbers
Send the SMS to a specific list of phone numbers entered directly in the form. Phone numbers that are not yet in your project are automatically registered as SMS devices and included in the send.
### Send to all subscribers
Target your entire SMS-reachable audience.
Once you've set your audience, click **Next** to proceed to the scheduling step.
## Schedule SMS
Choose when to send your SMS.
### Send immediately
Send the SMS as soon as the campaign setup is complete. This is ideal for urgent or time-sensitive messages.
### Selected time
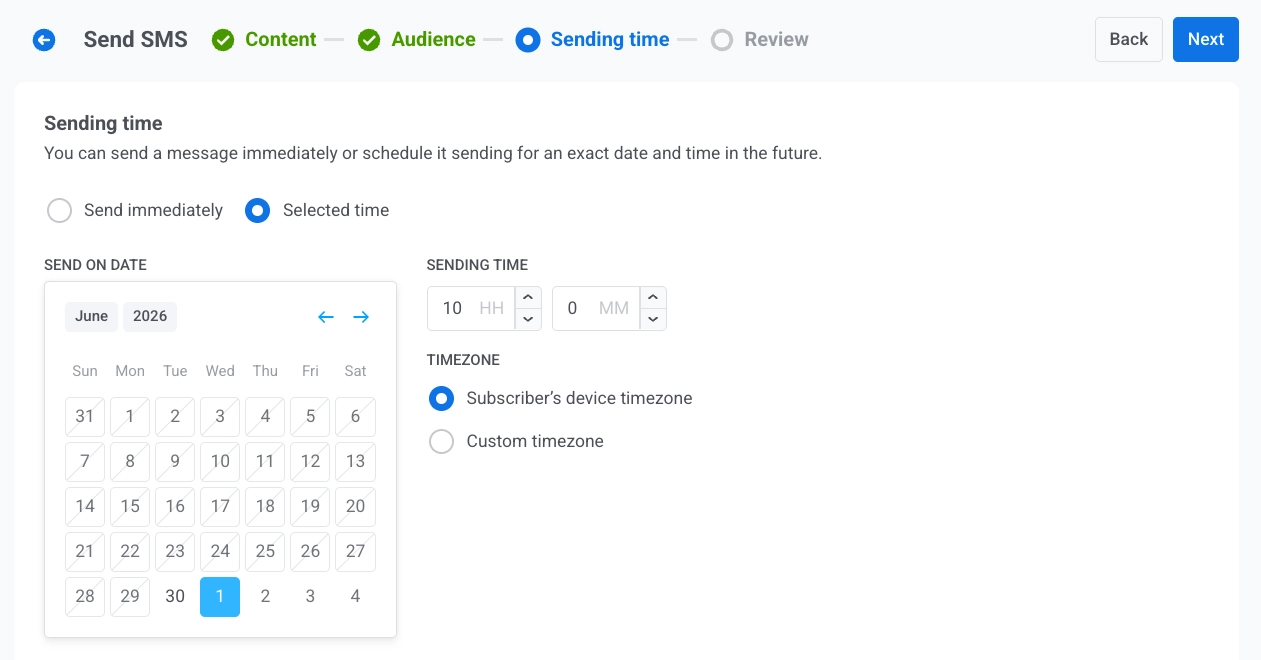
Schedule your SMS for a specific date and time.
* **Set the date and time**: Use the calendar to pick the date, then specify the time in hours and minutes (24-hour format).
* **Select the timezone**:
* **Subscriber's device timezone**: The SMS is sent at the specified local time for each recipient.
* **Custom timezone**: The SMS is sent at the same time for all recipients, useful for targeting a particular region.
### Configure message delivery settings
#### Set frequency capping
Use [**Frequency capping**](/product/messaging-channels/global-frequency-capping/#enable-global-frequency-capping) to limit how often users receive SMS messages, preventing over-messaging and reducing opt-outs. Choose one of the following options:
* **Use Global frequency capping settings**
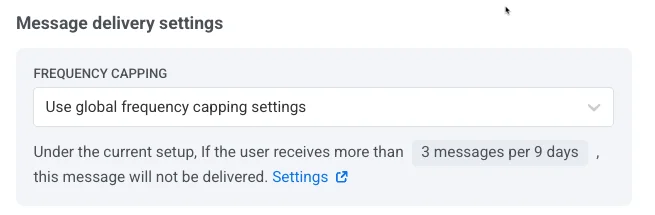
Apply the project-wide limits configured in your [Global frequency capping settings](/product/messaging-channels/global-frequency-capping/#enable-global-frequency-capping). For example, if the global limit is 3 messages in 9 days, additional messages exceeding this limit are skipped.
* **Ignore Global frequency capping**
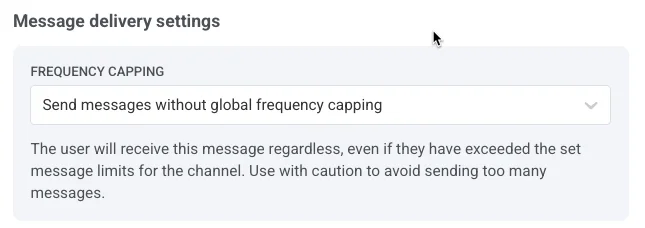
The user receives this message even if they've exceeded the channel's message limits. Use with caution to avoid over-messaging.
* **Use custom frequency capping**
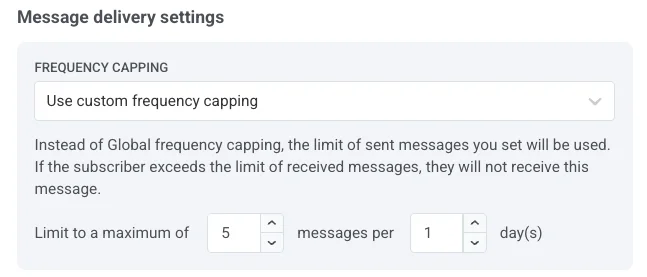
Set a custom message limit for this message. If the user exceeds this custom cap, the message is skipped.
#### Set send rate limits
The **Send rate** setting controls how quickly messages are delivered to your audience. Adjusting the send rate helps you manage delivery speed, prevent backend overload, and improve overall deliverability.
Choose one of the following options:
* **Use global send rate settings**
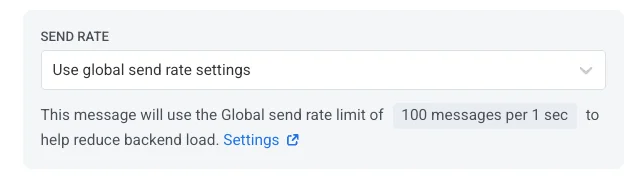
Applies the send rate limits configured in your project's message delivery settings. If no limits are set, all messages are sent immediately. [Learn more about global send rate limits](/product/messaging-channels/global-frequency-capping/#set-send-rate-limits)
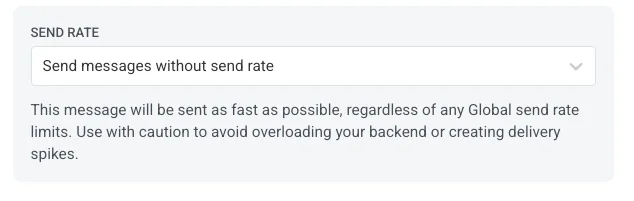
* **Send messages without send rate**
Sends messages as fast as possible, ignoring any global send rate limits. Use with caution to avoid delivery spikes.
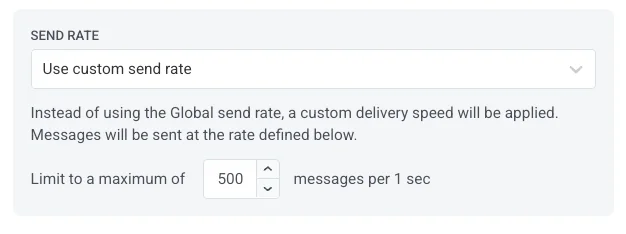
* **Use custom send rate**
Overrides the global send rate for this message only. Specify the number of messages sent per minute for full control over delivery speed.
Once you've configured the options, click **Next** to proceed to the confirmation step.
## Review and send
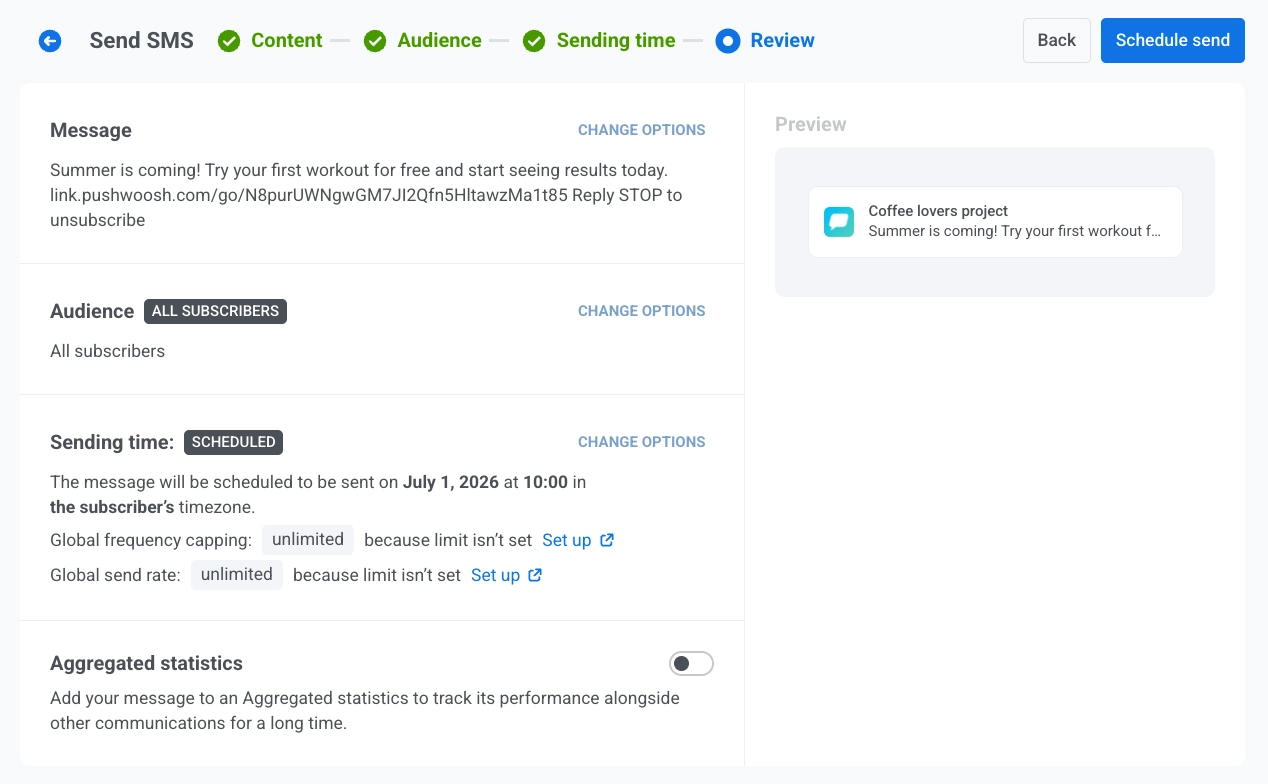
In **Review**, check the preview and the summaries for content, audience, and schedule. If the selected preset has MMS attachments, the content summary shows "Sent as MMS with N image(s)" and the preview includes the attachment thumbnails. Update anything that still needs to change before you send.
Once everything is verified, click **Schedule** to set it for later delivery or **Send Now** to send it immediately, depending on your selected scheduling options.
## Cancel or edit a scheduled SMS
For SMS messages that are scheduled and not yet sent (status **PENDING**), you can change or cancel them. Open the list of messages in **Campaigns** → **One-time messages**, then open the actions menu (⋮) for the message:
* **Edit message**: opens the SMS form with the message data loaded. You can update the content, audience, schedule, and delivery settings.
* **Delete message**: cancels the scheduled delivery and changes the status to **Canceled**.
## Example scenario
Imagine you run an e-commerce store and want to send a flash-sale alert by SMS to customers who purchased in the last 90 days, scheduled for the morning the sale starts.
**1.** Navigate to **Campaigns**, select **One-time messages**, click **Send message**, and choose **SMS**.
**2.** In the **Content** step, select the **Flash Sale Alert** preset:
`"Flash sale starts now! Get 30% off everything today only. Shop: {shortened link}"`
Keep the message type as **Marketing** so it respects opt-outs and frequency capping.
**3.** In the **Audience** step, choose **Send to segment** and select **Recent buyers (90 days)**.
**4.** In the **Schedule** step, choose **Selected time**, set the date and time to the sale's start, and select **Subscriber's device timezone** so each customer receives it at the same local time.
**5.** In **Review**, check the preview and the audience and schedule summaries, then click **Schedule** to finalize the campaign.
 ### Select message type
Choose how this SMS is treated for subscription and delivery rules:
* **Marketing message**: Respects user opt-outs and frequency capping. Not sent to [global control group](/product/audience-data-and-segmentation/global-control-group/) users.
* **Transactional message**: Sent to all users regardless of subscription status. Bypasses opt-outs and frequency capping. Delivered to control group users.
### Select message type
Choose how this SMS is treated for subscription and delivery rules:
* **Marketing message**: Respects user opt-outs and frequency capping. Not sent to [global control group](/product/audience-data-and-segmentation/global-control-group/) users.
* **Transactional message**: Sent to all users regardless of subscription status. Bypasses opt-outs and frequency capping. Delivered to control group users.
 [Learn how message type affects delivery](/product/messaging-channels/marketing-vs-transactional/).
## Select the audience for your SMS campaign
In the **Audience** step, define who will receive your SMS.
[Learn how message type affects delivery](/product/messaging-channels/marketing-vs-transactional/).
## Select the audience for your SMS campaign
In the **Audience** step, define who will receive your SMS.
 ### Send to segment
Target a predefined [segment](/product/audience-data-and-segmentation/segmentation/) of your audience based on tags, events, or behavior. Select a segment from the dropdown, or click **Create segment** to [build](/product/audience-data-and-segmentation/segmentation/create-segments/) or [import](/product/audience-data-and-segmentation/segmentation/create-segments/by-import/#how-to-import-a-segment) one.
### Send to a list of phone numbers
Send the SMS to a specific list of phone numbers entered directly in the form. Phone numbers that are not yet in your project are automatically registered as SMS devices and included in the send.
### Send to all subscribers
Target your entire SMS-reachable audience.
Once you've set your audience, click **Next** to proceed to the scheduling step.
## Schedule SMS
Choose when to send your SMS.
### Send immediately
Send the SMS as soon as the campaign setup is complete. This is ideal for urgent or time-sensitive messages.
### Selected time
Schedule your SMS for a specific date and time.
* **Set the date and time**: Use the calendar to pick the date, then specify the time in hours and minutes (24-hour format).
* **Select the timezone**:
* **Subscriber's device timezone**: The SMS is sent at the specified local time for each recipient.
* **Custom timezone**: The SMS is sent at the same time for all recipients, useful for targeting a particular region.
### Send to segment
Target a predefined [segment](/product/audience-data-and-segmentation/segmentation/) of your audience based on tags, events, or behavior. Select a segment from the dropdown, or click **Create segment** to [build](/product/audience-data-and-segmentation/segmentation/create-segments/) or [import](/product/audience-data-and-segmentation/segmentation/create-segments/by-import/#how-to-import-a-segment) one.
### Send to a list of phone numbers
Send the SMS to a specific list of phone numbers entered directly in the form. Phone numbers that are not yet in your project are automatically registered as SMS devices and included in the send.
### Send to all subscribers
Target your entire SMS-reachable audience.
Once you've set your audience, click **Next** to proceed to the scheduling step.
## Schedule SMS
Choose when to send your SMS.
### Send immediately
Send the SMS as soon as the campaign setup is complete. This is ideal for urgent or time-sensitive messages.
### Selected time
Schedule your SMS for a specific date and time.
* **Set the date and time**: Use the calendar to pick the date, then specify the time in hours and minutes (24-hour format).
* **Select the timezone**:
* **Subscriber's device timezone**: The SMS is sent at the specified local time for each recipient.
* **Custom timezone**: The SMS is sent at the same time for all recipients, useful for targeting a particular region.
 ### Configure message delivery settings
#### Set frequency capping
Use [**Frequency capping**](/product/messaging-channels/global-frequency-capping/#enable-global-frequency-capping) to limit how often users receive SMS messages, preventing over-messaging and reducing opt-outs. Choose one of the following options:
* **Use Global frequency capping settings**
Apply the project-wide limits configured in your [Global frequency capping settings](/product/messaging-channels/global-frequency-capping/#enable-global-frequency-capping). For example, if the global limit is 3 messages in 9 days, additional messages exceeding this limit are skipped.
### Configure message delivery settings
#### Set frequency capping
Use [**Frequency capping**](/product/messaging-channels/global-frequency-capping/#enable-global-frequency-capping) to limit how often users receive SMS messages, preventing over-messaging and reducing opt-outs. Choose one of the following options:
* **Use Global frequency capping settings**
Apply the project-wide limits configured in your [Global frequency capping settings](/product/messaging-channels/global-frequency-capping/#enable-global-frequency-capping). For example, if the global limit is 3 messages in 9 days, additional messages exceeding this limit are skipped.
 * **Ignore Global frequency capping**
The user receives this message even if they've exceeded the channel's message limits. Use with caution to avoid over-messaging.
* **Ignore Global frequency capping**
The user receives this message even if they've exceeded the channel's message limits. Use with caution to avoid over-messaging.
 * **Use custom frequency capping**
Set a custom message limit for this message. If the user exceeds this custom cap, the message is skipped.
* **Use custom frequency capping**
Set a custom message limit for this message. If the user exceeds this custom cap, the message is skipped.
 #### Set send rate limits
The **Send rate** setting controls how quickly messages are delivered to your audience. Adjusting the send rate helps you manage delivery speed, prevent backend overload, and improve overall deliverability.
Choose one of the following options:
* **Use global send rate settings**
Applies the send rate limits configured in your project's message delivery settings. If no limits are set, all messages are sent immediately. [Learn more about global send rate limits](/product/messaging-channels/global-frequency-capping/#set-send-rate-limits)
#### Set send rate limits
The **Send rate** setting controls how quickly messages are delivered to your audience. Adjusting the send rate helps you manage delivery speed, prevent backend overload, and improve overall deliverability.
Choose one of the following options:
* **Use global send rate settings**
Applies the send rate limits configured in your project's message delivery settings. If no limits are set, all messages are sent immediately. [Learn more about global send rate limits](/product/messaging-channels/global-frequency-capping/#set-send-rate-limits)
 * **Send messages without send rate**
Sends messages as fast as possible, ignoring any global send rate limits. Use with caution to avoid delivery spikes.
* **Send messages without send rate**
Sends messages as fast as possible, ignoring any global send rate limits. Use with caution to avoid delivery spikes.
 * **Use custom send rate**
Overrides the global send rate for this message only. Specify the number of messages sent per minute for full control over delivery speed.
* **Use custom send rate**
Overrides the global send rate for this message only. Specify the number of messages sent per minute for full control over delivery speed.
 Once you've configured the options, click **Next** to proceed to the confirmation step.
## Review and send
In **Review**, check the preview and the summaries for content, audience, and schedule. If the selected preset has MMS attachments, the content summary shows "Sent as MMS with N image(s)" and the preview includes the attachment thumbnails. Update anything that still needs to change before you send.
Once you've configured the options, click **Next** to proceed to the confirmation step.
## Review and send
In **Review**, check the preview and the summaries for content, audience, and schedule. If the selected preset has MMS attachments, the content summary shows "Sent as MMS with N image(s)" and the preview includes the attachment thumbnails. Update anything that still needs to change before you send.
 Once everything is verified, click **Schedule** to set it for later delivery or **Send Now** to send it immediately, depending on your selected scheduling options.
## Cancel or edit a scheduled SMS
For SMS messages that are scheduled and not yet sent (status **PENDING**), you can change or cancel them. Open the list of messages in **Campaigns** → **One-time messages**, then open the actions menu (⋮) for the message:
* **Edit message**: opens the SMS form with the message data loaded. You can update the content, audience, schedule, and delivery settings.
* **Delete message**: cancels the scheduled delivery and changes the status to **Canceled**.
## Example scenario
Imagine you run an e-commerce store and want to send a flash-sale alert by SMS to customers who purchased in the last 90 days, scheduled for the morning the sale starts.
**1.** Navigate to **Campaigns**, select **One-time messages**, click **Send message**, and choose **SMS**.
**2.** In the **Content** step, select the **Flash Sale Alert** preset:
`"Flash sale starts now! Get 30% off everything today only. Shop: {shortened link}"`
Keep the message type as **Marketing** so it respects opt-outs and frequency capping.
**3.** In the **Audience** step, choose **Send to segment** and select **Recent buyers (90 days)**.
**4.** In the **Schedule** step, choose **Selected time**, set the date and time to the sale's start, and select **Subscriber's device timezone** so each customer receives it at the same local time.
**5.** In **Review**, check the preview and the audience and schedule summaries, then click **Schedule** to finalize the campaign.
Once everything is verified, click **Schedule** to set it for later delivery or **Send Now** to send it immediately, depending on your selected scheduling options.
## Cancel or edit a scheduled SMS
For SMS messages that are scheduled and not yet sent (status **PENDING**), you can change or cancel them. Open the list of messages in **Campaigns** → **One-time messages**, then open the actions menu (⋮) for the message:
* **Edit message**: opens the SMS form with the message data loaded. You can update the content, audience, schedule, and delivery settings.
* **Delete message**: cancels the scheduled delivery and changes the status to **Canceled**.
## Example scenario
Imagine you run an e-commerce store and want to send a flash-sale alert by SMS to customers who purchased in the last 90 days, scheduled for the morning the sale starts.
**1.** Navigate to **Campaigns**, select **One-time messages**, click **Send message**, and choose **SMS**.
**2.** In the **Content** step, select the **Flash Sale Alert** preset:
`"Flash sale starts now! Get 30% off everything today only. Shop: {shortened link}"`
Keep the message type as **Marketing** so it respects opt-outs and frequency capping.
**3.** In the **Audience** step, choose **Send to segment** and select **Recent buyers (90 days)**.
**4.** In the **Schedule** step, choose **Selected time**, set the date and time to the sale's start, and select **Subscriber's device timezone** so each customer receives it at the same local time.
**5.** In **Review**, check the preview and the audience and schedule summaries, then click **Schedule** to finalize the campaign.