# Scheduled push
## Schedule via the one-time push form
To send a one-time push notification in Pushwoosh, go to the **Campaigns** section. Select **One-time messages** and click **Send message** → **One-time push**.
### Select or create push message content
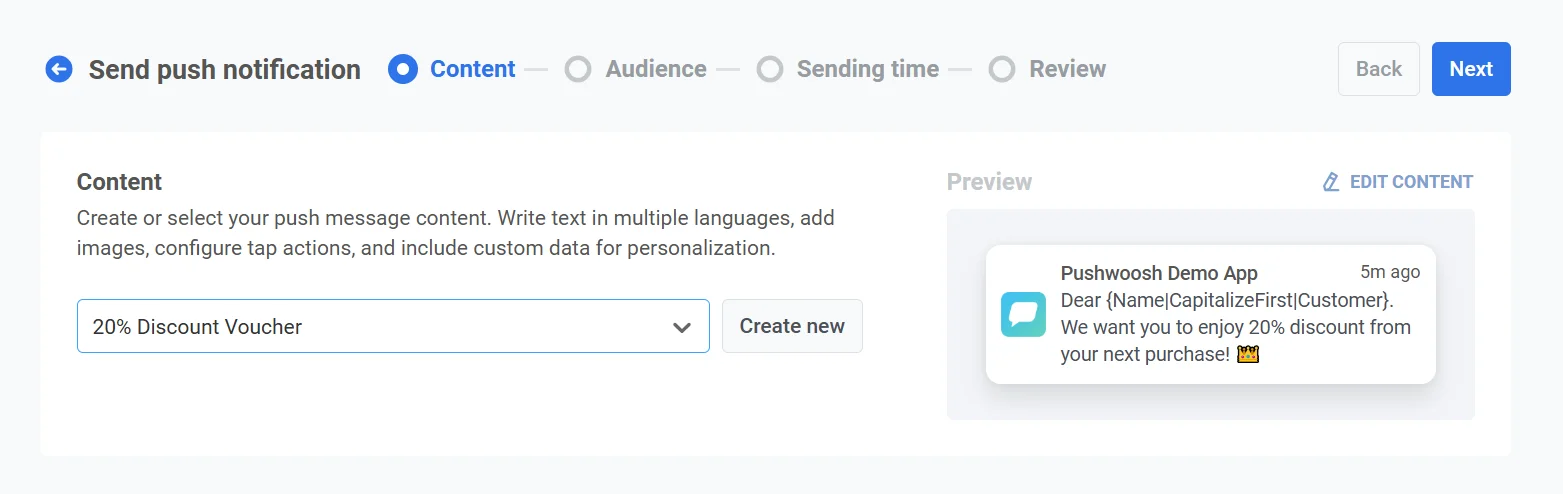
To start, either create new content or select existing content for your push notification. If you’d like to use a pre-built push preset, choose it from the dropdown menu of available options.
To create a new message, click **Create new** and [follow this guide](/product/content/push-presets) to set up a new push preset.
If you need to edit an existing preset, click **Edit Content** to modify the message.
A preview of the notification will be displayed on the right side, showing how it will appear to users.
Once you're satisfied with the content and appearance, click **Next** to proceed to the Audience setup step.
### Select audience for push notification
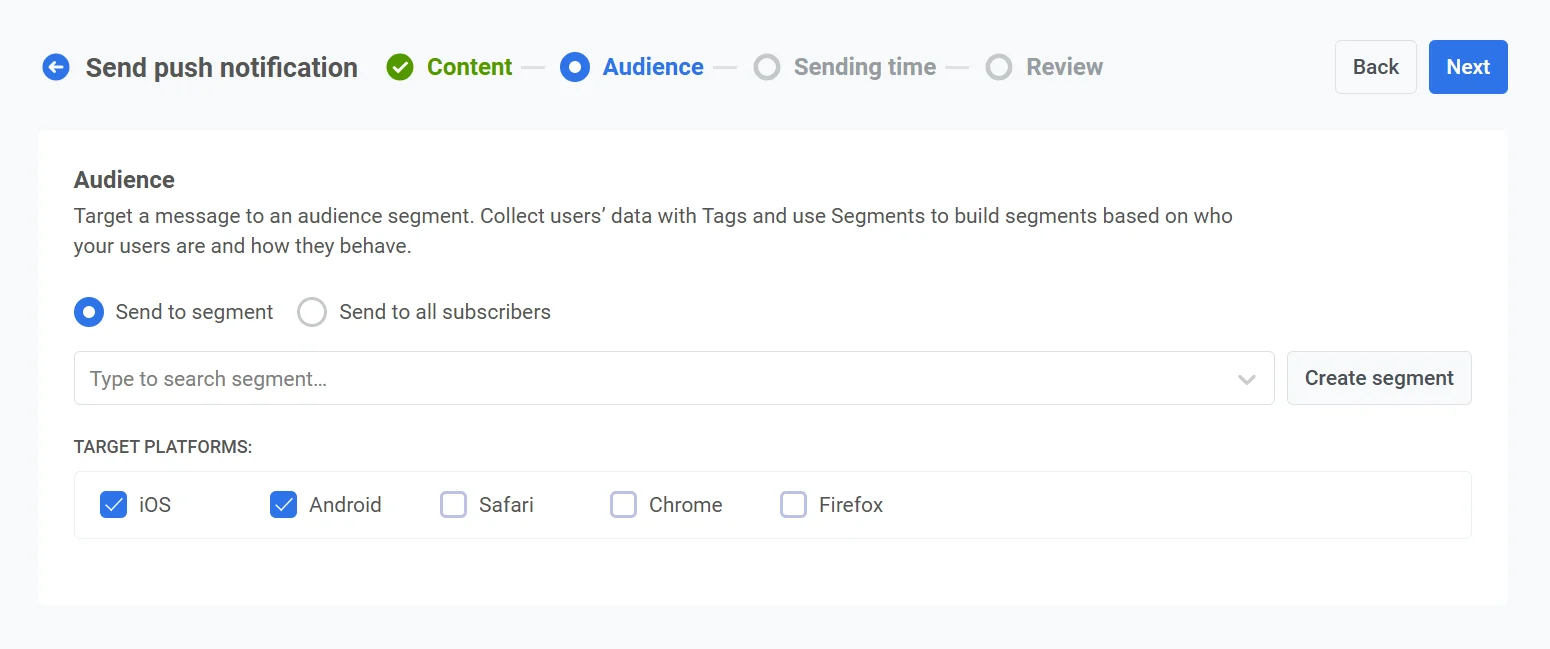
Next, choose the audience for your push notification. You can either send the notification to all users or target a specific segment based on user behavior or demographics.
#### Send to segment
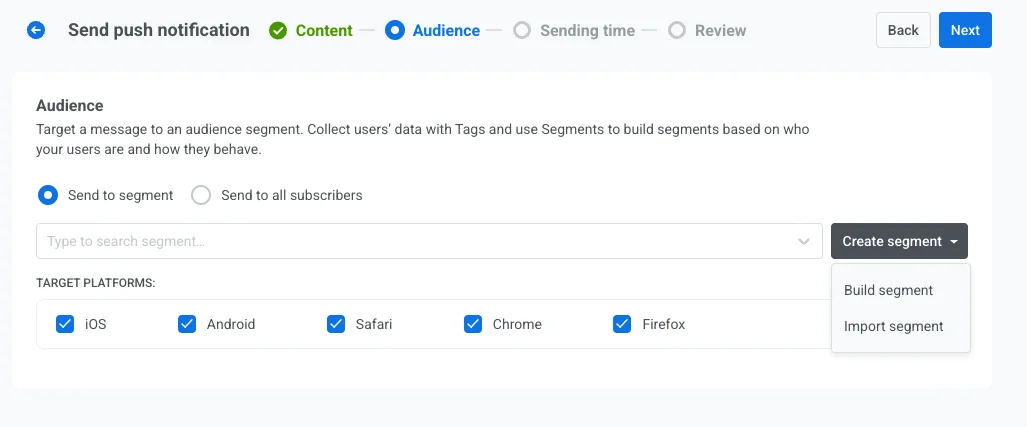
Select this option to target a specific audience segment. Choose a pre-built segment from the dropdown menu, or create a new segment by clicking **Create Segment**. For more details, refer to the [guide on creating segments](/product/audience-data-and-segmentation/segmentation/create-segments).
#### Send to all users
Choose this option to send the notification to all your subscribers. This is ideal for general announcements or promotions that apply to your entire user base.
#### Target platforms
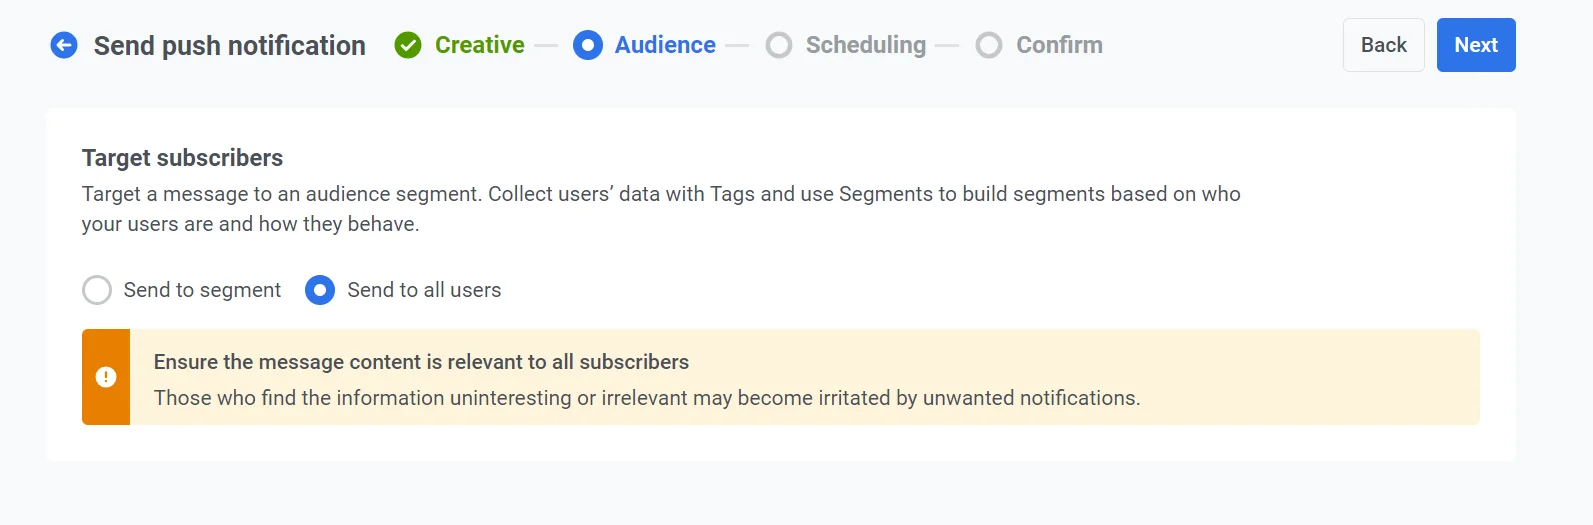
Select the platforms on which you want the notification to be delivered. Available platforms include:
* iOS
* Android
* Safari
* Chrome
* Firefox
Choosing target platforms ensures that your message reaches users on the appropriate devices. Only users on the selected platforms will receive the notification.
Once you’ve configured your audience and selected the target platforms, click **Next** to proceed with setting up your push notification.
### Schedule push notification
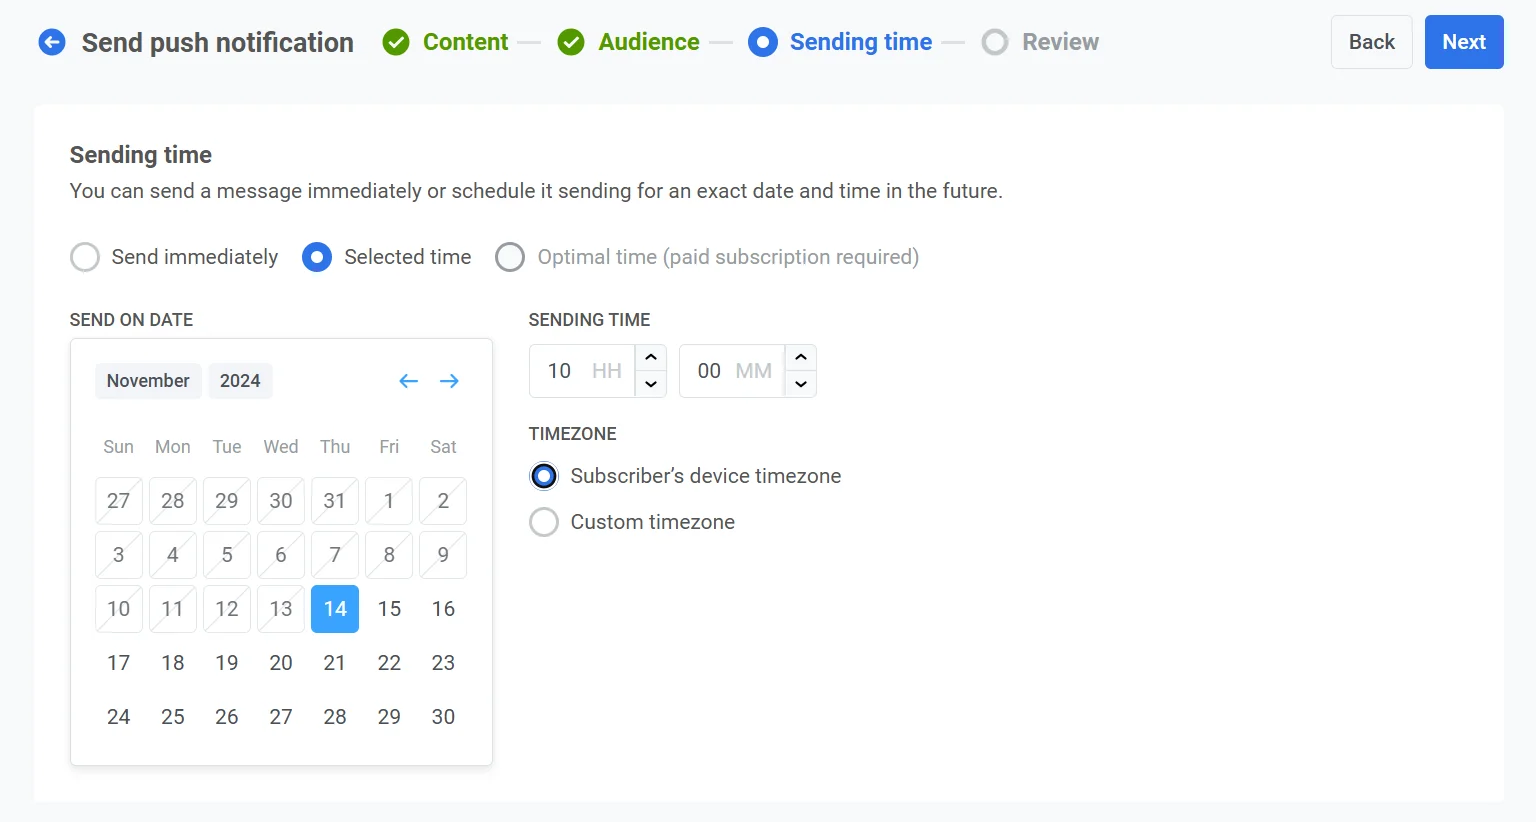
Next, choose **Selected time** to schedule your push notification for a specific date and time.
1. Use the calendar to select the exact date for your notification.
2. Set the time in hours and minutes (using the 24-hour format) for when the notification should be sent.
3. Choose the appropriate time zone:
* **Subscriber’s device timezone:** the notification will be sent based on the recipient’s local time, ensuring delivery at the specified time in their timezone.
* **Custom timezone:** select a specific timezone to schedule the notification for all recipients, useful for targeting users in a specific region.
### Review and edit your content
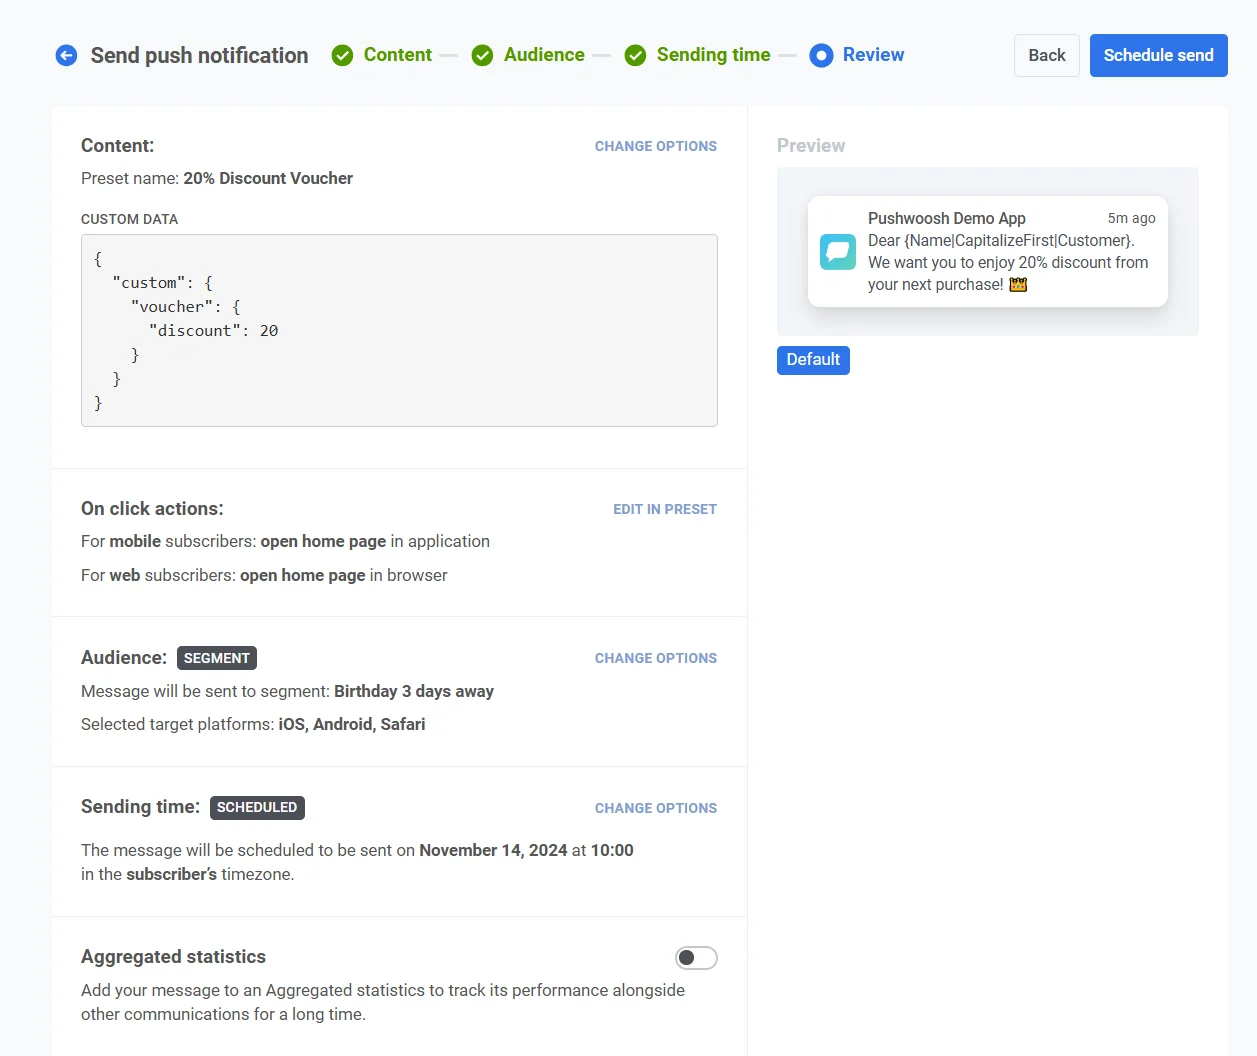
Before finalizing, review the content, on-click actions, audience, platform, and scheduling options to ensure everything is configured correctly. You’ll also see a preview of your push notification in each selected language. You can adjust any settings as needed.
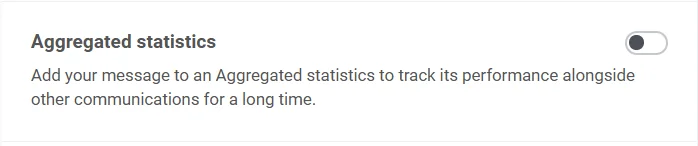
Optionally, you can choose to link your push notification to an **Aggregated Campaign**, allowing you to associate this message with a larger, ongoing campaign and track its performance alongside related notifications over time.
Once everything is confirmed, click **Schedule push** to set it for later delivery or **Send now** to send it immediately.
#### Cancel or edit a scheduled message
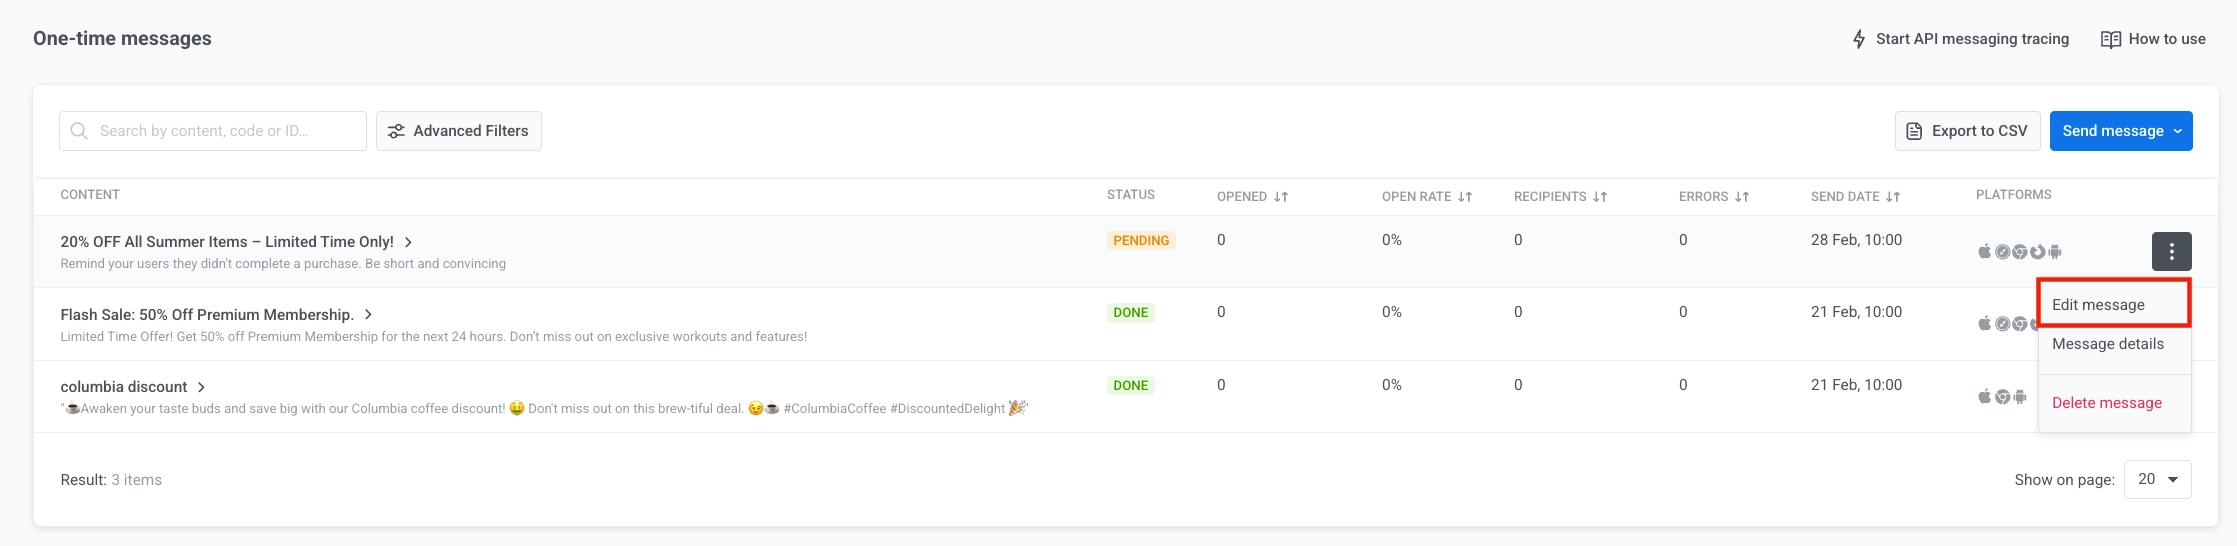
For messages that are scheduled and not yet sent (status **PENDING**), you can change or cancel them. Open the actions menu (⋮) for the message in the one-time messages list:
* **Delete message:** cancels the scheduled delivery and changes the status to **Canceled**.
* **Edit message:** opens the one-time push form with the message data. You can change content or audience (the scheduled send time cannot be changed).
## Schedule a push with Customer Journey Builder
The process is the same for both mobile and web push notification campaigns. This guide explains how to schedule push notification delivery for a specific date and time.
The scheduling setup may vary depending on whether the push notification starts a new communication flow or continues an existing one.
### If a push notification initiates a communication flow
Once you've set up a [basic push flow](/product/messaging-channels/push-notifications/send-push-notifications/one-time-push-via-customer-journey/), you can add scheduling in the Entry element.
In the [**Audience-based entry**](/product/customer-journey/journey-elements/entry-elements/audience-based-entry/#entry-schedule) element, set **Entry schedule** to **One-time entry**, then choose **Schedule for a specific day**. Set the date, time, and timezone.
Select the timezone. There are two options:
1. **Subscriber's device timezone (default):** users enter based on their device timezone. If timezone is missing, a fallback is used. Click **Change fallback** to change it.
2. **Specific timezone:** pick a timezone from the dropdown for a fixed entry time.
Once scheduling is set, click **Apply**.
### If a push notification continues a communication flow
Insert the [**Time Delay**](/product/customer-journey/journey-elements/flow-controls/time-delay/) element between the preceding communication elements and the push notification you wish to schedule:
Double-click the **Time Delay** element. In the **Time Delay Option** field, select either **Specific time**:
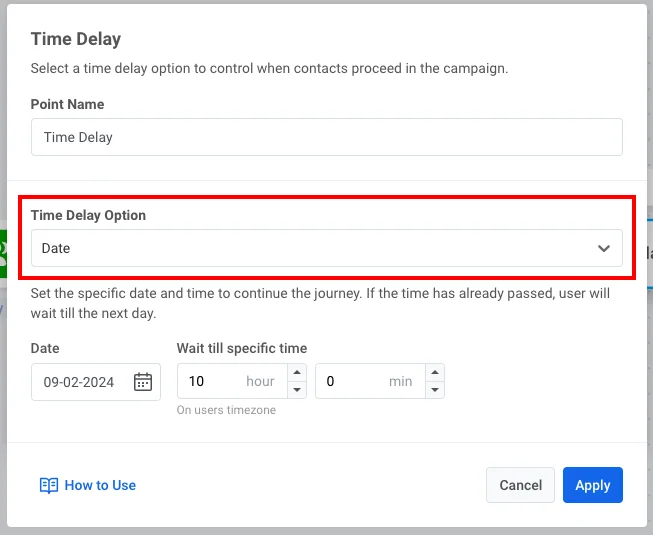
or **Date**:
 ### Select or create push message content
To start, either create new content or select existing content for your push notification. If you’d like to use a pre-built push preset, choose it from the dropdown menu of available options.
### Select or create push message content
To start, either create new content or select existing content for your push notification. If you’d like to use a pre-built push preset, choose it from the dropdown menu of available options.
 To create a new message, click **Create new** and [follow this guide](/product/content/push-presets) to set up a new push preset.
If you need to edit an existing preset, click **Edit Content** to modify the message.
A preview of the notification will be displayed on the right side, showing how it will appear to users.
Once you're satisfied with the content and appearance, click **Next** to proceed to the Audience setup step.
### Select audience for push notification
Next, choose the audience for your push notification. You can either send the notification to all users or target a specific segment based on user behavior or demographics.
#### Send to segment
Select this option to target a specific audience segment. Choose a pre-built segment from the dropdown menu, or create a new segment by clicking **Create Segment**. For more details, refer to the [guide on creating segments](/product/audience-data-and-segmentation/segmentation/create-segments).
To create a new message, click **Create new** and [follow this guide](/product/content/push-presets) to set up a new push preset.
If you need to edit an existing preset, click **Edit Content** to modify the message.
A preview of the notification will be displayed on the right side, showing how it will appear to users.
Once you're satisfied with the content and appearance, click **Next** to proceed to the Audience setup step.
### Select audience for push notification
Next, choose the audience for your push notification. You can either send the notification to all users or target a specific segment based on user behavior or demographics.
#### Send to segment
Select this option to target a specific audience segment. Choose a pre-built segment from the dropdown menu, or create a new segment by clicking **Create Segment**. For more details, refer to the [guide on creating segments](/product/audience-data-and-segmentation/segmentation/create-segments).
 #### Send to all users
Choose this option to send the notification to all your subscribers. This is ideal for general announcements or promotions that apply to your entire user base.
#### Send to all users
Choose this option to send the notification to all your subscribers. This is ideal for general announcements or promotions that apply to your entire user base.
 #### Target platforms
Select the platforms on which you want the notification to be delivered. Available platforms include:
* iOS
* Android
* Safari
* Chrome
* Firefox
Choosing target platforms ensures that your message reaches users on the appropriate devices. Only users on the selected platforms will receive the notification.
#### Target platforms
Select the platforms on which you want the notification to be delivered. Available platforms include:
* iOS
* Android
* Safari
* Chrome
* Firefox
Choosing target platforms ensures that your message reaches users on the appropriate devices. Only users on the selected platforms will receive the notification.
 Once you’ve configured your audience and selected the target platforms, click **Next** to proceed with setting up your push notification.
### Schedule push notification
Next, choose **Selected time** to schedule your push notification for a specific date and time.
1. Use the calendar to select the exact date for your notification.
2. Set the time in hours and minutes (using the 24-hour format) for when the notification should be sent.
3. Choose the appropriate time zone:
* **Subscriber’s device timezone:** the notification will be sent based on the recipient’s local time, ensuring delivery at the specified time in their timezone.
* **Custom timezone:** select a specific timezone to schedule the notification for all recipients, useful for targeting users in a specific region.
Once you’ve configured your audience and selected the target platforms, click **Next** to proceed with setting up your push notification.
### Schedule push notification
Next, choose **Selected time** to schedule your push notification for a specific date and time.
1. Use the calendar to select the exact date for your notification.
2. Set the time in hours and minutes (using the 24-hour format) for when the notification should be sent.
3. Choose the appropriate time zone:
* **Subscriber’s device timezone:** the notification will be sent based on the recipient’s local time, ensuring delivery at the specified time in their timezone.
* **Custom timezone:** select a specific timezone to schedule the notification for all recipients, useful for targeting users in a specific region.
 ### Review and edit your content
Before finalizing, review the content, on-click actions, audience, platform, and scheduling options to ensure everything is configured correctly. You’ll also see a preview of your push notification in each selected language. You can adjust any settings as needed.
### Review and edit your content
Before finalizing, review the content, on-click actions, audience, platform, and scheduling options to ensure everything is configured correctly. You’ll also see a preview of your push notification in each selected language. You can adjust any settings as needed.
 Optionally, you can choose to link your push notification to an **Aggregated Campaign**, allowing you to associate this message with a larger, ongoing campaign and track its performance alongside related notifications over time.
 Once everything is confirmed, click **Schedule push** to set it for later delivery or **Send now** to send it immediately.
#### Cancel or edit a scheduled message
For messages that are scheduled and not yet sent (status **PENDING**), you can change or cancel them. Open the actions menu (⋮) for the message in the one-time messages list:
* **Delete message:** cancels the scheduled delivery and changes the status to **Canceled**.
Once everything is confirmed, click **Schedule push** to set it for later delivery or **Send now** to send it immediately.
#### Cancel or edit a scheduled message
For messages that are scheduled and not yet sent (status **PENDING**), you can change or cancel them. Open the actions menu (⋮) for the message in the one-time messages list:
* **Delete message:** cancels the scheduled delivery and changes the status to **Canceled**.
 * **Edit message:** opens the one-time push form with the message data. You can change content or audience (the scheduled send time cannot be changed).
 ## Schedule a push with Customer Journey Builder
The process is the same for both mobile and web push notification campaigns. This guide explains how to schedule push notification delivery for a specific date and time.
The scheduling setup may vary depending on whether the push notification starts a new communication flow or continues an existing one.
### If a push notification initiates a communication flow
Once you've set up a [basic push flow](/product/messaging-channels/push-notifications/send-push-notifications/one-time-push-via-customer-journey/), you can add scheduling in the Entry element.
In the [**Audience-based entry**](/product/customer-journey/journey-elements/entry-elements/audience-based-entry/#entry-schedule) element, set **Entry schedule** to **One-time entry**, then choose **Schedule for a specific day**. Set the date, time, and timezone.
## Schedule a push with Customer Journey Builder
The process is the same for both mobile and web push notification campaigns. This guide explains how to schedule push notification delivery for a specific date and time.
The scheduling setup may vary depending on whether the push notification starts a new communication flow or continues an existing one.
### If a push notification initiates a communication flow
Once you've set up a [basic push flow](/product/messaging-channels/push-notifications/send-push-notifications/one-time-push-via-customer-journey/), you can add scheduling in the Entry element.
In the [**Audience-based entry**](/product/customer-journey/journey-elements/entry-elements/audience-based-entry/#entry-schedule) element, set **Entry schedule** to **One-time entry**, then choose **Schedule for a specific day**. Set the date, time, and timezone.
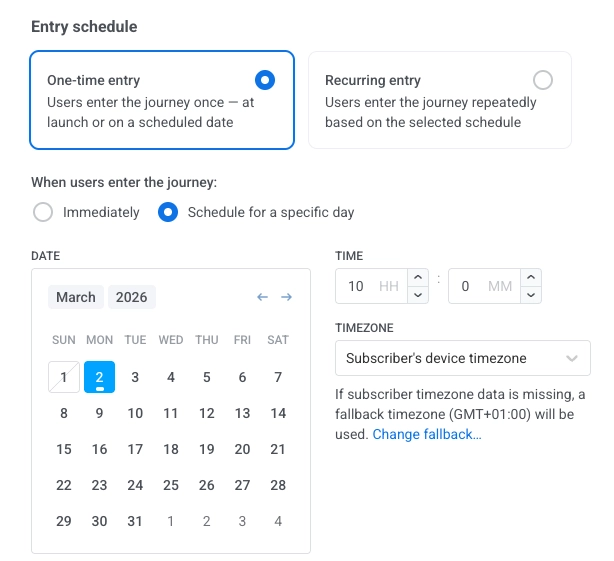 Select the timezone. There are two options:
1. **Subscriber's device timezone (default):** users enter based on their device timezone. If timezone is missing, a fallback is used. Click **Change fallback** to change it.
2. **Specific timezone:** pick a timezone from the dropdown for a fixed entry time.
Once scheduling is set, click **Apply**.
### If a push notification continues a communication flow
Insert the [**Time Delay**](/product/customer-journey/journey-elements/flow-controls/time-delay/) element between the preceding communication elements and the push notification you wish to schedule:
Double-click the **Time Delay** element. In the **Time Delay Option** field, select either **Specific time**:
Select the timezone. There are two options:
1. **Subscriber's device timezone (default):** users enter based on their device timezone. If timezone is missing, a fallback is used. Click **Change fallback** to change it.
2. **Specific timezone:** pick a timezone from the dropdown for a fixed entry time.
Once scheduling is set, click **Apply**.
### If a push notification continues a communication flow
Insert the [**Time Delay**](/product/customer-journey/journey-elements/flow-controls/time-delay/) element between the preceding communication elements and the push notification you wish to schedule:
Double-click the **Time Delay** element. In the **Time Delay Option** field, select either **Specific time**:
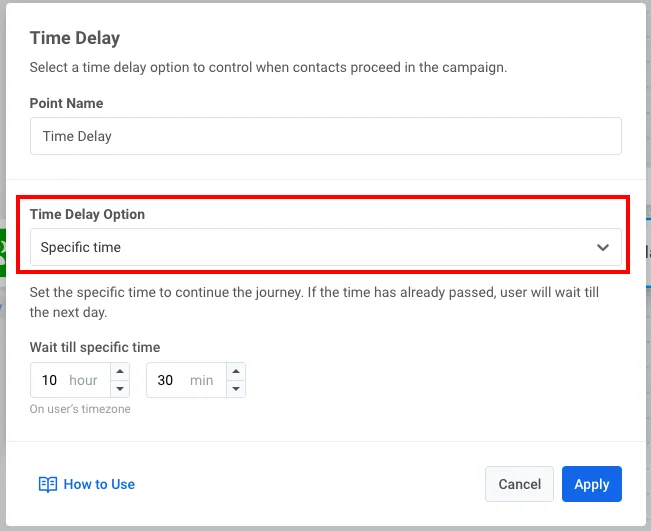 or **Date**: