# One-time push
## How to send a push notification using the one-time push form
To send a one-time push notification in Pushwoosh, go to the **Campaigns** section. Select **One-time messages** and click **Send message** → **One-time push**.
### Select or create push message content
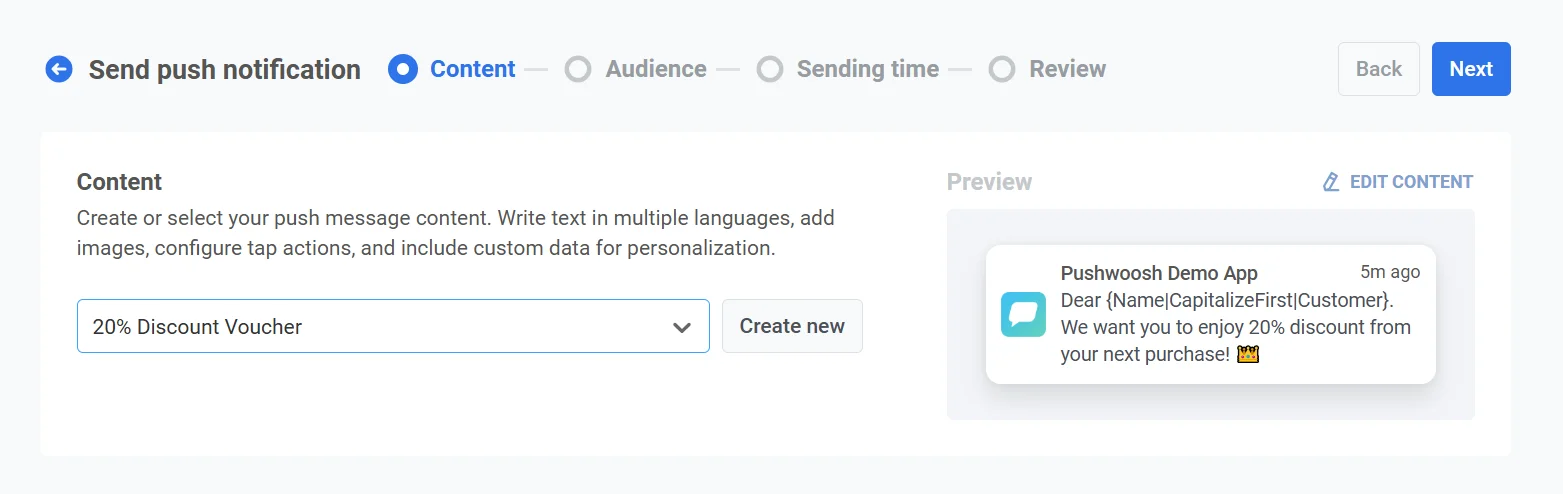
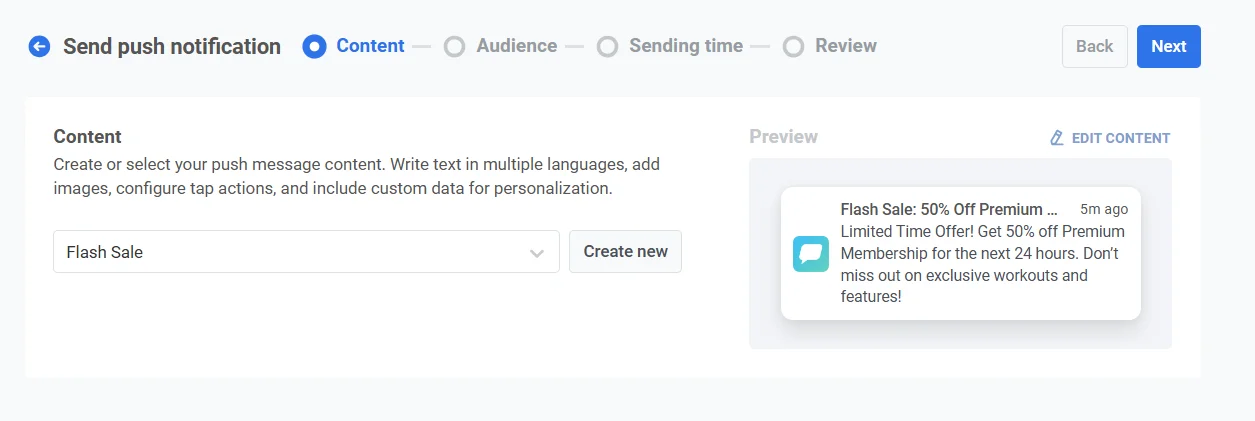
To start, either create new content or select existing content for your push notification. If you’d like to use a pre-built push preset, choose it from the dropdown menu of available options.
To create a new message, click **Create new** and [follow this guide](/product/content/push-presets) to set up a new push preset.
If you need to edit an existing preset, click **Edit Content** to modify the message.
A preview of the notification will be displayed on the right side, showing how it will appear to users.
### Select message type
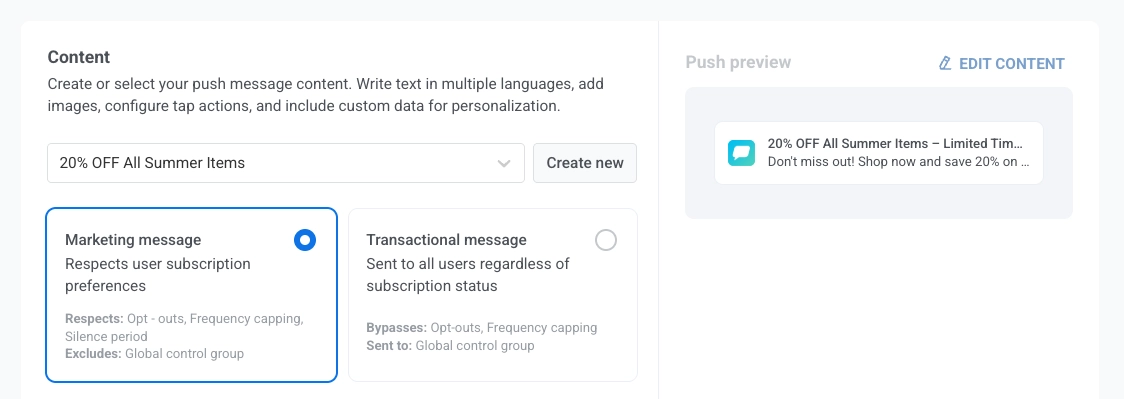
In the **Content** step, choose **Marketing message** or **Transactional message**:
* **Marketing message:** Respects subscription preferences, opt-outs, frequency capping, and silence period. Not sent to the [global control group](/product/audience-data-and-segmentation/global-control-group/).
* **Transactional message:** Sent to all users regardless of subscription status. Delivered to the control group.
[Learn how message type affects delivery](/product/messaging-channels/marketing-vs-transactional/).
### Define what happens when the push is clicked
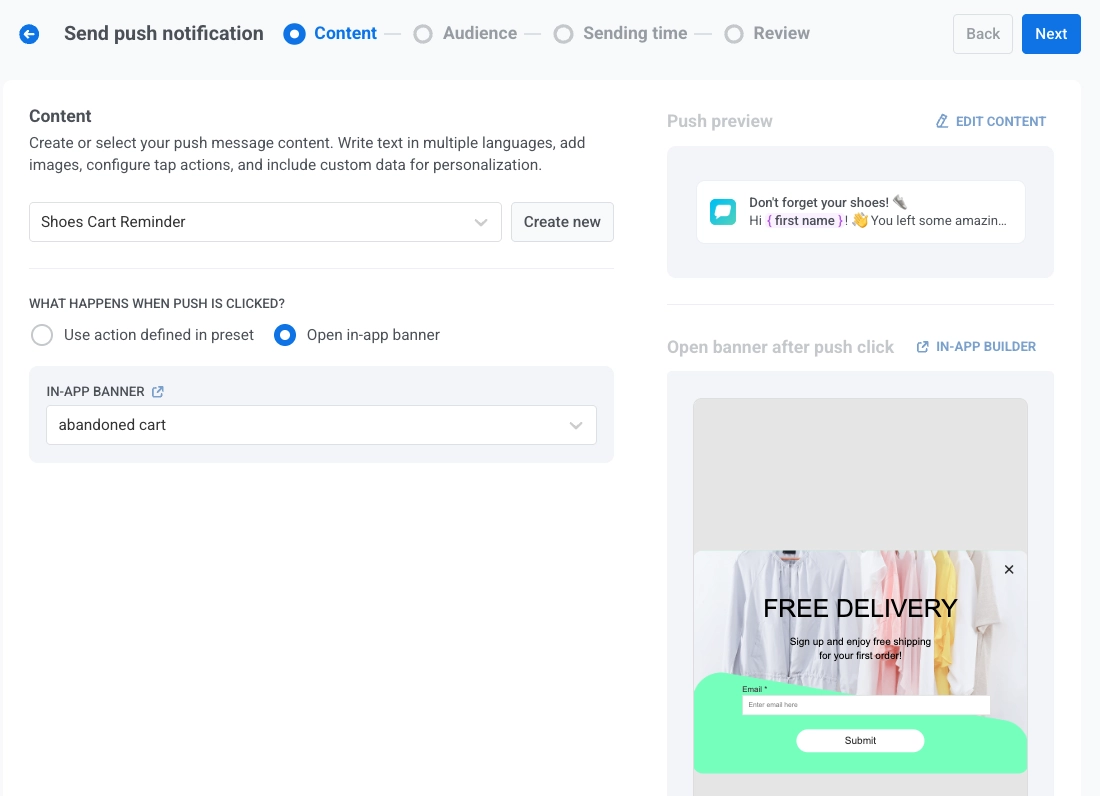
After selecting or creating the content for your push notification, configure what happens when a user taps the notification using the **Show in-app banner when message is clicked** toggle.
By default, the toggle is off, and the [action configured in the push preset](/product/content/push-presets/#define-the-next-step-for-users-who-click-on-the-notification) will be executed when the user taps the push notification. Use this default behavior when your push preset already includes a well-defined click action.
To display an in-app banner instead, enable the **Show in-app banner when message is clicked** toggle, then select the in-app message to display from the **in-app banner** dropdown. This is useful for delivering additional information, promotions, or forms directly within the app. A live preview of the selected banner will appear on the right.
##### Understand language behavior for push and in-app messages
Push notifications and in-app messages can support different sets of languages. The language displayed to the user depends on the availability of that language in each content type and the user’s device language.
##### Example
You send a push notification using a preset that supports English (default), Spanish, and German.
The linked in-app banner supports only English and French.
The user’s device language is set to German.
* The **push notification** will be shown in German, since it's supported on the user’s device.
* The **in-app banner** will fall back to English, as German is not available in the banner's language settings.
### Save message to Inbox
You can save push notifications to the app's inbox, allowing users to access and review important messages at their convenience. [Learn more about Message Inbox](/product/messaging-channels/message-inbox/mobile-message-inbox).
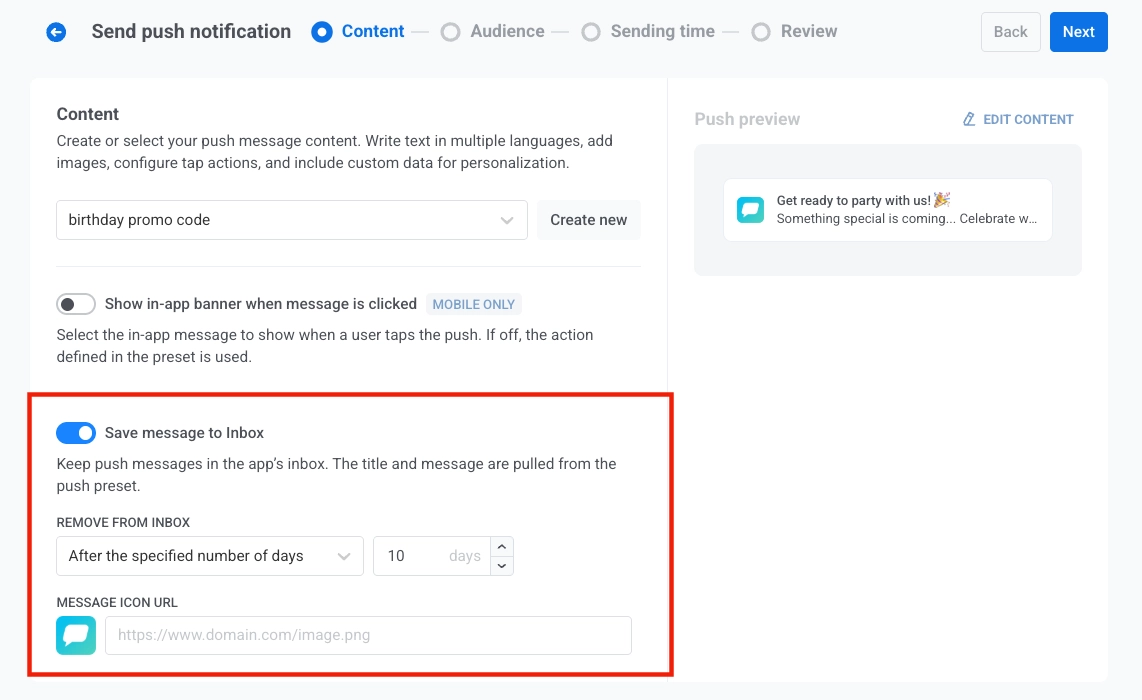
To enable this feature, toggle the **Save message to Inbox** option. When enabled, the title and message are pulled from the push preset.
##### Remove from Inbox
Control how long messages stay in the inbox by selecting one of the following options from the **Remove from Inbox** dropdown:
- **After the specified number of days**: Set the number of days a message should remain in the inbox before being automatically removed. Use the input field to specify the number of days.
- **On a specific date**: Select an exact date when the message will be deleted from the inbox.
##### Message icon URL
Customize the appearance of the stored notification by specifying an icon URL in the **MESSAGE ICON URL** field. This icon will be displayed next to the message in the inbox, serving as a visual identifier for the notification.
If no icon URL is provided, a default icon will be displayed next to the message.
### Select audience for push notification
Next, choose the audience for your push notification. You can either send the notification to all users or target a specific segment based on user behavior or demographics.
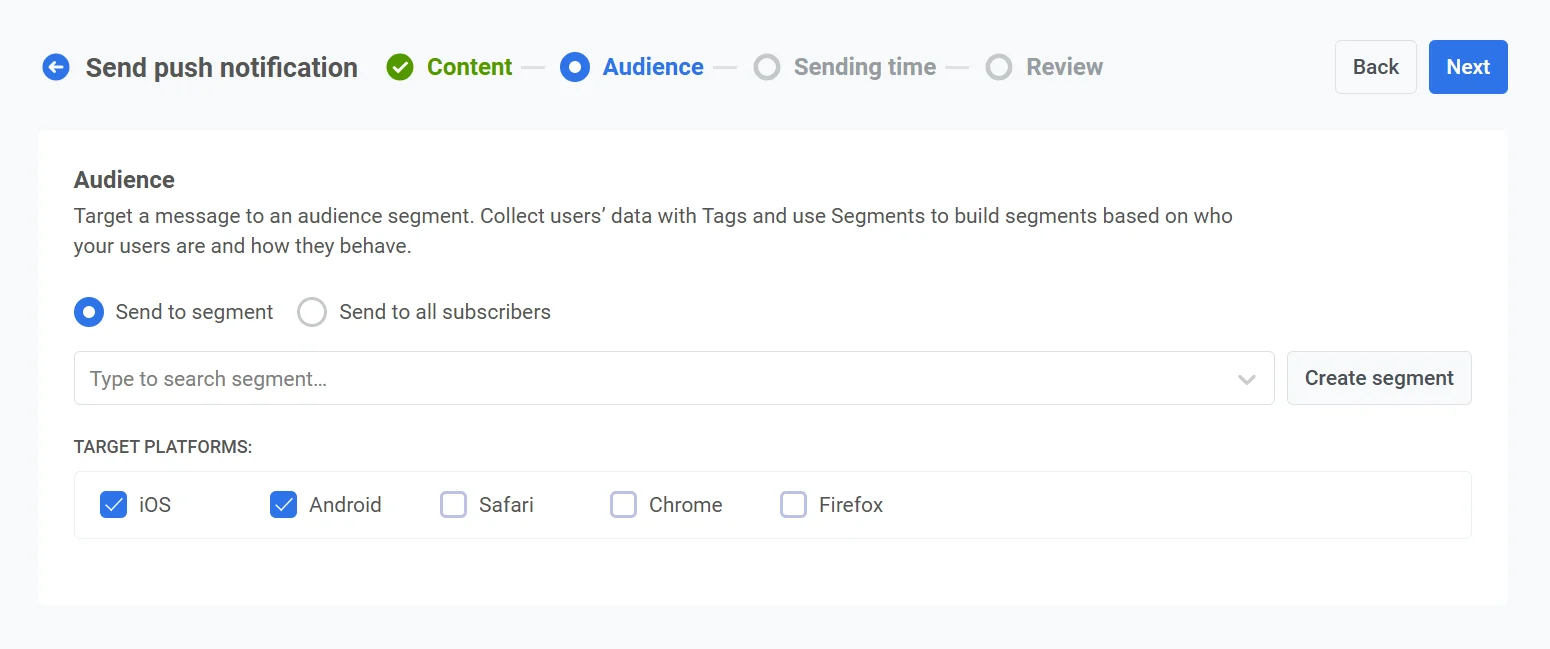
#### Send to segment
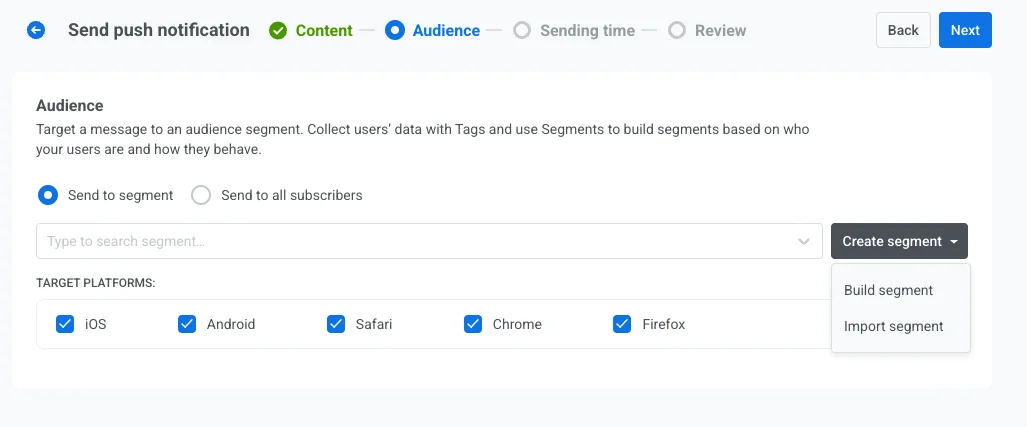
Select this option to target a [specific audience segment](/product/audience-data-and-segmentation/segmentation/). Choose a pre-built segment from the dropdown menu, or create a new segment by clicking **Create Segment**.
Then select one of the following actions from the dropdown menu:
* **Build segment**: Create a new segment using the Segment builder. [Learn more](/product/audience-data-and-segmentation/segmentation/create-segments/)
* **Import segment**: Import a segment from a CSV file. [Learn more](/product/audience-data-and-segmentation/segmentation/create-segments/by-import/#how-to-import-a-segment).
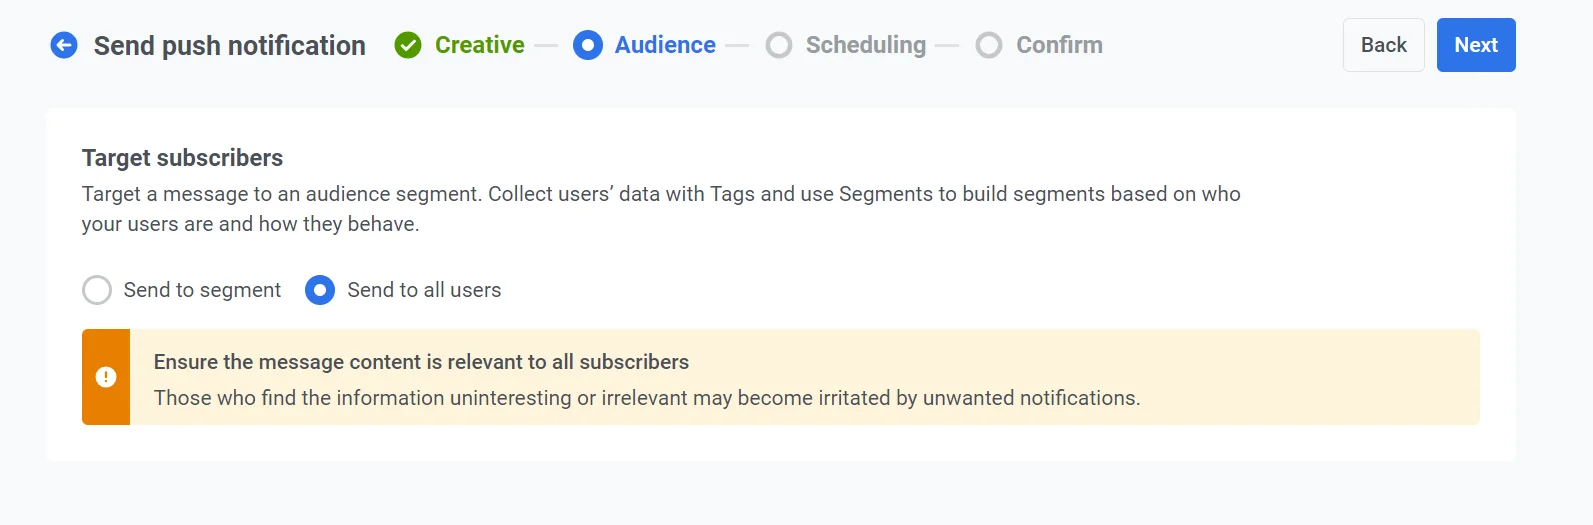
#### Send to all users
Choose this option to send the notification to all your subscribers. This is ideal for general announcements or promotions that apply to your entire user base.
#### Target platforms
Select the platforms on which you want the notification to be delivered. Available platforms include:
* iOS
* Android
* Safari
* Chrome
* Firefox
Choosing target platforms ensures that your message reaches users on the appropriate devices. Only users on the selected platforms will receive the notification.
Once you’ve configured your audience and selected the target platforms, click **Next** to proceed with setting up your push notification.
### Schedule push notification
Next, choose when to send your push notification. You have the following options:
* send it immediately
* schedule it for a specific time
* let Pushwoosh determine the optimal time for each user based on their behavior.
#### Set time to live for push delivery
Use **Time to live** in **Sending options** to control how long Pushwoosh retains a push notification for delivery if the recipient is offline at the time of the send attempt.
In **Time to live**, choose a preset period for how long Pushwoosh keeps this message available for delivery, from 1 hour to 3 weeks.
You can also choose **Custom range** and enter a specific number of hours, days, or weeks. The maximum period is 4 weeks.
> **Note:** The **Time to live** value set here overrides the expiration time defined in the [push preset legacy form](/product/content/push-presets/push-preset-legacy-form/#ios). For example, if the preset TTL is 2 weeks but the TTL set here is 1 week, the push expires after 1 week.
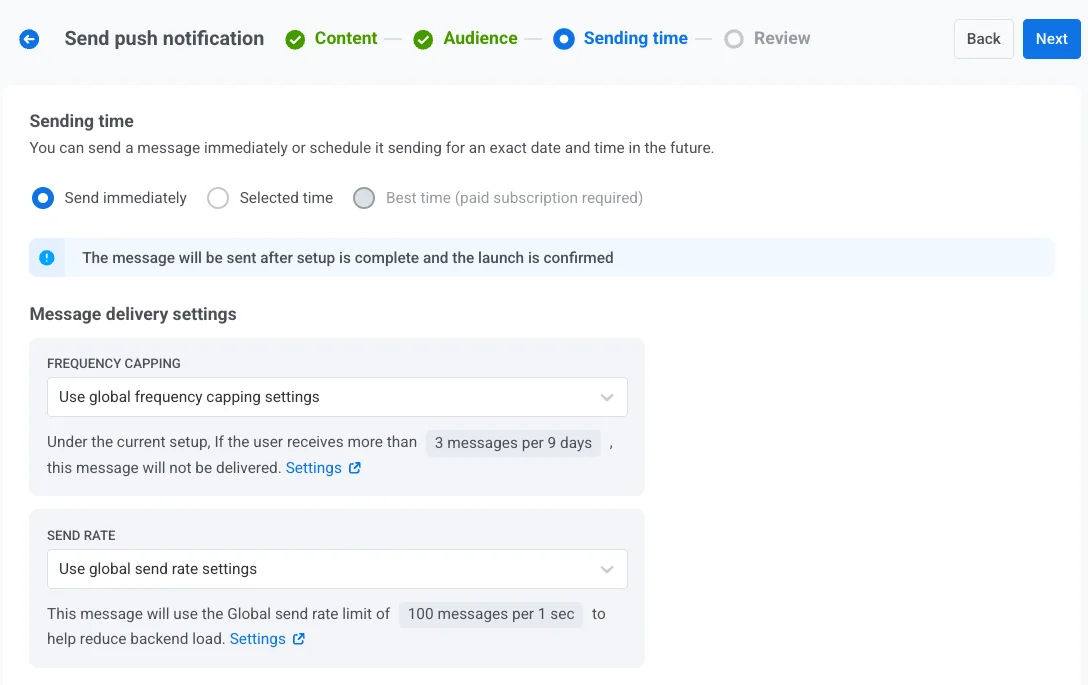
#### Send immediately
Select this option if you want to send the push notification immediately after setting up the campaign. This is useful for urgent or time-sensitive messages.
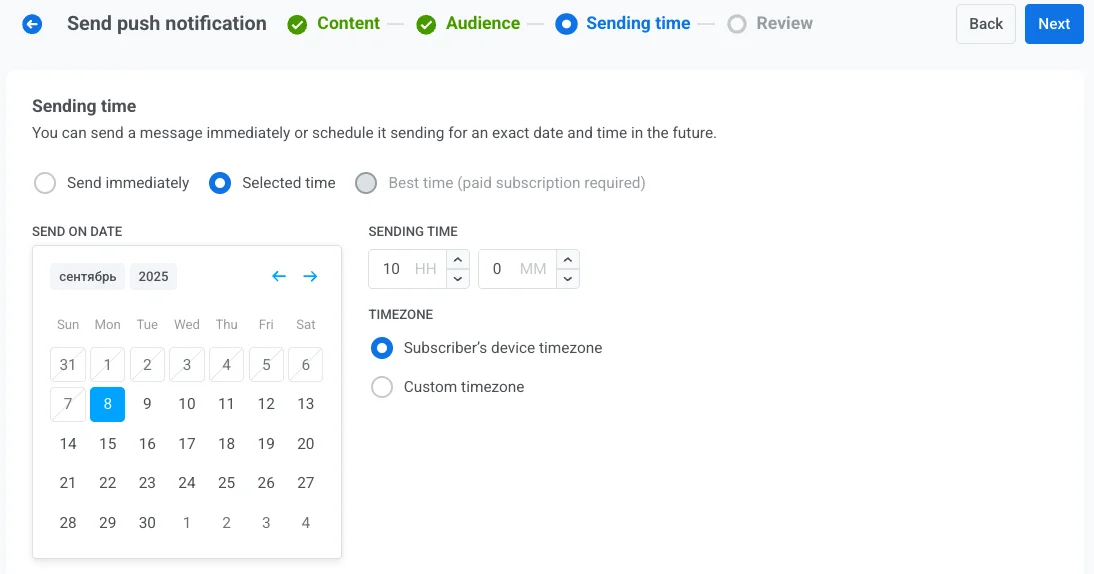
#### Selected time
Choose this option to schedule your push notification for a specific date and time.
1. Use the calendar to select the exact date for your notification.
2. Set the time in hours and minutes (using the 24-hour format) for when the notification should be sent.
3. Choose the appropriate time zone:
* **Subscriber’s device timezone**. The notification will be sent based on the recipient’s local time, ensuring delivery at the specified time in their timezone.
* **Custom timezone**. Select a specific timezone to schedule the notification for all recipients, useful for targeting users in a specific region.
#### Best time (paid subscription required)
This option sends each message at the user’s best time based on their behavior and past message performance. Select the start date, and Pushwoosh schedules delivery automatically. You can schedule messages from tomorrow up to one month ahead.
If there is not enough data for some users, set **Fallback time** in hours and minutes. In this case, the message is sent on the selected date or one day later at the fallback time in the user’s timezone.
To use the **Best time** feature, make sure that:
* [**Default app events**](/product/audience-data-and-segmentation/events/default-events) are enabled.
* You have previously sent messages at different times to collect enough user data for the system to determine optimal send times.
#### Configure message delivery settings
##### Set frequency capping
Use [**Frequency capping**](/product/messaging-channels/global-frequency-capping/#enable-global-frequency-capping) to limit how often users receive push messages, preventing over-messaging and reducing churn. Choose one of the following options:
* **Use Global frequency capping settings**
Apply the project-wide limits configured in your [Global frequency capping settings](/product/messaging-channels/global-frequency-capping/#enable-global-frequency-capping).
For example, if the global limit is set to 3 messages in 9 days, additional messages exceeding this limit will be skipped.
* **Ignore Global frequency capping**
The user will receive this message even if they’ve exceeded the channel’s message limits. Use this option with caution to avoid over-messaging.
* **Use custom frequency capping**
Set a custom message limit for this message. If the user exceeds this custom cap, the message will be skipped, and the user will proceed to the next step.
##### Set send rate limits
The **Send rate** setting controls how quickly messages are delivered to your audience. Adjusting the send rate helps you manage delivery speed, prevent backend overload, and improve overall deliverability.
Choose one of the following options:
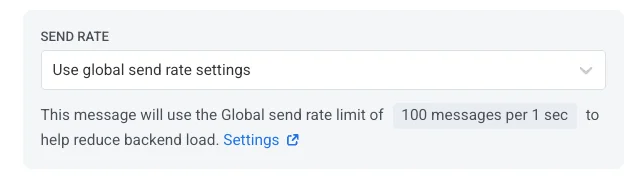
* **Use global send rate settings**
Applies the send rate limits configured in your project’s message delivery settings. If no limits are set, all messages will be sent immediately. Use this option when you want delivery speed to follow your project’s default rules. [Learn more about global send rate limits](/product/messaging-channels/global-frequency-capping/#set-send-rate-limits)
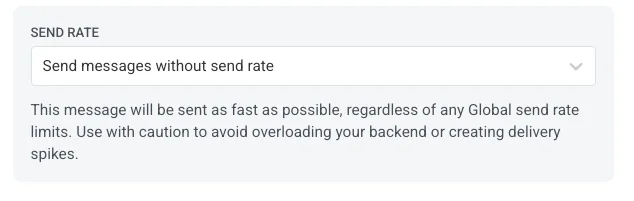
* **Send messages without send rate**
Sends messages as fast as possible, ignoring any global send rate limits. Use with caution to avoid overloading your backend or creating delivery spikes.
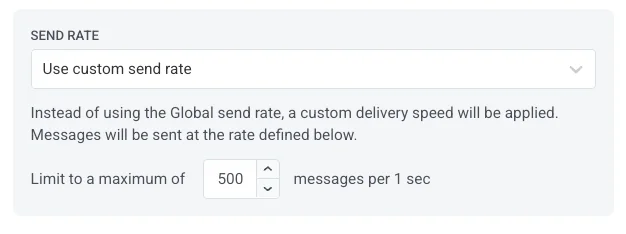
* **Use custom send rate**
Overrides the global send rate for this message only. Allows you to specify the number of messages sent per minute, giving you full control over delivery speed. Messages will be sent at the custom rate you define in the message element.
Once you've configured the desired options, click **Next** to proceed to the confirmation step.
### Review and edit your content
Before finalizing, review the content, on-click actions, audience, platform, and scheduling options to ensure everything is configured correctly. You’ll also see a preview of your push notification in each selected language. You can adjust any settings as needed.
Optionally, you can choose to link your push notification to an **Aggregated Campaign**, allowing you to associate this message with a larger, ongoing campaign and track its performance alongside related notifications over time.
Once everything is confirmed, click **Schedule push** to set it for later delivery or **Send now** to send it immediately.
### Cancel or edit a scheduled message
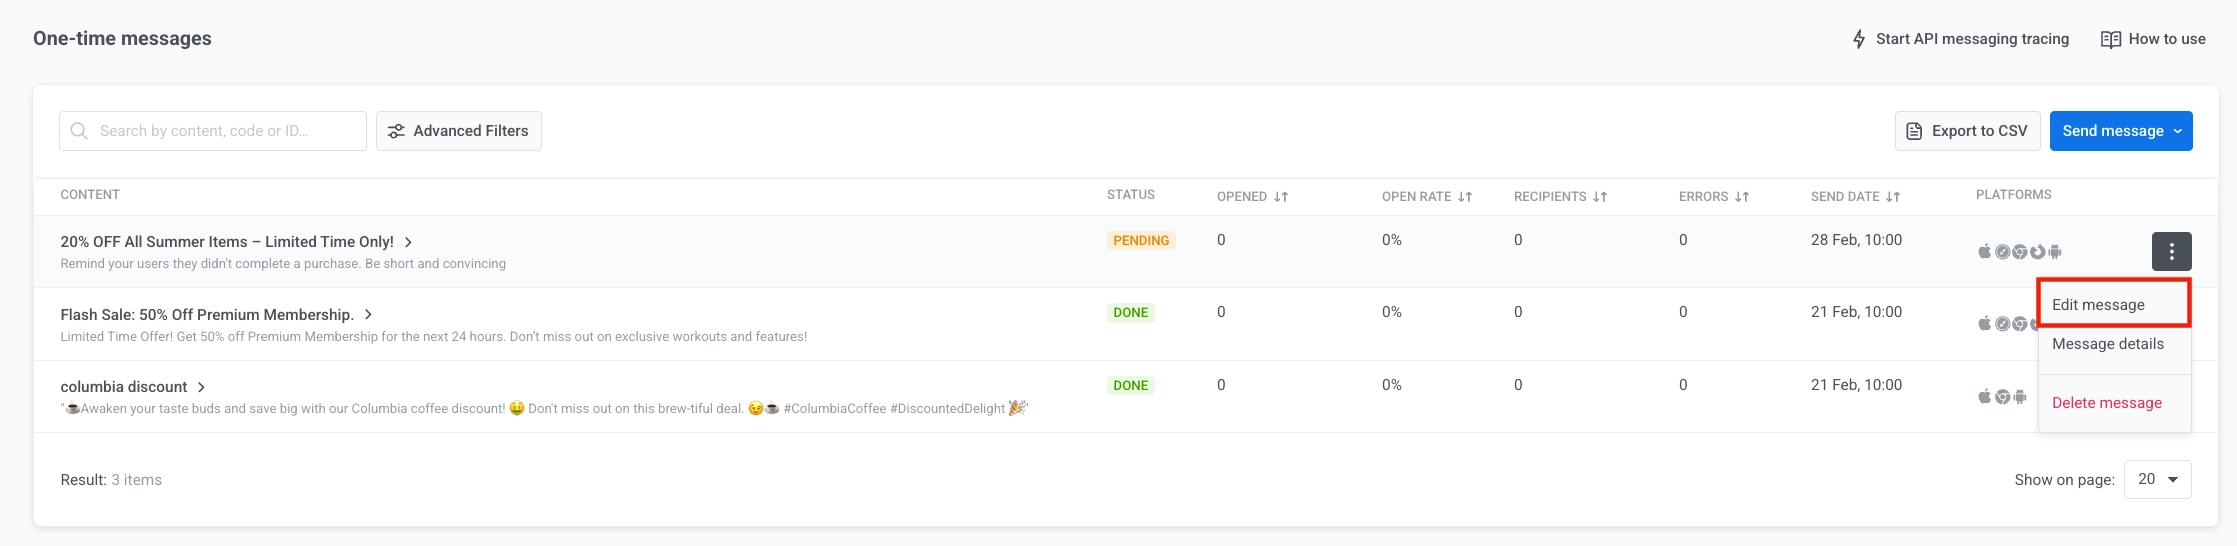
For messages that are scheduled and not yet sent (status **PENDING**), you can change or cancel them.
Open the list of messages in **Campaigns** → **One-time messages**. Open the actions menu (⋮) for the message you want to change or cancel:
* **Delete message:** cancels the scheduled delivery and changes the status to **Canceled**.
* **Edit message:** opens the one-time push form with the message data loaded. You can change content or audience.
### Example scenario
Imagine you're a marketing manager for a fitness app, and you want to send a one-time push notification about a **flash sale** on premium memberships. Do it as follows:
##### Create the campaign
Go to **Campaigns**, select **One-time messages**, and click **Send message** → **One-time push** to begin setting up your campaign.
##### Create message content
Since you want to create a new message for this flash sale, click **Create new** and set up a push preset titled **Flash Sale: 50% Off Premium Membership**.
Example text for a push message:
*“Limited Time Offer! Get 50% off Premium Membership for the next 24 hours. Don’t miss out on exclusive workouts and features!”*
In the push preset, add a [deep link](/product/messaging-channels/push-notifications/advanced-push-features/deep-linking) to direct users to the app's membership page. Once you're satisfied with the design and content, click **Next** to proceed to the audience selection step.
##### Select the audience
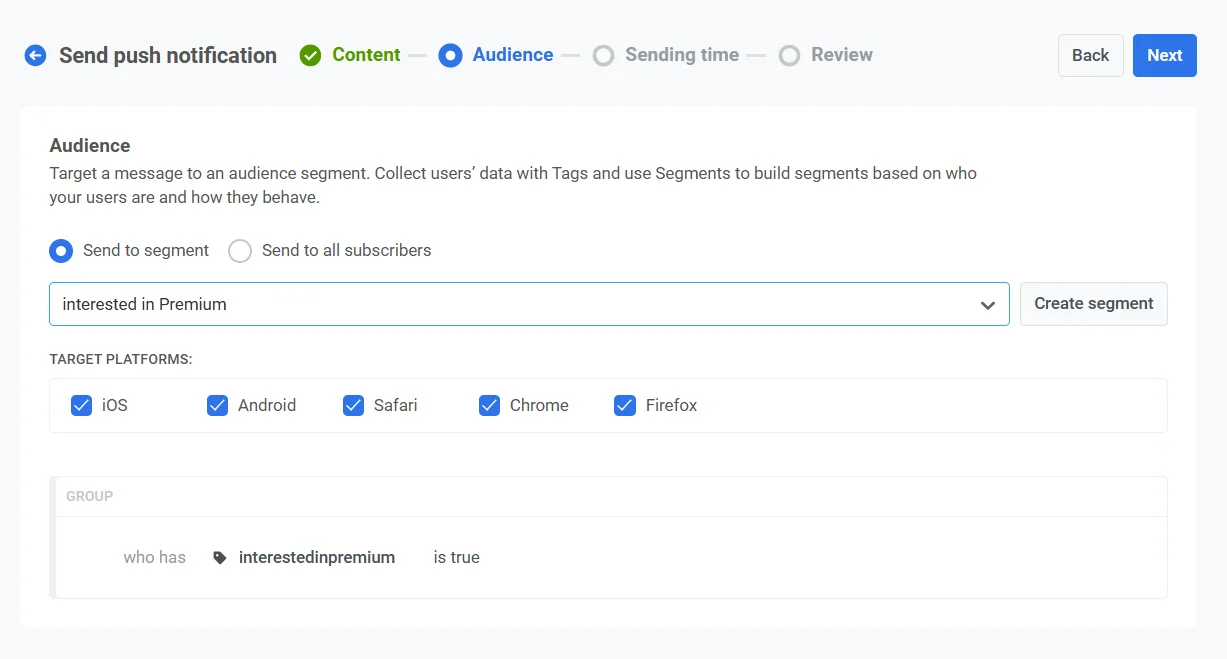
For this flash sale, you want to target users who have shown interest in premium services but haven’t subscribed yet. Select **Send to segment**, and from the dropdown menu, choose the **Interested in Premium** segment. This segment includes users who have viewed the premium page but haven’t upgraded.
##### Set the timing
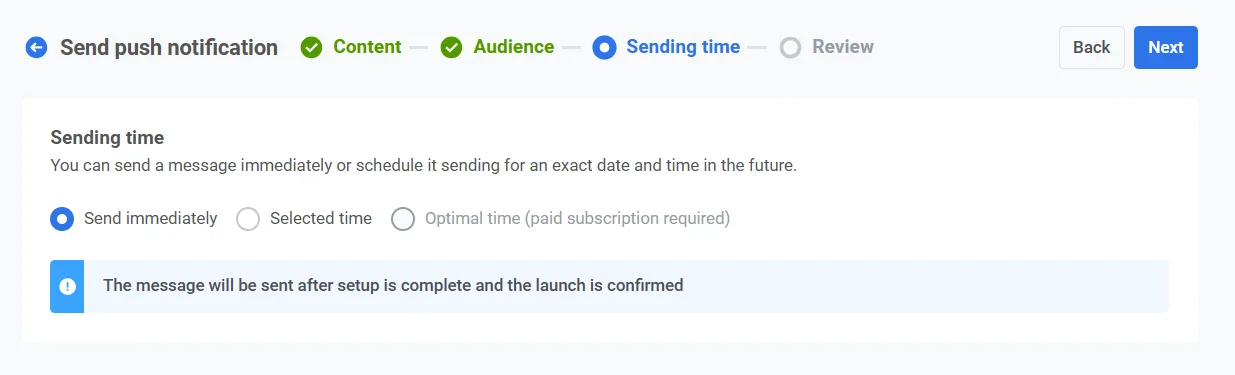
Since the flash sale is time-sensitive, you want the notification to go out immediately. Select **Send immediately** to dispatch the notification as soon as the campaign setup is complete.
##### Review and send
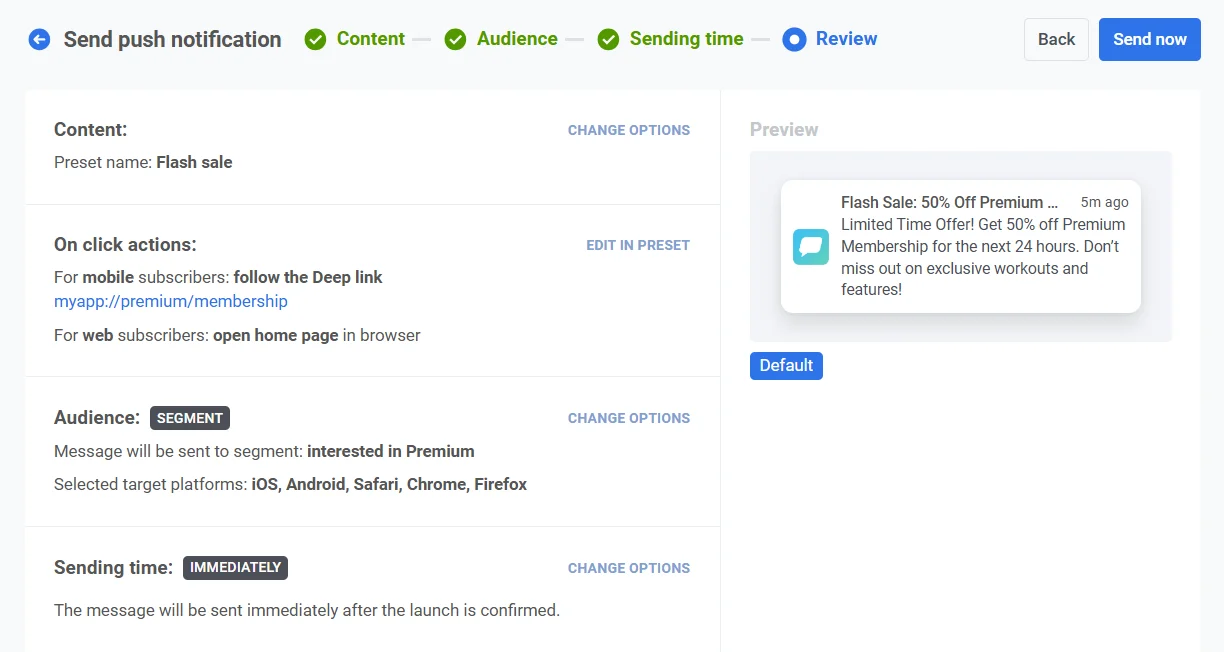
Review all the campaign details to ensure the notification looks correct.
##### Link to aggregated campaign (optional)
If this notification is part of a long-term marketing campaign with multiple messages (e.g., a seasonal sale or ongoing promotions), you can toggle the **Link to Aggregated Campaign** option. This will allow you to track this notification’s performance alongside other related messages in the broader campaign.
Once everything is confirmed, click **Send message** to immediately dispatch the notification.
You can also send a one-time push using Customer Journey Builder. [Learn how to send one-time push via Customer Journey](/product/messaging-channels/push-notifications/send-push-notifications/one-time-push-via-customer-journey/).
 ### Select or create push message content
To start, either create new content or select existing content for your push notification. If you’d like to use a pre-built push preset, choose it from the dropdown menu of available options.
### Select or create push message content
To start, either create new content or select existing content for your push notification. If you’d like to use a pre-built push preset, choose it from the dropdown menu of available options.
 To create a new message, click **Create new** and [follow this guide](/product/content/push-presets) to set up a new push preset.
If you need to edit an existing preset, click **Edit Content** to modify the message.
A preview of the notification will be displayed on the right side, showing how it will appear to users.
### Select message type
In the **Content** step, choose **Marketing message** or **Transactional message**:
* **Marketing message:** Respects subscription preferences, opt-outs, frequency capping, and silence period. Not sent to the [global control group](/product/audience-data-and-segmentation/global-control-group/).
* **Transactional message:** Sent to all users regardless of subscription status. Delivered to the control group.
To create a new message, click **Create new** and [follow this guide](/product/content/push-presets) to set up a new push preset.
If you need to edit an existing preset, click **Edit Content** to modify the message.
A preview of the notification will be displayed on the right side, showing how it will appear to users.
### Select message type
In the **Content** step, choose **Marketing message** or **Transactional message**:
* **Marketing message:** Respects subscription preferences, opt-outs, frequency capping, and silence period. Not sent to the [global control group](/product/audience-data-and-segmentation/global-control-group/).
* **Transactional message:** Sent to all users regardless of subscription status. Delivered to the control group.
 [Learn how message type affects delivery](/product/messaging-channels/marketing-vs-transactional/).
### Define what happens when the push is clicked
After selecting or creating the content for your push notification, configure what happens when a user taps the notification using the **Show in-app banner when message is clicked** toggle.
By default, the toggle is off, and the [action configured in the push preset](/product/content/push-presets/#define-the-next-step-for-users-who-click-on-the-notification) will be executed when the user taps the push notification. Use this default behavior when your push preset already includes a well-defined click action.
To display an in-app banner instead, enable the **Show in-app banner when message is clicked** toggle, then select the in-app message to display from the **in-app banner** dropdown. This is useful for delivering additional information, promotions, or forms directly within the app. A live preview of the selected banner will appear on the right.
[Learn how message type affects delivery](/product/messaging-channels/marketing-vs-transactional/).
### Define what happens when the push is clicked
After selecting or creating the content for your push notification, configure what happens when a user taps the notification using the **Show in-app banner when message is clicked** toggle.
By default, the toggle is off, and the [action configured in the push preset](/product/content/push-presets/#define-the-next-step-for-users-who-click-on-the-notification) will be executed when the user taps the push notification. Use this default behavior when your push preset already includes a well-defined click action.
To display an in-app banner instead, enable the **Show in-app banner when message is clicked** toggle, then select the in-app message to display from the **in-app banner** dropdown. This is useful for delivering additional information, promotions, or forms directly within the app. A live preview of the selected banner will appear on the right.
 ##### Understand language behavior for push and in-app messages
Push notifications and in-app messages can support different sets of languages. The language displayed to the user depends on the availability of that language in each content type and the user’s device language.
##### Example
You send a push notification using a preset that supports English (default), Spanish, and German.
The linked in-app banner supports only English and French.
The user’s device language is set to German.
* The **push notification** will be shown in German, since it's supported on the user’s device.
* The **in-app banner** will fall back to English, as German is not available in the banner's language settings.
### Save message to Inbox
You can save push notifications to the app's inbox, allowing users to access and review important messages at their convenience. [Learn more about Message Inbox](/product/messaging-channels/message-inbox/mobile-message-inbox).
To enable this feature, toggle the **Save message to Inbox** option. When enabled, the title and message are pulled from the push preset.
##### Understand language behavior for push and in-app messages
Push notifications and in-app messages can support different sets of languages. The language displayed to the user depends on the availability of that language in each content type and the user’s device language.
##### Example
You send a push notification using a preset that supports English (default), Spanish, and German.
The linked in-app banner supports only English and French.
The user’s device language is set to German.
* The **push notification** will be shown in German, since it's supported on the user’s device.
* The **in-app banner** will fall back to English, as German is not available in the banner's language settings.
### Save message to Inbox
You can save push notifications to the app's inbox, allowing users to access and review important messages at their convenience. [Learn more about Message Inbox](/product/messaging-channels/message-inbox/mobile-message-inbox).
To enable this feature, toggle the **Save message to Inbox** option. When enabled, the title and message are pulled from the push preset.
 ##### Remove from Inbox
Control how long messages stay in the inbox by selecting one of the following options from the **Remove from Inbox** dropdown:
- **After the specified number of days**: Set the number of days a message should remain in the inbox before being automatically removed. Use the input field to specify the number of days.
- **On a specific date**: Select an exact date when the message will be deleted from the inbox.
##### Message icon URL
Customize the appearance of the stored notification by specifying an icon URL in the **MESSAGE ICON URL** field. This icon will be displayed next to the message in the inbox, serving as a visual identifier for the notification.
If no icon URL is provided, a default icon will be displayed next to the message.
### Select audience for push notification
Next, choose the audience for your push notification. You can either send the notification to all users or target a specific segment based on user behavior or demographics.
#### Send to segment
Select this option to target a [specific audience segment](/product/audience-data-and-segmentation/segmentation/). Choose a pre-built segment from the dropdown menu, or create a new segment by clicking **Create Segment**.
Then select one of the following actions from the dropdown menu:
* **Build segment**: Create a new segment using the Segment builder. [Learn more](/product/audience-data-and-segmentation/segmentation/create-segments/)
* **Import segment**: Import a segment from a CSV file. [Learn more](/product/audience-data-and-segmentation/segmentation/create-segments/by-import/#how-to-import-a-segment).
##### Remove from Inbox
Control how long messages stay in the inbox by selecting one of the following options from the **Remove from Inbox** dropdown:
- **After the specified number of days**: Set the number of days a message should remain in the inbox before being automatically removed. Use the input field to specify the number of days.
- **On a specific date**: Select an exact date when the message will be deleted from the inbox.
##### Message icon URL
Customize the appearance of the stored notification by specifying an icon URL in the **MESSAGE ICON URL** field. This icon will be displayed next to the message in the inbox, serving as a visual identifier for the notification.
If no icon URL is provided, a default icon will be displayed next to the message.
### Select audience for push notification
Next, choose the audience for your push notification. You can either send the notification to all users or target a specific segment based on user behavior or demographics.
#### Send to segment
Select this option to target a [specific audience segment](/product/audience-data-and-segmentation/segmentation/). Choose a pre-built segment from the dropdown menu, or create a new segment by clicking **Create Segment**.
Then select one of the following actions from the dropdown menu:
* **Build segment**: Create a new segment using the Segment builder. [Learn more](/product/audience-data-and-segmentation/segmentation/create-segments/)
* **Import segment**: Import a segment from a CSV file. [Learn more](/product/audience-data-and-segmentation/segmentation/create-segments/by-import/#how-to-import-a-segment).
 #### Send to all users
Choose this option to send the notification to all your subscribers. This is ideal for general announcements or promotions that apply to your entire user base.
#### Send to all users
Choose this option to send the notification to all your subscribers. This is ideal for general announcements or promotions that apply to your entire user base.
 #### Target platforms
Select the platforms on which you want the notification to be delivered. Available platforms include:
* iOS
* Android
* Safari
* Chrome
* Firefox
Choosing target platforms ensures that your message reaches users on the appropriate devices. Only users on the selected platforms will receive the notification.
#### Target platforms
Select the platforms on which you want the notification to be delivered. Available platforms include:
* iOS
* Android
* Safari
* Chrome
* Firefox
Choosing target platforms ensures that your message reaches users on the appropriate devices. Only users on the selected platforms will receive the notification.
 Once you’ve configured your audience and selected the target platforms, click **Next** to proceed with setting up your push notification.
### Schedule push notification
Next, choose when to send your push notification. You have the following options:
* send it immediately
* schedule it for a specific time
* let Pushwoosh determine the optimal time for each user based on their behavior.
#### Set time to live for push delivery
Use **Time to live** in **Sending options** to control how long Pushwoosh retains a push notification for delivery if the recipient is offline at the time of the send attempt.
In **Time to live**, choose a preset period for how long Pushwoosh keeps this message available for delivery, from 1 hour to 3 weeks.
Once you’ve configured your audience and selected the target platforms, click **Next** to proceed with setting up your push notification.
### Schedule push notification
Next, choose when to send your push notification. You have the following options:
* send it immediately
* schedule it for a specific time
* let Pushwoosh determine the optimal time for each user based on their behavior.
#### Set time to live for push delivery
Use **Time to live** in **Sending options** to control how long Pushwoosh retains a push notification for delivery if the recipient is offline at the time of the send attempt.
In **Time to live**, choose a preset period for how long Pushwoosh keeps this message available for delivery, from 1 hour to 3 weeks.
 You can also choose **Custom range** and enter a specific number of hours, days, or weeks. The maximum period is 4 weeks.
 > **Note:** The **Time to live** value set here overrides the expiration time defined in the [push preset legacy form](/product/content/push-presets/push-preset-legacy-form/#ios). For example, if the preset TTL is 2 weeks but the TTL set here is 1 week, the push expires after 1 week.
#### Send immediately
Select this option if you want to send the push notification immediately after setting up the campaign. This is useful for urgent or time-sensitive messages.
> **Note:** The **Time to live** value set here overrides the expiration time defined in the [push preset legacy form](/product/content/push-presets/push-preset-legacy-form/#ios). For example, if the preset TTL is 2 weeks but the TTL set here is 1 week, the push expires after 1 week.
#### Send immediately
Select this option if you want to send the push notification immediately after setting up the campaign. This is useful for urgent or time-sensitive messages.
 #### Selected time
Choose this option to schedule your push notification for a specific date and time.
1. Use the calendar to select the exact date for your notification.
2. Set the time in hours and minutes (using the 24-hour format) for when the notification should be sent.
3. Choose the appropriate time zone:
* **Subscriber’s device timezone**. The notification will be sent based on the recipient’s local time, ensuring delivery at the specified time in their timezone.
* **Custom timezone**. Select a specific timezone to schedule the notification for all recipients, useful for targeting users in a specific region.
#### Selected time
Choose this option to schedule your push notification for a specific date and time.
1. Use the calendar to select the exact date for your notification.
2. Set the time in hours and minutes (using the 24-hour format) for when the notification should be sent.
3. Choose the appropriate time zone:
* **Subscriber’s device timezone**. The notification will be sent based on the recipient’s local time, ensuring delivery at the specified time in their timezone.
* **Custom timezone**. Select a specific timezone to schedule the notification for all recipients, useful for targeting users in a specific region.
 #### Best time (paid subscription required)
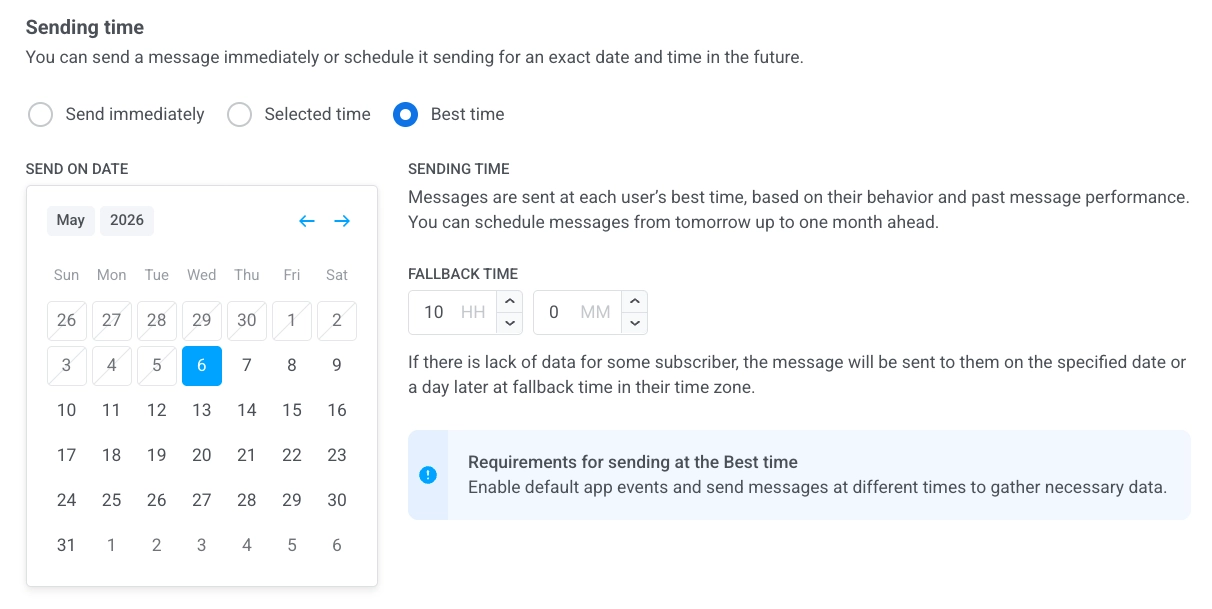
This option sends each message at the user’s best time based on their behavior and past message performance. Select the start date, and Pushwoosh schedules delivery automatically. You can schedule messages from tomorrow up to one month ahead.
If there is not enough data for some users, set **Fallback time** in hours and minutes. In this case, the message is sent on the selected date or one day later at the fallback time in the user’s timezone.
#### Best time (paid subscription required)
This option sends each message at the user’s best time based on their behavior and past message performance. Select the start date, and Pushwoosh schedules delivery automatically. You can schedule messages from tomorrow up to one month ahead.
If there is not enough data for some users, set **Fallback time** in hours and minutes. In this case, the message is sent on the selected date or one day later at the fallback time in the user’s timezone.
 To use the **Best time** feature, make sure that:
* [**Default app events**](/product/audience-data-and-segmentation/events/default-events) are enabled.
* You have previously sent messages at different times to collect enough user data for the system to determine optimal send times.
#### Configure message delivery settings
##### Set frequency capping
Use [**Frequency capping**](/product/messaging-channels/global-frequency-capping/#enable-global-frequency-capping) to limit how often users receive push messages, preventing over-messaging and reducing churn. Choose one of the following options:
* **Use Global frequency capping settings**
Apply the project-wide limits configured in your [Global frequency capping settings](/product/messaging-channels/global-frequency-capping/#enable-global-frequency-capping).
For example, if the global limit is set to 3 messages in 9 days, additional messages exceeding this limit will be skipped.
To use the **Best time** feature, make sure that:
* [**Default app events**](/product/audience-data-and-segmentation/events/default-events) are enabled.
* You have previously sent messages at different times to collect enough user data for the system to determine optimal send times.
#### Configure message delivery settings
##### Set frequency capping
Use [**Frequency capping**](/product/messaging-channels/global-frequency-capping/#enable-global-frequency-capping) to limit how often users receive push messages, preventing over-messaging and reducing churn. Choose one of the following options:
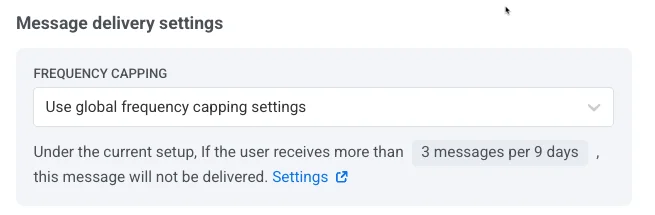
* **Use Global frequency capping settings**
Apply the project-wide limits configured in your [Global frequency capping settings](/product/messaging-channels/global-frequency-capping/#enable-global-frequency-capping).
For example, if the global limit is set to 3 messages in 9 days, additional messages exceeding this limit will be skipped.
 * **Ignore Global frequency capping**
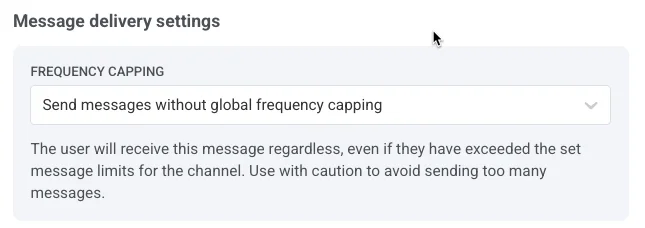
The user will receive this message even if they’ve exceeded the channel’s message limits. Use this option with caution to avoid over-messaging.
* **Ignore Global frequency capping**
The user will receive this message even if they’ve exceeded the channel’s message limits. Use this option with caution to avoid over-messaging.
 * **Use custom frequency capping**
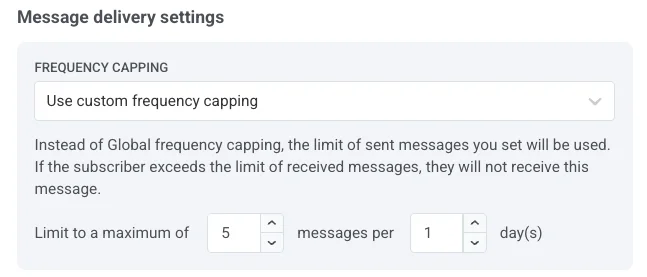
Set a custom message limit for this message. If the user exceeds this custom cap, the message will be skipped, and the user will proceed to the next step.
* **Use custom frequency capping**
Set a custom message limit for this message. If the user exceeds this custom cap, the message will be skipped, and the user will proceed to the next step.
 ##### Set send rate limits
The **Send rate** setting controls how quickly messages are delivered to your audience. Adjusting the send rate helps you manage delivery speed, prevent backend overload, and improve overall deliverability.
Choose one of the following options:
* **Use global send rate settings**
Applies the send rate limits configured in your project’s message delivery settings. If no limits are set, all messages will be sent immediately. Use this option when you want delivery speed to follow your project’s default rules. [Learn more about global send rate limits](/product/messaging-channels/global-frequency-capping/#set-send-rate-limits)

* **Send messages without send rate**
Sends messages as fast as possible, ignoring any global send rate limits. Use with caution to avoid overloading your backend or creating delivery spikes.

* **Use custom send rate**
Overrides the global send rate for this message only. Allows you to specify the number of messages sent per minute, giving you full control over delivery speed. Messages will be sent at the custom rate you define in the message element.

Once you've configured the desired options, click **Next** to proceed to the confirmation step.
### Review and edit your content
Before finalizing, review the content, on-click actions, audience, platform, and scheduling options to ensure everything is configured correctly. You’ll also see a preview of your push notification in each selected language. You can adjust any settings as needed.
##### Set send rate limits
The **Send rate** setting controls how quickly messages are delivered to your audience. Adjusting the send rate helps you manage delivery speed, prevent backend overload, and improve overall deliverability.
Choose one of the following options:
* **Use global send rate settings**
Applies the send rate limits configured in your project’s message delivery settings. If no limits are set, all messages will be sent immediately. Use this option when you want delivery speed to follow your project’s default rules. [Learn more about global send rate limits](/product/messaging-channels/global-frequency-capping/#set-send-rate-limits)

* **Send messages without send rate**
Sends messages as fast as possible, ignoring any global send rate limits. Use with caution to avoid overloading your backend or creating delivery spikes.

* **Use custom send rate**
Overrides the global send rate for this message only. Allows you to specify the number of messages sent per minute, giving you full control over delivery speed. Messages will be sent at the custom rate you define in the message element.

Once you've configured the desired options, click **Next** to proceed to the confirmation step.
### Review and edit your content
Before finalizing, review the content, on-click actions, audience, platform, and scheduling options to ensure everything is configured correctly. You’ll also see a preview of your push notification in each selected language. You can adjust any settings as needed.
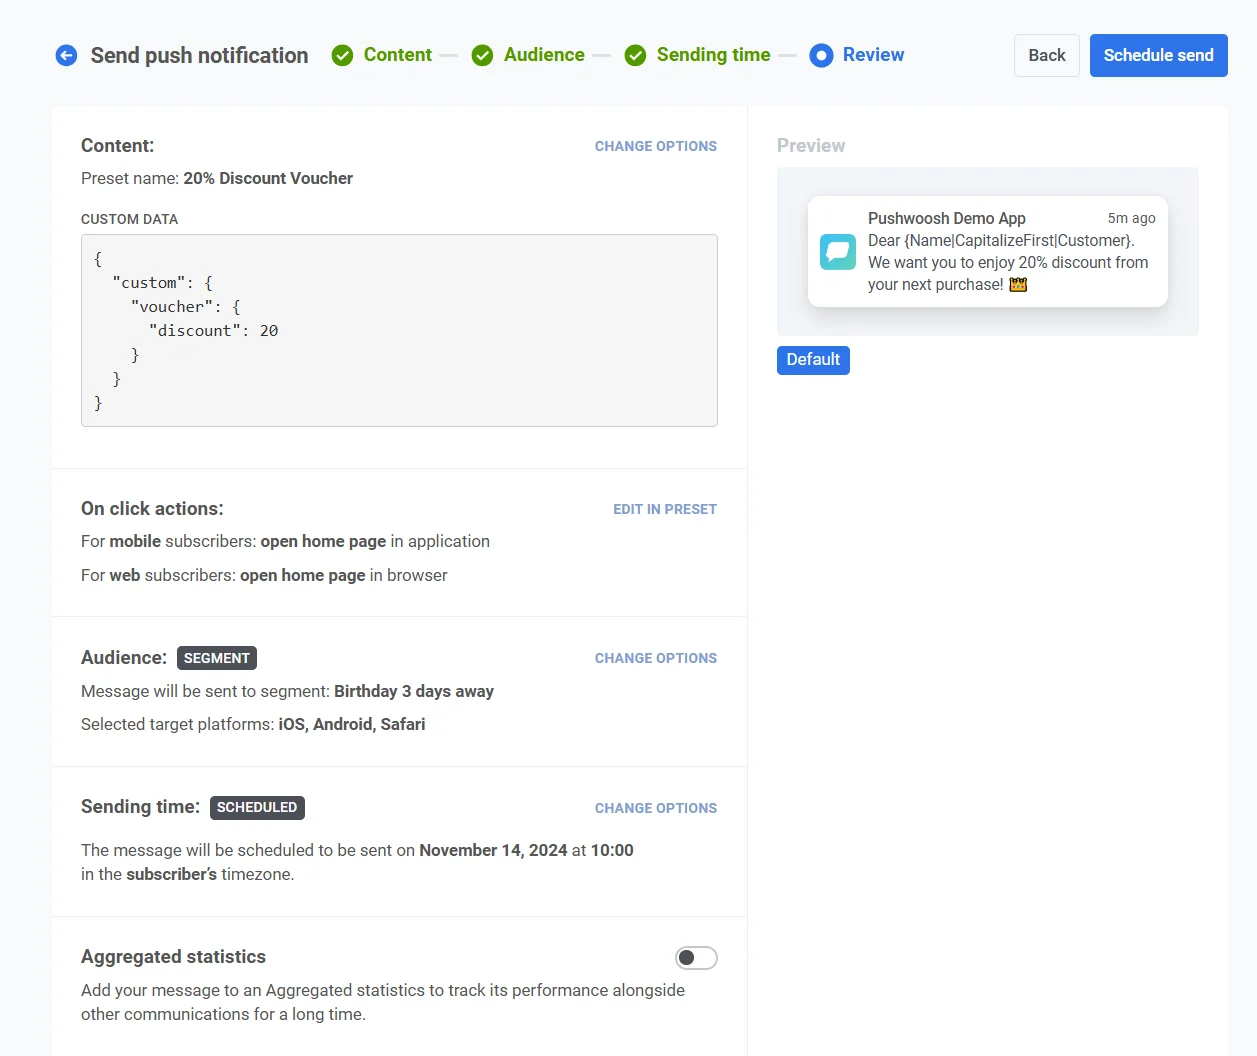 Optionally, you can choose to link your push notification to an **Aggregated Campaign**, allowing you to associate this message with a larger, ongoing campaign and track its performance alongside related notifications over time.
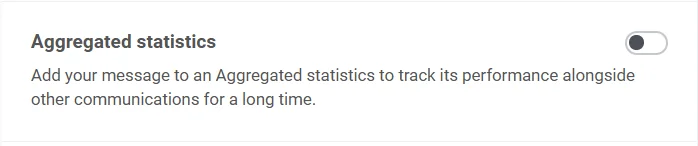 Once everything is confirmed, click **Schedule push** to set it for later delivery or **Send now** to send it immediately.
### Cancel or edit a scheduled message
For messages that are scheduled and not yet sent (status **PENDING**), you can change or cancel them.
Open the list of messages in **Campaigns** → **One-time messages**. Open the actions menu (⋮) for the message you want to change or cancel:
* **Delete message:** cancels the scheduled delivery and changes the status to **Canceled**.
Once everything is confirmed, click **Schedule push** to set it for later delivery or **Send now** to send it immediately.
### Cancel or edit a scheduled message
For messages that are scheduled and not yet sent (status **PENDING**), you can change or cancel them.
Open the list of messages in **Campaigns** → **One-time messages**. Open the actions menu (⋮) for the message you want to change or cancel:
* **Delete message:** cancels the scheduled delivery and changes the status to **Canceled**.
 * **Edit message:** opens the one-time push form with the message data loaded. You can change content or audience.
 ### Example scenario
Imagine you're a marketing manager for a fitness app, and you want to send a one-time push notification about a **flash sale** on premium memberships. Do it as follows:
##### Create the campaign
Go to **Campaigns**, select **One-time messages**, and click **Send message** → **One-time push** to begin setting up your campaign.
##### Create message content
Since you want to create a new message for this flash sale, click **Create new** and set up a push preset titled **Flash Sale: 50% Off Premium Membership**.
Example text for a push message:
*“Limited Time Offer! Get 50% off Premium Membership for the next 24 hours. Don’t miss out on exclusive workouts and features!”*
In the push preset, add a [deep link](/product/messaging-channels/push-notifications/advanced-push-features/deep-linking) to direct users to the app's membership page. Once you're satisfied with the design and content, click **Next** to proceed to the audience selection step.
### Example scenario
Imagine you're a marketing manager for a fitness app, and you want to send a one-time push notification about a **flash sale** on premium memberships. Do it as follows:
##### Create the campaign
Go to **Campaigns**, select **One-time messages**, and click **Send message** → **One-time push** to begin setting up your campaign.
##### Create message content
Since you want to create a new message for this flash sale, click **Create new** and set up a push preset titled **Flash Sale: 50% Off Premium Membership**.
Example text for a push message:
*“Limited Time Offer! Get 50% off Premium Membership for the next 24 hours. Don’t miss out on exclusive workouts and features!”*
In the push preset, add a [deep link](/product/messaging-channels/push-notifications/advanced-push-features/deep-linking) to direct users to the app's membership page. Once you're satisfied with the design and content, click **Next** to proceed to the audience selection step.
 ##### Select the audience
For this flash sale, you want to target users who have shown interest in premium services but haven’t subscribed yet. Select **Send to segment**, and from the dropdown menu, choose the **Interested in Premium** segment. This segment includes users who have viewed the premium page but haven’t upgraded.
##### Select the audience
For this flash sale, you want to target users who have shown interest in premium services but haven’t subscribed yet. Select **Send to segment**, and from the dropdown menu, choose the **Interested in Premium** segment. This segment includes users who have viewed the premium page but haven’t upgraded.
 ##### Set the timing
Since the flash sale is time-sensitive, you want the notification to go out immediately. Select **Send immediately** to dispatch the notification as soon as the campaign setup is complete.
##### Set the timing
Since the flash sale is time-sensitive, you want the notification to go out immediately. Select **Send immediately** to dispatch the notification as soon as the campaign setup is complete.
 ##### Review and send
Review all the campaign details to ensure the notification looks correct.
##### Review and send
Review all the campaign details to ensure the notification looks correct.
 ##### Link to aggregated campaign (optional)
If this notification is part of a long-term marketing campaign with multiple messages (e.g., a seasonal sale or ongoing promotions), you can toggle the **Link to Aggregated Campaign** option. This will allow you to track this notification’s performance alongside other related messages in the broader campaign.
Once everything is confirmed, click **Send message** to immediately dispatch the notification.
You can also send a one-time push using Customer Journey Builder. [Learn how to send one-time push via Customer Journey](/product/messaging-channels/push-notifications/send-push-notifications/one-time-push-via-customer-journey/).
##### Link to aggregated campaign (optional)
If this notification is part of a long-term marketing campaign with multiple messages (e.g., a seasonal sale or ongoing promotions), you can toggle the **Link to Aggregated Campaign** option. This will allow you to track this notification’s performance alongside other related messages in the broader campaign.
Once everything is confirmed, click **Send message** to immediately dispatch the notification.
You can also send a one-time push using Customer Journey Builder. [Learn how to send one-time push via Customer Journey](/product/messaging-channels/push-notifications/send-push-notifications/one-time-push-via-customer-journey/).