# Geo campaigns
A geo campaign sends a push notification automatically when a user's device enters a location you defined on a map, such as a store, a venue, a delivery point, or a transit hub.
Pushwoosh uses geozones to define where a campaign can trigger. You can group multiple geozones into a cluster to apply one shared cooldown and avoid repeated sends in nearby areas.
## How it works
After you set up a geo campaign, Pushwoosh sends a push when a user's device enters a geozone, the campaign is active, and cooldown allows delivery.
Location permission is required. If a user has not granted it, geo campaigns cannot trigger for that device, and no push is sent when the device enters a geozone.
## Use cases
- Send an in-store offer when a user enters a geozone around a retail location.
- Trigger an arrival message at a venue, pickup point, or branch office.
- Limit repeat sends in dense areas by applying one cooldown across a cluster of nearby geozones.
## Prerequisites
Before you create your first geo campaign, make sure:
1. At least one mobile platform (Android or iOS) is configured in the project. [Learn how to configure platforms](/product/first-steps/start-with-your-project/configure-platforms/).
2. The Pushwoosh SDK is integrated in your app with location tracking enabled.
3. Location tracking is configured in the app. For implementation details, see [Geozones for iOS](/developer/pushwoosh-sdk/ios-sdk/customizing-ios-sdk/#geozones-push-notifications) and [Geozones for Android](/developer/pushwoosh-sdk/android-sdk/customizing-android-sdk-50/#geozones-push-notification).
## Create a geozone
Create a geozone to define where your campaign triggers and what message users receive when they enter that area.
Go to **Campaigns → Geo campaigns**. Click **Create geozone** to start.
### Set the campaign name and aggregated statistics
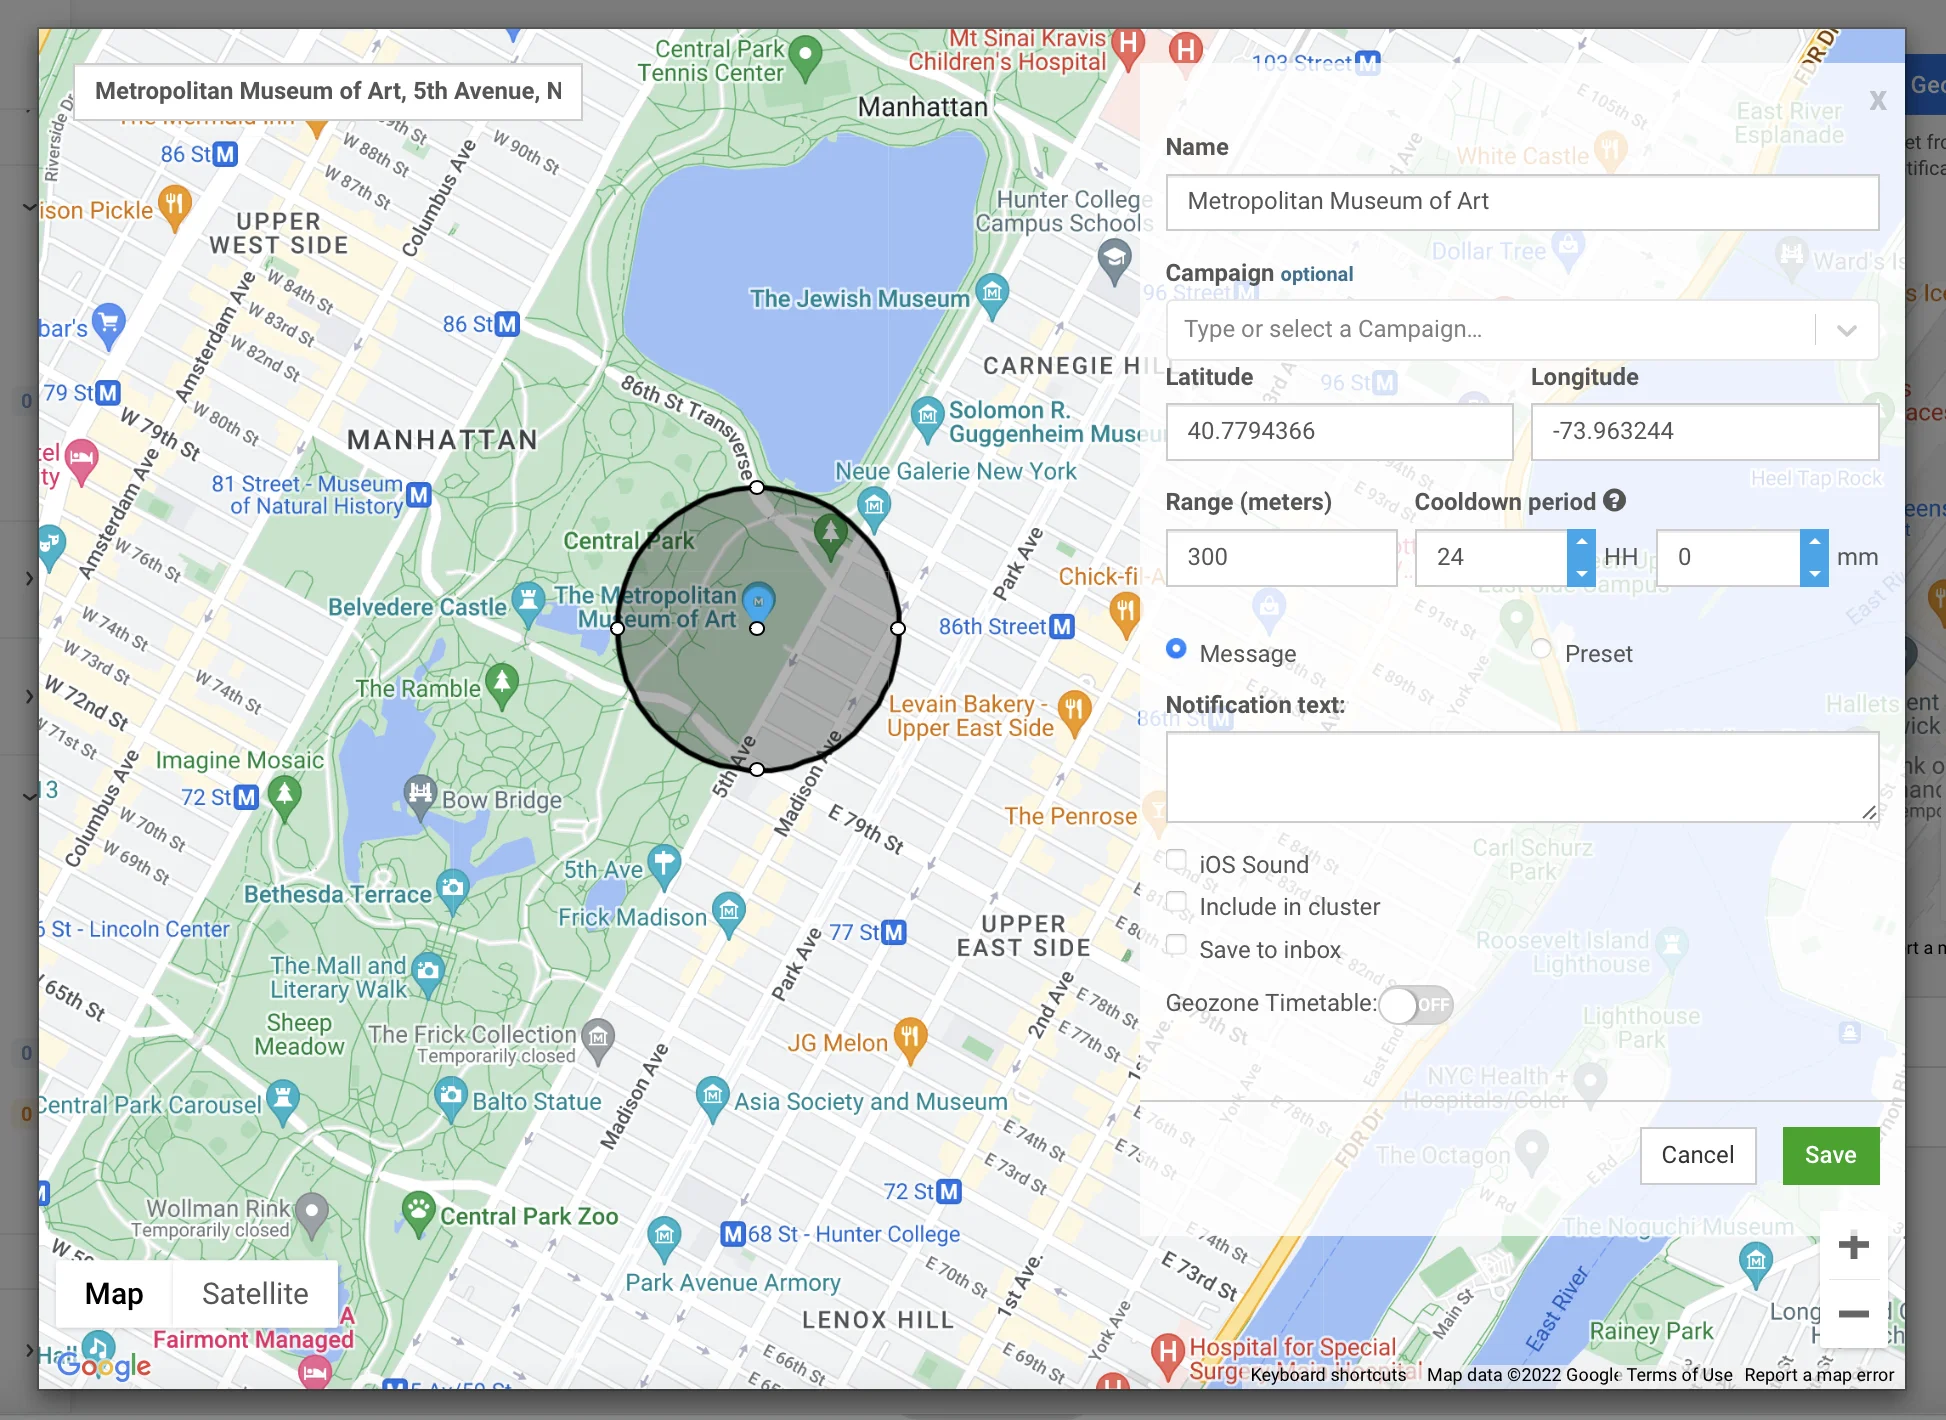
In the **Campaign name** field, enter a label up to 64 characters. Keep it short and recognizable, for example, `Spring sale at downtown shops`.
Optionally, select an existing campaign in the **Aggregated statistics** field. Geo campaign pushes will then be counted together with other touchpoints in that campaign's [aggregated messages statistics](/product/statistics-and-analytics/aggregated-messages/).
### Compose the push message
Choose how to compose the notification:
- **Write a message**: enter the push text directly in the form (up to 1024 characters). Use this option for a quick one-time message in a single geozone.
- **Use an existing preset**: pick a saved [preset](/product/content/push-presets/) for full templating with title, deep link, custom sound, and platform-specific payloads.
Configure optional message settings:
- **Play default sound on iOS**: uses the system push sound on iOS devices.
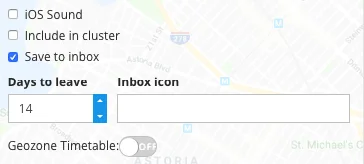
- **Save to inbox**: keeps the push in the device's in-app inbox after delivery, so the user can come back to it later. When enabled, set **Inbox expire** (1–365 days) and optionally an **Inbox icon URL**. [Learn more](/product/messaging-channels/message-inbox/mobile-message-inbox/#choosing-which-messages-to-save-to-inbox).
### Set the trigger location
1. Search for an address, paste raw coordinates into the search bar, or click anywhere on the map to drop a marker.
2. Drag the handle on the circle to set the **Range**. Range can be set between 50 m and 100 km. Default is 200 m.
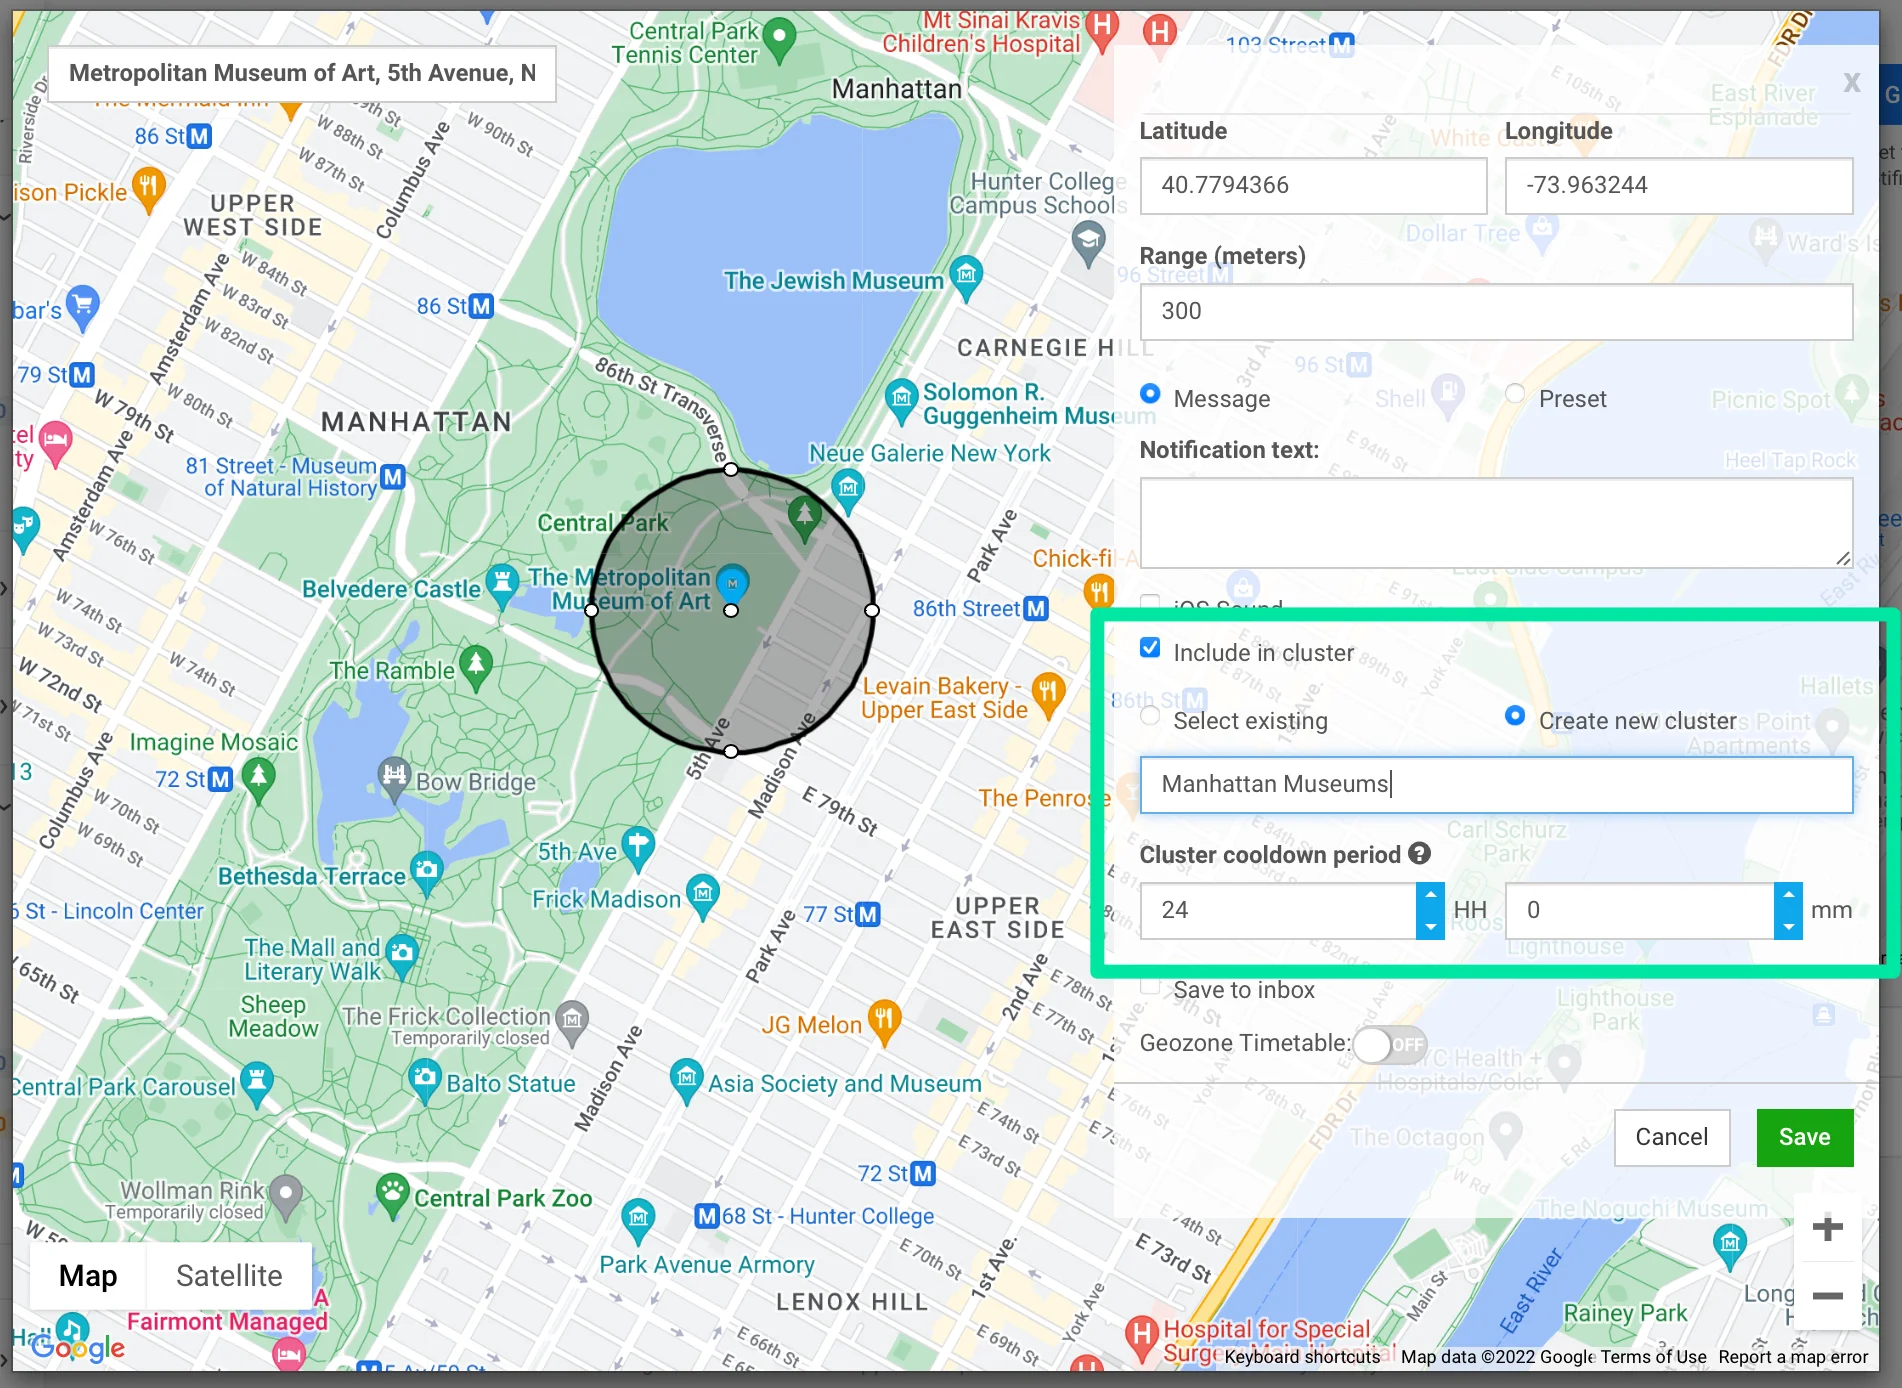
### Choose a cluster and cooldown
A cooldown is a silent period after a push is sent. The same device will not receive another notification from that geozone until the cooldown expires, even if it exits and re-enters.
In the **Cooldown** field, choose one of three modes:
| Mode | How cooldown is set | Behavior |
|---|---|---|
| **Standalone** | Set days, hours, and minutes directly for this geozone. Minimum is 1 minute. Maximum is 41 days. | Cooldown applies to this geozone only. |
| **Use existing cluster** | Apply the cooldown from an existing [cluster](#create-a-cluster). | The cluster cooldown overrides this geozone's own cooldown. |
| **New cluster** | Create a new cluster and set its cooldown. | The cluster cooldown overrides this geozone's own cooldown. |
### Schedule when the campaign can fire
The **Campaign schedule** section decides when the geozone is allowed to trigger pushes:
- **Always active**: the geozone fires 24/7.
- **On selected days and hours**: enable specific weekdays and pick one time window per day (start – end). The campaign only fires inside those windows.
Schedules are stored in the browser's local time zone at the time of creation.
Click **Save** to create the geozone. The geozone is saved and enabled immediately. If you set a schedule, pushes fire only during the configured windows.
The push is sent when a device enters the geozone during the active schedule and is not blocked by cooldown.
## Create a cluster
Use a cluster when the same device might enter several of your zones in a short window, for example, two stores on the same street. Once a device receives a push from any geozone in the cluster, it stays silent for all others in that cluster until the cooldown expires.
After you create the first geozone, you can create clusters from the **Geo campaigns** page.
1. On the **Geo campaigns** page, click **Create cluster**.
2. Enter the **Cluster name** and **Cluster cooldown**.
3. Click **Create**.
Once created, the cluster appears on the **Geo campaigns** page. To assign geozones to it:
- Select **Use existing cluster** in the **Cooldown** field when [creating or editing a geozone](#choose-a-cluster-and-cooldown).
- Use **Move to cluster** on the [Geo campaigns](#manage-geozones-and-clusters) page.
## Manage geozones and clusters
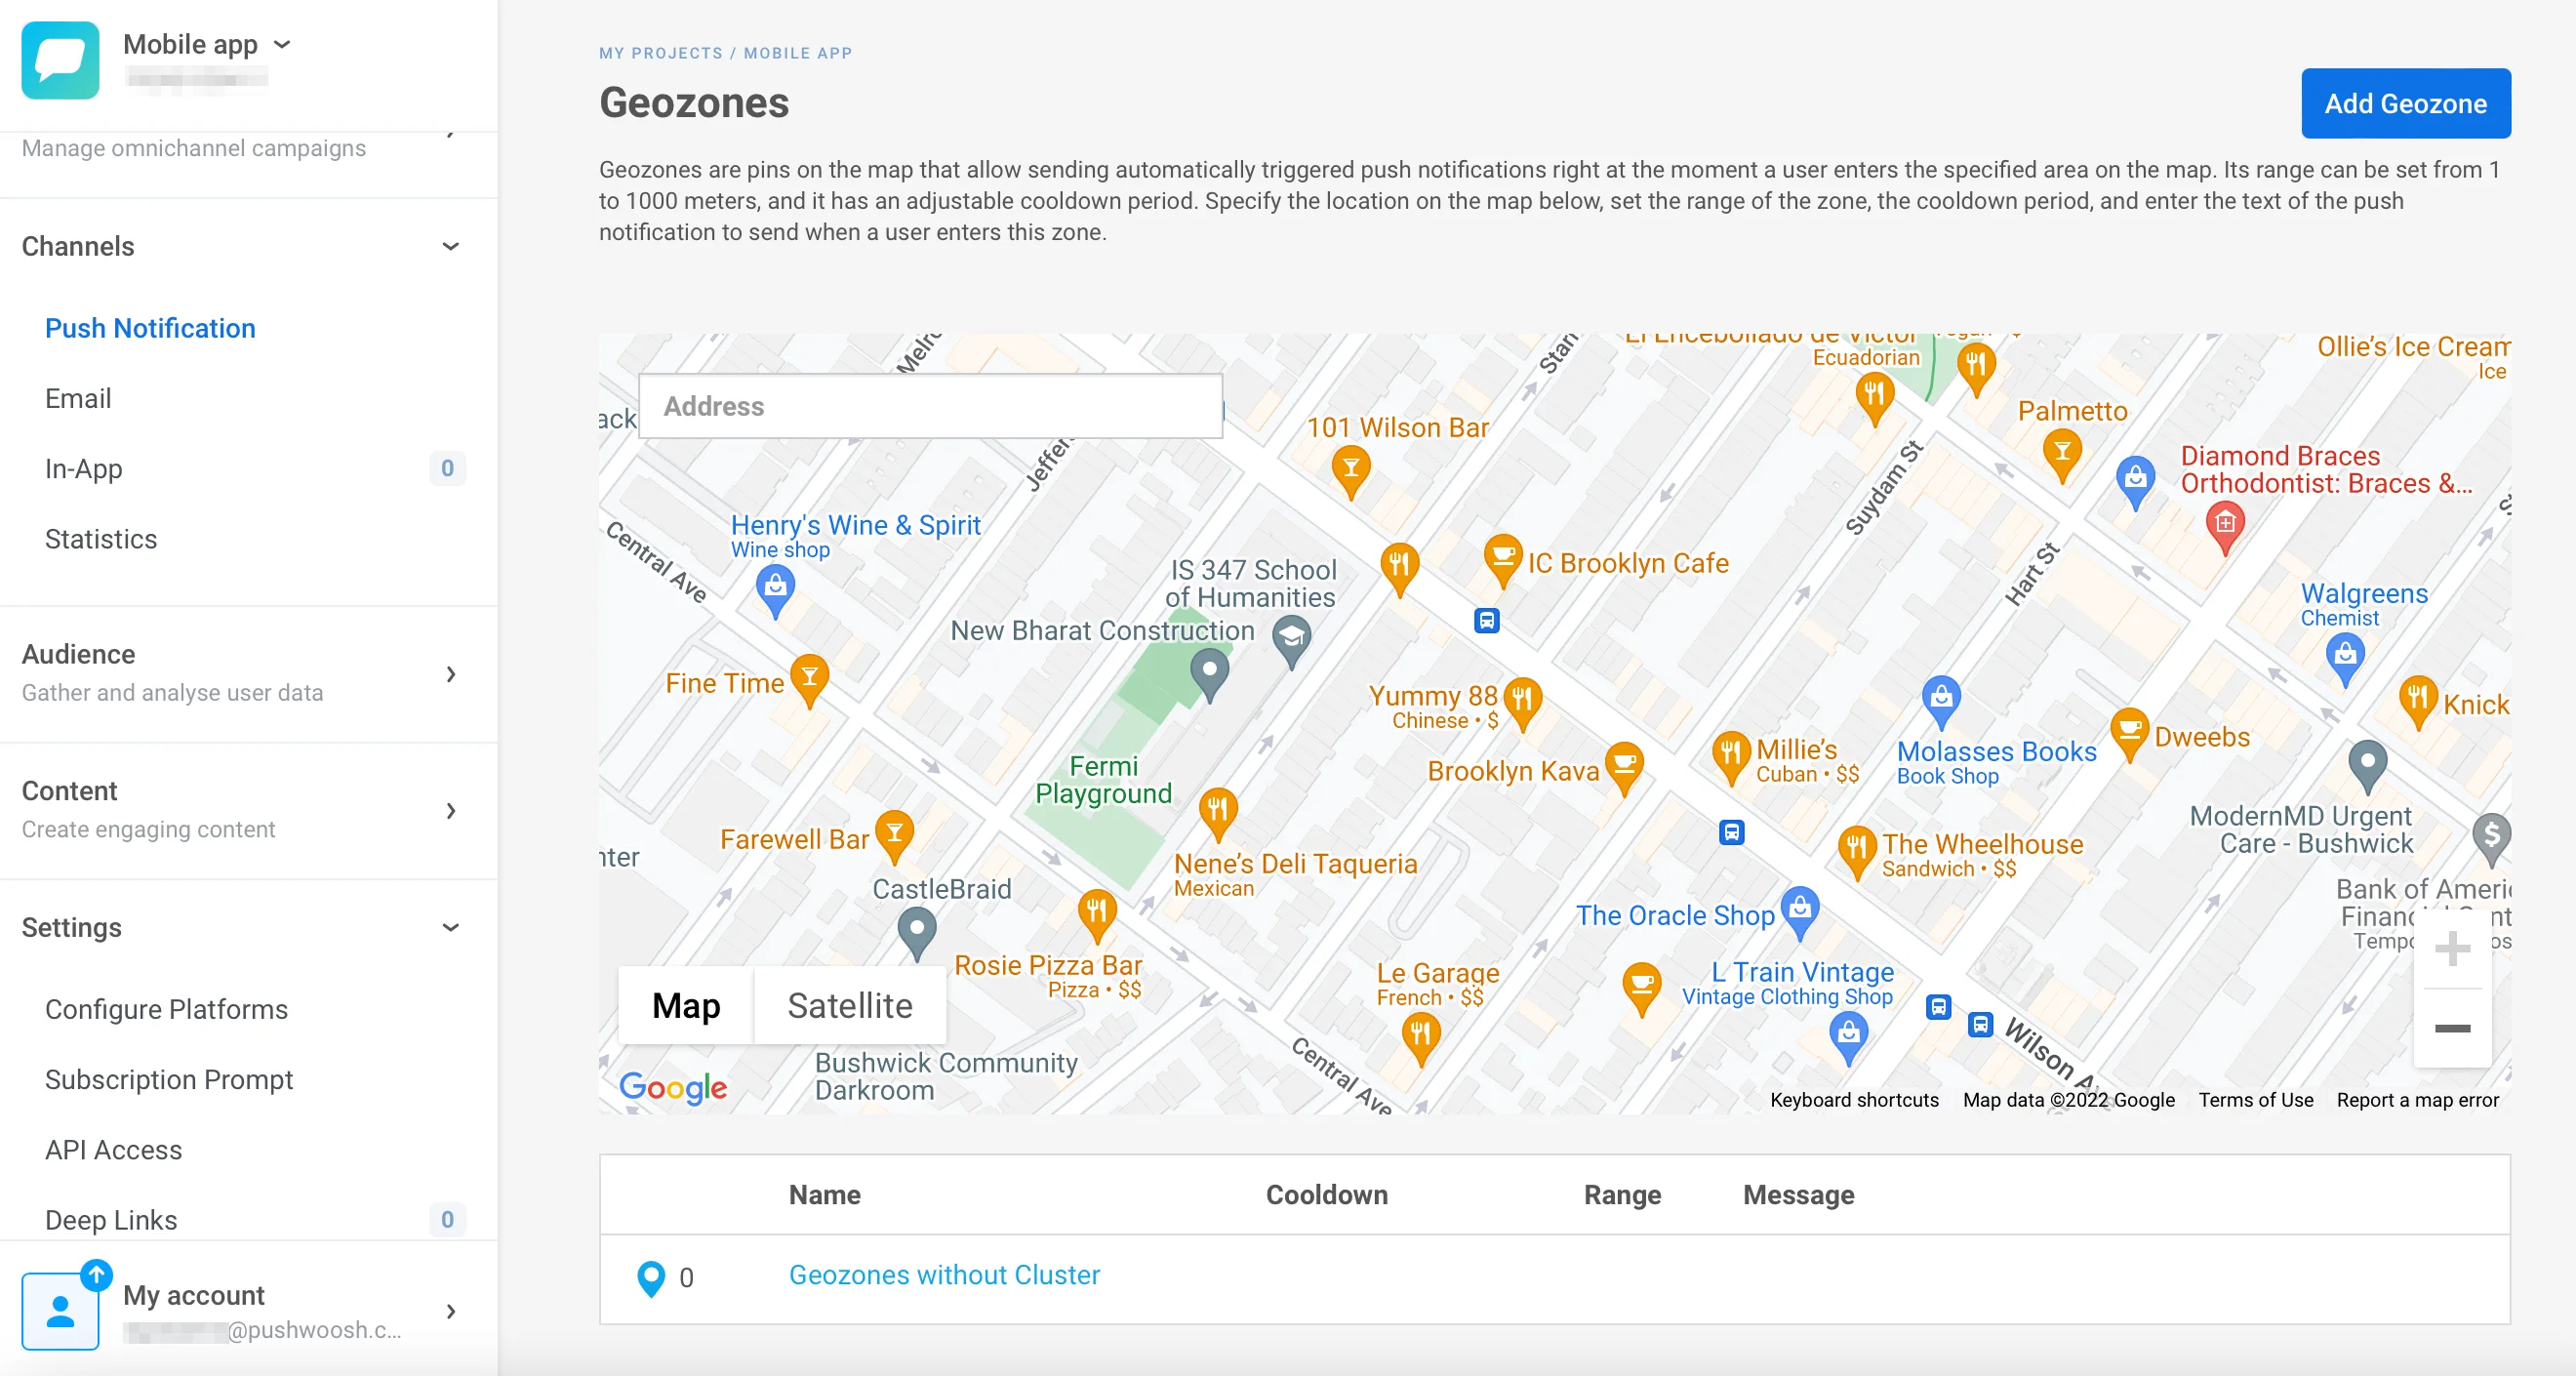
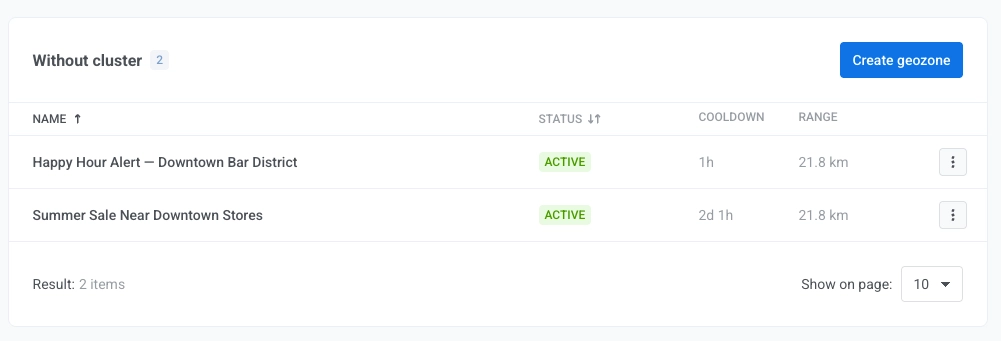
The **Geo campaigns** page shows all your geozones plotted on a map and listed in a table, grouped by cluster. Standalone zones appear under a **Without cluster** section.
For each geozone you can:
- **Pause** or **Resume** the trigger.
- **Edit** the geozone in the form.
- **Move to cluster**: assign to a different cluster, or remove from its current cluster.
- **Delete** the geozone permanently.
For each cluster you can:
- **Pause** or **Resume** the cluster. Pausing a cluster also pauses every geozone inside it.
- **Edit** the cluster name or cooldown.
- **Delete** the cluster. Only clusters without attached geozones can be deleted.
 ### Set the campaign name and aggregated statistics
In the **Campaign name** field, enter a label up to 64 characters. Keep it short and recognizable, for example, `Spring sale at downtown shops`.
Optionally, select an existing campaign in the **Aggregated statistics** field. Geo campaign pushes will then be counted together with other touchpoints in that campaign's [aggregated messages statistics](/product/statistics-and-analytics/aggregated-messages/).
### Set the campaign name and aggregated statistics
In the **Campaign name** field, enter a label up to 64 characters. Keep it short and recognizable, for example, `Spring sale at downtown shops`.
Optionally, select an existing campaign in the **Aggregated statistics** field. Geo campaign pushes will then be counted together with other touchpoints in that campaign's [aggregated messages statistics](/product/statistics-and-analytics/aggregated-messages/).
 ### Compose the push message
Choose how to compose the notification:
- **Write a message**: enter the push text directly in the form (up to 1024 characters). Use this option for a quick one-time message in a single geozone.
- **Use an existing preset**: pick a saved [preset](/product/content/push-presets/) for full templating with title, deep link, custom sound, and platform-specific payloads.
### Compose the push message
Choose how to compose the notification:
- **Write a message**: enter the push text directly in the form (up to 1024 characters). Use this option for a quick one-time message in a single geozone.
- **Use an existing preset**: pick a saved [preset](/product/content/push-presets/) for full templating with title, deep link, custom sound, and platform-specific payloads.
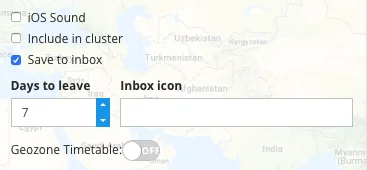
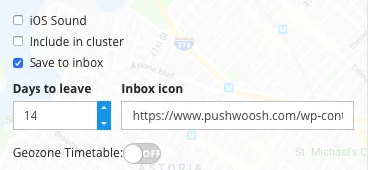
 Configure optional message settings:
- **Play default sound on iOS**: uses the system push sound on iOS devices.
- **Save to inbox**: keeps the push in the device's in-app inbox after delivery, so the user can come back to it later. When enabled, set **Inbox expire** (1–365 days) and optionally an **Inbox icon URL**. [Learn more](/product/messaging-channels/message-inbox/mobile-message-inbox/#choosing-which-messages-to-save-to-inbox).
### Set the trigger location
1. Search for an address, paste raw coordinates into the search bar, or click anywhere on the map to drop a marker.
2. Drag the handle on the circle to set the **Range**. Range can be set between 50 m and 100 km. Default is 200 m.
Configure optional message settings:
- **Play default sound on iOS**: uses the system push sound on iOS devices.
- **Save to inbox**: keeps the push in the device's in-app inbox after delivery, so the user can come back to it later. When enabled, set **Inbox expire** (1–365 days) and optionally an **Inbox icon URL**. [Learn more](/product/messaging-channels/message-inbox/mobile-message-inbox/#choosing-which-messages-to-save-to-inbox).
### Set the trigger location
1. Search for an address, paste raw coordinates into the search bar, or click anywhere on the map to drop a marker.
2. Drag the handle on the circle to set the **Range**. Range can be set between 50 m and 100 km. Default is 200 m.
 ### Choose a cluster and cooldown
A cooldown is a silent period after a push is sent. The same device will not receive another notification from that geozone until the cooldown expires, even if it exits and re-enters.
In the **Cooldown** field, choose one of three modes:
| Mode | How cooldown is set | Behavior |
|---|---|---|
| **Standalone** | Set days, hours, and minutes directly for this geozone. Minimum is 1 minute. Maximum is 41 days. | Cooldown applies to this geozone only. |
| **Use existing cluster** | Apply the cooldown from an existing [cluster](#create-a-cluster). | The cluster cooldown overrides this geozone's own cooldown. |
| **New cluster** | Create a new cluster and set its cooldown. | The cluster cooldown overrides this geozone's own cooldown. |
### Choose a cluster and cooldown
A cooldown is a silent period after a push is sent. The same device will not receive another notification from that geozone until the cooldown expires, even if it exits and re-enters.
In the **Cooldown** field, choose one of three modes:
| Mode | How cooldown is set | Behavior |
|---|---|---|
| **Standalone** | Set days, hours, and minutes directly for this geozone. Minimum is 1 minute. Maximum is 41 days. | Cooldown applies to this geozone only. |
| **Use existing cluster** | Apply the cooldown from an existing [cluster](#create-a-cluster). | The cluster cooldown overrides this geozone's own cooldown. |
| **New cluster** | Create a new cluster and set its cooldown. | The cluster cooldown overrides this geozone's own cooldown. |
 ### Schedule when the campaign can fire
The **Campaign schedule** section decides when the geozone is allowed to trigger pushes:
- **Always active**: the geozone fires 24/7.
- **On selected days and hours**: enable specific weekdays and pick one time window per day (start – end). The campaign only fires inside those windows.
### Schedule when the campaign can fire
The **Campaign schedule** section decides when the geozone is allowed to trigger pushes:
- **Always active**: the geozone fires 24/7.
- **On selected days and hours**: enable specific weekdays and pick one time window per day (start – end). The campaign only fires inside those windows.
 Schedules are stored in the browser's local time zone at the time of creation.
Click **Save** to create the geozone. The geozone is saved and enabled immediately. If you set a schedule, pushes fire only during the configured windows.
The push is sent when a device enters the geozone during the active schedule and is not blocked by cooldown.
## Create a cluster
Use a cluster when the same device might enter several of your zones in a short window, for example, two stores on the same street. Once a device receives a push from any geozone in the cluster, it stays silent for all others in that cluster until the cooldown expires.
After you create the first geozone, you can create clusters from the **Geo campaigns** page.
1. On the **Geo campaigns** page, click **Create cluster**.
Schedules are stored in the browser's local time zone at the time of creation.
Click **Save** to create the geozone. The geozone is saved and enabled immediately. If you set a schedule, pushes fire only during the configured windows.
The push is sent when a device enters the geozone during the active schedule and is not blocked by cooldown.
## Create a cluster
Use a cluster when the same device might enter several of your zones in a short window, for example, two stores on the same street. Once a device receives a push from any geozone in the cluster, it stays silent for all others in that cluster until the cooldown expires.
After you create the first geozone, you can create clusters from the **Geo campaigns** page.
1. On the **Geo campaigns** page, click **Create cluster**.
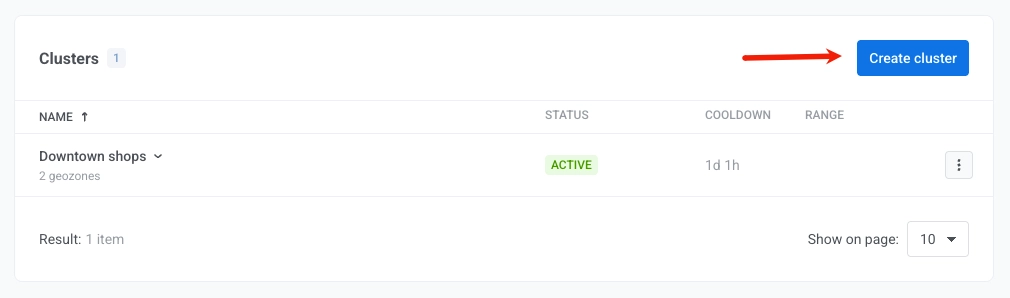 2. Enter the **Cluster name** and **Cluster cooldown**.
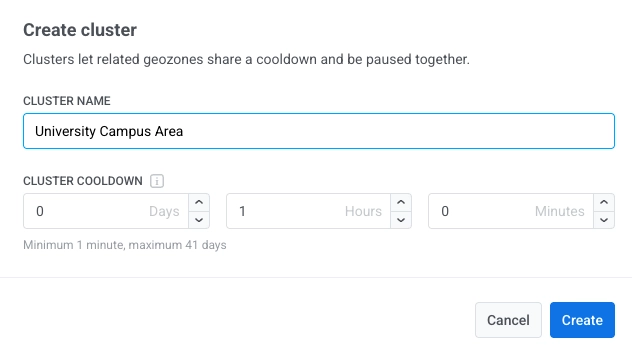 3. Click **Create**.
Once created, the cluster appears on the **Geo campaigns** page. To assign geozones to it:
- Select **Use existing cluster** in the **Cooldown** field when [creating or editing a geozone](#choose-a-cluster-and-cooldown).
- Use **Move to cluster** on the [Geo campaigns](#manage-geozones-and-clusters) page.
## Manage geozones and clusters
The **Geo campaigns** page shows all your geozones plotted on a map and listed in a table, grouped by cluster. Standalone zones appear under a **Without cluster** section.
3. Click **Create**.
Once created, the cluster appears on the **Geo campaigns** page. To assign geozones to it:
- Select **Use existing cluster** in the **Cooldown** field when [creating or editing a geozone](#choose-a-cluster-and-cooldown).
- Use **Move to cluster** on the [Geo campaigns](#manage-geozones-and-clusters) page.
## Manage geozones and clusters
The **Geo campaigns** page shows all your geozones plotted on a map and listed in a table, grouped by cluster. Standalone zones appear under a **Without cluster** section.
 For each geozone you can:
- **Pause** or **Resume** the trigger.
- **Edit** the geozone in the form.
- **Move to cluster**: assign to a different cluster, or remove from its current cluster.
- **Delete** the geozone permanently.
For each cluster you can:
- **Pause** or **Resume** the cluster. Pausing a cluster also pauses every geozone inside it.
- **Edit** the cluster name or cooldown.
- **Delete** the cluster. Only clusters without attached geozones can be deleted.
For each geozone you can:
- **Pause** or **Resume** the trigger.
- **Edit** the geozone in the form.
- **Move to cluster**: assign to a different cluster, or remove from its current cluster.
- **Delete** the geozone permanently.
For each cluster you can:
- **Pause** or **Resume** the cluster. Pausing a cluster also pauses every geozone inside it.
- **Edit** the cluster name or cooldown.
- **Delete** the cluster. Only clusters without attached geozones can be deleted.