# Send instant in-apps
Instant in-apps deliver messages to users the moment a specified action happens inside the app, maximizing the chance they will be seen.
To send in-app messages through in-app campaigns:
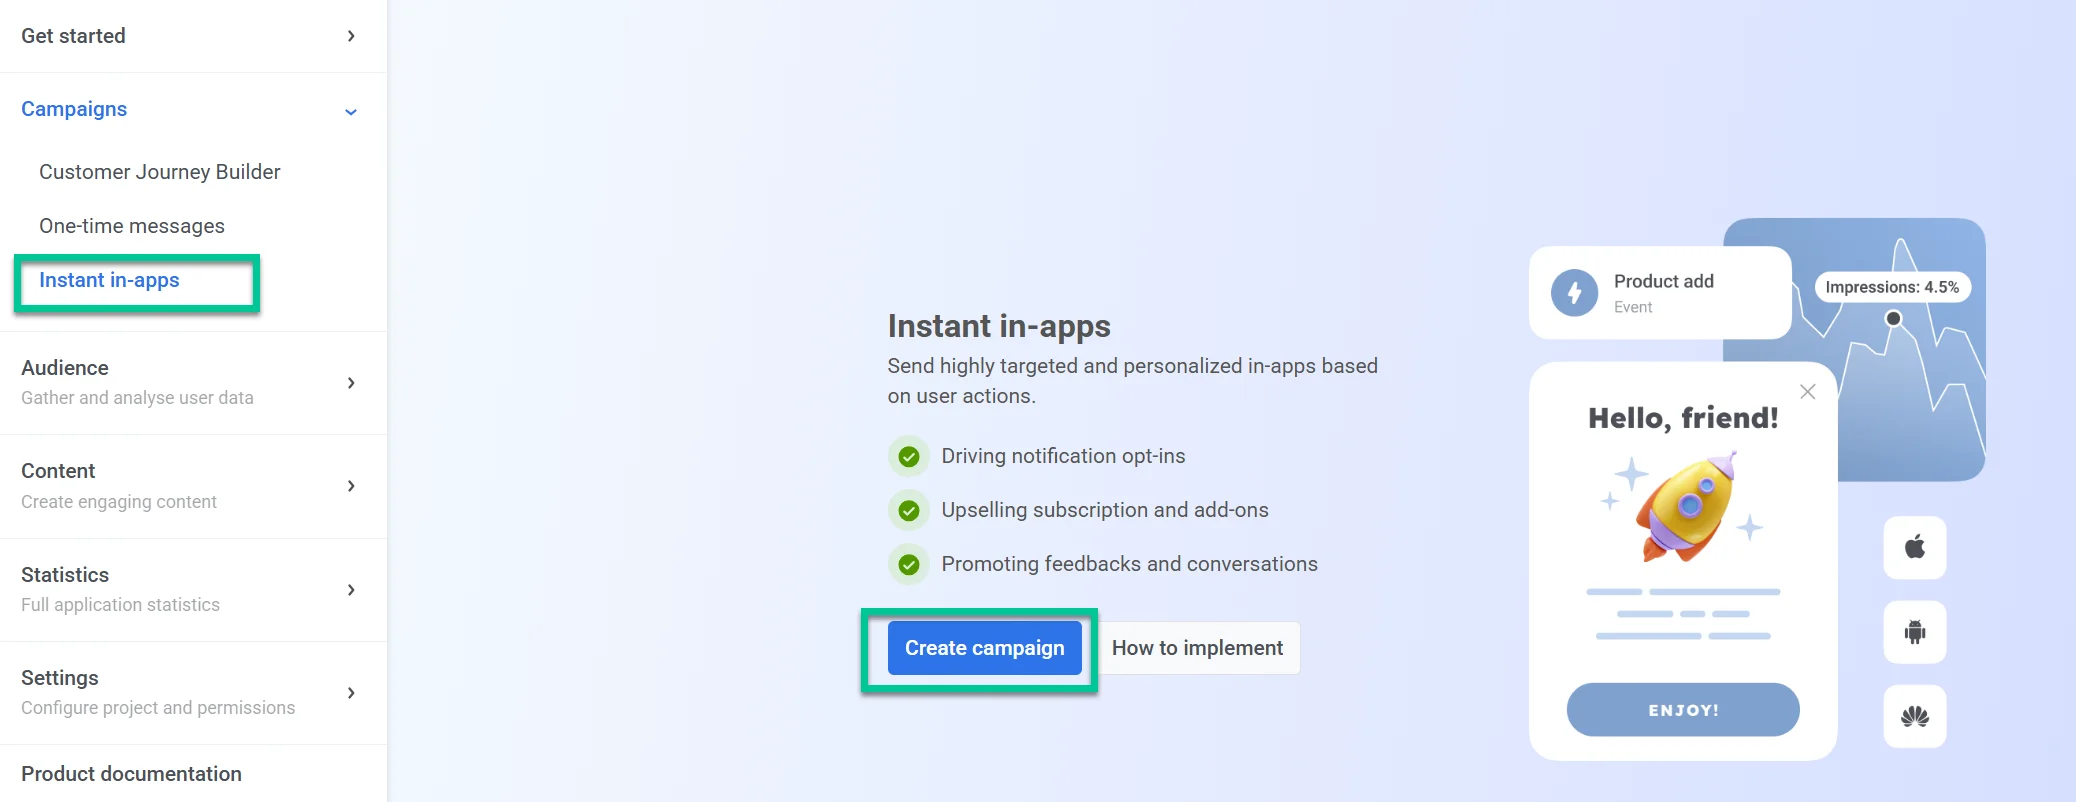
1. Navigate to **Campaigns** in the Pushwoosh Control Panel.
2. Select **Instant in-apps**.
3. Click **Create in-app** to set up a new campaign.
## Define creative content
### Select an in-app banner
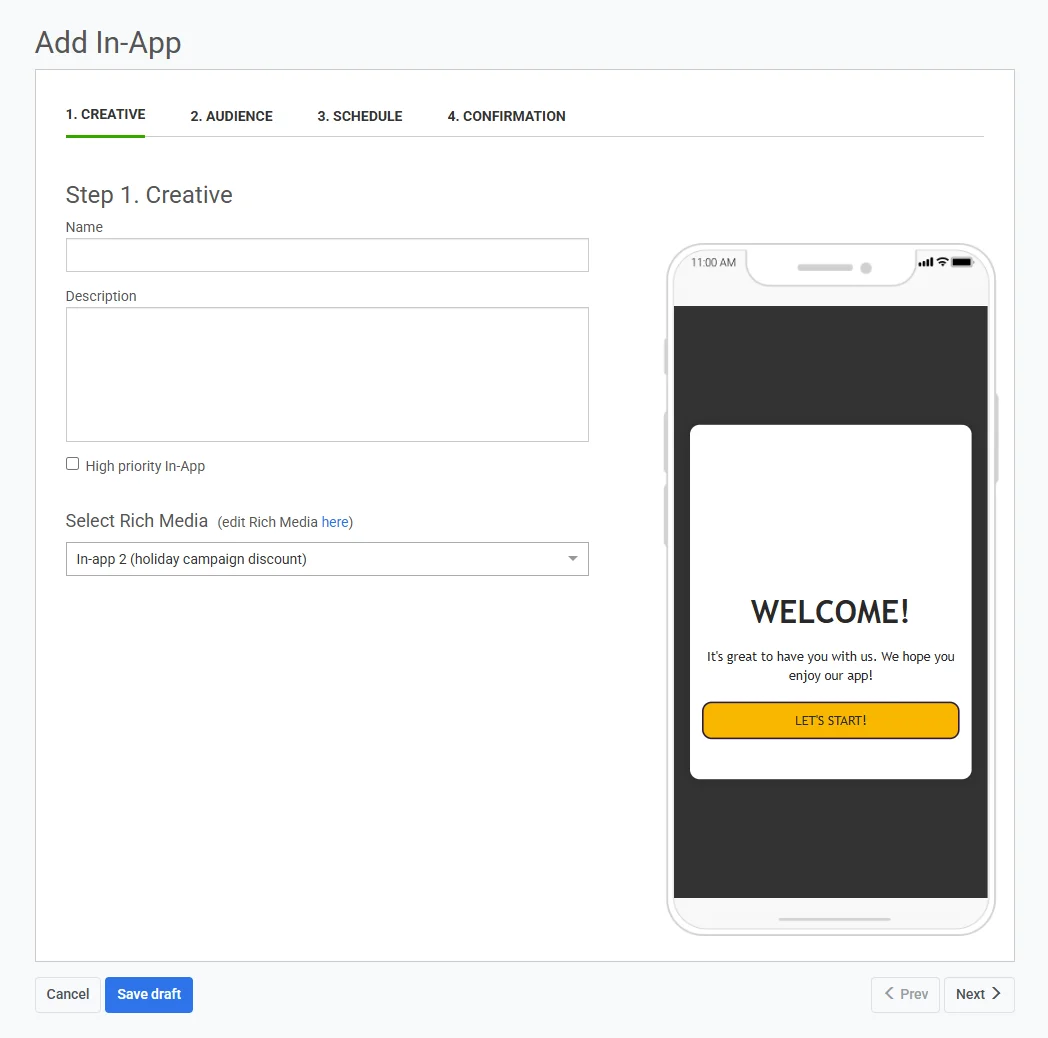
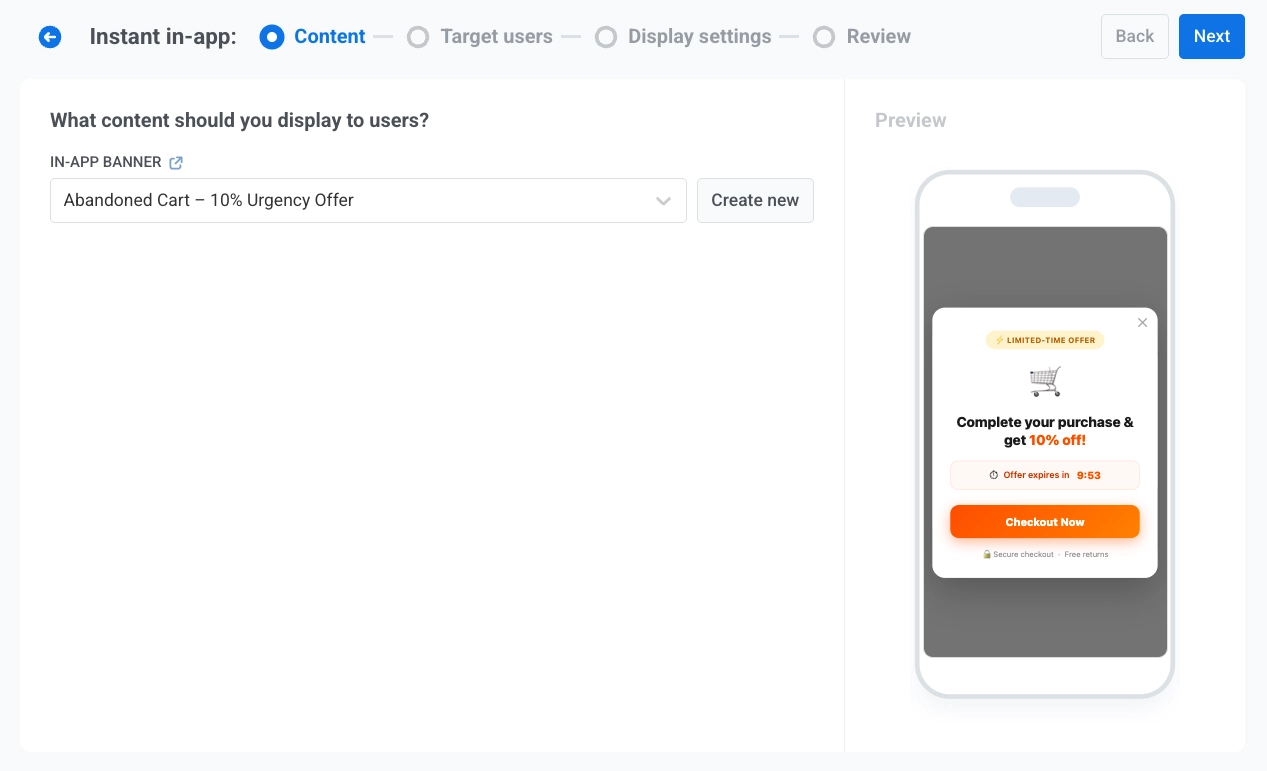
In the **IN-APP BANNER** field, select an existing in-app template from the list, or click **Create new** to open the **Add new template** window without leaving the campaign wizard.
#### Create an in-app template
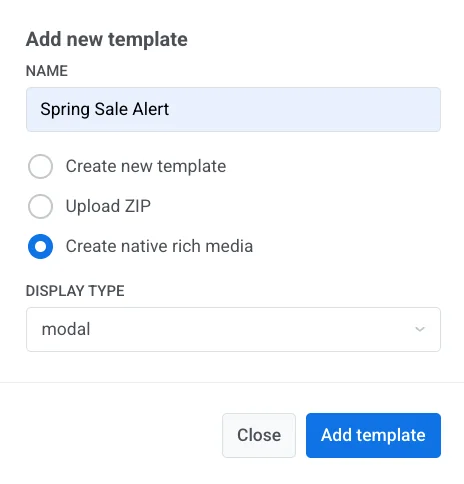
1. In the **Add new template** window, enter a name.
2. Choose how to create the content:
* **Create new template:** Build the message in the built-in in-app editor.
* **Upload ZIP:** Upload a ready-made HTML in-app message.
* **Create native rich media:** Build a native in-app message.
3. If you chose **Create native rich media**, select a **Display type**: **modal**, **fullscreen**, **stories**, **sheet**, **carousel**, or **banner**.
4. Click **Add template**.
5. Continue with the option you chose below.
##### Create new template
The built-in editor opens full-screen over the campaign wizard. [Learn how to build the message](/product/content/in-apps/no-code-in-app-editor/create-rich-media-in-the-built-in-editor/).
Save the template, then click **Back** to return to the campaign wizard. The template is selected automatically.
##### Upload ZIP
The archive becomes the in-app content right away. No editor opens. After a correct upload, a device preview appears, and the archive is saved under the **Rich Media** tab in the Control Panel. For the ZIP format, see [Rich media templates syntax](/developer/guides/content/rich-media-templates-syntax/).
##### Create native rich media
The native editor opens full-screen over the campaign wizard. [Learn how to build the message](/product/content/in-apps/create-native-in-app-messages/).
Save the template, then click **Back** to return to the campaign wizard. The template is selected automatically.
### Preview the message
On the right side of the screen, you'll see a mobile preview of the selected in-app banner.
Click **Next** to proceed to **Target users** settings.
## Define audience
In **Target users**, set the event that triggers the message and choose which users should see it.
### Set a trigger event
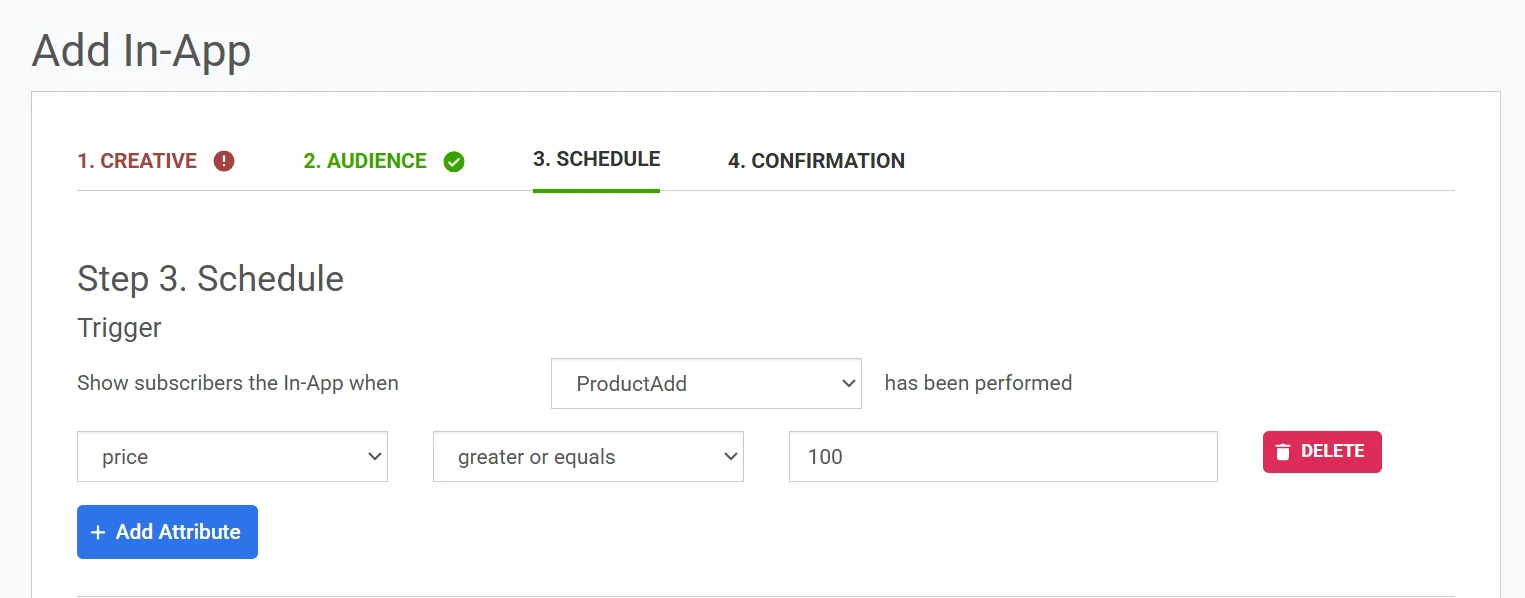
In **TRIGGER EVENT**, select the event that will launch the in-app message. Selecting a trigger is required.
To make trigger conditions more specific, add event parameters:
1. Click **ADD ATTRIBUTE**.
2. Select values in **ATTRIBUTE**, **CONDITION**, and **VALUE**.
3. Add more attributes if needed.
### Select which users will receive the in-app
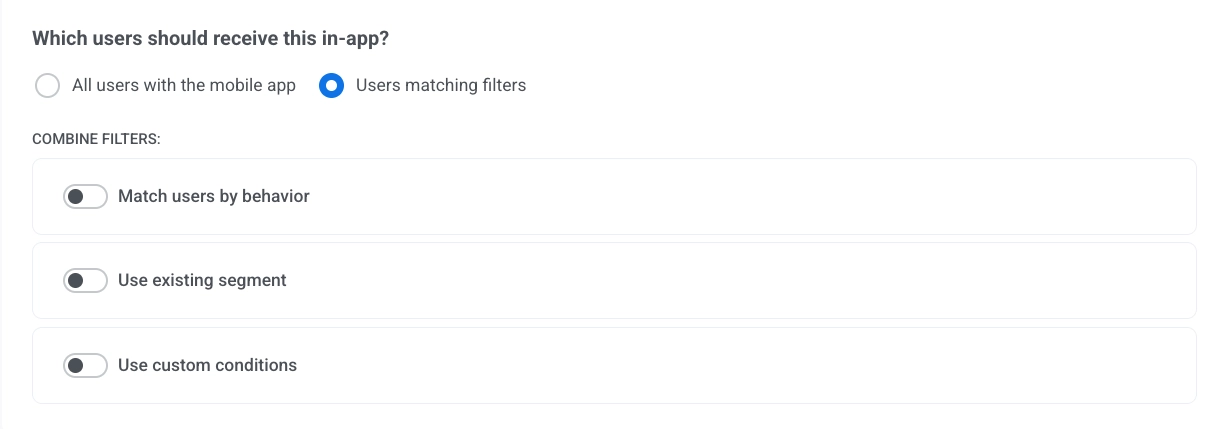
In **Which users should receive this in-app?**, select one option:
* **All users with the mobile app**: Send the in-app to all app users.
* **Users matching filters**: Limit delivery to users that match selected conditions.
#### Configure filters for target users
If you select **Users matching filters**, use **COMBINE FILTERS** to configure targeting:
##### Match users by behavior
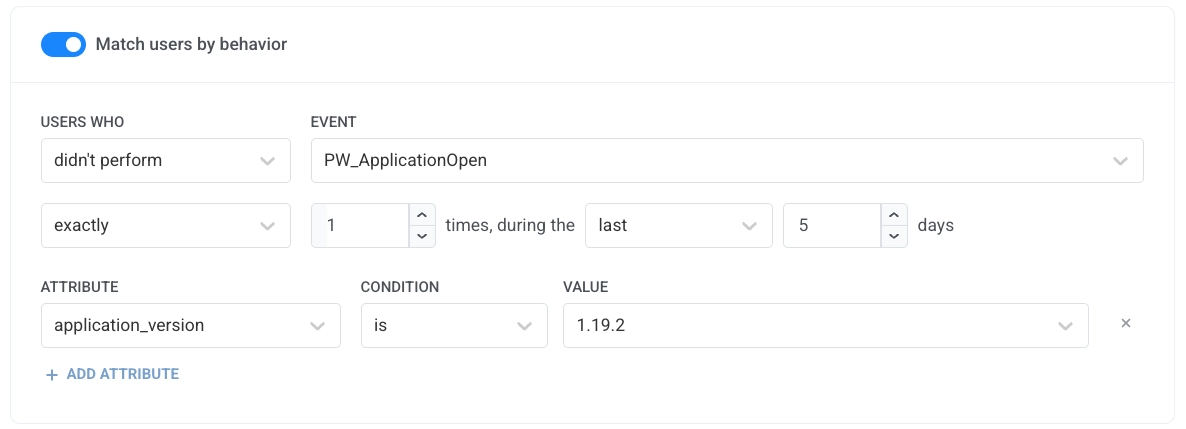
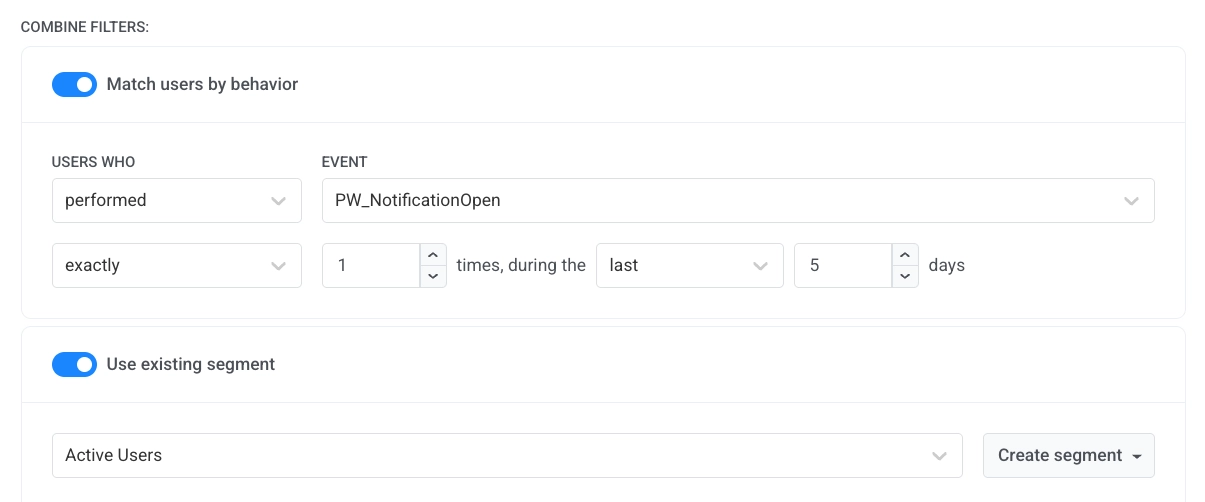
Enable **Match users by behavior** to define event-based rules. Select values in **USERS WHO** and **EVENT**, then set frequency and timeframe.
##### Use existing segment
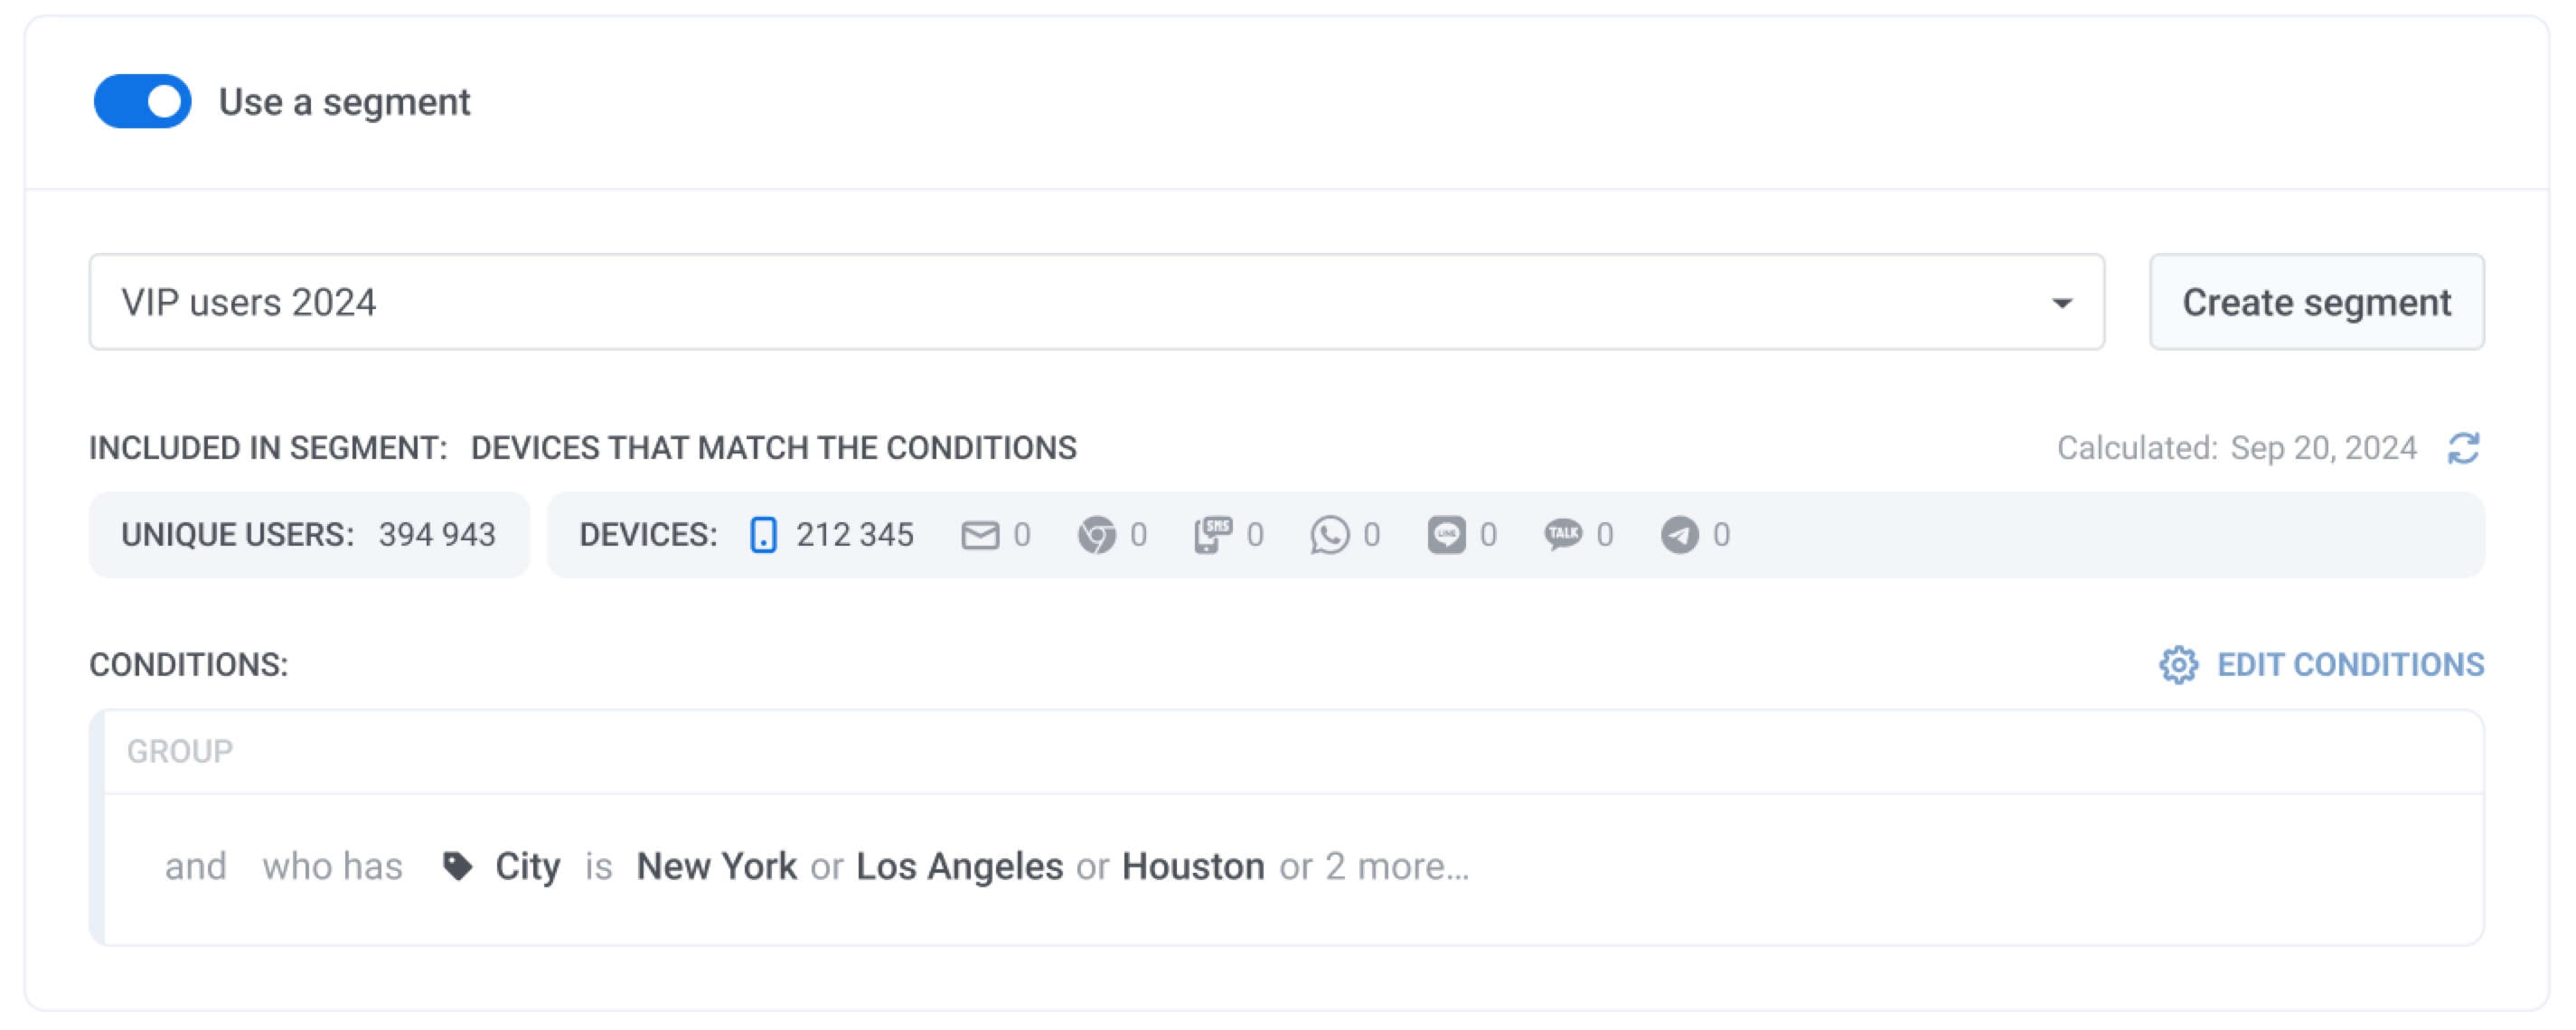
Enable **Use existing segment** to select a saved segment from the list. You can click **Refresh** to update the segment size and **Edit segment** to review conditions.
##### Use custom conditions
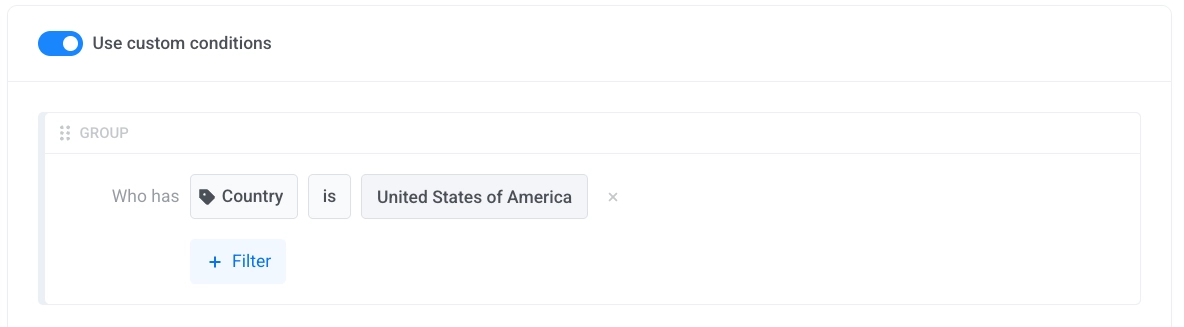
Enable **Use custom conditions** to build a custom filter group by adding conditions.
## Schedule the in-app message
### Configure display settings
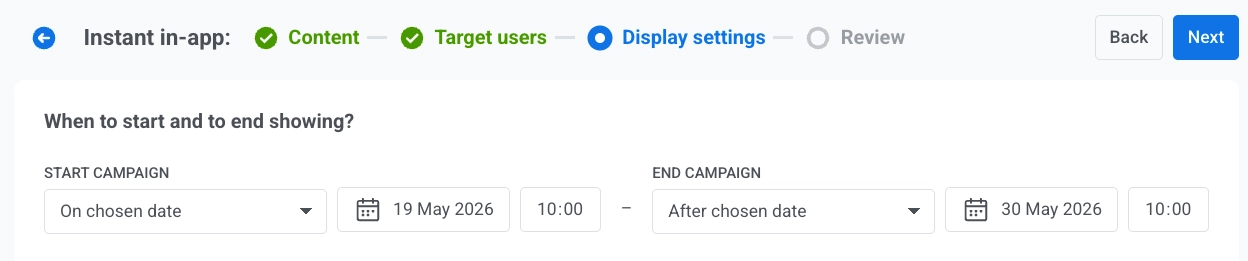
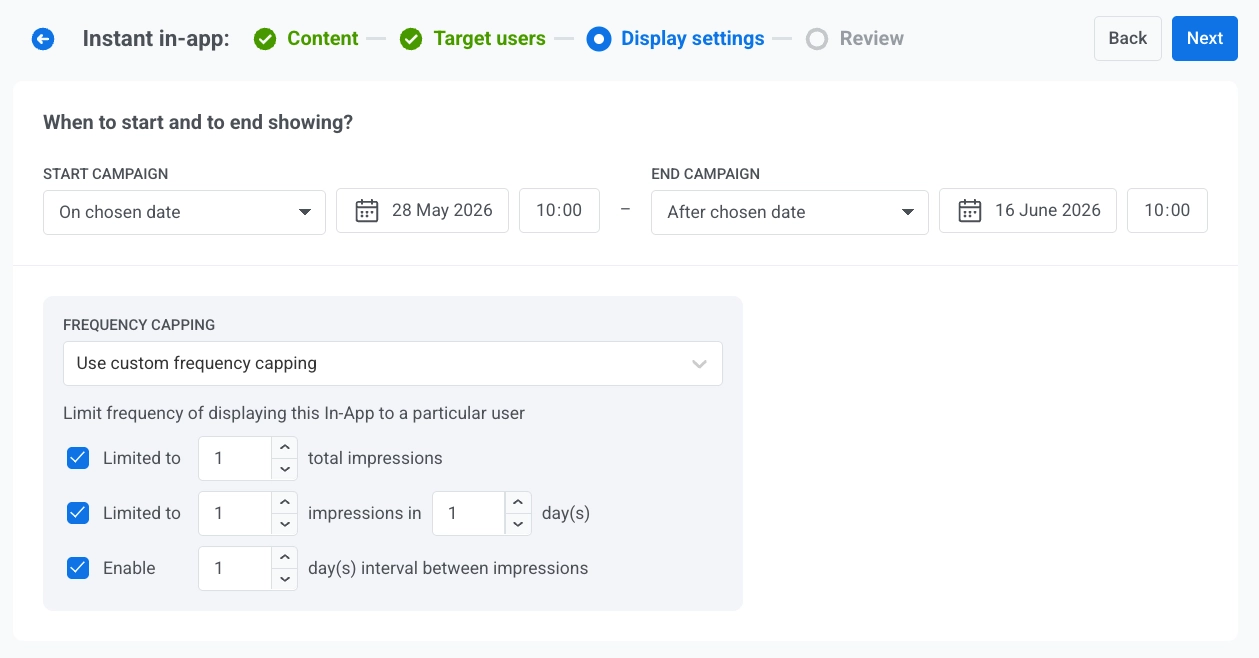
On the **Display settings** step, define the campaign period, timezone, and frequency capping.
1. In **START CAMPAIGN**, choose **Immediately** or **On chosen date**.
2. If you choose **On chosen date**, set the date and time.
3. In **END CAMPAIGN**, choose **Never** or **After chosen date**.
4. If you choose **After chosen date**, set the date and time.
### Set the timezone for campaign schedule
In **Timezone for campaign schedule**, select the timezone used to interpret the campaign start and end dates and times. By default, the schedule uses **UTC-0 – Coordinated Universal Time**. Choose a different timezone if you want the start and end times to follow a specific local time.
### Configure frequency capping
In **FREQUENCY CAPPING**, choose one option:
* **Use Global frequency capping**: Apply the global in-app channel limit configured in [Message delivery settings](/product/messaging-channels/global-frequency-capping/).
* **Send messages without global frequency capping**: Ignore global capping limits for this in-app.
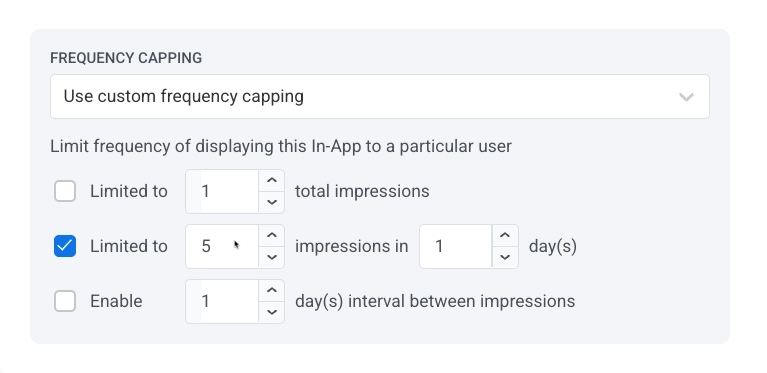
* **Use custom frequency capping**: Apply campaign-specific limits instead of global thresholds. The message still counts toward the global in-app channel counter.
#### Custom capping options
| | |
|---|---|
| **Limited to total impressions** | Set the maximum number of times one user can see this in-app. |
| **Limited to impressions in day(s)** | Set how many impressions are allowed during the selected number of days. |
| **Enable day(s) interval between impressions** | Set a minimum interval between repeated impressions for one user. |
#### How custom and global frequency capping work together
Custom frequency capping adds a campaign-level limit. Global in-app channel capping still applies and can block delivery.
For example, if an in-app message is set to appear 5 times in 3 days, and the global frequency capping for in-app messages is also 5 times in 3 days, but the user has already seen 3 other in-app messages, this specific message will be shown only 2 more times before reaching the global limit. [Learn more about Global frequency capping](/product/messaging-channels/global-frequency-capping/).
## Review and complete setup
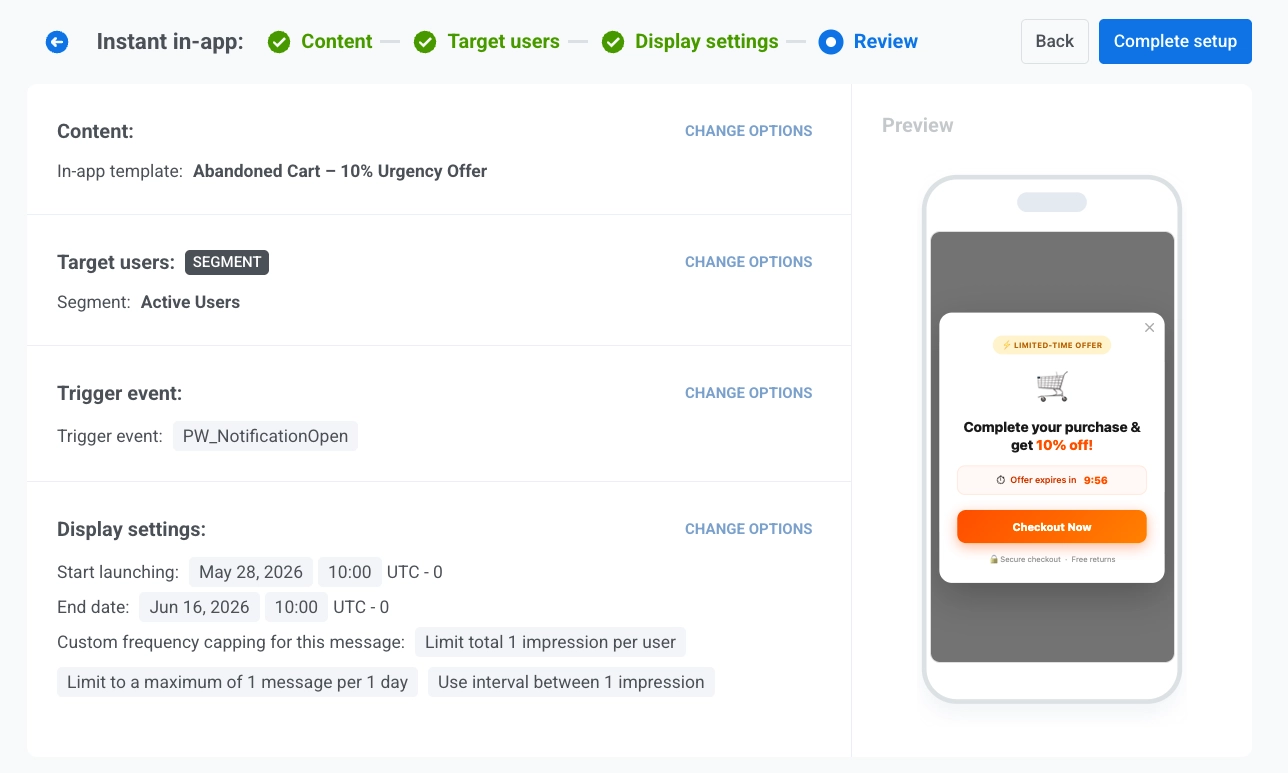
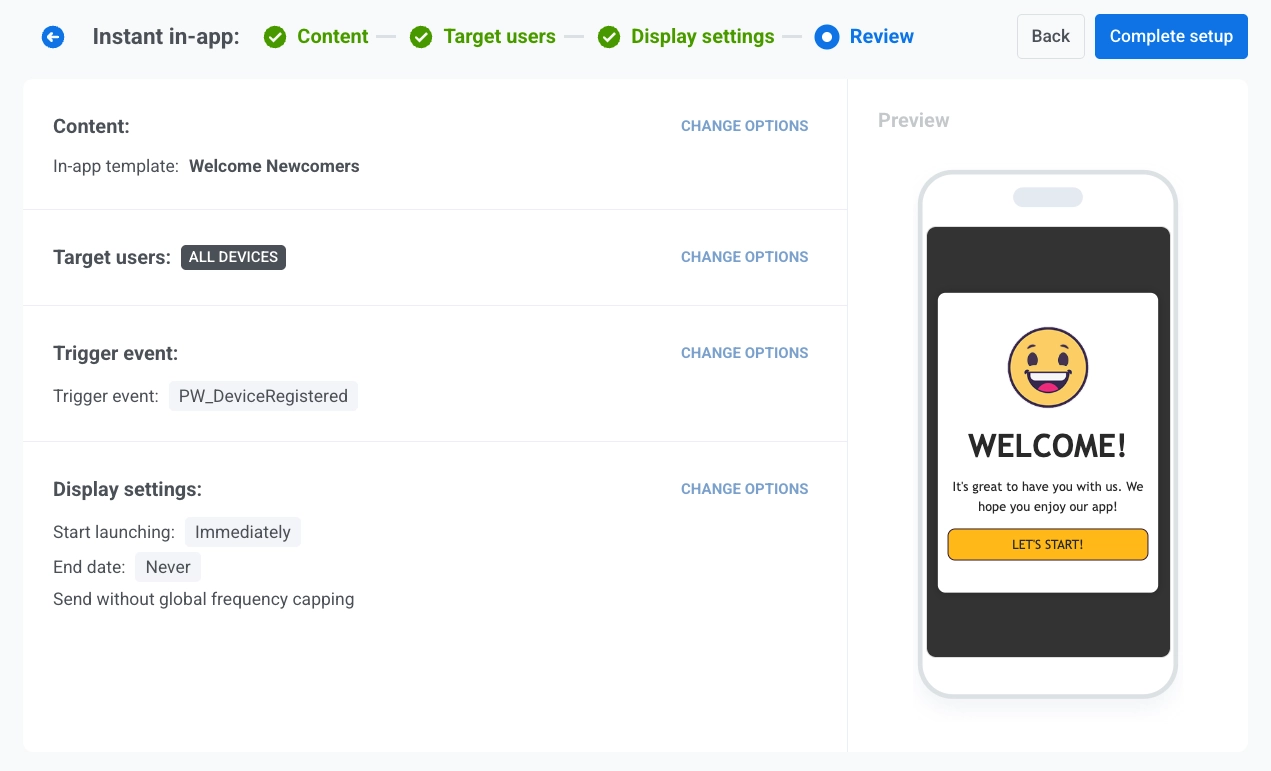
On the **Review** step, verify all campaign settings before launch.
1. Check **Content**, **Target users**, **Trigger event**, and **Display settings**.
2. Review the mobile preview on the right.
3. If needed, click **CHANGE OPTIONS** in any section to edit settings.
4. Click **Complete setup**.
5. Select **Launch campaign** to activate the campaign or **Save as draft** to save settings without launching.
In the **Confirm launching** window, confirm details and click the action you selected.
After launch, the campaign appears in the **Instant in-apps** list with the current status, such as **Scheduled**.
If you save the campaign as a draft, it appears in the same list with the **Draft** status.
## View and manage instant in-app campaigns
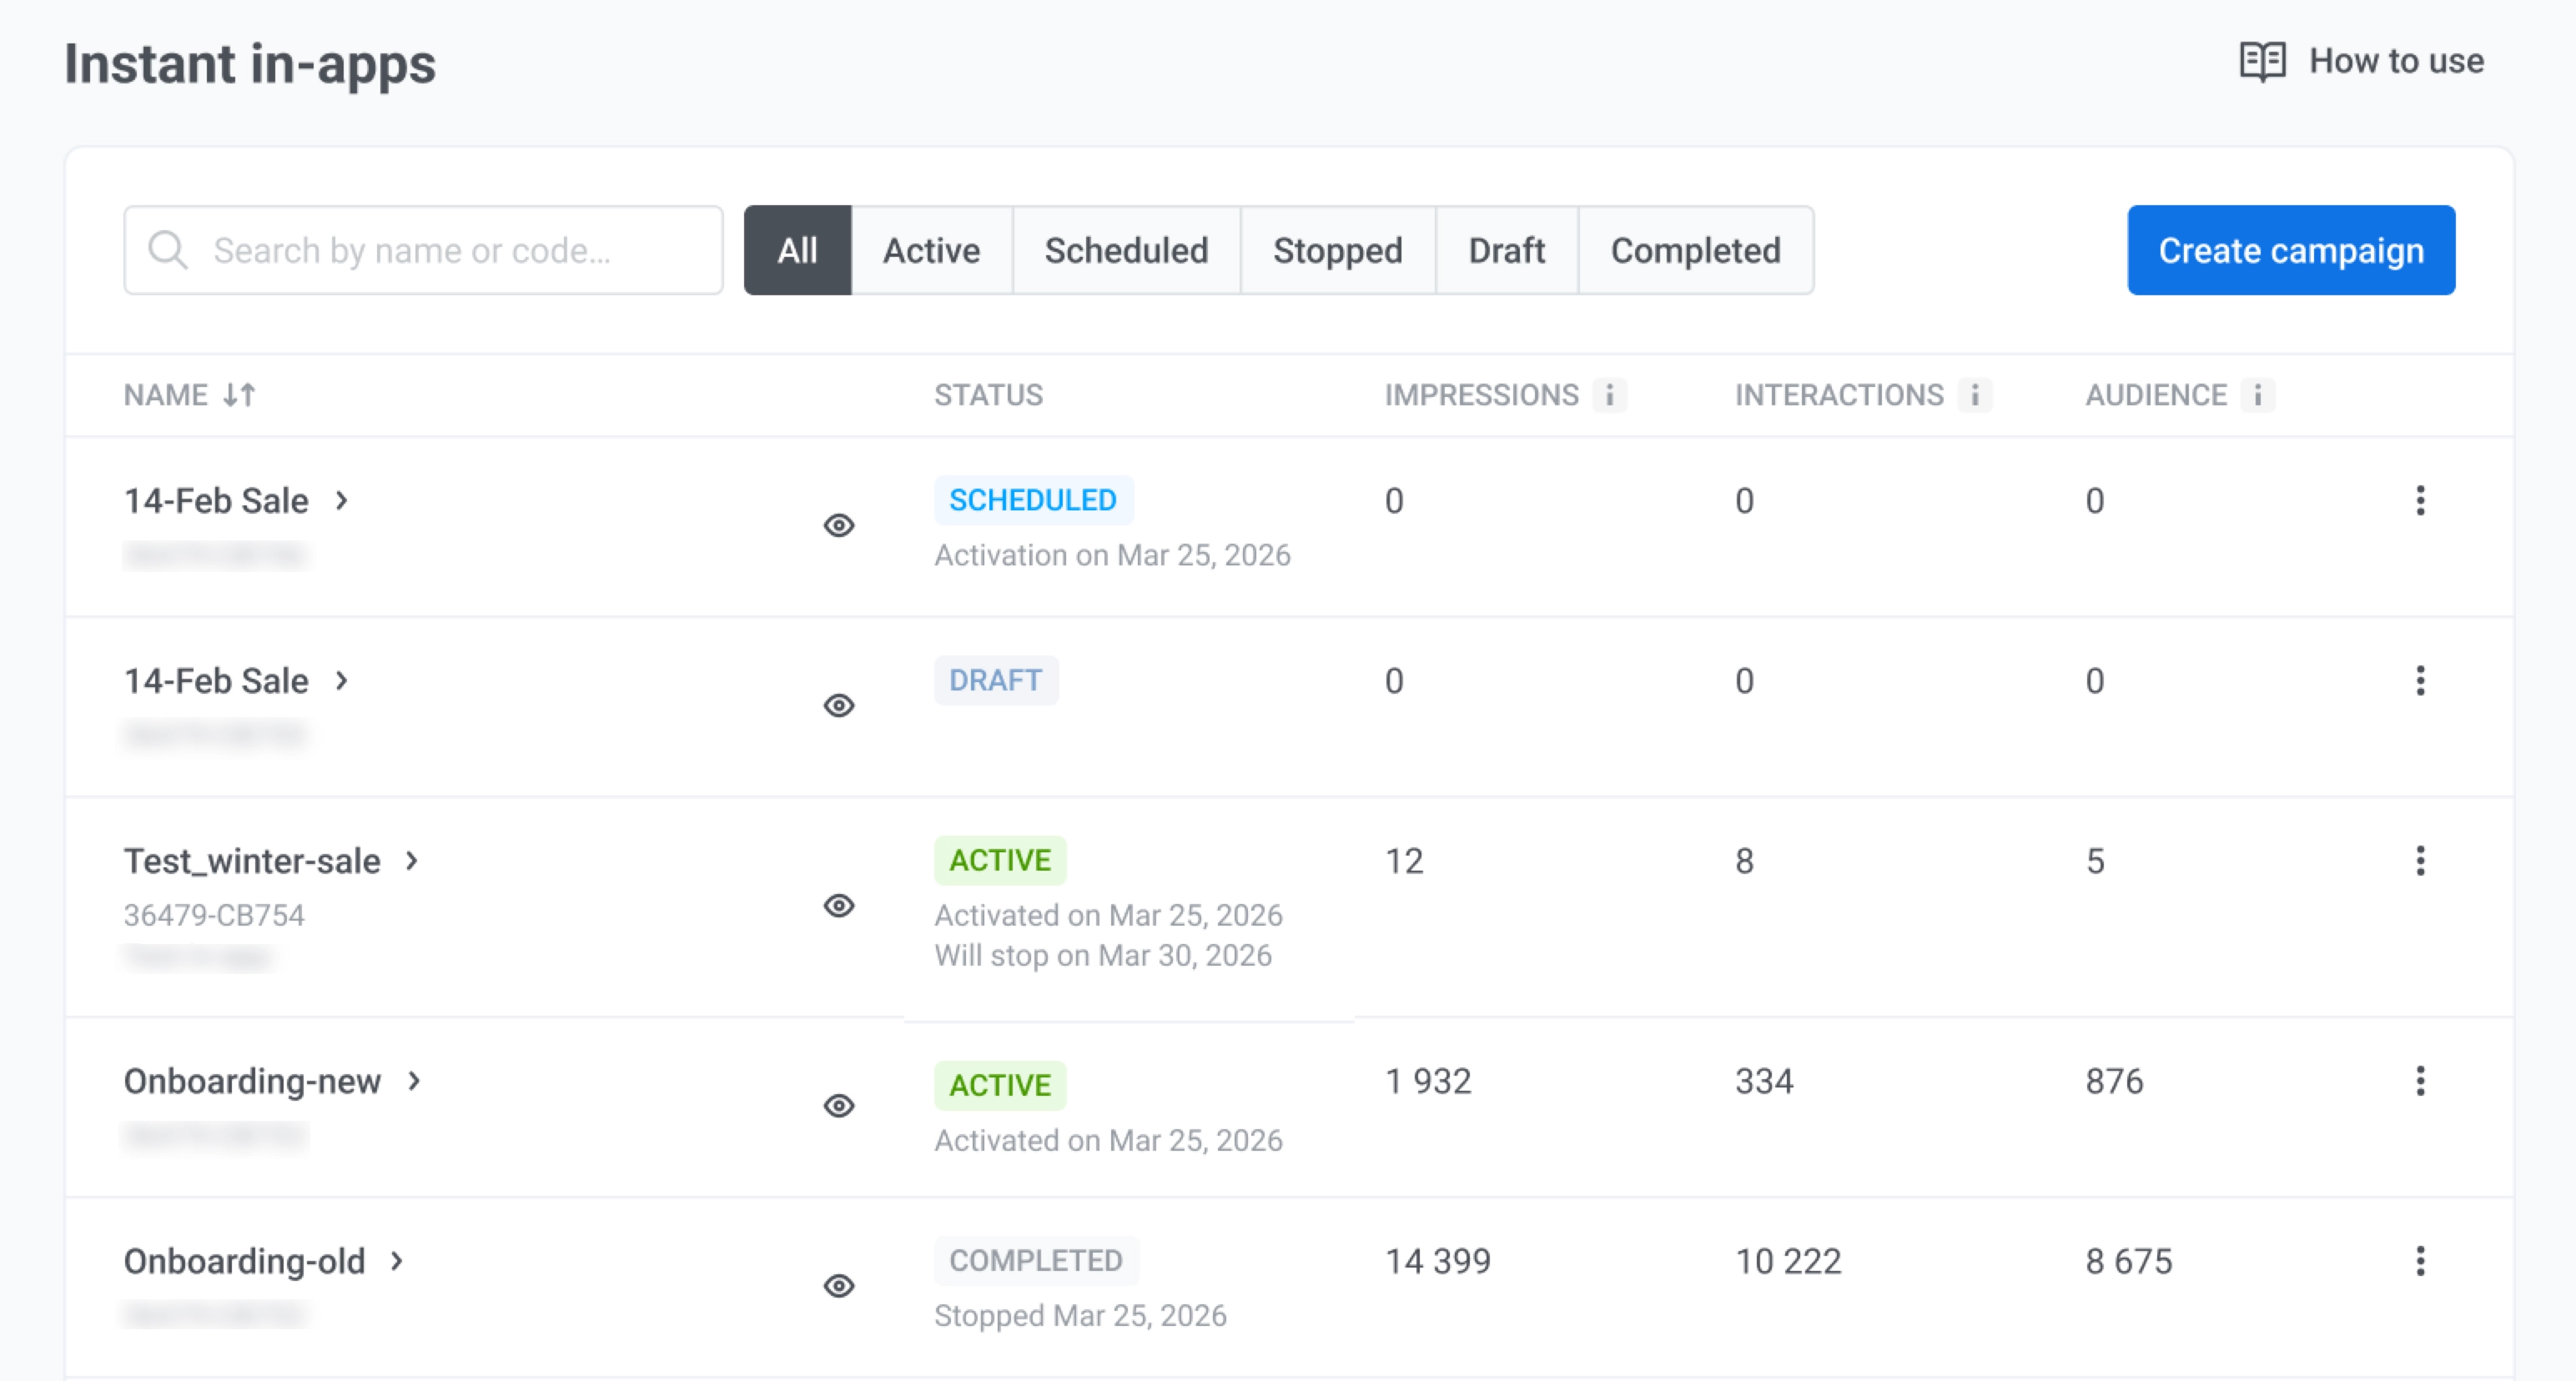
Go to **Campaigns → Instant in-apps** to find campaigns, review performance, and edit, clone, resume, or delete them from one list.
Use **Search by name or code...** to find a campaign by name or message code, or filter the list by **All**, **Active**, **Scheduled**, **Stopped**, **Draft**, or **Completed**.
### Monitor your campaigns
Use the table to check whether a campaign is running and how it performs. Click the campaign name or the arrow to open details.
* **Status:** The current campaign state. **Stopped** campaigns also show when they were stopped (for example, **Stopped on 27 May 2026**).
* **Impressions:** How many times users saw the in-app.
* **Interactions:** How many times users interacted with the in-app.
* **Audience:** The number of user devices the in-app was displayed to (reach) over the last 30 days.
* **Preview:** Hover over the eye icon to preview the in-app message without opening the wizard.
### Take action on a campaign
Click the **three-dot menu (⋮)** on a row to open the actions menu. The available actions depend on the campaign status.
* **View statistics:** Open delivery and engagement metrics for the campaign.
* **Edit campaign:** Open the campaign wizard and change content, target users, or display settings.
* **Clone campaign:** Create a copy with the same creative, trigger event, audience, and display settings. Adjust settings in the wizard, then launch or save the copy as a draft.
* **Resume campaign:** Relaunch a stopped campaign so it can deliver in-apps again.
* **Change schedule:** Adjust the start and end dates for a completed campaign.
* **Stop campaign:** End a running or scheduled campaign. You can update and relaunch it later.
* **Delete:** Permanently remove the campaign. This action cannot be undone. Stop the campaign first if it is still running or scheduled.
## Example scenario: Sending an in-app message using in-app campaigns
Imagine you run a fashion retail app and want to increase conversions with a limited-time discount when users engage with push notifications. You set up an instant in-app campaign for active users in the U.S.
### Prepare the in-app message
[**Create an in-app template**](/product/content/in-apps/no-code-in-app-editor/create-rich-media-in-the-built-in-editor/) with a discount offer and a CTA button leading to checkout.
### Configure target users
Select `PW_NotificationOpen` as the trigger to catch users at peak intent, right after they engage with a push. Enable **Match users by behavior** and limit to users who triggered the event once in the last 5 days. This keeps the audience recently active without being too broad. Select `Active Users` as the base segment.
### Configure display settings
Set a start and end date to keep the campaign time-bound. Set frequency capping to 1 impression per day with a 1-day interval to prevent the message from feeling intrusive if a user opens multiple push notifications in a short period.
### Review and complete setup
On the **Review** step, check all settings, click **Complete setup**, and select **Launch campaign**.
 ## Define creative content
### Select an in-app banner
In the **IN-APP BANNER** field, select an existing in-app template from the list, or click **Create new** to open the **Add new template** window without leaving the campaign wizard.
## Define creative content
### Select an in-app banner
In the **IN-APP BANNER** field, select an existing in-app template from the list, or click **Create new** to open the **Add new template** window without leaving the campaign wizard.
 #### Create an in-app template
1. In the **Add new template** window, enter a name.
2. Choose how to create the content:
* **Create new template:** Build the message in the built-in in-app editor.
* **Upload ZIP:** Upload a ready-made HTML in-app message.
* **Create native rich media:** Build a native in-app message.
#### Create an in-app template
1. In the **Add new template** window, enter a name.
2. Choose how to create the content:
* **Create new template:** Build the message in the built-in in-app editor.
* **Upload ZIP:** Upload a ready-made HTML in-app message.
* **Create native rich media:** Build a native in-app message.
 3. If you chose **Create native rich media**, select a **Display type**: **modal**, **fullscreen**, **stories**, **sheet**, **carousel**, or **banner**.
4. Click **Add template**.
5. Continue with the option you chose below.
##### Create new template
The built-in editor opens full-screen over the campaign wizard. [Learn how to build the message](/product/content/in-apps/no-code-in-app-editor/create-rich-media-in-the-built-in-editor/).
Save the template, then click **Back** to return to the campaign wizard. The template is selected automatically.
##### Upload ZIP
The archive becomes the in-app content right away. No editor opens. After a correct upload, a device preview appears, and the archive is saved under the **Rich Media** tab in the Control Panel. For the ZIP format, see [Rich media templates syntax](/developer/guides/content/rich-media-templates-syntax/).
##### Create native rich media
The native editor opens full-screen over the campaign wizard. [Learn how to build the message](/product/content/in-apps/create-native-in-app-messages/).
Save the template, then click **Back** to return to the campaign wizard. The template is selected automatically.
### Preview the message
On the right side of the screen, you'll see a mobile preview of the selected in-app banner.
Click **Next** to proceed to **Target users** settings.
## Define audience
In **Target users**, set the event that triggers the message and choose which users should see it.
### Set a trigger event
In **TRIGGER EVENT**, select the event that will launch the in-app message. Selecting a trigger is required.
To make trigger conditions more specific, add event parameters:
1. Click **ADD ATTRIBUTE**.
2. Select values in **ATTRIBUTE**, **CONDITION**, and **VALUE**.
3. Add more attributes if needed.
3. If you chose **Create native rich media**, select a **Display type**: **modal**, **fullscreen**, **stories**, **sheet**, **carousel**, or **banner**.
4. Click **Add template**.
5. Continue with the option you chose below.
##### Create new template
The built-in editor opens full-screen over the campaign wizard. [Learn how to build the message](/product/content/in-apps/no-code-in-app-editor/create-rich-media-in-the-built-in-editor/).
Save the template, then click **Back** to return to the campaign wizard. The template is selected automatically.
##### Upload ZIP
The archive becomes the in-app content right away. No editor opens. After a correct upload, a device preview appears, and the archive is saved under the **Rich Media** tab in the Control Panel. For the ZIP format, see [Rich media templates syntax](/developer/guides/content/rich-media-templates-syntax/).
##### Create native rich media
The native editor opens full-screen over the campaign wizard. [Learn how to build the message](/product/content/in-apps/create-native-in-app-messages/).
Save the template, then click **Back** to return to the campaign wizard. The template is selected automatically.
### Preview the message
On the right side of the screen, you'll see a mobile preview of the selected in-app banner.
Click **Next** to proceed to **Target users** settings.
## Define audience
In **Target users**, set the event that triggers the message and choose which users should see it.
### Set a trigger event
In **TRIGGER EVENT**, select the event that will launch the in-app message. Selecting a trigger is required.
To make trigger conditions more specific, add event parameters:
1. Click **ADD ATTRIBUTE**.
2. Select values in **ATTRIBUTE**, **CONDITION**, and **VALUE**.
3. Add more attributes if needed.
 ### Select which users will receive the in-app
In **Which users should receive this in-app?**, select one option:
* **All users with the mobile app**: Send the in-app to all app users.
* **Users matching filters**: Limit delivery to users that match selected conditions.
### Select which users will receive the in-app
In **Which users should receive this in-app?**, select one option:
* **All users with the mobile app**: Send the in-app to all app users.
* **Users matching filters**: Limit delivery to users that match selected conditions.
 #### Configure filters for target users
If you select **Users matching filters**, use **COMBINE FILTERS** to configure targeting:
##### Match users by behavior
Enable **Match users by behavior** to define event-based rules. Select values in **USERS WHO** and **EVENT**, then set frequency and timeframe.
#### Configure filters for target users
If you select **Users matching filters**, use **COMBINE FILTERS** to configure targeting:
##### Match users by behavior
Enable **Match users by behavior** to define event-based rules. Select values in **USERS WHO** and **EVENT**, then set frequency and timeframe.
 ##### Use existing segment
Enable **Use existing segment** to select a saved segment from the list. You can click **Refresh** to update the segment size and **Edit segment** to review conditions.
##### Use existing segment
Enable **Use existing segment** to select a saved segment from the list. You can click **Refresh** to update the segment size and **Edit segment** to review conditions.
 ##### Use custom conditions
Enable **Use custom conditions** to build a custom filter group by adding conditions.
##### Use custom conditions
Enable **Use custom conditions** to build a custom filter group by adding conditions.
 ## Schedule the in-app message
### Configure display settings
On the **Display settings** step, define the campaign period, timezone, and frequency capping.
1. In **START CAMPAIGN**, choose **Immediately** or **On chosen date**.
2. If you choose **On chosen date**, set the date and time.
3. In **END CAMPAIGN**, choose **Never** or **After chosen date**.
4. If you choose **After chosen date**, set the date and time.
## Schedule the in-app message
### Configure display settings
On the **Display settings** step, define the campaign period, timezone, and frequency capping.
1. In **START CAMPAIGN**, choose **Immediately** or **On chosen date**.
2. If you choose **On chosen date**, set the date and time.
3. In **END CAMPAIGN**, choose **Never** or **After chosen date**.
4. If you choose **After chosen date**, set the date and time.
 ### Set the timezone for campaign schedule
In **Timezone for campaign schedule**, select the timezone used to interpret the campaign start and end dates and times. By default, the schedule uses **UTC-0 – Coordinated Universal Time**. Choose a different timezone if you want the start and end times to follow a specific local time.
### Configure frequency capping
In **FREQUENCY CAPPING**, choose one option:
* **Use Global frequency capping**: Apply the global in-app channel limit configured in [Message delivery settings](/product/messaging-channels/global-frequency-capping/).
* **Send messages without global frequency capping**: Ignore global capping limits for this in-app.
* **Use custom frequency capping**: Apply campaign-specific limits instead of global thresholds. The message still counts toward the global in-app channel counter.
#### Custom capping options
| | |
|---|---|
| **Limited to total impressions** | Set the maximum number of times one user can see this in-app. |
| **Limited to impressions in day(s)** | Set how many impressions are allowed during the selected number of days. |
| **Enable day(s) interval between impressions** | Set a minimum interval between repeated impressions for one user. |
### Set the timezone for campaign schedule
In **Timezone for campaign schedule**, select the timezone used to interpret the campaign start and end dates and times. By default, the schedule uses **UTC-0 – Coordinated Universal Time**. Choose a different timezone if you want the start and end times to follow a specific local time.
### Configure frequency capping
In **FREQUENCY CAPPING**, choose one option:
* **Use Global frequency capping**: Apply the global in-app channel limit configured in [Message delivery settings](/product/messaging-channels/global-frequency-capping/).
* **Send messages without global frequency capping**: Ignore global capping limits for this in-app.
* **Use custom frequency capping**: Apply campaign-specific limits instead of global thresholds. The message still counts toward the global in-app channel counter.
#### Custom capping options
| | |
|---|---|
| **Limited to total impressions** | Set the maximum number of times one user can see this in-app. |
| **Limited to impressions in day(s)** | Set how many impressions are allowed during the selected number of days. |
| **Enable day(s) interval between impressions** | Set a minimum interval between repeated impressions for one user. |
 #### How custom and global frequency capping work together
Custom frequency capping adds a campaign-level limit. Global in-app channel capping still applies and can block delivery.
For example, if an in-app message is set to appear 5 times in 3 days, and the global frequency capping for in-app messages is also 5 times in 3 days, but the user has already seen 3 other in-app messages, this specific message will be shown only 2 more times before reaching the global limit. [Learn more about Global frequency capping](/product/messaging-channels/global-frequency-capping/).
## Review and complete setup
On the **Review** step, verify all campaign settings before launch.
1. Check **Content**, **Target users**, **Trigger event**, and **Display settings**.
2. Review the mobile preview on the right.
3. If needed, click **CHANGE OPTIONS** in any section to edit settings.
#### How custom and global frequency capping work together
Custom frequency capping adds a campaign-level limit. Global in-app channel capping still applies and can block delivery.
For example, if an in-app message is set to appear 5 times in 3 days, and the global frequency capping for in-app messages is also 5 times in 3 days, but the user has already seen 3 other in-app messages, this specific message will be shown only 2 more times before reaching the global limit. [Learn more about Global frequency capping](/product/messaging-channels/global-frequency-capping/).
## Review and complete setup
On the **Review** step, verify all campaign settings before launch.
1. Check **Content**, **Target users**, **Trigger event**, and **Display settings**.
2. Review the mobile preview on the right.
3. If needed, click **CHANGE OPTIONS** in any section to edit settings.
 4. Click **Complete setup**.
5. Select **Launch campaign** to activate the campaign or **Save as draft** to save settings without launching.
In the **Confirm launching** window, confirm details and click the action you selected.
After launch, the campaign appears in the **Instant in-apps** list with the current status, such as **Scheduled**.
If you save the campaign as a draft, it appears in the same list with the **Draft** status.
## View and manage instant in-app campaigns
Go to **Campaigns → Instant in-apps** to find campaigns, review performance, and edit, clone, resume, or delete them from one list.
Use **Search by name or code...** to find a campaign by name or message code, or filter the list by **All**, **Active**, **Scheduled**, **Stopped**, **Draft**, or **Completed**.
### Monitor your campaigns
Use the table to check whether a campaign is running and how it performs. Click the campaign name or the arrow to open details.
* **Status:** The current campaign state. **Stopped** campaigns also show when they were stopped (for example, **Stopped on 27 May 2026**).
* **Impressions:** How many times users saw the in-app.
* **Interactions:** How many times users interacted with the in-app.
* **Audience:** The number of user devices the in-app was displayed to (reach) over the last 30 days.
* **Preview:** Hover over the eye icon to preview the in-app message without opening the wizard.
4. Click **Complete setup**.
5. Select **Launch campaign** to activate the campaign or **Save as draft** to save settings without launching.
In the **Confirm launching** window, confirm details and click the action you selected.
After launch, the campaign appears in the **Instant in-apps** list with the current status, such as **Scheduled**.
If you save the campaign as a draft, it appears in the same list with the **Draft** status.
## View and manage instant in-app campaigns
Go to **Campaigns → Instant in-apps** to find campaigns, review performance, and edit, clone, resume, or delete them from one list.
Use **Search by name or code...** to find a campaign by name or message code, or filter the list by **All**, **Active**, **Scheduled**, **Stopped**, **Draft**, or **Completed**.
### Monitor your campaigns
Use the table to check whether a campaign is running and how it performs. Click the campaign name or the arrow to open details.
* **Status:** The current campaign state. **Stopped** campaigns also show when they were stopped (for example, **Stopped on 27 May 2026**).
* **Impressions:** How many times users saw the in-app.
* **Interactions:** How many times users interacted with the in-app.
* **Audience:** The number of user devices the in-app was displayed to (reach) over the last 30 days.
* **Preview:** Hover over the eye icon to preview the in-app message without opening the wizard.
 ### Take action on a campaign
Click the **three-dot menu (⋮)** on a row to open the actions menu. The available actions depend on the campaign status.
* **View statistics:** Open delivery and engagement metrics for the campaign.
* **Edit campaign:** Open the campaign wizard and change content, target users, or display settings.
* **Clone campaign:** Create a copy with the same creative, trigger event, audience, and display settings. Adjust settings in the wizard, then launch or save the copy as a draft.
* **Resume campaign:** Relaunch a stopped campaign so it can deliver in-apps again.
* **Change schedule:** Adjust the start and end dates for a completed campaign.
* **Stop campaign:** End a running or scheduled campaign. You can update and relaunch it later.
* **Delete:** Permanently remove the campaign. This action cannot be undone. Stop the campaign first if it is still running or scheduled.
## Example scenario: Sending an in-app message using in-app campaigns
Imagine you run a fashion retail app and want to increase conversions with a limited-time discount when users engage with push notifications. You set up an instant in-app campaign for active users in the U.S.
### Prepare the in-app message
[**Create an in-app template**](/product/content/in-apps/no-code-in-app-editor/create-rich-media-in-the-built-in-editor/) with a discount offer and a CTA button leading to checkout.
### Take action on a campaign
Click the **three-dot menu (⋮)** on a row to open the actions menu. The available actions depend on the campaign status.
* **View statistics:** Open delivery and engagement metrics for the campaign.
* **Edit campaign:** Open the campaign wizard and change content, target users, or display settings.
* **Clone campaign:** Create a copy with the same creative, trigger event, audience, and display settings. Adjust settings in the wizard, then launch or save the copy as a draft.
* **Resume campaign:** Relaunch a stopped campaign so it can deliver in-apps again.
* **Change schedule:** Adjust the start and end dates for a completed campaign.
* **Stop campaign:** End a running or scheduled campaign. You can update and relaunch it later.
* **Delete:** Permanently remove the campaign. This action cannot be undone. Stop the campaign first if it is still running or scheduled.
## Example scenario: Sending an in-app message using in-app campaigns
Imagine you run a fashion retail app and want to increase conversions with a limited-time discount when users engage with push notifications. You set up an instant in-app campaign for active users in the U.S.
### Prepare the in-app message
[**Create an in-app template**](/product/content/in-apps/no-code-in-app-editor/create-rich-media-in-the-built-in-editor/) with a discount offer and a CTA button leading to checkout.
 ### Configure target users
Select `PW_NotificationOpen` as the trigger to catch users at peak intent, right after they engage with a push. Enable **Match users by behavior** and limit to users who triggered the event once in the last 5 days. This keeps the audience recently active without being too broad. Select `Active Users` as the base segment.
### Configure target users
Select `PW_NotificationOpen` as the trigger to catch users at peak intent, right after they engage with a push. Enable **Match users by behavior** and limit to users who triggered the event once in the last 5 days. This keeps the audience recently active without being too broad. Select `Active Users` as the base segment.
 ### Configure display settings
Set a start and end date to keep the campaign time-bound. Set frequency capping to 1 impression per day with a 1-day interval to prevent the message from feeling intrusive if a user opens multiple push notifications in a short period.
### Configure display settings
Set a start and end date to keep the campaign time-bound. Set frequency capping to 1 impression per day with a 1-day interval to prevent the message from feeling intrusive if a user opens multiple push notifications in a short period.
 ### Review and complete setup
On the **Review** step, check all settings, click **Complete setup**, and select **Launch campaign**.
### Review and complete setup
On the **Review** step, check all settings, click **Complete setup**, and select **Launch campaign**.