# Send in-apps via Customer Journey
This guide walks you through sending an in-app message via Customer Journey.
## Create a journey and add elements
1. Go to **Customer Journey Builder → Create Campaign**.
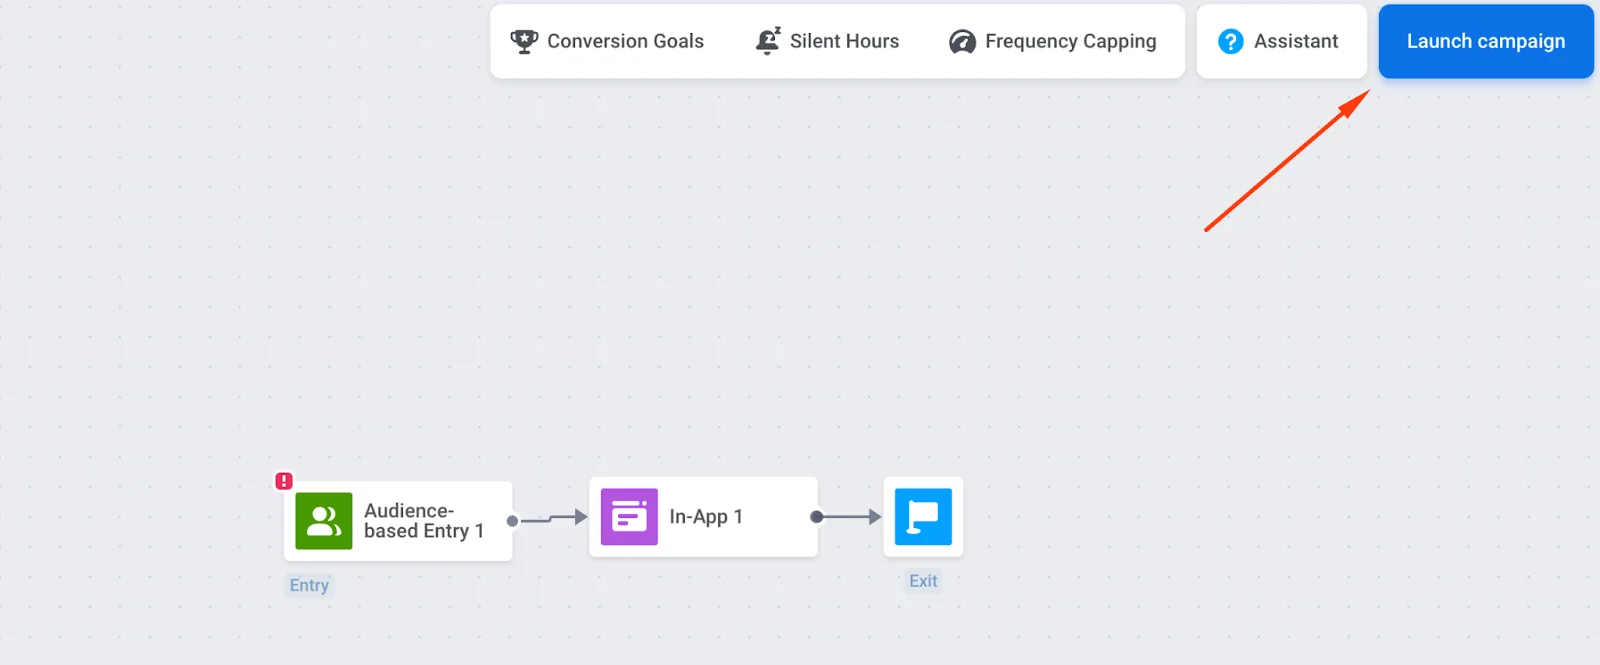
2. Drag **Entry**, **In-App**, and **Exit** onto the canvas and connect them in that order.
## Configure entry and audience
You must configure the **Entry** element; otherwise, the in-app message will not be delivered.
### Trigger-based entry
Show the in-app when a user performs a specific action (for example, lands on a pricing screen). Use default triggers and events or [create your own](/product/audience-data-and-segmentation/events/).
[Learn more about trigger-based entry](/product/customer-journey/journey-elements/entry-elements/trigger-based-entry/).
Example: show an in-app with a discount only to iOS users by adding a platform filter.
### Audience-based entry
Start the journey for a segment of users (for example, your entire user base). Create a segment from tags and/or events or use [pre-built segments](/product/audience-data-and-segmentation/segmentation/create-segments).
[Learn more about audience-based entry](/product/customer-journey/journey-elements/entry-elements/audience-based-entry/).
#### Configure scheduling
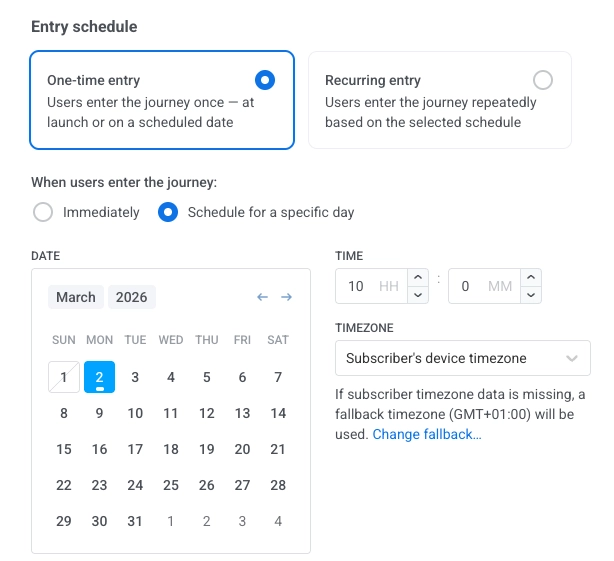
In the [Audience-based entry](/product/customer-journey/journey-elements/entry-elements/audience-based-entry/) element, **Entry schedule** controls when users enter. By default, **One-time entry** with **Immediately** makes users enter as soon as the journey is activated.
To run on a specific date and time (with timezone), choose **One-time entry** → **Schedule for a specific day**.
To run on several dates or at a fixed interval, choose **Recurring entry**. [Learn more](/product/customer-journey/journey-elements/entry-elements/audience-based-entry/#entry-schedule)
## Configure the in-app element
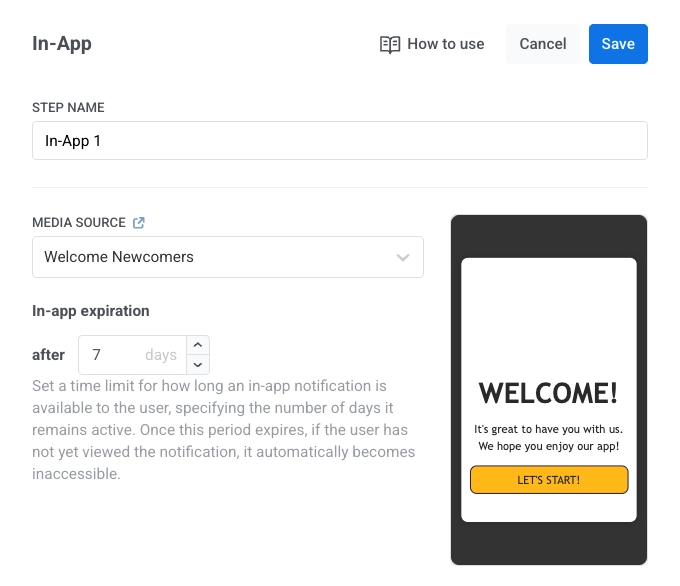
1. Click the **In-App** element → **Media Source**. Select a template (newest first) and click **Apply**.
2. Set **In-app expiration** (number of days the message is available). For example, set 7 days if the offer expires in a week.
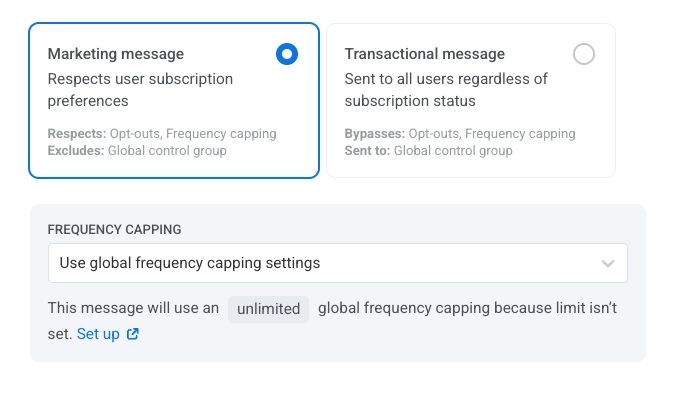
3. Choose the message type:
* **Marketing message**: For campaigns and promos. All rules and limits apply. Respects: opt-outs, frequency capping, and the silence period. Excludes: the [global control group](/product/audience-data-and-segmentation/global-control-group/) users.
* **Transactional message**: For operational or service messages. Rules and limits don't apply. Bypasses: opt-outs, frequency capping, and the silence period. Sent to: the [global control group](/product/audience-data-and-segmentation/global-control-group/) users.
[Learn more about the difference between marketing and transactional messages](/product/messaging-channels/marketing-vs-transactional/).
4. Configure frequency capping. [Learn more](/product/customer-journey/journey-elements/channels/in-app/#set-frequency-capping).
5. Click **Apply** to save the settings.
## Validate and launch the journey
1. Finish configuring the journey and run the [pre-launch check](/product/customer-journey/journey-settings/#pre-launch-check) to validate the journey.
2. Click **Launch campaign** (top-right) to send the in-app message to users.
 ## Configure the in-app element
1. Click the **In-App** element → **Media Source**. Select a template (newest first) and click **Apply**.
2. Set **In-app expiration** (number of days the message is available). For example, set 7 days if the offer expires in a week.
## Configure the in-app element
1. Click the **In-App** element → **Media Source**. Select a template (newest first) and click **Apply**.
2. Set **In-app expiration** (number of days the message is available). For example, set 7 days if the offer expires in a week.
 3. Choose the message type:
* **Marketing message**: For campaigns and promos. All rules and limits apply. Respects: opt-outs, frequency capping, and the silence period. Excludes: the [global control group](/product/audience-data-and-segmentation/global-control-group/) users.
* **Transactional message**: For operational or service messages. Rules and limits don't apply. Bypasses: opt-outs, frequency capping, and the silence period. Sent to: the [global control group](/product/audience-data-and-segmentation/global-control-group/) users.
3. Choose the message type:
* **Marketing message**: For campaigns and promos. All rules and limits apply. Respects: opt-outs, frequency capping, and the silence period. Excludes: the [global control group](/product/audience-data-and-segmentation/global-control-group/) users.
* **Transactional message**: For operational or service messages. Rules and limits don't apply. Bypasses: opt-outs, frequency capping, and the silence period. Sent to: the [global control group](/product/audience-data-and-segmentation/global-control-group/) users.
 [Learn more about the difference between marketing and transactional messages](/product/messaging-channels/marketing-vs-transactional/).
4. Configure frequency capping. [Learn more](/product/customer-journey/journey-elements/channels/in-app/#set-frequency-capping).
5. Click **Apply** to save the settings.
## Validate and launch the journey
1. Finish configuring the journey and run the [pre-launch check](/product/customer-journey/journey-settings/#pre-launch-check) to validate the journey.
2. Click **Launch campaign** (top-right) to send the in-app message to users.
[Learn more about the difference between marketing and transactional messages](/product/messaging-channels/marketing-vs-transactional/).
4. Configure frequency capping. [Learn more](/product/customer-journey/journey-elements/channels/in-app/#set-frequency-capping).
5. Click **Apply** to save the settings.
## Validate and launch the journey
1. Finish configuring the journey and run the [pre-launch check](/product/customer-journey/journey-settings/#pre-launch-check) to validate the journey.
2. Click **Launch campaign** (top-right) to send the in-app message to users.