# Design Google Wallet passes in the pass builder
The Google Wallet pass builder is a visual designer in the Control Panel. You pick a pass type, fill in branding, fields, and a barcode, watch a live preview, and create the pass. When you generate the pass, Pushwoosh creates the pass object in Google Wallet and returns an "Add to Google Wallet" save link.
## Create a pass
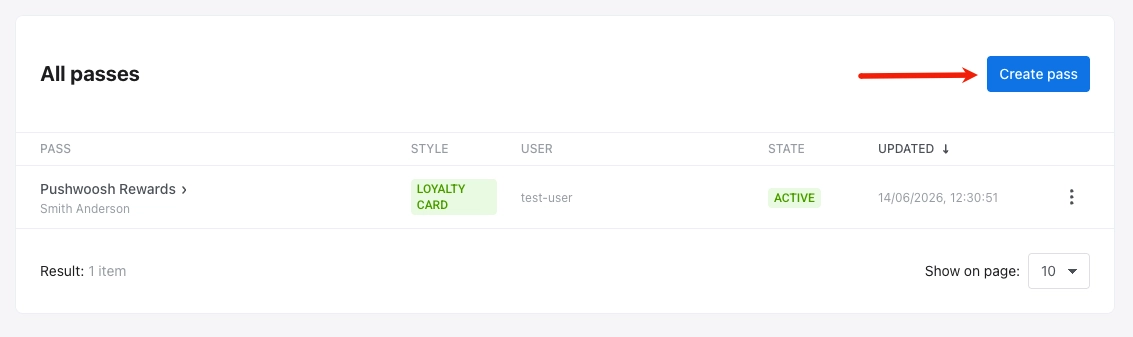
In the Control Panel, go to **Campaigns → Wallet Passes**, open the **Google Wallet** tab, and click **Create pass**.
## Configure the pass
* **From scratch:** start with an empty pass. Choose a pass type, then set fields, appearance, a barcode, and other options yourself in the sections below.
* **From a template:** click **Load template**, pick a built-in pass in **Select Template** (generic, offer, loyalty, event ticket, gift card, flight, or transit), and confirm. The form prefills the pass type, fields, colors, and barcode. Edit any value or change the type as needed.
### Choose a pass type
Under **PASS TYPE**, pick one of the seven Google Wallet pass types. The type controls the card layout and which fields are available. Typed passes use Google's native layout. The generic pass is free-form.
* **Generic:** free-form card from your own fields.
* **Offer:** coupons and discounts.
* **Loyalty card:** loyalty and membership cards.
* **Event ticket:** tickets for events.
* **Gift card:** gift and prepaid cards.
* **Flight:** boarding passes.
* **Transit:** rail, bus, tram, and ferry tickets.
### Fill in pass fields
The fields you see depend on the pass type. Required fields are marked. Common fields per type:
| Pass type | Key fields |
| :---- | :---- |
| **Generic** | Card title*, Header*, Subheader, card fields |
| **Offer** | Title*, Provider*, Details, Fine print, Redemption channel (in-store / online / both), Issuer name |
| **Loyalty** | Program name*, Member name, Member ID, Points balance, Points label, Rewards tier, Tier label, Issuer name |
| **Event ticket** | Event name*, Venue, Address, Start/End date & time, Ticket holder, Ticket number, Type, Section, Row, Seat, Gate |
| **Gift card** | Merchant name*, Card number*, PIN, Balance + currency |
| **Flight** | Carrier IATA code*, Flight number*, Origin*, Destination*, Departure*, Passenger name*, Boarding time, Seat, Class, Boarding group, Confirmation code |
| **Transit** | Transit type* (bus / rail / tram / ferry / other), Operator*, Passenger*, Trip type, journey legs (origin*, destination*, times, platform, coach, seat) |
\* Required by Google.
#### Personalize pass content
Each pass is linked to one [User ID](/product/pushwoosh-knowledge-hub/users-userids/). Use tag placeholders to show data unique to that user, for example a points balance on a loyalty card or the recipient name on a gift card. Issue one pass per User ID so each recipient gets their own values.
To insert a tag placeholder:
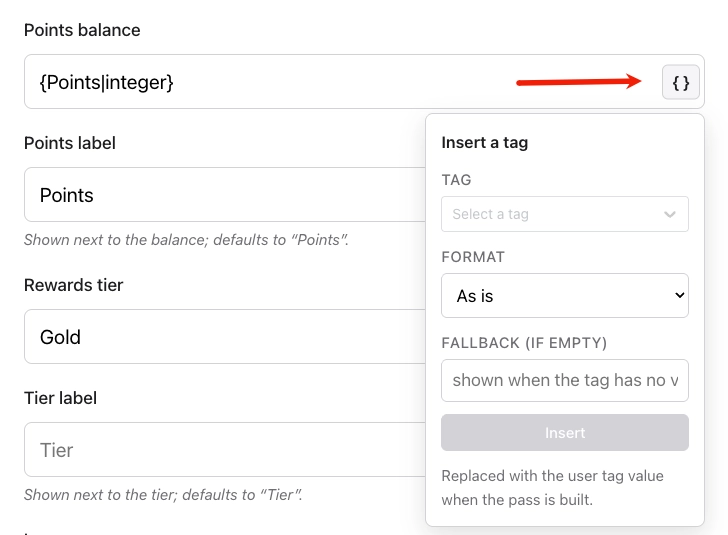
1. Next to a supported text field (for example, **Merchant**, **Card title**, or **Header**), click `{}` to insert a tag.
2. In **TAG**, select the [tag](/product/audience-data-and-segmentation/user-data-tags/tags/) to insert into the field.
3. In **FORMAT**, choose how to display the tag value: **As is** (use the stored value), **Integer** (round to a whole number), **Price (0.00)** (show two decimal places), or **Capitalize first letter** (capitalize the first letter).
4. In **FALLBACK**, optionally enter text to show when the recipient has no value for the tag.
5. Click **Insert**.
Pushwoosh fills in tag values when you create the pass and refreshes them on every update.
### Set appearance
Under **APPEARANCE**, configure colors, images, who can save the pass, and expiration.
#### Colors
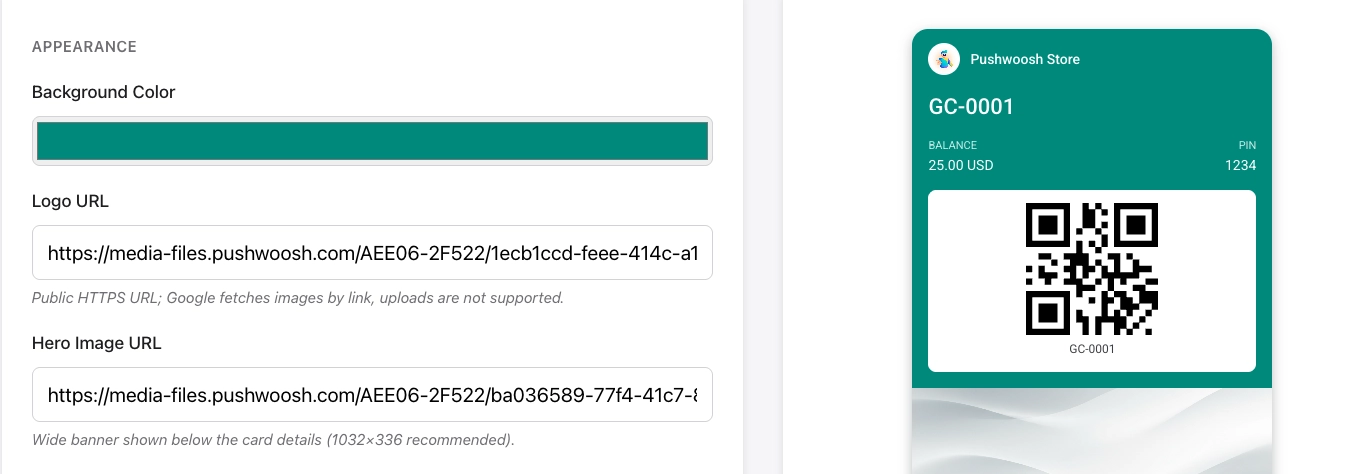
Enter a hex code in **Background color**, for example `#FFFFFF` for white. Include the leading `#` and six characters.
#### Images
Paste a public HTTPS link in **Logo URL**. Required for loyalty and transit passes.
Optionally paste a link in **Hero image URL** for a wide banner below the card details on the front of the pass. Recommended size is 1032×336 px.
#### Who can save the pass
In **Who can save the pass**, select who can add the pass to Google Wallet:
* **One user, all their devices** (default): the pass is linked to one Google account and syncs across that account's devices.
* **One user, one device:** the pass is saved on a single device only.
* **Anyone with the link:** every Google account that opens the save link gets the same shared pass object. When you update the pass, Google delivers the change to all holders automatically.
#### Expiration
Set **Expiration date** to when Google should expire the pass, or leave it empty for no expiry.
### Add a barcode
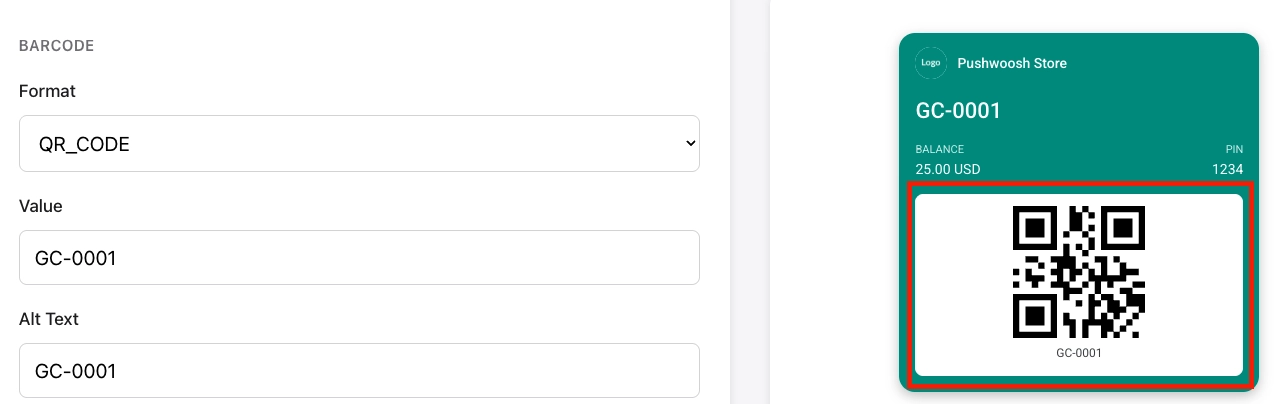
Under **BARCODE**, choose a format and enter the value to encode:
1. **Format:** choose how the barcode looks and what type of scanner can read it.
* **QR_CODE:** square code that most phones and scanners read easily. Best for most passes.
* **PDF_417:** wide barcode made of several rows of lines. Often required for boarding passes.
* **AZTEC:** compact square code, similar to QR. Common on event and transit tickets.
* **CODE_128** / **EAN_13:** 1D barcodes. Choose these only if your scanner or POS system requires them.
2. **Value:** the data encoded in the barcode (for example, a ticket or membership number). To use a unique value per user, click `{}` next to the field and insert a [tag placeholder](#personalize-pass-content).
3. **Alt Text:** text shown below the barcode on the pass.
### Add details fields and links
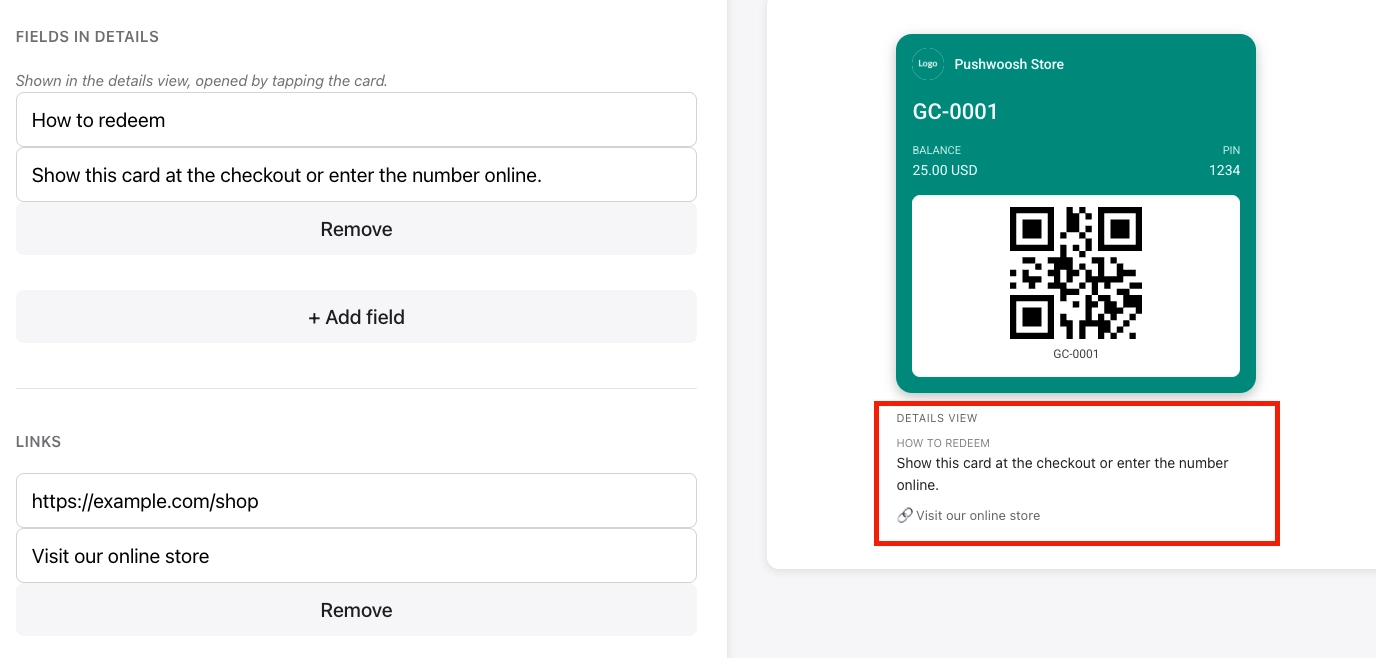
On the front of the pass, users see the main card. When they open the pass details (the back), they can read extra sections and tap links you add here.
* **Text modules:** extra text blocks on the back of the pass. Set a **header** (the section title) and a **body** (the text). Use them for terms, instructions, or other information that does not fit on the front.
* **Links:** tappable links on the back of the pass. Set a **URL** and a short **description** (for example, "Store locator" or "Terms and conditions").
### Add an app link *(optional)*
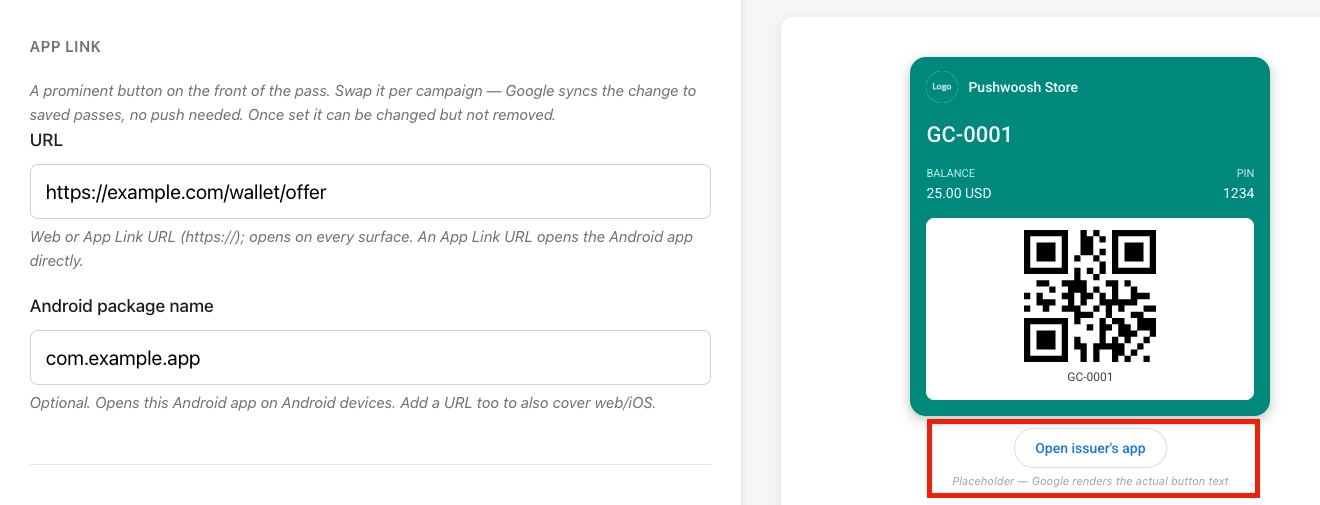
Under **APP LINK**, add a button on the front of the pass that opens a web page or your Android app when tapped. You can set a **URL**, an **Android package name**, or both.
If you set only the URL, the button opens that web address on any device. If you set only a package name, the button works on Android devices that have the app installed, with no web fallback.
### Add locations *(optional)*
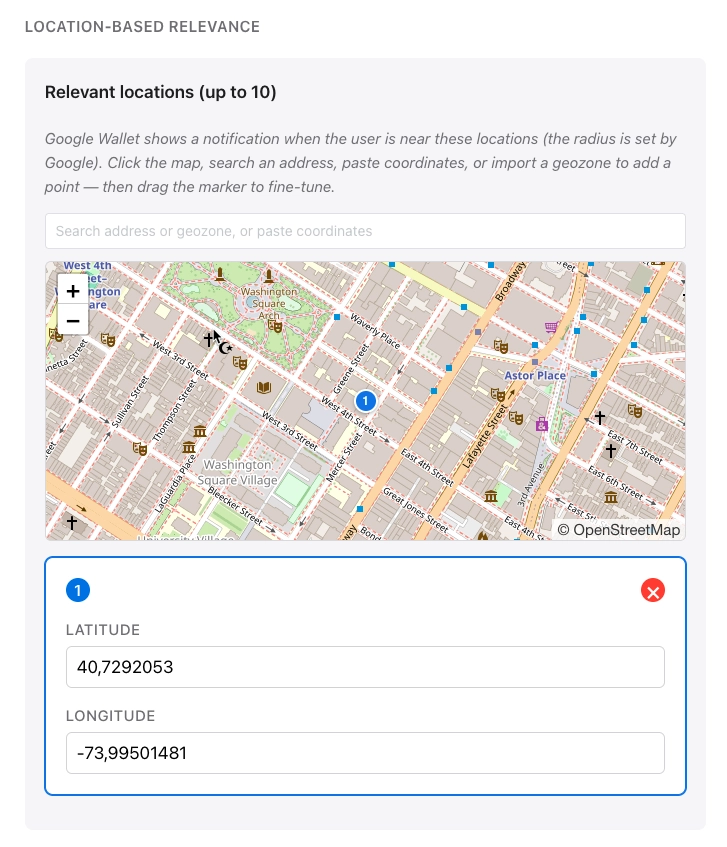
Under **Location-based relevance**, add points of interest. Google shows a geofenced notification when the user is near a location you add. For example, surface a loyalty card near your store, an event ticket near the venue, or a boarding pass near the airport.
You can add up to **10** locations, each set by latitude and longitude.
### Enter a User ID
Enter the Pushwoosh [User ID](/product/pushwoosh-knowledge-hub/users-userids/#how-are-users-and-devices-related) for the person who will receive this pass.
Pushwoosh issues the pass to that user and lists it under **USER** on [**All passes**](/product/messaging-channels/google-wallet-passes/#view-and-manage-existing-passes).
### Preview and validate
A **live preview** updates as you edit, so you can see roughly how the pass will look in Google Wallet.
To check the pass against Google's requirements without creating it, click **Validate**. The builder flags missing required fields and other problems.
## Generate the pass
Click **Generate**. Pushwoosh checks the pass and creates it in Google Wallet. You get an **Add to Google Wallet** save link to share with users. Within a few seconds, the pass appears in [**All passes**](/product/messaging-channels/google-wallet-passes/#view-and-manage-existing-passes).
For editing, getting the save link, invalidating, and deleting passes after creation, see [Manage existing passes](/product/messaging-channels/google-wallet-passes/#view-and-manage-existing-passes).
## Manage passes via API
Everything the pass builder does is also available through the [Google Wallet API](/developer/api-reference/google-wallet-api/): create, update, list, get a save link, set state, and delete passes.
 ## Configure the pass
* **From scratch:** start with an empty pass. Choose a pass type, then set fields, appearance, a barcode, and other options yourself in the sections below.
* **From a template:** click **Load template**, pick a built-in pass in **Select Template** (generic, offer, loyalty, event ticket, gift card, flight, or transit), and confirm. The form prefills the pass type, fields, colors, and barcode. Edit any value or change the type as needed.
### Choose a pass type
Under **PASS TYPE**, pick one of the seven Google Wallet pass types. The type controls the card layout and which fields are available. Typed passes use Google's native layout. The generic pass is free-form.
* **Generic:** free-form card from your own fields.
* **Offer:** coupons and discounts.
* **Loyalty card:** loyalty and membership cards.
* **Event ticket:** tickets for events.
* **Gift card:** gift and prepaid cards.
* **Flight:** boarding passes.
* **Transit:** rail, bus, tram, and ferry tickets.
### Fill in pass fields
The fields you see depend on the pass type. Required fields are marked. Common fields per type:
| Pass type | Key fields |
| :---- | :---- |
| **Generic** | Card title*, Header*, Subheader, card fields |
| **Offer** | Title*, Provider*, Details, Fine print, Redemption channel (in-store / online / both), Issuer name |
| **Loyalty** | Program name*, Member name, Member ID, Points balance, Points label, Rewards tier, Tier label, Issuer name |
| **Event ticket** | Event name*, Venue, Address, Start/End date & time, Ticket holder, Ticket number, Type, Section, Row, Seat, Gate |
| **Gift card** | Merchant name*, Card number*, PIN, Balance + currency |
| **Flight** | Carrier IATA code*, Flight number*, Origin*, Destination*, Departure*, Passenger name*, Boarding time, Seat, Class, Boarding group, Confirmation code |
| **Transit** | Transit type* (bus / rail / tram / ferry / other), Operator*, Passenger*, Trip type, journey legs (origin*, destination*, times, platform, coach, seat) |
\* Required by Google.
#### Personalize pass content
Each pass is linked to one [User ID](/product/pushwoosh-knowledge-hub/users-userids/). Use tag placeholders to show data unique to that user, for example a points balance on a loyalty card or the recipient name on a gift card. Issue one pass per User ID so each recipient gets their own values.
To insert a tag placeholder:
1. Next to a supported text field (for example, **Merchant**, **Card title**, or **Header**), click `{}` to insert a tag.
2. In **TAG**, select the [tag](/product/audience-data-and-segmentation/user-data-tags/tags/) to insert into the field.
3. In **FORMAT**, choose how to display the tag value: **As is** (use the stored value), **Integer** (round to a whole number), **Price (0.00)** (show two decimal places), or **Capitalize first letter** (capitalize the first letter).
4. In **FALLBACK**, optionally enter text to show when the recipient has no value for the tag.
5. Click **Insert**.
## Configure the pass
* **From scratch:** start with an empty pass. Choose a pass type, then set fields, appearance, a barcode, and other options yourself in the sections below.
* **From a template:** click **Load template**, pick a built-in pass in **Select Template** (generic, offer, loyalty, event ticket, gift card, flight, or transit), and confirm. The form prefills the pass type, fields, colors, and barcode. Edit any value or change the type as needed.
### Choose a pass type
Under **PASS TYPE**, pick one of the seven Google Wallet pass types. The type controls the card layout and which fields are available. Typed passes use Google's native layout. The generic pass is free-form.
* **Generic:** free-form card from your own fields.
* **Offer:** coupons and discounts.
* **Loyalty card:** loyalty and membership cards.
* **Event ticket:** tickets for events.
* **Gift card:** gift and prepaid cards.
* **Flight:** boarding passes.
* **Transit:** rail, bus, tram, and ferry tickets.
### Fill in pass fields
The fields you see depend on the pass type. Required fields are marked. Common fields per type:
| Pass type | Key fields |
| :---- | :---- |
| **Generic** | Card title*, Header*, Subheader, card fields |
| **Offer** | Title*, Provider*, Details, Fine print, Redemption channel (in-store / online / both), Issuer name |
| **Loyalty** | Program name*, Member name, Member ID, Points balance, Points label, Rewards tier, Tier label, Issuer name |
| **Event ticket** | Event name*, Venue, Address, Start/End date & time, Ticket holder, Ticket number, Type, Section, Row, Seat, Gate |
| **Gift card** | Merchant name*, Card number*, PIN, Balance + currency |
| **Flight** | Carrier IATA code*, Flight number*, Origin*, Destination*, Departure*, Passenger name*, Boarding time, Seat, Class, Boarding group, Confirmation code |
| **Transit** | Transit type* (bus / rail / tram / ferry / other), Operator*, Passenger*, Trip type, journey legs (origin*, destination*, times, platform, coach, seat) |
\* Required by Google.
#### Personalize pass content
Each pass is linked to one [User ID](/product/pushwoosh-knowledge-hub/users-userids/). Use tag placeholders to show data unique to that user, for example a points balance on a loyalty card or the recipient name on a gift card. Issue one pass per User ID so each recipient gets their own values.
To insert a tag placeholder:
1. Next to a supported text field (for example, **Merchant**, **Card title**, or **Header**), click `{}` to insert a tag.
2. In **TAG**, select the [tag](/product/audience-data-and-segmentation/user-data-tags/tags/) to insert into the field.
3. In **FORMAT**, choose how to display the tag value: **As is** (use the stored value), **Integer** (round to a whole number), **Price (0.00)** (show two decimal places), or **Capitalize first letter** (capitalize the first letter).
4. In **FALLBACK**, optionally enter text to show when the recipient has no value for the tag.
5. Click **Insert**.
 Pushwoosh fills in tag values when you create the pass and refreshes them on every update.
### Set appearance
Under **APPEARANCE**, configure colors, images, who can save the pass, and expiration.
#### Colors
Enter a hex code in **Background color**, for example `#FFFFFF` for white. Include the leading `#` and six characters.
#### Images
Paste a public HTTPS link in **Logo URL**. Required for loyalty and transit passes.
Optionally paste a link in **Hero image URL** for a wide banner below the card details on the front of the pass. Recommended size is 1032×336 px.
Pushwoosh fills in tag values when you create the pass and refreshes them on every update.
### Set appearance
Under **APPEARANCE**, configure colors, images, who can save the pass, and expiration.
#### Colors
Enter a hex code in **Background color**, for example `#FFFFFF` for white. Include the leading `#` and six characters.
#### Images
Paste a public HTTPS link in **Logo URL**. Required for loyalty and transit passes.
Optionally paste a link in **Hero image URL** for a wide banner below the card details on the front of the pass. Recommended size is 1032×336 px.
 #### Who can save the pass
In **Who can save the pass**, select who can add the pass to Google Wallet:
* **One user, all their devices** (default): the pass is linked to one Google account and syncs across that account's devices.
* **One user, one device:** the pass is saved on a single device only.
* **Anyone with the link:** every Google account that opens the save link gets the same shared pass object. When you update the pass, Google delivers the change to all holders automatically.
#### Expiration
Set **Expiration date** to when Google should expire the pass, or leave it empty for no expiry.
### Add a barcode
Under **BARCODE**, choose a format and enter the value to encode:
1. **Format:** choose how the barcode looks and what type of scanner can read it.
* **QR_CODE:** square code that most phones and scanners read easily. Best for most passes.
* **PDF_417:** wide barcode made of several rows of lines. Often required for boarding passes.
* **AZTEC:** compact square code, similar to QR. Common on event and transit tickets.
* **CODE_128** / **EAN_13:** 1D barcodes. Choose these only if your scanner or POS system requires them.
2. **Value:** the data encoded in the barcode (for example, a ticket or membership number). To use a unique value per user, click `{}` next to the field and insert a [tag placeholder](#personalize-pass-content).
3. **Alt Text:** text shown below the barcode on the pass.
#### Who can save the pass
In **Who can save the pass**, select who can add the pass to Google Wallet:
* **One user, all their devices** (default): the pass is linked to one Google account and syncs across that account's devices.
* **One user, one device:** the pass is saved on a single device only.
* **Anyone with the link:** every Google account that opens the save link gets the same shared pass object. When you update the pass, Google delivers the change to all holders automatically.
#### Expiration
Set **Expiration date** to when Google should expire the pass, or leave it empty for no expiry.
### Add a barcode
Under **BARCODE**, choose a format and enter the value to encode:
1. **Format:** choose how the barcode looks and what type of scanner can read it.
* **QR_CODE:** square code that most phones and scanners read easily. Best for most passes.
* **PDF_417:** wide barcode made of several rows of lines. Often required for boarding passes.
* **AZTEC:** compact square code, similar to QR. Common on event and transit tickets.
* **CODE_128** / **EAN_13:** 1D barcodes. Choose these only if your scanner or POS system requires them.
2. **Value:** the data encoded in the barcode (for example, a ticket or membership number). To use a unique value per user, click `{}` next to the field and insert a [tag placeholder](#personalize-pass-content).
3. **Alt Text:** text shown below the barcode on the pass.
 ### Add details fields and links
On the front of the pass, users see the main card. When they open the pass details (the back), they can read extra sections and tap links you add here.
* **Text modules:** extra text blocks on the back of the pass. Set a **header** (the section title) and a **body** (the text). Use them for terms, instructions, or other information that does not fit on the front.
* **Links:** tappable links on the back of the pass. Set a **URL** and a short **description** (for example, "Store locator" or "Terms and conditions").
### Add details fields and links
On the front of the pass, users see the main card. When they open the pass details (the back), they can read extra sections and tap links you add here.
* **Text modules:** extra text blocks on the back of the pass. Set a **header** (the section title) and a **body** (the text). Use them for terms, instructions, or other information that does not fit on the front.
* **Links:** tappable links on the back of the pass. Set a **URL** and a short **description** (for example, "Store locator" or "Terms and conditions").
 ### Add an app link *(optional)*
Under **APP LINK**, add a button on the front of the pass that opens a web page or your Android app when tapped. You can set a **URL**, an **Android package name**, or both.
If you set only the URL, the button opens that web address on any device. If you set only a package name, the button works on Android devices that have the app installed, with no web fallback.
### Add an app link *(optional)*
Under **APP LINK**, add a button on the front of the pass that opens a web page or your Android app when tapped. You can set a **URL**, an **Android package name**, or both.
If you set only the URL, the button opens that web address on any device. If you set only a package name, the button works on Android devices that have the app installed, with no web fallback.
 ### Add locations *(optional)*
Under **Location-based relevance**, add points of interest. Google shows a geofenced notification when the user is near a location you add. For example, surface a loyalty card near your store, an event ticket near the venue, or a boarding pass near the airport.
You can add up to **10** locations, each set by latitude and longitude.
### Add locations *(optional)*
Under **Location-based relevance**, add points of interest. Google shows a geofenced notification when the user is near a location you add. For example, surface a loyalty card near your store, an event ticket near the venue, or a boarding pass near the airport.
You can add up to **10** locations, each set by latitude and longitude.
 ### Enter a User ID
Enter the Pushwoosh [User ID](/product/pushwoosh-knowledge-hub/users-userids/#how-are-users-and-devices-related) for the person who will receive this pass.
Pushwoosh issues the pass to that user and lists it under **USER** on [**All passes**](/product/messaging-channels/google-wallet-passes/#view-and-manage-existing-passes).
### Preview and validate
A **live preview** updates as you edit, so you can see roughly how the pass will look in Google Wallet.
To check the pass against Google's requirements without creating it, click **Validate**. The builder flags missing required fields and other problems.
## Generate the pass
Click **Generate**. Pushwoosh checks the pass and creates it in Google Wallet. You get an **Add to Google Wallet** save link to share with users. Within a few seconds, the pass appears in [**All passes**](/product/messaging-channels/google-wallet-passes/#view-and-manage-existing-passes).
For editing, getting the save link, invalidating, and deleting passes after creation, see [Manage existing passes](/product/messaging-channels/google-wallet-passes/#view-and-manage-existing-passes).
## Manage passes via API
Everything the pass builder does is also available through the [Google Wallet API](/developer/api-reference/google-wallet-api/): create, update, list, get a save link, set state, and delete passes.
### Enter a User ID
Enter the Pushwoosh [User ID](/product/pushwoosh-knowledge-hub/users-userids/#how-are-users-and-devices-related) for the person who will receive this pass.
Pushwoosh issues the pass to that user and lists it under **USER** on [**All passes**](/product/messaging-channels/google-wallet-passes/#view-and-manage-existing-passes).
### Preview and validate
A **live preview** updates as you edit, so you can see roughly how the pass will look in Google Wallet.
To check the pass against Google's requirements without creating it, click **Validate**. The builder flags missing required fields and other problems.
## Generate the pass
Click **Generate**. Pushwoosh checks the pass and creates it in Google Wallet. You get an **Add to Google Wallet** save link to share with users. Within a few seconds, the pass appears in [**All passes**](/product/messaging-channels/google-wallet-passes/#view-and-manage-existing-passes).
For editing, getting the save link, invalidating, and deleting passes after creation, see [Manage existing passes](/product/messaging-channels/google-wallet-passes/#view-and-manage-existing-passes).
## Manage passes via API
Everything the pass builder does is also available through the [Google Wallet API](/developer/api-reference/google-wallet-api/): create, update, list, get a save link, set state, and delete passes.