# Send emails via Customer Journey
This guide explains how to send emails through Customer Journey.
## Create a campaign and set up the Entry
### Create a campaign
Log in to your Pushwoosh account and navigate to **Customer Journey Builder.** Click **Create Campaign** to begin. You can either choose a journey from the templates or start from scratch.
### Add an entry element to the canvas
If you're starting from scratch, drag and drop an [entry element](/product/customer-journey/journey-elements/entry-elements/) (Audience-based, Trigger-based, or API-based) as the first element of your journey. If you're using a template, the entry element will already be on the canvas.
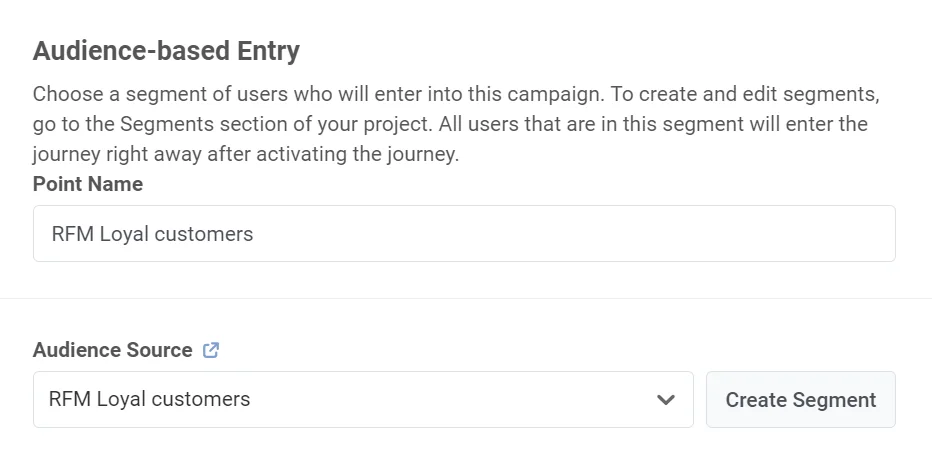
Example: use **Audience-based Entry** to target loyal customers who have made purchases during past sales and are likely interested in the current promotion.
### Configure the Entry element
Double-click on the Entry element to configure it. The settings depend on the entry type. For [Audience-based Entry](/product/customer-journey/journey-elements/entry-elements/audience-based-entry/) you choose or create a segment. For [Trigger-based Entry](/product/customer-journey/journey-elements/entry-elements/trigger-based-entry/) you select an event and conditions. For [API-based Entry](/product/customer-journey/journey-elements/entry-elements/api-based-entry/) you use the API to add users. [Learn how to configure each entry type](/product/customer-journey/journey-elements/entry-elements/).
## Add and configure the Email element
Drag and drop the [Email element](/product/customer-journey/journey-elements/channels/email/) onto the canvas and double-click to open its settings. In the pop-up window, start setting up your email.
### Give the journey point a name
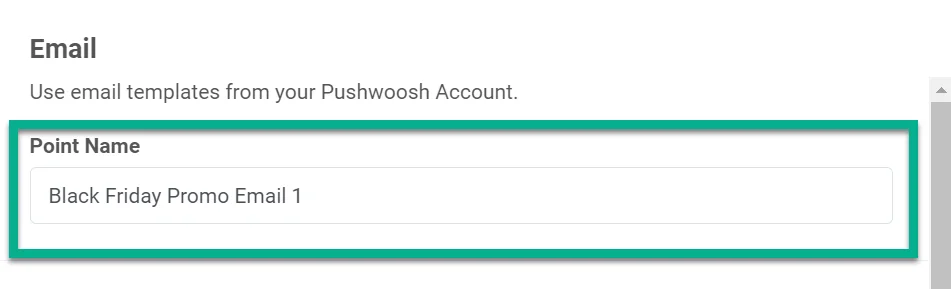
Example: *Black Friday Promo Email*.
### Configure content
In the **Content** step, configure the email body, subject, and sender details.
#### Email preset
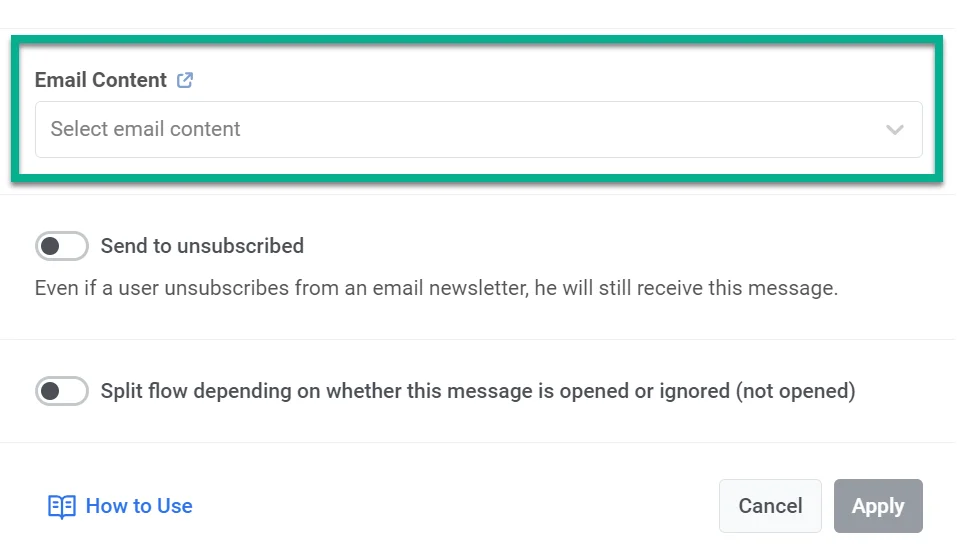
1. Select an existing preset from the dropdown, or click **Create content** to build new content.
2. To change the selected preset, click **Edit content** below the field.
Save your content, then click the back arrow at the top of the editor to close the drawer and return to the Email element with the preset selected.
#### Subject line
Choose how to set the subject for this step:
* **Custom:** Type a subject in the **Subject** field. This value is saved in the step and does not sync with preset changes.
* **From preset:** Use the current subject from the selected preset. If the preset subject changes later, the step uses the updated value automatically at send time. [Learn more](/product/customer-journey/journey-elements/channels/email/#set-the-subject-line)
#### Sender info
Choose how to set sender details:
* **From preset:** Use sender details from the selected preset. Updates in the preset apply automatically. If any part of the preset's sender details is missing, the step fills it in from your [default sender details](/product/first-steps/start-with-your-project/configure-platforms/email-verification/#add-default-sender-details). If those are missing too, the [pre-launch check](/product/customer-journey/journey-settings/#pre-launch-check) flags it before you can launch the journey.
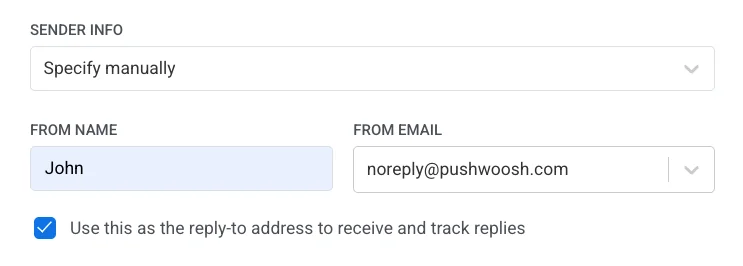
* **Specify manually:** Enter **From Name** and **From Email** in this step (must be a [verified domain](/product/first-steps/start-with-your-project/configure-platforms/email-verification/); the field suggests known mailbox names for each verified domain). Manual values are saved in the step and do not sync with preset changes. [How sender priority works](/product/customer-journey/journey-elements/channels/email/#define-sender-details-and-reply-address)
Optionally enable **Use this as the reply-to address to receive and track replies** so replies go to the From email. [Learn more](/product/customer-journey/journey-elements/channels/email/#define-sender-details-and-reply-address)
### Choose the message type
* **Marketing message**: Respects subscription preferences, opt-outs, and frequency capping. Not sent to [global control group](/product/audience-data-and-segmentation/global-control-group/) users.
* **Transactional message**: Sent to all users regardless of subscription status. Delivered to control group users.
[Learn how message type affects delivery](/product/messaging-channels/marketing-vs-transactional/).
### Select subscription category
If you chose Marketing message, pick a category from the dropdown (e.g. Product Updates, Newsletter, Promotional) so the message aligns with your subscribers' preferences. Categories are defined in the [subscription preference center](/product/messaging-channels/emails/email-preferences/).
### Overwrite personalization (optional)
Configure how message content is personalized:
* **Personalise message with event attributes**: Fill placeholders in the email with data from the journey (e.g. event or API-based entry). [Learn more](/product/customer-journey/journey-elements/dynamic-content-and-liquid-templates-in-journeys)
* **Overwrite Liquid placeholders**: Use values from a selected Event in Liquid tags. Tags that match event attribute names get those values. [Learn more](/product/customer-journey/journey-elements/dynamic-content-and-liquid-templates-in-journeys)
* **Use Vouchers**: Insert a unique voucher code from a pool into the email (e.g. for promotions). [Learn more](/product/customer-journey/journey-elements/channels/email/#use-vouchers)
### Delivery settings (optional)
In this section you can set:
* **Frequency capping**: Use global, ignore, or custom limit. [Learn more](/product/customer-journey/journey-elements/channels/email/#configure-message-delivery-settings)
* **Send rate**: Use global, without limit, or custom. [Learn more](/product/messaging-channels/global-frequency-capping/#set-send-rate-limits)
* **Best time to send**: Deliver at the optimal time per user based on behavior. [Learn more](/product/customer-journey/journey-elements/channels/email/#enable-best-time-to-send)
### Split by email open (optional)
Split the flow by whether users open the email or not. Set the wait period (up to 7 days). Example: follow up with a push or another email if the user doesn't open. [Learn more](/product/customer-journey/journey-elements/channels/email/#split-flow-depending-on-whether-this-message-is-opened-or-ignored)
### Add Exit element
Once your email is configured, complete the journey by adding an [**Exit element**](/product/customer-journey/journey-elements#exit-from-journey). If you chose to split the flow, set up actions for users who ignore the email.
## Configure journey settings and launch
### Journey settings (optional)
* Set [Silence period](/product/customer-journey/journey-settings#silence-period) during which messages will not be sent to users
* Set [Campaign entry limit](/product/customer-journey/journey-settings#campaign-entry-limit) to define how many times a particular person can enter the journey within a specified period
### Set Conversion Goals
Set Conversion Goals to track the success of your journey. Example: set up the CheckoutSuccess event as a Conversion Goal and monitor how many users achieve it within the journey. [Learn more about Conversion Goals in Journeys](/product/customer-journey/journey-settings#conversion-goals)
### Launch the campaign
Before launching, use the [Pre-launch check](/product/customer-journey/journey-settings/#pre-launch-check) to validate the campaign and fix any missing steps. When the campaign is ready, click **Start campaign** to start sending.
 ## Add and configure the Email element
Drag and drop the [Email element](/product/customer-journey/journey-elements/channels/email/) onto the canvas and double-click to open its settings. In the pop-up window, start setting up your email.
### Give the journey point a name
Example: *Black Friday Promo Email*.
## Add and configure the Email element
Drag and drop the [Email element](/product/customer-journey/journey-elements/channels/email/) onto the canvas and double-click to open its settings. In the pop-up window, start setting up your email.
### Give the journey point a name
Example: *Black Friday Promo Email*.
 ### Configure content
In the **Content** step, configure the email body, subject, and sender details.
#### Email preset
1. Select an existing preset from the dropdown, or click **Create content** to build new content.
2. To change the selected preset, click **Edit content** below the field.
### Configure content
In the **Content** step, configure the email body, subject, and sender details.
#### Email preset
1. Select an existing preset from the dropdown, or click **Create content** to build new content.
2. To change the selected preset, click **Edit content** below the field.
 Save your content, then click the back arrow at the top of the editor to close the drawer and return to the Email element with the preset selected.
#### Subject line
Choose how to set the subject for this step:
* **Custom:** Type a subject in the **Subject** field. This value is saved in the step and does not sync with preset changes.
* **From preset:** Use the current subject from the selected preset. If the preset subject changes later, the step uses the updated value automatically at send time. [Learn more](/product/customer-journey/journey-elements/channels/email/#set-the-subject-line)
Save your content, then click the back arrow at the top of the editor to close the drawer and return to the Email element with the preset selected.
#### Subject line
Choose how to set the subject for this step:
* **Custom:** Type a subject in the **Subject** field. This value is saved in the step and does not sync with preset changes.
* **From preset:** Use the current subject from the selected preset. If the preset subject changes later, the step uses the updated value automatically at send time. [Learn more](/product/customer-journey/journey-elements/channels/email/#set-the-subject-line)
 #### Sender info
Choose how to set sender details:
* **From preset:** Use sender details from the selected preset. Updates in the preset apply automatically. If any part of the preset's sender details is missing, the step fills it in from your [default sender details](/product/first-steps/start-with-your-project/configure-platforms/email-verification/#add-default-sender-details). If those are missing too, the [pre-launch check](/product/customer-journey/journey-settings/#pre-launch-check) flags it before you can launch the journey.
* **Specify manually:** Enter **From Name** and **From Email** in this step (must be a [verified domain](/product/first-steps/start-with-your-project/configure-platforms/email-verification/); the field suggests known mailbox names for each verified domain). Manual values are saved in the step and do not sync with preset changes. [How sender priority works](/product/customer-journey/journey-elements/channels/email/#define-sender-details-and-reply-address)
Optionally enable **Use this as the reply-to address to receive and track replies** so replies go to the From email. [Learn more](/product/customer-journey/journey-elements/channels/email/#define-sender-details-and-reply-address)
#### Sender info
Choose how to set sender details:
* **From preset:** Use sender details from the selected preset. Updates in the preset apply automatically. If any part of the preset's sender details is missing, the step fills it in from your [default sender details](/product/first-steps/start-with-your-project/configure-platforms/email-verification/#add-default-sender-details). If those are missing too, the [pre-launch check](/product/customer-journey/journey-settings/#pre-launch-check) flags it before you can launch the journey.
* **Specify manually:** Enter **From Name** and **From Email** in this step (must be a [verified domain](/product/first-steps/start-with-your-project/configure-platforms/email-verification/); the field suggests known mailbox names for each verified domain). Manual values are saved in the step and do not sync with preset changes. [How sender priority works](/product/customer-journey/journey-elements/channels/email/#define-sender-details-and-reply-address)
Optionally enable **Use this as the reply-to address to receive and track replies** so replies go to the From email. [Learn more](/product/customer-journey/journey-elements/channels/email/#define-sender-details-and-reply-address)
 ### Choose the message type
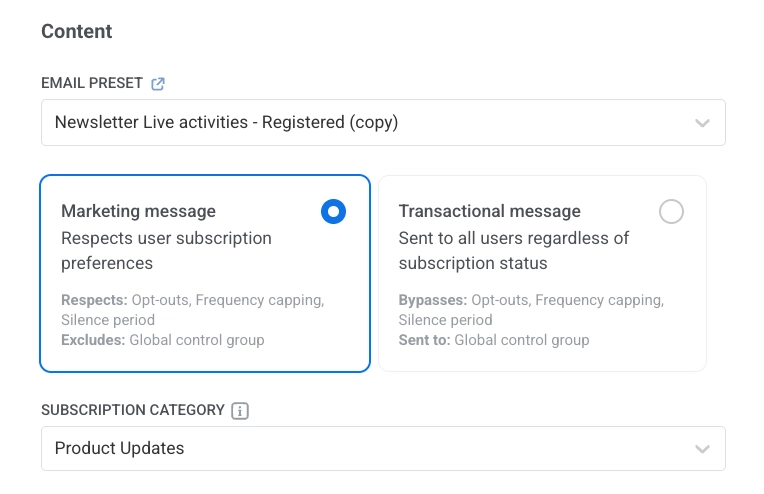
* **Marketing message**: Respects subscription preferences, opt-outs, and frequency capping. Not sent to [global control group](/product/audience-data-and-segmentation/global-control-group/) users.
* **Transactional message**: Sent to all users regardless of subscription status. Delivered to control group users.
### Choose the message type
* **Marketing message**: Respects subscription preferences, opt-outs, and frequency capping. Not sent to [global control group](/product/audience-data-and-segmentation/global-control-group/) users.
* **Transactional message**: Sent to all users regardless of subscription status. Delivered to control group users.
 [Learn how message type affects delivery](/product/messaging-channels/marketing-vs-transactional/).
### Select subscription category
If you chose Marketing message, pick a category from the dropdown (e.g. Product Updates, Newsletter, Promotional) so the message aligns with your subscribers' preferences. Categories are defined in the [subscription preference center](/product/messaging-channels/emails/email-preferences/).
### Overwrite personalization (optional)
Configure how message content is personalized:
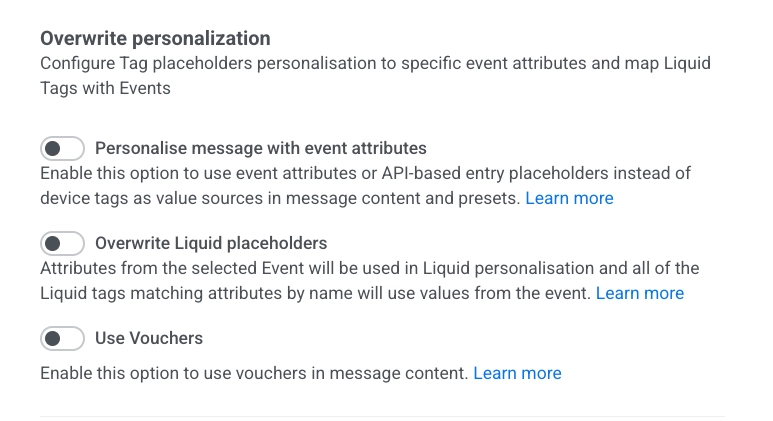
* **Personalise message with event attributes**: Fill placeholders in the email with data from the journey (e.g. event or API-based entry). [Learn more](/product/customer-journey/journey-elements/dynamic-content-and-liquid-templates-in-journeys)
* **Overwrite Liquid placeholders**: Use values from a selected Event in Liquid tags. Tags that match event attribute names get those values. [Learn more](/product/customer-journey/journey-elements/dynamic-content-and-liquid-templates-in-journeys)
* **Use Vouchers**: Insert a unique voucher code from a pool into the email (e.g. for promotions). [Learn more](/product/customer-journey/journey-elements/channels/email/#use-vouchers)
[Learn how message type affects delivery](/product/messaging-channels/marketing-vs-transactional/).
### Select subscription category
If you chose Marketing message, pick a category from the dropdown (e.g. Product Updates, Newsletter, Promotional) so the message aligns with your subscribers' preferences. Categories are defined in the [subscription preference center](/product/messaging-channels/emails/email-preferences/).
### Overwrite personalization (optional)
Configure how message content is personalized:
* **Personalise message with event attributes**: Fill placeholders in the email with data from the journey (e.g. event or API-based entry). [Learn more](/product/customer-journey/journey-elements/dynamic-content-and-liquid-templates-in-journeys)
* **Overwrite Liquid placeholders**: Use values from a selected Event in Liquid tags. Tags that match event attribute names get those values. [Learn more](/product/customer-journey/journey-elements/dynamic-content-and-liquid-templates-in-journeys)
* **Use Vouchers**: Insert a unique voucher code from a pool into the email (e.g. for promotions). [Learn more](/product/customer-journey/journey-elements/channels/email/#use-vouchers)
 ### Delivery settings (optional)
In this section you can set:
* **Frequency capping**: Use global, ignore, or custom limit. [Learn more](/product/customer-journey/journey-elements/channels/email/#configure-message-delivery-settings)
* **Send rate**: Use global, without limit, or custom. [Learn more](/product/messaging-channels/global-frequency-capping/#set-send-rate-limits)
* **Best time to send**: Deliver at the optimal time per user based on behavior. [Learn more](/product/customer-journey/journey-elements/channels/email/#enable-best-time-to-send)
### Delivery settings (optional)
In this section you can set:
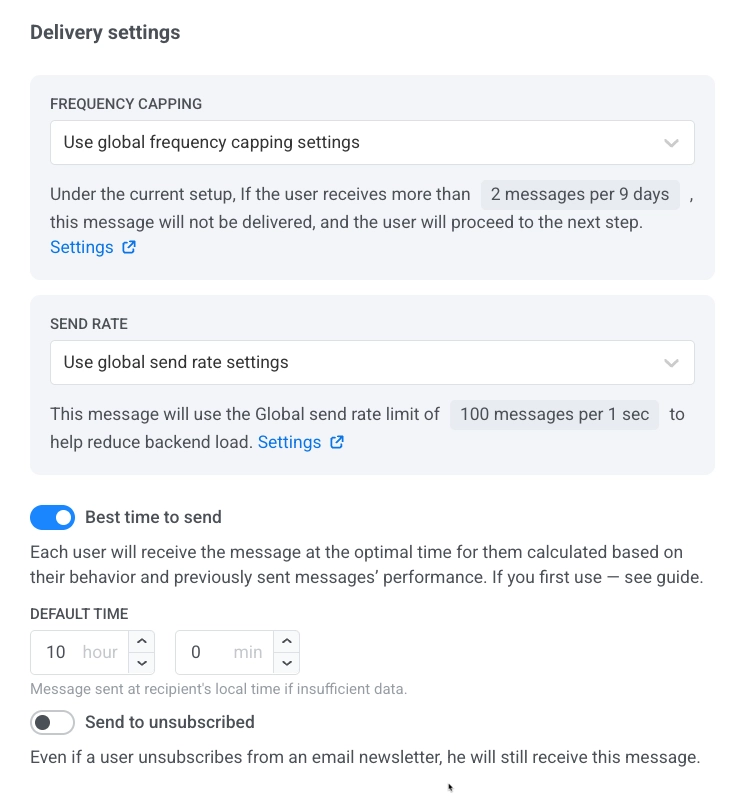
* **Frequency capping**: Use global, ignore, or custom limit. [Learn more](/product/customer-journey/journey-elements/channels/email/#configure-message-delivery-settings)
* **Send rate**: Use global, without limit, or custom. [Learn more](/product/messaging-channels/global-frequency-capping/#set-send-rate-limits)
* **Best time to send**: Deliver at the optimal time per user based on behavior. [Learn more](/product/customer-journey/journey-elements/channels/email/#enable-best-time-to-send)
 ### Split by email open (optional)
Split the flow by whether users open the email or not. Set the wait period (up to 7 days). Example: follow up with a push or another email if the user doesn't open. [Learn more](/product/customer-journey/journey-elements/channels/email/#split-flow-depending-on-whether-this-message-is-opened-or-ignored)
### Split by email open (optional)
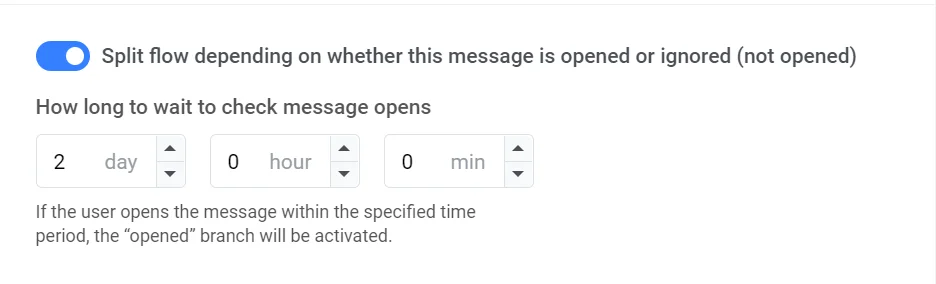
Split the flow by whether users open the email or not. Set the wait period (up to 7 days). Example: follow up with a push or another email if the user doesn't open. [Learn more](/product/customer-journey/journey-elements/channels/email/#split-flow-depending-on-whether-this-message-is-opened-or-ignored)
 ### Add Exit element
Once your email is configured, complete the journey by adding an [**Exit element**](/product/customer-journey/journey-elements#exit-from-journey). If you chose to split the flow, set up actions for users who ignore the email.
## Configure journey settings and launch
### Journey settings (optional)
* Set [Silence period](/product/customer-journey/journey-settings#silence-period) during which messages will not be sent to users
* Set [Campaign entry limit](/product/customer-journey/journey-settings#campaign-entry-limit) to define how many times a particular person can enter the journey within a specified period
### Set Conversion Goals
Set Conversion Goals to track the success of your journey. Example: set up the CheckoutSuccess event as a Conversion Goal and monitor how many users achieve it within the journey. [Learn more about Conversion Goals in Journeys](/product/customer-journey/journey-settings#conversion-goals)
### Launch the campaign
Before launching, use the [Pre-launch check](/product/customer-journey/journey-settings/#pre-launch-check) to validate the campaign and fix any missing steps. When the campaign is ready, click **Start campaign** to start sending.
### Add Exit element
Once your email is configured, complete the journey by adding an [**Exit element**](/product/customer-journey/journey-elements#exit-from-journey). If you chose to split the flow, set up actions for users who ignore the email.
## Configure journey settings and launch
### Journey settings (optional)
* Set [Silence period](/product/customer-journey/journey-settings#silence-period) during which messages will not be sent to users
* Set [Campaign entry limit](/product/customer-journey/journey-settings#campaign-entry-limit) to define how many times a particular person can enter the journey within a specified period
### Set Conversion Goals
Set Conversion Goals to track the success of your journey. Example: set up the CheckoutSuccess event as a Conversion Goal and monitor how many users achieve it within the journey. [Learn more about Conversion Goals in Journeys](/product/customer-journey/journey-settings#conversion-goals)
### Launch the campaign
Before launching, use the [Pre-launch check](/product/customer-journey/journey-settings/#pre-launch-check) to validate the campaign and fix any missing steps. When the campaign is ready, click **Start campaign** to start sending.