# Get email subscribers
To effectively benefit from email marketing, the first step is building a strong email audience. Collecting email addresses and importing existing contacts are crucial to start engaging your users and sending targeted campaigns.
## Collect email addresses
Think about where and when it makes sense to ask users for their email addresses. For example, you might ask for an email:
- On your website with **subscription forms**. [Learn more](/product/audience-data-and-segmentation/subscription-forms/)
- On the login or registration page of your app.
- When users sign up for a newsletter or special offer.
- After a purchase is completed.
## How to import your email list from CSV
Importing email contacts into Pushwoosh is straightforward, but your CSV file must be correctly formatted to ensure a smooth import process. Follow the guidelines below to prepare and upload your email list.
### Prepare your CSV file
#### CSV formatting rules
To successfully import email contacts, your CSV file must follow these formatting rules:
##### General structure
* The first row must contain column headers that describe the data in each column.
* Each subsequent row represents a single contact, with values corresponding to the headers.
* Values must be separated by commas.
* Save the file in UTF-8 encoding to ensure proper character display.
* The maximum file size is 100 MB.
##### Required columns
* **Email identifier**: The recipient’s email address. Email addresses must be valid and properly formatted.
* **User ID**: A unique identifier for the user (e.g., name).
##### Optional columns
Including additional columns allows for better segmentation and personalization in email campaigns:
* **City**: Specifies the user’s city. Useful for location-based targeting (e.g., *Exclusive event in New York\!*).
* **Language**: Indicates the user’s preferred language. Helps send messages in the recipient's language for better engagement.
* **Customer type**: Identifies the user’s type (e.g., New Customer, VIP, Returning). Useful for sending personalized offers.
* Any additional data that can be mapped to Pushwoosh system tags for further segmentation.
##### Example CSV file
```csv
Email_address, Name, City, Language
exampleemail@gmail.com, Marko, Belgrade,Serbian
exampleemail2@gmail.com, Alex, New York, English
```
### Upload the CSV file
1. Go to **Audience \> Import CSV \> Import Email Contacts**.
2. Click **Upload CSV** and upload your CSV file.
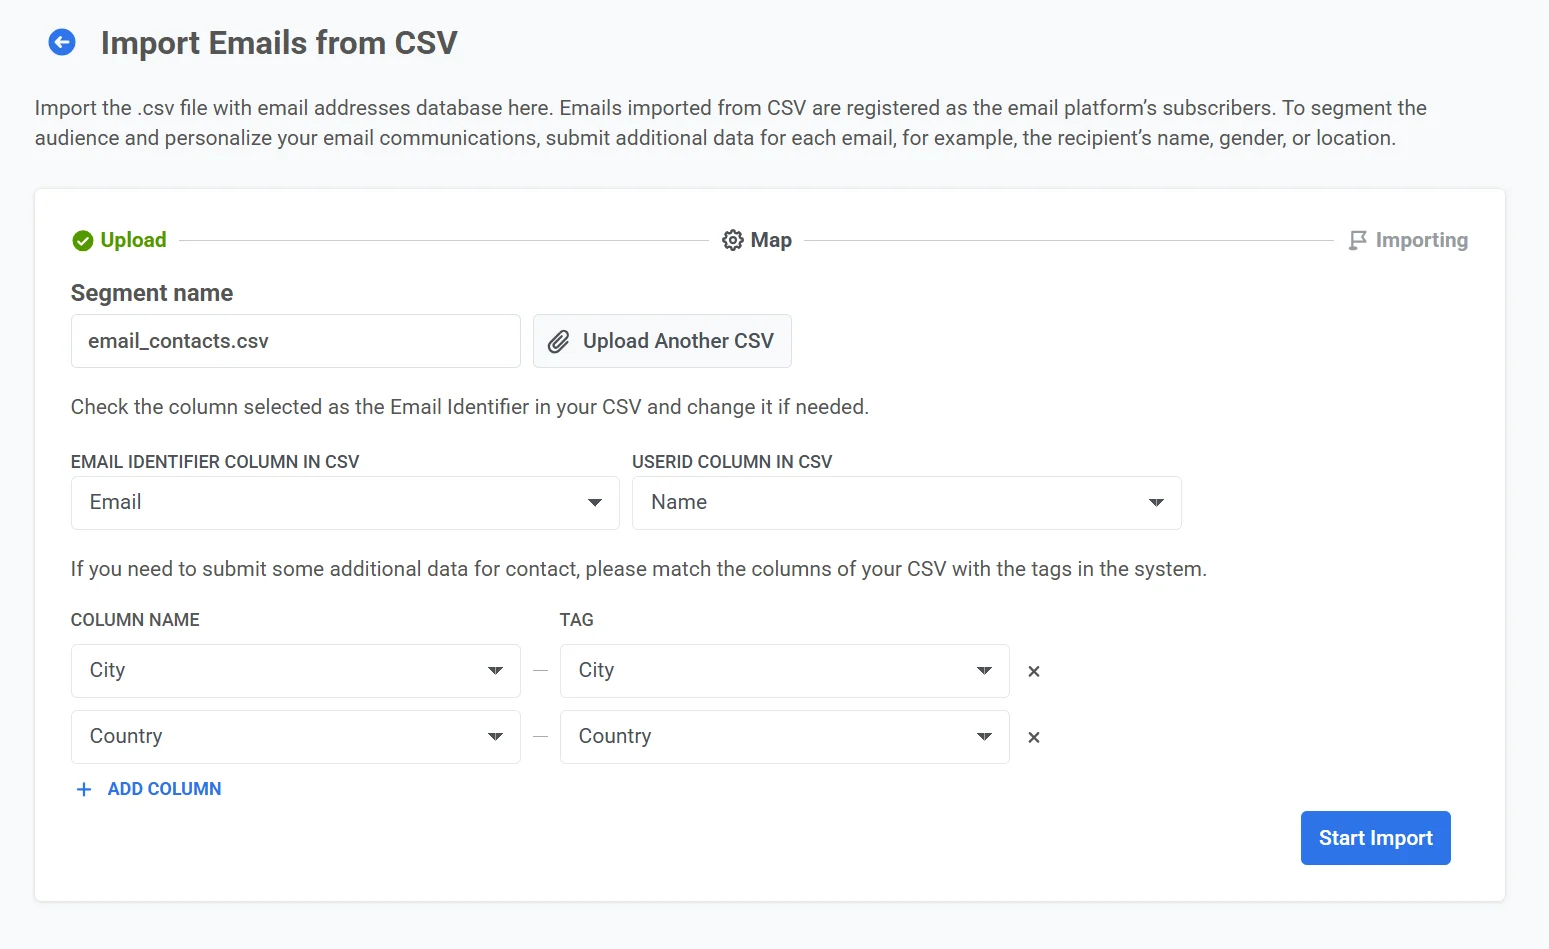
3. Map columns:
* Under **Email Identifier Column in CSV**, select the column that contains email addresses (e.g., "Email").
* Under the **User ID Column in CSV**, select the column that contains unique user identifiers (e.g., "Name").
* If you have additional data, match **Column Names** from your CSV to system **Tags** (e.g., "City" → "City", "Country" → "Country").
4. Click **Import** to process the file.
After the import, the contacts will be available for email campaigns in Pushwoosh. They will appear as a new segment in the [Segments list](/product/audience-data-and-segmentation/segmentation/) and can also be accessed via [User explorer](/product/audience-data-and-segmentation/user-explorer/).
With your email contacts imported, set up the [subscription preference center](/product/messaging-channels/emails/email-preferences/) so you can assign categories when sending and let users manage their preferences. Then create email content using the [Drag & drop](/product/content/email-content/drag-and-drop-email-editor) or [HTML code editor](/product/content/email-content/html-code-editor) and [send an email](/product/messaging-channels/emails/sending-emails).
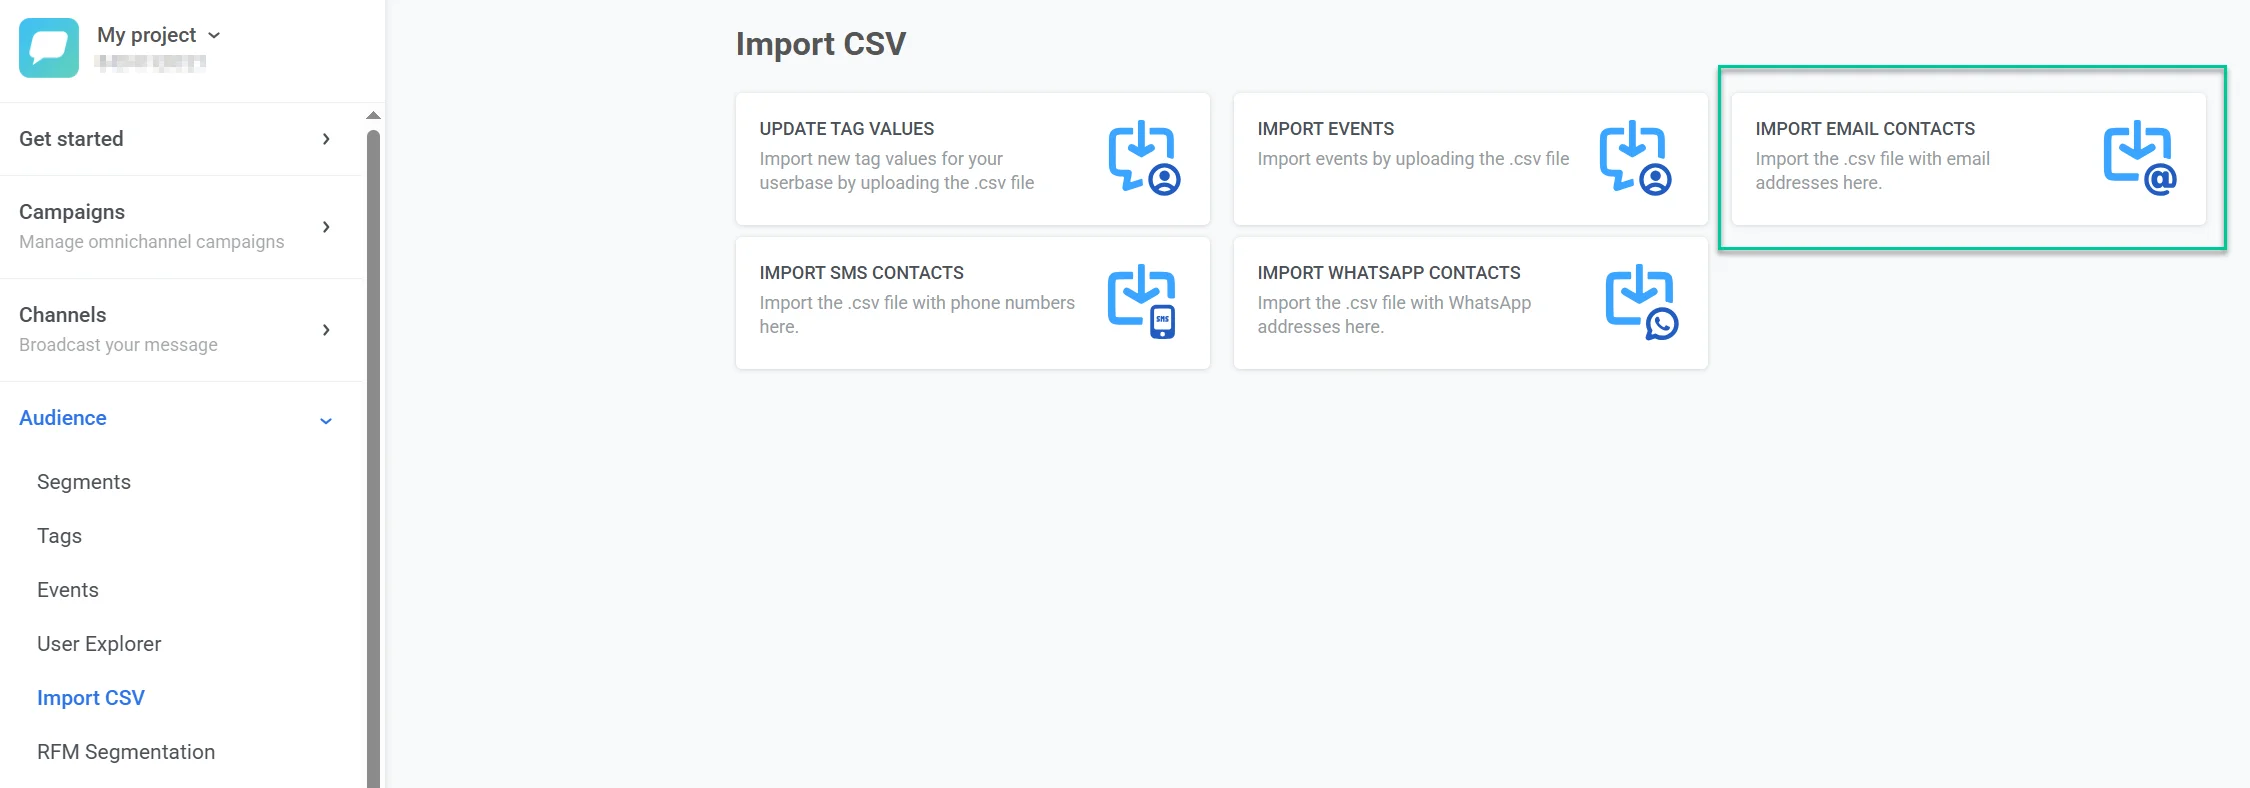 2. Click **Upload CSV** and upload your CSV file.
3. Map columns:
* Under **Email Identifier Column in CSV**, select the column that contains email addresses (e.g., "Email").
* Under the **User ID Column in CSV**, select the column that contains unique user identifiers (e.g., "Name").
* If you have additional data, match **Column Names** from your CSV to system **Tags** (e.g., "City" → "City", "Country" → "Country").
2. Click **Upload CSV** and upload your CSV file.
3. Map columns:
* Under **Email Identifier Column in CSV**, select the column that contains email addresses (e.g., "Email").
* Under the **User ID Column in CSV**, select the column that contains unique user identifiers (e.g., "Name").
* If you have additional data, match **Column Names** from your CSV to system **Tags** (e.g., "City" → "City", "Country" → "Country").
 4. Click **Import** to process the file.
After the import, the contacts will be available for email campaigns in Pushwoosh. They will appear as a new segment in the [Segments list](/product/audience-data-and-segmentation/segmentation/) and can also be accessed via [User explorer](/product/audience-data-and-segmentation/user-explorer/).
With your email contacts imported, set up the [subscription preference center](/product/messaging-channels/emails/email-preferences/) so you can assign categories when sending and let users manage their preferences. Then create email content using the [Drag & drop](/product/content/email-content/drag-and-drop-email-editor) or [HTML code editor](/product/content/email-content/html-code-editor) and [send an email](/product/messaging-channels/emails/sending-emails).
4. Click **Import** to process the file.
After the import, the contacts will be available for email campaigns in Pushwoosh. They will appear as a new segment in the [Segments list](/product/audience-data-and-segmentation/segmentation/) and can also be accessed via [User explorer](/product/audience-data-and-segmentation/user-explorer/).
With your email contacts imported, set up the [subscription preference center](/product/messaging-channels/emails/email-preferences/) so you can assign categories when sending and let users manage their preferences. Then create email content using the [Drag & drop](/product/content/email-content/drag-and-drop-email-editor) or [HTML code editor](/product/content/email-content/html-code-editor) and [send an email](/product/messaging-channels/emails/sending-emails).