# Set up the email subscription preference center
## Email subscription preference center overview
The email subscription preference center lets subscribers choose which types of emails they want to receive, such as newsletters, promotions, or product updates.
Instead of unsubscribing from all emails, users can opt out of specific categories and stay subscribed to what matters most to them. This improves the overall user experience, reduces full opt-outs, and helps you keep a healthier and more engaged audience.
### Why you should set it up
Setting up a subscription preference center improves both user experience and legal compliance.
##### Improve user experience
Letting users choose which types of emails they want to receive, such as newsletters, promotions, or product updates, helps reduce full opt-outs and keeps your audience more engaged.
##### Ensure compliance with email regulations
Several laws require that users can easily manage their communication preferences:
* **GDPR** (EU): Requires clear options to opt in or out of specific types of communication.
* **CAN-SPAM** (U.S.): Requires every commercial email to include a visible unsubscribe link.
If you don’t provide these options:
* You may face legal penalties for non-compliance
* Your email service provider (ESP) account may be flagged or suspended
## How email categories and message delivery work
### How subscriptions are stored
Pushwoosh tracks category subscriptions using the **`Subscribed Email Categories`** tag. This tag stores the list of categories each subscriber is currently subscribed to.
Delivery logic:
- If a category name is in the list, the subscriber receives emails for that category.
- If a category name is not in the list, the subscriber does not receive emails for that category.
- You can populate this tag automatically when [adding a category](#add-a-category) or by [importing subscription categories via CSV](#import-subscription-categories-via-csv).
Every subscribe, unsubscribe, and resubscribe action also fires the [**PW_EmailSubscribed**](/product/audience-data-and-segmentation/events/default-events/#pw_emailsubscribed) or [**PW_EmailUnsubscribed**](/product/audience-data-and-segmentation/events/default-events/#pw_emailunsubscribed) event, so you can trigger follow-up automation based on category-level opt-ins and opt-outs.
#### Full opt-out with the Unsubscribed Emails tag
For a complete opt-out from all marketing emails, Pushwoosh sets the [**Unsubscribed Emails**](/product/audience-data-and-segmentation/user-data-tags/tags/#default-tags) tag to `true`. This happens when a subscriber:
**With the preference center enabled:**
* Clicks **Unsubscribe from all** in the preference center.
**Without the preference center:**
* Clicks the unsubscribe link in any email — this opts them out of all marketing emails immediately.
In both cases, unsubscribing via the email client using the [List-Unsubscribe header](/product/messaging-channels/emails/email-deliverability/#list-unsubscribe-header-support) (for example, the native unsubscribe button in Gmail or Apple Mail) also sets the tag to `true`.
[Transactional emails](/product/messaging-channels/marketing-vs-transactional/) are not affected by this tag and are always delivered.
### How categories apply to campaigns
Once the preference center is set up, every marketing campaign you send (via Journey or One‑Time Message) will prompt you to assign a category before sending. [Learn more](/product/messaging-channels/emails/sending-emails/send-one-time-emails/#select-subscription-category)
This ensures emails are only delivered to subscribers who are subscribed to that content type.
### Handling transactional messages
Transactional messages are a separate message type designed for critical, non-promotional communication. Unlike marketing emails, transactional messages bypass all delivery restrictions to ensure they reach the user.
When creating an email campaign in Pushwoosh, you must choose between two message types: marketing and transactional. [Learn more about message types and delivery rules](/product/messaging-channels/marketing-vs-transactional/).
## Set up the subscription preference center
To enable category-based filtering and let users manage preferences, follow these steps to configure the preference center in your project:
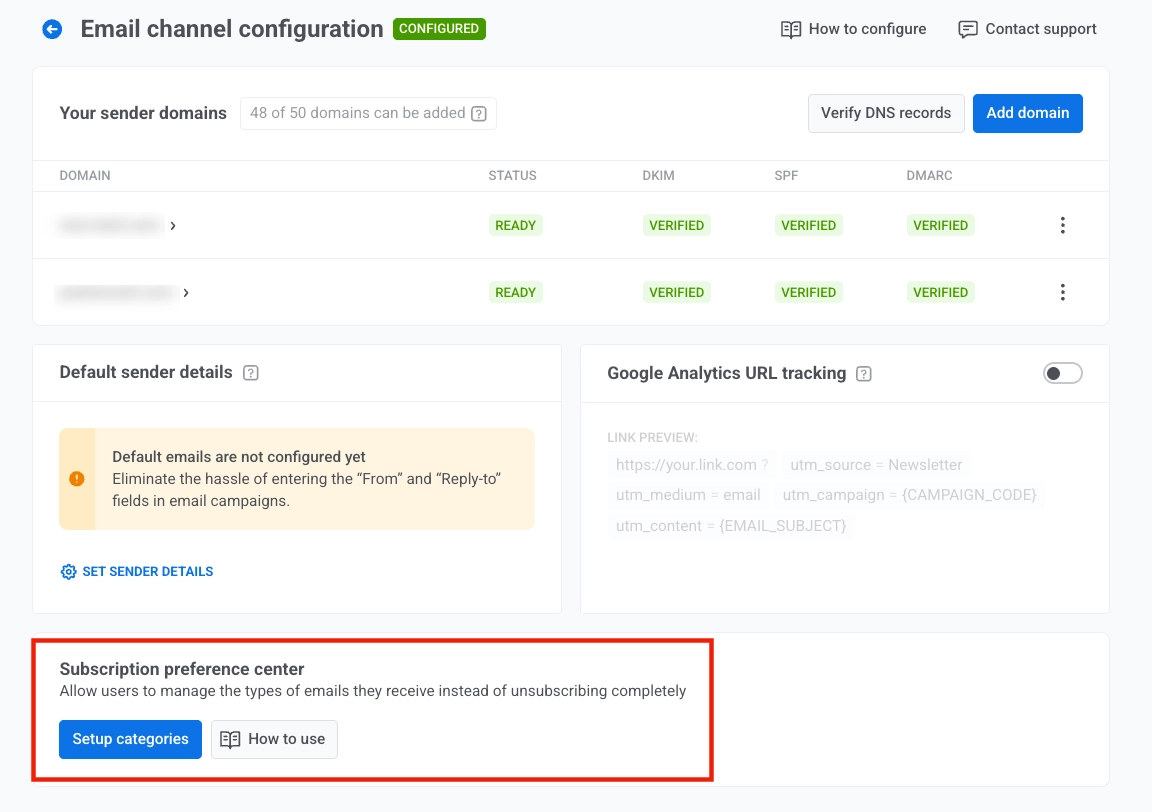
1. Go to **Settings > Configure platforms**. Locate **Email channel configuration**, click **Edit**, then find **Subscription preference center**.
2. Click **Set up categories** in the **Subscription preference center** to define which email categories users can subscribe to (e.g., *Promotional*, *Newsletter*, *Product Updates*, *Events*).
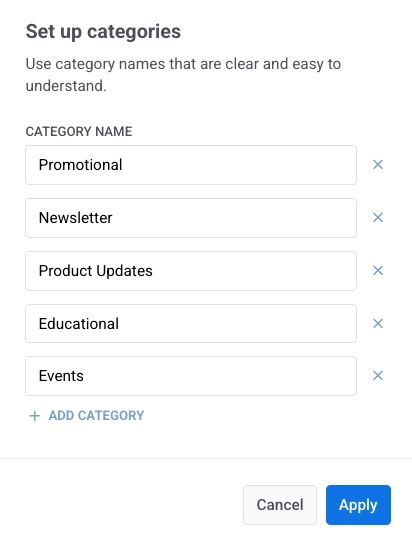
3. In the **Set up categories** modal, review the existing category list, edit category names if needed, and add new categories with **Add category**.
Then configure subscription options:
- **Subscribe new** to subscribe new users automatically when they register.
- **Subscribe existing** to subscribe existing users when you save changes.
4. Click **Save**. After you click **Save**, users will see these categories when they open the preference center.
## Manage categories
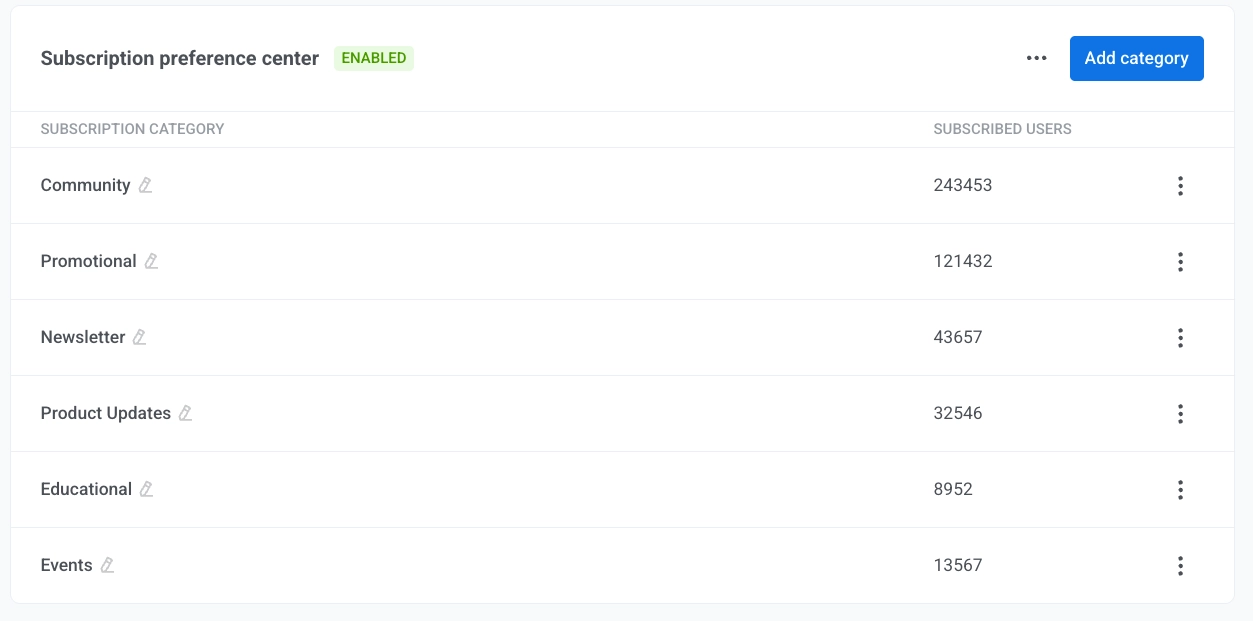
Once the preference center is enabled, its settings will appear directly below the email configuration section. Here, you can view and manage your subscription categories, see how many users are subscribed to each one, and add or edit categories as needed.
In this table, **New users subscription** shows whether new users are auto-subscribed to each category, and **Subscribed users** shows the number of users currently subscribed.
#### Add a category
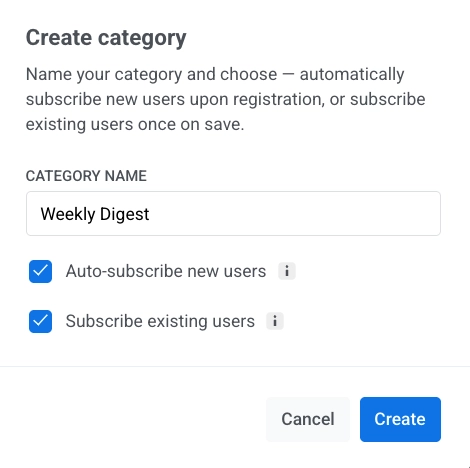
To add a category to your Subscription preference center:
1. Click **Add category**.
2. Enter a clear, unique category name.
3. Select **Auto-subscribe new users** to subscribe new users to this category automatically when they register.
4. Select **Subscribe existing users** to subscribe current users to this category when you save it.
5. Click **Create**.
#### Rename a category
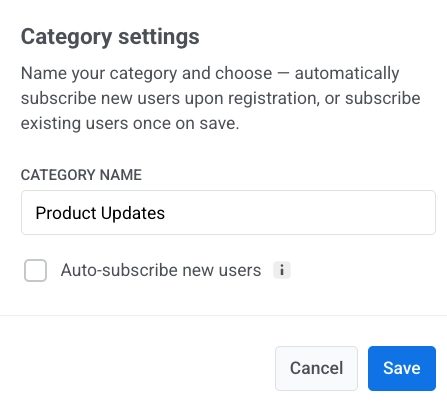
1. To rename a category, open the three-dot menu next to the category and click **Edit settings**.
2. In **Category settings**, update the category name and set the **Auto-subscribe new users** checkbox as needed: select it to enable auto-subscription, or clear it to disable.
3. Click **Save**.
Once the category is renamed, the values in **`Subscribed Email Categories`** are automatically updated to match the new category name for all subscribers.
#### Delete a category
To delete a category, open the three‑dot menu next to it and select **Delete category**.
## Manage preference center settings
### Disable the preference center
To disable the preference center:
1. Click the **three-dot menu** in the top right of the Subscription preference center section.
2. Select **Disable preference center**.
3. In the confirmation dialog, click **Disable**.
### Copy the preference center link
From the same three-dot menu, select **Copy Preference center link** to copy the URL.
## Import subscription categories via CSV
Use **Import subscription categories** to import user subscriptions and bulk update the **`Subscribed Email Categories`** tag from a CSV file.
You can open this flow in either of these ways:
1. Open the three-dot menu in the Preference center settings and select **Subscribe users manually**.
Alternatively, in the main menu, go to **Audience and Segmentation** > **Import CSV** > **Import subscription categories**.
2. Upload your CSV file.
3. Click **Start import**.
4. Review results.
## How to let users unsubscribe from a category or manage preferences
#### Default behavior: Unsubscribe from a category
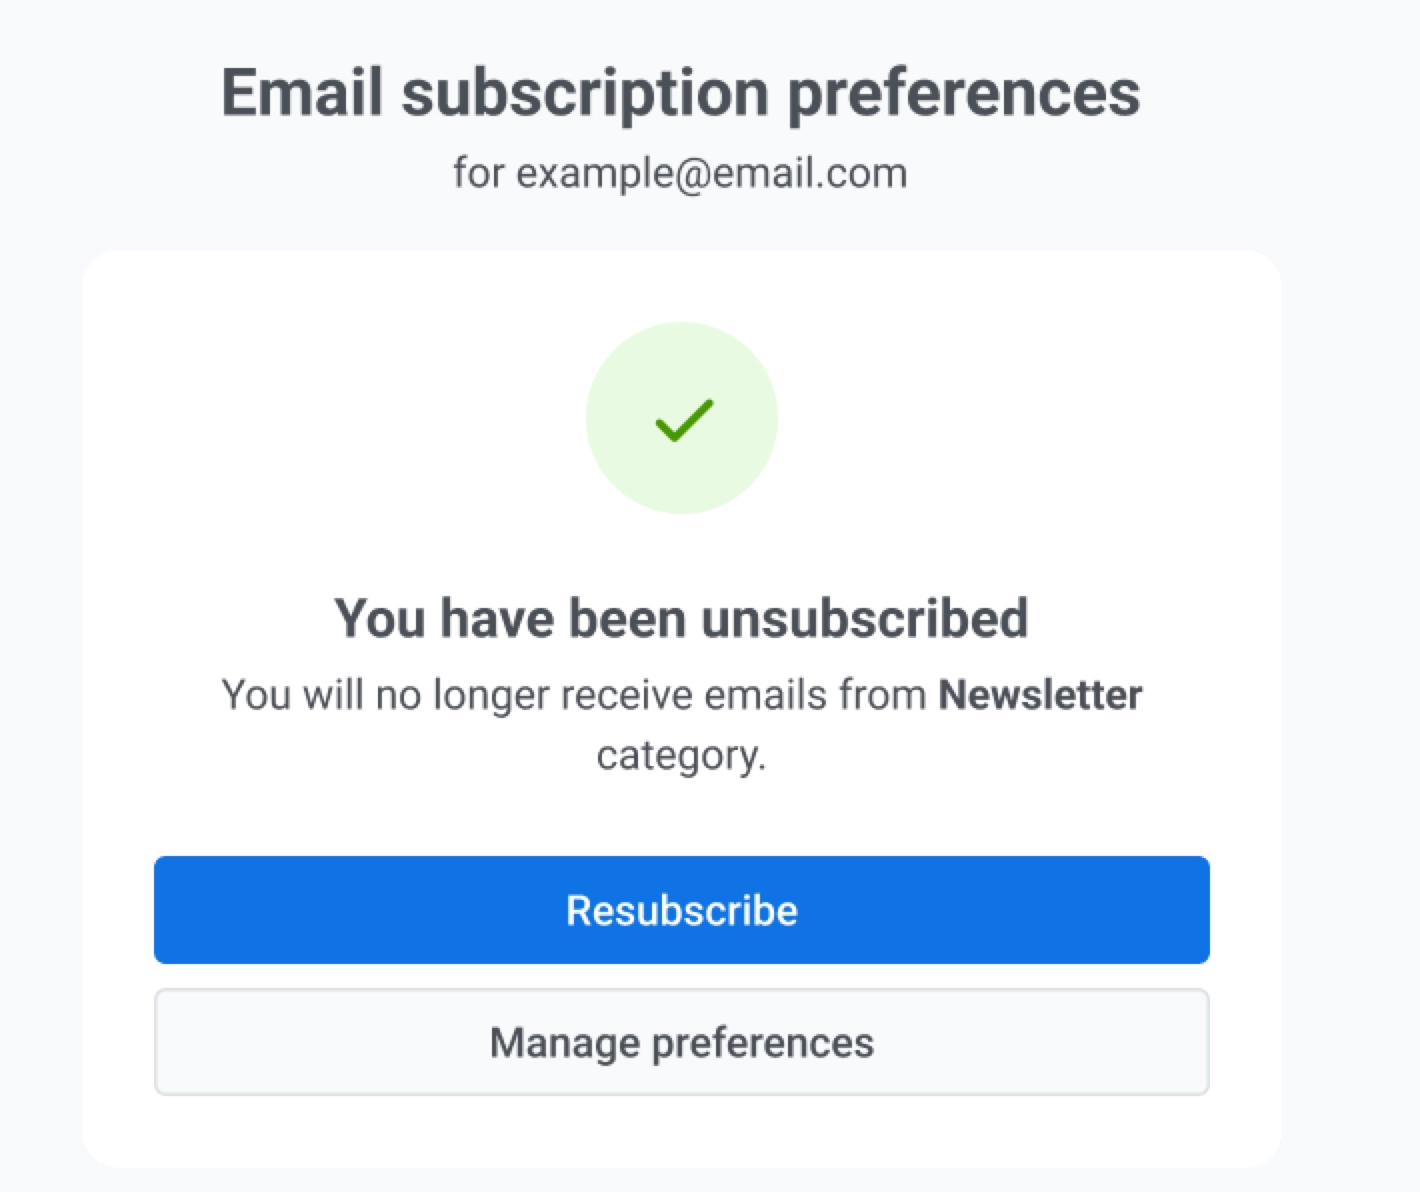
By default, when a user clicks the [**Unsubscribe link**](/product/content/email-content/drag-and-drop-email-editor/blocks/#unsubscribe-link) you included in an email, they are unsubscribed only from the category assigned to that specific email (e.g., *Newsletter*).
A confirmation screen appears, stating they will no longer receive emails from that category.
Here, users can also click:
* **Resubscribe** to opt back into that category.
* **Manage preferences** to adjust their full email preferences.
This is the default unsubscribe behavior and works automatically. No additional setup is required when adding an unsubscribe link to your emails.
#### Optional setup: Full preference center
You can insert a link to the Preference center in your emails (for example, in the footer or a call-to-action button) so users can manage their communication preferences.
To do so:
- In the Drag & drop editor, select **Manage preferences link** from the **Action type** dropdown. [Learn more](/product/content/email-content/drag-and-drop-email-editor/blocks/#manage-preferences-link)
- In the HTML code editor, use the variable `%%PW_EMAIL_PREFERENCE_CENTER_LINK%%`. [Learn more](/product/content/email-content/html-code-editor/#preference-center-link)
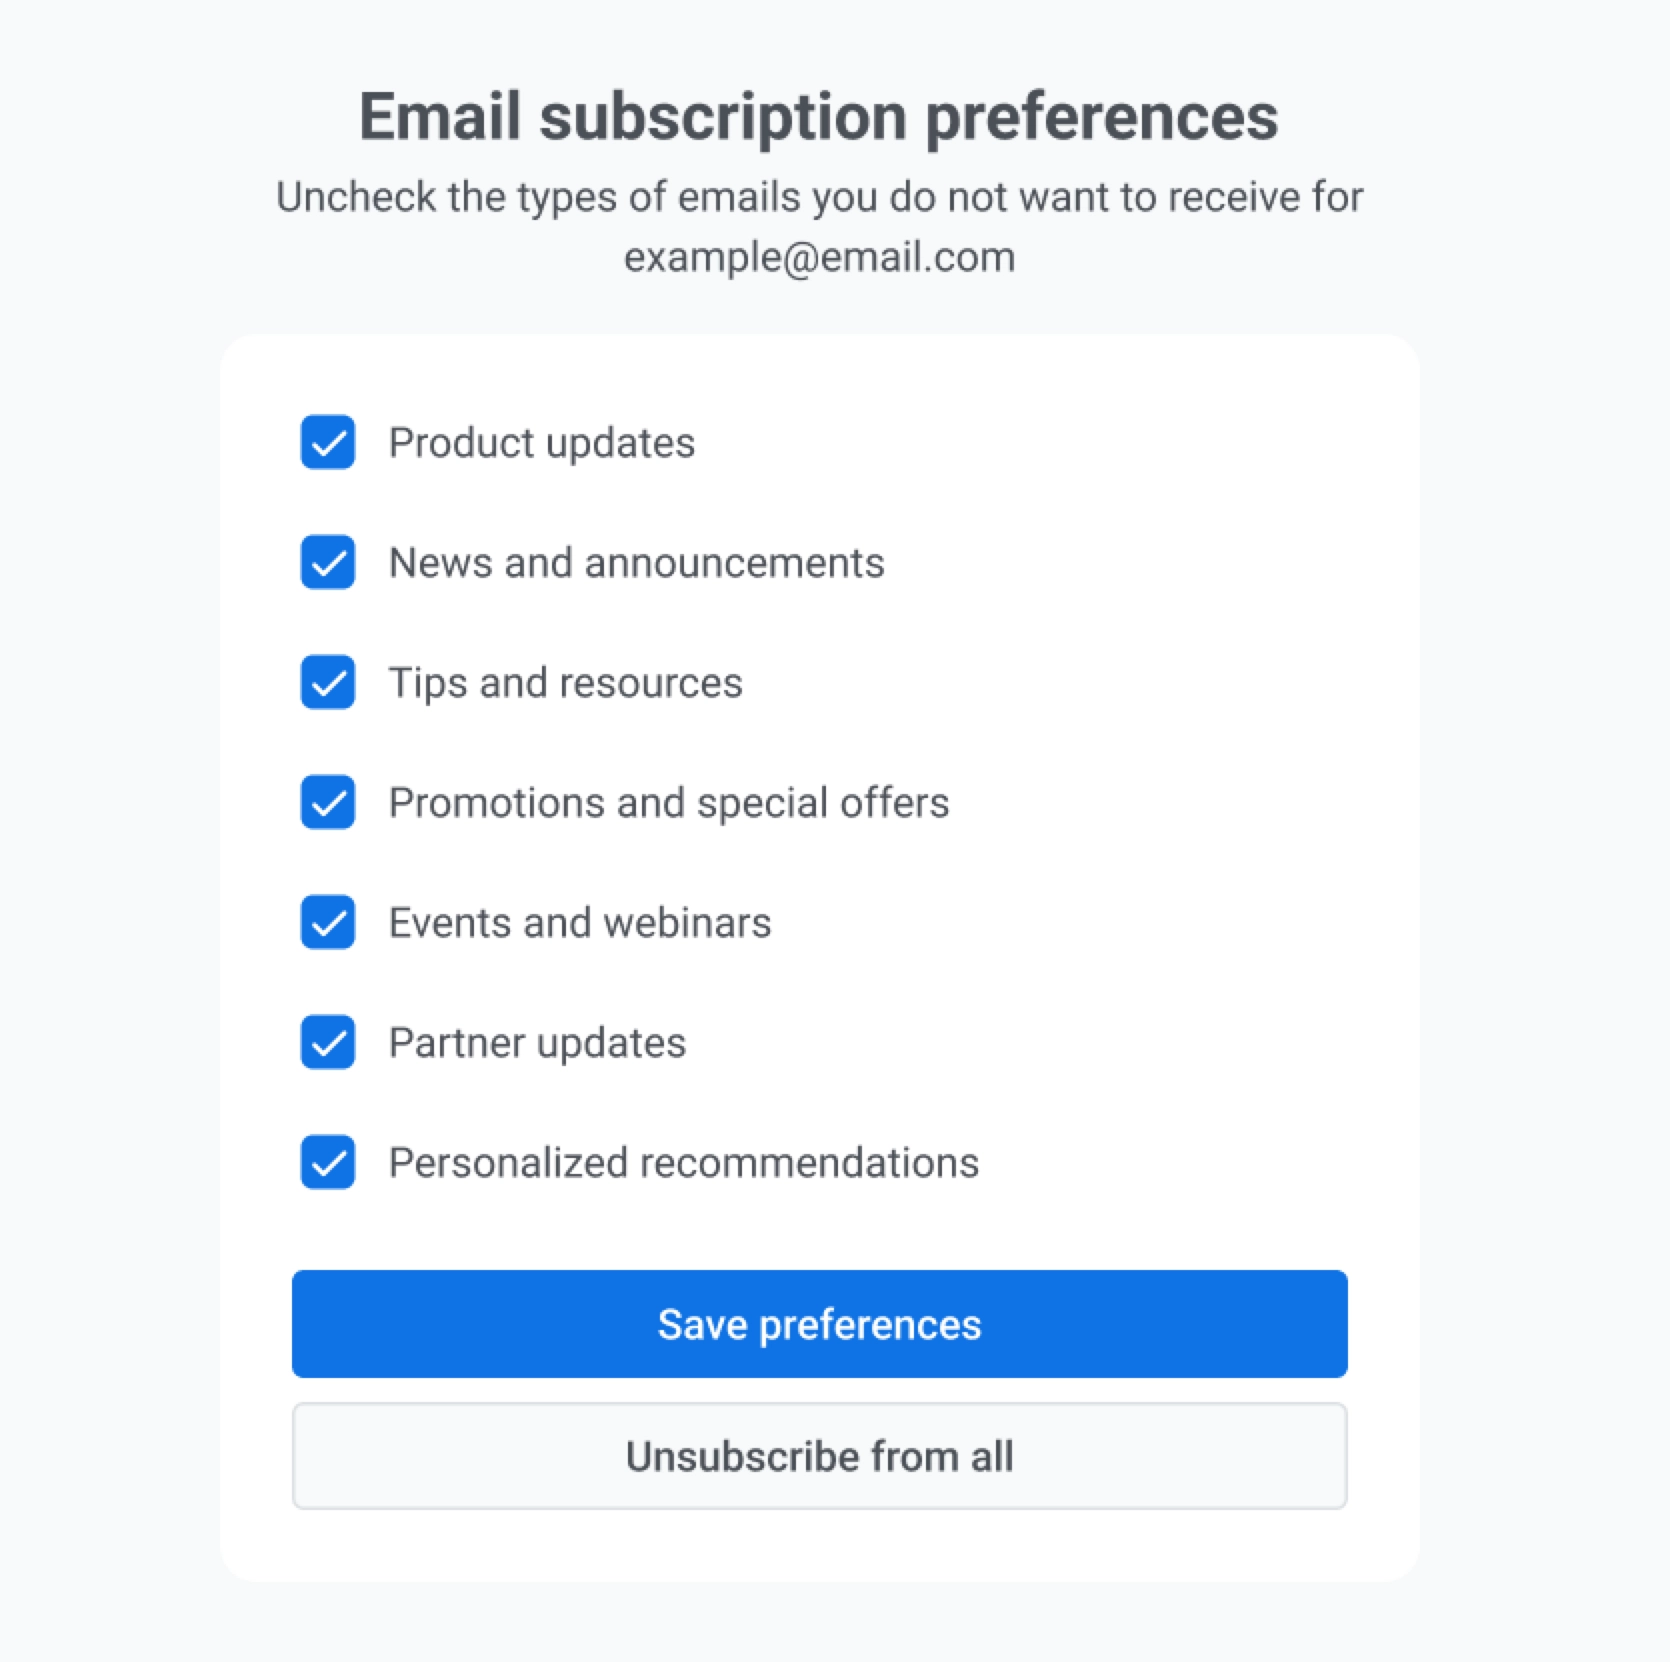
When users click the Preference center link, they will see a page showing all available email categories. Here they can:
* Select which types of emails they want to receive.
* Unsubscribe from multiple categories at once.
* Click **Unsubscribe from all** to opt out of all marketing emails at once.
## Frequently asked questions
##### What happens if I rename a category?
When you rename a category, the values in **`Subscribed Email Categories`** are automatically updated to match the new category name for all subscribers.
##### What happens to existing campaigns when I set up the subscription preference center?
Email categories only apply to new campaigns and templates created after the feature is enabled. Campaigns created before category setup will be sent without regard to user preferences and will bypass opt-outs (like transactional messages).
##### Will users still receive transactional emails if they unsubscribe from all categories?
Yes. Transactional messages bypass user preferences, unsubscribe settings, and frequency capping to ensure critical communication, such as password resets or order confirmations, is always delivered.
##### What happens to campaigns if I delete a category used in them?
Any active campaigns or journeys that use the deleted category will be paused automatically. You’ll receive a notification in the **Notification Center** informing you about the issue. To resume sending, you must assign a new category to the affected campaigns or journeys.
##### Can I create custom category names?
Yes. You can create up to 20 unique categories per project. Use clear, user-friendly names that match the type of content users expect to receive (e.g., *Newsletters*, *Product Updates*).
##### Do I need to do anything to enable unsubscribe links?
Add an [unsubscribe link](/product/content/email-content/drag-and-drop-email-editor/blocks/#unsubscribe-link) to your email content so recipients can opt out. The default behavior is described in [Default behavior: Unsubscribe from a category](#default-behavior-unsubscribe-from-a-category). Optionally, add a [Preference center](/product/messaging-channels/emails/email-preferences/#optional-setup-full-preference-center) link so users can manage all categories in one place.
 2. Click **Set up categories** in the **Subscription preference center** to define which email categories users can subscribe to (e.g., *Promotional*, *Newsletter*, *Product Updates*, *Events*).
3. In the **Set up categories** modal, review the existing category list, edit category names if needed, and add new categories with **Add category**.
Then configure subscription options:
- **Subscribe new** to subscribe new users automatically when they register.
- **Subscribe existing** to subscribe existing users when you save changes.
2. Click **Set up categories** in the **Subscription preference center** to define which email categories users can subscribe to (e.g., *Promotional*, *Newsletter*, *Product Updates*, *Events*).
3. In the **Set up categories** modal, review the existing category list, edit category names if needed, and add new categories with **Add category**.
Then configure subscription options:
- **Subscribe new** to subscribe new users automatically when they register.
- **Subscribe existing** to subscribe existing users when you save changes.
 4. Click **Save**. After you click **Save**, users will see these categories when they open the preference center.
## Manage categories
Once the preference center is enabled, its settings will appear directly below the email configuration section. Here, you can view and manage your subscription categories, see how many users are subscribed to each one, and add or edit categories as needed.
In this table, **New users subscription** shows whether new users are auto-subscribed to each category, and **Subscribed users** shows the number of users currently subscribed.
4. Click **Save**. After you click **Save**, users will see these categories when they open the preference center.
## Manage categories
Once the preference center is enabled, its settings will appear directly below the email configuration section. Here, you can view and manage your subscription categories, see how many users are subscribed to each one, and add or edit categories as needed.
In this table, **New users subscription** shows whether new users are auto-subscribed to each category, and **Subscribed users** shows the number of users currently subscribed.
 #### Add a category
To add a category to your Subscription preference center:
1. Click **Add category**.
2. Enter a clear, unique category name.
3. Select **Auto-subscribe new users** to subscribe new users to this category automatically when they register.
4. Select **Subscribe existing users** to subscribe current users to this category when you save it.
5. Click **Create**.
#### Add a category
To add a category to your Subscription preference center:
1. Click **Add category**.
2. Enter a clear, unique category name.
3. Select **Auto-subscribe new users** to subscribe new users to this category automatically when they register.
4. Select **Subscribe existing users** to subscribe current users to this category when you save it.
5. Click **Create**.
 #### Rename a category
1. To rename a category, open the three-dot menu next to the category and click **Edit settings**.
2. In **Category settings**, update the category name and set the **Auto-subscribe new users** checkbox as needed: select it to enable auto-subscription, or clear it to disable.
3. Click **Save**.
#### Rename a category
1. To rename a category, open the three-dot menu next to the category and click **Edit settings**.
2. In **Category settings**, update the category name and set the **Auto-subscribe new users** checkbox as needed: select it to enable auto-subscription, or clear it to disable.
3. Click **Save**.
 Once the category is renamed, the values in **`Subscribed Email Categories`** are automatically updated to match the new category name for all subscribers.
#### Delete a category
To delete a category, open the three‑dot menu next to it and select **Delete category**.
## Manage preference center settings
### Disable the preference center
To disable the preference center:
1. Click the **three-dot menu** in the top right of the Subscription preference center section.
2. Select **Disable preference center**.
Once the category is renamed, the values in **`Subscribed Email Categories`** are automatically updated to match the new category name for all subscribers.
#### Delete a category
To delete a category, open the three‑dot menu next to it and select **Delete category**.
## Manage preference center settings
### Disable the preference center
To disable the preference center:
1. Click the **three-dot menu** in the top right of the Subscription preference center section.
2. Select **Disable preference center**.
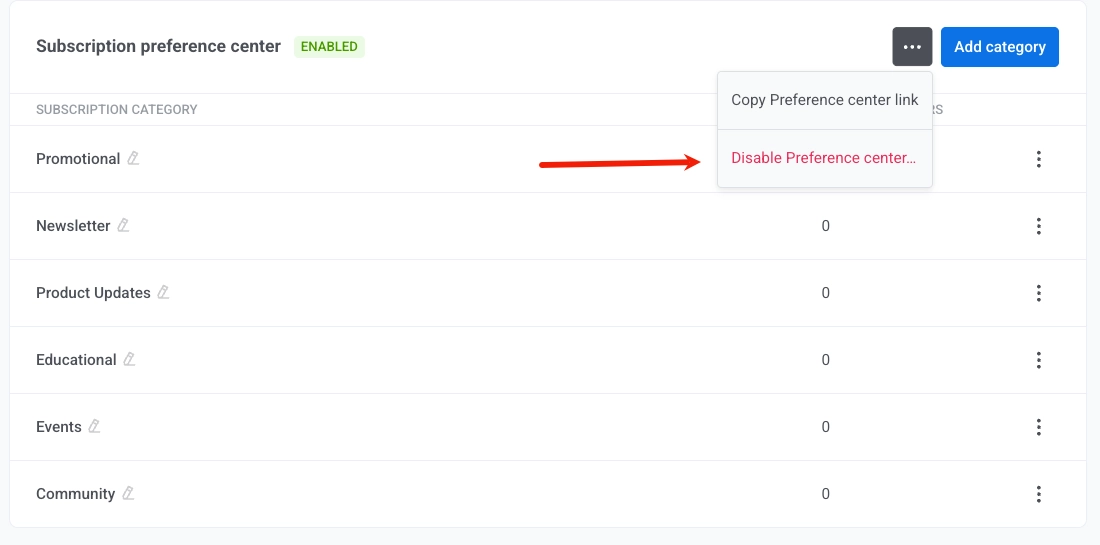 3. In the confirmation dialog, click **Disable**.
### Copy the preference center link
From the same three-dot menu, select **Copy Preference center link** to copy the URL.
## Import subscription categories via CSV
Use **Import subscription categories** to import user subscriptions and bulk update the **`Subscribed Email Categories`** tag from a CSV file.
You can open this flow in either of these ways:
1. Open the three-dot menu in the Preference center settings and select **Subscribe users manually**.
3. In the confirmation dialog, click **Disable**.
### Copy the preference center link
From the same three-dot menu, select **Copy Preference center link** to copy the URL.
## Import subscription categories via CSV
Use **Import subscription categories** to import user subscriptions and bulk update the **`Subscribed Email Categories`** tag from a CSV file.
You can open this flow in either of these ways:
1. Open the three-dot menu in the Preference center settings and select **Subscribe users manually**.
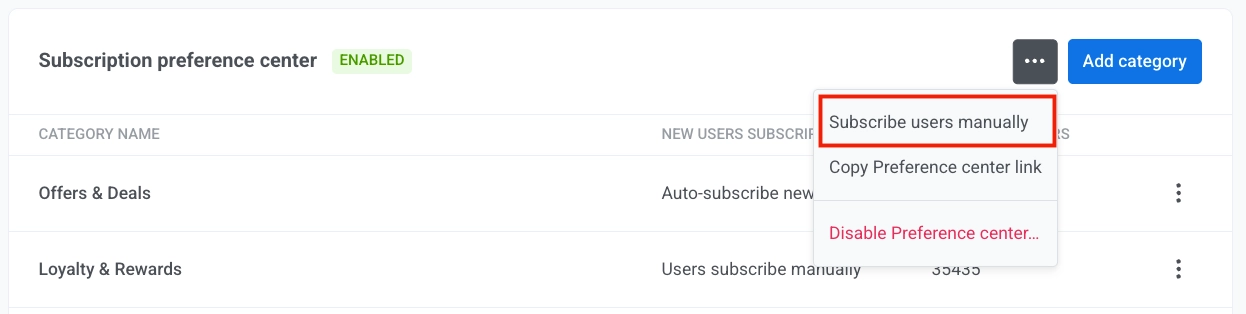 Alternatively, in the main menu, go to **Audience and Segmentation** > **Import CSV** > **Import subscription categories**.
2. Upload your CSV file.
Alternatively, in the main menu, go to **Audience and Segmentation** > **Import CSV** > **Import subscription categories**.
2. Upload your CSV file.
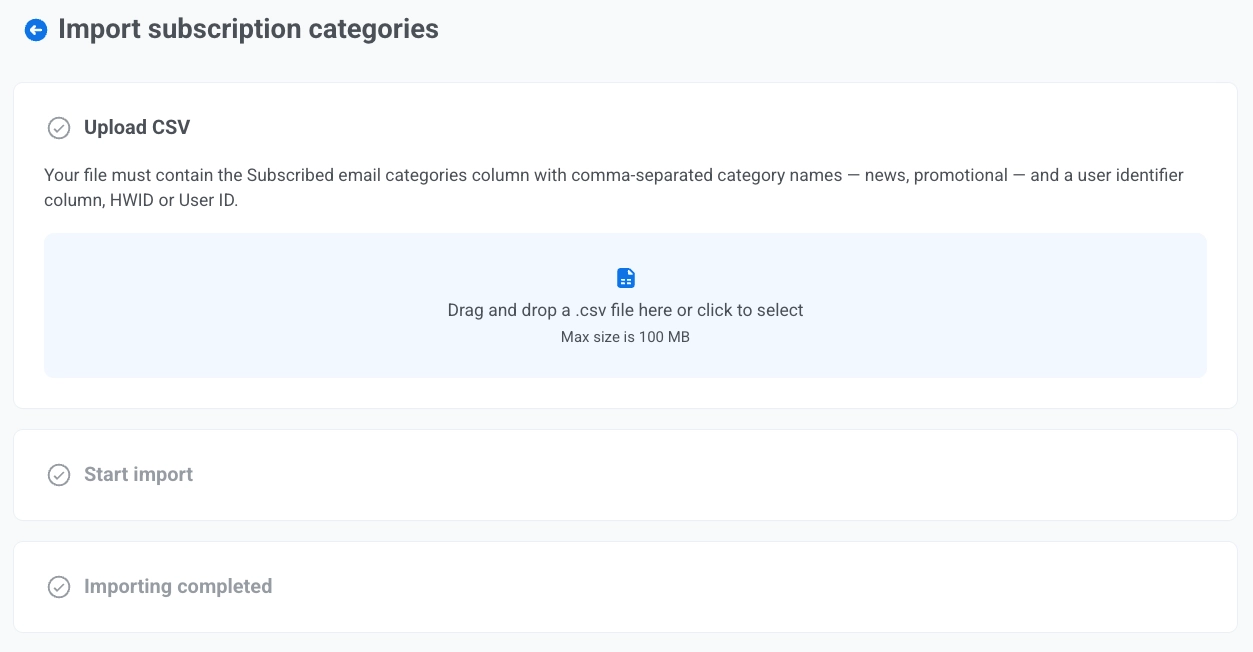 3. Click **Start import**.
4. Review results.
## How to let users unsubscribe from a category or manage preferences
#### Default behavior: Unsubscribe from a category
By default, when a user clicks the [**Unsubscribe link**](/product/content/email-content/drag-and-drop-email-editor/blocks/#unsubscribe-link) you included in an email, they are unsubscribed only from the category assigned to that specific email (e.g., *Newsletter*).
A confirmation screen appears, stating they will no longer receive emails from that category.
3. Click **Start import**.
4. Review results.
## How to let users unsubscribe from a category or manage preferences
#### Default behavior: Unsubscribe from a category
By default, when a user clicks the [**Unsubscribe link**](/product/content/email-content/drag-and-drop-email-editor/blocks/#unsubscribe-link) you included in an email, they are unsubscribed only from the category assigned to that specific email (e.g., *Newsletter*).
A confirmation screen appears, stating they will no longer receive emails from that category.
 Here, users can also click:
* **Resubscribe** to opt back into that category.
* **Manage preferences** to adjust their full email preferences.
This is the default unsubscribe behavior and works automatically. No additional setup is required when adding an unsubscribe link to your emails.
#### Optional setup: Full preference center
You can insert a link to the Preference center in your emails (for example, in the footer or a call-to-action button) so users can manage their communication preferences.
To do so:
- In the Drag & drop editor, select **Manage preferences link** from the **Action type** dropdown. [Learn more](/product/content/email-content/drag-and-drop-email-editor/blocks/#manage-preferences-link)
- In the HTML code editor, use the variable `%%PW_EMAIL_PREFERENCE_CENTER_LINK%%`. [Learn more](/product/content/email-content/html-code-editor/#preference-center-link)
When users click the Preference center link, they will see a page showing all available email categories. Here they can:
* Select which types of emails they want to receive.
* Unsubscribe from multiple categories at once.
* Click **Unsubscribe from all** to opt out of all marketing emails at once.
Here, users can also click:
* **Resubscribe** to opt back into that category.
* **Manage preferences** to adjust their full email preferences.
This is the default unsubscribe behavior and works automatically. No additional setup is required when adding an unsubscribe link to your emails.
#### Optional setup: Full preference center
You can insert a link to the Preference center in your emails (for example, in the footer or a call-to-action button) so users can manage their communication preferences.
To do so:
- In the Drag & drop editor, select **Manage preferences link** from the **Action type** dropdown. [Learn more](/product/content/email-content/drag-and-drop-email-editor/blocks/#manage-preferences-link)
- In the HTML code editor, use the variable `%%PW_EMAIL_PREFERENCE_CENTER_LINK%%`. [Learn more](/product/content/email-content/html-code-editor/#preference-center-link)
When users click the Preference center link, they will see a page showing all available email categories. Here they can:
* Select which types of emails they want to receive.
* Unsubscribe from multiple categories at once.
* Click **Unsubscribe from all** to opt out of all marketing emails at once.
 ## Frequently asked questions
##### What happens if I rename a category?
When you rename a category, the values in **`Subscribed Email Categories`** are automatically updated to match the new category name for all subscribers.
##### What happens to existing campaigns when I set up the subscription preference center?
Email categories only apply to new campaigns and templates created after the feature is enabled. Campaigns created before category setup will be sent without regard to user preferences and will bypass opt-outs (like transactional messages).
##### Will users still receive transactional emails if they unsubscribe from all categories?
Yes. Transactional messages bypass user preferences, unsubscribe settings, and frequency capping to ensure critical communication, such as password resets or order confirmations, is always delivered.
##### What happens to campaigns if I delete a category used in them?
Any active campaigns or journeys that use the deleted category will be paused automatically. You’ll receive a notification in the **Notification Center** informing you about the issue. To resume sending, you must assign a new category to the affected campaigns or journeys.
##### Can I create custom category names?
Yes. You can create up to 20 unique categories per project. Use clear, user-friendly names that match the type of content users expect to receive (e.g., *Newsletters*, *Product Updates*).
##### Do I need to do anything to enable unsubscribe links?
Add an [unsubscribe link](/product/content/email-content/drag-and-drop-email-editor/blocks/#unsubscribe-link) to your email content so recipients can opt out. The default behavior is described in [Default behavior: Unsubscribe from a category](#default-behavior-unsubscribe-from-a-category). Optionally, add a [Preference center](/product/messaging-channels/emails/email-preferences/#optional-setup-full-preference-center) link so users can manage all categories in one place.
## Frequently asked questions
##### What happens if I rename a category?
When you rename a category, the values in **`Subscribed Email Categories`** are automatically updated to match the new category name for all subscribers.
##### What happens to existing campaigns when I set up the subscription preference center?
Email categories only apply to new campaigns and templates created after the feature is enabled. Campaigns created before category setup will be sent without regard to user preferences and will bypass opt-outs (like transactional messages).
##### Will users still receive transactional emails if they unsubscribe from all categories?
Yes. Transactional messages bypass user preferences, unsubscribe settings, and frequency capping to ensure critical communication, such as password resets or order confirmations, is always delivered.
##### What happens to campaigns if I delete a category used in them?
Any active campaigns or journeys that use the deleted category will be paused automatically. You’ll receive a notification in the **Notification Center** informing you about the issue. To resume sending, you must assign a new category to the affected campaigns or journeys.
##### Can I create custom category names?
Yes. You can create up to 20 unique categories per project. Use clear, user-friendly names that match the type of content users expect to receive (e.g., *Newsletters*, *Product Updates*).
##### Do I need to do anything to enable unsubscribe links?
Add an [unsubscribe link](/product/content/email-content/drag-and-drop-email-editor/blocks/#unsubscribe-link) to your email content so recipients can opt out. The default behavior is described in [Default behavior: Unsubscribe from a category](#default-behavior-unsubscribe-from-a-category). Optionally, add a [Preference center](/product/messaging-channels/emails/email-preferences/#optional-setup-full-preference-center) link so users can manage all categories in one place.