# Segment integration
[Segment](https://segment.com/) is a customer data platform that simplifies collecting user data and helps you leverage it effectively. If you store your customer data in Segment, you can set up integration with Pushwoosh in just a few clicks.
Once the integration is set, Segment will send the following data to Pushwoosh:
* User attributes: name, device, preferences, location, behavior, etc. Pushwoosh will save this data as [Tags](/product/audience-data-and-segmentation/user-data-tags/tags/) and their values for each user.
* Events: each Segment Event will be transferred to Pushwoosh and saved as a [Pushwoosh Event](/product/audience-data-and-segmentation/events/) with the same name. Pushwoosh will also get information about which events each user has triggered.
Using Segment data, you can follow up on your audience with seamless communications in Pushwoosh. Below are two examples of leveraging the power of two platforms:
**1. Create targeted campaigns based on user behavior data.** Use Events data from Segment to build precise user segments in Pushwoosh based on specific user behavior.
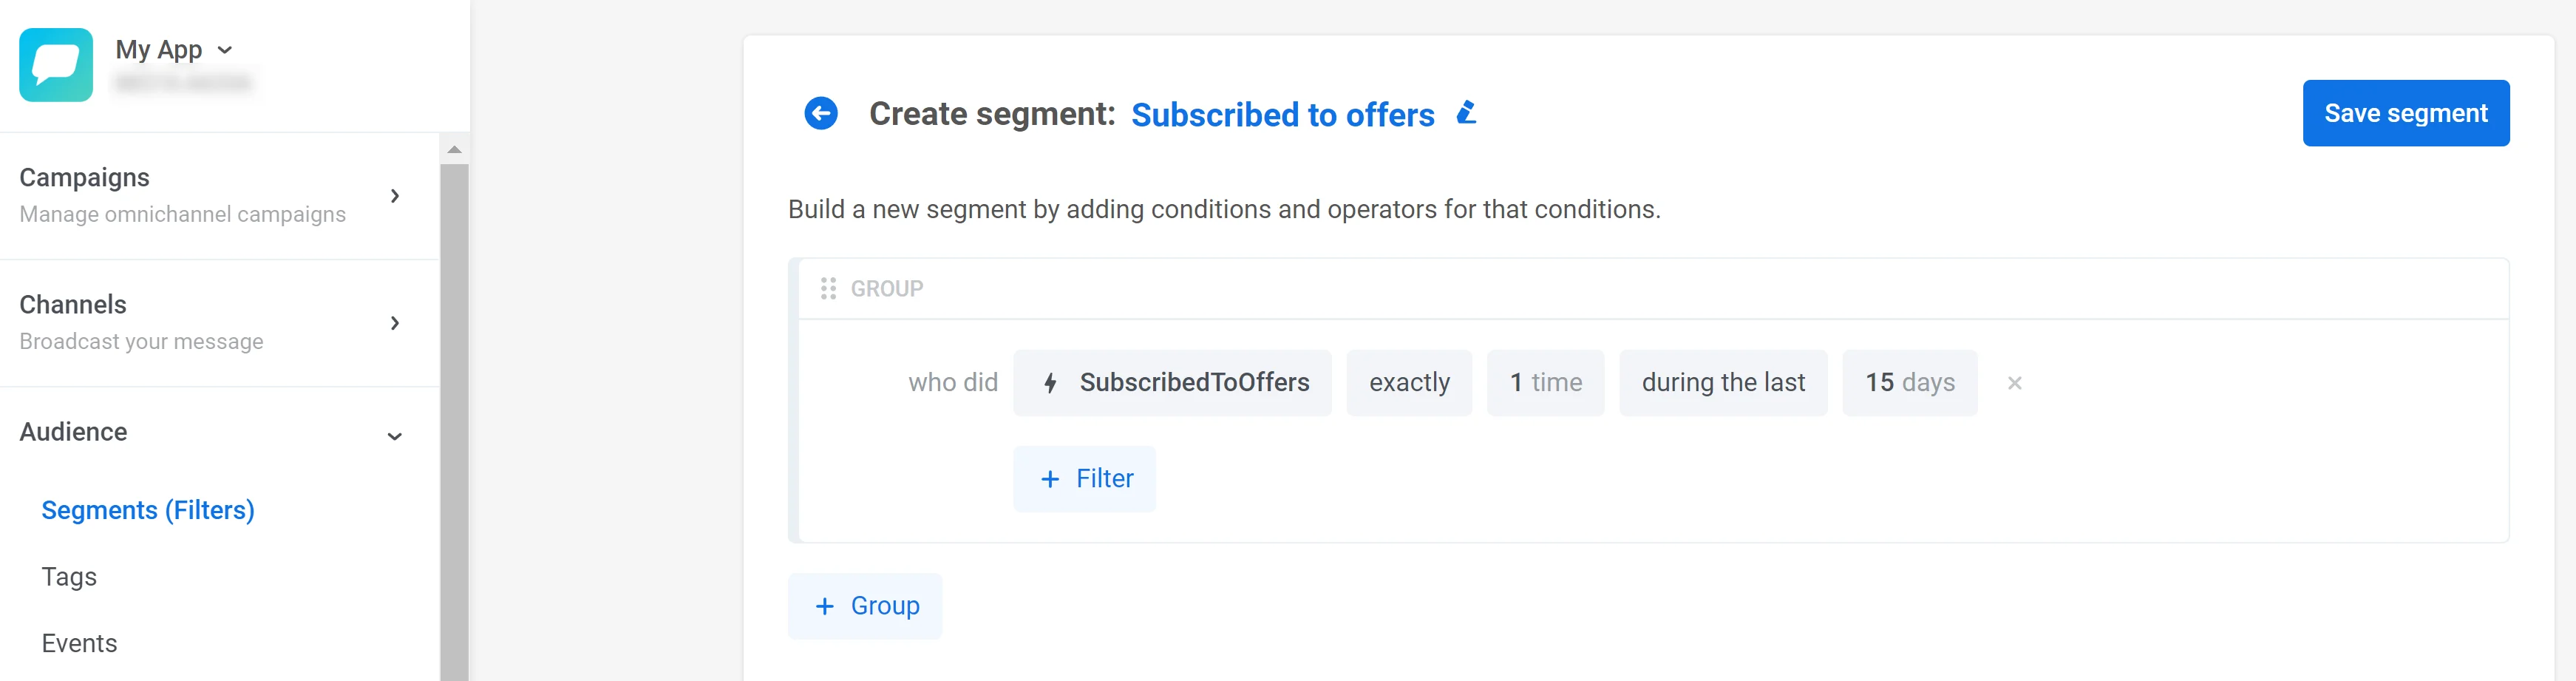
For example, Segment sends data about the _SubscribedToOffers_ Event to Pushwoosh. You can build a user segment in Pushwoosh consisting of users who have subscribed to special offers:
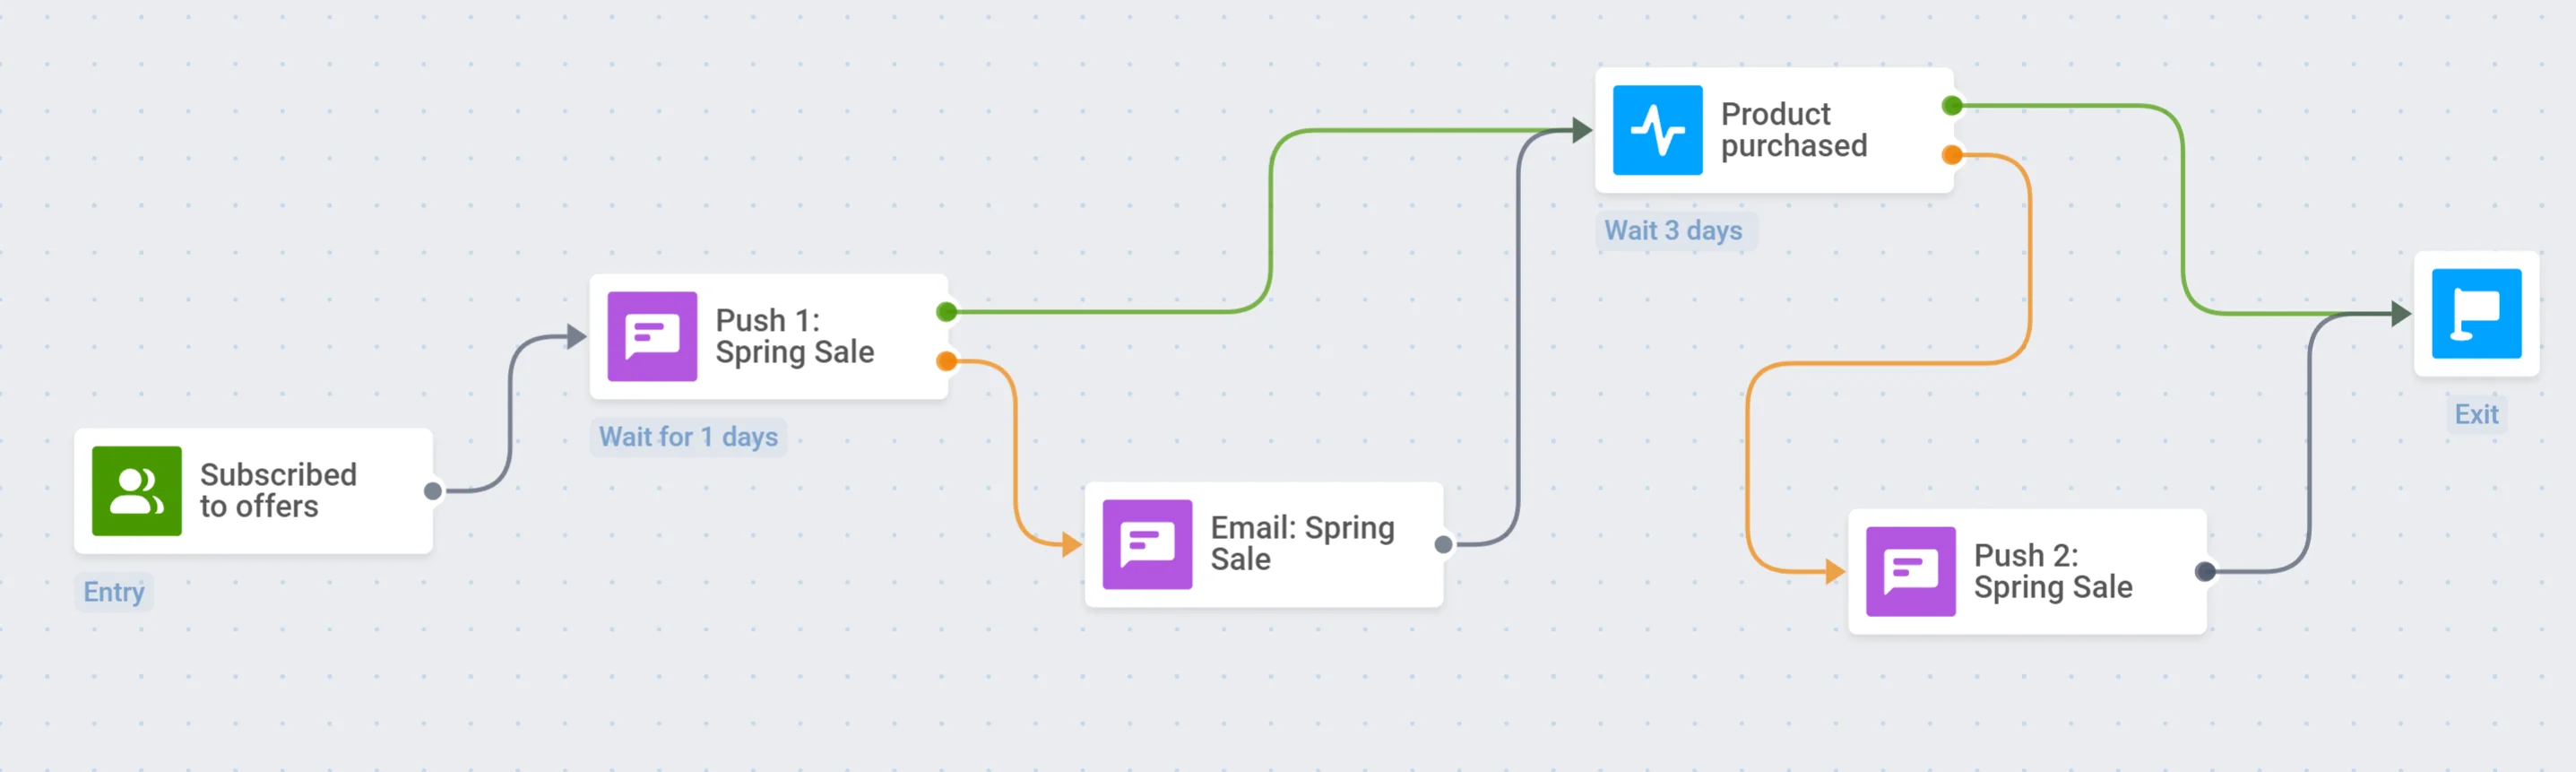
Then, you can create engaging customer journeys with promo messages and discounts for users who subscribed to your offers:
**2. Personalize messages based on user attributes from Segment.** You can leverage user attributes obtained from Segment to modify the content of your push notifications, in-app messages, and emails. This will allow you to set up relevant and high-converting communications.
For example, Segment sends the _searched_product_ attribute values to Pushwoosh. You can create a push preset offering a discount on the products from a category a user has previously searched for:
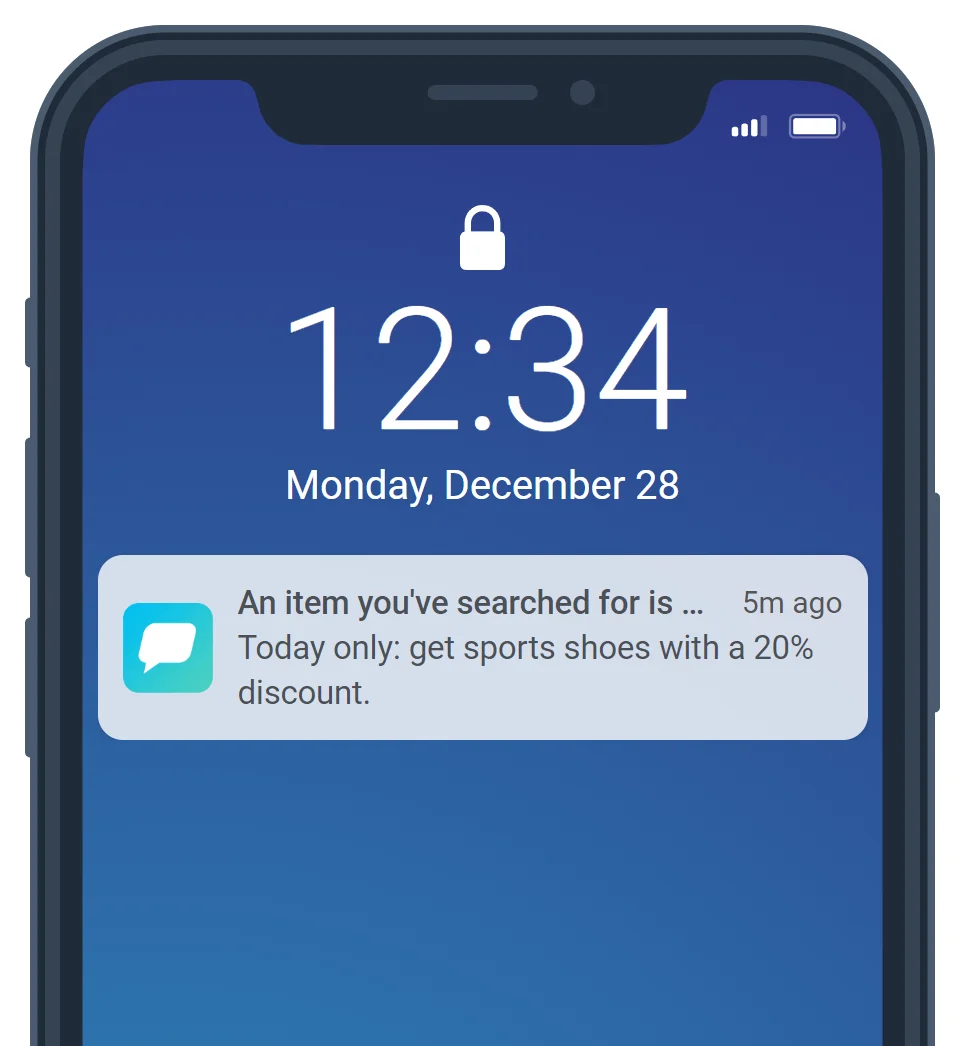
Each user will receive a push offering a discount on the exact product category they browsed previously. For example, those who searched for sports shoes will see this message:
## Integration overview
### Integration type
* **Destination**: Data is sent from Segment to Pushwoosh.
* **Source**: Data is sent from Pushwoosh to Segment.
### Prerequisites
Paid accounts in both Pushwoosh and Segment
### Synchronized entities
**Source**
* Push Statistics
**Destination**
* Devices
* Tags
### Use cases
**Tracking Notifications**
Send push notifications and track their status, including whether they were successfully sent and delivered.
**Event Analysis**
Analyze user-triggered events, such as push notifications or email deliveries, and ensure these events are accurately recorded in Segment.
**User Management**
Register and manage user information, including tagging users with relevant attributes or deleting users when needed.
## Setting up integration
### Configuring a Destination
1. [In the Segment interface](https://app.segment.com/login/), navigate to **Connections** → **Destinations** and click **Add Destination**.
2. Search for **Pushwoosh** and select it.
3. Choose the Sources you want to connect the Destination to.
4. Go to Destination settings:
5. Enter the **Pushwoosh API key** and **application code**. Ensure the **Enable Destination** switch is on. After that, click **Save Changes**.
Where can I find the API key and application code?
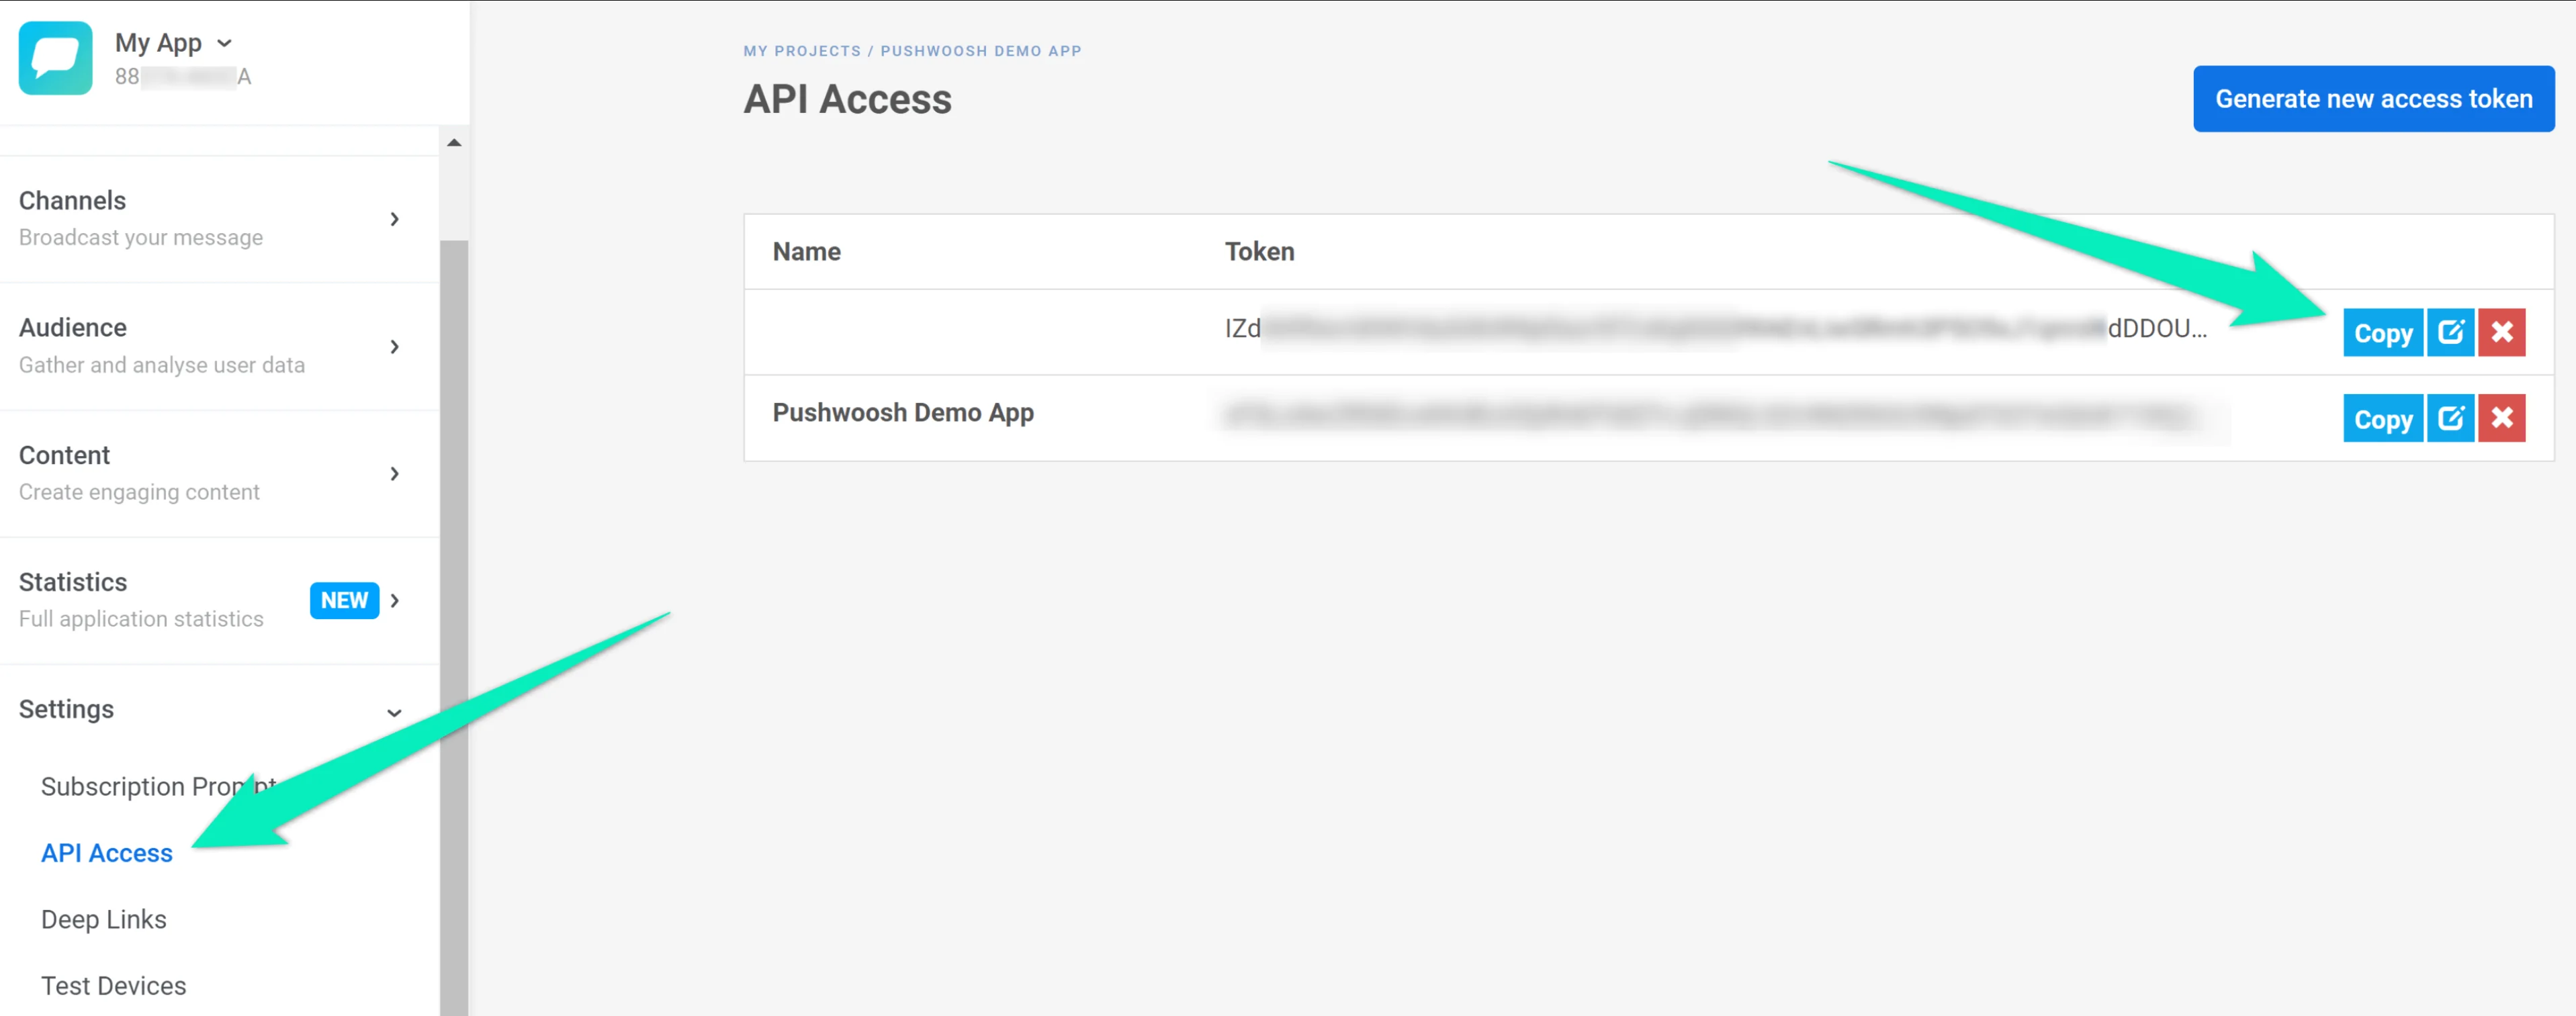
You can find the API key in the **Settings** → **API Access** section:
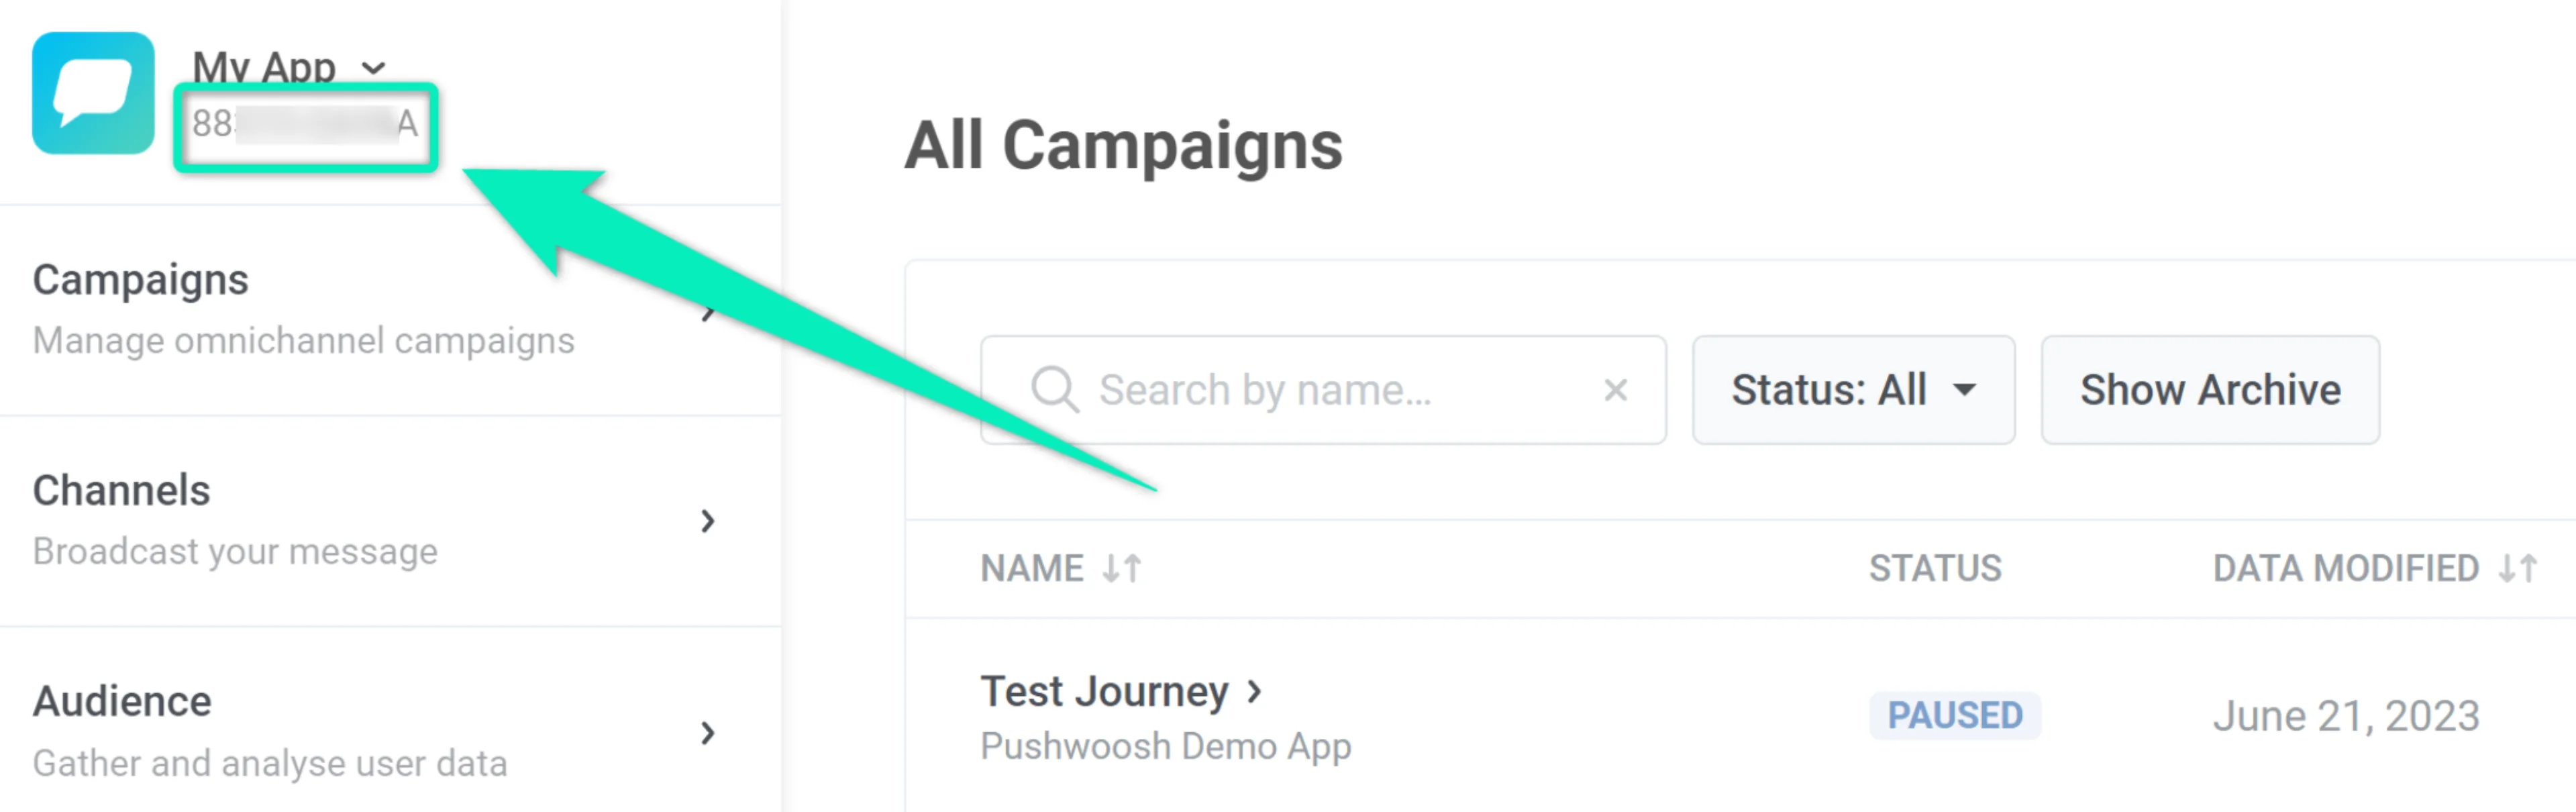
The application code can be found at the top left corner of the Pushwoosh interface, right below the project name:
6. Go to the **Mappings** tab and ensure the **Create or Update User Profile** and **Track Events** options are enabled:
It is important to verify the mapping of event fields from your source to Pushwoosh as the destination to ensure your events are processed correctly.
If an event does not contain the _**device_platform**_ field or this field is incorrect, your event will be disregarded. Additionally, if an event does not contain either _**userId**_ or _**deviceId**_, it will also be disregarded.
To ensure that your mapping is configured correctly, go to **Pushwoosh as Destination > Settings**.
Then, select the **Mapping** tab and click **Edit Mapping** for the **Track Events** method.
Next, ensure that the mapping of your events to the events sent to Pushwoosh is correct, and that the fields **Device Platform** and **External User ID** (or **Device ID**) are properly matched.
Your event may differ from the example provided above. However, the key is to match the data transfer for the platform and device for the event sent to Pushwoosh.
If the integration is configured correctly, Pushwoosh will start receiving Events and user attributes from Segment. Based on this data, you can create highly targeted [customer journeys](/product/customer-journey/pushwoosh-journey-overview) and [personalize](/product/personalization/dynamic-content/) your push notifications, in-app messages, and emails.
### Configuring a Source
1. From your workspace's [Sources catalog page](https://app.segment.com/goto-my-workspace/sources/catalog), click **Add Source**.
2. Search for "**Pushwoosh**" in the Sources Catalog, select Pushwoosh, and click **Add Source**.
3. On the next screen, give the Source a name and configure any other settings.
4. Click **Add Source** to save your settings.
5. Copy the **Write key** from the Segment UI.
6. Log in to your Pushwoosh account, and select the Application you want to connect.
7. Navigate to **Settings > 3rd party integration > Segment**, click the **Configure button**, and enter your **Write key** from your Segment workspace.
8. List the events you want to export using a `,` delimiter in the **Events** field, or leave it blank if you want to export all events, then click **Apply**.
#### Stream
Pushwoosh uses the Segment stream Source component to send Segment event data. It uses a server-side track method to send data to Segment. These events are then available in any destination that accepts server-side events, and are available in a schema in your data warehouse.
By default, Pushwoosh passes the Pushwoosh User ID as the Segment userId property. If there is no associated User ID, Pushwoosh will pass the HWID as the Segment anonymousId.
#### Events
The table below lists events that Pushwoosh sends to Segment. These events appear as tables in your warehouse, and as regular events in other Destinations.
| Event Name | Description |
| ------------------ | ----------------------------------------------- |
| Email Sent | Email was sent successfully |
| Push Sent | Push notification successfully sent |
| SMS Sent | SMS sent to recipient |
| Push Opened | Push notification was opened |
| Email Opened | Email notification was opened |
| Email Delivered | Email successfully delivered |
| Push Delivered | Push notification successfully delivered |
| SMS Delivered | SMS successfully delivered |
| SMS Not Delivered | SMS delivery failed |
| Email Bounced | Email returned to sender due to permanent error |
| Email Unsubscribed | Email unsubscribed link clicked |
#### Event Properties
The table below list the properties included in the events listed above.
| Property Name | Description |
| --------------- | --------------------------------------------------------- |
| `message_type` | Contains the type of message (Push, Email, In-App or SMS) |
| `campaign_code` | Unique identifier of the message campaign |
| `device_type` | Type of the device |
#### Adding Destinations
Now that your Source is set up, you can connect it with Destinations.
Log into your downstream tools and check to see that your events appear as expected and that they contain all of the properties you expect. If your events and properties don’t appear, check the Event Delivery, and refer to the Destination docs for each tool for troubleshooting.
If there are any issues with how the events are arriving to Segment, [contact our support team](mailto:support@pushwoosh.com).
## How the integration works
1. **Push notification initiation**: A client starts the process by initiating a push notification through the Pushwoosh interface.
2. **Event production**: The Pushwoosh backend processes the push notification request and generates an event. This event is then sent to a Kafka topic named `channels-tracking-log` managed by Pushwoosh.
3. **Event consumption**: The Segment Integration service continuously listens to the `channels-tracking-log` Kafka topic and consumes the events as they arrive.
4. **Event processing**: The consumed events are processed by the Segment Integration service, which transforms them into Segment Track Events.
5. **Event transmission**: The processed Segment Track Events are then sent to the Segment backend for further handling and analysis.
## How do you know that the integration is working?
#### Destination
##### track-user
Go to your **Pushwoosh account > Your Connected Application > Audience > User Explorer.** Find your user/device and check tags which Segment sent.
##### post-event
Go to your **Pushwoosh account > Your Connected Application > Audience > Events**. Select the event, click the three-dot menu, and choose Event Statistics. Make sure that the event is counted.
##### delete-user
Go to your **PW account > Your Connected Application > Audience > User Explorer.** Make sure that user/device does not exist.
#### Source
Use [Source debugger](https://segment.com/docs/connections/sources/debugger/) to detect events which were sent from Pushwoosh to Segment.
## Troubleshooting
### Check integration status
To troubleshoot issues with the Pushwoosh integration, start by verifying the following:
**Destination**
* **Track-User**: Verify user/device information and tags in Pushwoosh under `Audience > User Explorer`.
* **Post-Event**: Ensure the event is counted in Pushwoosh by checking event statistics.
* **Delete-User**: Confirm that the user/device no longer exists in Pushwoosh.
**Source**
Use the source debugger at [Segment Debugger](https://segment.com/docs/connections/sources/debugger/) to check if events from Pushwoosh are properly sent to Segment.
### Event mismatch
If events are not appearing correctly in Segment, ensure that Pushwoosh events are correctly mapped to Segment Track Events as per the provided mapping rules.
### Authentication issues
Verify that the correct authentication tokens or API keys are used in the requests to Pushwoosh and Segment.
### Data flow issues
Confirm that the data flow between Pushwoosh and Segment is uninterrupted and that Kafka topics are being monitored correctly.
## FAQ
### What types of events are sent to Segment from Pushwoosh?
Reserved events such as **Push Sent, Email Sent, SMS Sent, Push Delivered, Email Delivered, SMS Delivered, and Email Bounced** are sent to Segment.
### How can I verify that events are correctly sent to Segment?
Use the Segment source debugger to check for events sent from Pushwoosh, and review event statistics in your Pushwoosh account to ensure they are properly counted.
### What should I do if I encounter issues with the integration?
Check the integration status by verifying user/device information, event counts, and user deletions in Pushwoosh. Additionally, ensure that the correct authentication tokens are used and that the data flow is uninterrupted.
### How is user and device information handled in the integration?
User and device information, including attributes and tags, are registered or updated in Pushwoosh based on requests from Segment. Note that default tags are not automatically created in Pushwoosh.
### Where can I find detailed documentation for the integration?
Detailed documentation is available in the Segment and Pushwoosh integration manuals, as well as in their respective API documentation.
 The application code can be found at the top left corner of the Pushwoosh interface, right below the project name:
 Then, you can create engaging customer journeys with promo messages and discounts for users who subscribed to your offers:
 **2. Personalize messages based on user attributes from Segment.** You can leverage user attributes obtained from Segment to modify the content of your push notifications, in-app messages, and emails. This will allow you to set up relevant and high-converting communications.
For example, Segment sends the _searched_product_ attribute values to Pushwoosh. You can create a push preset offering a discount on the products from a category a user has previously searched for:
**2. Personalize messages based on user attributes from Segment.** You can leverage user attributes obtained from Segment to modify the content of your push notifications, in-app messages, and emails. This will allow you to set up relevant and high-converting communications.
For example, Segment sends the _searched_product_ attribute values to Pushwoosh. You can create a push preset offering a discount on the products from a category a user has previously searched for:
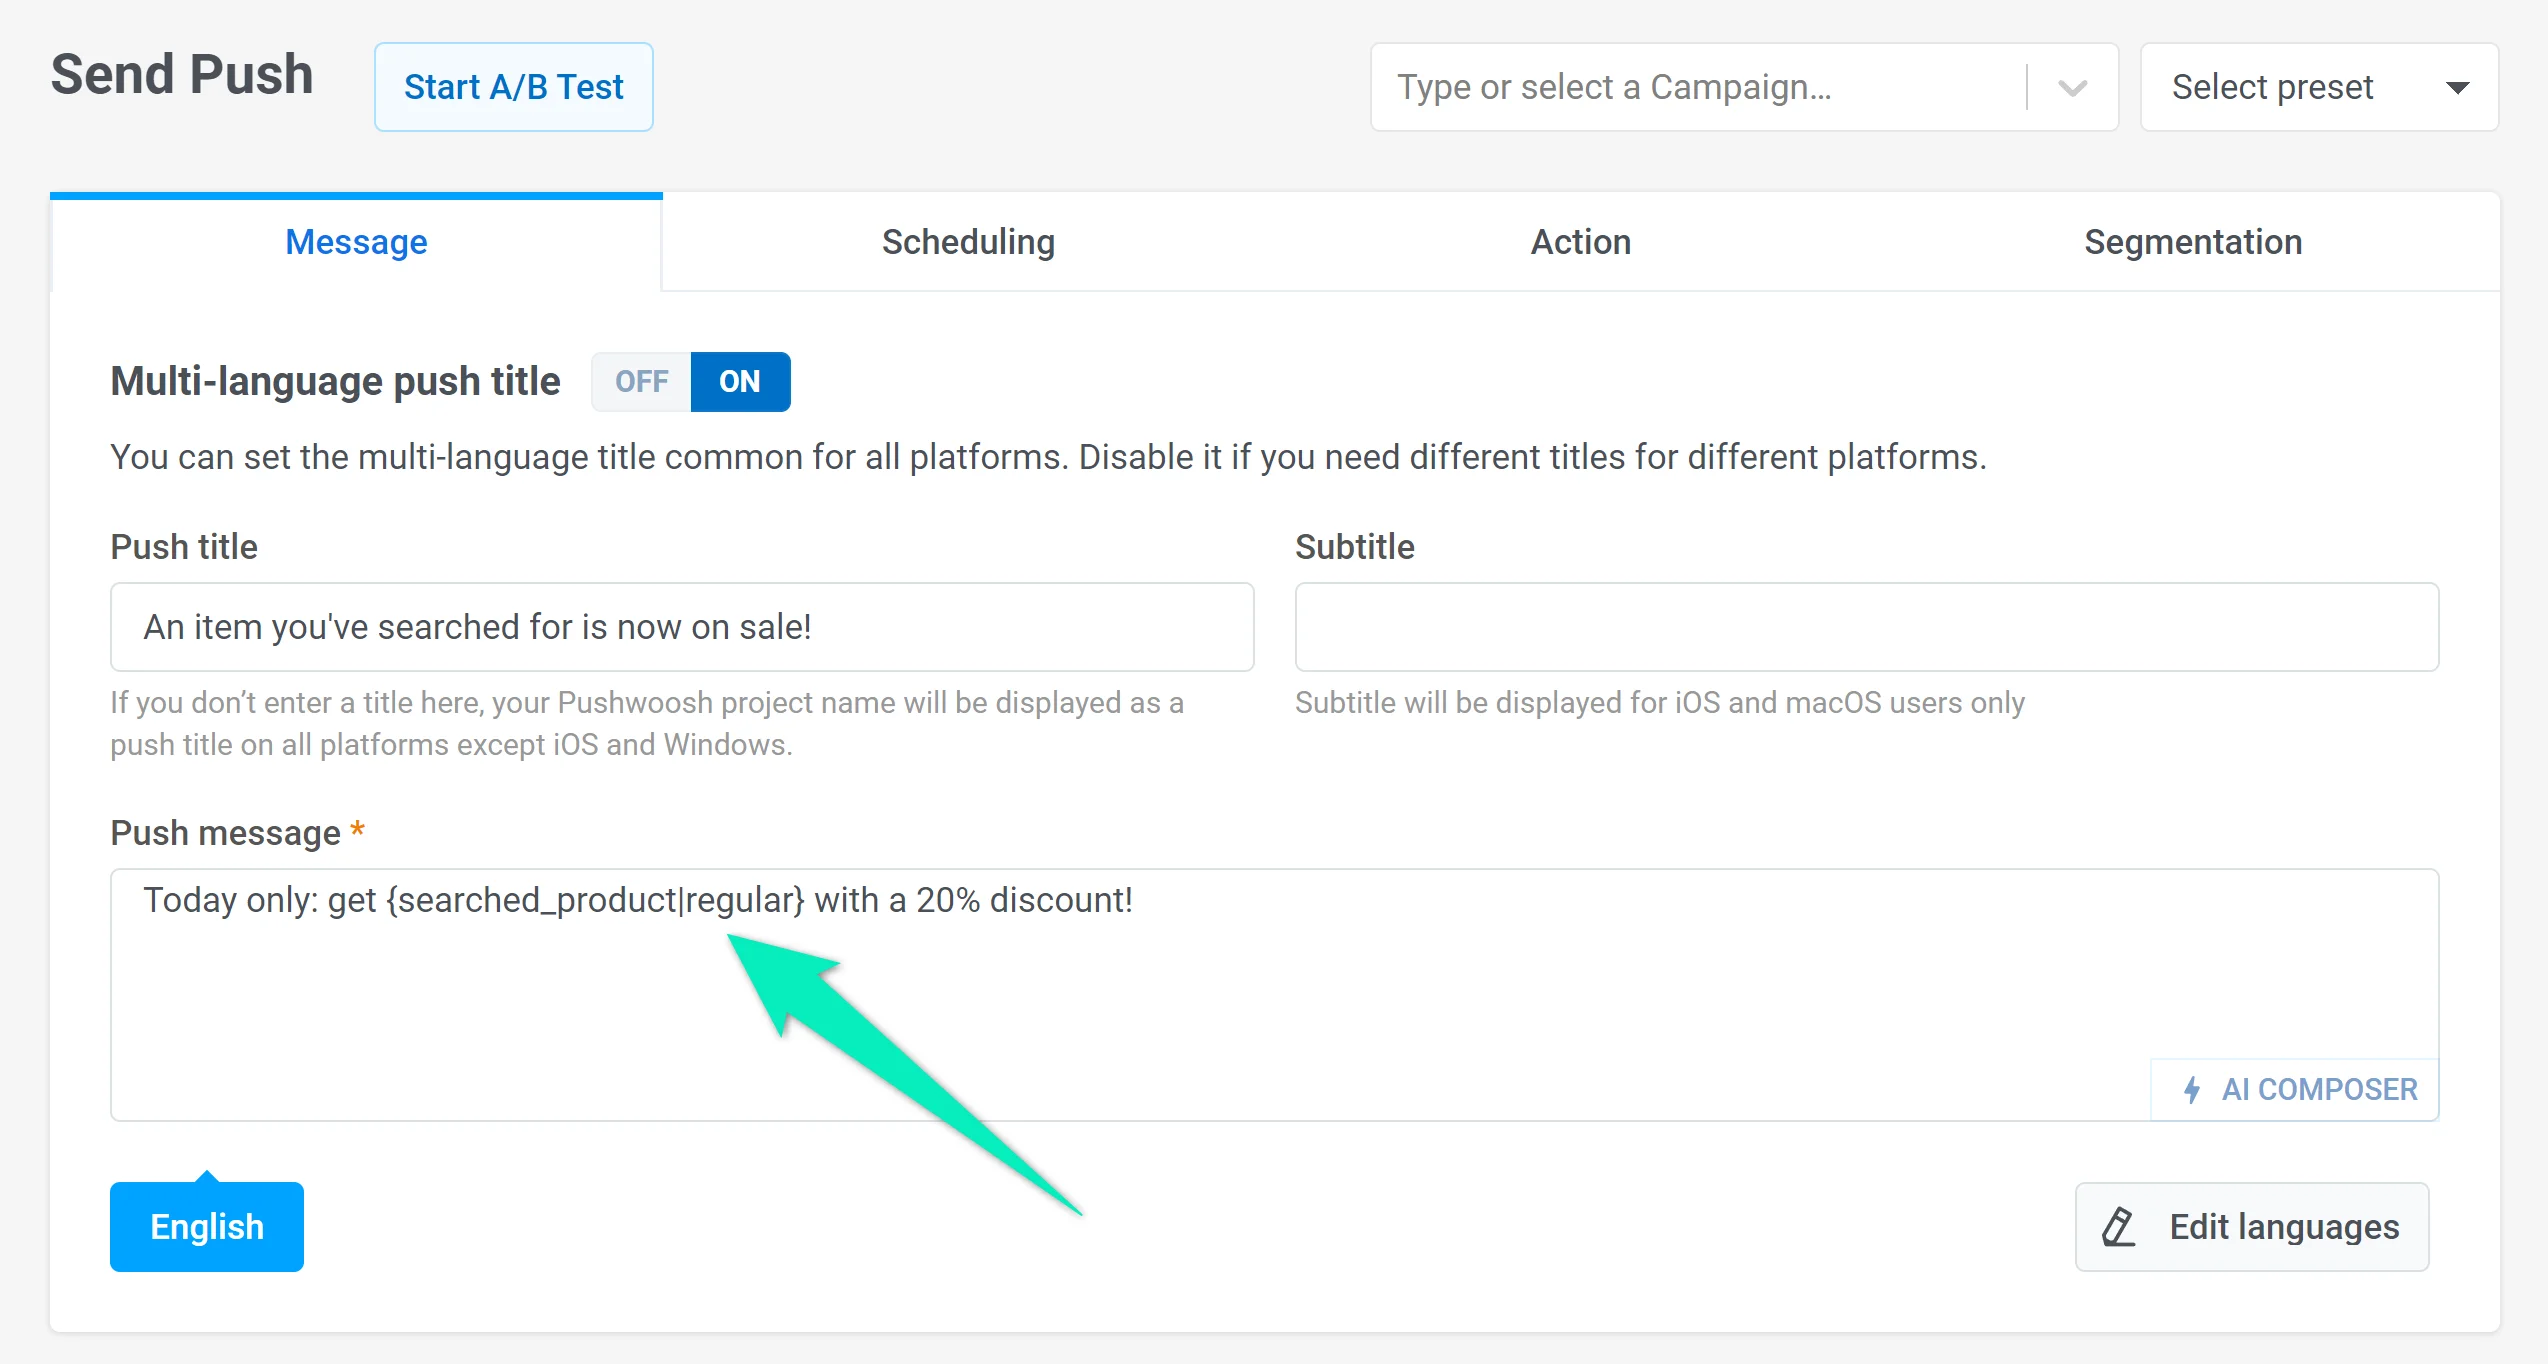 Each user will receive a push offering a discount on the exact product category they browsed previously. For example, those who searched for sports shoes will see this message:
 ## Integration overview
### Integration type
* **Destination**: Data is sent from Segment to Pushwoosh.
* **Source**: Data is sent from Pushwoosh to Segment.
### Prerequisites
Paid accounts in both Pushwoosh and Segment
### Synchronized entities
**Source**
* Push Statistics
**Destination**
* Devices
* Tags
### Use cases
**Tracking Notifications**
Send push notifications and track their status, including whether they were successfully sent and delivered.
**Event Analysis**
Analyze user-triggered events, such as push notifications or email deliveries, and ensure these events are accurately recorded in Segment.
**User Management**
Register and manage user information, including tagging users with relevant attributes or deleting users when needed.
## Setting up integration
### Configuring a Destination
1. [In the Segment interface](https://app.segment.com/login/), navigate to **Connections** → **Destinations** and click **Add Destination**.
2. Search for **Pushwoosh** and select it.
3. Choose the Sources you want to connect the Destination to.
4. Go to Destination settings:
## Integration overview
### Integration type
* **Destination**: Data is sent from Segment to Pushwoosh.
* **Source**: Data is sent from Pushwoosh to Segment.
### Prerequisites
Paid accounts in both Pushwoosh and Segment
### Synchronized entities
**Source**
* Push Statistics
**Destination**
* Devices
* Tags
### Use cases
**Tracking Notifications**
Send push notifications and track their status, including whether they were successfully sent and delivered.
**Event Analysis**
Analyze user-triggered events, such as push notifications or email deliveries, and ensure these events are accurately recorded in Segment.
**User Management**
Register and manage user information, including tagging users with relevant attributes or deleting users when needed.
## Setting up integration
### Configuring a Destination
1. [In the Segment interface](https://app.segment.com/login/), navigate to **Connections** → **Destinations** and click **Add Destination**.
2. Search for **Pushwoosh** and select it.
3. Choose the Sources you want to connect the Destination to.
4. Go to Destination settings:
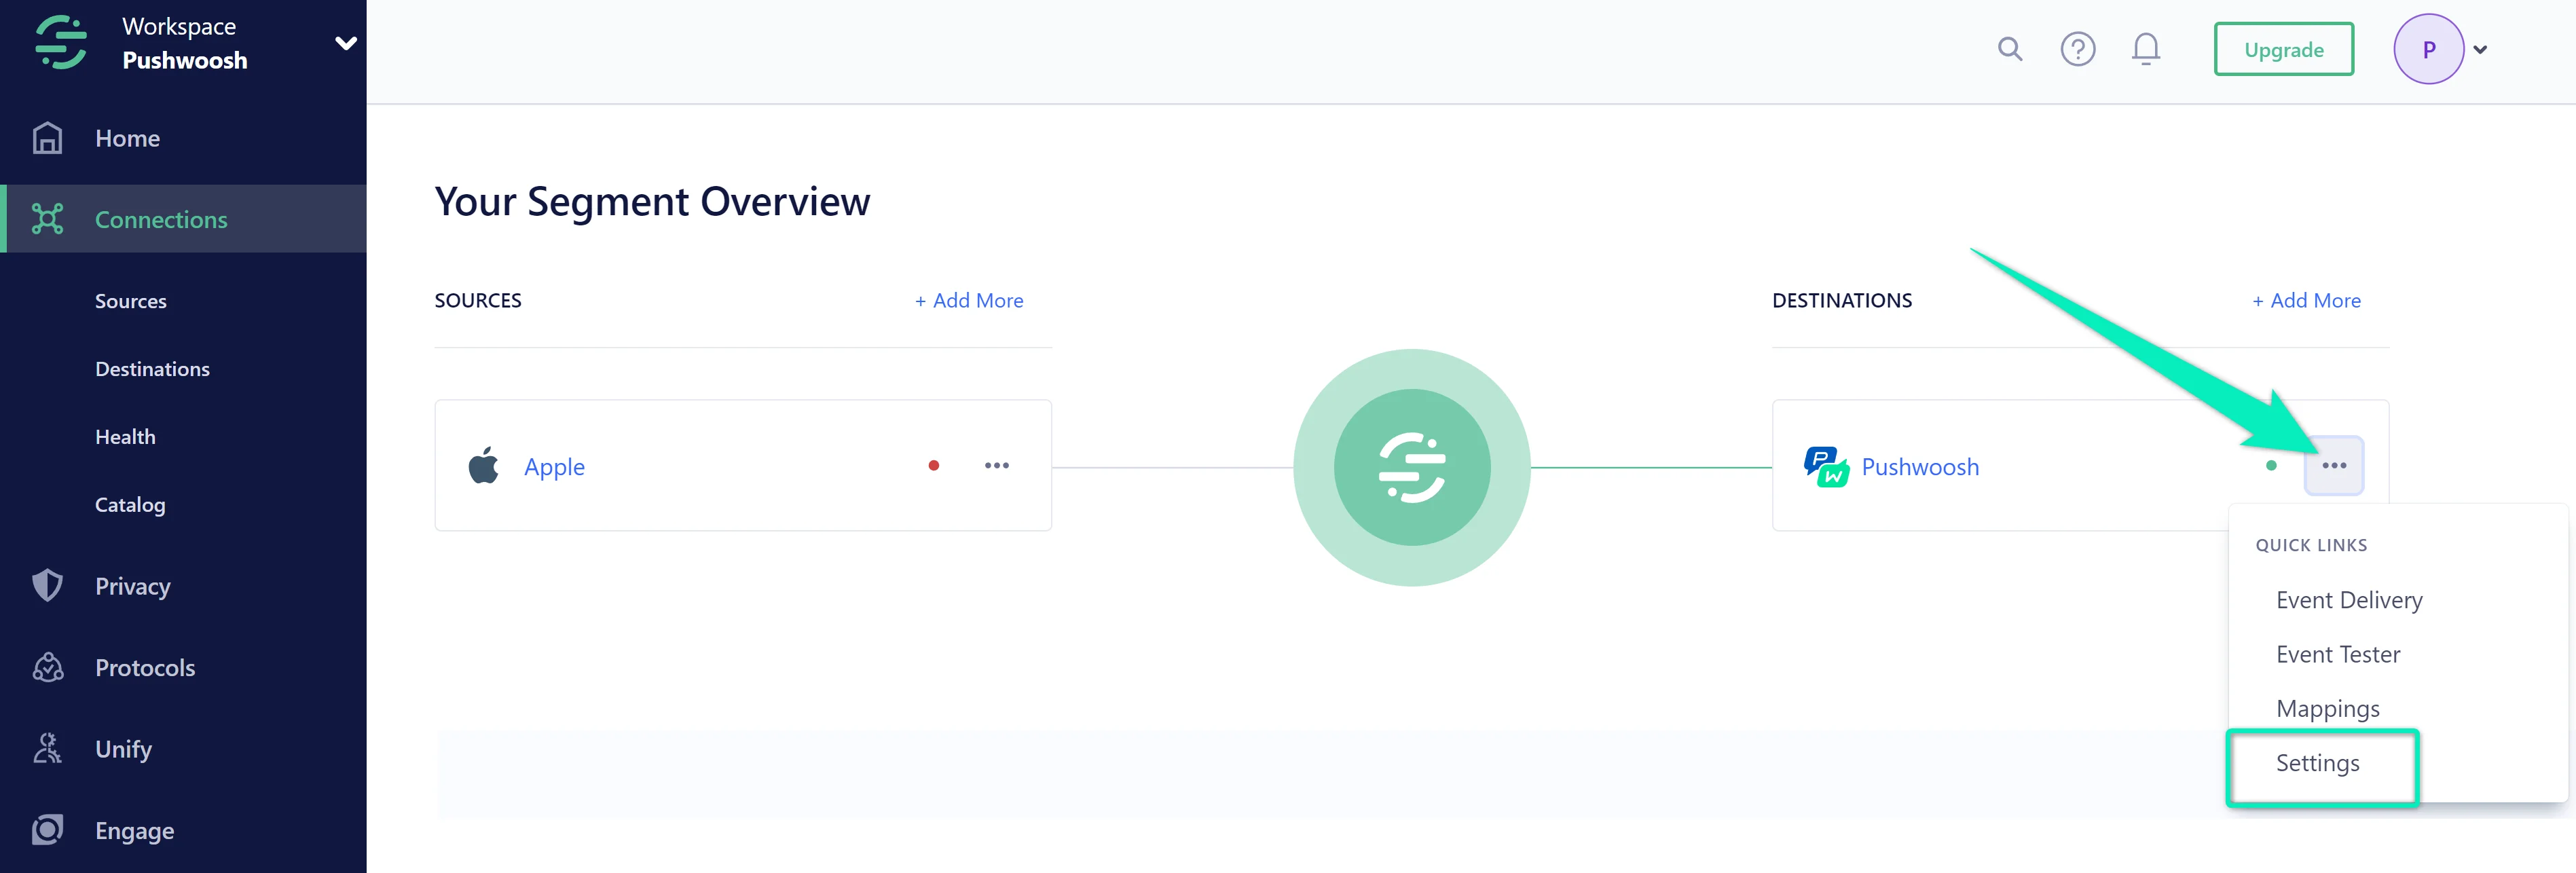 5. Enter the **Pushwoosh API key** and **application code**. Ensure the **Enable Destination** switch is on. After that, click **Save Changes**.
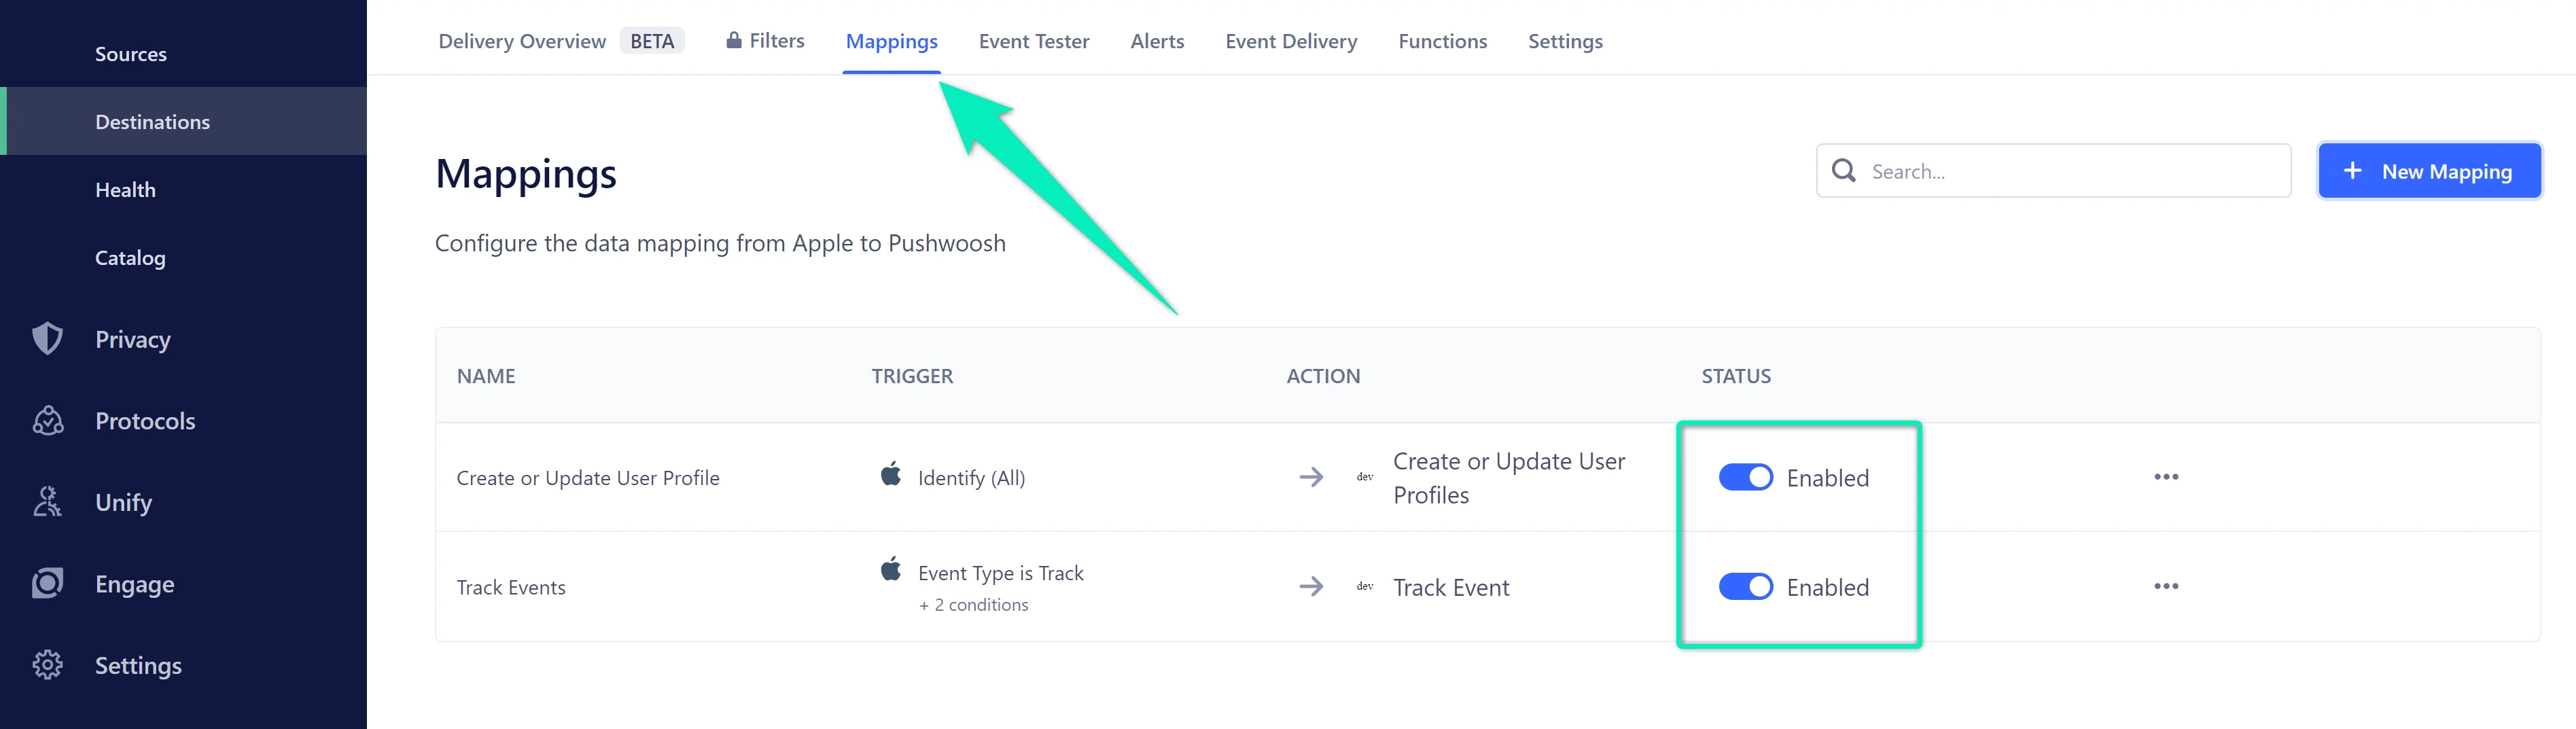 It is important to verify the mapping of event fields from your source to Pushwoosh as the destination to ensure your events are processed correctly.
If an event does not contain the _**device_platform**_ field or this field is incorrect, your event will be disregarded. Additionally, if an event does not contain either _**userId**_ or _**deviceId**_, it will also be disregarded.
To ensure that your mapping is configured correctly, go to **Pushwoosh as Destination > Settings**.
It is important to verify the mapping of event fields from your source to Pushwoosh as the destination to ensure your events are processed correctly.
If an event does not contain the _**device_platform**_ field or this field is incorrect, your event will be disregarded. Additionally, if an event does not contain either _**userId**_ or _**deviceId**_, it will also be disregarded.
To ensure that your mapping is configured correctly, go to **Pushwoosh as Destination > Settings**.
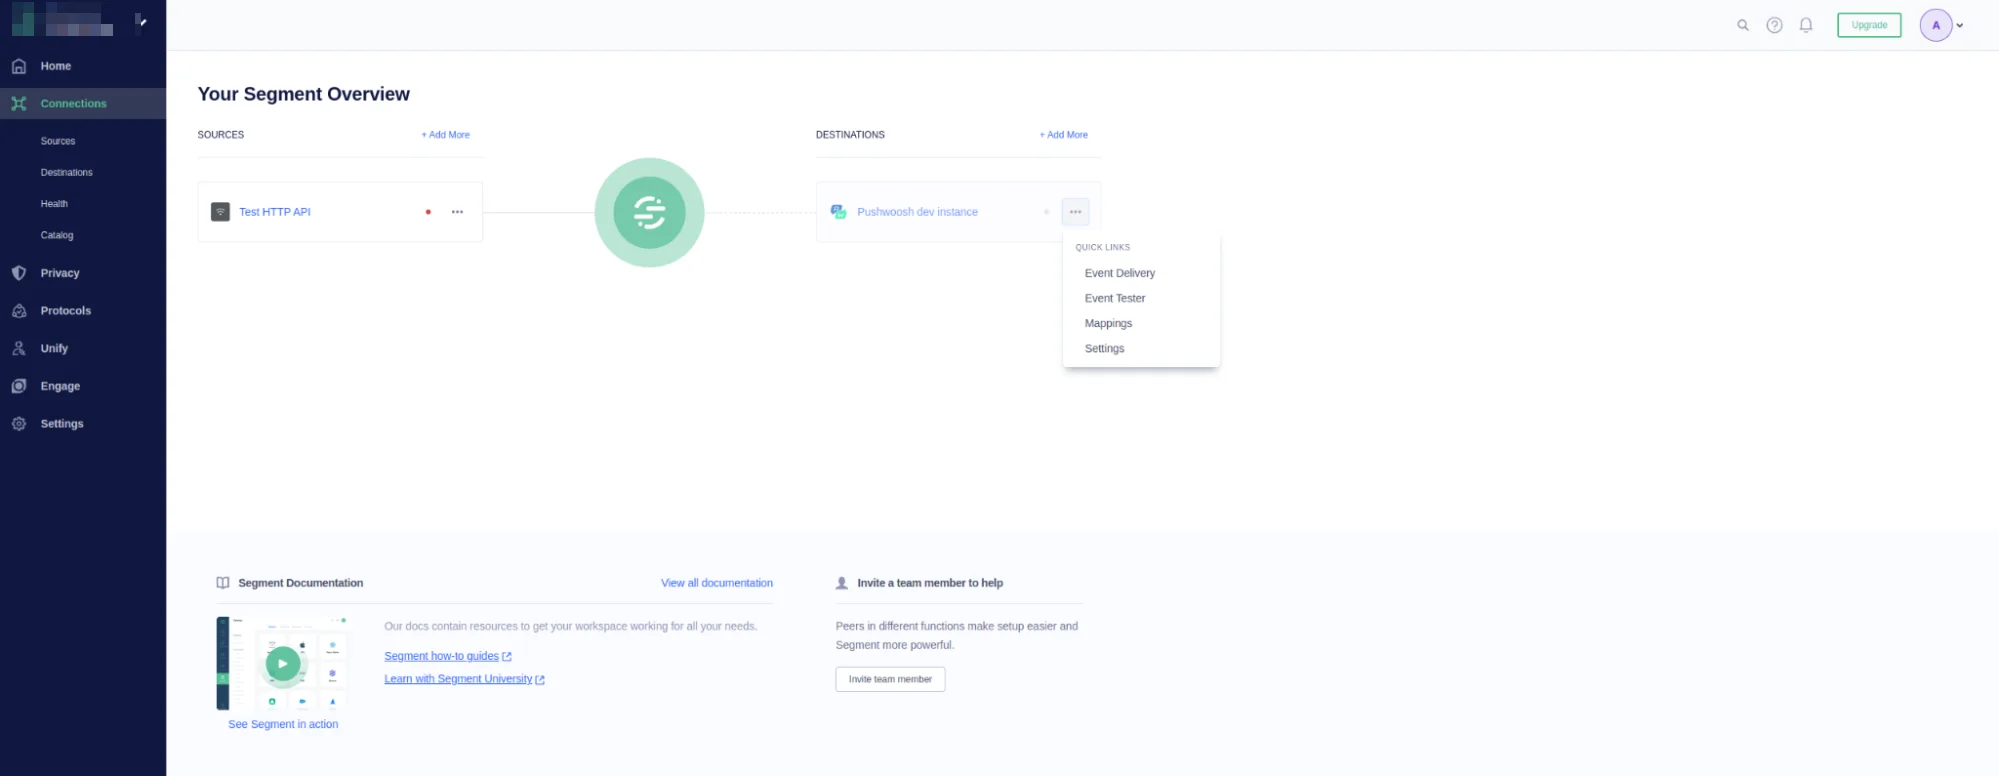 Then, select the **Mapping** tab and click **Edit Mapping** for the **Track Events** method.
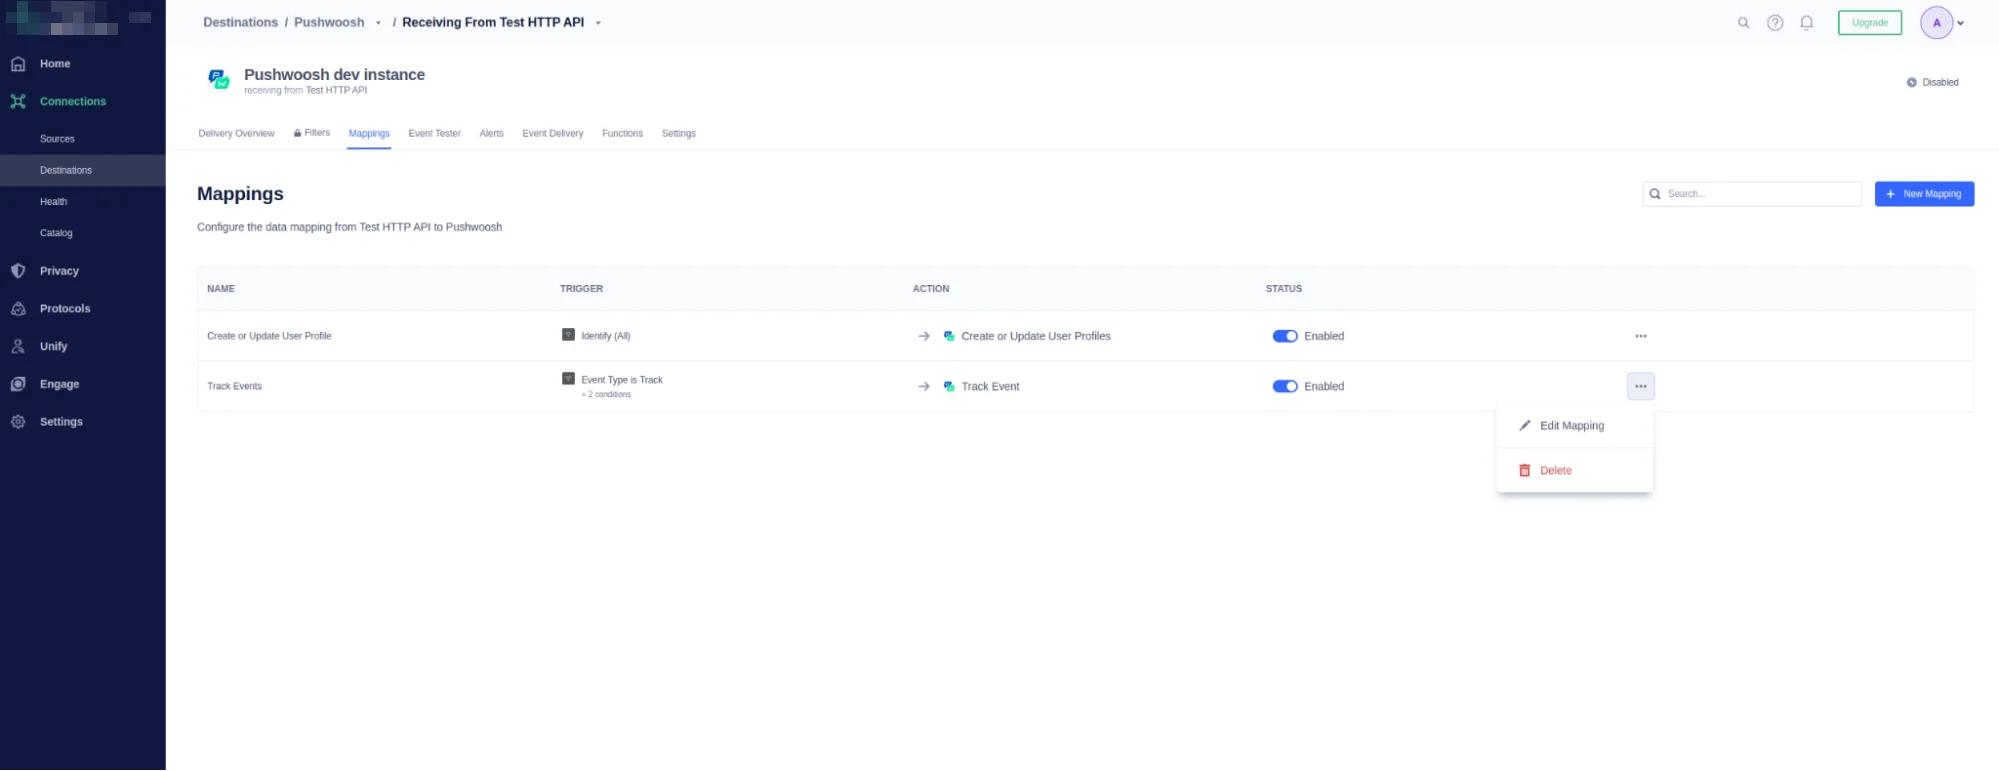 Next, ensure that the mapping of your events to the events sent to Pushwoosh is correct, and that the fields **Device Platform** and **External User ID** (or **Device ID**) are properly matched.
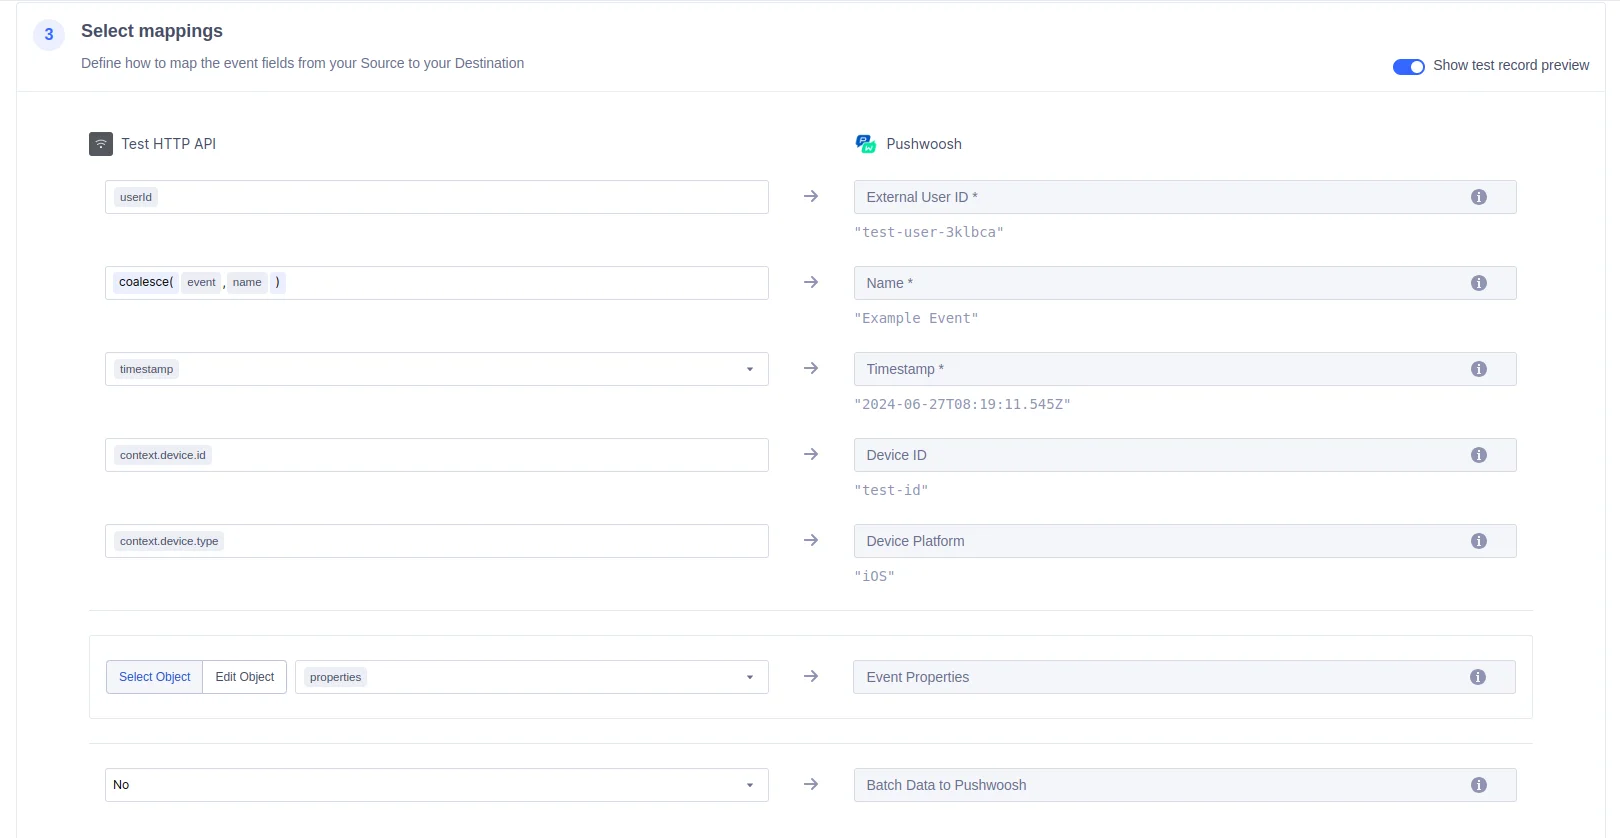 Your event may differ from the example provided above. However, the key is to match the data transfer for the platform and device for the event sent to Pushwoosh.
If the integration is configured correctly, Pushwoosh will start receiving Events and user attributes from Segment. Based on this data, you can create highly targeted [customer journeys](/product/customer-journey/pushwoosh-journey-overview) and [personalize](/product/personalization/dynamic-content/) your push notifications, in-app messages, and emails.
### Configuring a Source
1. From your workspace's [Sources catalog page](https://app.segment.com/goto-my-workspace/sources/catalog), click **Add Source**.
2. Search for "**Pushwoosh**" in the Sources Catalog, select Pushwoosh, and click **Add Source**.
3. On the next screen, give the Source a name and configure any other settings.
4. Click **Add Source** to save your settings.
5. Copy the **Write key** from the Segment UI.
6. Log in to your Pushwoosh account, and select the Application you want to connect.
7. Navigate to **Settings > 3rd party integration > Segment**, click the **Configure button**, and enter your **Write key** from your Segment workspace.
8. List the events you want to export using a `,` delimiter in the **Events** field, or leave it blank if you want to export all events, then click **Apply**.
#### Stream
Pushwoosh uses the Segment stream Source component to send Segment event data. It uses a server-side track method to send data to Segment. These events are then available in any destination that accepts server-side events, and are available in a schema in your data warehouse.
By default, Pushwoosh passes the Pushwoosh User ID as the Segment userId property. If there is no associated User ID, Pushwoosh will pass the HWID as the Segment anonymousId.
#### Events
The table below lists events that Pushwoosh sends to Segment. These events appear as tables in your warehouse, and as regular events in other Destinations.
| Event Name | Description |
| ------------------ | ----------------------------------------------- |
| Email Sent | Email was sent successfully |
| Push Sent | Push notification successfully sent |
| SMS Sent | SMS sent to recipient |
| Push Opened | Push notification was opened |
| Email Opened | Email notification was opened |
| Email Delivered | Email successfully delivered |
| Push Delivered | Push notification successfully delivered |
| SMS Delivered | SMS successfully delivered |
| SMS Not Delivered | SMS delivery failed |
| Email Bounced | Email returned to sender due to permanent error |
| Email Unsubscribed | Email unsubscribed link clicked |
#### Event Properties
The table below list the properties included in the events listed above.
| Property Name | Description |
| --------------- | --------------------------------------------------------- |
| `message_type` | Contains the type of message (Push, Email, In-App or SMS) |
| `campaign_code` | Unique identifier of the message campaign |
| `device_type` | Type of the device |
#### Adding Destinations
Now that your Source is set up, you can connect it with Destinations.
Log into your downstream tools and check to see that your events appear as expected and that they contain all of the properties you expect. If your events and properties don’t appear, check the Event Delivery, and refer to the Destination docs for each tool for troubleshooting.
If there are any issues with how the events are arriving to Segment, [contact our support team](mailto:support@pushwoosh.com).
## How the integration works
1. **Push notification initiation**: A client starts the process by initiating a push notification through the Pushwoosh interface.
2. **Event production**: The Pushwoosh backend processes the push notification request and generates an event. This event is then sent to a Kafka topic named `channels-tracking-log` managed by Pushwoosh.
3. **Event consumption**: The Segment Integration service continuously listens to the `channels-tracking-log` Kafka topic and consumes the events as they arrive.
4. **Event processing**: The consumed events are processed by the Segment Integration service, which transforms them into Segment Track Events.
5. **Event transmission**: The processed Segment Track Events are then sent to the Segment backend for further handling and analysis.
## How do you know that the integration is working?
#### Destination
##### track-user
Go to your **Pushwoosh account > Your Connected Application > Audience > User Explorer.** Find your user/device and check tags which Segment sent.
##### post-event
Go to your **Pushwoosh account > Your Connected Application > Audience > Events**. Select the event, click the three-dot menu, and choose Event Statistics. Make sure that the event is counted.
##### delete-user
Go to your **PW account > Your Connected Application > Audience > User Explorer.** Make sure that user/device does not exist.
#### Source
Use [Source debugger](https://segment.com/docs/connections/sources/debugger/) to detect events which were sent from Pushwoosh to Segment.
## Troubleshooting
### Check integration status
To troubleshoot issues with the Pushwoosh integration, start by verifying the following:
**Destination**
* **Track-User**: Verify user/device information and tags in Pushwoosh under `Audience > User Explorer`.
* **Post-Event**: Ensure the event is counted in Pushwoosh by checking event statistics.
* **Delete-User**: Confirm that the user/device no longer exists in Pushwoosh.
**Source**
Use the source debugger at [Segment Debugger](https://segment.com/docs/connections/sources/debugger/) to check if events from Pushwoosh are properly sent to Segment.
### Event mismatch
If events are not appearing correctly in Segment, ensure that Pushwoosh events are correctly mapped to Segment Track Events as per the provided mapping rules.
### Authentication issues
Verify that the correct authentication tokens or API keys are used in the requests to Pushwoosh and Segment.
### Data flow issues
Confirm that the data flow between Pushwoosh and Segment is uninterrupted and that Kafka topics are being monitored correctly.
## FAQ
### What types of events are sent to Segment from Pushwoosh?
Reserved events such as **Push Sent, Email Sent, SMS Sent, Push Delivered, Email Delivered, SMS Delivered, and Email Bounced** are sent to Segment.
### How can I verify that events are correctly sent to Segment?
Use the Segment source debugger to check for events sent from Pushwoosh, and review event statistics in your Pushwoosh account to ensure they are properly counted.
### What should I do if I encounter issues with the integration?
Check the integration status by verifying user/device information, event counts, and user deletions in Pushwoosh. Additionally, ensure that the correct authentication tokens are used and that the data flow is uninterrupted.
### How is user and device information handled in the integration?
User and device information, including attributes and tags, are registered or updated in Pushwoosh based on requests from Segment. Note that default tags are not automatically created in Pushwoosh.
### Where can I find detailed documentation for the integration?
Detailed documentation is available in the Segment and Pushwoosh integration manuals, as well as in their respective API documentation.
Your event may differ from the example provided above. However, the key is to match the data transfer for the platform and device for the event sent to Pushwoosh.
If the integration is configured correctly, Pushwoosh will start receiving Events and user attributes from Segment. Based on this data, you can create highly targeted [customer journeys](/product/customer-journey/pushwoosh-journey-overview) and [personalize](/product/personalization/dynamic-content/) your push notifications, in-app messages, and emails.
### Configuring a Source
1. From your workspace's [Sources catalog page](https://app.segment.com/goto-my-workspace/sources/catalog), click **Add Source**.
2. Search for "**Pushwoosh**" in the Sources Catalog, select Pushwoosh, and click **Add Source**.
3. On the next screen, give the Source a name and configure any other settings.
4. Click **Add Source** to save your settings.
5. Copy the **Write key** from the Segment UI.
6. Log in to your Pushwoosh account, and select the Application you want to connect.
7. Navigate to **Settings > 3rd party integration > Segment**, click the **Configure button**, and enter your **Write key** from your Segment workspace.
8. List the events you want to export using a `,` delimiter in the **Events** field, or leave it blank if you want to export all events, then click **Apply**.
#### Stream
Pushwoosh uses the Segment stream Source component to send Segment event data. It uses a server-side track method to send data to Segment. These events are then available in any destination that accepts server-side events, and are available in a schema in your data warehouse.
By default, Pushwoosh passes the Pushwoosh User ID as the Segment userId property. If there is no associated User ID, Pushwoosh will pass the HWID as the Segment anonymousId.
#### Events
The table below lists events that Pushwoosh sends to Segment. These events appear as tables in your warehouse, and as regular events in other Destinations.
| Event Name | Description |
| ------------------ | ----------------------------------------------- |
| Email Sent | Email was sent successfully |
| Push Sent | Push notification successfully sent |
| SMS Sent | SMS sent to recipient |
| Push Opened | Push notification was opened |
| Email Opened | Email notification was opened |
| Email Delivered | Email successfully delivered |
| Push Delivered | Push notification successfully delivered |
| SMS Delivered | SMS successfully delivered |
| SMS Not Delivered | SMS delivery failed |
| Email Bounced | Email returned to sender due to permanent error |
| Email Unsubscribed | Email unsubscribed link clicked |
#### Event Properties
The table below list the properties included in the events listed above.
| Property Name | Description |
| --------------- | --------------------------------------------------------- |
| `message_type` | Contains the type of message (Push, Email, In-App or SMS) |
| `campaign_code` | Unique identifier of the message campaign |
| `device_type` | Type of the device |
#### Adding Destinations
Now that your Source is set up, you can connect it with Destinations.
Log into your downstream tools and check to see that your events appear as expected and that they contain all of the properties you expect. If your events and properties don’t appear, check the Event Delivery, and refer to the Destination docs for each tool for troubleshooting.
If there are any issues with how the events are arriving to Segment, [contact our support team](mailto:support@pushwoosh.com).
## How the integration works
1. **Push notification initiation**: A client starts the process by initiating a push notification through the Pushwoosh interface.
2. **Event production**: The Pushwoosh backend processes the push notification request and generates an event. This event is then sent to a Kafka topic named `channels-tracking-log` managed by Pushwoosh.
3. **Event consumption**: The Segment Integration service continuously listens to the `channels-tracking-log` Kafka topic and consumes the events as they arrive.
4. **Event processing**: The consumed events are processed by the Segment Integration service, which transforms them into Segment Track Events.
5. **Event transmission**: The processed Segment Track Events are then sent to the Segment backend for further handling and analysis.
## How do you know that the integration is working?
#### Destination
##### track-user
Go to your **Pushwoosh account > Your Connected Application > Audience > User Explorer.** Find your user/device and check tags which Segment sent.
##### post-event
Go to your **Pushwoosh account > Your Connected Application > Audience > Events**. Select the event, click the three-dot menu, and choose Event Statistics. Make sure that the event is counted.
##### delete-user
Go to your **PW account > Your Connected Application > Audience > User Explorer.** Make sure that user/device does not exist.
#### Source
Use [Source debugger](https://segment.com/docs/connections/sources/debugger/) to detect events which were sent from Pushwoosh to Segment.
## Troubleshooting
### Check integration status
To troubleshoot issues with the Pushwoosh integration, start by verifying the following:
**Destination**
* **Track-User**: Verify user/device information and tags in Pushwoosh under `Audience > User Explorer`.
* **Post-Event**: Ensure the event is counted in Pushwoosh by checking event statistics.
* **Delete-User**: Confirm that the user/device no longer exists in Pushwoosh.
**Source**
Use the source debugger at [Segment Debugger](https://segment.com/docs/connections/sources/debugger/) to check if events from Pushwoosh are properly sent to Segment.
### Event mismatch
If events are not appearing correctly in Segment, ensure that Pushwoosh events are correctly mapped to Segment Track Events as per the provided mapping rules.
### Authentication issues
Verify that the correct authentication tokens or API keys are used in the requests to Pushwoosh and Segment.
### Data flow issues
Confirm that the data flow between Pushwoosh and Segment is uninterrupted and that Kafka topics are being monitored correctly.
## FAQ
### What types of events are sent to Segment from Pushwoosh?
Reserved events such as **Push Sent, Email Sent, SMS Sent, Push Delivered, Email Delivered, SMS Delivered, and Email Bounced** are sent to Segment.
### How can I verify that events are correctly sent to Segment?
Use the Segment source debugger to check for events sent from Pushwoosh, and review event statistics in your Pushwoosh account to ensure they are properly counted.
### What should I do if I encounter issues with the integration?
Check the integration status by verifying user/device information, event counts, and user deletions in Pushwoosh. Additionally, ensure that the correct authentication tokens are used and that the data flow is uninterrupted.
### How is user and device information handled in the integration?
User and device information, including attributes and tags, are registered or updated in Pushwoosh based on requests from Segment. Note that default tags are not automatically created in Pushwoosh.
### Where can I find detailed documentation for the integration?
Detailed documentation is available in the Segment and Pushwoosh integration manuals, as well as in their respective API documentation.