# Piano Analytics integration
[Piano Analytics](https://piano.io/product/analytics/) is a tool that helps businesses understand how people interact with their websites and apps. It collects data about user behavior and provides insights through reports and visualizations. This information helps businesses make better decisions about how to improve their digital products and marketing efforts.
Integrating [Piano Analytics](https://piano.io/product/analytics/) and Pushwoosh allows for detailed user behavior insights to create precise segments and send highly targeted push notifications, emails, and in-app messages to the right users at the right time.
## Integration overview
### Integration type
* **Destination**: Data is sent from Piano Analytics to Pushwoosh.
* **Source**: Data is sent from Pushwoosh to Piano Analytics.
### Prerequisites
Paid accounts in both Pushwoosh and Piano Analytics
### Glossary (mapping entity names if they are different)
When integrating Pushwoosh and Piano Analytics, certain entity names may vary between the two platforms. Here are the mappings between Pushwoosh and Piano Analytics:
| Pushwoosh | Piano Analytics |
| ----- | ----- |
| UserID/hwid | visitorID |
| PostEvent.EventName | PianoEvent.Name |
| PostEvent.UserID | PianoEvent.PushwooshID |
| PostEvent.CampaignID | PianoEvent.SrcMedium |
| PostEvent.PlatformID | PianoEvent.DeviceType |
### Synchronized entities
**Source**
* Events
* Push Stats
* Tags (as event attributes)
**Destination**
* Segments
### Use cases
**Unified analytics**
Combine Pushwoosh engagement data with Piano Analytics for comprehensive user insights. This allows you to get a holistic view of user behavior and interactions across multiple touchpoints.
**Segmentation**
Create targeted user segments in Pushwoosh based on Piano Analytics data. Use this enhanced segmentation to deliver personalized and effective marketing campaigns.
**Performance Monitoring**
Track campaign effectiveness and user interaction across platforms.
### How does the integration work?
##### Flow Overview
1. **Setup**: Configure integration settings in both Pushwoosh and Piano Analytics accounts.
2. **Event Mapping**: Map Pushwoosh events to Piano events (e.g., PostEvent.EventName to PianoEvent.Name).
3. **Data Transfer**: Pushwoosh sends events (Post Events and Tracking Log Events) to Piano Analytics.
4. **Segment Import**: Piano Analytics sends segment data to Pushwoosh for audience segmentation.
##### Technical Flow
1. **Post Events**
* Pushwoosh sends event data to Piano Analytics.
* Attributes are mapped as follows:
* UserID (Pushwoosh) > PushwooshID (Piano)
* CampaignID (Pushwoosh) > SrcMedium (Piano)
* PlatformID (Pushwoosh) > DeviceType (Piano)
2. **Tracking Log Events**:
* Pushwoosh sends tracking data (e.g., Push Sent, Push Delivered) to Piano Analytics.
* This data enriches Piano Analytics with delivery and engagement metrics.
3. **Piano VisitorID Integration**:
* Optionally, integrate Piano VisitorID with Pushwoosh for unified analytics across SDKs.
## Setting up the integration
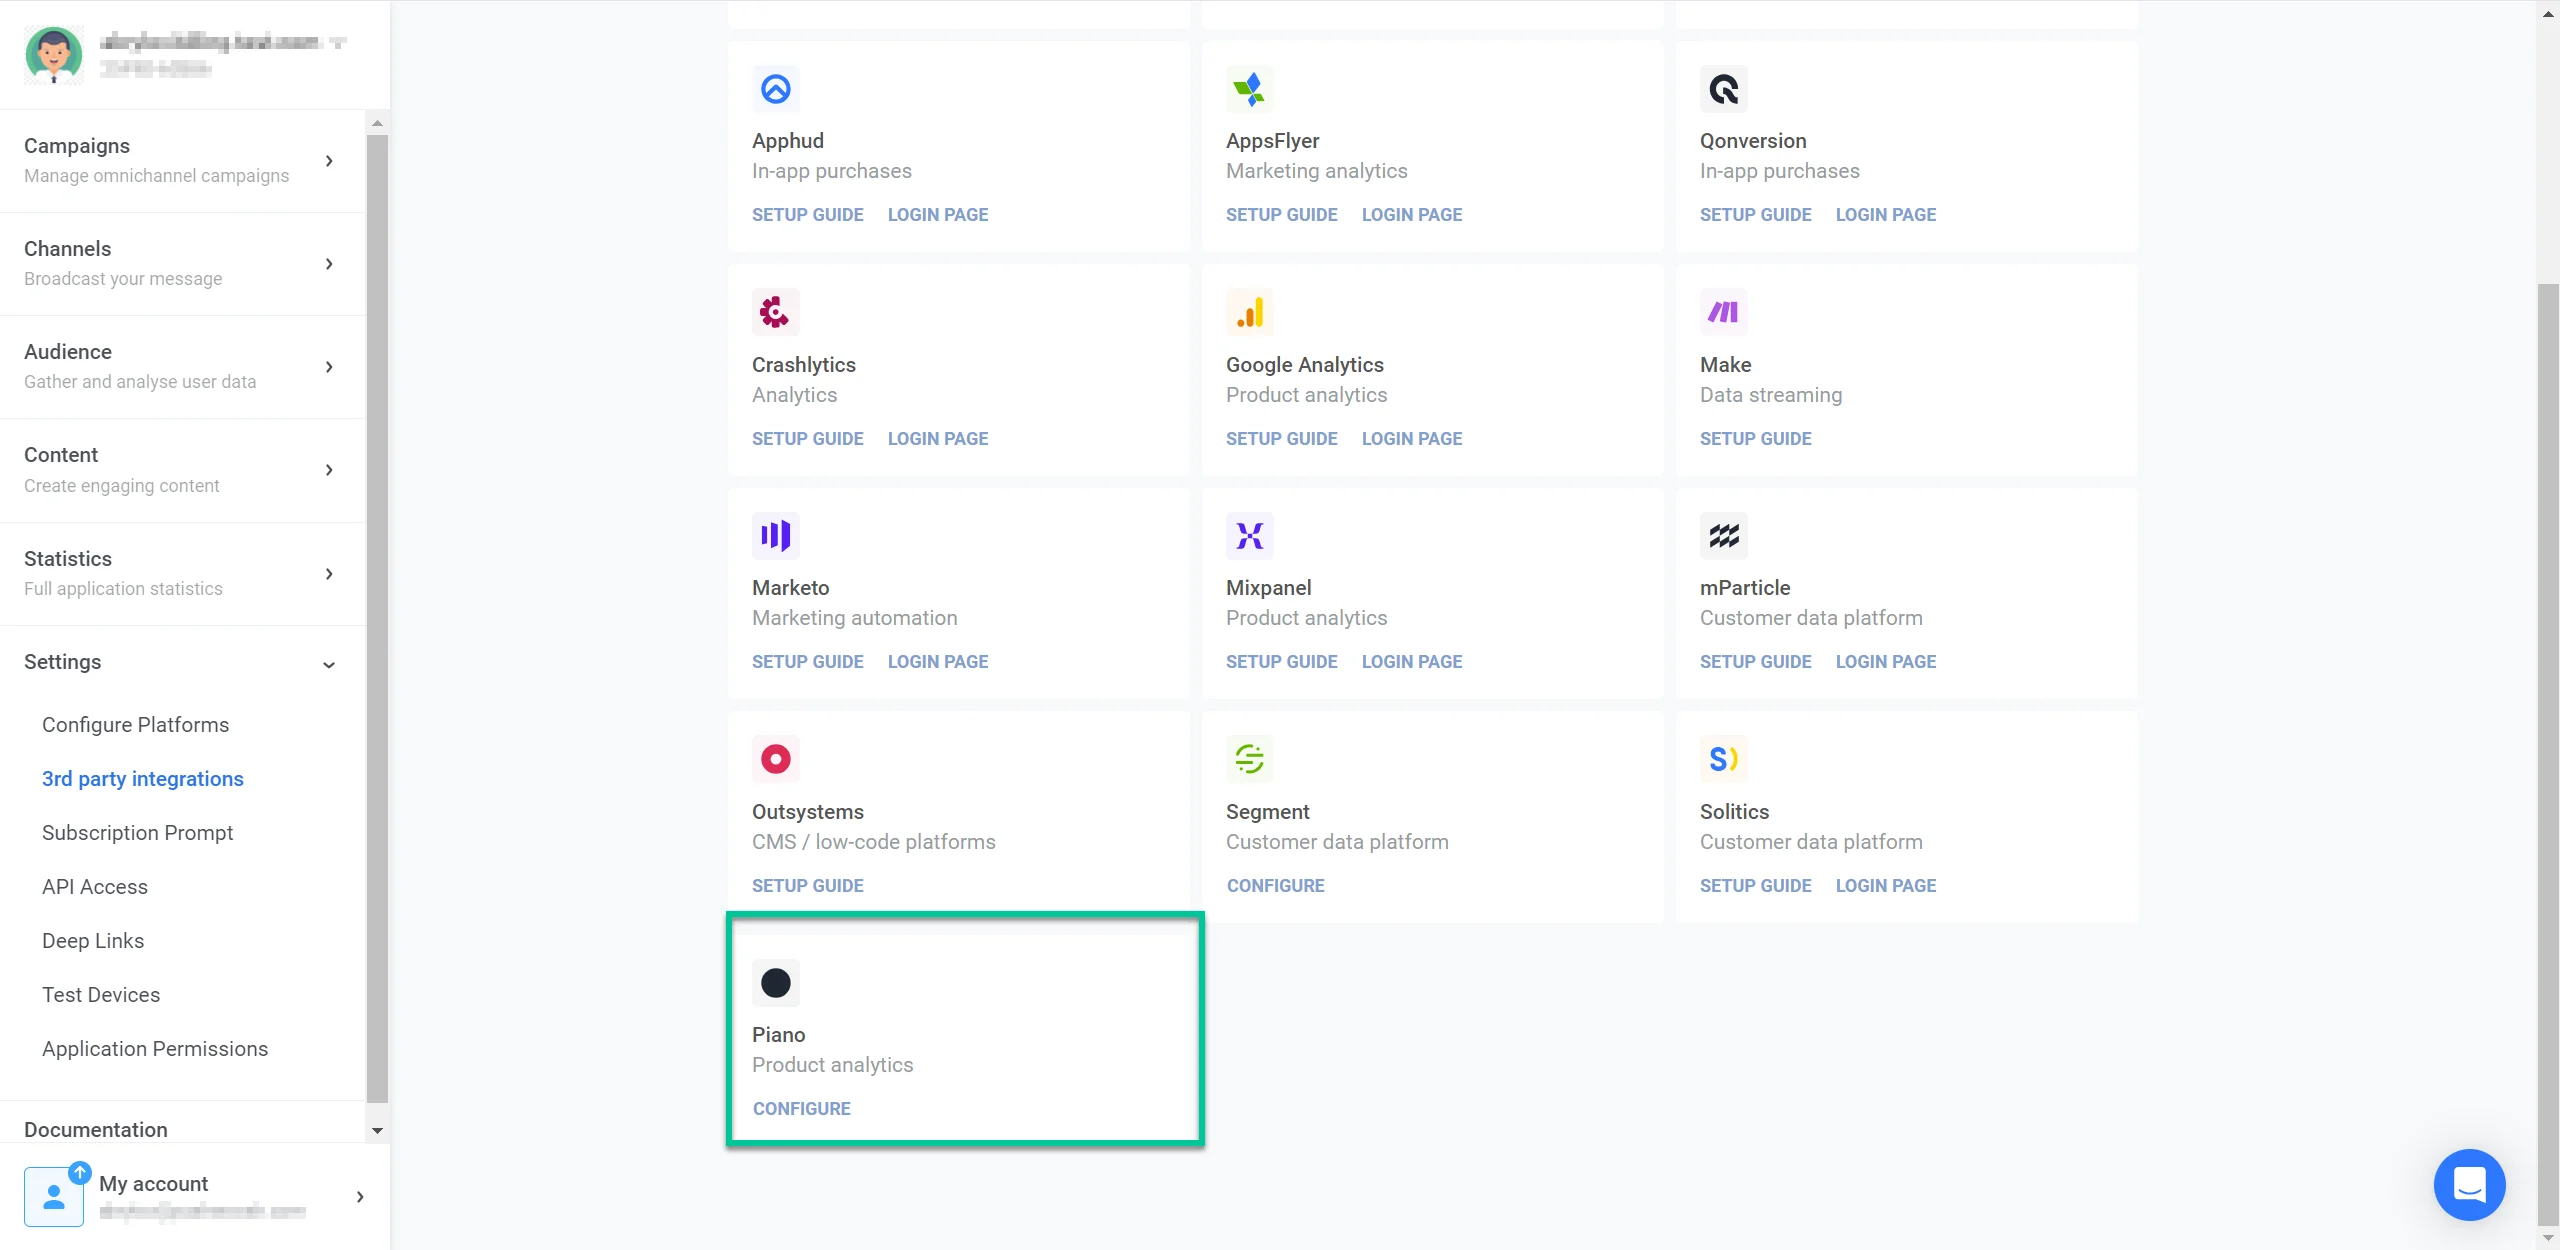
To set up the integration, go to **Settings > 3rd Party Integrations** in your Pushwoosh account and locate **Piano**. Click **Configure**.
In the window that opens, provide the following credentials:
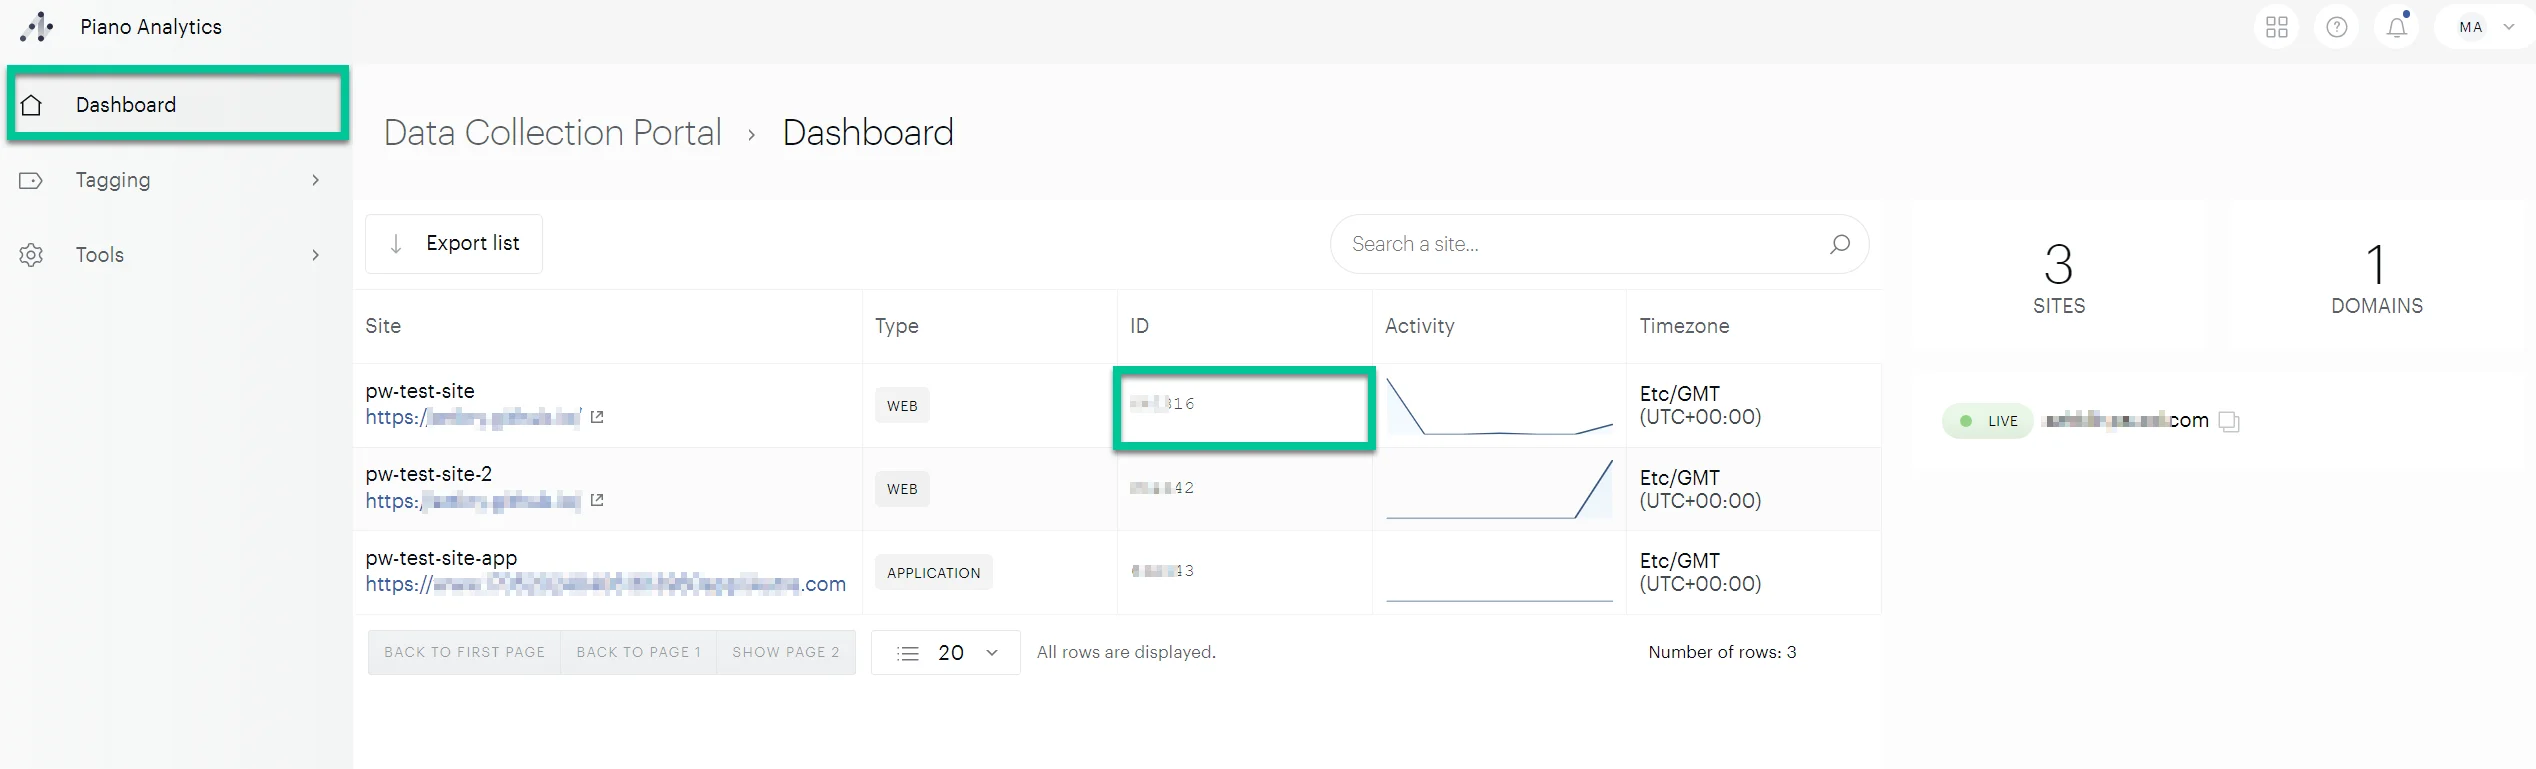
1. Site ID
To locate your Site ID, log in to your Piano account and go to **Analytics > Data Collection Portal > Dashboard.** Find the relevant website and copy its ID.
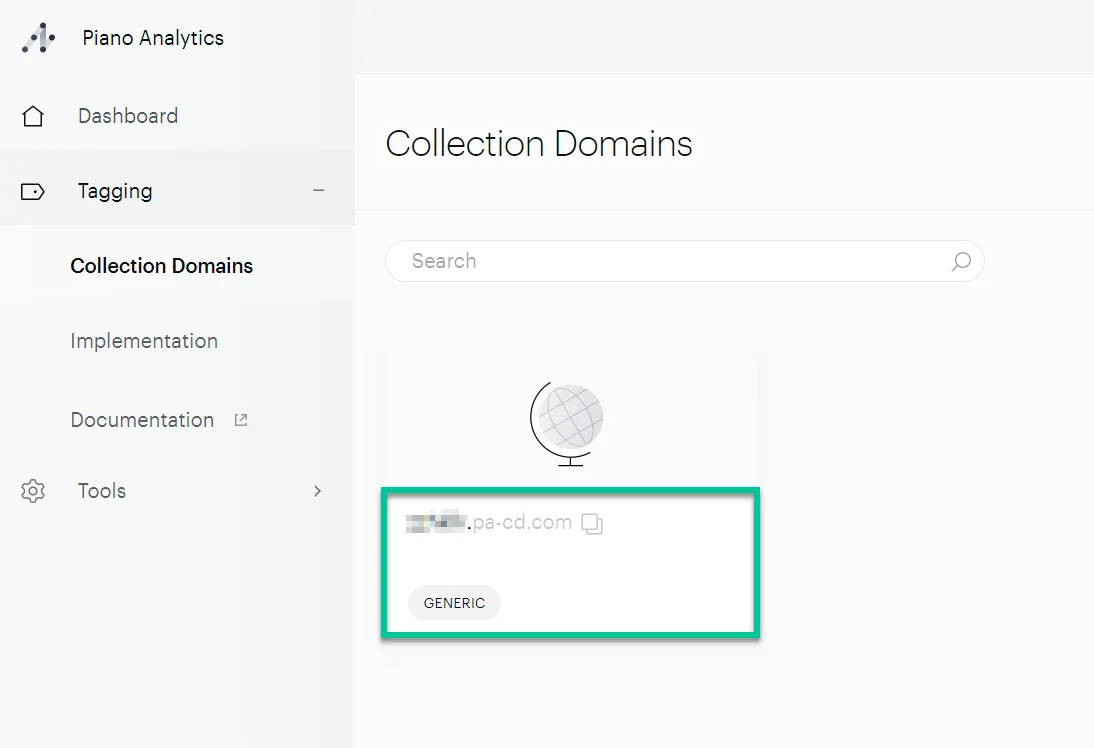
2. Collection Domain
To find the Collection Domain, navigate to **Tagging > Collection Domains**. Copy the Collection Domain ID. Make sure to enter the collection domain in the **\*\*\*\*.pa-cd.com** format without the **https:// prefix.**
3. Piano API Access and Secret keys
To get the keys:
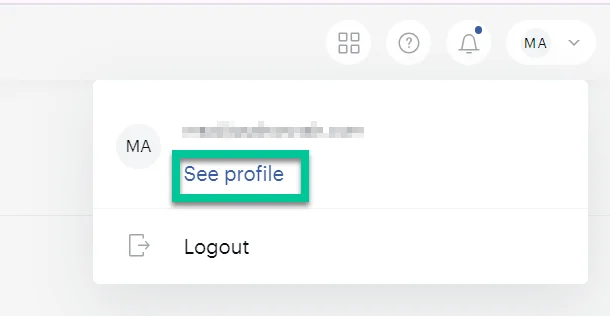
* In your Piano account, click on **See profile** below your account name.
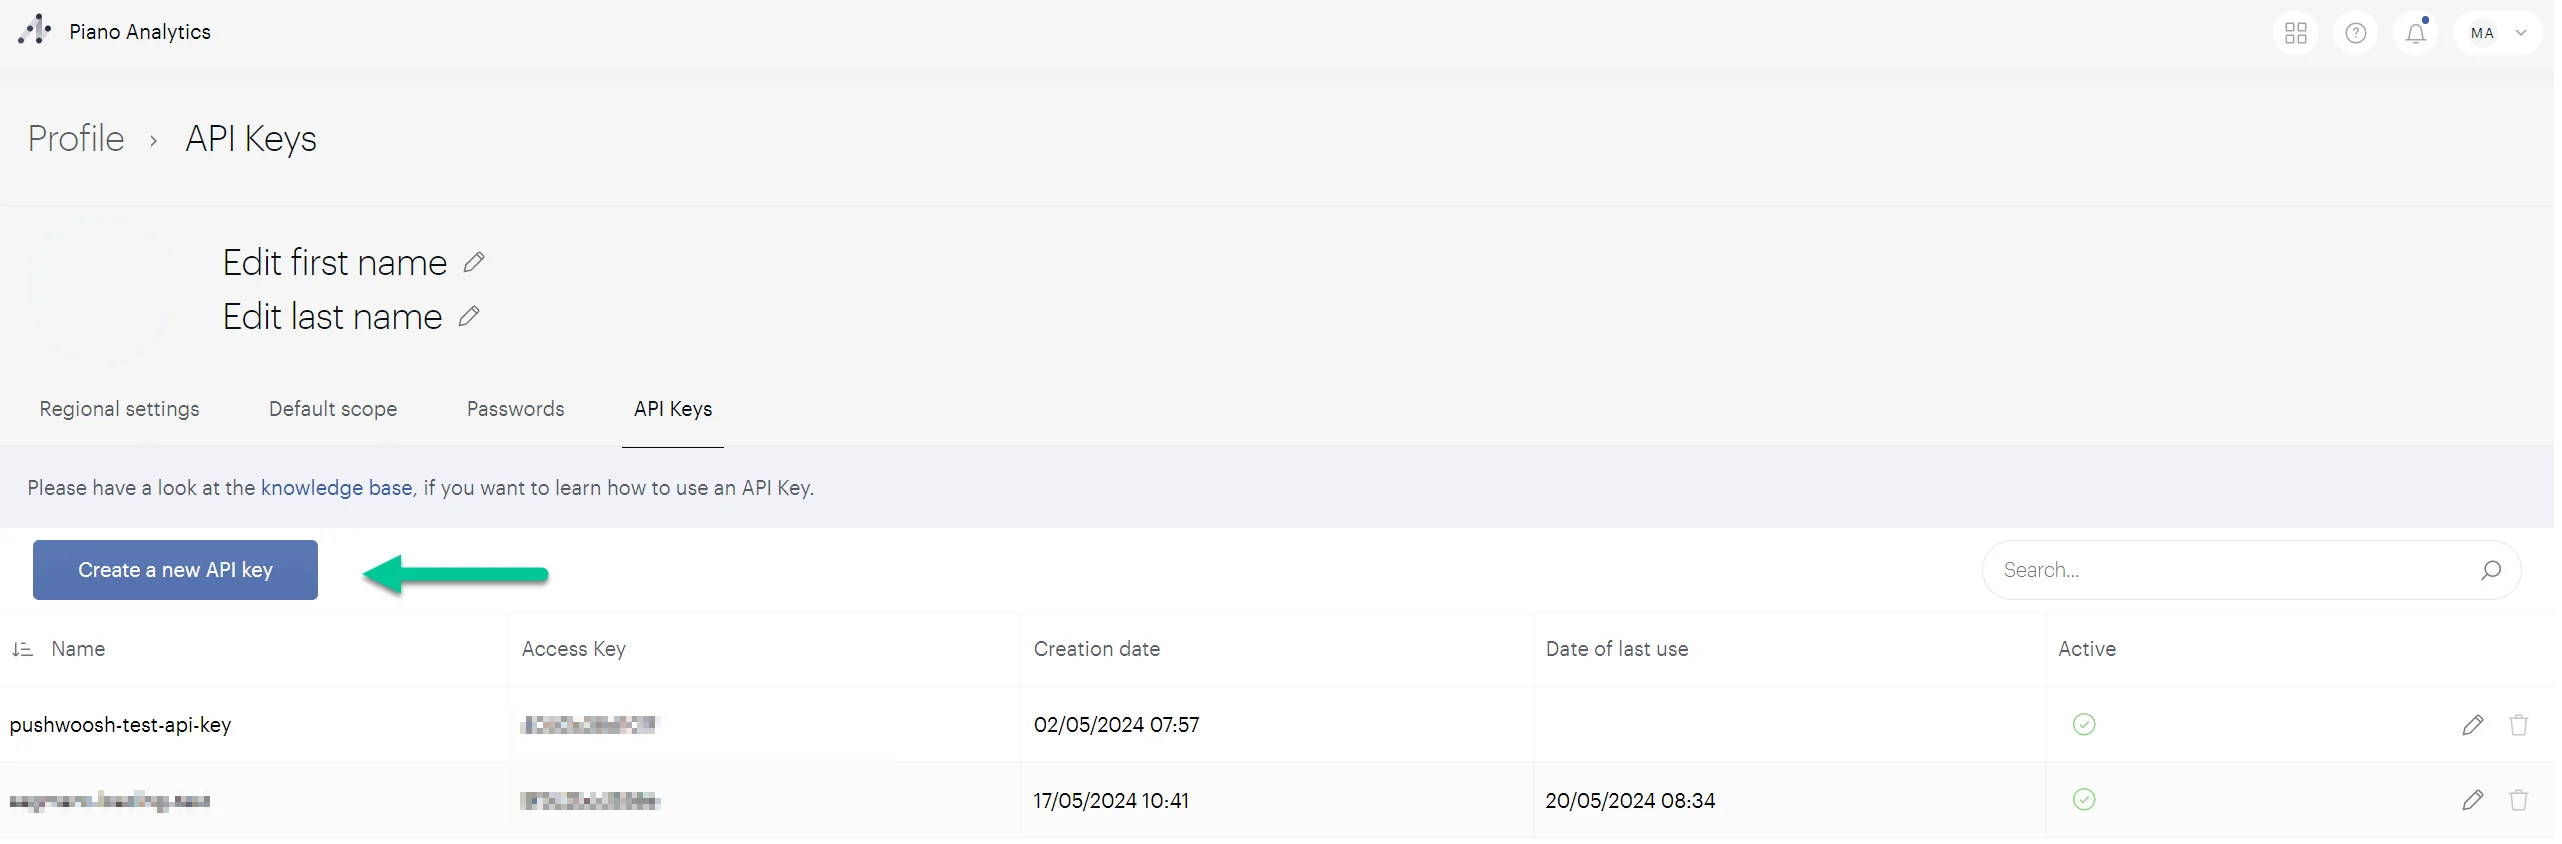
* Navigate to the **API Keys** tab and create a new key with a clear name and description. Then click **OK**.
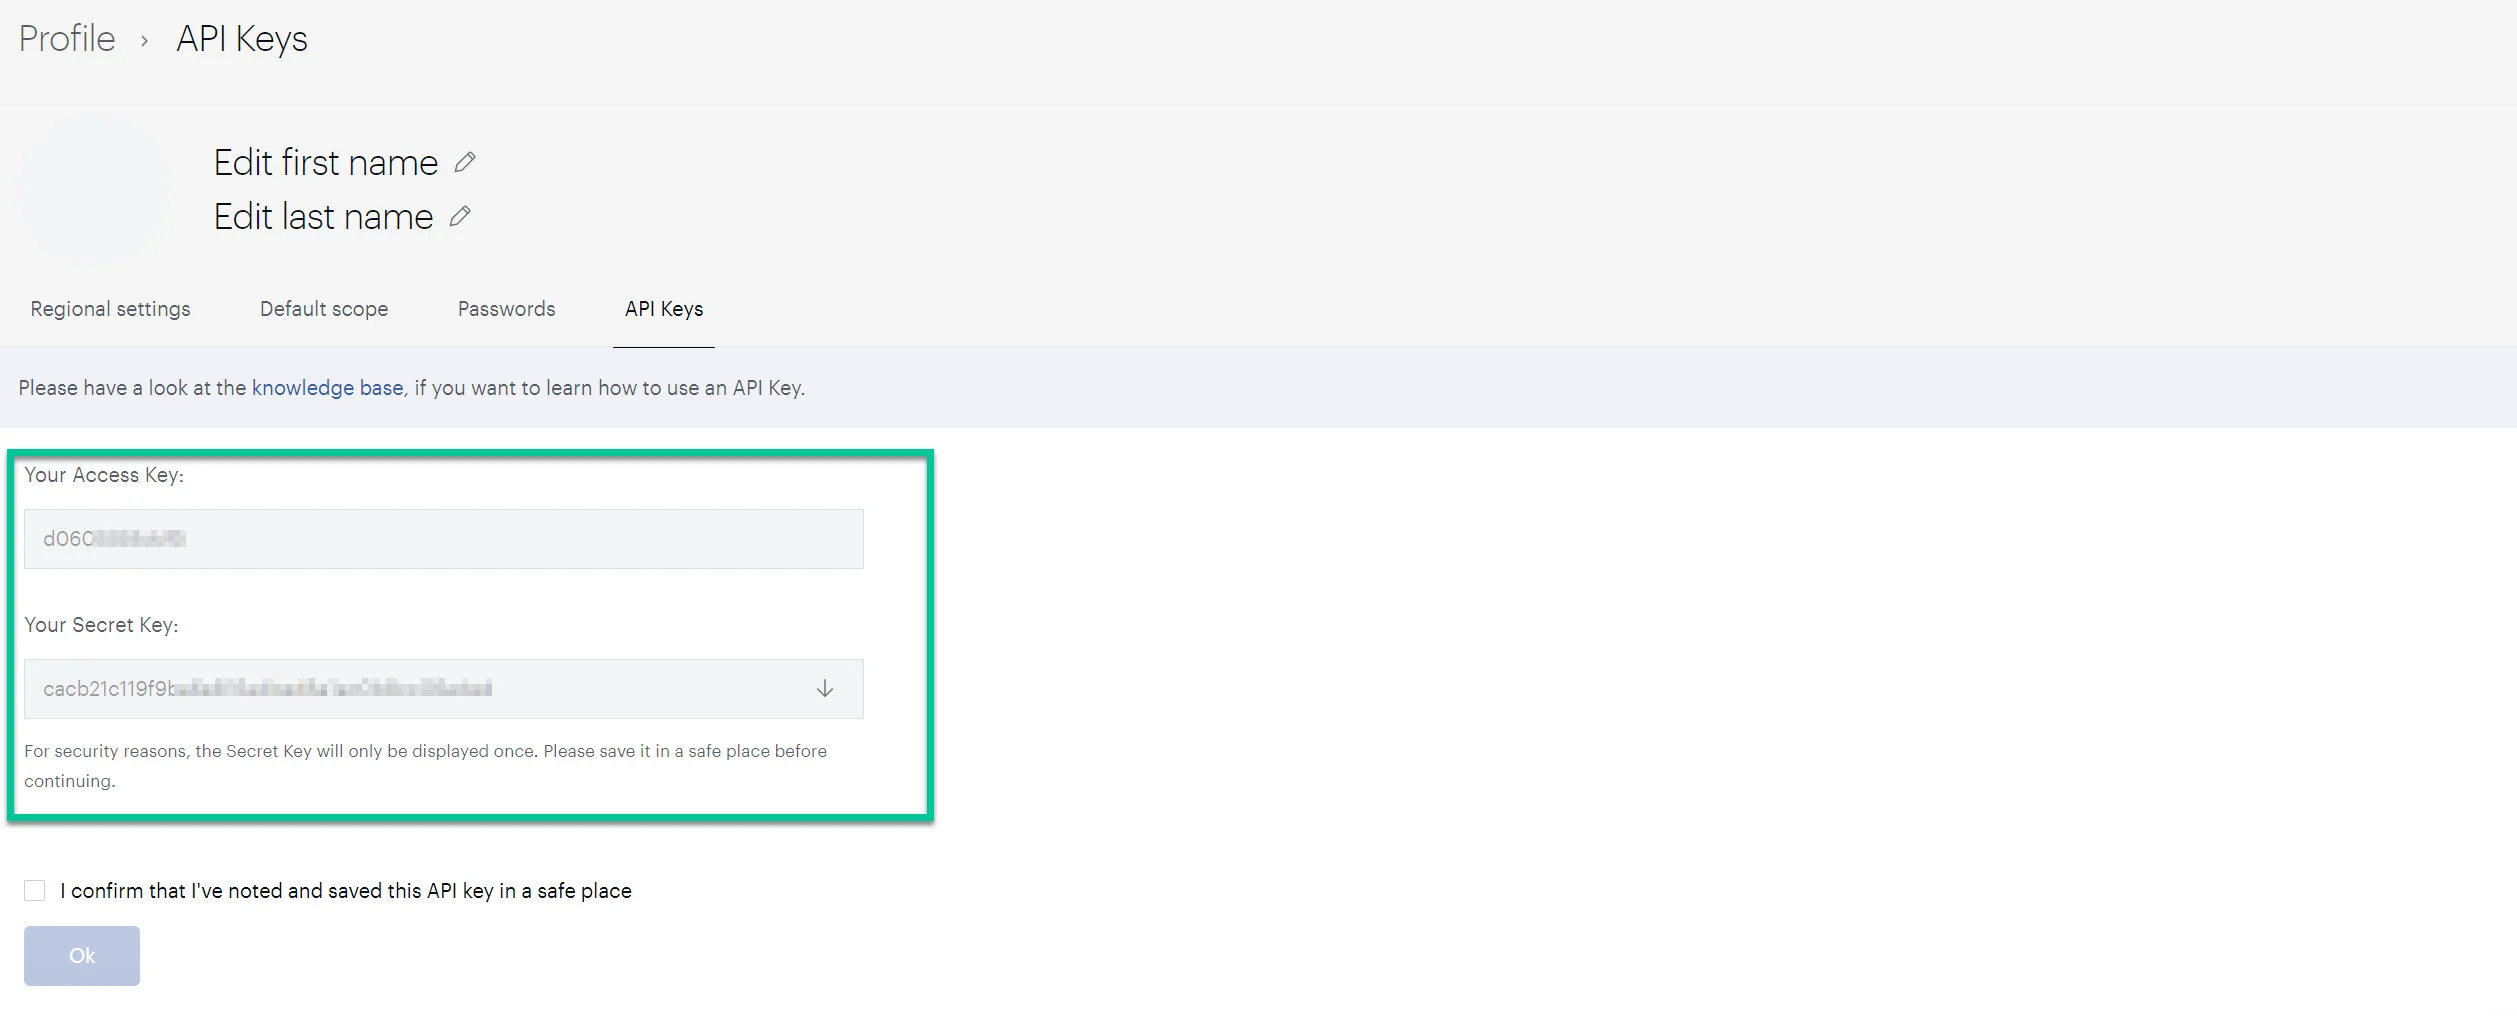
* In the window that opens, copy your **Access Key** and **the Secret Key**.
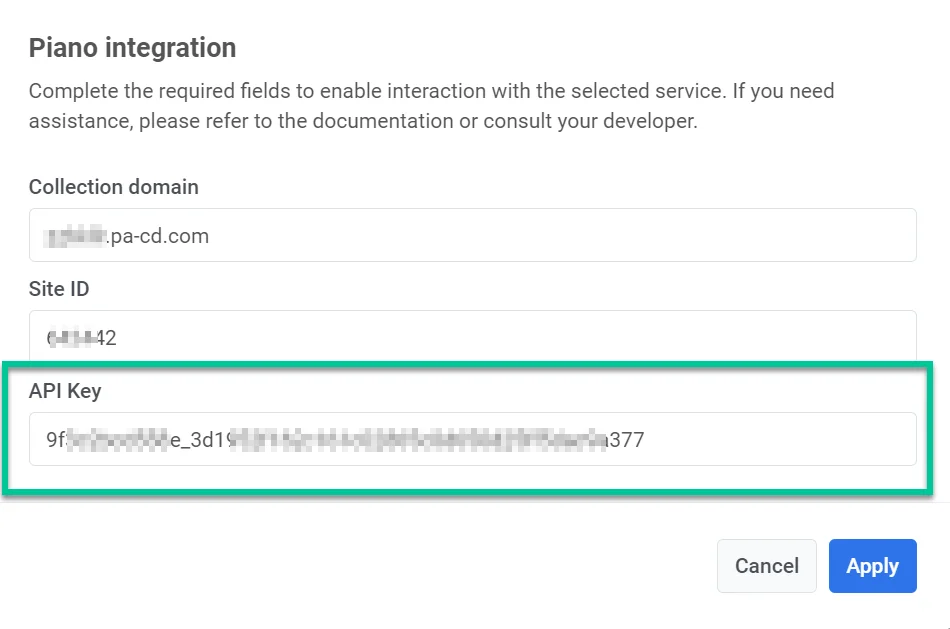
* In the **API key** field in Pushwoosh, enter both the **Access Key** and **Secret Key**, separated by an underscore. For example: **accesskey_secretkey**.
### Creating Piano events to match Pushwoosh events
To track events sent from Pushwoosh in Piano, you need to create corresponding events manually within Piano.
Here's how to do it in your Piano account:
1. Go to **Settings > Data management > Data model**.
2. Select **Events** and click the plus icon to create a new event.
3. In the window that opens, provide the event name and description, for example, _**"pw\_siteopened"**_.
4. In the **Type** field, select **On-site**.
5. In the **Categories** field, select **Events**.
6. Click **Save**.
### Setting your website’s time zone in Piano
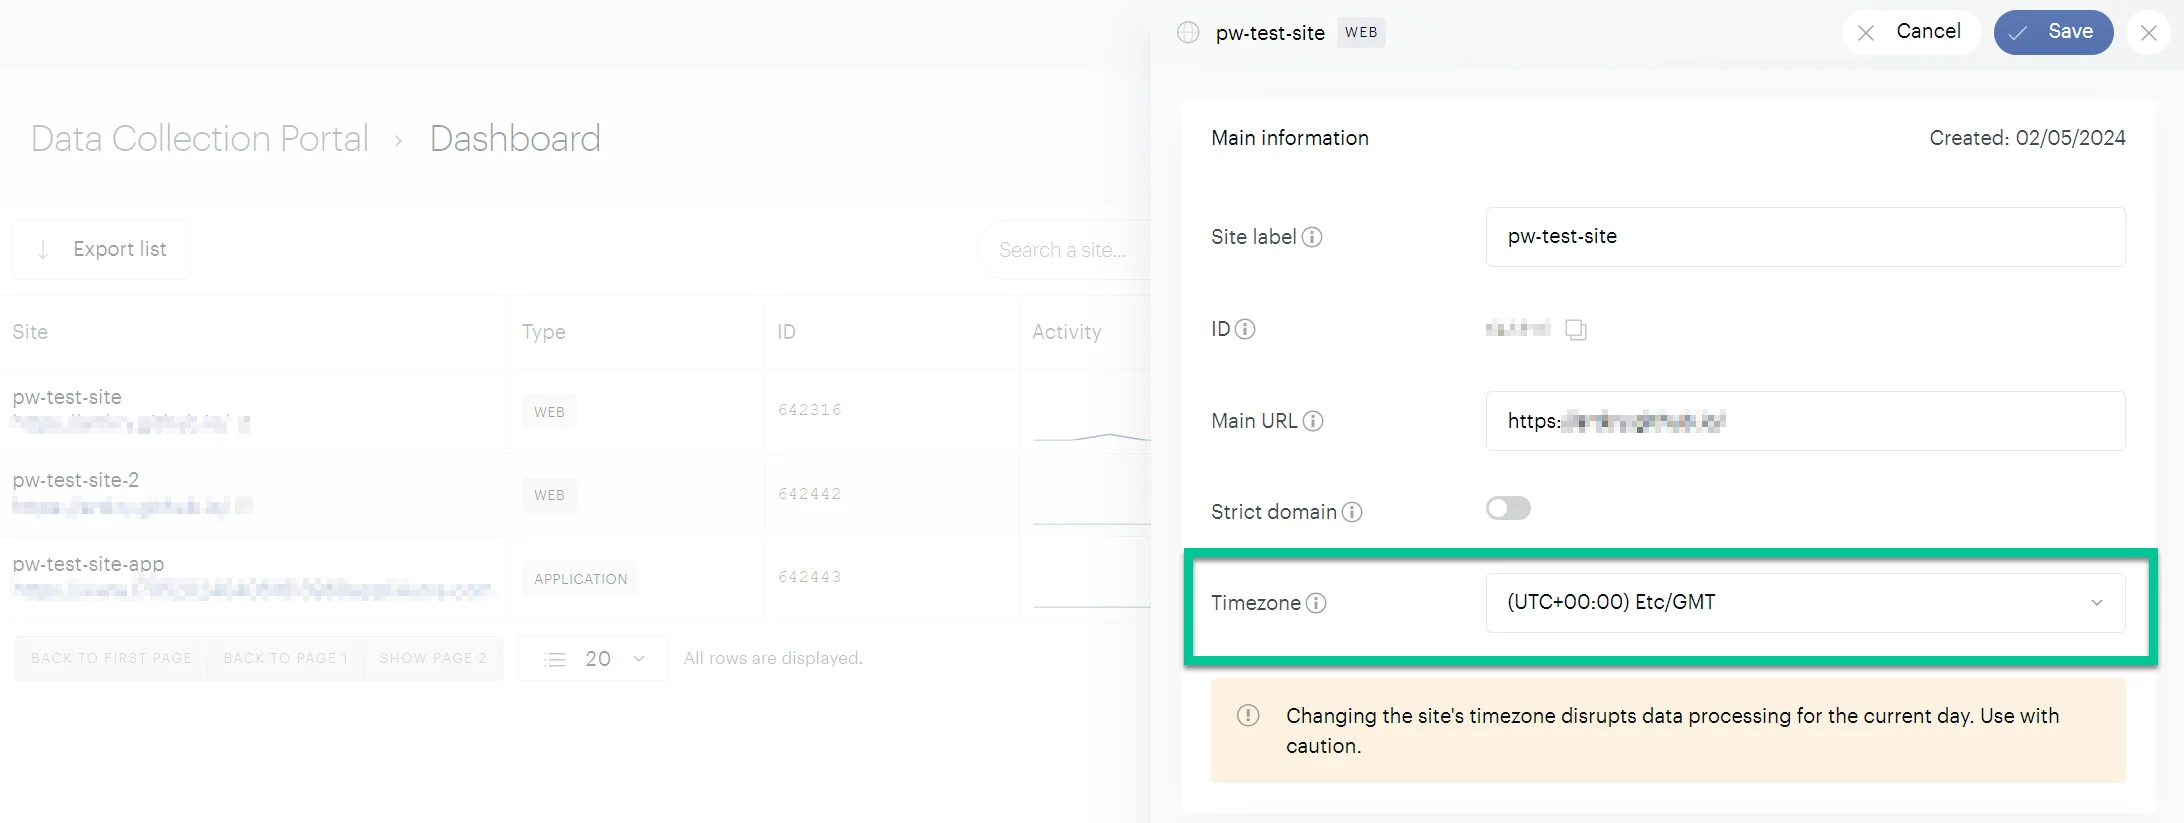
Setting the correct time zone for your website in Piano is crucial for accurate data tracking and analysis. The best practice is to match the time zone with the location where you're sending events and conducting analysis. This eliminates time discrepancies.
To edit the timezone in Piano, go to **Dashboard** and click the line containing your site information. In the pop-up window, click **Edit** and select the desired time zone. Then, click **Save**.
### Creating a property for identifying events sent from Pushwoosh in Piano
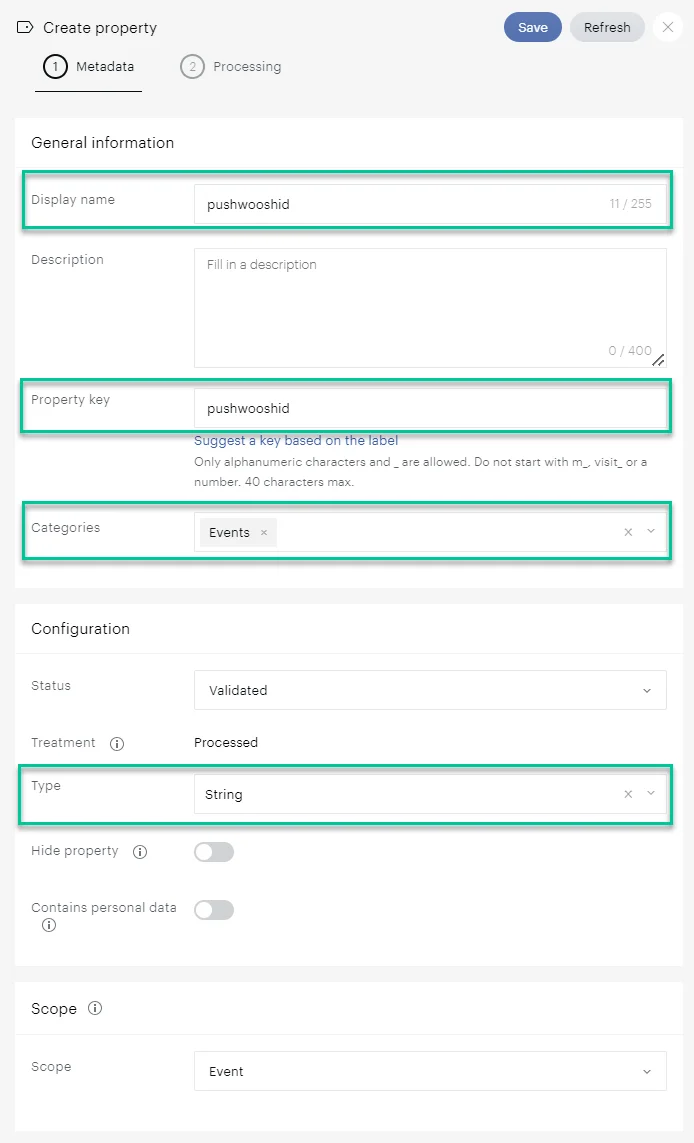
To make data management easier, create a property in Piano that can be associated with Pushwoosh events. This will allow you to easily identify events sent from Pushwoosh.
Here's how to create the property:
1. In Piano, go to **Settings > Data Management > Properties.**
2. Click **Create Property**.
3. In the **Name** field, enter **pushwooshid**.
4. In the **Property Key** field, enter **pushwooshid**.
5. Set the **Type** to **String**.
6. Click **Save**.
### Checking if Pushwoosh events are sent to Piano
To verify that events set up in Pushwoosh are successfully sent to Piano, follow these steps:
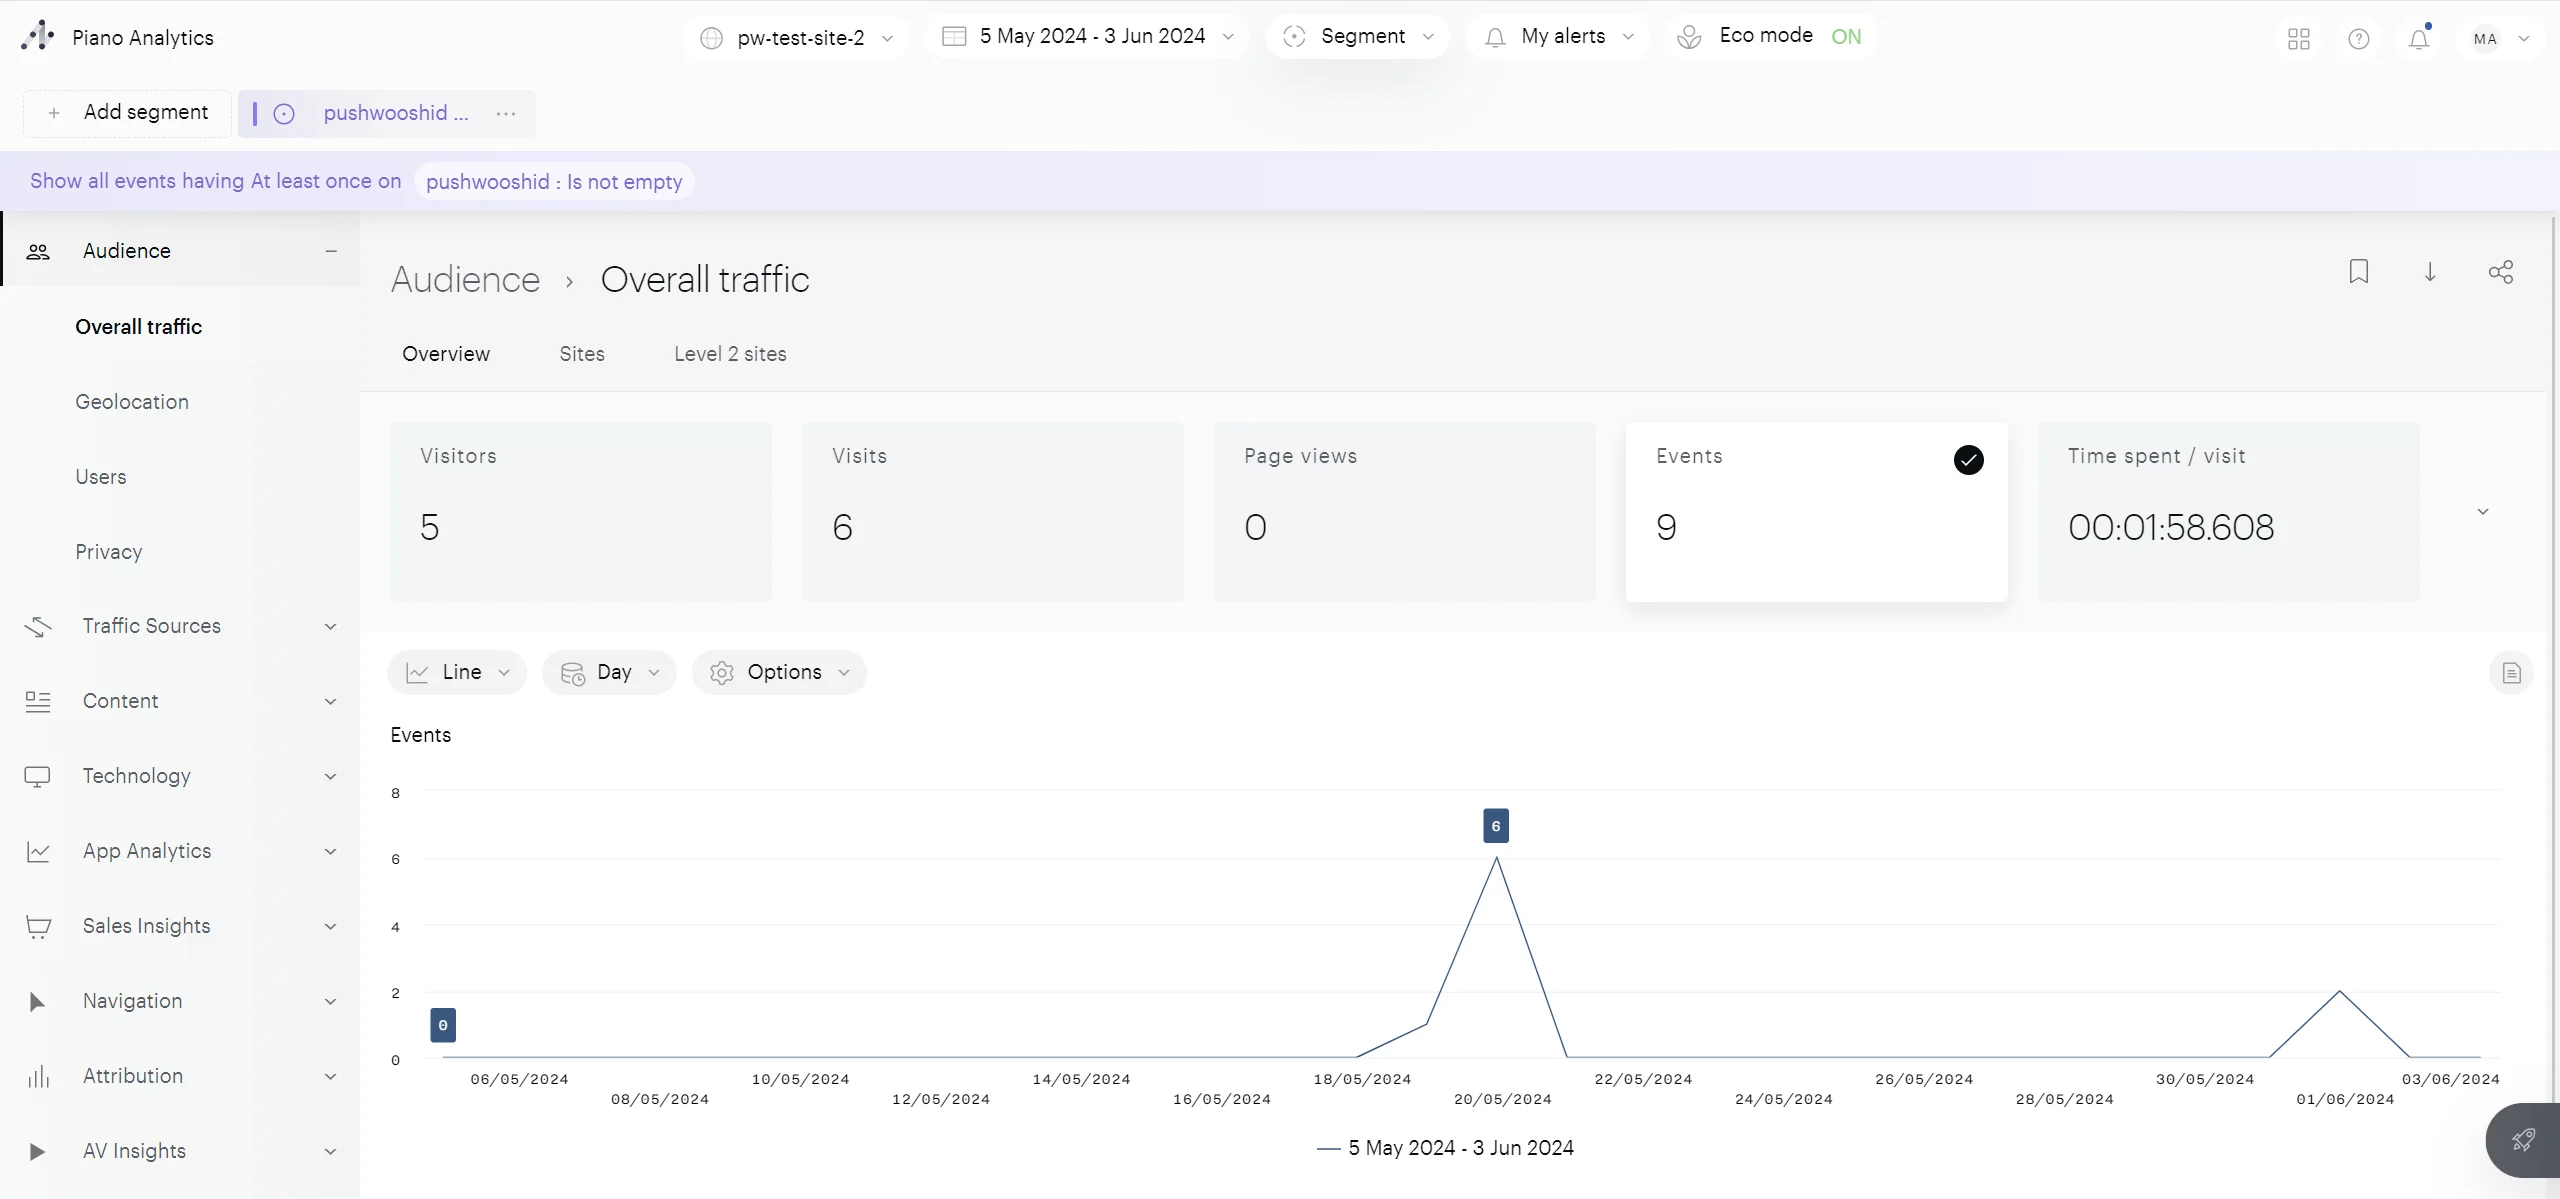
1. In your Piano account, go to **Explorer > Audience > Overall Traffic**.
2. Create a segment based on events where the property **pushwooshid** is not empty.
The filtered view will display overall traffic information, including any associated events.
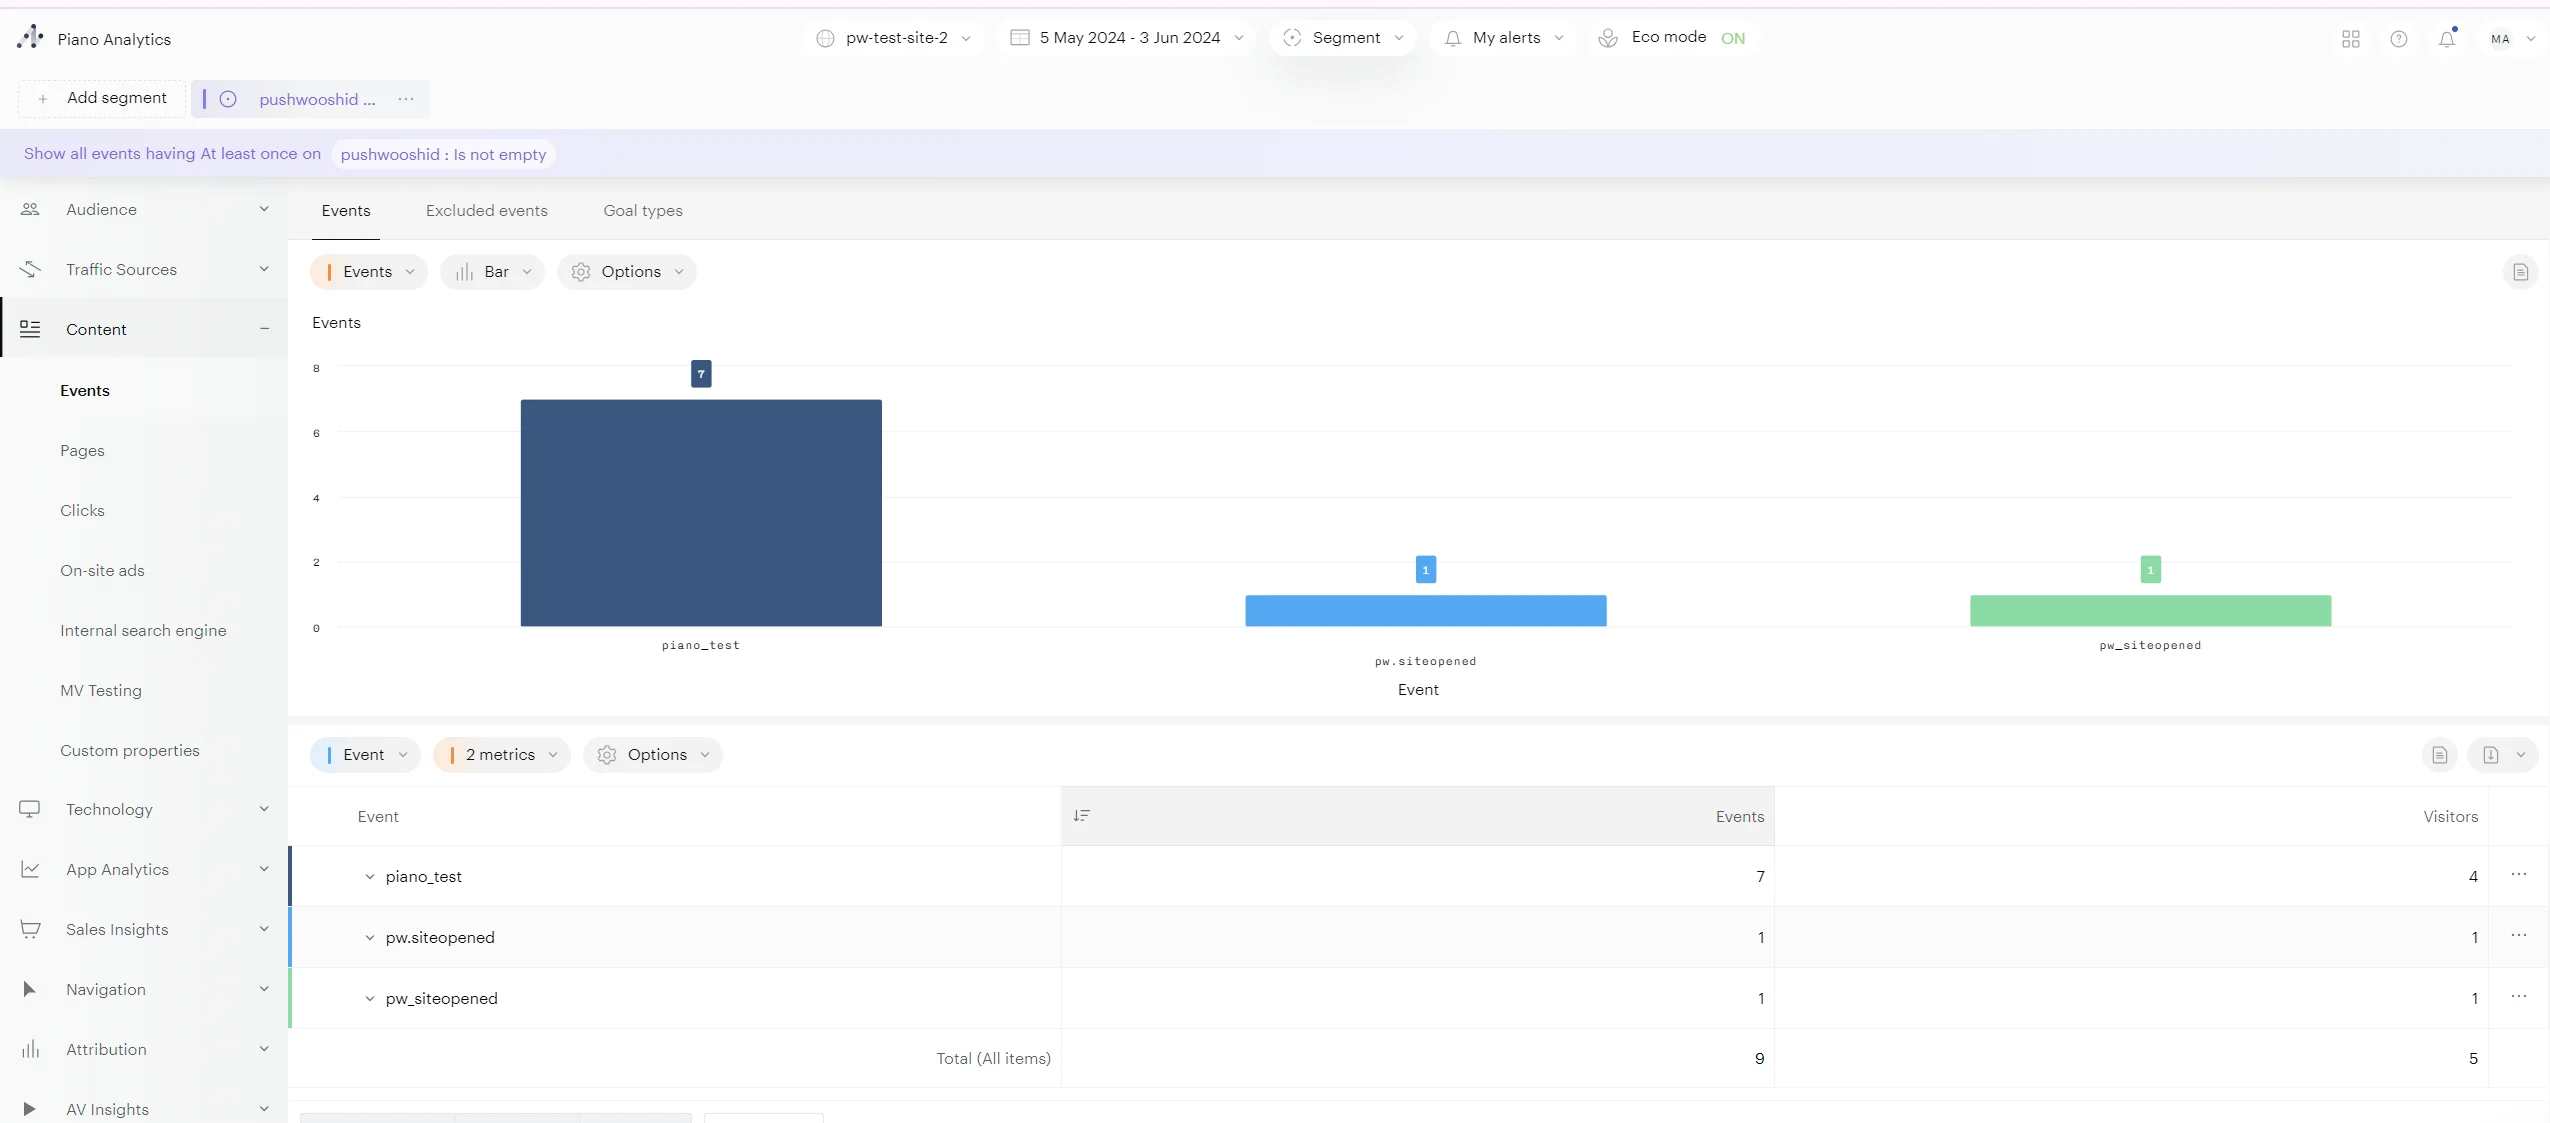
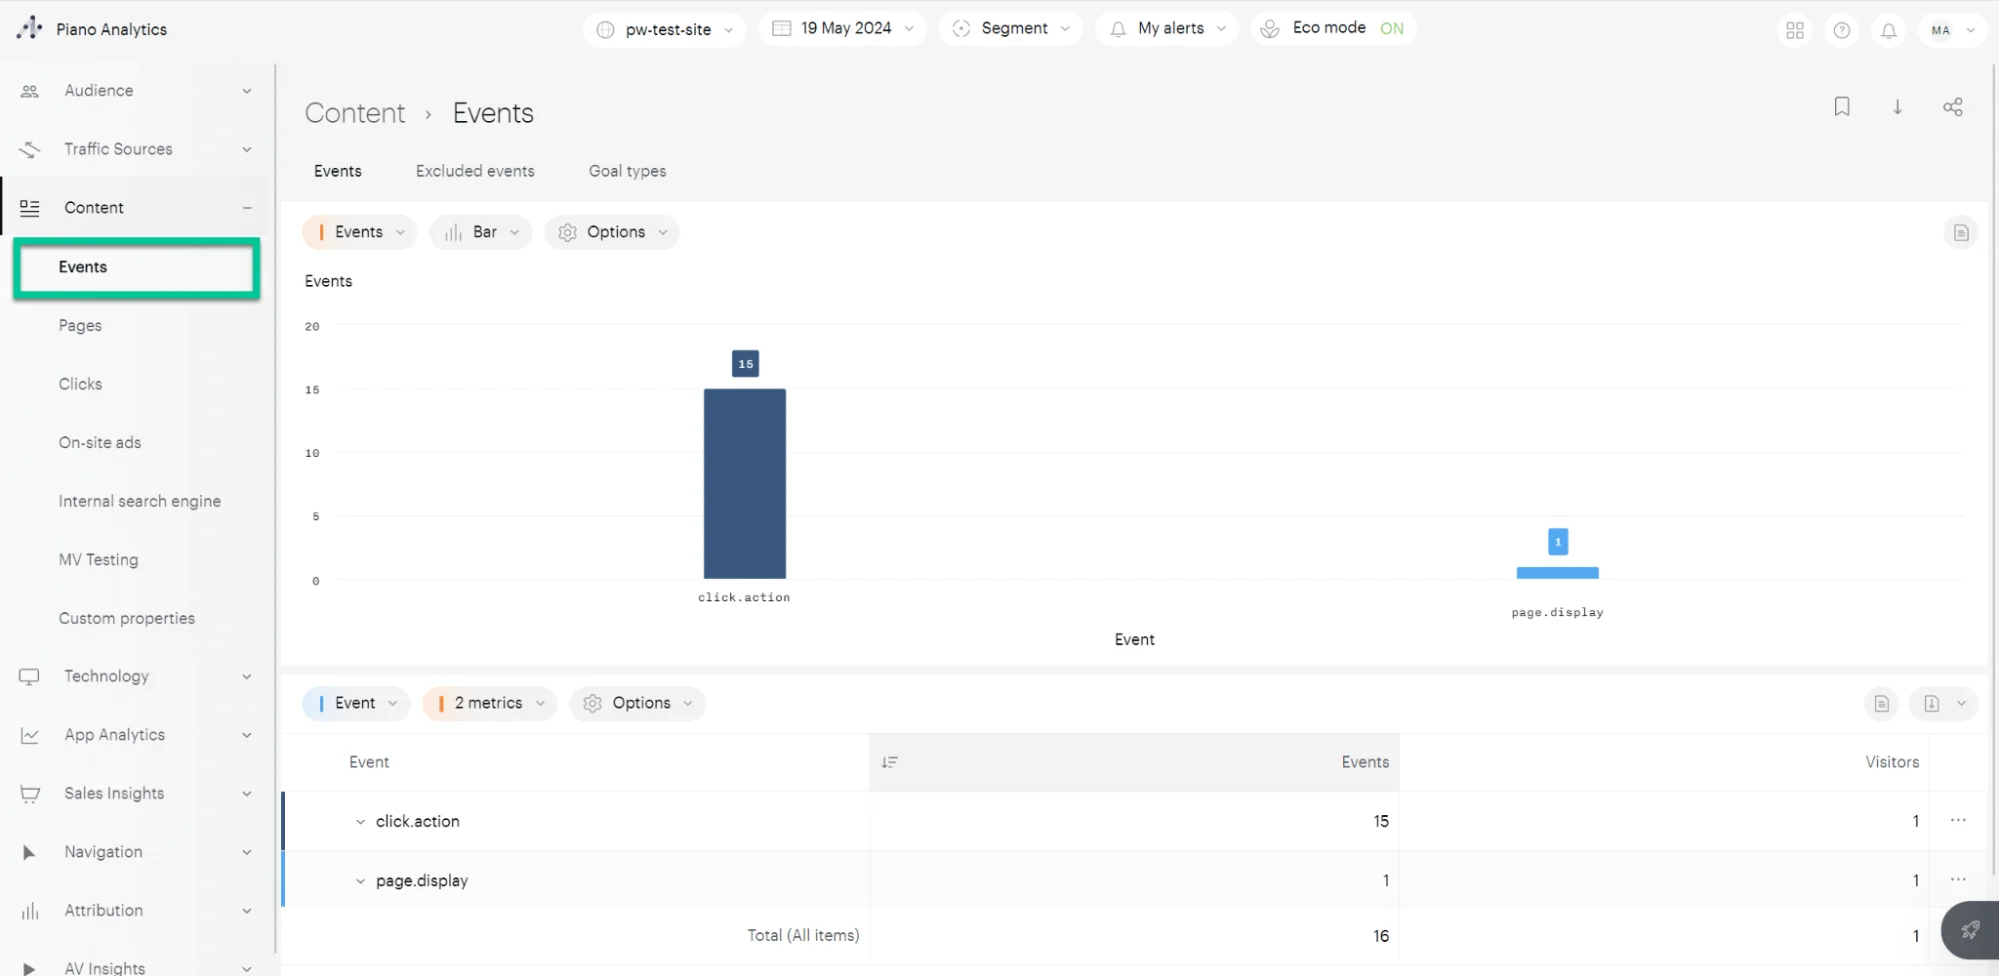
For a more granular view of events sent from Pushwoosh, navigate to **Content > Events**. This section provides a detailed breakdown of all the events sent from Pushwoosh, including the number of times each event occurred.
### Creating segments in Piano
Once you've completed the integration setup, you can start analyzing events sent from Pushwoosh within Piano. To access these events, navigate to **Explorer > Content > Events** in your Piano account.
Then [create Segments](https://support.piano.io/hc/en-us/articles/4467486423570-Create-a-segment) using these events. When creating segments, select the **`pushwooshid`** property you've created earlier to filter events.
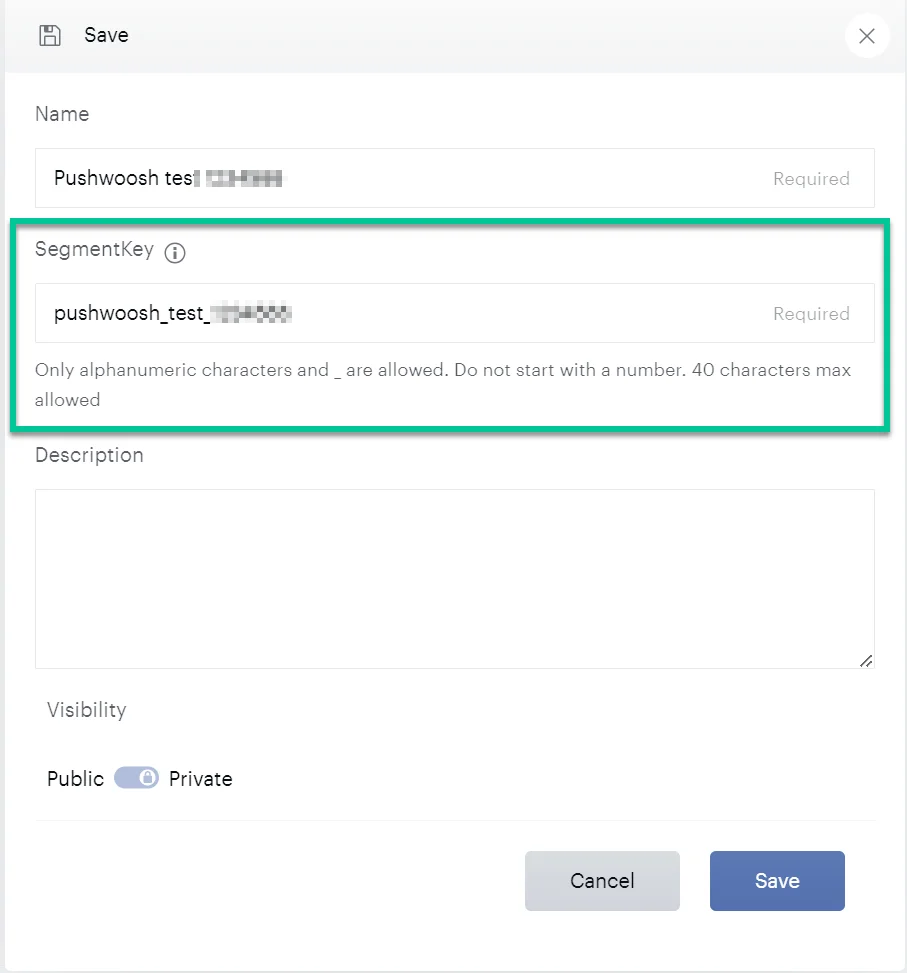
Make sure to give your segment a clear and descriptive name. The **Segment Key**, which is a unique identifier for the saved segment, will be needed later for sending segments to Pushwoosh.
### Sending segments from Piano to Pushwoosh
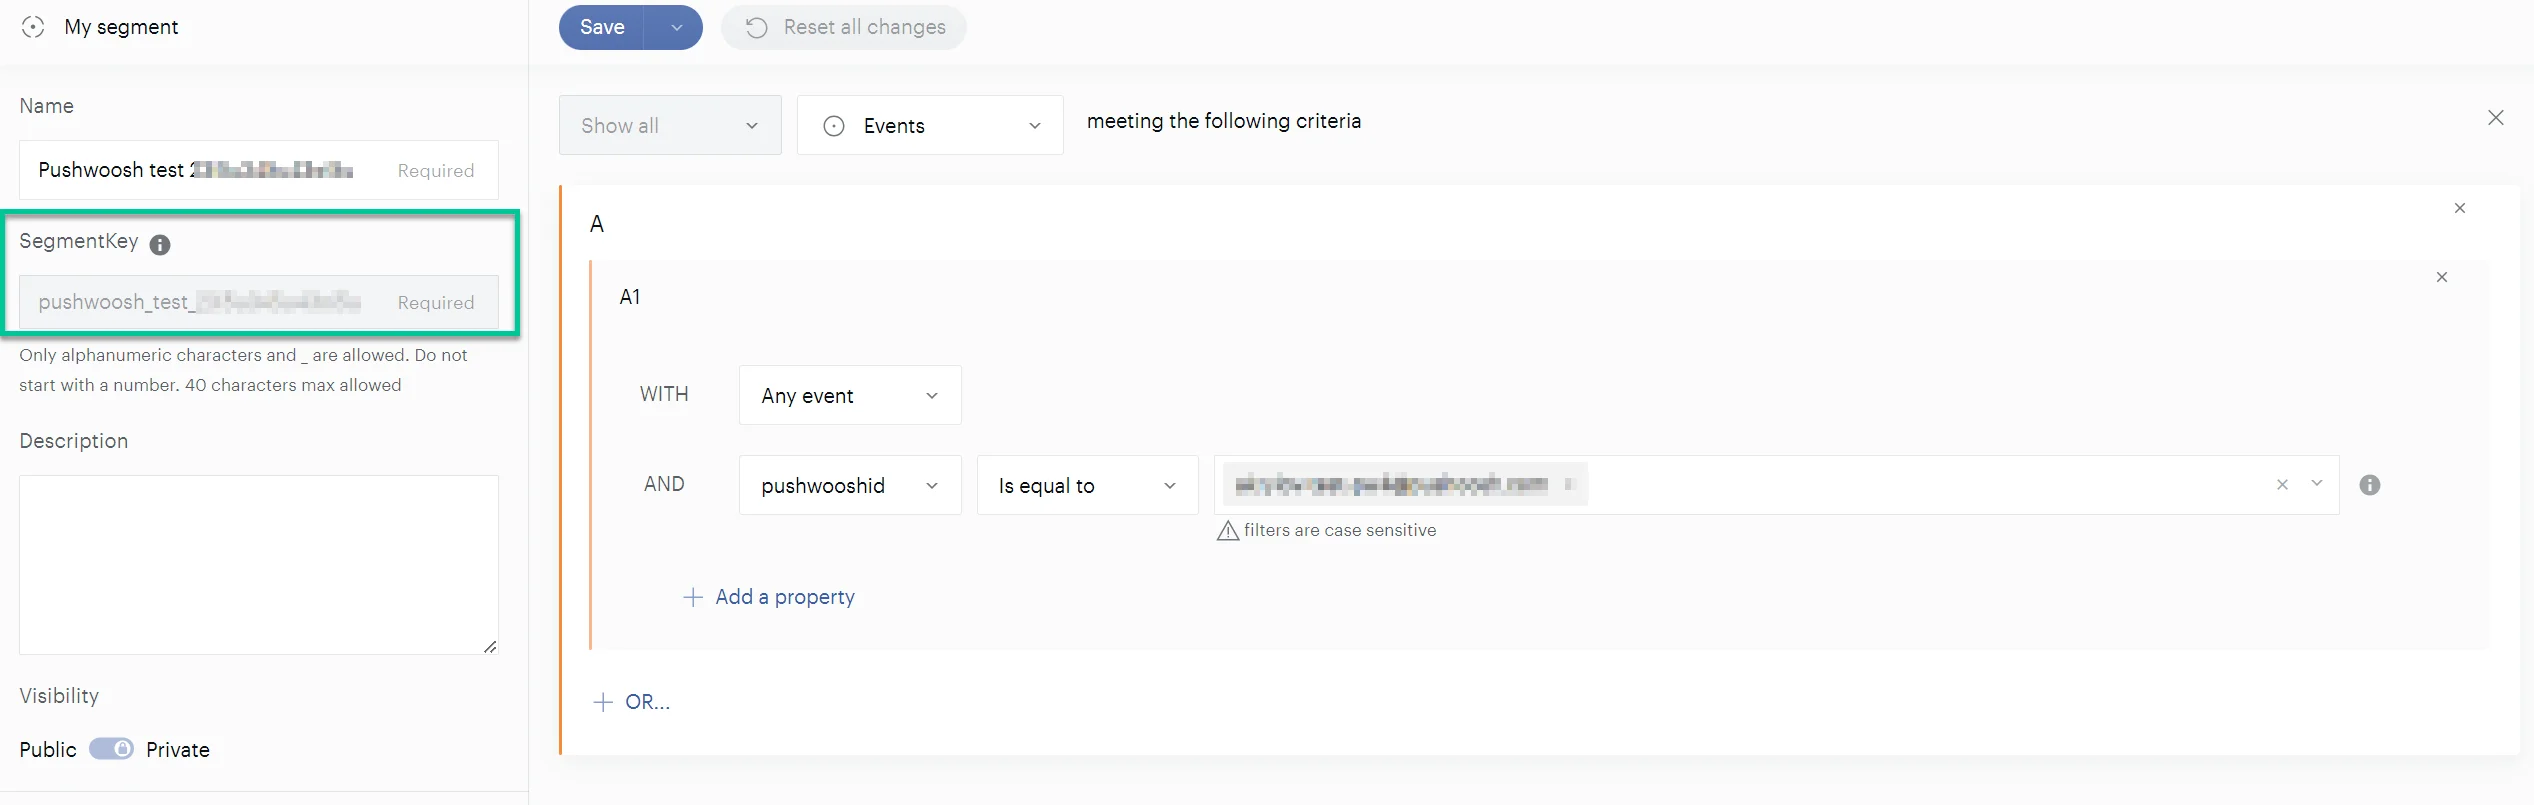
To enable Pushwoosh to retrieve segments from Piano, provide Pushwoosh with the SegmentKey you created. To find the SegmentKey for a segment, go to **Analysis > Library > Segments**. Click on the segment you need and copy the **Segment Key**.
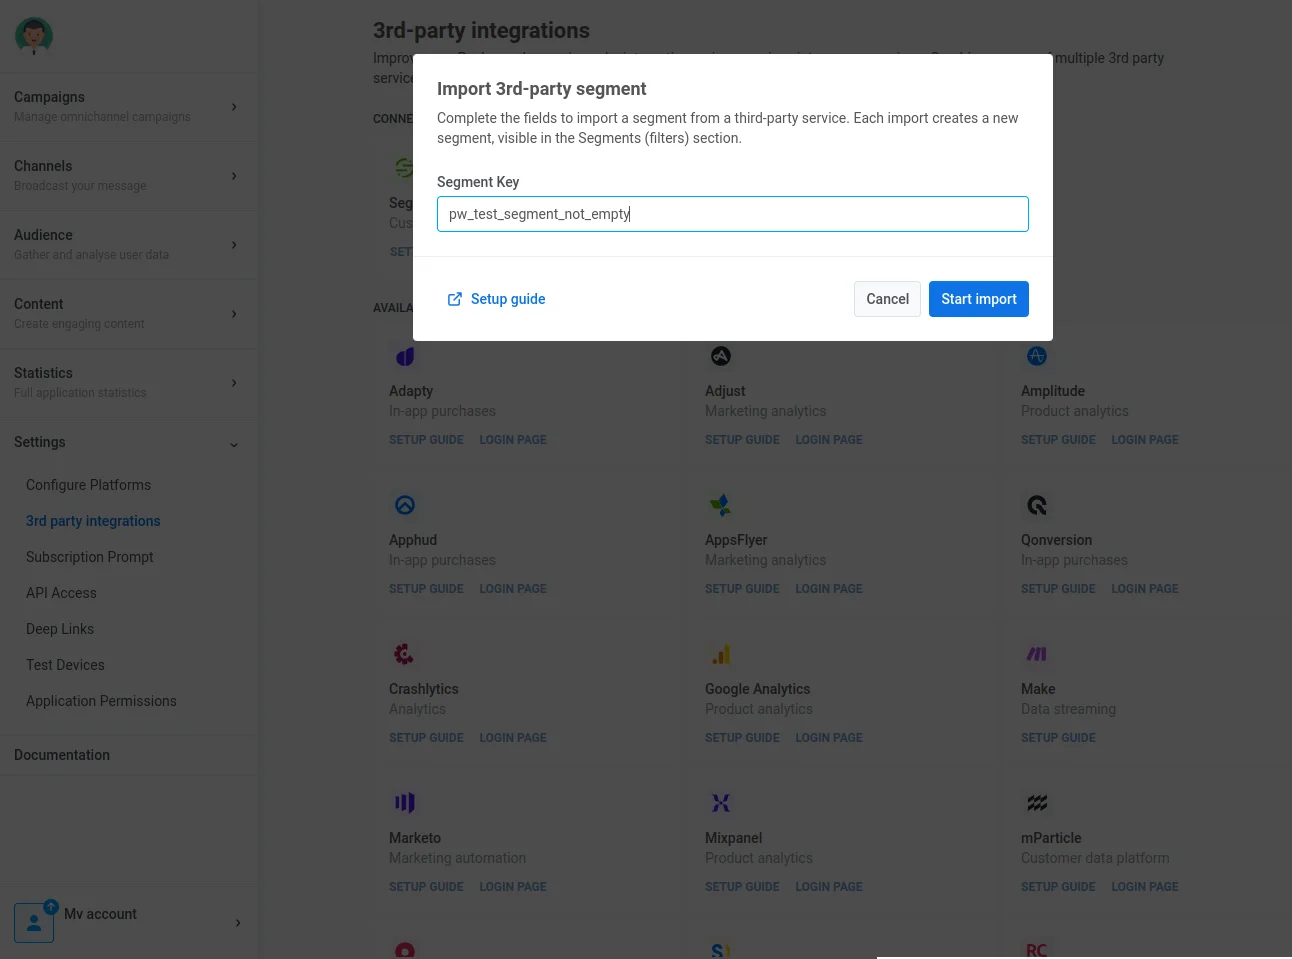
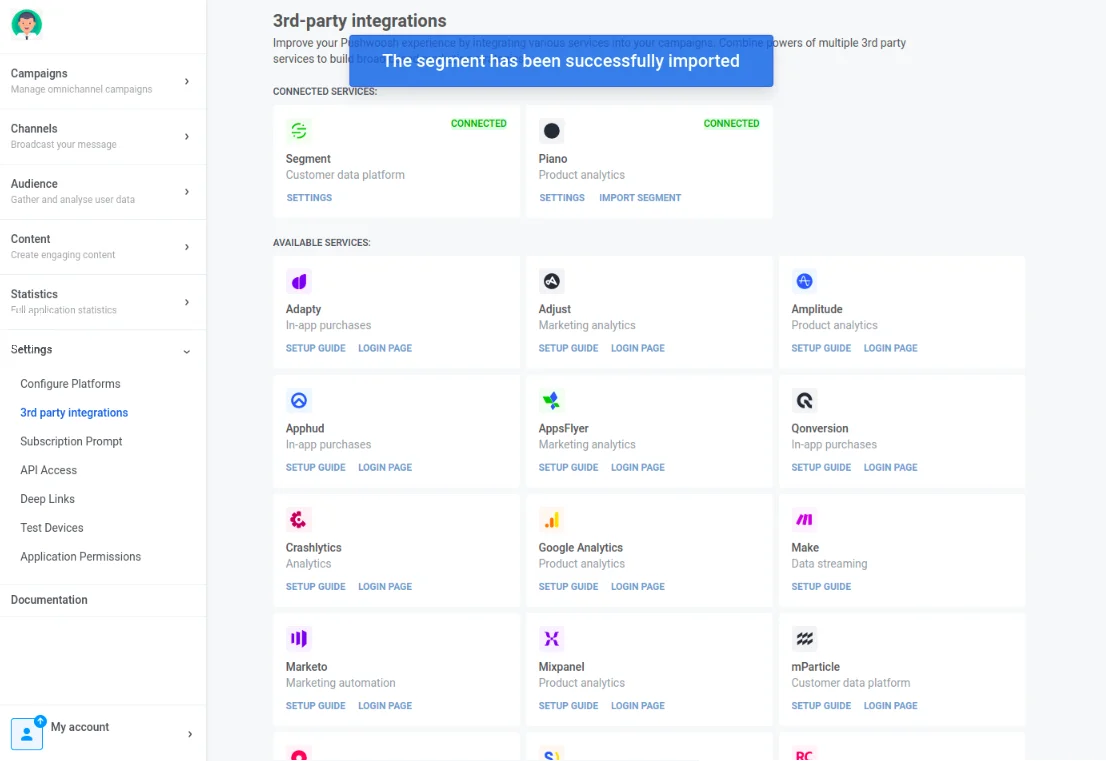
In the Pushwoosh Integrations section, locate **Piano** and click on **Import Segment**. Then, enter the Segment key you copied.
If the import is successful, you'll see a confirmation message.
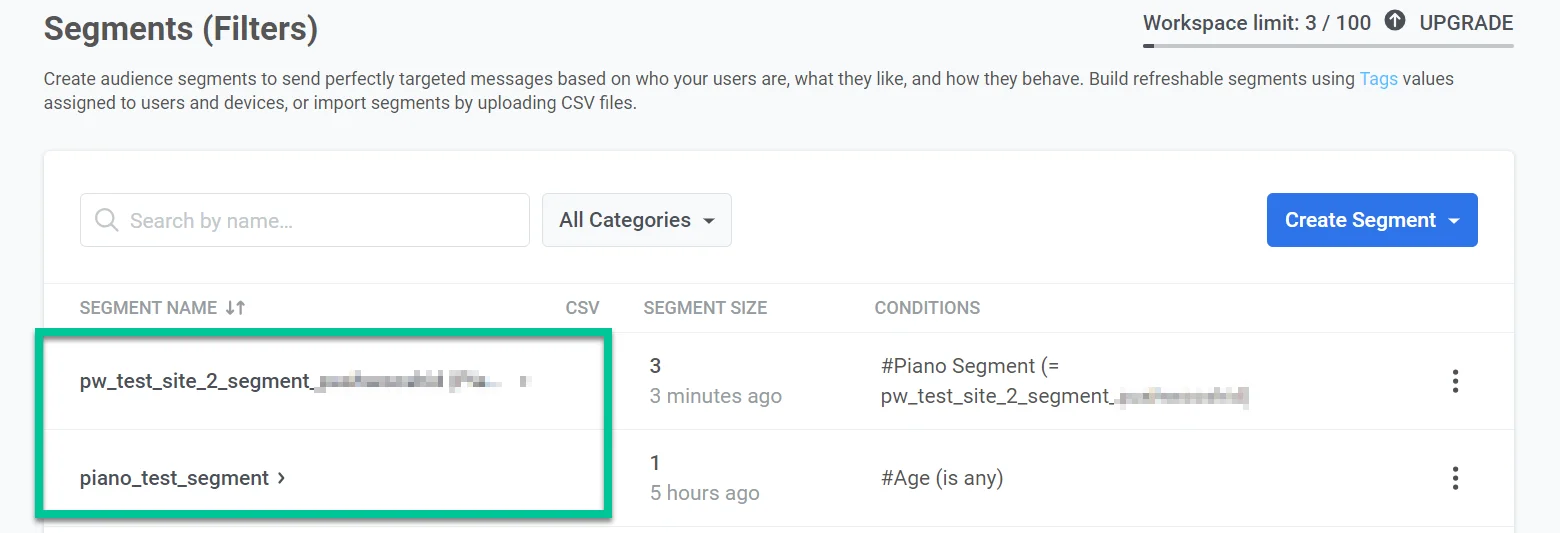
You can access your imported segments in Pushwoosh. Once the import is complete, they'll be listed in the **Audience > Segments** section of your Pushwoosh account.
## Mapping Piano VisitorID to Pushwoosh UserID/HWID for accumulated analytics across SDKs
If a client wants to accumulate analytics from both the Pushwoosh SDK and the Piano Analytics SDK, Pushwoosh needs to map Piano VisitorID to Pushwoosh UserID/HWID. The solution is to send a Piano VisitorID tag to Pushwoosh for the user/device.
For this, do the following:
1. Create a tag named '**Piano Visitor ID**' on the Pushwoosh side for the application. Note: The tag name must be exactly as described.
2. On the client’s application side, get the Piano Visitor ID within the Piano SDK using the **getVisitorId** method.
3. On the client’s application side, use the Pushwoosh SDK to call the `setTags` request with the tag value once.
If the tag value (Piano Visitor ID) exists for the user/device, Pushwoosh will automatically include it as Client ID in requests to Piano Analytics. On the Piano Analytics side, it will be transformed into a unique visitor ID value.
## Code examples
##### Web Push SDK (JavaScript)
```javascript
Pushwoosh.push(function(api) {
// Set tags for a user
api.setTags({
'Piano Visitor ID': pa.getVisitorID(),
});
```
##### Android (Java)
```java
String value1 = PianoAnalytics.getInstance().visitorId();
TagsBundle pianoTag = new TagsBundle.Builder()
.putString("Piano Visitor ID", value1)
.build();
Pushwoosh.getInstance().setTags(pianoTag);
```
##### iOS (Swift)
```swift
var pianoId: String = pa.getVisitorId(completionHandler: { visitorId in
Pushwoosh.sharedInstance().setTags([
"Piano Visitor ID": visitorId
])
})
```
##### iOS (Objective-C)
```objective-c
__block NSString *pianoId;
[pa getVisitorIdWithCompletionHandler:^(NSString *visitorId) {
Piano Visitor ID = visitorId;
[[Pushwoosh sharedInstance] setTags:@{@"Piano Visitor ID": visitorId}];
}];
```
In general, Pushwoosh uses device tags to provide device and other information to Piano Analytics within each request. Here is a list of common tags used:
* **Country**
* **Device Model**
* **OS Version**
* **Browser Type** (in some cases)
## How to verify the integration is working
#### Source: Detecting events sent to Piano Analytics
There are two easy ways to detect events that were sent to Piano Analytics:
##### Stream Inspector
1. Go to your **Piano Analytics** account.
2. Navigate to **Settings** > **Data Collection Portal** > **Tools** > **Stream Inspector**.
3. Choose the connected site you want to check.
4. Select the events you want to inspect and start a session.
5. Verify that the events were received by Piano Analytics.
##### Check Events in Overall Traffic
1. Go to your **Piano Analytics** account.
2. Navigate to **Settings** > **Explorer** > **Audience** > **Overall Traffic**.
3. Choose the site and date range in the menu below.
#### Destination: Importing Piano's Segment
To verify the integration on the destination side:
* Import Piano's segment.
* You should see a new segment (filter) with a name constructed like `segment_key (Piano Autogenerated)`.
* Recalculate the segment to get up-to-date information about current devices processing.
## FAQ troubleshooting: Common issues
#### How can I ensure events are correctly sent from Pushwoosh to Piano Analytics?
**Solution**: Use Piano's Stream Inspector or check Overall Traffic in Piano Analytics to monitor incoming events from Pushwoosh.
#### What should I do if segment data isn't imported correctly into Pushwoosh?
**Solution**: Ensure the Segment Key from Piano matches the setup in Pushwoosh. Check for any errors in segment size calculations or data retrieval.
#### Can I integrate Piano VisitorID with Pushwoosh for enhanced analytics?
**Solution**: Yes, by setting up a specific tag in Pushwoosh and using Piano's SDK to fetch VisitorID, you can synchronize user IDs across platforms.
#### What should I do if there are issues with API key configurations?
**Solution**: Review API request logs, ensure correct endpoint URLs and authentication tokens (API keys), and check for any server-side errors reported by either service.
 In the window that opens, provide the following credentials:
1. Site ID
To locate your Site ID, log in to your Piano account and go to **Analytics > Data Collection Portal > Dashboard.** Find the relevant website and copy its ID.
In the window that opens, provide the following credentials:
1. Site ID
To locate your Site ID, log in to your Piano account and go to **Analytics > Data Collection Portal > Dashboard.** Find the relevant website and copy its ID.
 2. Collection Domain
To find the Collection Domain, navigate to **Tagging > Collection Domains**. Copy the Collection Domain ID. Make sure to enter the collection domain in the **\*\*\*\*.pa-cd.com** format without the **https:// prefix.**
2. Collection Domain
To find the Collection Domain, navigate to **Tagging > Collection Domains**. Copy the Collection Domain ID. Make sure to enter the collection domain in the **\*\*\*\*.pa-cd.com** format without the **https:// prefix.**
 3. Piano API Access and Secret keys
To get the keys:
* In your Piano account, click on **See profile** below your account name.
3. Piano API Access and Secret keys
To get the keys:
* In your Piano account, click on **See profile** below your account name.
 * Navigate to the **API Keys** tab and create a new key with a clear name and description. Then click **OK**.
 * In the window that opens, copy your **Access Key** and **the Secret Key**.
 * In the **API key** field in Pushwoosh, enter both the **Access Key** and **Secret Key**, separated by an underscore. For example: **accesskey_secretkey**.
 ### Creating Piano events to match Pushwoosh events
To track events sent from Pushwoosh in Piano, you need to create corresponding events manually within Piano.
Here's how to do it in your Piano account:
1. Go to **Settings > Data management > Data model**.
2. Select **Events** and click the plus icon to create a new event.
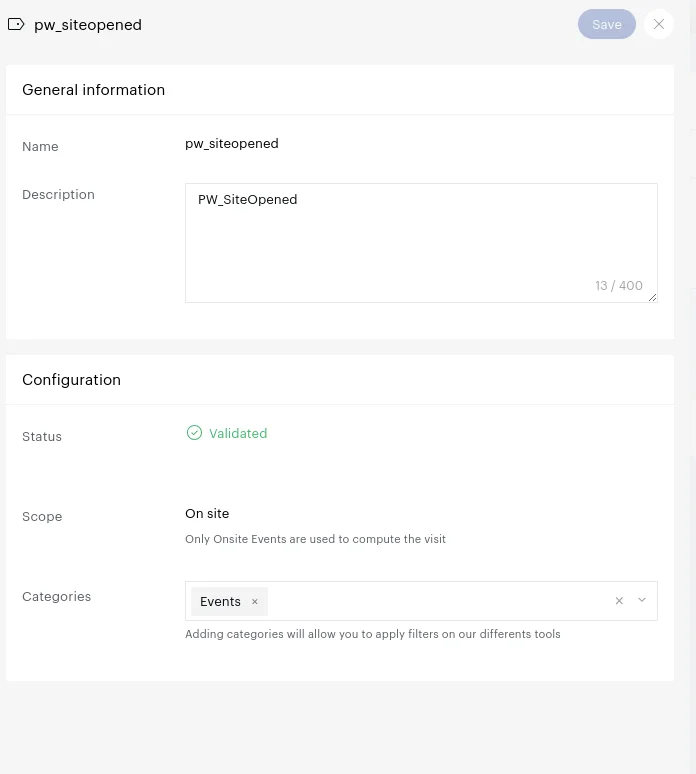
3. In the window that opens, provide the event name and description, for example, _**"pw\_siteopened"**_.
4. In the **Type** field, select **On-site**.
5. In the **Categories** field, select **Events**.
6. Click **Save**.
### Creating Piano events to match Pushwoosh events
To track events sent from Pushwoosh in Piano, you need to create corresponding events manually within Piano.
Here's how to do it in your Piano account:
1. Go to **Settings > Data management > Data model**.
2. Select **Events** and click the plus icon to create a new event.
3. In the window that opens, provide the event name and description, for example, _**"pw\_siteopened"**_.
4. In the **Type** field, select **On-site**.
5. In the **Categories** field, select **Events**.
6. Click **Save**.
 ### Setting your website’s time zone in Piano
Setting the correct time zone for your website in Piano is crucial for accurate data tracking and analysis. The best practice is to match the time zone with the location where you're sending events and conducting analysis. This eliminates time discrepancies.
To edit the timezone in Piano, go to **Dashboard** and click the line containing your site information. In the pop-up window, click **Edit** and select the desired time zone. Then, click **Save**.
### Setting your website’s time zone in Piano
Setting the correct time zone for your website in Piano is crucial for accurate data tracking and analysis. The best practice is to match the time zone with the location where you're sending events and conducting analysis. This eliminates time discrepancies.
To edit the timezone in Piano, go to **Dashboard** and click the line containing your site information. In the pop-up window, click **Edit** and select the desired time zone. Then, click **Save**.
 ### Creating a property for identifying events sent from Pushwoosh in Piano
To make data management easier, create a property in Piano that can be associated with Pushwoosh events. This will allow you to easily identify events sent from Pushwoosh.
Here's how to create the property:
1. In Piano, go to **Settings > Data Management > Properties.**
2. Click **Create Property**.
3. In the **Name** field, enter **pushwooshid**.
4. In the **Property Key** field, enter **pushwooshid**.
5. Set the **Type** to **String**.
6. Click **Save**.
### Creating a property for identifying events sent from Pushwoosh in Piano
To make data management easier, create a property in Piano that can be associated with Pushwoosh events. This will allow you to easily identify events sent from Pushwoosh.
Here's how to create the property:
1. In Piano, go to **Settings > Data Management > Properties.**
2. Click **Create Property**.
3. In the **Name** field, enter **pushwooshid**.
4. In the **Property Key** field, enter **pushwooshid**.
5. Set the **Type** to **String**.
6. Click **Save**.
 ### Checking if Pushwoosh events are sent to Piano
To verify that events set up in Pushwoosh are successfully sent to Piano, follow these steps:
1. In your Piano account, go to **Explorer > Audience > Overall Traffic**.
2. Create a segment based on events where the property **pushwooshid** is not empty.
### Checking if Pushwoosh events are sent to Piano
To verify that events set up in Pushwoosh are successfully sent to Piano, follow these steps:
1. In your Piano account, go to **Explorer > Audience > Overall Traffic**.
2. Create a segment based on events where the property **pushwooshid** is not empty.
 The filtered view will display overall traffic information, including any associated events.
 For a more granular view of events sent from Pushwoosh, navigate to **Content > Events**. This section provides a detailed breakdown of all the events sent from Pushwoosh, including the number of times each event occurred.
 ### Creating segments in Piano
Once you've completed the integration setup, you can start analyzing events sent from Pushwoosh within Piano. To access these events, navigate to **Explorer > Content > Events** in your Piano account.
### Creating segments in Piano
Once you've completed the integration setup, you can start analyzing events sent from Pushwoosh within Piano. To access these events, navigate to **Explorer > Content > Events** in your Piano account.
 Then [create Segments](https://support.piano.io/hc/en-us/articles/4467486423570-Create-a-segment) using these events. When creating segments, select the **`pushwooshid`** property you've created earlier to filter events.
 Make sure to give your segment a clear and descriptive name. The **Segment Key**, which is a unique identifier for the saved segment, will be needed later for sending segments to Pushwoosh.
 ### Sending segments from Piano to Pushwoosh
To enable Pushwoosh to retrieve segments from Piano, provide Pushwoosh with the SegmentKey you created. To find the SegmentKey for a segment, go to **Analysis > Library > Segments**. Click on the segment you need and copy the **Segment Key**.
### Sending segments from Piano to Pushwoosh
To enable Pushwoosh to retrieve segments from Piano, provide Pushwoosh with the SegmentKey you created. To find the SegmentKey for a segment, go to **Analysis > Library > Segments**. Click on the segment you need and copy the **Segment Key**.
 In the Pushwoosh Integrations section, locate **Piano** and click on **Import Segment**. Then, enter the Segment key you copied.
 If the import is successful, you'll see a confirmation message.
 You can access your imported segments in Pushwoosh. Once the import is complete, they'll be listed in the **Audience > Segments** section of your Pushwoosh account.
 ## Mapping Piano VisitorID to Pushwoosh UserID/HWID for accumulated analytics across SDKs
If a client wants to accumulate analytics from both the Pushwoosh SDK and the Piano Analytics SDK, Pushwoosh needs to map Piano VisitorID to Pushwoosh UserID/HWID. The solution is to send a Piano VisitorID tag to Pushwoosh for the user/device.
For this, do the following:
1. Create a tag named '**Piano Visitor ID**' on the Pushwoosh side for the application. Note: The tag name must be exactly as described.
2. On the client’s application side, get the Piano Visitor ID within the Piano SDK using the **getVisitorId** method.
3. On the client’s application side, use the Pushwoosh SDK to call the `setTags` request with the tag value once.
If the tag value (Piano Visitor ID) exists for the user/device, Pushwoosh will automatically include it as Client ID in requests to Piano Analytics. On the Piano Analytics side, it will be transformed into a unique visitor ID value.
## Code examples
##### Web Push SDK (JavaScript)
```javascript
Pushwoosh.push(function(api) {
// Set tags for a user
api.setTags({
'Piano Visitor ID': pa.getVisitorID(),
});
```
##### Android (Java)
```java
String value1 = PianoAnalytics.getInstance().visitorId();
TagsBundle pianoTag = new TagsBundle.Builder()
.putString("Piano Visitor ID", value1)
.build();
Pushwoosh.getInstance().setTags(pianoTag);
```
##### iOS (Swift)
```swift
var pianoId: String = pa.getVisitorId(completionHandler: { visitorId in
Pushwoosh.sharedInstance().setTags([
"Piano Visitor ID": visitorId
])
})
```
##### iOS (Objective-C)
```objective-c
__block NSString *pianoId;
[pa getVisitorIdWithCompletionHandler:^(NSString *visitorId) {
Piano Visitor ID = visitorId;
[[Pushwoosh sharedInstance] setTags:@{@"Piano Visitor ID": visitorId}];
}];
```
In general, Pushwoosh uses device tags to provide device and other information to Piano Analytics within each request. Here is a list of common tags used:
* **Country**
* **Device Model**
* **OS Version**
* **Browser Type** (in some cases)
## How to verify the integration is working
#### Source: Detecting events sent to Piano Analytics
There are two easy ways to detect events that were sent to Piano Analytics:
##### Stream Inspector
1. Go to your **Piano Analytics** account.
2. Navigate to **Settings** > **Data Collection Portal** > **Tools** > **Stream Inspector**.
3. Choose the connected site you want to check.
4. Select the events you want to inspect and start a session.
5. Verify that the events were received by Piano Analytics.
##### Check Events in Overall Traffic
1. Go to your **Piano Analytics** account.
2. Navigate to **Settings** > **Explorer** > **Audience** > **Overall Traffic**.
3. Choose the site and date range in the menu below.
#### Destination: Importing Piano's Segment
To verify the integration on the destination side:
* Import Piano's segment.
* You should see a new segment (filter) with a name constructed like `segment_key (Piano Autogenerated)`.
* Recalculate the segment to get up-to-date information about current devices processing.
## FAQ troubleshooting: Common issues
#### How can I ensure events are correctly sent from Pushwoosh to Piano Analytics?
**Solution**: Use Piano's Stream Inspector or check Overall Traffic in Piano Analytics to monitor incoming events from Pushwoosh.
#### What should I do if segment data isn't imported correctly into Pushwoosh?
**Solution**: Ensure the Segment Key from Piano matches the setup in Pushwoosh. Check for any errors in segment size calculations or data retrieval.
#### Can I integrate Piano VisitorID with Pushwoosh for enhanced analytics?
**Solution**: Yes, by setting up a specific tag in Pushwoosh and using Piano's SDK to fetch VisitorID, you can synchronize user IDs across platforms.
#### What should I do if there are issues with API key configurations?
**Solution**: Review API request logs, ensure correct endpoint URLs and authentication tokens (API keys), and check for any server-side errors reported by either service.
## Mapping Piano VisitorID to Pushwoosh UserID/HWID for accumulated analytics across SDKs
If a client wants to accumulate analytics from both the Pushwoosh SDK and the Piano Analytics SDK, Pushwoosh needs to map Piano VisitorID to Pushwoosh UserID/HWID. The solution is to send a Piano VisitorID tag to Pushwoosh for the user/device.
For this, do the following:
1. Create a tag named '**Piano Visitor ID**' on the Pushwoosh side for the application. Note: The tag name must be exactly as described.
2. On the client’s application side, get the Piano Visitor ID within the Piano SDK using the **getVisitorId** method.
3. On the client’s application side, use the Pushwoosh SDK to call the `setTags` request with the tag value once.
If the tag value (Piano Visitor ID) exists for the user/device, Pushwoosh will automatically include it as Client ID in requests to Piano Analytics. On the Piano Analytics side, it will be transformed into a unique visitor ID value.
## Code examples
##### Web Push SDK (JavaScript)
```javascript
Pushwoosh.push(function(api) {
// Set tags for a user
api.setTags({
'Piano Visitor ID': pa.getVisitorID(),
});
```
##### Android (Java)
```java
String value1 = PianoAnalytics.getInstance().visitorId();
TagsBundle pianoTag = new TagsBundle.Builder()
.putString("Piano Visitor ID", value1)
.build();
Pushwoosh.getInstance().setTags(pianoTag);
```
##### iOS (Swift)
```swift
var pianoId: String = pa.getVisitorId(completionHandler: { visitorId in
Pushwoosh.sharedInstance().setTags([
"Piano Visitor ID": visitorId
])
})
```
##### iOS (Objective-C)
```objective-c
__block NSString *pianoId;
[pa getVisitorIdWithCompletionHandler:^(NSString *visitorId) {
Piano Visitor ID = visitorId;
[[Pushwoosh sharedInstance] setTags:@{@"Piano Visitor ID": visitorId}];
}];
```
In general, Pushwoosh uses device tags to provide device and other information to Piano Analytics within each request. Here is a list of common tags used:
* **Country**
* **Device Model**
* **OS Version**
* **Browser Type** (in some cases)
## How to verify the integration is working
#### Source: Detecting events sent to Piano Analytics
There are two easy ways to detect events that were sent to Piano Analytics:
##### Stream Inspector
1. Go to your **Piano Analytics** account.
2. Navigate to **Settings** > **Data Collection Portal** > **Tools** > **Stream Inspector**.
3. Choose the connected site you want to check.
4. Select the events you want to inspect and start a session.
5. Verify that the events were received by Piano Analytics.
##### Check Events in Overall Traffic
1. Go to your **Piano Analytics** account.
2. Navigate to **Settings** > **Explorer** > **Audience** > **Overall Traffic**.
3. Choose the site and date range in the menu below.
#### Destination: Importing Piano's Segment
To verify the integration on the destination side:
* Import Piano's segment.
* You should see a new segment (filter) with a name constructed like `segment_key (Piano Autogenerated)`.
* Recalculate the segment to get up-to-date information about current devices processing.
## FAQ troubleshooting: Common issues
#### How can I ensure events are correctly sent from Pushwoosh to Piano Analytics?
**Solution**: Use Piano's Stream Inspector or check Overall Traffic in Piano Analytics to monitor incoming events from Pushwoosh.
#### What should I do if segment data isn't imported correctly into Pushwoosh?
**Solution**: Ensure the Segment Key from Piano matches the setup in Pushwoosh. Check for any errors in segment size calculations or data retrieval.
#### Can I integrate Piano VisitorID with Pushwoosh for enhanced analytics?
**Solution**: Yes, by setting up a specific tag in Pushwoosh and using Piano's SDK to fetch VisitorID, you can synchronize user IDs across platforms.
#### What should I do if there are issues with API key configurations?
**Solution**: Review API request logs, ensure correct endpoint URLs and authentication tokens (API keys), and check for any server-side errors reported by either service.