# Meta Ads integration
[Meta Ads](https://www.facebook.com/business/ads) integration lets you sync Pushwoosh audiences to your Meta ad accounts. Use it to target or exclude users in ad campaigns and add paid ads as another channel in your customer journey.
## Use cases
Use this integration to:
* target high-value users in multiple channels to increase purchases or engagement
* retarget users who are less responsive in other channels
* build suppression audiences so loyal customers do not receive unnecessary ads
## Prerequisites
Before you connect Meta Ads, make sure:
* You have the **Admin** role in your Pushwoosh account. See [Manage user access and permissions](/product/account-management-and-security/multi-login-accounts/#creating-and-managing-roles-also-known-as-groups) for how roles and permissions work.
* You have a [**Facebook Business Manager**](https://www.facebook.com/business/tools/business-manager) set up to manage your brand's Facebook assets, including ad accounts, pages, and apps.
* You have an active [**Facebook Ad Account**](https://www.facebook.com/business/tools/ads-manager) tied to your Business Manager.
* Your Facebook Business Manager admin has granted you either **Manage Campaigns** or **Manage ad accounts** permissions for the ad accounts you plan to use with Pushwoosh.
* You have accepted the ad account terms and conditions for those accounts.
* You have accepted [**Facebook's Custom Audiences Terms**](https://business.facebook.com/legal/terms/customaudience) for the Facebook ad accounts you plan to use with Pushwoosh.
## Set up Meta Ads in Pushwoosh
1. In Pushwoosh, go to **Settings** > **3rd party integrations**.
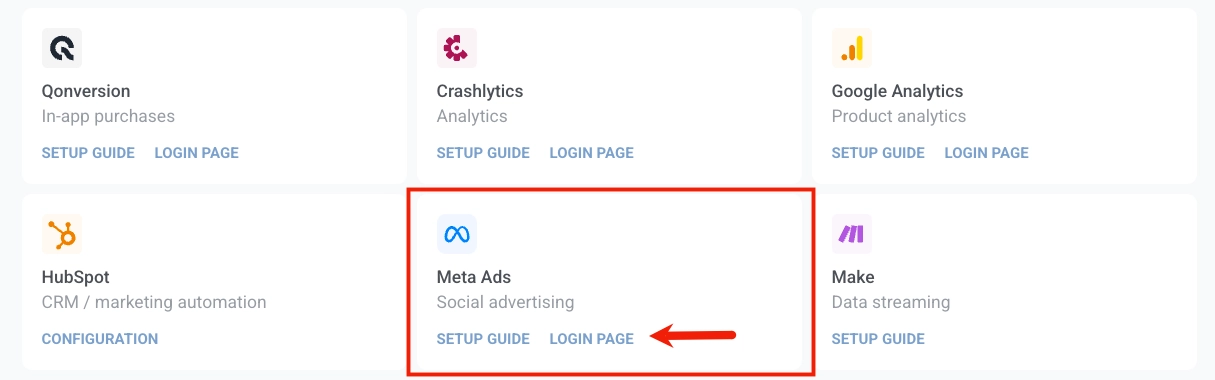
2. In the Meta Ads card, click **Login page**.
3. Sign in to your Meta account, then click **Continue**.
4. Select the ad accounts you want to connect.
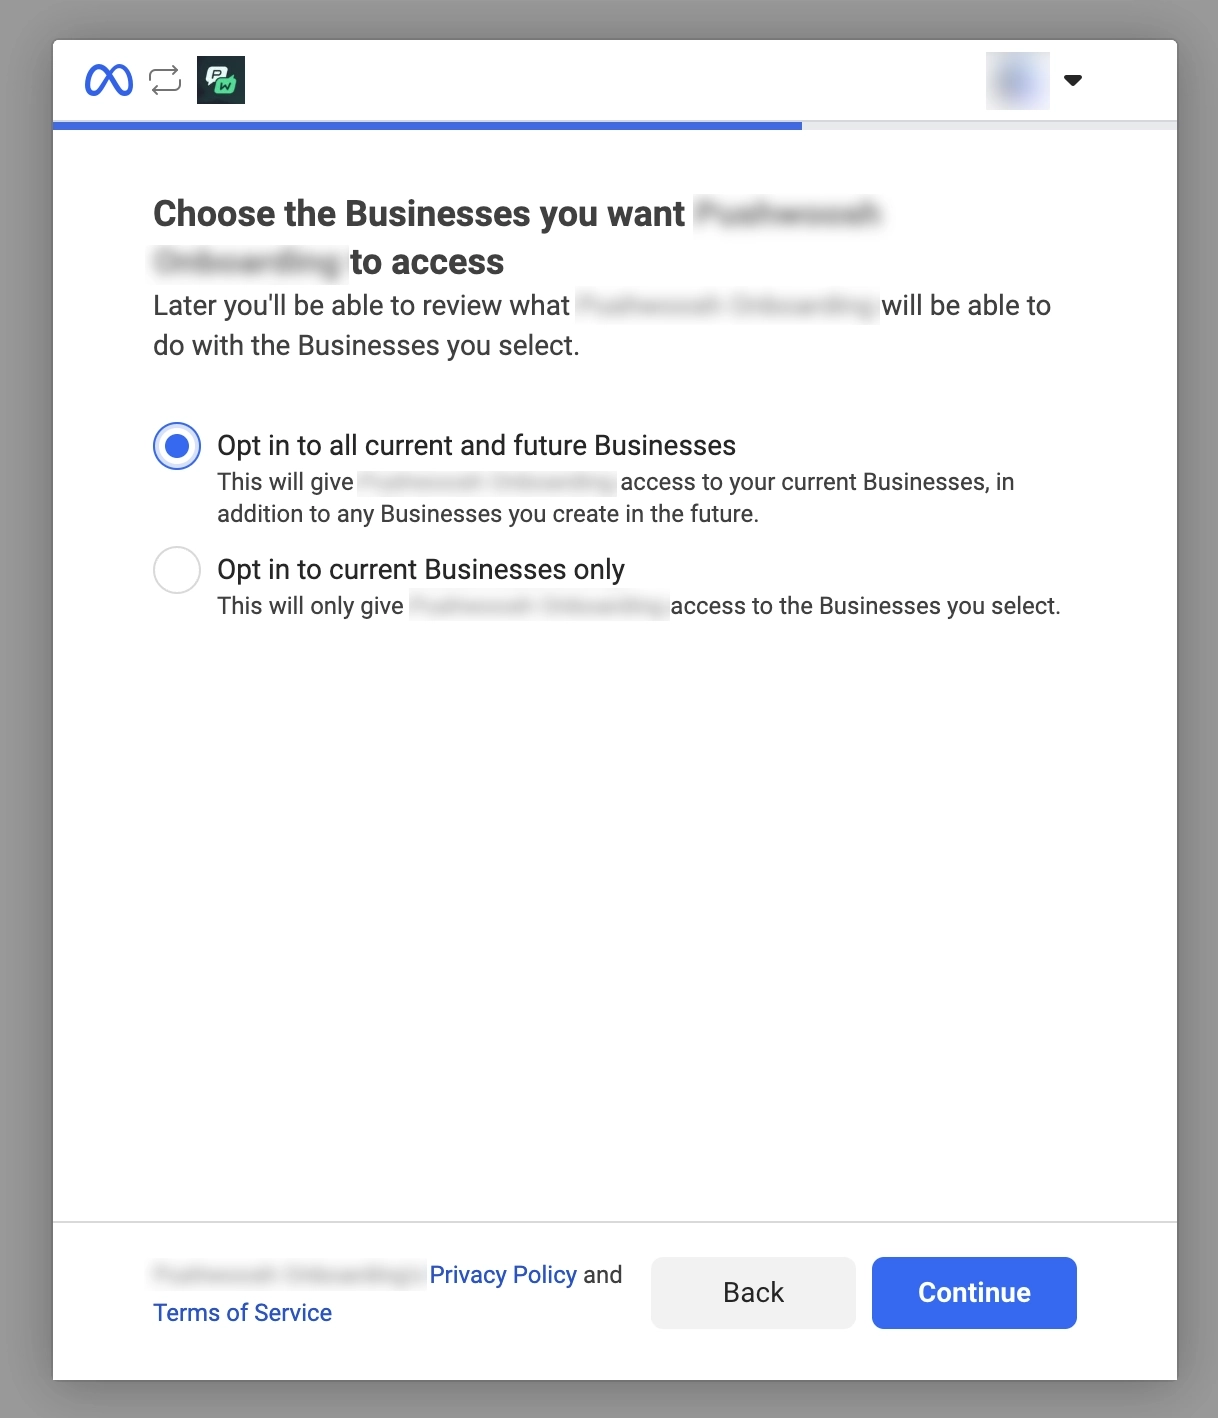
5. Review the requested permissions for ad account and business access.
6. Click **Save**. Meta then shows a confirmation that your account is connected.
### Review connection status
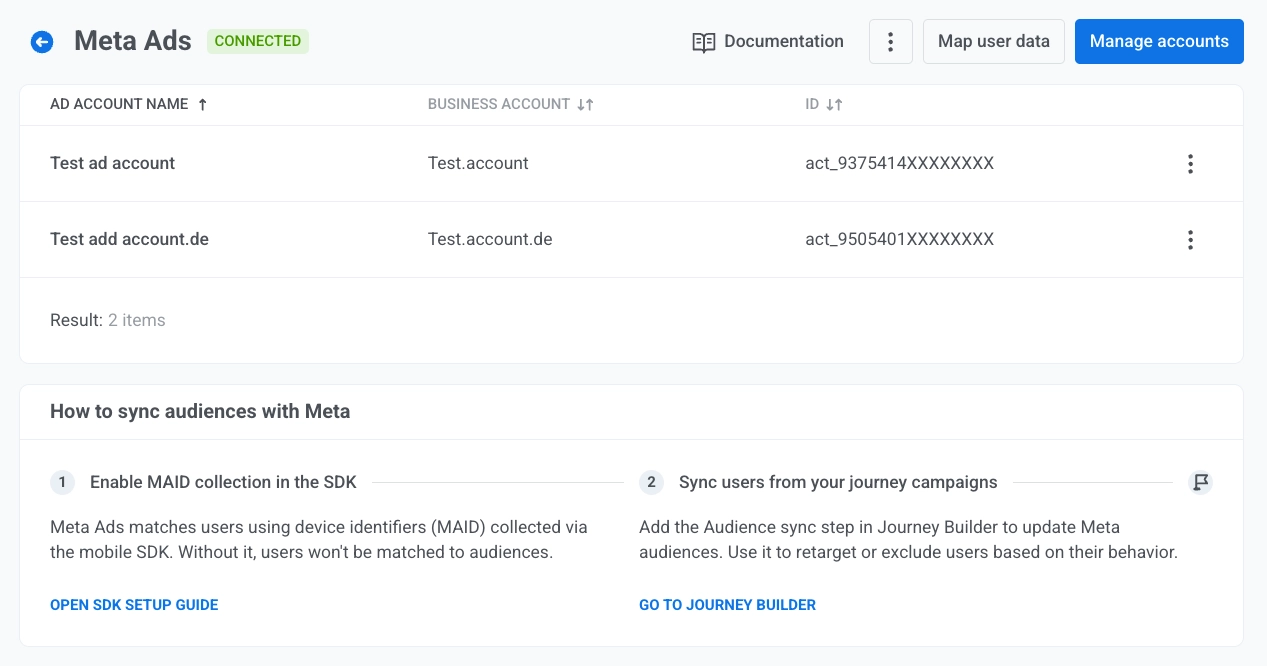
After setup, you will be redirected to the **Meta Ads** page in Pushwoosh.
The ad accounts table lists each connected account with:
* **Ad account name**
* **Business account**
* **ID**
Open the three dots at the end of a row and choose **Remove ad account** to delete that ad account from the list in Pushwoosh.
### Manage connected ad accounts
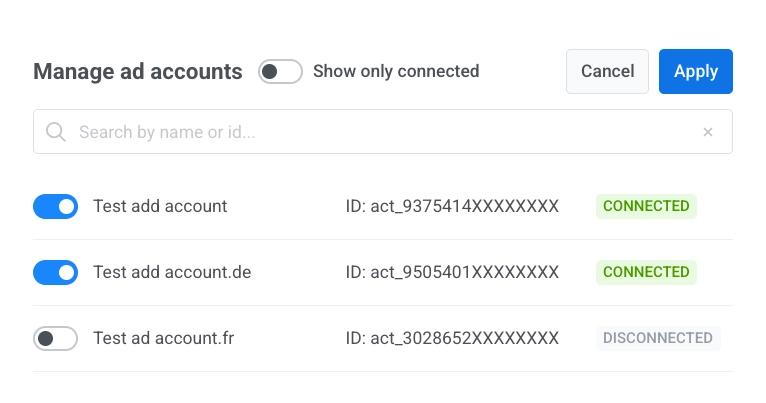
On the **Meta Ads** page, click **Manage accounts** to open the dialog. Use the toggle on each row to include or exclude that ad account from the integration.
Click **Apply** to save changes or **Cancel** to close without saving.
To adjust the list view:
* Turn **Show only connected** on or off to limit which rows appear.
* Type in **Search by name or id...** to find accounts in the list.
### Map project tags to Meta fields
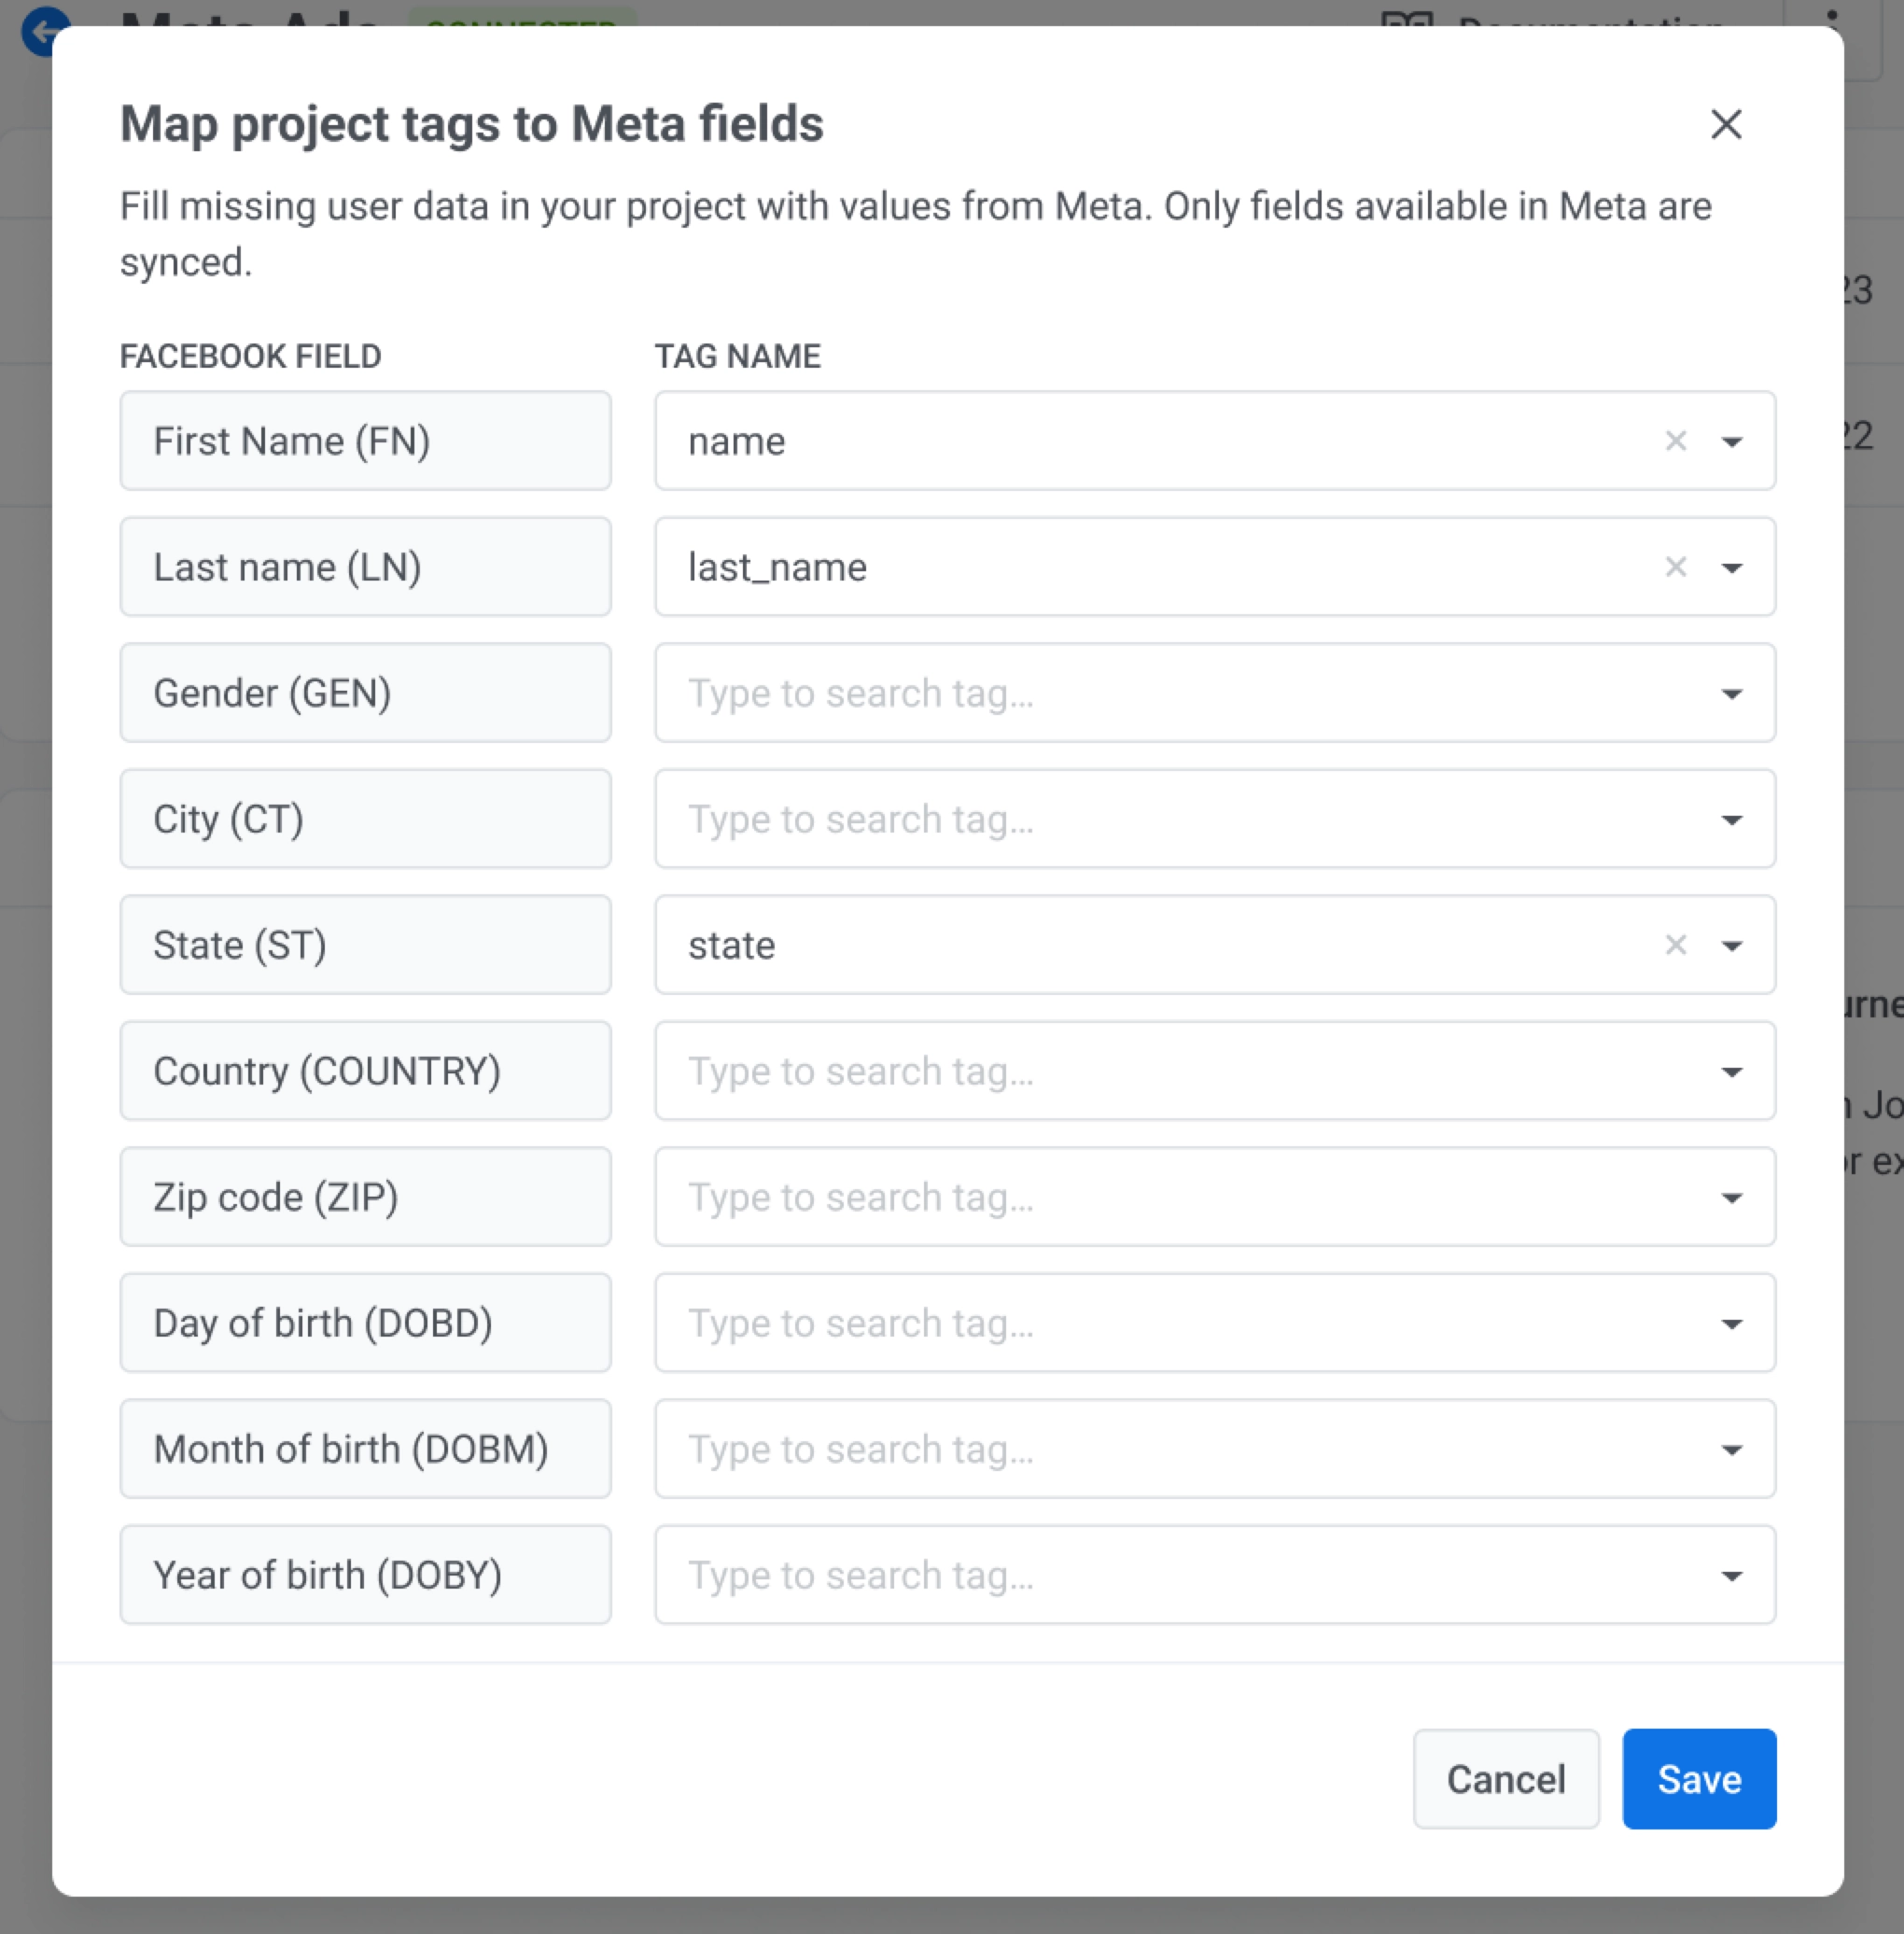
Mapping user properties allows you to tell Pushwoosh which Meta user attributes should update which **Tag name** fields in your project. That way, when data comes from Meta, it is saved where you expect.
1. On the **Meta Ads** page, click **Map user data**.
2. For each **Facebook field** in the left column, choose a **Tag name** in your project from the control on the right.
Map only the rows you need.
3. Click **Save** to apply the mapping or **Cancel** to close without saving.
## Enable MADID collection in the SDK
Meta Ads matches users using device identifiers (MADID) collected via the mobile SDK.
The Pushwoosh SDK does not collect advertising identifiers (GAID on Android, IDFA on iOS)
automatically. Both platforms require explicit user consent before the identifier can be read.
In your application, request user consent, read the identifier when permitted, and pass the
value to the SDK.
**1. Add the dependency**
```groovy
implementation 'com.google.android.gms:play-services-ads-identifier:...'
```
**2. Declare the AD_ID permission (required for targetSdk ≥ 33)**
Add this to your `AndroidManifest.xml`:
```xml
```
**3. Retrieve the GAID and pass it to the SDK**
`getAdvertisingIdInfo` must be called on a background thread:
```java
String gaid = AdvertisingIdClient.getAdvertisingIdInfo(context).getId();
Pushwoosh.getInstance().setAdvertisingId(gaid);
```
To clear the stored value on the backend, pass `null` or an empty string:
```java
Pushwoosh.getInstance().setAdvertisingId(null);
```
**Behavior notes:**
- If the value has not changed since the last successful call, no network request is made.
- If the network request fails, retry on the next app launch.
- The call is ignored when `Pushwoosh.stopCommunication()` is active.
- The zero UUID (`00000000-0000-0000-0000-000000000000`) is treated the same as `null` — the stored MADID is cleared on the backend.
**1. Add the usage description to `Info.plist`**
Apple requires this key before showing the ATT permission dialog:
```xml
NSUserTrackingUsageDescriptionWe use your advertising identifier to show you relevant ads.
```
**2. Declare the tracking domain in your privacy manifest**
If your app uses IDFA for tracking, Apple requires you to list the domains that receive tracking data in your [privacy manifest](https://developer.apple.com/documentation/bundleresources/privacy-manifest-files) (`PrivacyInfo.xcprivacy`). See [TN3182](https://developer.apple.com/documentation/technotes/tn3182-adding-privacy-tracking-keys-to-your-privacy-manifest) for the full requirements.
Set `NSPrivacyTracking` to `true` and add the Pushwoosh tracking domain to `NSPrivacyTrackingDomains`:
```xml
NSPrivacyTrackingNSPrivacyTrackingDomainstracking.svc-nue.pushwoosh.com
```
**3. Request tracking authorization and pass the IDFA to the SDK**
`ATTrackingManager` requires iOS 14 or later. If your deployment target is below iOS 14, wrap the call in an availability check.
The Pushwoosh SDK does not call `ATTrackingManager`. Request tracking authorization in your application, then pass the result to the SDK:
```swift
import AppTrackingTransparency
import AdSupport
if #available(iOS 14, *) {
ATTrackingManager.requestTrackingAuthorization { status in
let idfa = status == .authorized
? ASIdentifierManager.shared().advertisingIdentifier.uuidString
: nil
Pushwoosh.configure.setAdvertisingId(idfa)
}
}
```
To clear the stored value on the backend, pass `nil` or an empty string:
```swift
Pushwoosh.configure.setAdvertisingId(nil)
```
**Behavior notes:**
- If the value has not changed since the last successful call, no network request is made.
- If the network request fails, call `setAdvertisingId` again on the next app launch.
- The call is ignored when `Pushwoosh_ALLOW_SERVER_COMMUNICATION` is disabled.
- The zero UUID (`00000000-0000-0000-0000-000000000000`) is treated the same as `nil` or an empty string — the stored MADID is cleared on the backend.
> Call `requestTrackingAuthorization` from your app's main UI flow. Apple recommends doing this after showing your own explanatory screen, not immediately on launch.
### How it works
Once you call `setAdvertisingId`, the SDK sends the value to the Pushwoosh tracking endpoint as the `madid` field alongside the app code and device hardware ID. Pushwoosh uses this identifier to match your device records with Meta Ads audiences for synchronization.
## Sync audiences in journeys
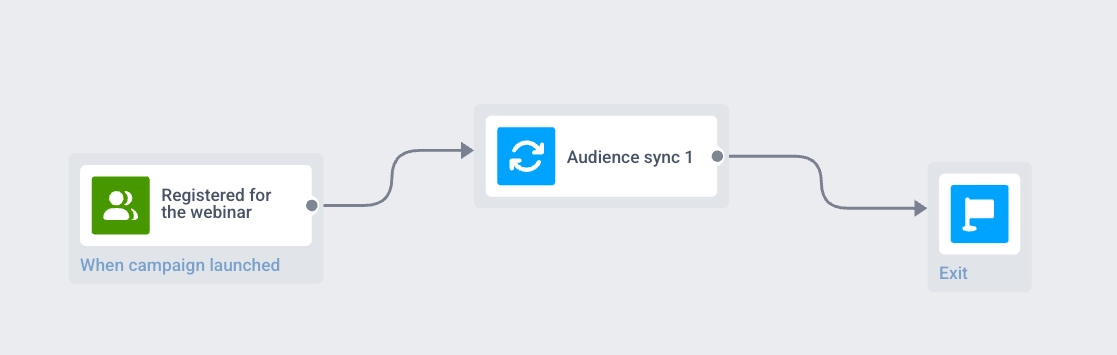
The **Audience sync** point in **Journey Builder** links your journey to a Meta Custom Audience. Every time a user reaches that point, Pushwoosh asks Meta to either add them to the audience or remove them from it.
For example, you may use this to stop showing a webinar ad to users who already registered, so you don't waste ad spend on people who don't need to see it anymore.
To configure audience sync:
1. Open [**Journey Builder**](/product/customer-journey/pushwoosh-journey-overview/).
2. Add an [**Audience-based entry**](/product/customer-journey/journey-elements/entry-elements/audience-based-entry/). In **Audience source**, choose a Pushwoosh segment or list that defines who enters this journey. For example, a segment **Users with tag `webinar_registered` set to `true`**. Only those users will move through the journey and reach **Audience sync**.
3. Add the **Audience sync** point.
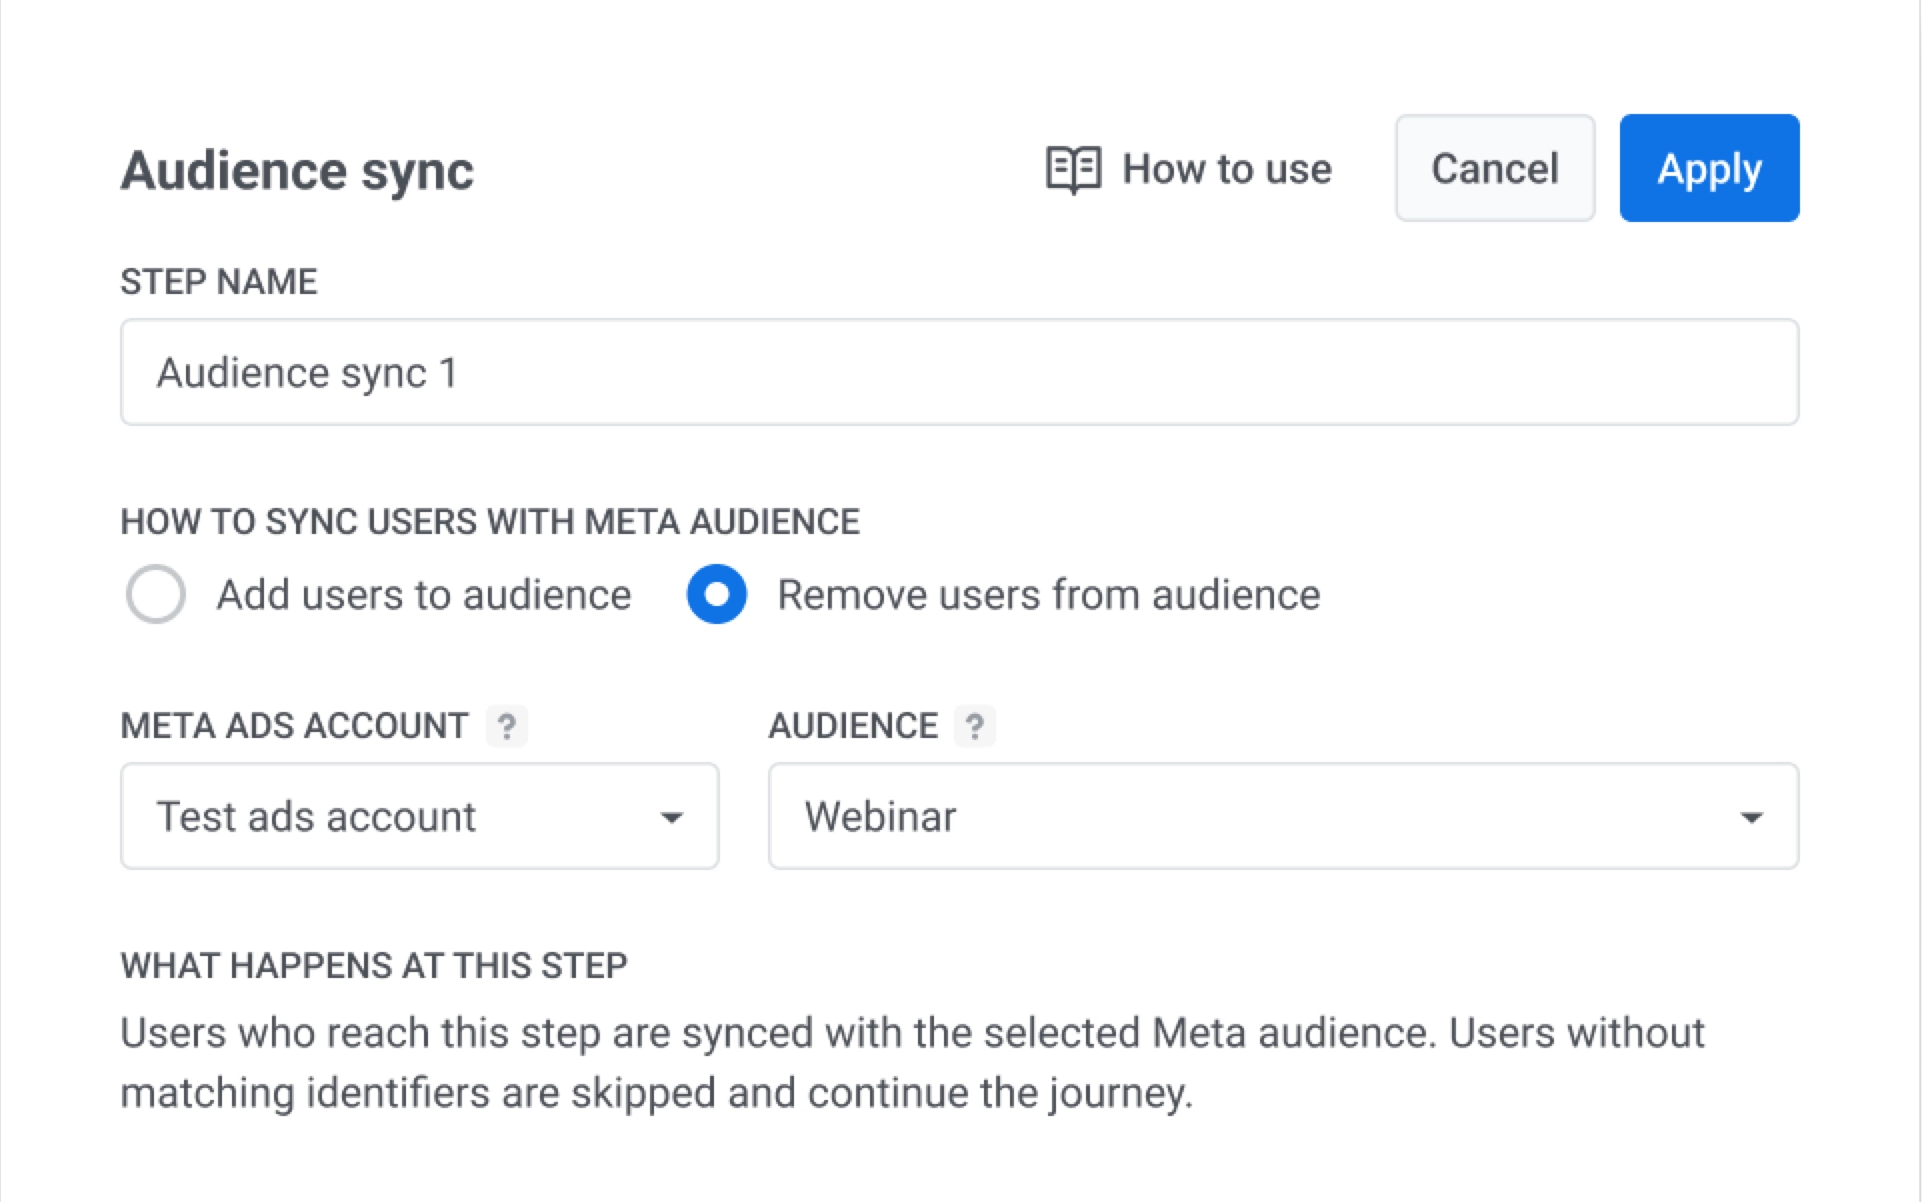
4. Under **How to sync users info to Meta audience**, pick one option:
* **Add users to audience**. Adds each user who reaches this step to the Meta audience you select. For example, use this to start showing an ad to users who signed up but have not yet attended.
* **Remove users from audience**. Removes each user who reaches this step from that Meta audience. In this example, select this option to stop showing the webinar ad to users who already registered.
5. In **Meta Ads account**, select the connected ad account.
6. In **Audience**, select the Meta audience, for example **Webinar**.
7. Click **Apply** to save the point or **Cancel** to close without saving.
8. Finish configuring the journey, then launch it.
When those users reach **Audience sync**, they are removed from the **Webinar** audience in Meta, so they no longer see the webinar ad there.
## Behavior and error handling
Journey processing depends on Meta account and audience availability:
* Meta updates the audience only when it can match the user from the data Pushwoosh provides. If Meta cannot match the user, the audience does not change for that user, and they continue in the journey.
* If a profile reaches the **Audience sync** point while the connected ad account is disconnected, the journey stops for that profile and Pushwoosh sends system and email notifications.
* If a selected audience is not found in Meta and the API returns an error, the journey stops for that profile and Pushwoosh sends system and email notifications.
## Audience sync statistics
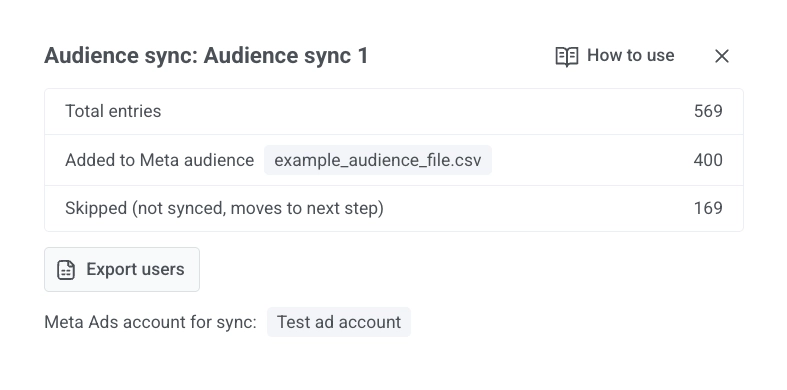
After launch, open statistics for the **Audience sync** step to see entry volume, adds and removals, and skipped profiles. For metric details, see [**Audience sync**](/product/statistics-and-analytics/journey-statistics/journey-element-statistics/#audience-sync) in **Customer Journey statistics**.
 3. Sign in to your Meta account, then click **Continue**.
4. Select the ad accounts you want to connect.
3. Sign in to your Meta account, then click **Continue**.
4. Select the ad accounts you want to connect.
 5. Review the requested permissions for ad account and business access.
6. Click **Save**. Meta then shows a confirmation that your account is connected.
### Review connection status
After setup, you will be redirected to the **Meta Ads** page in Pushwoosh.
5. Review the requested permissions for ad account and business access.
6. Click **Save**. Meta then shows a confirmation that your account is connected.
### Review connection status
After setup, you will be redirected to the **Meta Ads** page in Pushwoosh.
 The ad accounts table lists each connected account with:
* **Ad account name**
* **Business account**
* **ID**
Open the three dots at the end of a row and choose **Remove ad account** to delete that ad account from the list in Pushwoosh.
### Manage connected ad accounts
On the **Meta Ads** page, click **Manage accounts** to open the dialog. Use the toggle on each row to include or exclude that ad account from the integration.
Click **Apply** to save changes or **Cancel** to close without saving.
To adjust the list view:
* Turn **Show only connected** on or off to limit which rows appear.
* Type in **Search by name or id...** to find accounts in the list.
The ad accounts table lists each connected account with:
* **Ad account name**
* **Business account**
* **ID**
Open the three dots at the end of a row and choose **Remove ad account** to delete that ad account from the list in Pushwoosh.
### Manage connected ad accounts
On the **Meta Ads** page, click **Manage accounts** to open the dialog. Use the toggle on each row to include or exclude that ad account from the integration.
Click **Apply** to save changes or **Cancel** to close without saving.
To adjust the list view:
* Turn **Show only connected** on or off to limit which rows appear.
* Type in **Search by name or id...** to find accounts in the list.
 ### Map project tags to Meta fields
Mapping user properties allows you to tell Pushwoosh which Meta user attributes should update which **Tag name** fields in your project. That way, when data comes from Meta, it is saved where you expect.
1. On the **Meta Ads** page, click **Map user data**.
2. For each **Facebook field** in the left column, choose a **Tag name** in your project from the control on the right.
Map only the rows you need.
### Map project tags to Meta fields
Mapping user properties allows you to tell Pushwoosh which Meta user attributes should update which **Tag name** fields in your project. That way, when data comes from Meta, it is saved where you expect.
1. On the **Meta Ads** page, click **Map user data**.
2. For each **Facebook field** in the left column, choose a **Tag name** in your project from the control on the right.
Map only the rows you need.
 3. Click **Save** to apply the mapping or **Cancel** to close without saving.
## Enable MADID collection in the SDK
Meta Ads matches users using device identifiers (MADID) collected via the mobile SDK.
The Pushwoosh SDK does not collect advertising identifiers (GAID on Android, IDFA on iOS)
automatically. Both platforms require explicit user consent before the identifier can be read.
In your application, request user consent, read the identifier when permitted, and pass the
value to the SDK.
3. Click **Save** to apply the mapping or **Cancel** to close without saving.
## Enable MADID collection in the SDK
Meta Ads matches users using device identifiers (MADID) collected via the mobile SDK.
The Pushwoosh SDK does not collect advertising identifiers (GAID on Android, IDFA on iOS)
automatically. Both platforms require explicit user consent before the identifier can be read.
In your application, request user consent, read the identifier when permitted, and pass the
value to the SDK.
 7. Click **Apply** to save the point or **Cancel** to close without saving.
8. Finish configuring the journey, then launch it.
7. Click **Apply** to save the point or **Cancel** to close without saving.
8. Finish configuring the journey, then launch it.
 When those users reach **Audience sync**, they are removed from the **Webinar** audience in Meta, so they no longer see the webinar ad there.
## Behavior and error handling
Journey processing depends on Meta account and audience availability:
* Meta updates the audience only when it can match the user from the data Pushwoosh provides. If Meta cannot match the user, the audience does not change for that user, and they continue in the journey.
* If a profile reaches the **Audience sync** point while the connected ad account is disconnected, the journey stops for that profile and Pushwoosh sends system and email notifications.
* If a selected audience is not found in Meta and the API returns an error, the journey stops for that profile and Pushwoosh sends system and email notifications.
## Audience sync statistics
After launch, open statistics for the **Audience sync** step to see entry volume, adds and removals, and skipped profiles. For metric details, see [**Audience sync**](/product/statistics-and-analytics/journey-statistics/journey-element-statistics/#audience-sync) in **Customer Journey statistics**.
When those users reach **Audience sync**, they are removed from the **Webinar** audience in Meta, so they no longer see the webinar ad there.
## Behavior and error handling
Journey processing depends on Meta account and audience availability:
* Meta updates the audience only when it can match the user from the data Pushwoosh provides. If Meta cannot match the user, the audience does not change for that user, and they continue in the journey.
* If a profile reaches the **Audience sync** point while the connected ad account is disconnected, the journey stops for that profile and Pushwoosh sends system and email notifications.
* If a selected audience is not found in Meta and the API returns an error, the journey stops for that profile and Pushwoosh sends system and email notifications.
## Audience sync statistics
After launch, open statistics for the **Audience sync** step to see entry volume, adds and removals, and skipped profiles. For metric details, see [**Audience sync**](/product/statistics-and-analytics/journey-statistics/journey-element-statistics/#audience-sync) in **Customer Journey statistics**.