# Marketo integration
This guide explains how to integrate [Marketo](https://login.marketo.com/) with Pushwoosh. You would be able to use Web Push Notifications communication channel as a part of your marketing campaigns with Marketo.
As an example, imagine a user visited your Marketo landing page but did not take an action there. You would be able to reach this user with web push notification as a reminder. This web push notification can also be personalized with Marketo data recorded for this user for the maximum engagement!
## 1. Creating the Service Worker
Follow this [guide](/developer/pushwoosh-sdk/web-push-notifications/web-push-sdk-30) and do the **prerequisite steps** and steps **1 - 2.2.**
After completing the steps above you should have _manifest.json_ and _pushwoosh-service-worker.js_ files ready at hand.
Switch to **Marketo Design Studio**.
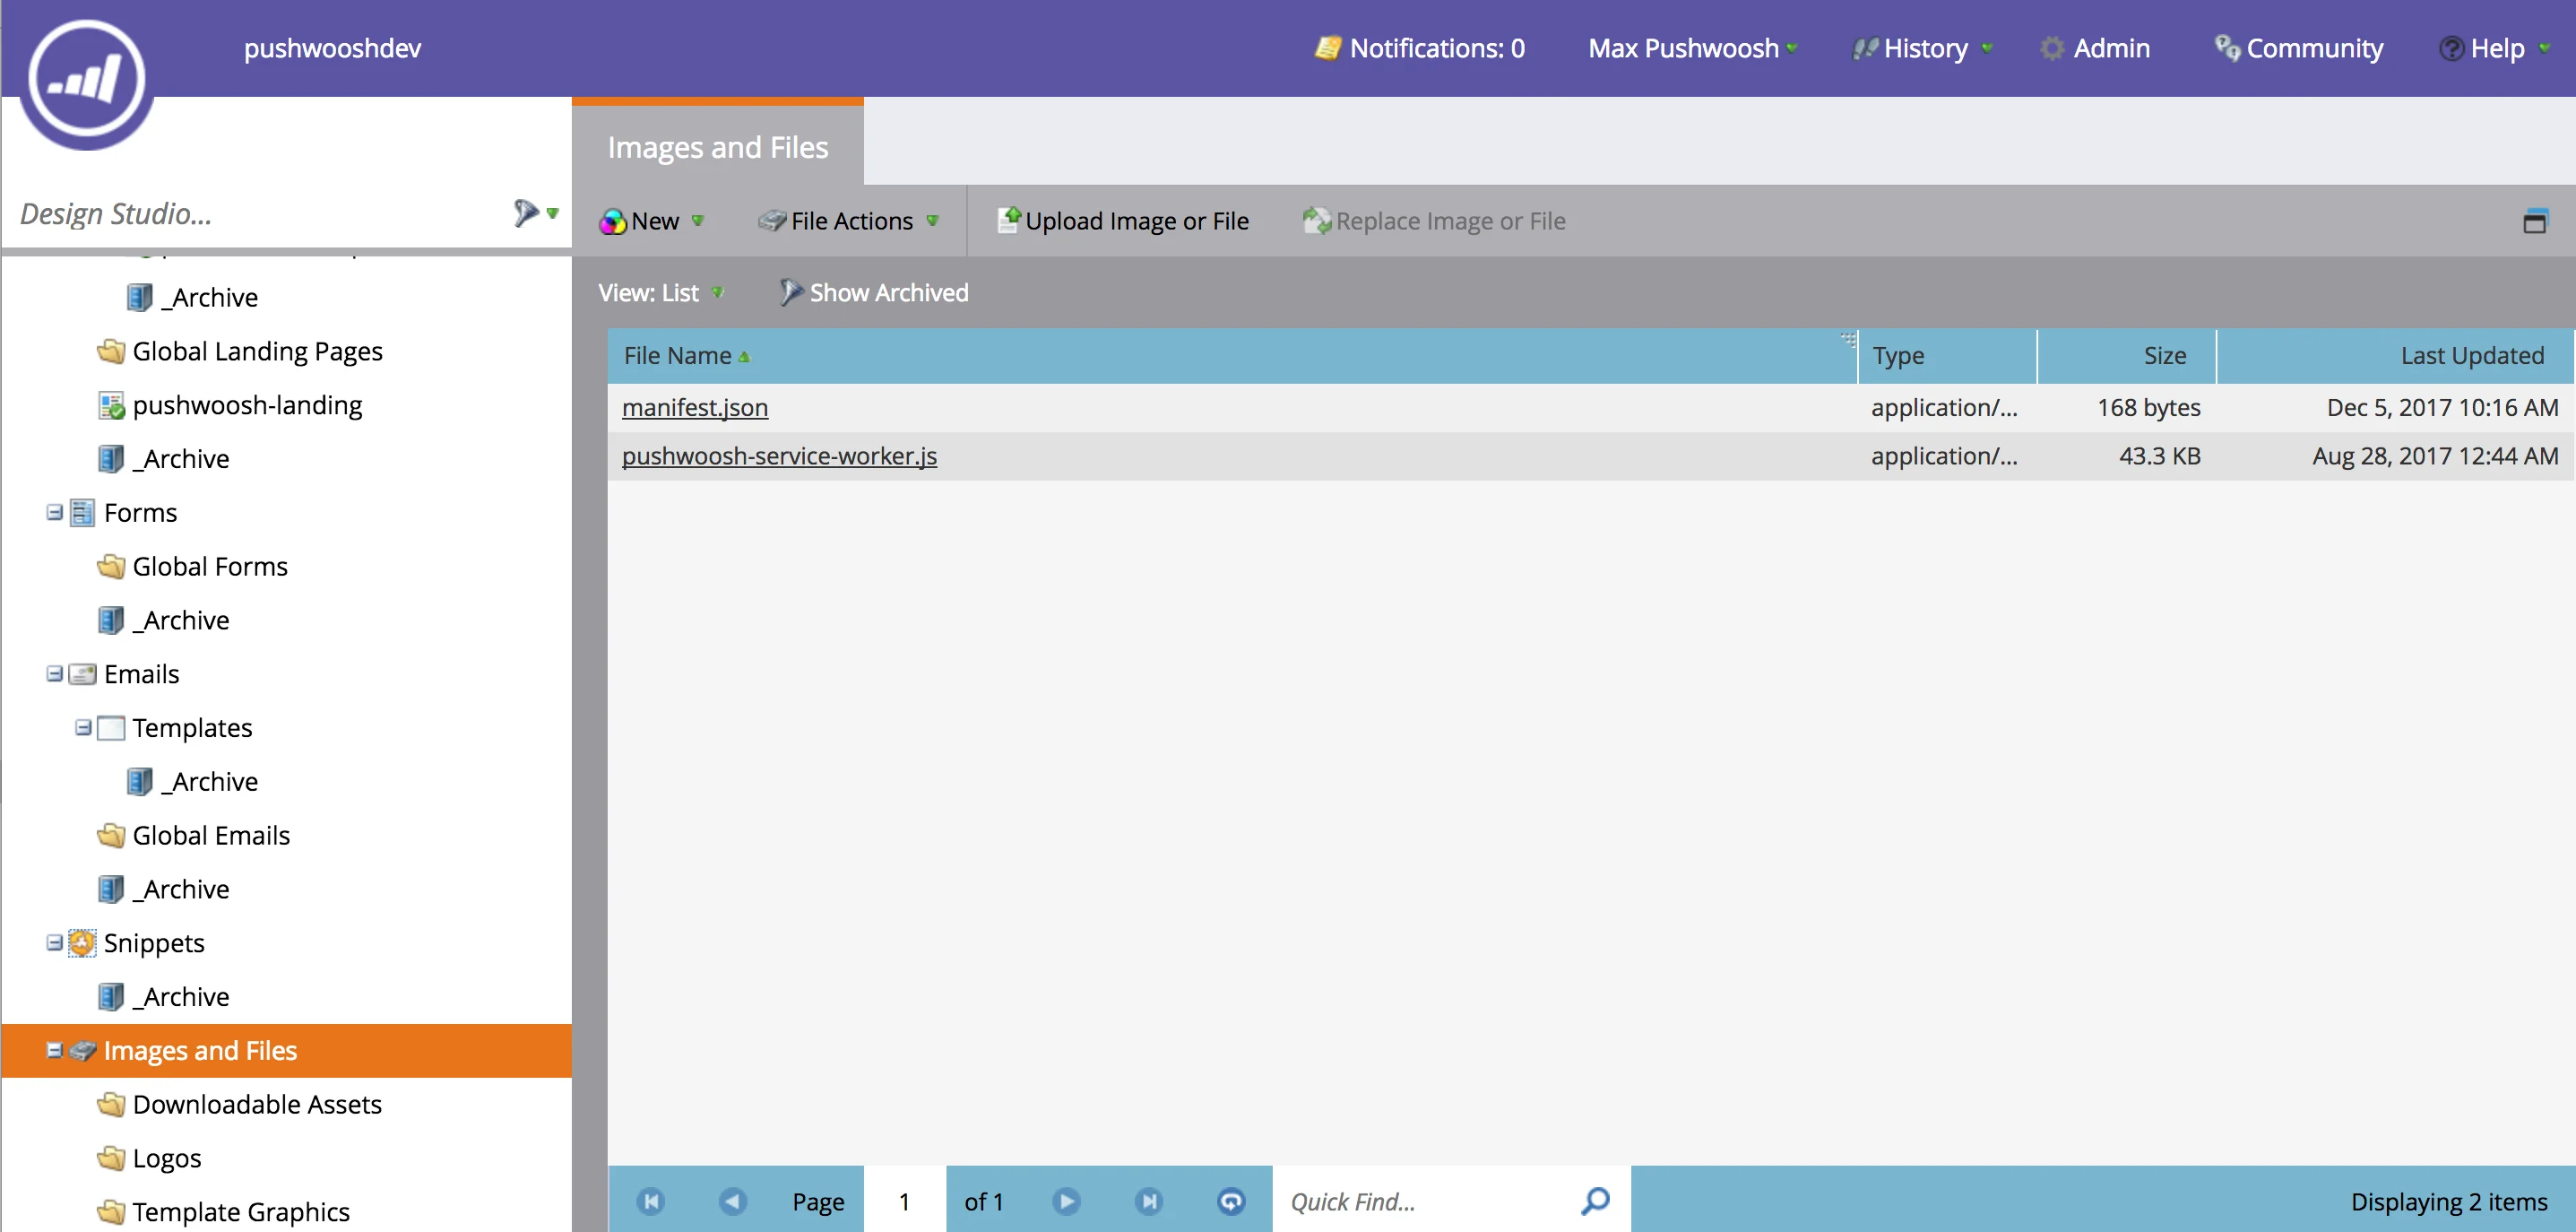
Marketo can only upload files to the resource folder, the folder called "Images and Files".
Upload _manifest.json_ and _pushwoosh-service-worker.js_ to these folder.
## 2. Creating push subscription page
As it was mentioned above Marketo can only upload files to the resource folder which is different from the scope of the landing pages.
For example if you click on any file uploaded above and check its URL you'll see something like "[https://your-host-name.com/rs/765-IWA-819/images/pushwoosh-service-worker.js](https://your-host-name.com/rs/765-IWA-819/images/pushwoosh-service-worker.js)".
However if you click on the landing page and check its URL it will be something like: "[https://your-host-name.com/lp/765-IWA-819/pushwoosh-landing.html](https://your-host-name.com/lp/765-IWA-819/pushwoosh-landing.html)".
Note **"lp"** part in the landing pages URL's and **"rs"** in the script URL's.
That means we need to register our _Service Worker_ script in a scope different from the landing pages.
To achieve that we'll upload special push subscription page to Marketo resources folder and then open it from the landing page. Let's create this subscription page.
Get the _push-subscription.html_ file from the following gist:
[https://gist.github.com/shaders/2b518e3acaf9b4712d5260205243343d#file-push-subscription-html](https://gist.github.com/shaders/2b518e3acaf9b4712d5260205243343d#file-push-subscription-html)
Open the file and change the following lines:
* Line 8 - change the link to the URL of _manifest.json_ file uploaded in the previous step.
* Line 24 - change the _scope_ parameter value to the URL of your resources folder (this is the folder where _manifest.json_ is).
* Line 20 - change the _applicationCode_ parameter value to your Pushwoosh App Id.
Note the script also maps Pushwoosh user-centric push notifications with Lead Identifier of the Marketo: _userId:leadId_ (line 26)
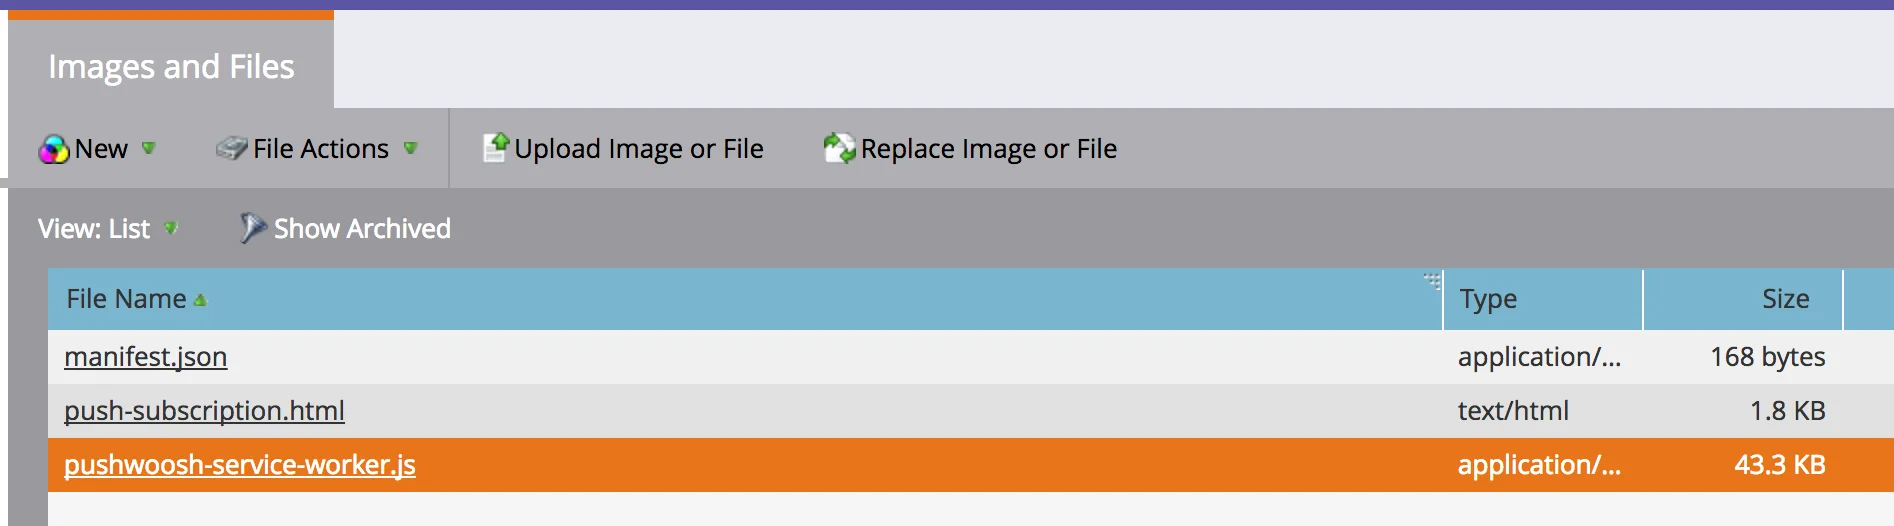
Upload resulting file to the "Images and Files" folder. Now you should have these files in the folder:
## 3. Creating landing page with push subscription
Get the _pushwoosh-template.html_ file from the following gist:
[https://gist.github.com/shaders/2b518e3acaf9b4712d5260205243343d#file-pushwoosh-template-html](https://gist.github.com/shaders/2b518e3acaf9b4712d5260205243343d#file-pushwoosh-template-html)
Open the file and change the following lines:
* Line 47 - change the _scope_ parameter value to the URL of your resources folder.
* Line 65 - change the link to the URL of _push-subscription.html_ file uploaded in the previous step.
* Line 43 - change the _applicationCode_ parameter value to your Pushwoosh App Id.
This script as a previous one also maps Pushwoosh user-centric push notifications with Lead Identifier of the Marketo: _userId:leadId_ (line 49)
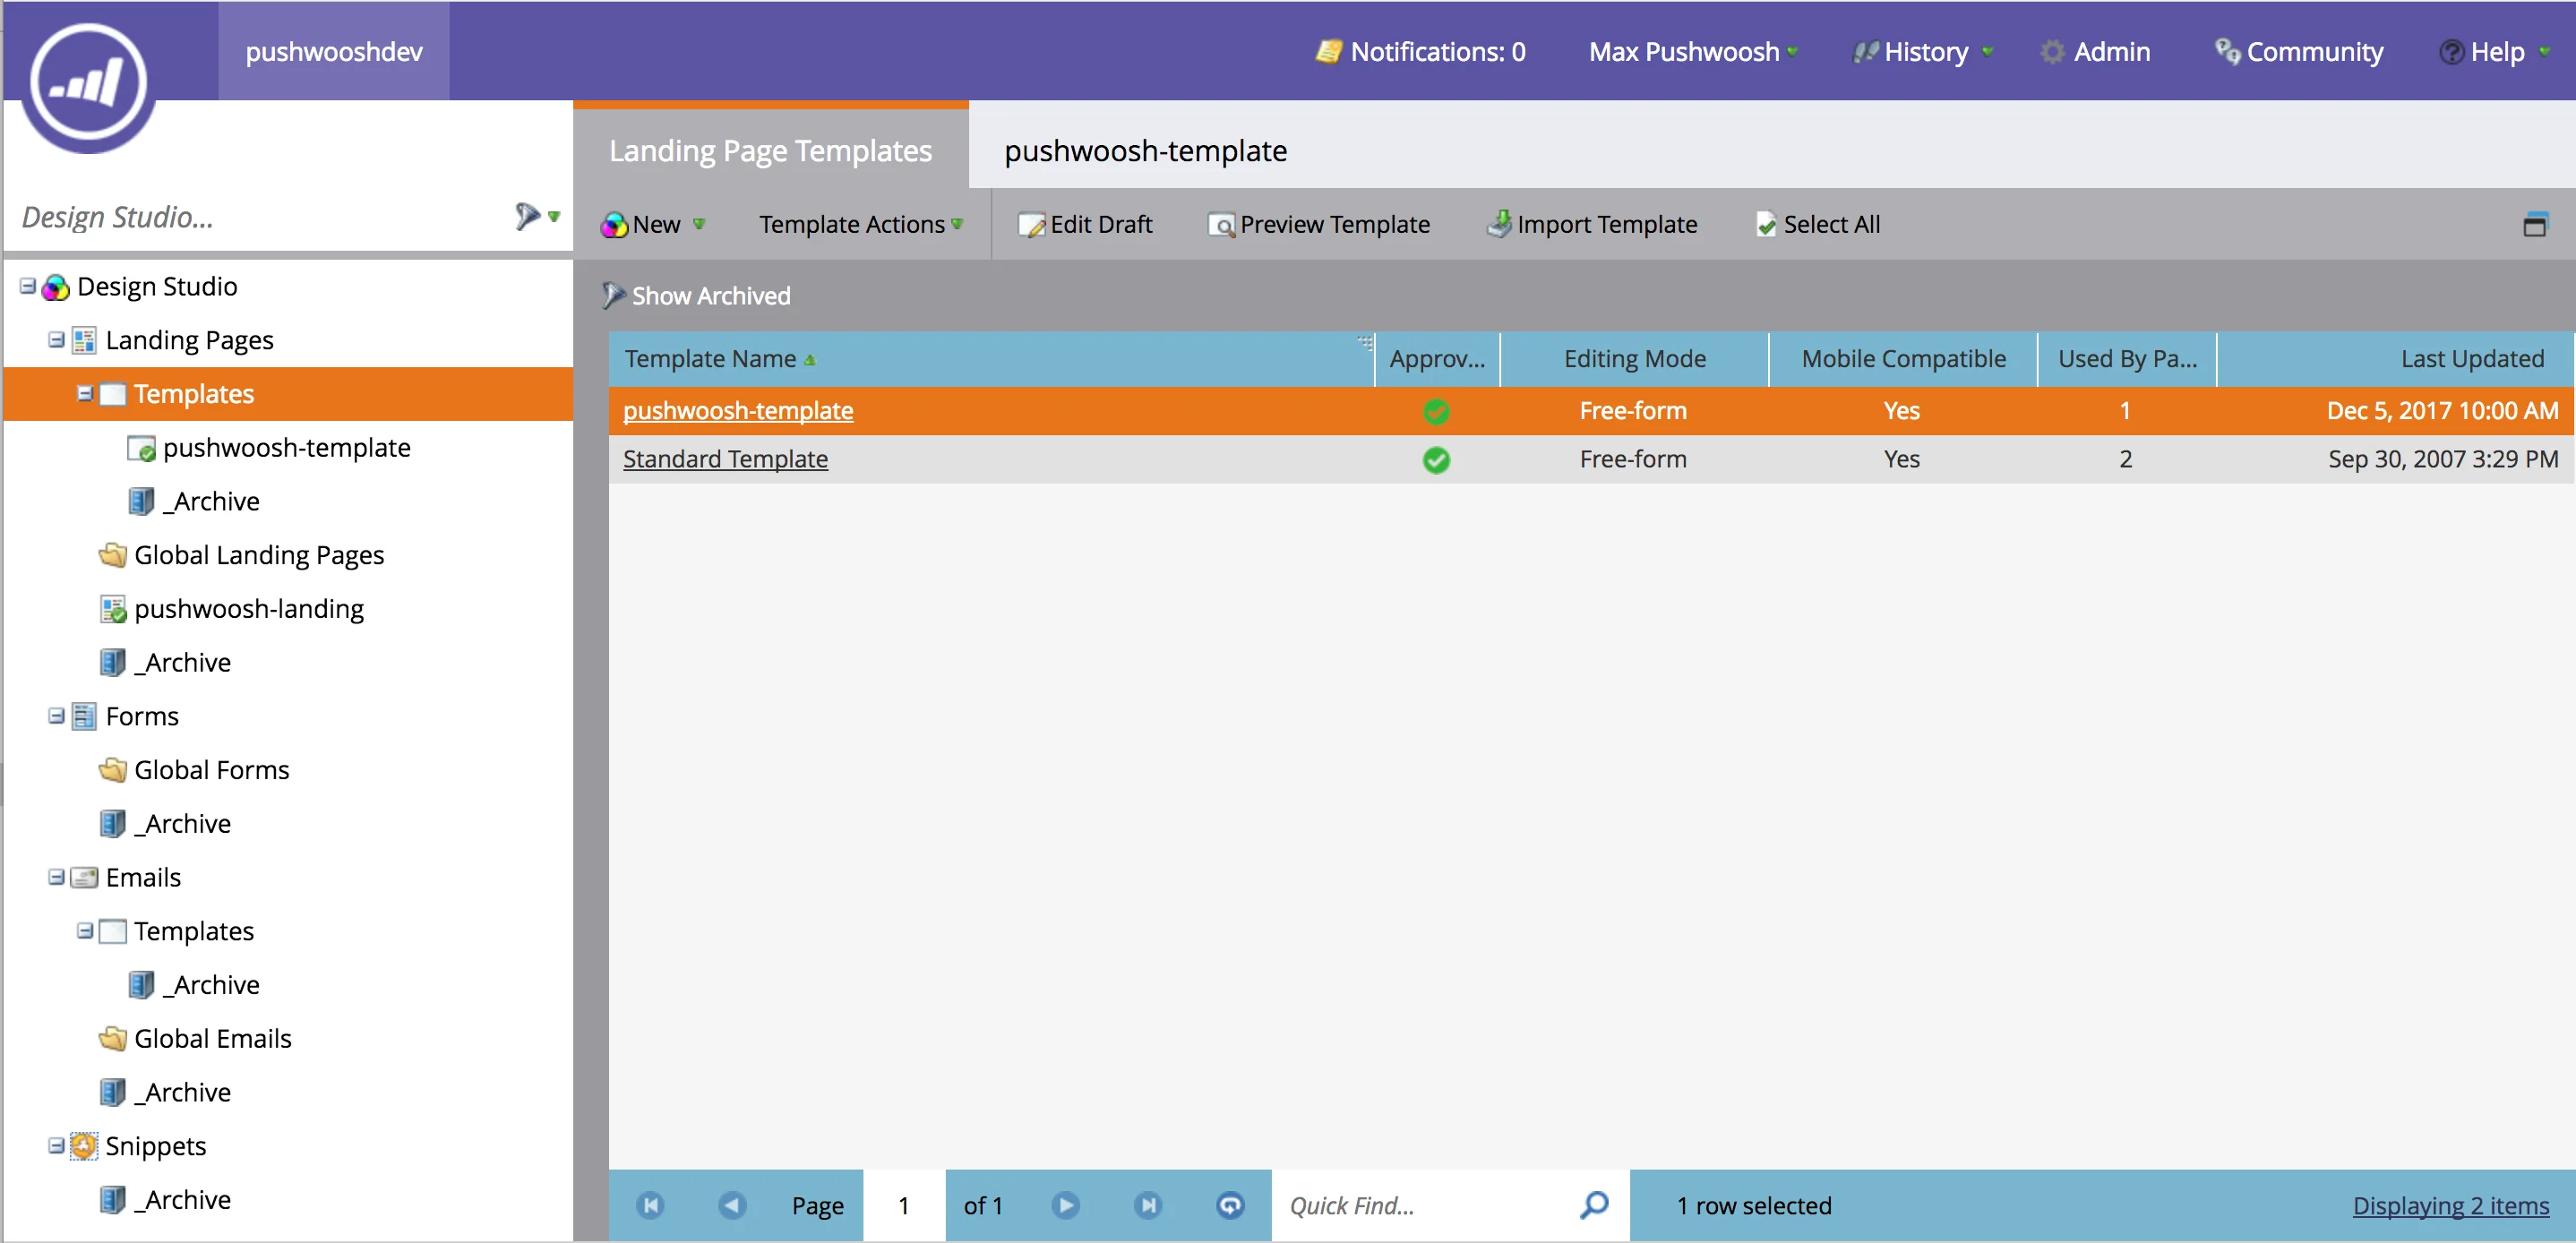
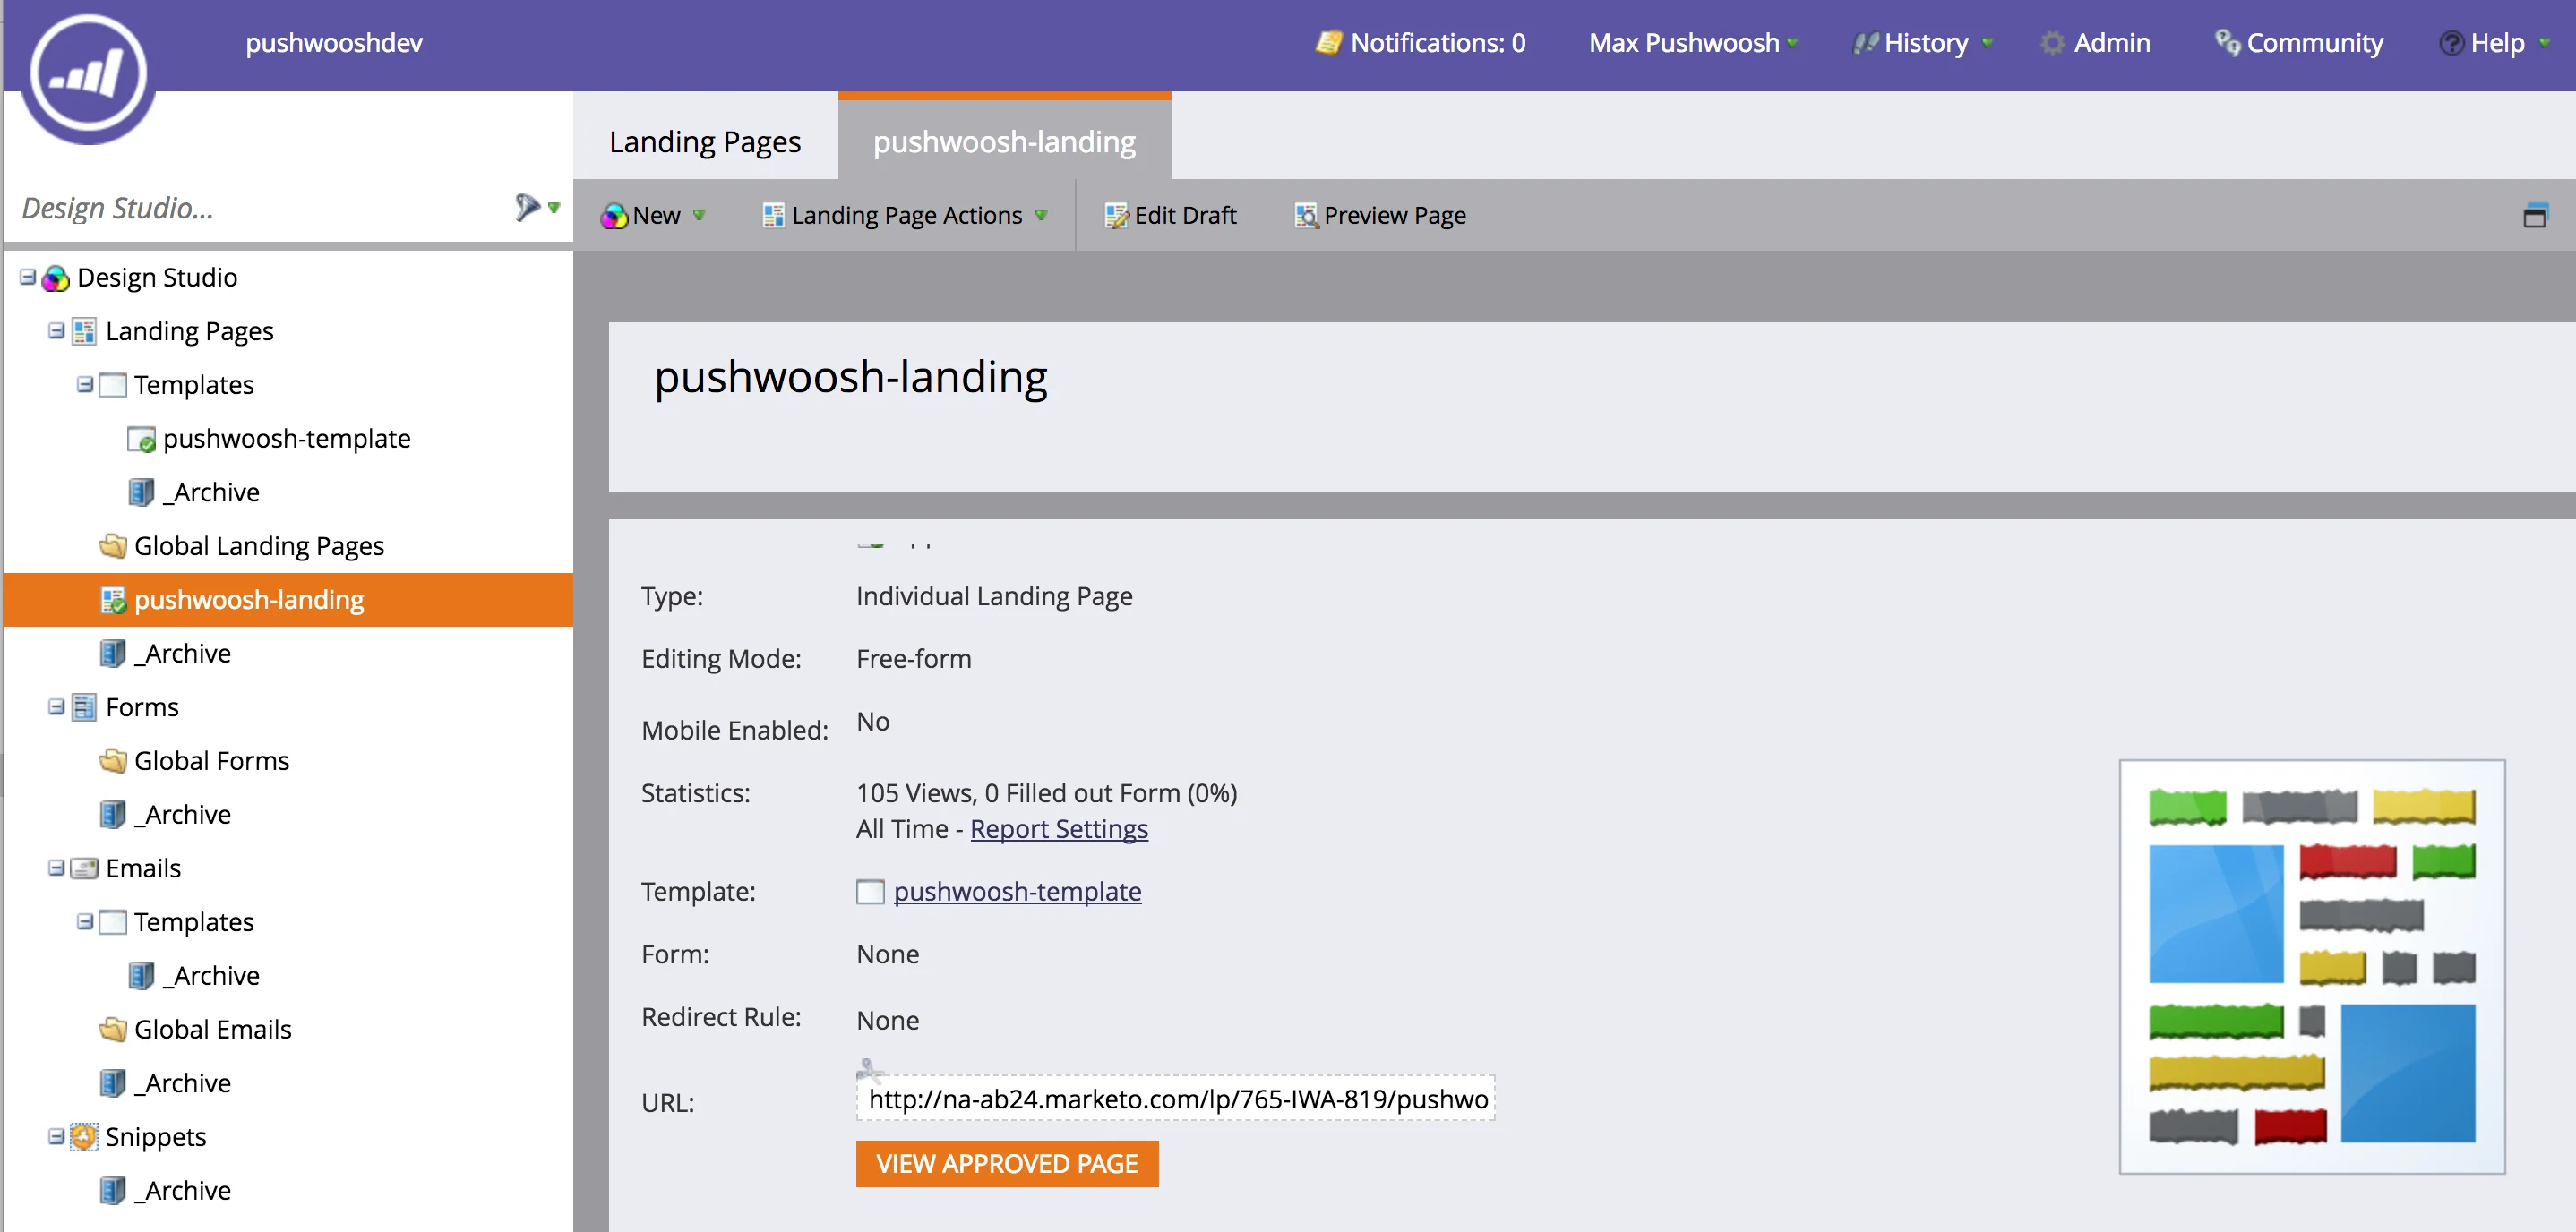
Now go to the "**Templates**" section of your **Marketo landing pages**, create the template (called "pushwoosh-template" in the screenshot below) and copy-paste the contents of the resulting file there.
Now let's create a new landing page based on this template.
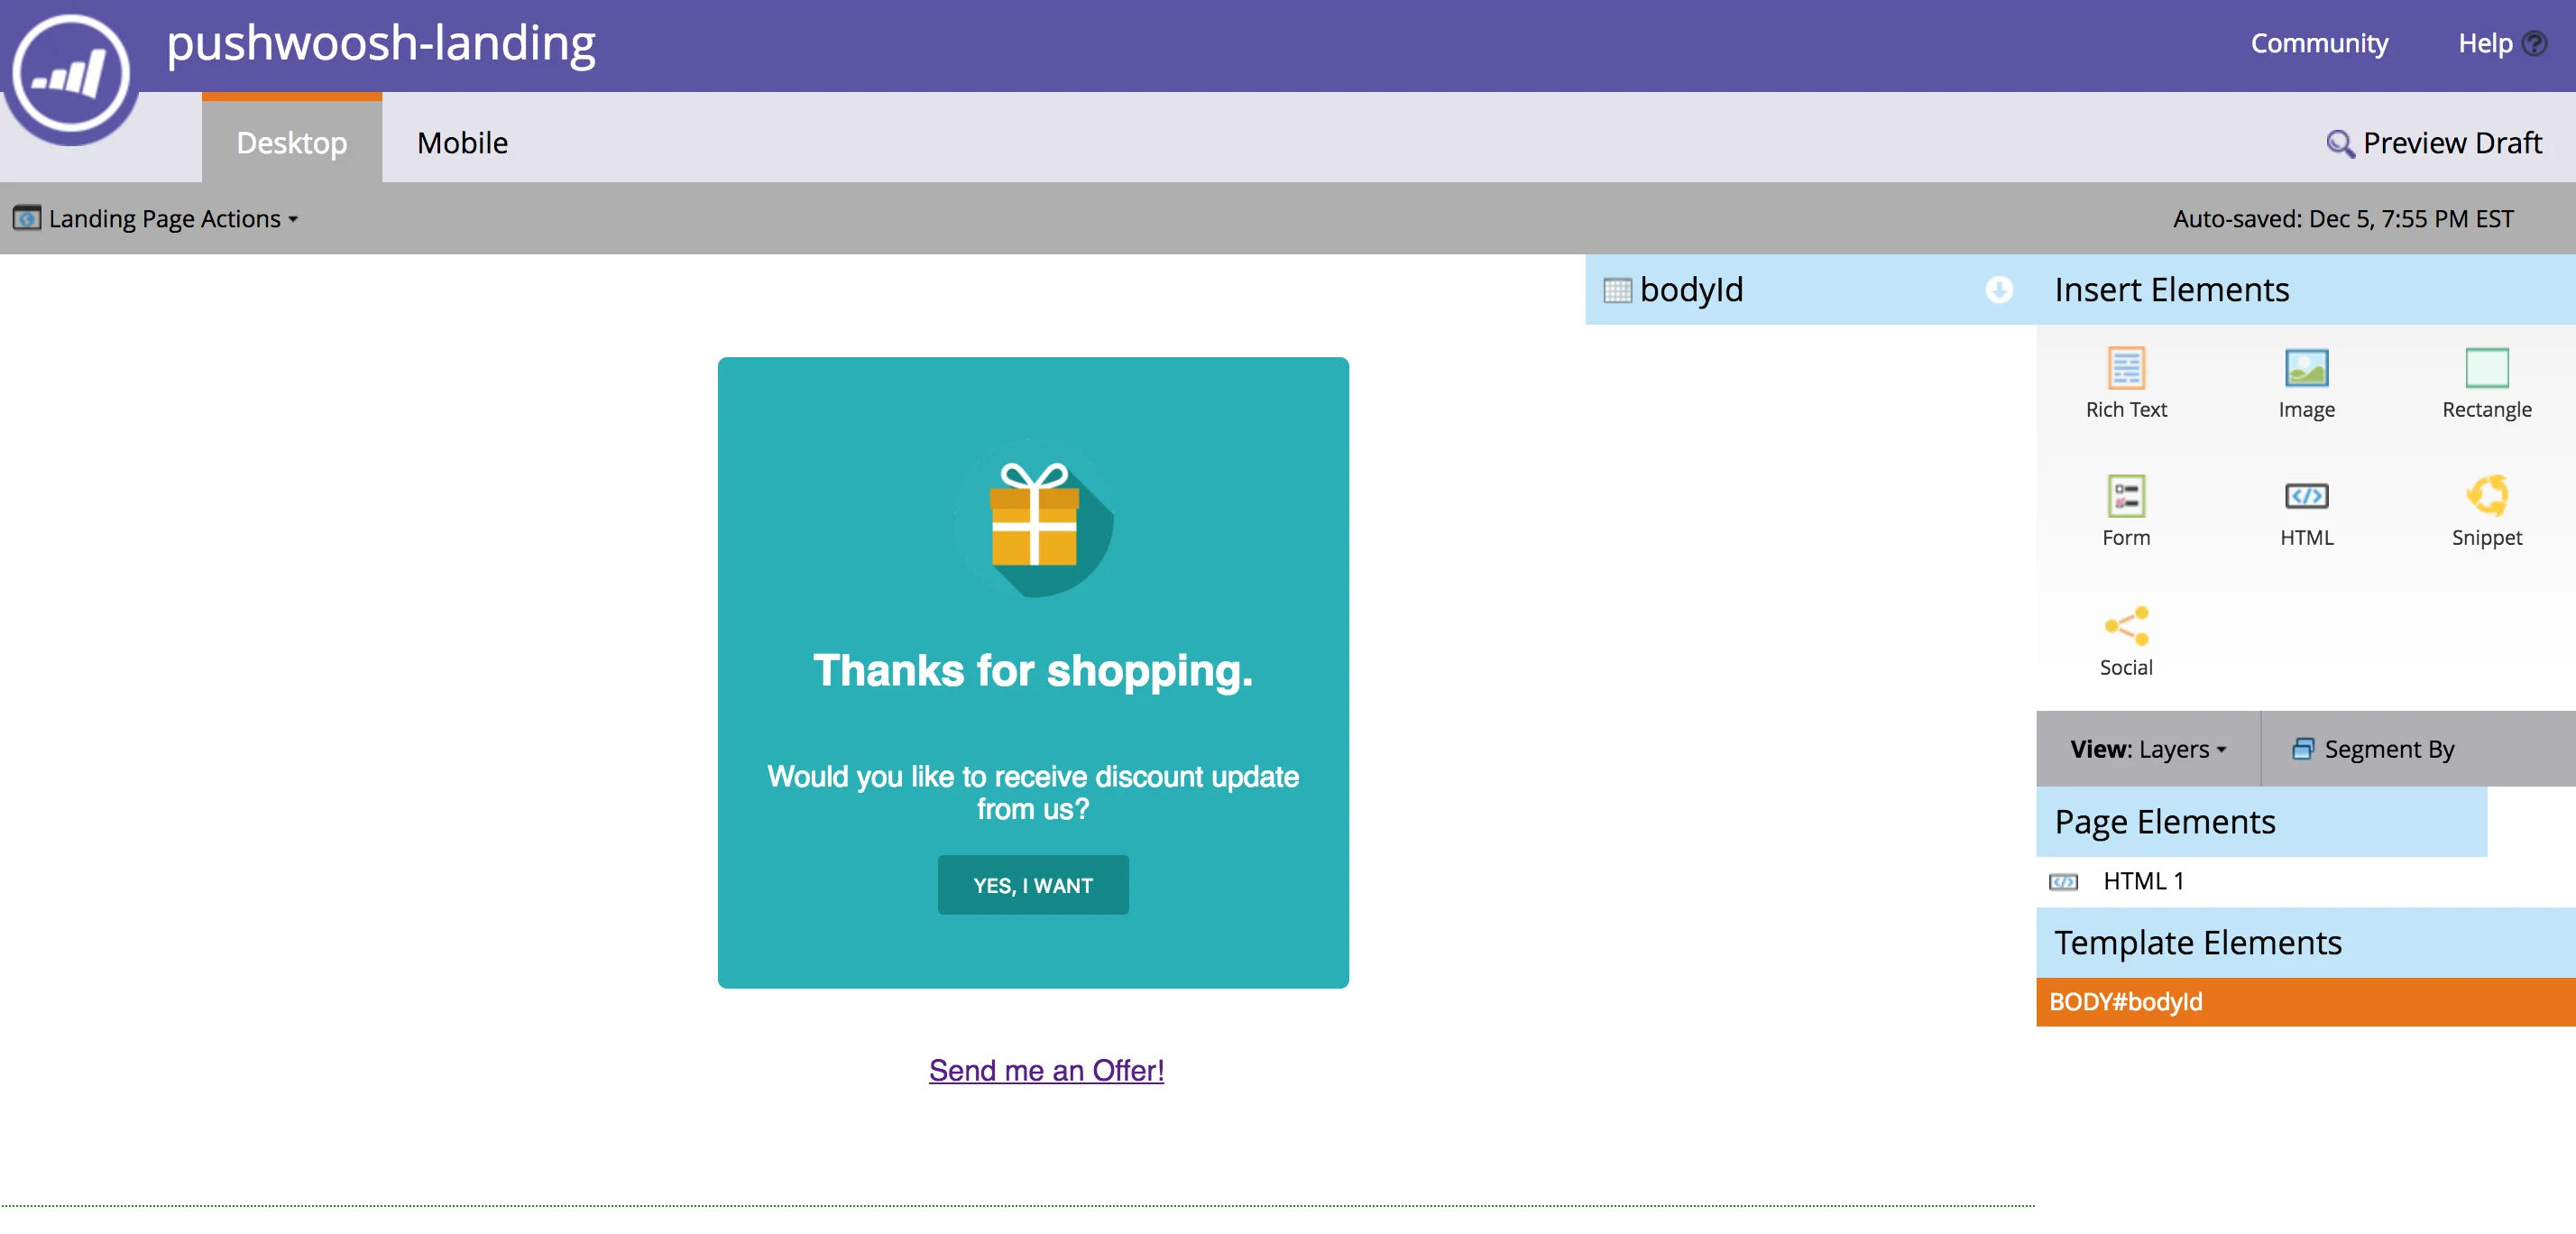
In our example to show capabilities of Pushwoosh integration with Marketo campaign automation for the sake of simplicity we'll add a simple link to the landing page. We are going to create a campaign that will trigger personal push notification when the user clicks on this link.
We are going to use the same URL as the landing page.
```txt
Send me an Offer!
```
## 4. Creating Pushwoosh Webhook
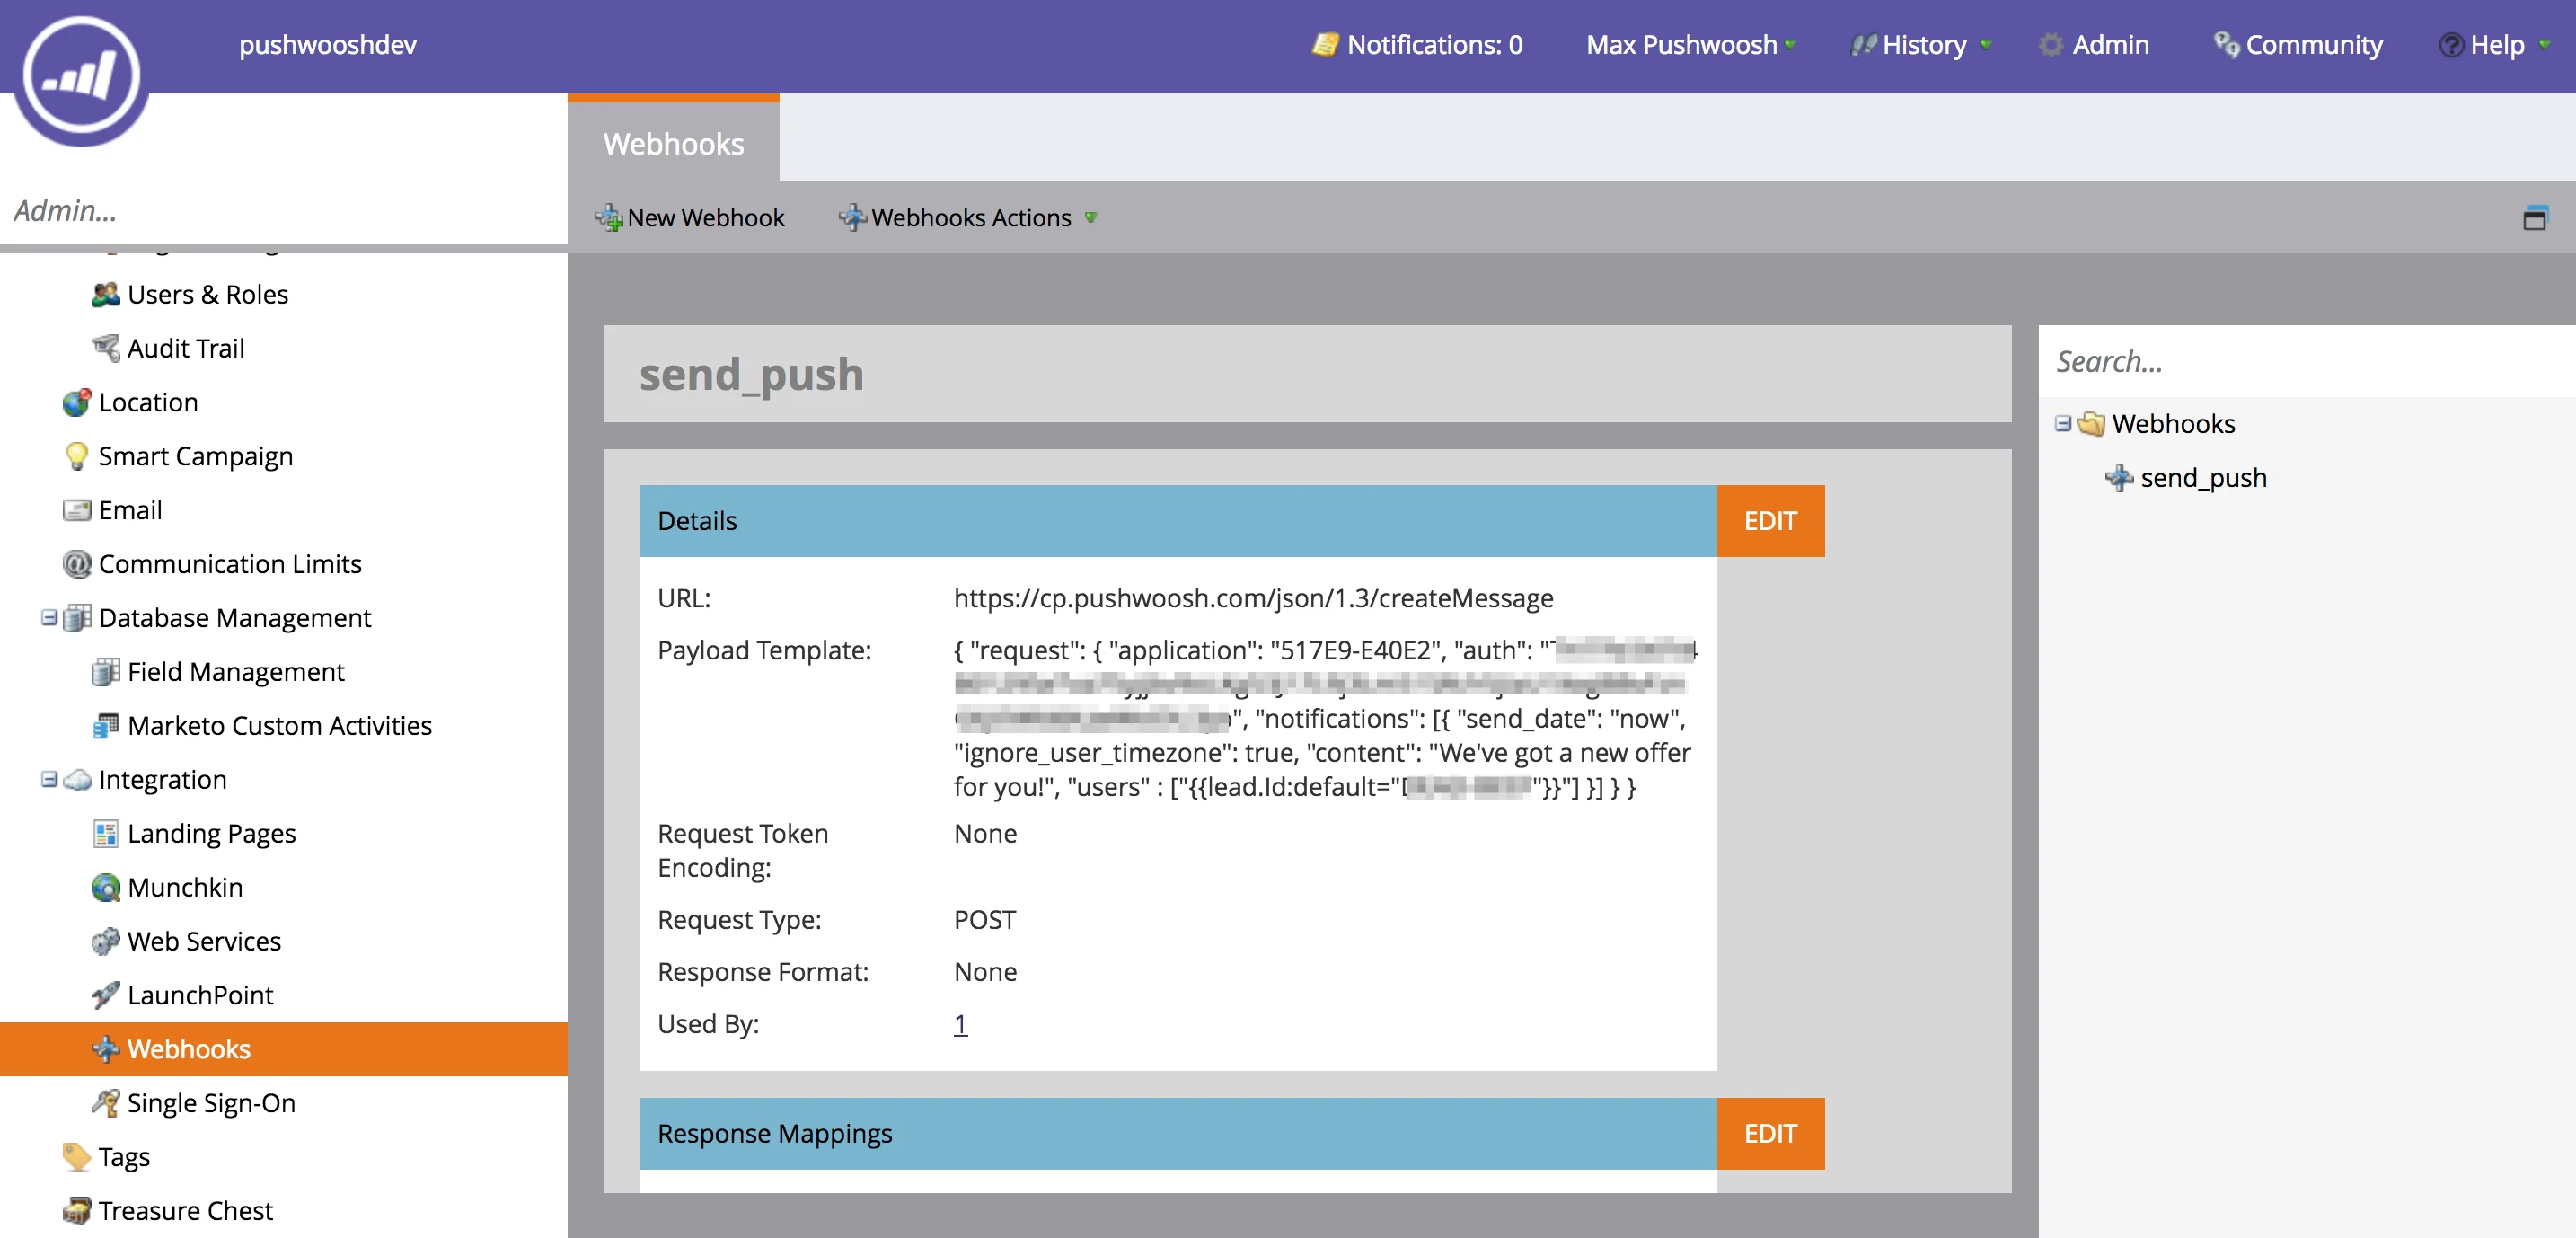
Go to the **"Admin" section of Marketo** and create a new Webhook with the following parameters:
* URL - [https://go.pushwoosh.com/json/1.3/createMessage](https://go.pushwoosh.com/json/1.3/createMessage)
* Request Type: POST
Paste the following code as a template.
```
{
"request": {
"application": "ENTER_YOUR_PUSHWOOSH_APP_ID",
"auth": "ENTER_YOUR_PUSHWOOSH_API_TOKEN_HERE",
"notifications": [{
"send_date": "now",
"ignore_user_timezone": true,
"content": "We've got a new offer for you!",
"users" : ["{{lead.Id:default="ABCD-EFGH"}}"]
}]
}
}
```
Note that we use Marketo Lead ID to refer user in Pushwoosh. See more about user-centric push notifications [here](/product/messaging-channels/push-notifications/send-push-notifications/push-by-user-id).
In our very simple example we use static push message. However you can use all the functionality of [`createMessage`](/developer/api-reference/messages-api/#createmessage)
To personalize push notification you can use **Preset** from Pushwoosh and pass the values from Marketo in **"dynamic_content_placeholders"** parameters of the `/createMessage` call for push personalization.
## 5. Integrating with Marketo automation campaign
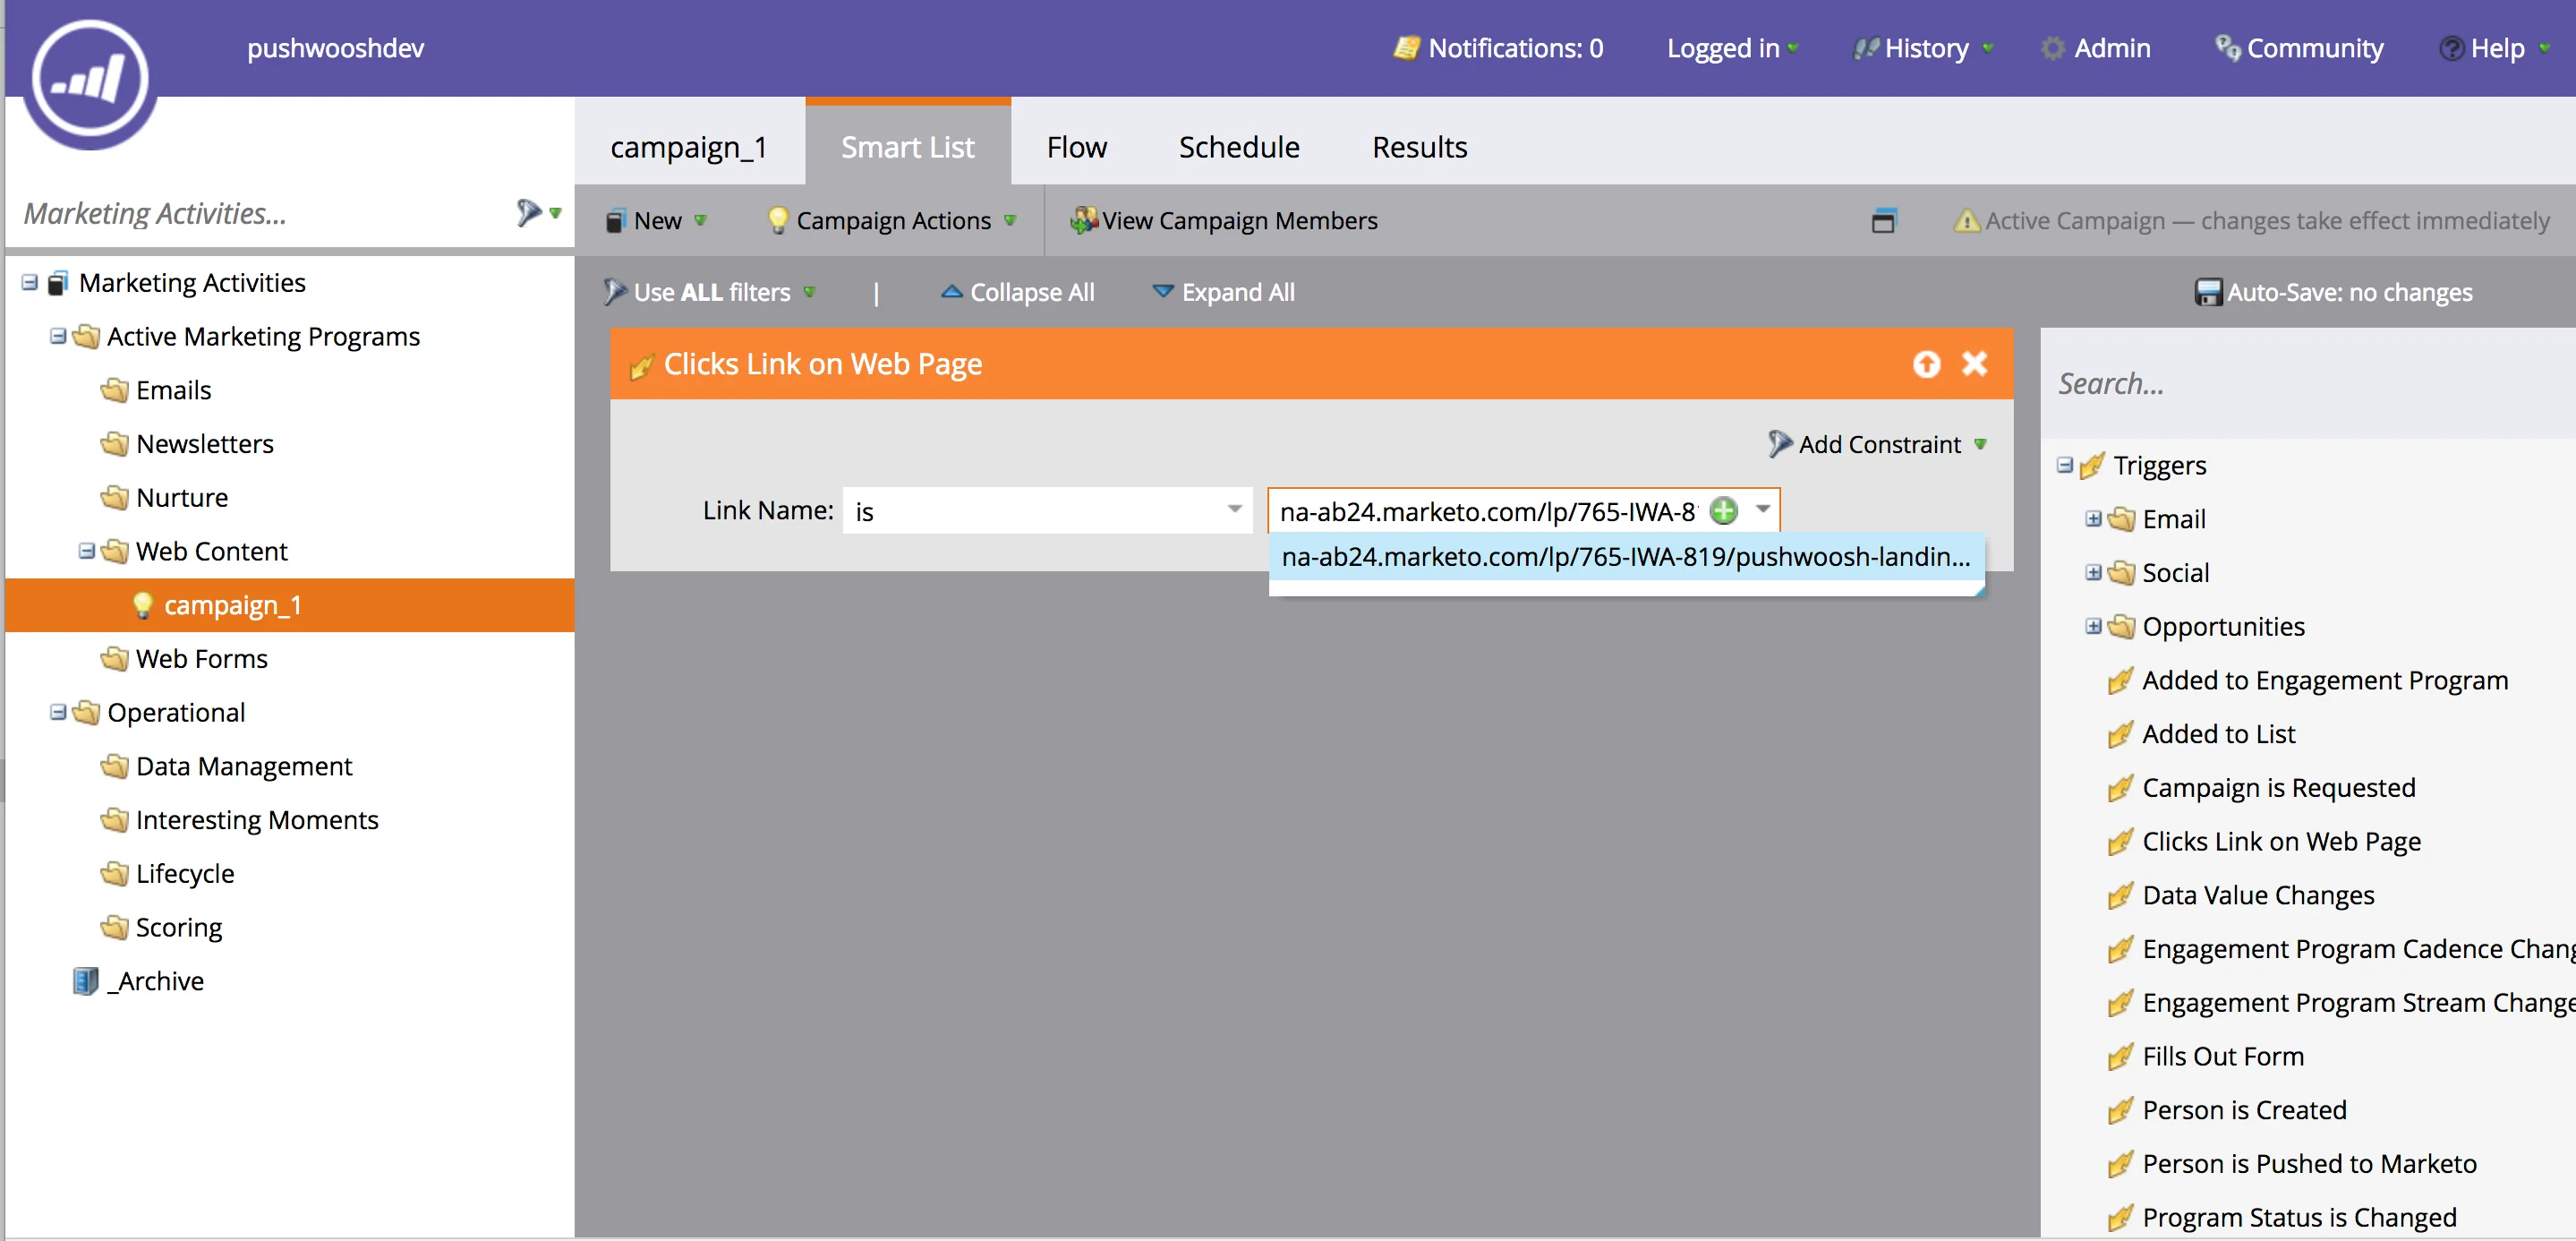
Go to the "**Marketing Activities**" section of Marketo and create a Campaign.
For our example we'll trigger the campaign when the user clicks on a link (the one we have created just two steps above) on our landing page.
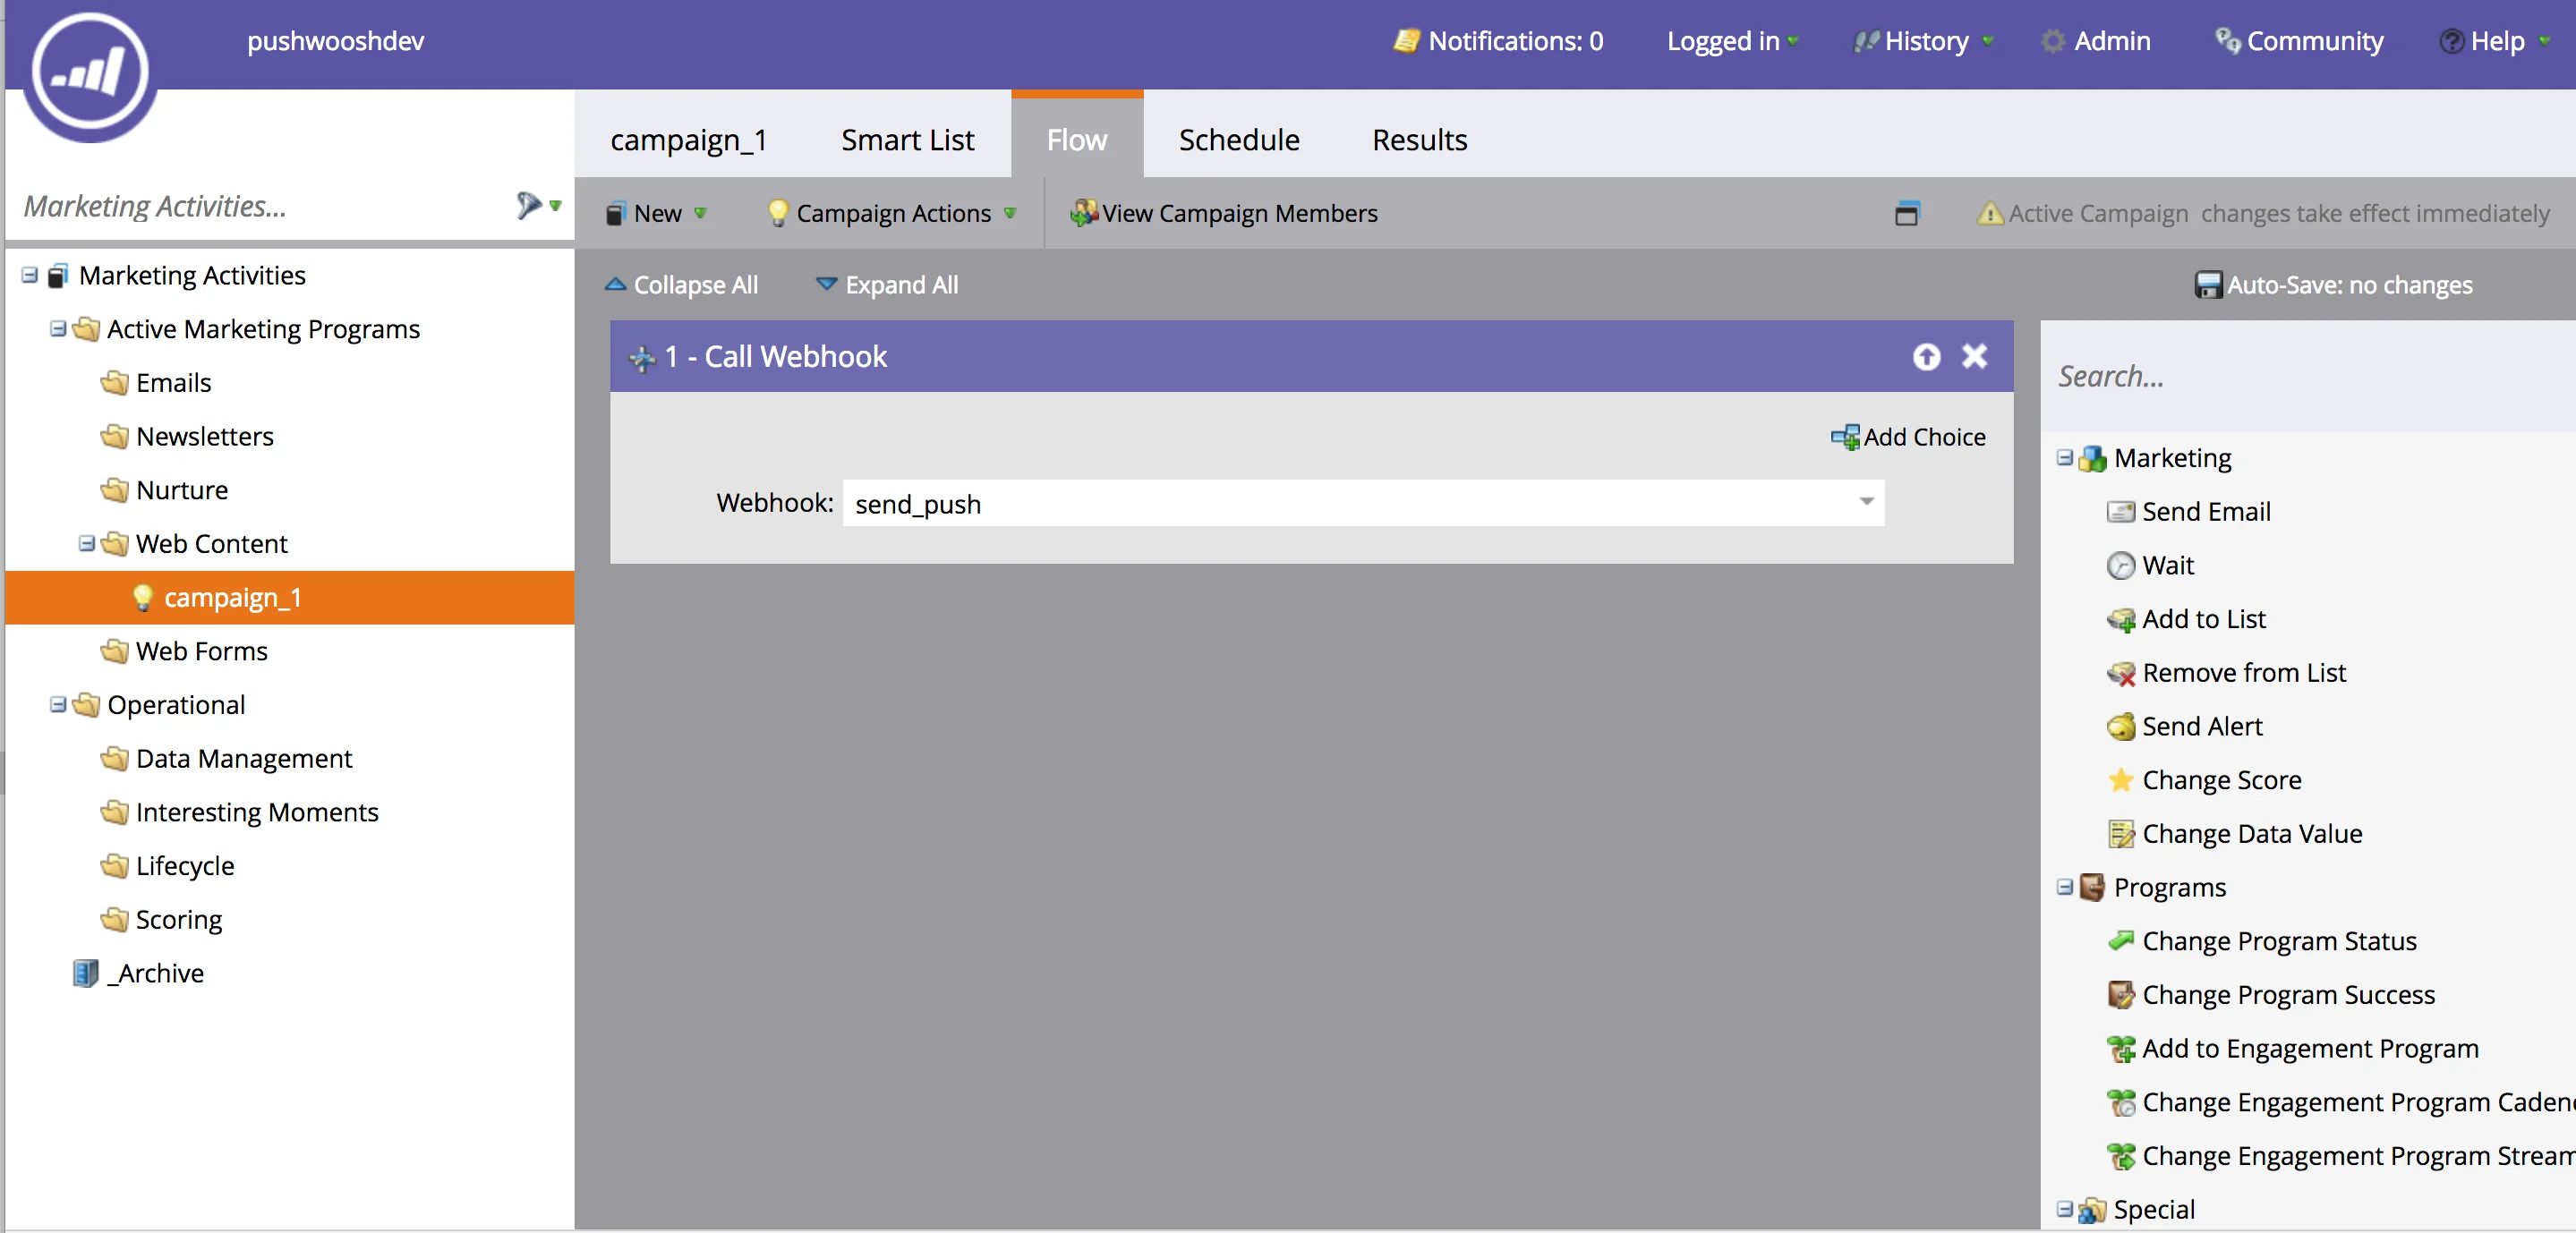
b. Select "send_push" Webhook in the "Flow" section
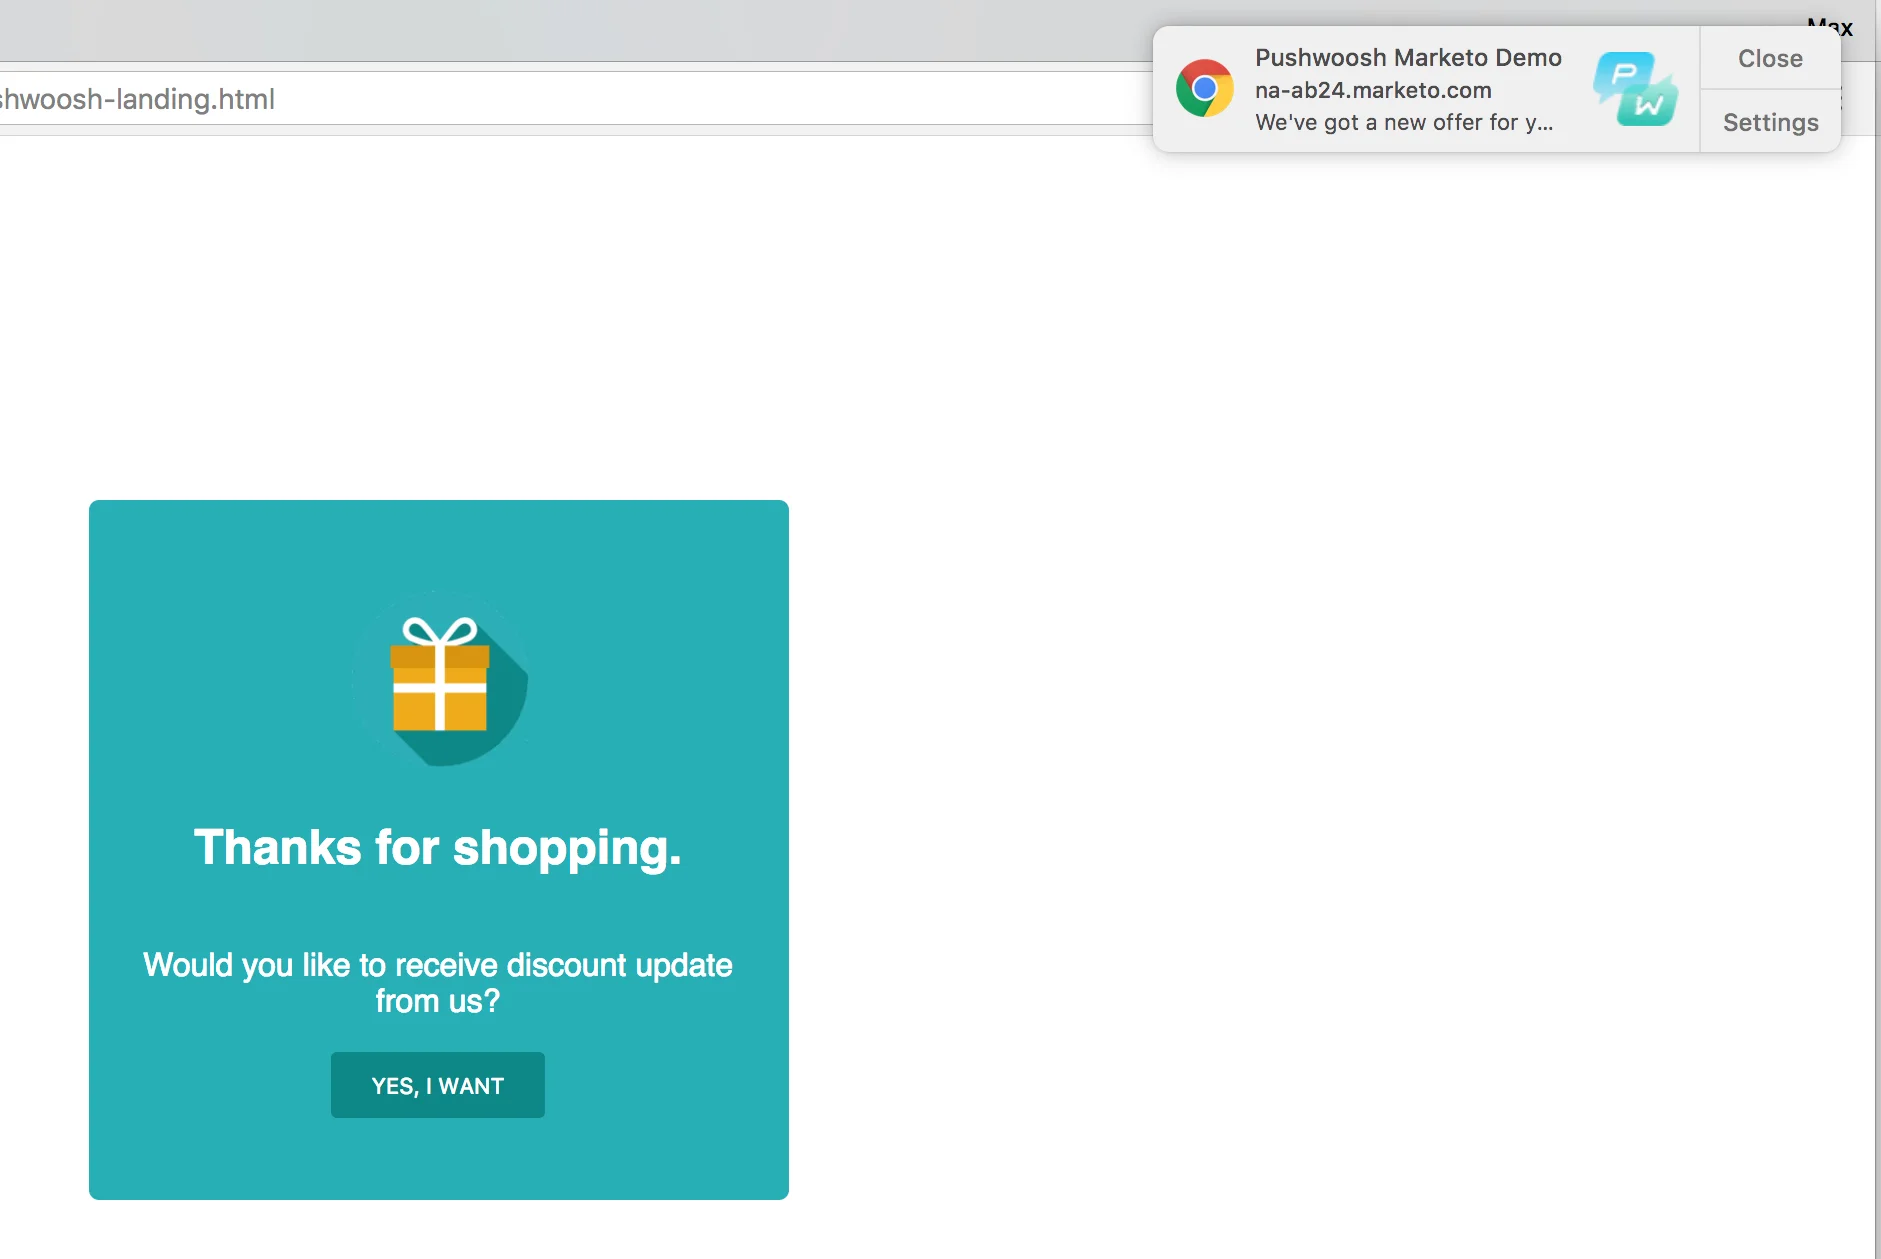
* Now open the landing page URL
* Click on the **"Yes, I Want"** button to open push subscription dialogue
* Subscribe to the push notifications
* Click on the **"Send me an Offer!"** link
You've got your Marketo automated push notification!
 ## 2. Creating push subscription page
As it was mentioned above Marketo can only upload files to the resource folder which is different from the scope of the landing pages.
For example if you click on any file uploaded above and check its URL you'll see something like "[https://your-host-name.com/rs/765-IWA-819/images/pushwoosh-service-worker.js](https://your-host-name.com/rs/765-IWA-819/images/pushwoosh-service-worker.js)".
However if you click on the landing page and check its URL it will be something like: "[https://your-host-name.com/lp/765-IWA-819/pushwoosh-landing.html](https://your-host-name.com/lp/765-IWA-819/pushwoosh-landing.html)".
Note **"lp"** part in the landing pages URL's and **"rs"** in the script URL's.
That means we need to register our _Service Worker_ script in a scope different from the landing pages.
To achieve that we'll upload special push subscription page to Marketo resources folder and then open it from the landing page. Let's create this subscription page.
Get the _push-subscription.html_ file from the following gist:
[https://gist.github.com/shaders/2b518e3acaf9b4712d5260205243343d#file-push-subscription-html](https://gist.github.com/shaders/2b518e3acaf9b4712d5260205243343d#file-push-subscription-html)
Open the file and change the following lines:
* Line 8 - change the link to the URL of _manifest.json_ file uploaded in the previous step.
* Line 24 - change the _scope_ parameter value to the URL of your resources folder (this is the folder where _manifest.json_ is).
* Line 20 - change the _applicationCode_ parameter value to your Pushwoosh App Id.
Note the script also maps Pushwoosh user-centric push notifications with Lead Identifier of the Marketo: _userId:leadId_ (line 26)
Upload resulting file to the "Images and Files" folder. Now you should have these files in the folder:
## 2. Creating push subscription page
As it was mentioned above Marketo can only upload files to the resource folder which is different from the scope of the landing pages.
For example if you click on any file uploaded above and check its URL you'll see something like "[https://your-host-name.com/rs/765-IWA-819/images/pushwoosh-service-worker.js](https://your-host-name.com/rs/765-IWA-819/images/pushwoosh-service-worker.js)".
However if you click on the landing page and check its URL it will be something like: "[https://your-host-name.com/lp/765-IWA-819/pushwoosh-landing.html](https://your-host-name.com/lp/765-IWA-819/pushwoosh-landing.html)".
Note **"lp"** part in the landing pages URL's and **"rs"** in the script URL's.
That means we need to register our _Service Worker_ script in a scope different from the landing pages.
To achieve that we'll upload special push subscription page to Marketo resources folder and then open it from the landing page. Let's create this subscription page.
Get the _push-subscription.html_ file from the following gist:
[https://gist.github.com/shaders/2b518e3acaf9b4712d5260205243343d#file-push-subscription-html](https://gist.github.com/shaders/2b518e3acaf9b4712d5260205243343d#file-push-subscription-html)
Open the file and change the following lines:
* Line 8 - change the link to the URL of _manifest.json_ file uploaded in the previous step.
* Line 24 - change the _scope_ parameter value to the URL of your resources folder (this is the folder where _manifest.json_ is).
* Line 20 - change the _applicationCode_ parameter value to your Pushwoosh App Id.
Note the script also maps Pushwoosh user-centric push notifications with Lead Identifier of the Marketo: _userId:leadId_ (line 26)
Upload resulting file to the "Images and Files" folder. Now you should have these files in the folder:
 ## 3. Creating landing page with push subscription
Get the _pushwoosh-template.html_ file from the following gist:
[https://gist.github.com/shaders/2b518e3acaf9b4712d5260205243343d#file-pushwoosh-template-html](https://gist.github.com/shaders/2b518e3acaf9b4712d5260205243343d#file-pushwoosh-template-html)
Open the file and change the following lines:
* Line 47 - change the _scope_ parameter value to the URL of your resources folder.
* Line 65 - change the link to the URL of _push-subscription.html_ file uploaded in the previous step.
* Line 43 - change the _applicationCode_ parameter value to your Pushwoosh App Id.
This script as a previous one also maps Pushwoosh user-centric push notifications with Lead Identifier of the Marketo: _userId:leadId_ (line 49)
Now go to the "**Templates**" section of your **Marketo landing pages**, create the template (called "pushwoosh-template" in the screenshot below) and copy-paste the contents of the resulting file there.
## 3. Creating landing page with push subscription
Get the _pushwoosh-template.html_ file from the following gist:
[https://gist.github.com/shaders/2b518e3acaf9b4712d5260205243343d#file-pushwoosh-template-html](https://gist.github.com/shaders/2b518e3acaf9b4712d5260205243343d#file-pushwoosh-template-html)
Open the file and change the following lines:
* Line 47 - change the _scope_ parameter value to the URL of your resources folder.
* Line 65 - change the link to the URL of _push-subscription.html_ file uploaded in the previous step.
* Line 43 - change the _applicationCode_ parameter value to your Pushwoosh App Id.
This script as a previous one also maps Pushwoosh user-centric push notifications with Lead Identifier of the Marketo: _userId:leadId_ (line 49)
Now go to the "**Templates**" section of your **Marketo landing pages**, create the template (called "pushwoosh-template" in the screenshot below) and copy-paste the contents of the resulting file there.
 Now let's create a new landing page based on this template.
 In our example to show capabilities of Pushwoosh integration with Marketo campaign automation for the sake of simplicity we'll add a simple link to the landing page. We are going to create a campaign that will trigger personal push notification when the user clicks on this link.
We are going to use the same URL as the landing page.
```txt
Send me an Offer!
```
In our example to show capabilities of Pushwoosh integration with Marketo campaign automation for the sake of simplicity we'll add a simple link to the landing page. We are going to create a campaign that will trigger personal push notification when the user clicks on this link.
We are going to use the same URL as the landing page.
```txt
Send me an Offer!
```
 ## 4. Creating Pushwoosh Webhook
Go to the **"Admin" section of Marketo** and create a new Webhook with the following parameters:
* URL - [https://go.pushwoosh.com/json/1.3/createMessage](https://go.pushwoosh.com/json/1.3/createMessage)
* Request Type: POST
Paste the following code as a template.
```
{
"request": {
"application": "ENTER_YOUR_PUSHWOOSH_APP_ID",
"auth": "ENTER_YOUR_PUSHWOOSH_API_TOKEN_HERE",
"notifications": [{
"send_date": "now",
"ignore_user_timezone": true,
"content": "We've got a new offer for you!",
"users" : ["{{lead.Id:default="ABCD-EFGH"}}"]
}]
}
}
```
Note that we use Marketo Lead ID to refer user in Pushwoosh. See more about user-centric push notifications [here](/product/messaging-channels/push-notifications/send-push-notifications/push-by-user-id).
## 4. Creating Pushwoosh Webhook
Go to the **"Admin" section of Marketo** and create a new Webhook with the following parameters:
* URL - [https://go.pushwoosh.com/json/1.3/createMessage](https://go.pushwoosh.com/json/1.3/createMessage)
* Request Type: POST
Paste the following code as a template.
```
{
"request": {
"application": "ENTER_YOUR_PUSHWOOSH_APP_ID",
"auth": "ENTER_YOUR_PUSHWOOSH_API_TOKEN_HERE",
"notifications": [{
"send_date": "now",
"ignore_user_timezone": true,
"content": "We've got a new offer for you!",
"users" : ["{{lead.Id:default="ABCD-EFGH"}}"]
}]
}
}
```
Note that we use Marketo Lead ID to refer user in Pushwoosh. See more about user-centric push notifications [here](/product/messaging-channels/push-notifications/send-push-notifications/push-by-user-id).
 In our very simple example we use static push message. However you can use all the functionality of [`createMessage`](/developer/api-reference/messages-api/#createmessage)
To personalize push notification you can use **Preset** from Pushwoosh and pass the values from Marketo in **"dynamic_content_placeholders"** parameters of the `/createMessage` call for push personalization.
## 5. Integrating with Marketo automation campaign
Go to the "**Marketing Activities**" section of Marketo and create a Campaign.
For our example we'll trigger the campaign when the user clicks on a link (the one we have created just two steps above) on our landing page.
In our very simple example we use static push message. However you can use all the functionality of [`createMessage`](/developer/api-reference/messages-api/#createmessage)
To personalize push notification you can use **Preset** from Pushwoosh and pass the values from Marketo in **"dynamic_content_placeholders"** parameters of the `/createMessage` call for push personalization.
## 5. Integrating with Marketo automation campaign
Go to the "**Marketing Activities**" section of Marketo and create a Campaign.
For our example we'll trigger the campaign when the user clicks on a link (the one we have created just two steps above) on our landing page.
 b. Select "send_push" Webhook in the "Flow" section
 * Now open the landing page URL
* Click on the **"Yes, I Want"** button to open push subscription dialogue
* Subscribe to the push notifications
* Click on the **"Send me an Offer!"** link
You've got your Marketo automated push notification!
* Now open the landing page URL
* Click on the **"Yes, I Want"** button to open push subscription dialogue
* Subscribe to the push notifications
* Click on the **"Send me an Offer!"** link
You've got your Marketo automated push notification!