# Magento integration
## Integration overview
[Magento](https://business.adobe.com/products/commerce.html) is a leading e-commerce platform that helps businesses manage products, customers, and orders at scale. By integrating Magento with Pushwoosh, you can automatically sync customers, orders, and abandoned carts to enable real-time messaging, targeted segmentation, and cross-channel marketing automation, helping you engage users and increase conversions directly from your store activity.
### Integration type
**Destination**: This integration pushes data from your Magento store to Pushwoosh.
### Prerequisites
Before proceeding, ensure the following:
* Access to the Magento Admin Panel
* A valid Pushwoosh account
* Your Pushwoosh [API access token](/developer/api-reference/api-access-token/) and [App code](/developer/api-reference/api-identifiers/#application-code)
* [Composer](https://getcomposer.org/) installed on your Magento server
* System requirements met:
* PHP 7.4 / 8.x
* Magento 2.3 / 2.4
* Elasticsearch 7
* RabbitMQ
### Glossary
Mapping entity names if they are different:
| Magento | Pushwoosh |
| :---- | :---- |
| Customer | User |
### List of synchronized entities:
* Customers
* Orders
* Abandoned сarts
### Use cases
* Send push notifications based on order creation and cart abandonment events.
* Segment customers based on attributes (e.g., location, birthday) and send targeted campaigns.
* Send browser-based promotional notifications.
## Set up the integration
### Installation
1. Run the following Composer command in the root of your Magento project:
```shell
composer require pushwoosh/magento2-integration
```
2. Once the package is installed, run Magento setup to install the module:
```shell
bin/magento setup:upgrade
bin/magento setup:di:compile
bin/magento cache:clean
```
### Post-installation configuration
After completing installation:
1. Log into the Magento Admin panel.
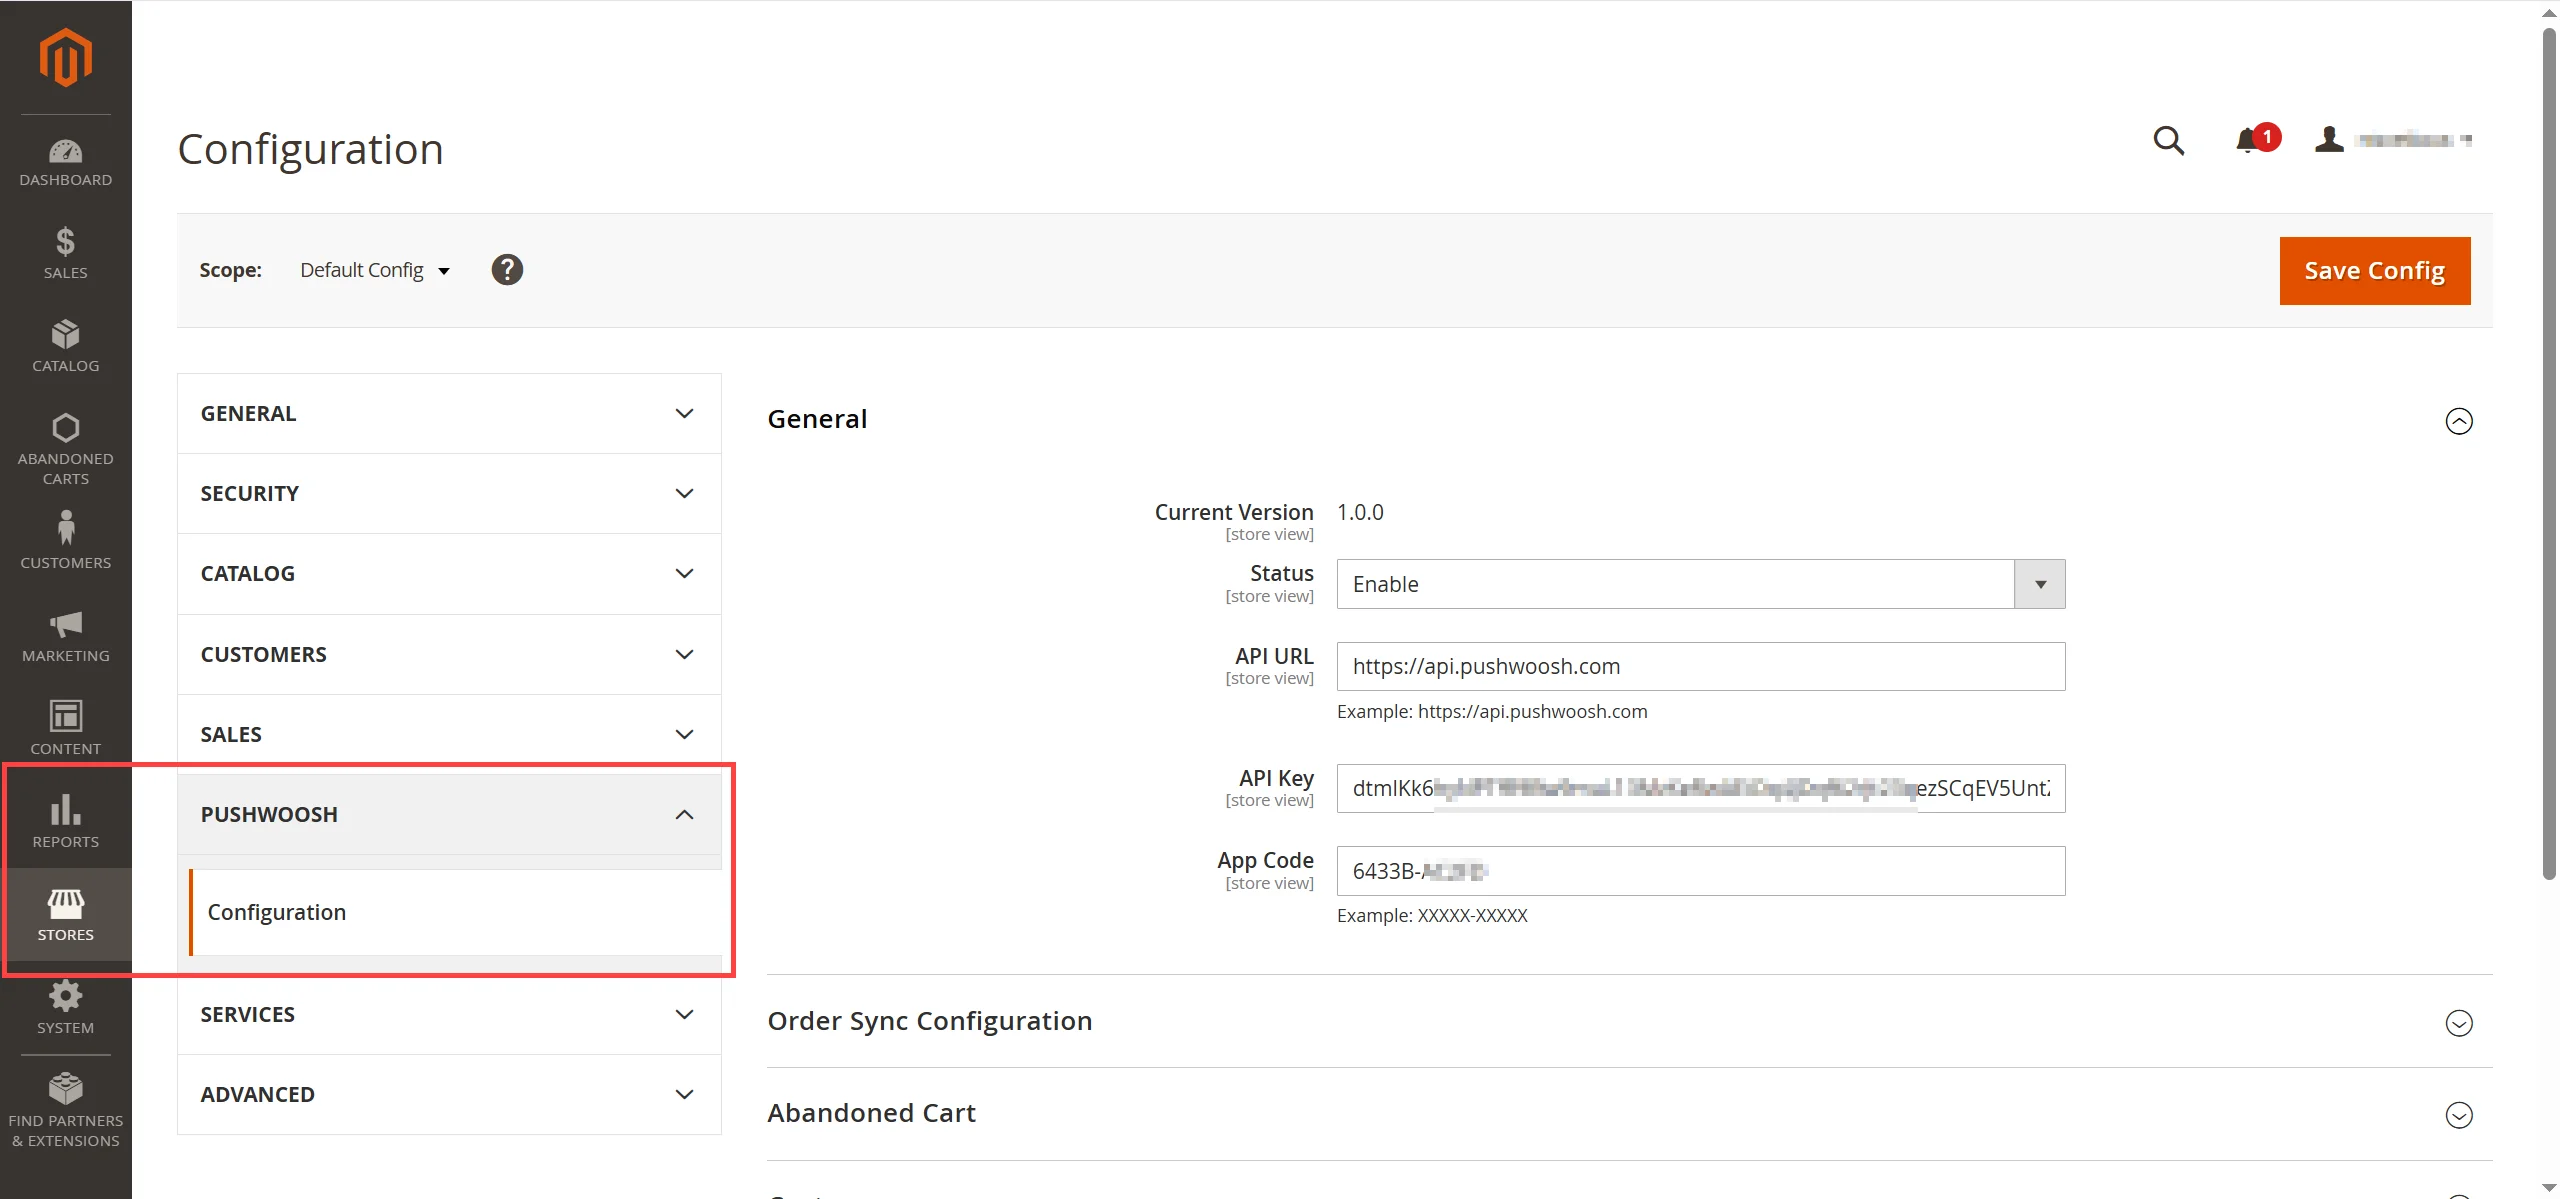
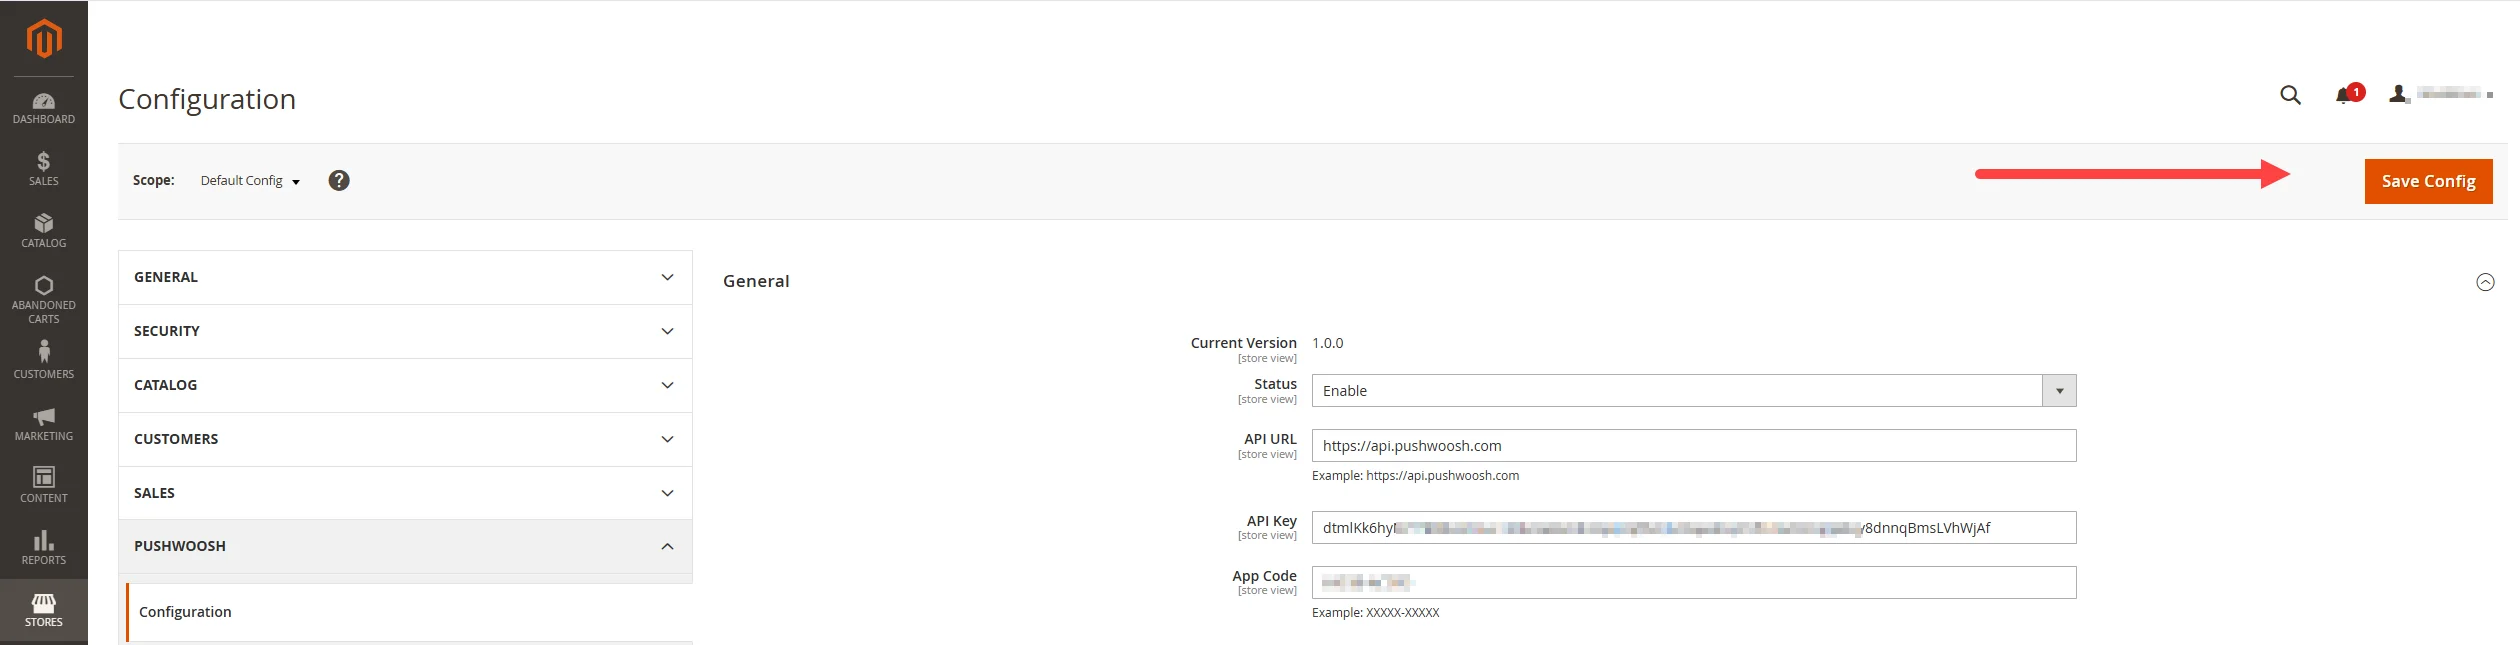
2. Navigate to **Stores > Configuration > Pushwoosh > Configuration**.
#### General settings
In the **General** section, configure the following fields:
* **Status**: Set this to `Enable` to activate the integration.
* **API URL**: Enter the Pushwoosh API endpoint: `https://api.pushwoosh.com/`
* **API Key**: Paste your Pushwoosh API Key required to authenticate requests. [Learn more about Pushwoosh API access key](/developer/api-reference/api-access-token/)
* **App Code**: Enter the [Pushwoosh App Code](/developer/api-reference/api-identifiers/#application-code) corresponding to your mobile or web application.
Below are the configuration options available for syncing customers, orders, and abandoned carts.
#### Order sync configuration
Define how order data is synchronized between your Magento store and Pushwoosh.
Fill in the following fields:
| | |
|-------------|-----------------|
| **Order Sync Enable** | Set to **Yes** to enable automatic order synchronization. If enabled, the process will follow the defined cron schedule. Set to **No** to disable automatic synchronization. |
| **Cron Settings** | Available only if Order Sync is enabled. Define when the cron job should run using the following fields: `Minute`, `Hour`, `Day`, `Month`, `Weekday`. **Cron** is a time-based scheduler used to run tasks automatically at specified intervals. |
| **Order Sync Numbers** | Specify how many orders to process during each sync execution. |
| **Order Sync in Real Time** | Set to **Yes** to sync orders immediately upon placement. |
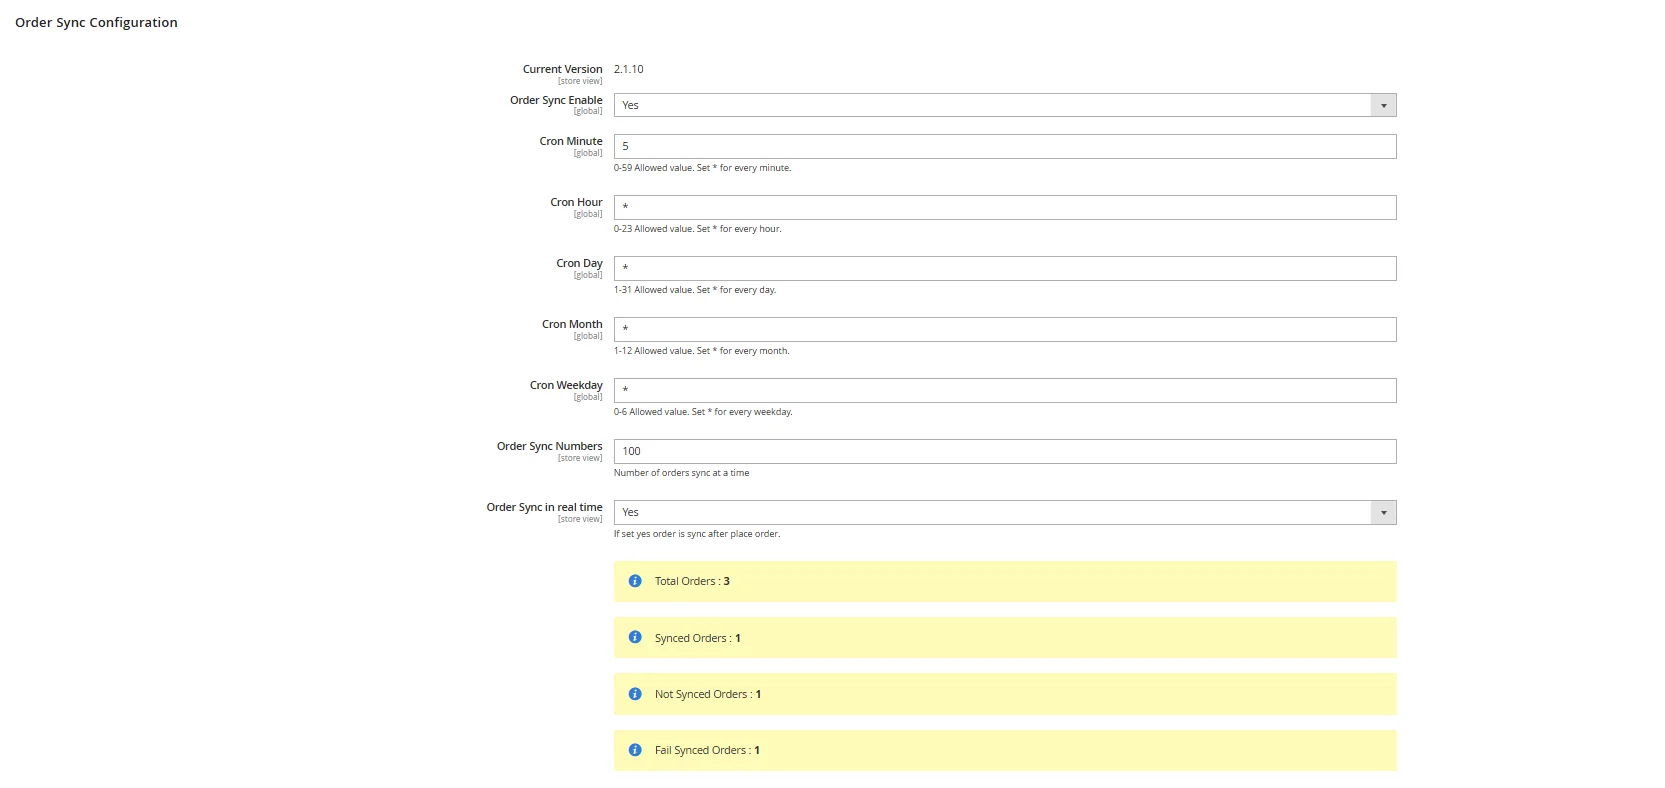
Here you can also see order synchronization status:
* **Total Orders**: Displays the total number of orders evaluated for synchronization.
* **Synced Orders**: Number of orders successfully synchronized with Pushwoosh.
* **Not Synced Orders**: Orders that have not yet been synchronized.
* **Fail Synced Orders**: Orders for which synchronization attempts have failed.
#### Abandoned cart sync configuration
Configure synchronization of abandoned shopping cart data between your Magento store and Pushwoosh.
Fill in the following fields:
| | |
|-------------|-----------------|
| **Abandoned Cart Syncing** | Set to **Yes** to enable automatic synchronization of abandoned cart data. If enabled, synchronization runs according to the defined cron schedule. |
| **Cron Schedule Configuration** | Define when the sync should run using the following fields: `Minute`, `Hour`, `Day`, `Month`, `Weekday`. **Cron** is a time-based job scheduler that runs tasks automatically at specified intervals. |
| **Number of Abandoned Cart** | Specify how many abandoned carts will be processed during each synchronization run. |
| **Minimum Inactivity Time** | Set the minimum inactivity time (in minutes) for a cart to be considered abandoned. For example, `60` means carts inactive for at least 60 minutes will be eligible for syncing. |
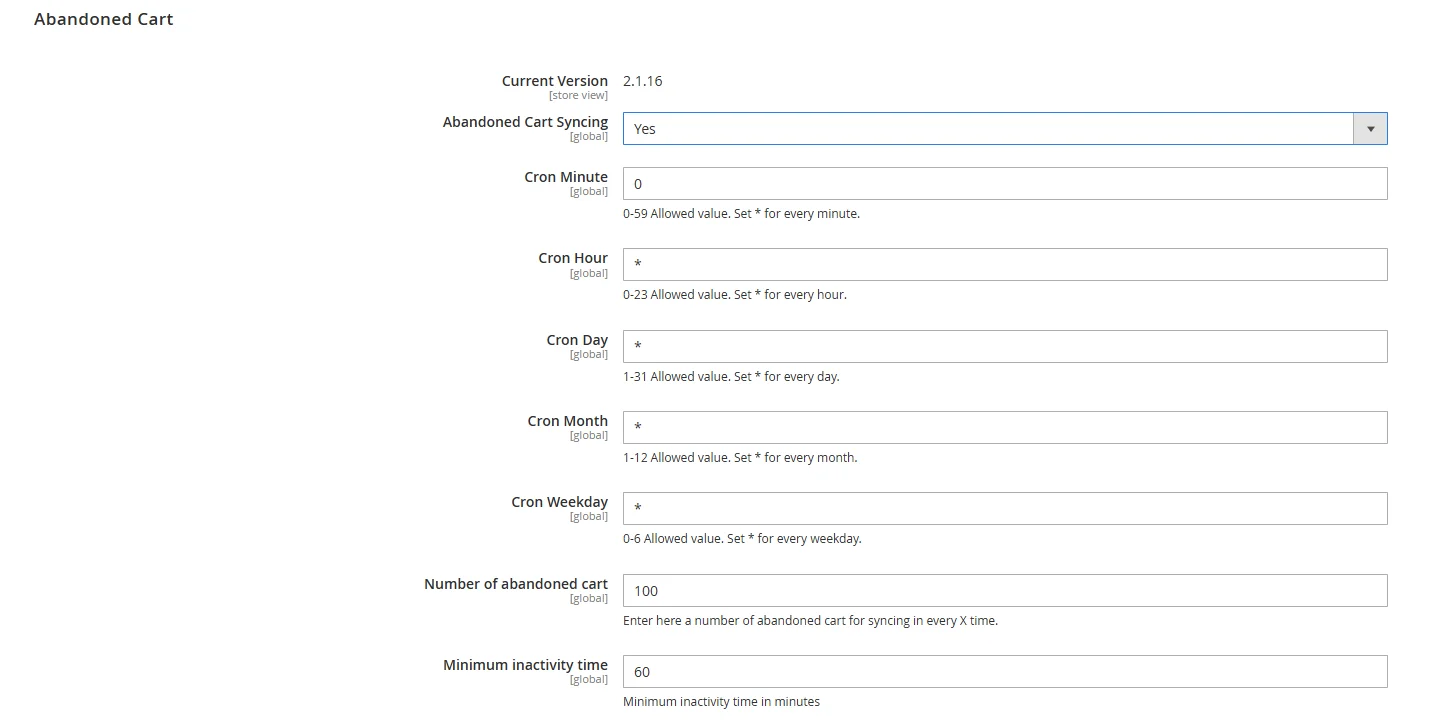
Here you can also see real-time metrics on synchronization activity:
* **Total Abandoned Carts**: Total number of carts identified as abandoned.
* **Synced Abandoned Carts**: Number of carts successfully synchronized with Pushwoosh.
* **Not Synced Abandoned Carts**: Number of carts that have not yet been synchronized.
* **Fail Synced Abandoned Carts**: Number of carts for which synchronization has failed.
#### Customer sync configuration
Configure the synchronization of customer data from your Magento store to Pushwoosh to enable audience segmentation and personalized messaging based on customer attributes.
Fill in the following fields:
| | |
|-------------|-----------------|
| **Customer Syncing** | Set to **Yes** to enable synchronization of all existing and new customer records. Syncing will follow the defined cron schedule and use the specified attribute mappings. |
| **Cron Schedule Configuration** | Define when the sync should run using the following fields: `Minute`, `Hour`, `Day`, `Month`, `Weekday`. **Cron** is a time-based job scheduler used to run tasks automatically at specified intervals. |
| **Mapping Customer Custom Fields** | Map Magento customer attributes to Pushwoosh custom fields for accurate data transfer. Examples: `Date of Birth → Birthday`, `First Name → firstName` |
| **Number of Customers** | Set the maximum number of customers to sync per cron run. |
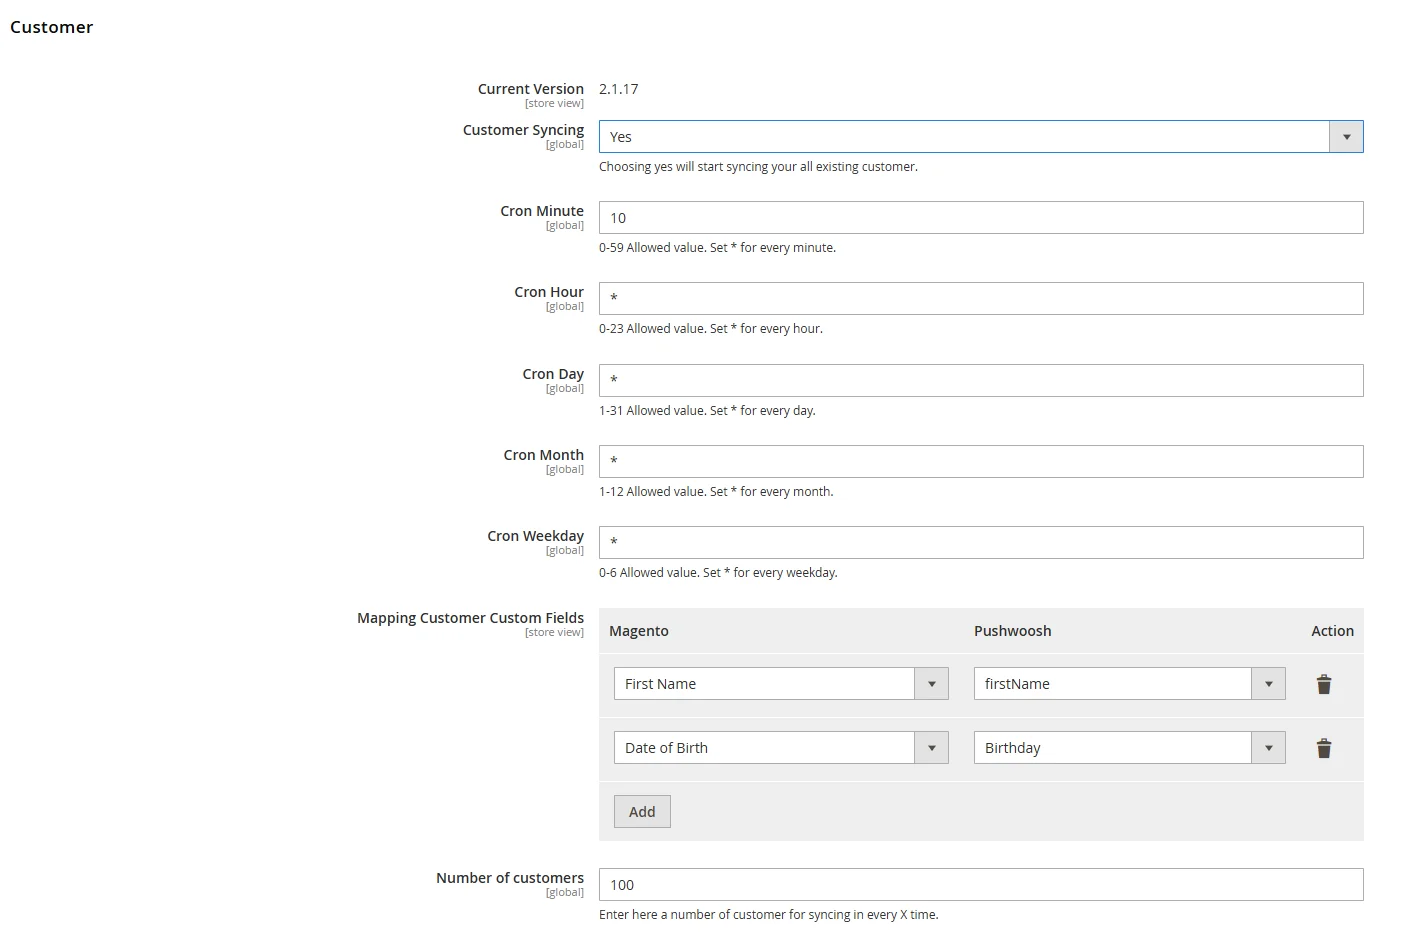
Here you can also see synchronization statistics:
* **Total Customer**: Total number of customer records identified for syncing.
* **Synced Customer**: Number of customers successfully synchronized with Pushwoosh.
* **Not Synced Customer**: Customers pending synchronization.
* **Fail Synced Customer**: Customers that failed to sync due to errors.
#### Web notifications configuration
Set to `Yes` to enable web push notifications for your store visitors. Set to `No` to disable this functionality.
When enabled, your Magento store can send real-time messages to users via their browser. Notifications can be used for promotional offers, order status updates, abandoned cart reminders, and other marketing communications.

#### Save configuration
Once all required fields are completed, click the **Save Config** button located in the top right corner. Clear Magento cache if prompted to apply the changes.
## Manual sync options
#### Sync selected customers to Pushwoosh
If you prefer not to synchronize all customers automatically, you can manually sync individual or selected customers.
1. In the Magento Admin Panel, navigate to **Customers > All Customers**.
2. Locate and select the customer(s) you wish to sync.
3. From the **Actions** dropdown above the customer list, choose **Sync to Pushwoosh**.
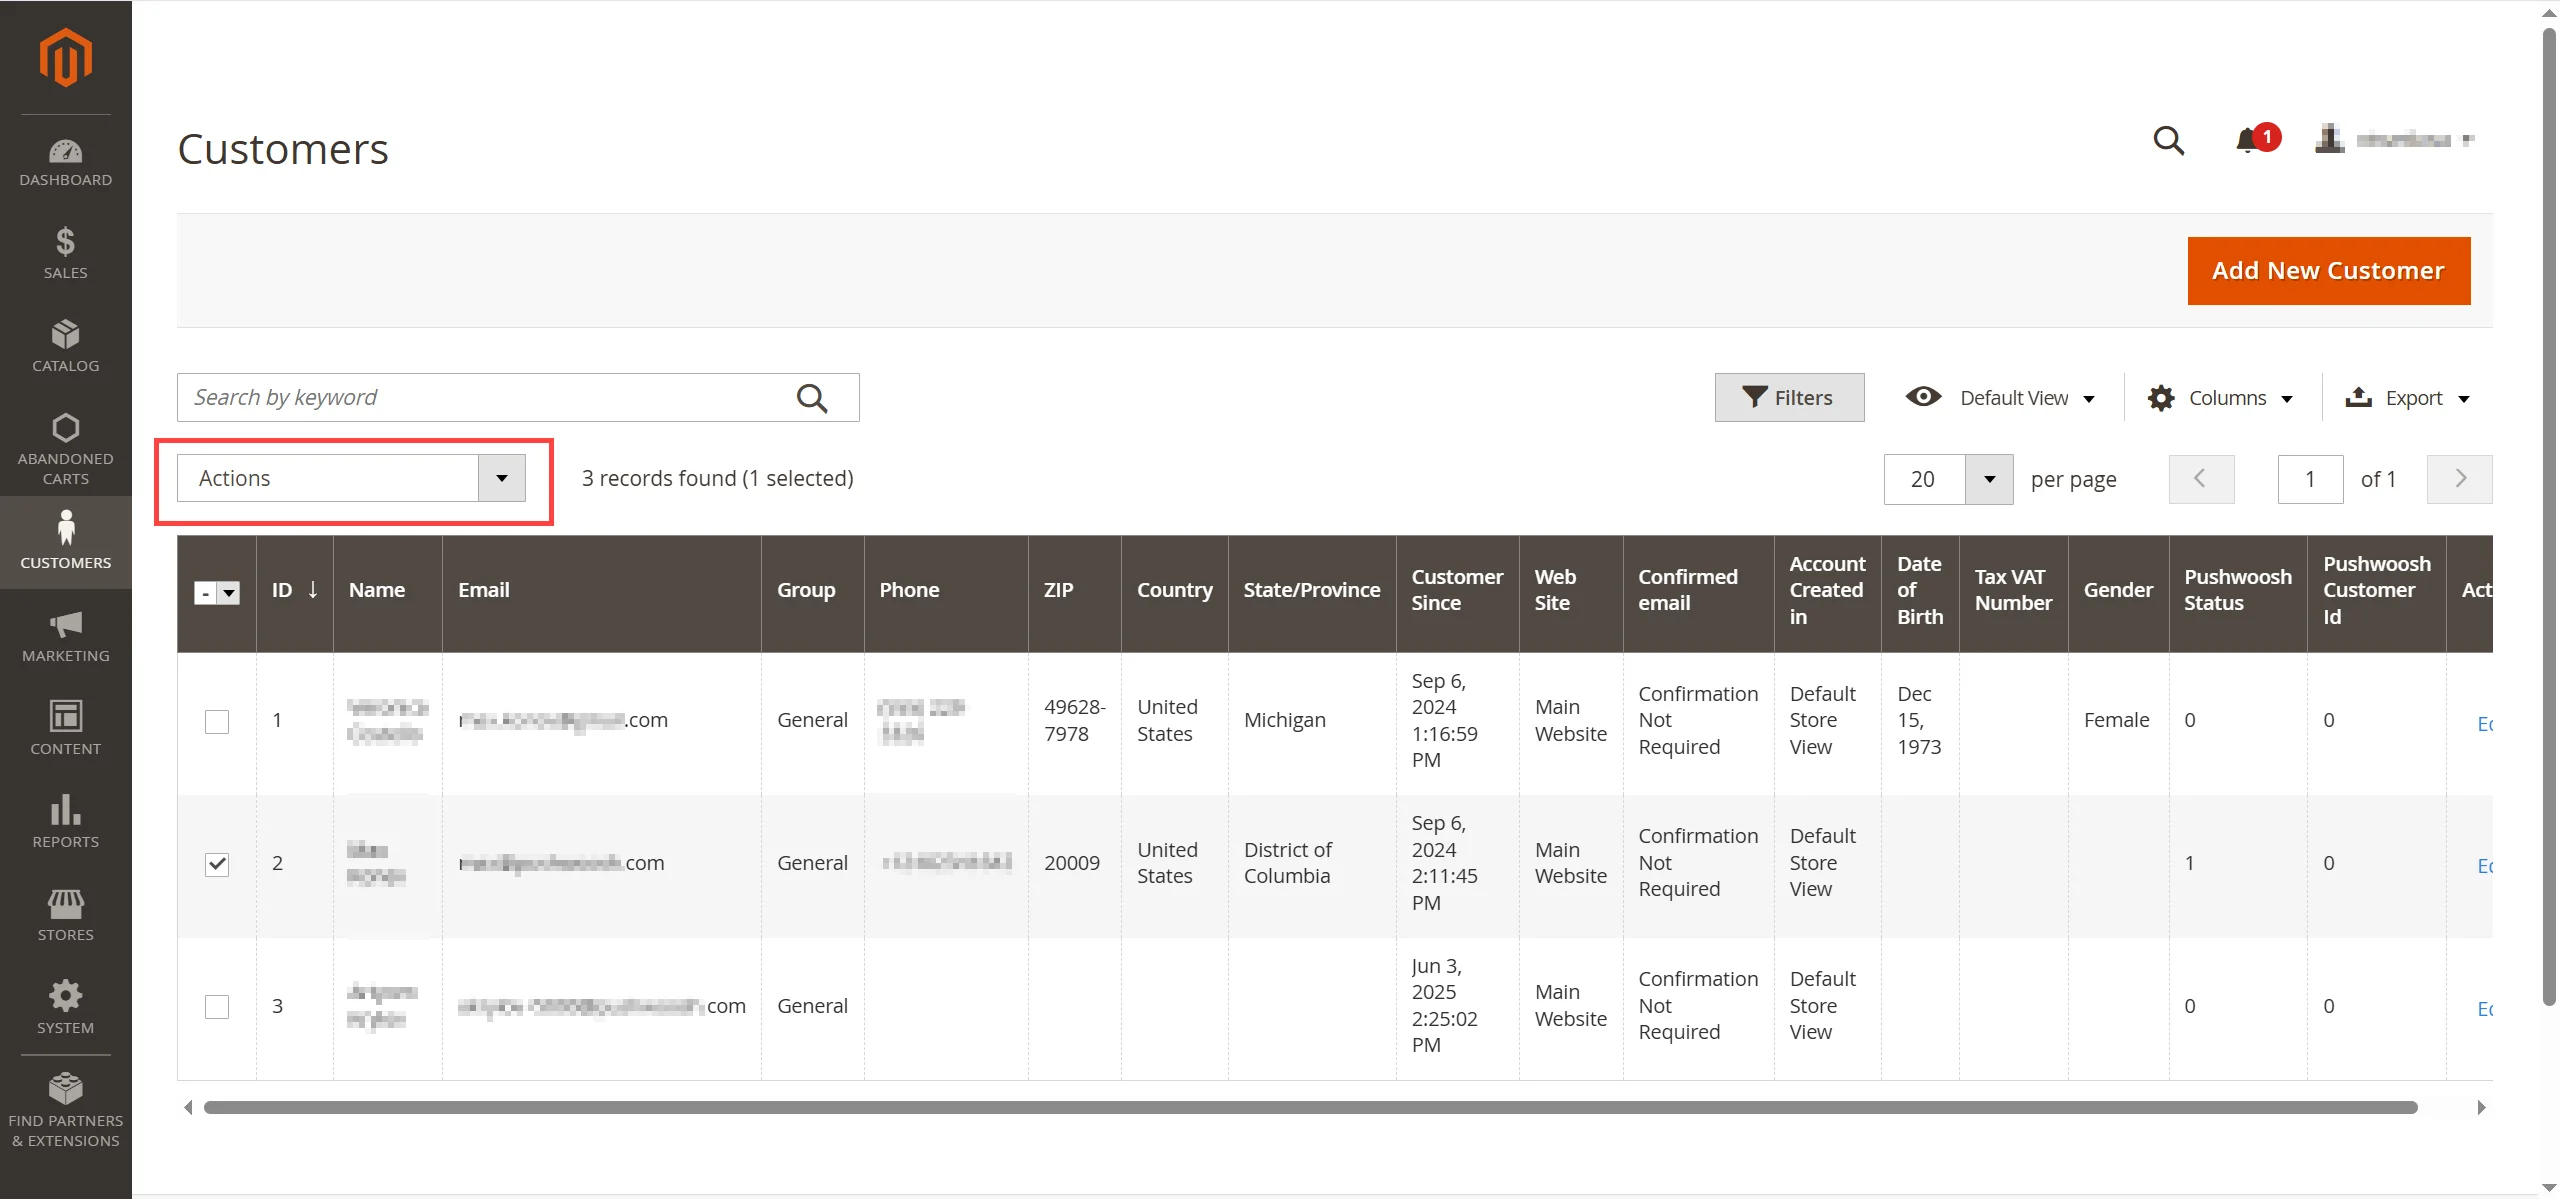
Once synchronization is complete, the customer data will appear in the [User Explorer](/product/audience-data-and-segmentation/user-explorer/) section of your Pushwoosh account, with all relevant information transferred from Magento.
#### Sync selected orders to Pushwoosh
If you prefer not to synchronize all orders automatically, you can manually sync specific orders. For this:
1. In the Magento Admin Panel, navigate to **Sales > Orders**.
2. Select one or more orders from the list.
3. From the **Actions** dropdown, choose **Sync to Pushwoosh**.
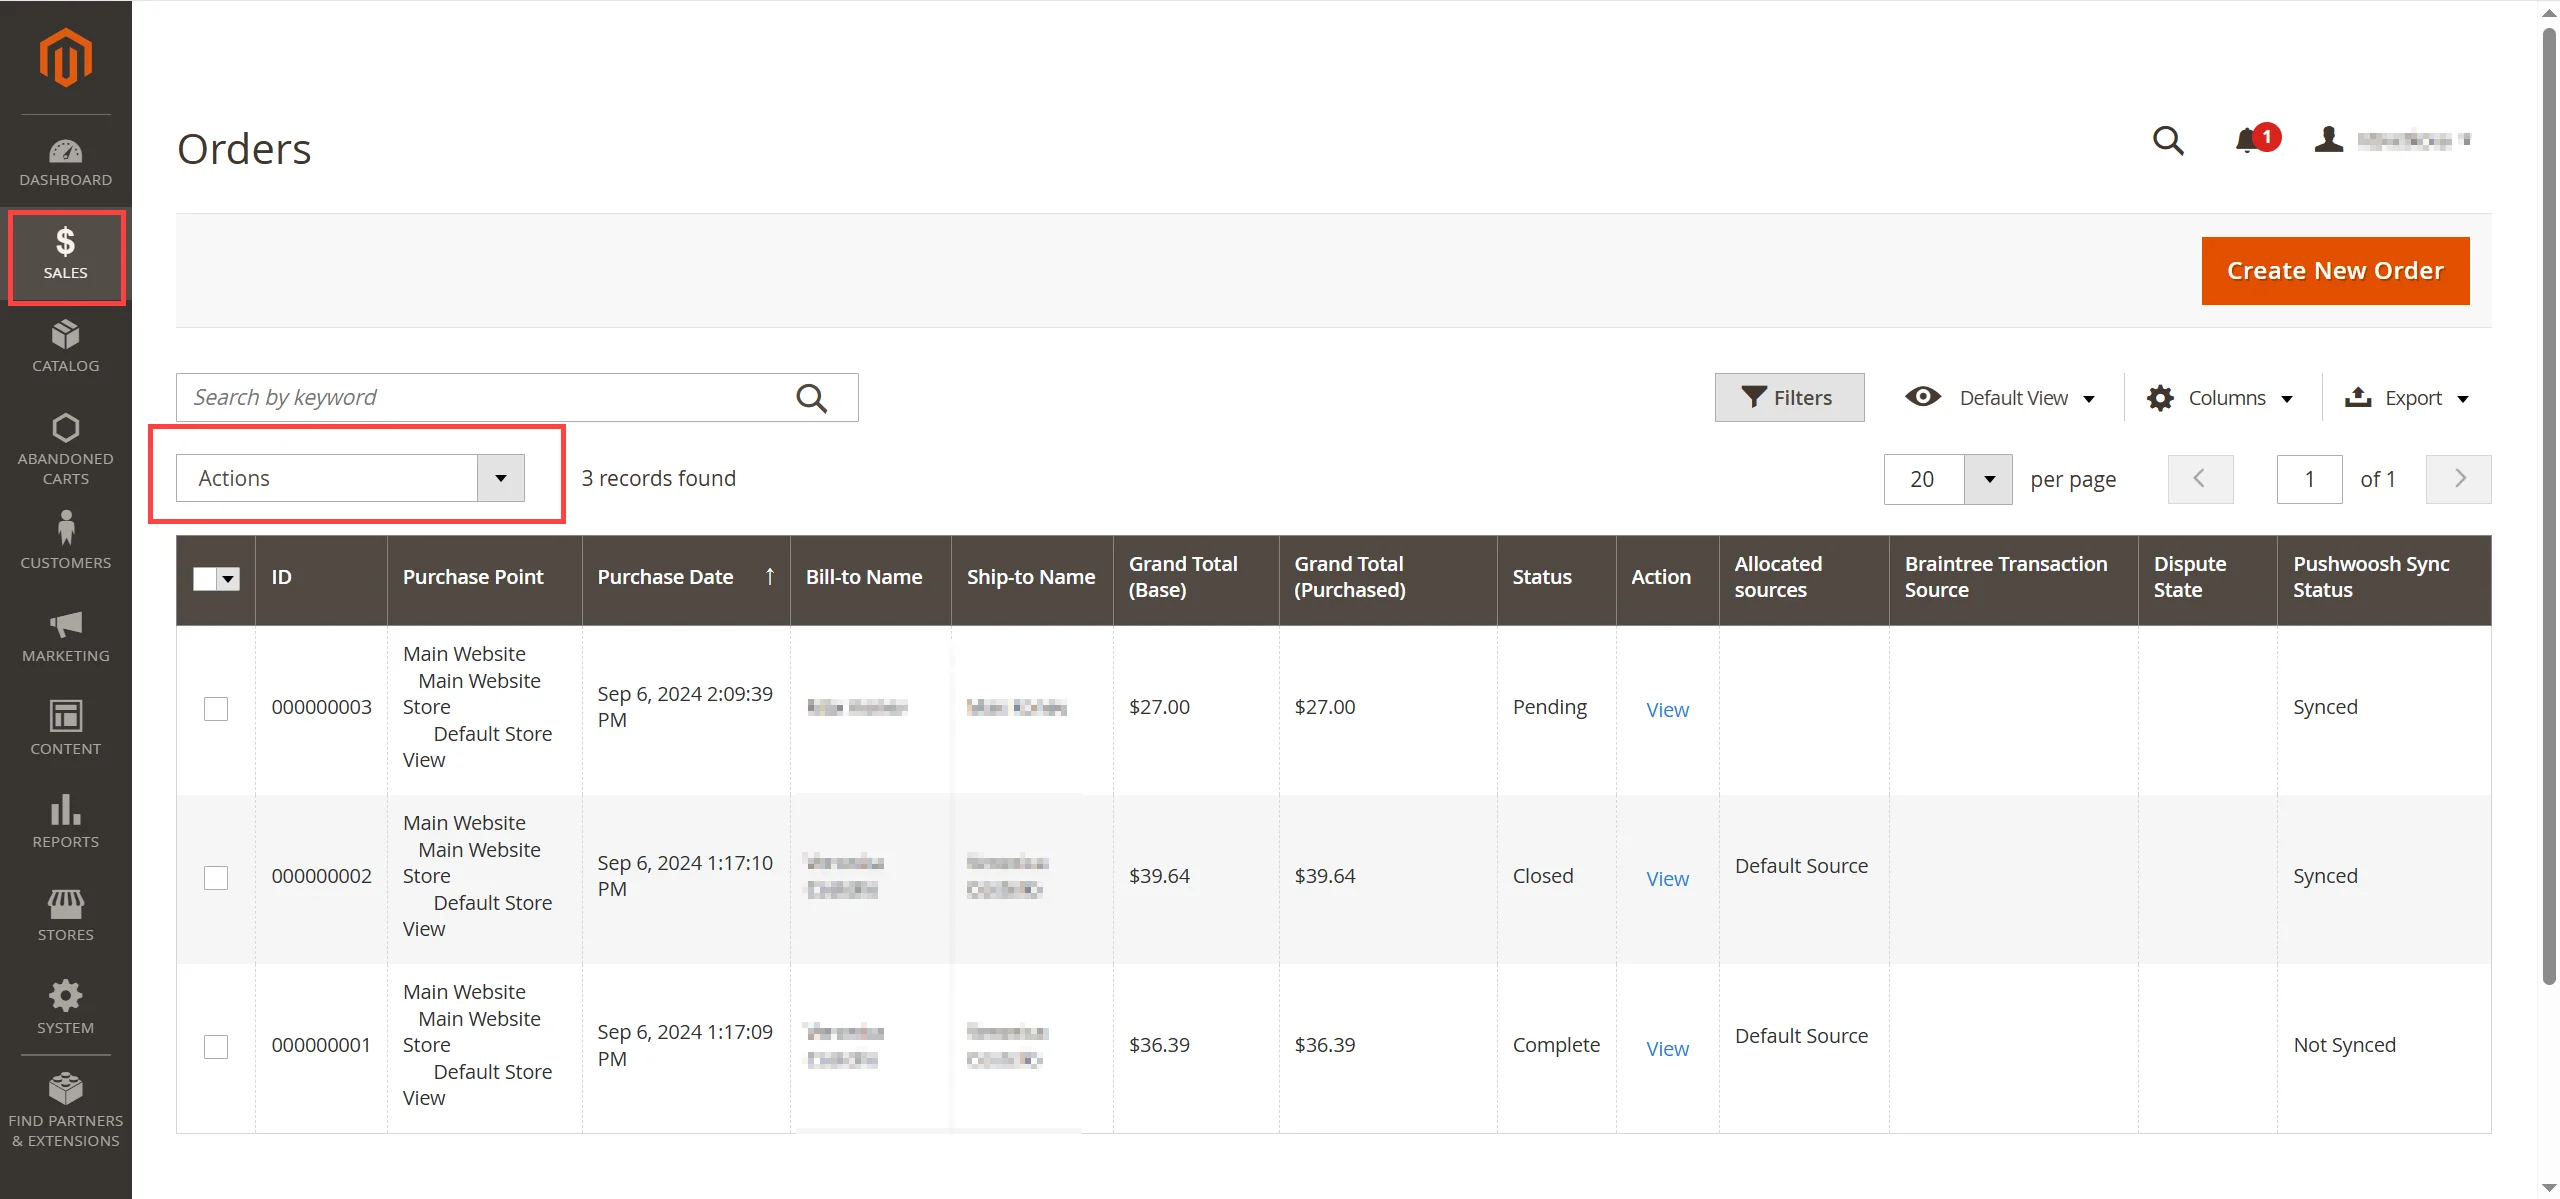
After synchronization, the order will appear in the Events section of the user profile in Pushwoosh [User Explorer](/product/audience-data-and-segmentation/user-explorer/) as a `PW_OrderCreated` or `PW_OrderUpdated` event (if the order status has changed), including detailed order information.
#### Sync selected abandoned carts
To manually sync selected abandoned carts:
1. In the Magento Admin Panel, go to the **Abandoned Carts** section.
2. Select the cart you want to sync.
3. From the **Actions** dropdown, choose **Sync to Pushwoosh**.
**Note:** Make sure you have configured the required inactivity period in the **Abandoned Cart Sync** settings to determine when a cart is considered abandoned.
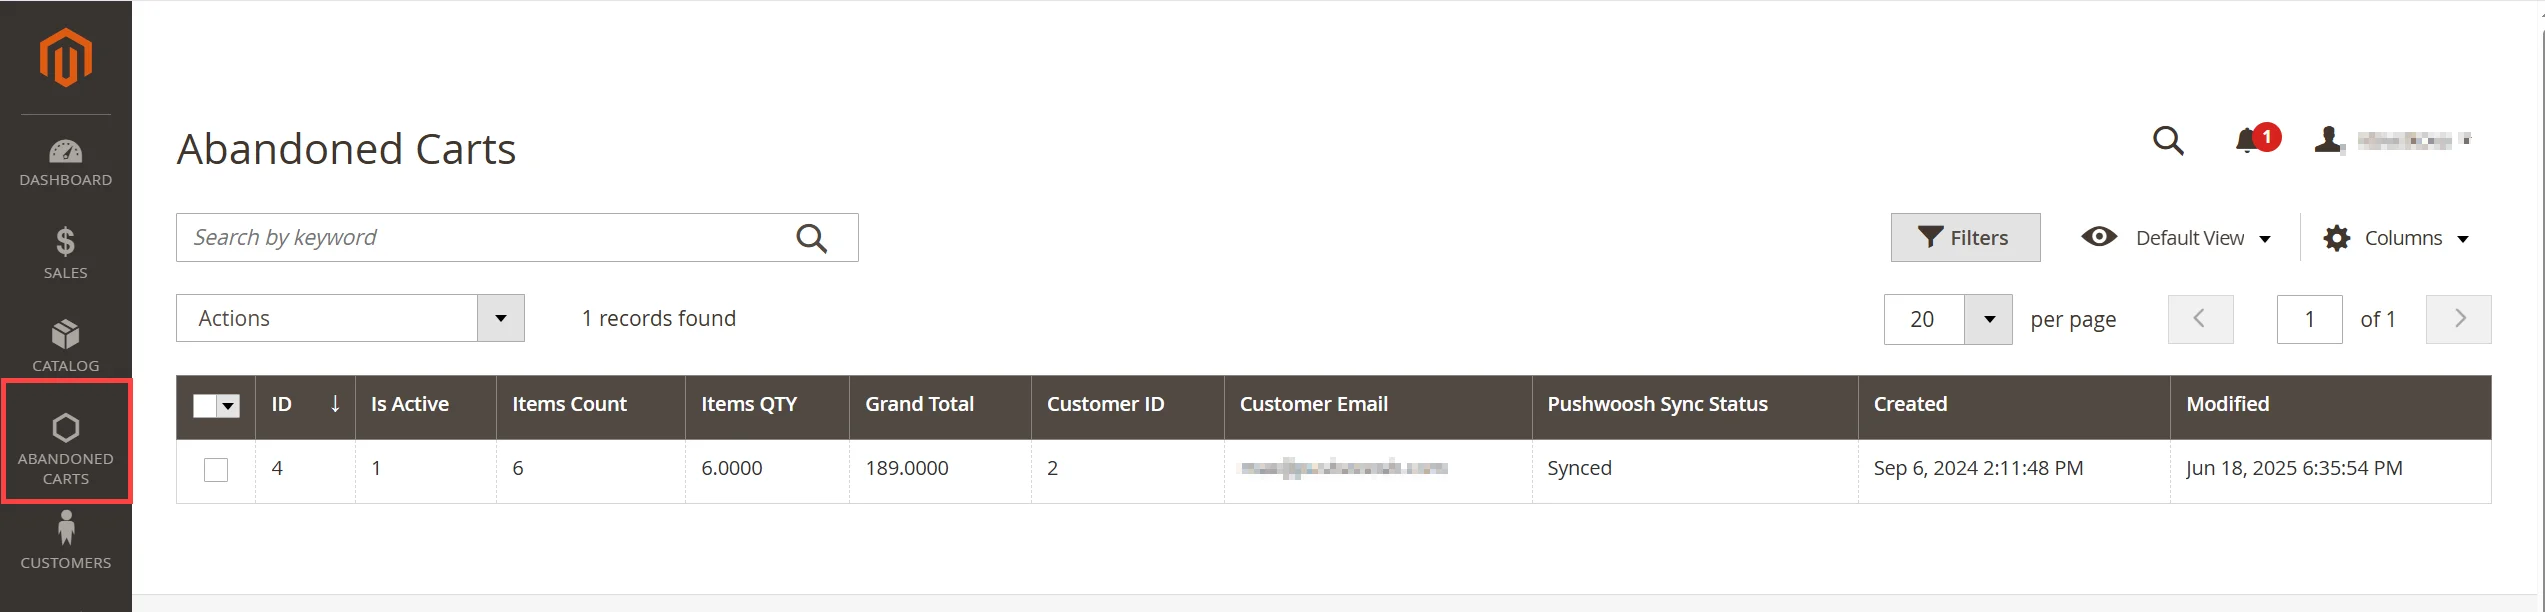
After synchronization, the abandoned cart data will appear in the **Events** section of the user profile in Pushwoosh [User Explorer](/product/audience-data-and-segmentation/user-explorer/) as a `PW_AbandonedCart` event with detailed information.
In addition, two tags will be set on the user profile:
* **Abandoned Cart Date** → `PW_AbandonedCartDate`
* **Abandoned Cart ID** → `PW_AbandonedCartID`
These tags can be used to send abandoned cart reminders. For the full email campaign setup with the Products block and Customer Journey, see [How to set up an abandoned cart campaign](/product/how-to-guides/email-marketing-campaigns/how-to-set-up-an-abandoned-cart-campaign/). You can also use [Connected content](/product/personalization/liquid-templates/#connected-content) in email templates.
### Verify the integration is working
To confirm that the integration is working correctly:
1. Create a test customer in Magento.
2. Manually sync the customer to Pushwoosh.
3. Open [User Explorer](/product/audience-data-and-segmentation/user-explorer/) in your Pushwoosh dashboard and find the customer.
If the customer appears in [User Explorer](/product/audience-data-and-segmentation/user-explorer/), it indicates that the synchronization was successful.