# Inbound webhook integration
Inbound webhooks let external services send events directly to Pushwoosh. When a third-party system triggers a webhook, Pushwoosh authenticates the request, identifies the subscriber, and fires the mapped event. The event can then start or advance a journey.
Use inbound webhooks to connect tools like CRMs, e-commerce platforms, or analytics services without building or maintaining your own server.
Each inbound webhook triggers one Pushwoosh event when a matching request is received and processed successfully.
## Before you start
Prepare the following before you open the webhook setup.
1. **Decide which Pushwoosh event the webhook should fire.** Pick an existing event from your project that you want to trigger from the third-party service. For example, `CheckoutSuccess`. If you don't have a suitable event yet, [create one](/product/audience-data-and-segmentation/events/custom-events/) with the attributes you want to fill from the incoming data.
2. **Make sure your third-party service can send webhooks.** The service must be able to send an HTTP POST request to an external URL when the event you care about happens, for example a new order or a form submission.
3. **Get a sample JSON payload from your third-party service.** This is a small example of the data the service sends on each event. You will need it to map payload fields to Pushwoosh event attributes.
## Create a webhook
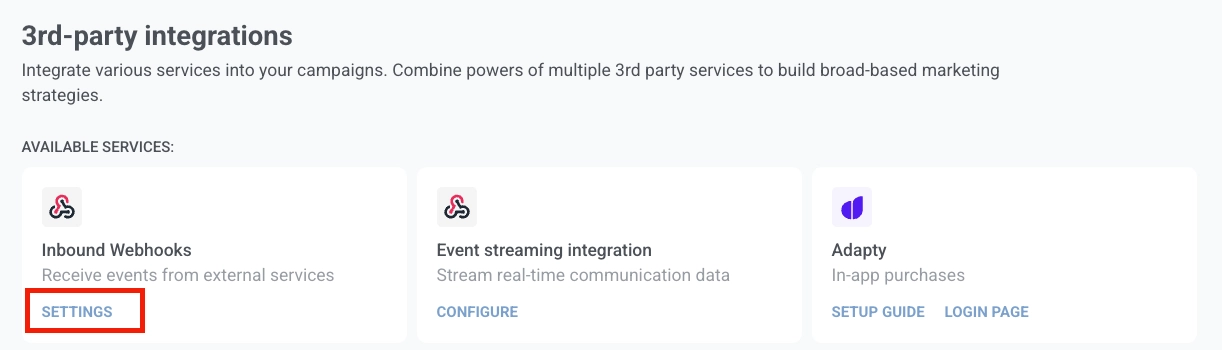
1. In your Pushwoosh account, go to **Settings** → **Integrations** → **Inbound webhooks** and click **Settings**.
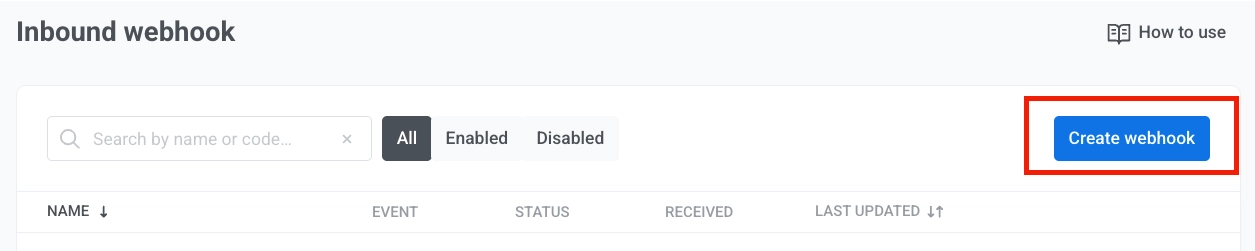
2. Click **Create webhook** to open the setup flow.
3. Enter a webhook name so you can identify the webhook in the list later.
4. Select the Pushwoosh event that should fire when the webhook receives a valid request. You can choose from events that already exist in your project. If you need to create an event first, see [Events](/product/audience-data-and-segmentation/events/custom-events/).
5. In **Match incoming data**, paste a sample JSON payload from your third-party service. Pushwoosh loads the payload fields into the dropdowns automatically.
Sample payload:
```json
{
"user_id": "12345",
"email_address": "jane@example.com",
"mobile": "+15551234567",
"purchase_date": "2024-03-15",
"order_number": "ORD-001",
"price": 99.99,
"payment_state": "success"
}
```
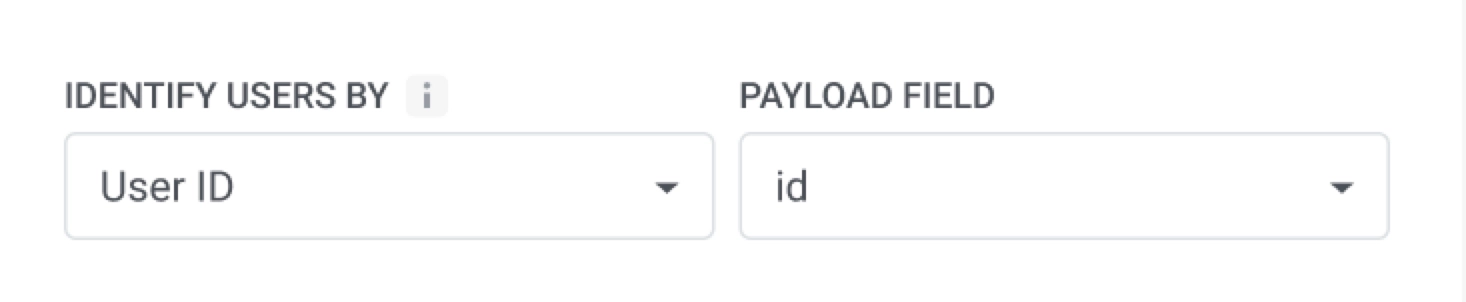
6. In **Identify users by**, select how Pushwoosh should match the incoming request to a user:
- **User ID:** matches by the internal user ID in Pushwoosh.
- **Email:** matches by email address.
- **Phone:** matches by phone number.
- **HWID:** matches by device, browser, or email identifier.
In **Payload field**, select the field that contains the matching value.
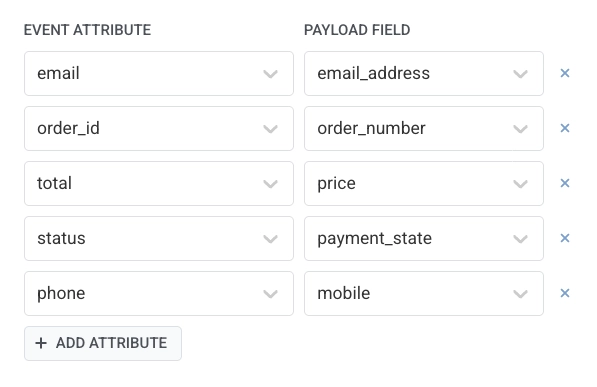
7. Map each event attribute to a payload field. In each mapping row:
- **Event attribute:** the attribute name in Pushwoosh. Select from the attributes defined for this event.
- **Payload field:** the field from the incoming payload that contains the value.
For example, map `email` to `email_address`, `total` to `price`, and `order_id` to `order_number`.
Click **+ Add attribute** to add a row. Click **×** to remove one.
8. When configuration is complete, click **Enable**. The **Webhook URL** window opens.
Copy the values and paste them into your external system's webhook settings:
- Copy the **URL** and set it as the webhook destination in your third-party service.
- Copy the **Secret** and paste it into your external service as the `Authorization` header value. The value includes the `Bearer` prefix, so use it as-is. Pushwoosh rejects any request where this header is missing or does not match.
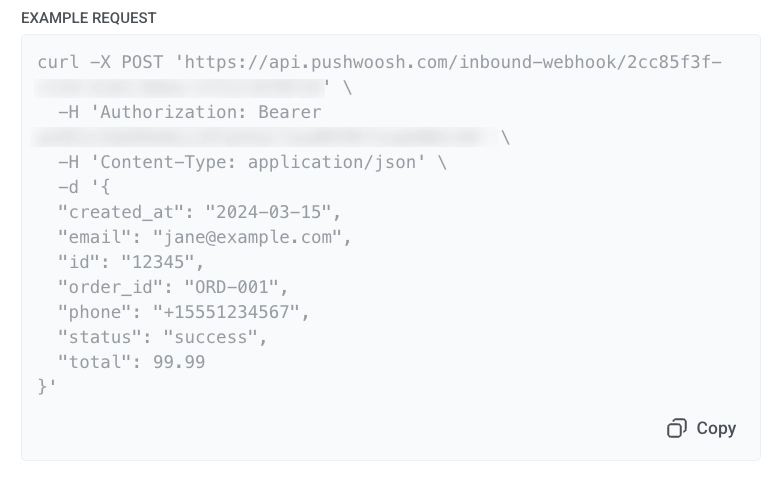
9. The window also shows an **Example request** with a sample `POST` request. Click **Copy** in the example block to copy the full request. Use it to send a test request and confirm that Pushwoosh accepts the webhook, or share it with your team as a template for the integration.
After you enable the webhook, it appears in the Webhooks list with an enabled status and starts accepting requests.
## Webhooks list
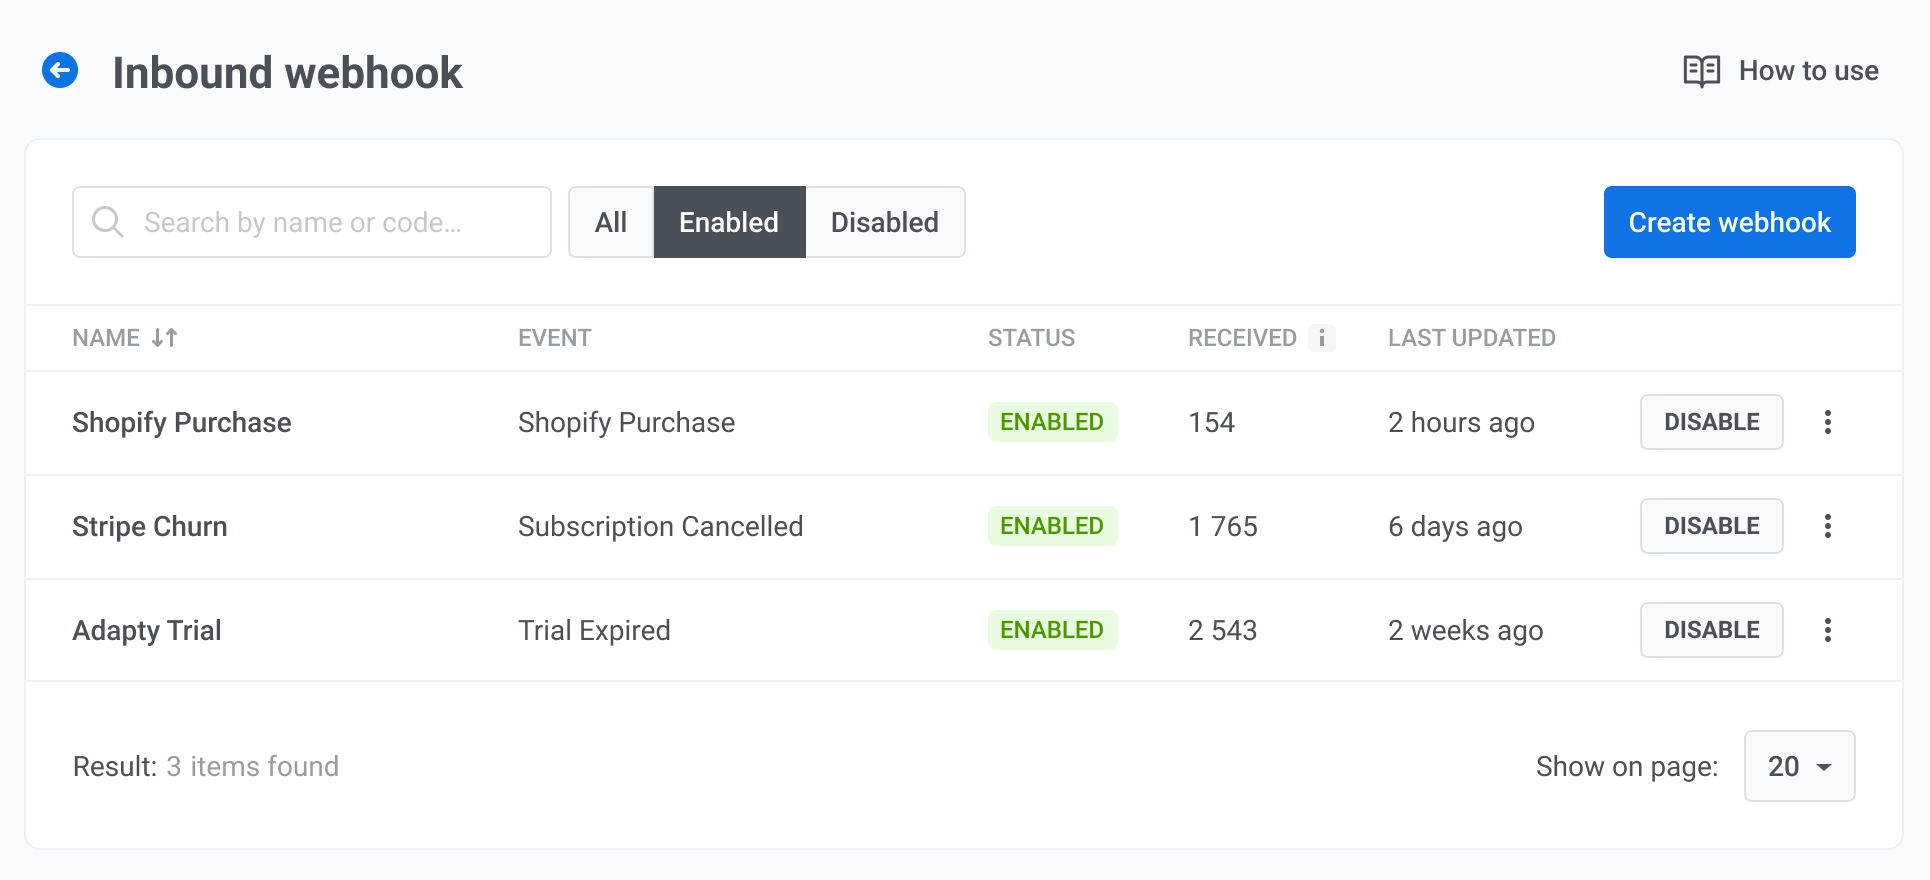
The inbound webhook list shows every webhook in your project.
Each row shows:
- **Name:** webhook name.
- **Event:** the Pushwoosh event that fires when the webhook receives a valid request.
- **Status:** **Enabled** or **Disabled**.
- **Received:** number of requests received by the webhook.
- **Last updated:** when the webhook was last changed.
## Manage webhooks
Open the row menu to:
- **Edit settings:** opens the webhook configuration so you can change the name, event, field mapping, and user identification.
- **Copy URL:** opens the **Webhook URL** window with the **URL** and **Secret** so you can copy them again.
- **Activity log:** opens the request log for this webhook.
- **Delete:** removes the webhook from the list.
For an enabled webhook, click **Disable** to deactivate it without deleting the configuration. For a disabled webhook, click **Enable** to start accepting requests again.
### View the activity log
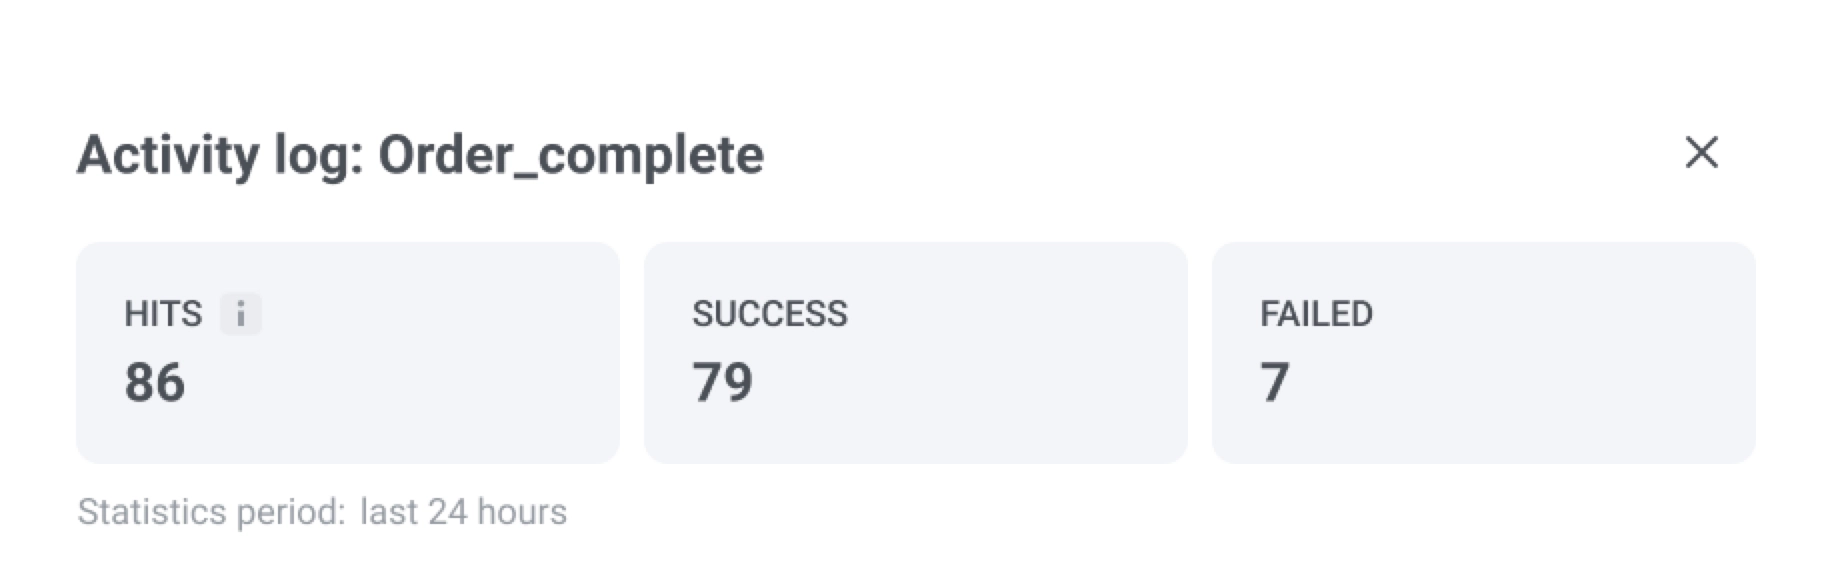
The activity log shows all incoming requests for the selected webhook.
**Summary panel**
At the top, review the summary for the last 24 hours:
- **Hits:** total number of incoming requests received.
- **Success:** requests where authentication passed, the user was found, and the event fired.
- **Failed:** requests that were not processed. A failed request does not stop the webhook. Pushwoosh continues to accept and process later requests.
| Failure reason | What it means |
| :---- | :---- |
| **Auth rejected** | The shared secret does not match the webhook configuration. If five consecutive requests fail with this error, Pushwoosh sends you a notification. Update the secret to resume. No reactivation needed. |
| **User identifier field missing** | The payload field mapped for user identification is not present in the request. |
**Request entries**
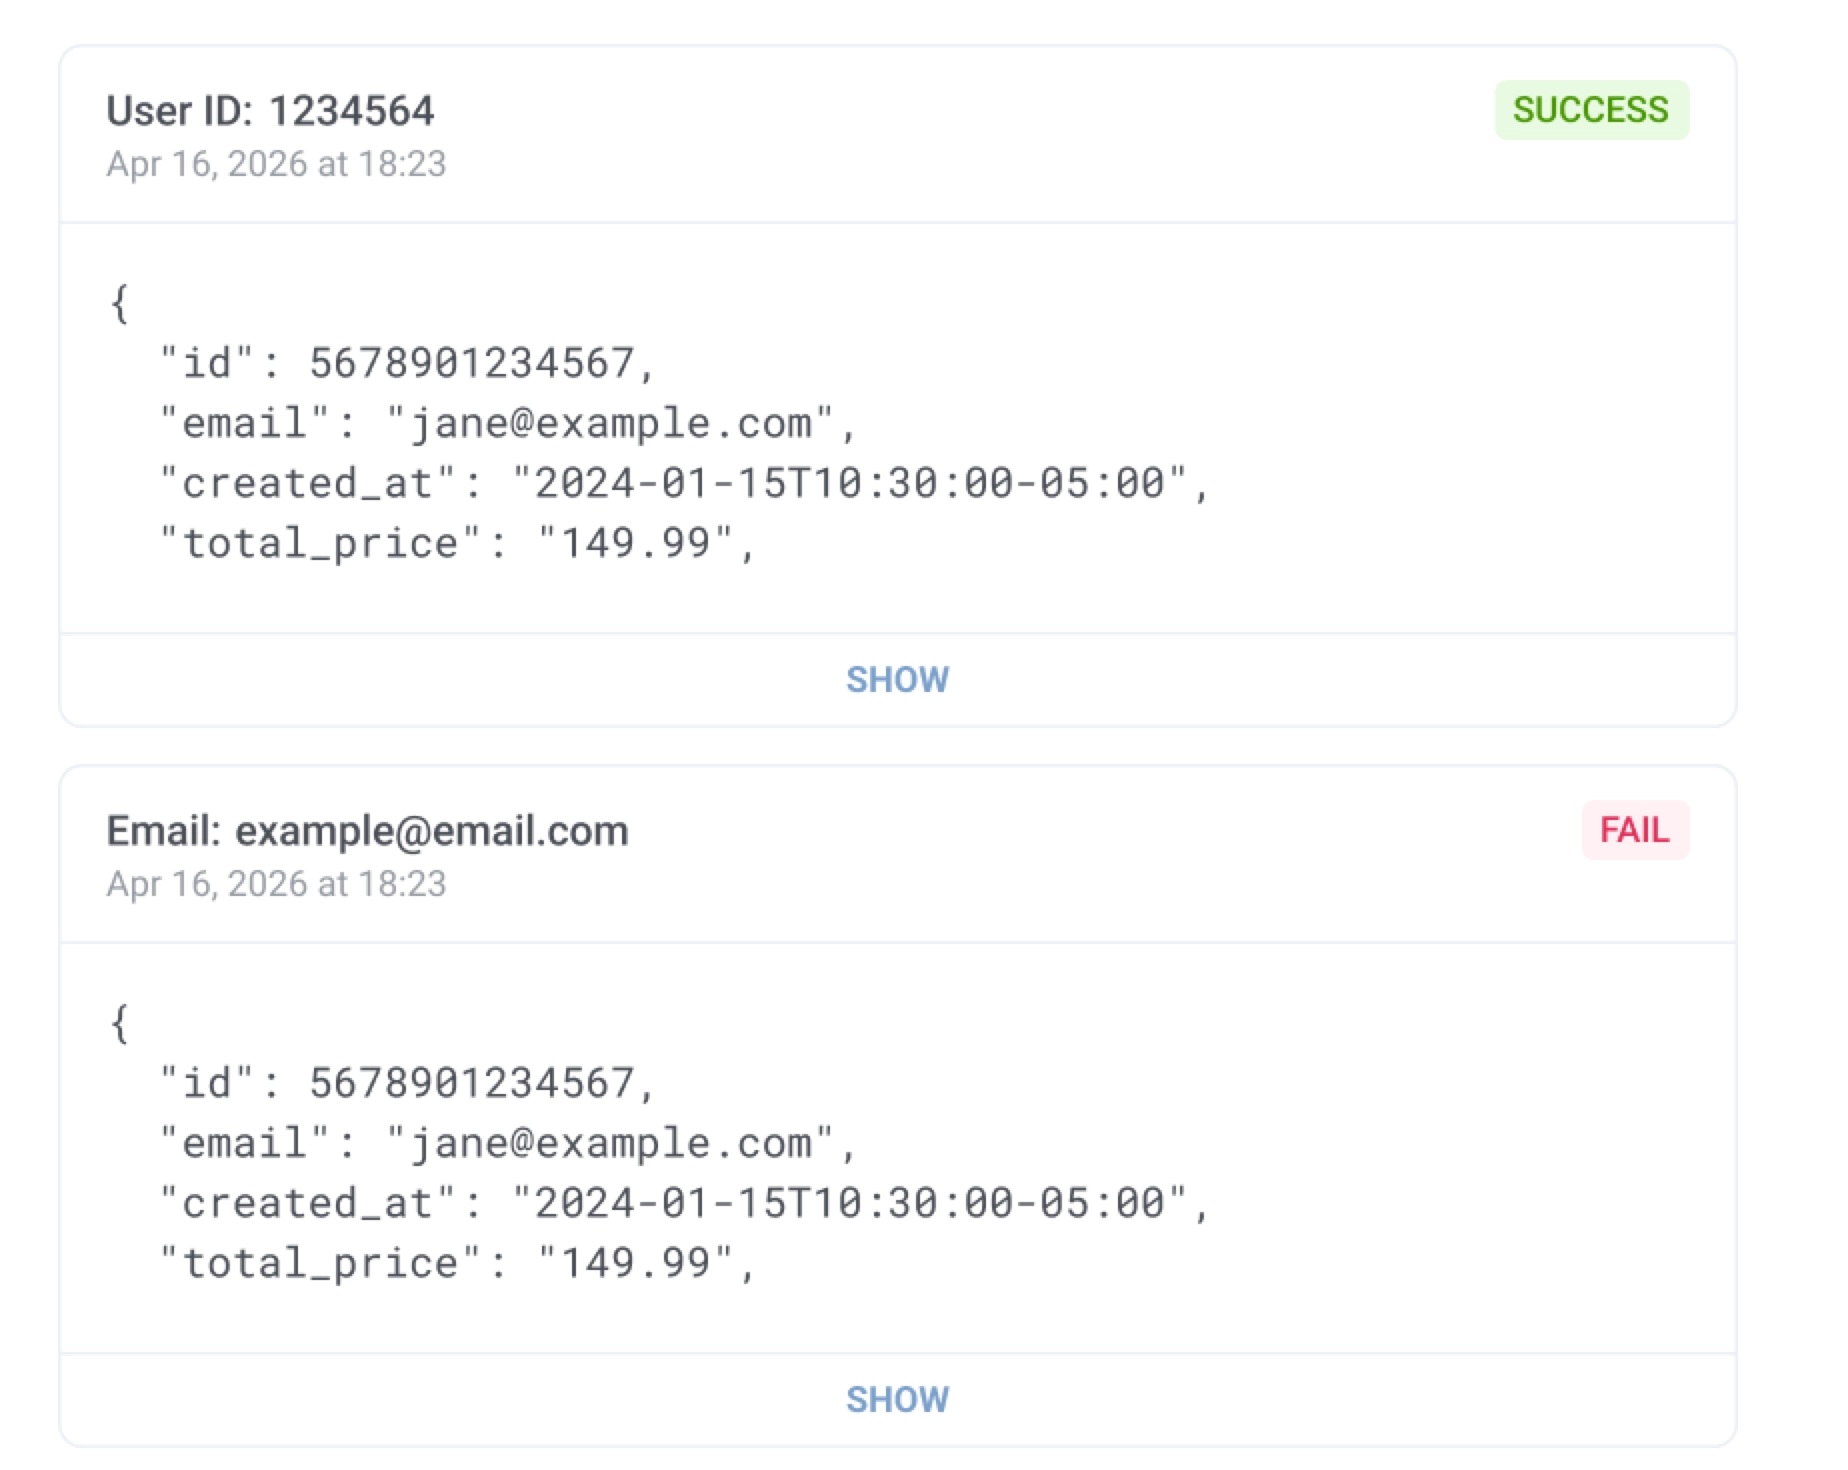
Each entry shows the user identifier (for example, **User ID** or **Email**), a **Success** or **Failed** badge, the request timestamp, and a preview of the received JSON payload. Click **Show** to expand the full request details.
## View webhook-fired events in User Explorer
When a webhook request is processed successfully, Pushwoosh records the event in [User Explorer](/product/audience-data-and-segmentation/user-explorer/). Where it appears depends on how you identified the user:
- **User ID, Email, or Phone:** the event is recorded on the user profile. Open the user and go to **Events history**.
- **HWID:** the event is recorded on the matching device. Open the user, find the device in **Active user devices**, and go to its **Events history** tab.
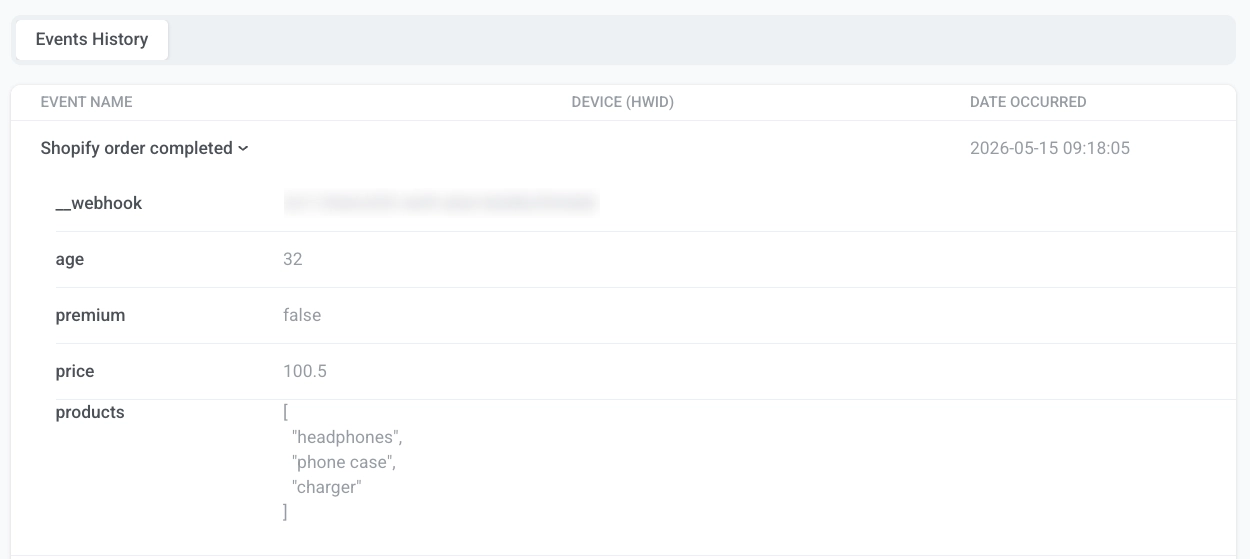
Find the event by name and expand it to see the mapped attributes (for example, `price` or `products`) and the `__webhook` attribute with the webhook ID.
## Use inbound webhooks with journeys
After a webhook is enabled and firing events successfully, use the selected event as a [trigger-based journey entry](/product/customer-journey/journey-elements/entry-elements/trigger-based-entry/). When the webhook receives a valid request, Pushwoosh fires the mapped event. Any journey that uses this event as an entry trigger starts automatically for the matched user.
 2. Click **Create webhook** to open the setup flow.
 3. Enter a webhook name so you can identify the webhook in the list later.
4. Select the Pushwoosh event that should fire when the webhook receives a valid request. You can choose from events that already exist in your project. If you need to create an event first, see [Events](/product/audience-data-and-segmentation/events/custom-events/).
3. Enter a webhook name so you can identify the webhook in the list later.
4. Select the Pushwoosh event that should fire when the webhook receives a valid request. You can choose from events that already exist in your project. If you need to create an event first, see [Events](/product/audience-data-and-segmentation/events/custom-events/).
 5. In **Match incoming data**, paste a sample JSON payload from your third-party service. Pushwoosh loads the payload fields into the dropdowns automatically.
Sample payload:
```json
{
"user_id": "12345",
"email_address": "jane@example.com",
"mobile": "+15551234567",
"purchase_date": "2024-03-15",
"order_number": "ORD-001",
"price": 99.99,
"payment_state": "success"
}
```
6. In **Identify users by**, select how Pushwoosh should match the incoming request to a user:
- **User ID:** matches by the internal user ID in Pushwoosh.
- **Email:** matches by email address.
- **Phone:** matches by phone number.
- **HWID:** matches by device, browser, or email identifier.
In **Payload field**, select the field that contains the matching value.
5. In **Match incoming data**, paste a sample JSON payload from your third-party service. Pushwoosh loads the payload fields into the dropdowns automatically.
Sample payload:
```json
{
"user_id": "12345",
"email_address": "jane@example.com",
"mobile": "+15551234567",
"purchase_date": "2024-03-15",
"order_number": "ORD-001",
"price": 99.99,
"payment_state": "success"
}
```
6. In **Identify users by**, select how Pushwoosh should match the incoming request to a user:
- **User ID:** matches by the internal user ID in Pushwoosh.
- **Email:** matches by email address.
- **Phone:** matches by phone number.
- **HWID:** matches by device, browser, or email identifier.
In **Payload field**, select the field that contains the matching value.
 7. Map each event attribute to a payload field. In each mapping row:
- **Event attribute:** the attribute name in Pushwoosh. Select from the attributes defined for this event.
- **Payload field:** the field from the incoming payload that contains the value.
For example, map `email` to `email_address`, `total` to `price`, and `order_id` to `order_number`.
7. Map each event attribute to a payload field. In each mapping row:
- **Event attribute:** the attribute name in Pushwoosh. Select from the attributes defined for this event.
- **Payload field:** the field from the incoming payload that contains the value.
For example, map `email` to `email_address`, `total` to `price`, and `order_id` to `order_number`.
 Click **+ Add attribute** to add a row. Click **×** to remove one.
8. When configuration is complete, click **Enable**. The **Webhook URL** window opens.
Copy the values and paste them into your external system's webhook settings:
- Copy the **URL** and set it as the webhook destination in your third-party service.
- Copy the **Secret** and paste it into your external service as the `Authorization` header value. The value includes the `Bearer` prefix, so use it as-is. Pushwoosh rejects any request where this header is missing or does not match.
Click **+ Add attribute** to add a row. Click **×** to remove one.
8. When configuration is complete, click **Enable**. The **Webhook URL** window opens.
Copy the values and paste them into your external system's webhook settings:
- Copy the **URL** and set it as the webhook destination in your third-party service.
- Copy the **Secret** and paste it into your external service as the `Authorization` header value. The value includes the `Bearer` prefix, so use it as-is. Pushwoosh rejects any request where this header is missing or does not match.
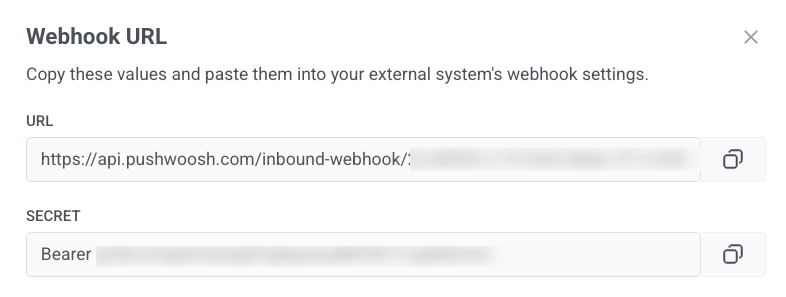 9. The window also shows an **Example request** with a sample `POST` request. Click **Copy** in the example block to copy the full request. Use it to send a test request and confirm that Pushwoosh accepts the webhook, or share it with your team as a template for the integration.
 After you enable the webhook, it appears in the Webhooks list with an enabled status and starts accepting requests.
## Webhooks list
The inbound webhook list shows every webhook in your project.
Each row shows:
- **Name:** webhook name.
- **Event:** the Pushwoosh event that fires when the webhook receives a valid request.
- **Status:** **Enabled** or **Disabled**.
- **Received:** number of requests received by the webhook.
- **Last updated:** when the webhook was last changed.
After you enable the webhook, it appears in the Webhooks list with an enabled status and starts accepting requests.
## Webhooks list
The inbound webhook list shows every webhook in your project.
Each row shows:
- **Name:** webhook name.
- **Event:** the Pushwoosh event that fires when the webhook receives a valid request.
- **Status:** **Enabled** or **Disabled**.
- **Received:** number of requests received by the webhook.
- **Last updated:** when the webhook was last changed.
 ## Manage webhooks
Open the row menu to:
- **Edit settings:** opens the webhook configuration so you can change the name, event, field mapping, and user identification.
- **Copy URL:** opens the **Webhook URL** window with the **URL** and **Secret** so you can copy them again.
- **Activity log:** opens the request log for this webhook.
- **Delete:** removes the webhook from the list.
For an enabled webhook, click **Disable** to deactivate it without deleting the configuration. For a disabled webhook, click **Enable** to start accepting requests again.
### View the activity log
The activity log shows all incoming requests for the selected webhook.
**Summary panel**
At the top, review the summary for the last 24 hours:
- **Hits:** total number of incoming requests received.
- **Success:** requests where authentication passed, the user was found, and the event fired.
- **Failed:** requests that were not processed. A failed request does not stop the webhook. Pushwoosh continues to accept and process later requests.
| Failure reason | What it means |
| :---- | :---- |
| **Auth rejected** | The shared secret does not match the webhook configuration. If five consecutive requests fail with this error, Pushwoosh sends you a notification. Update the secret to resume. No reactivation needed. |
| **User identifier field missing** | The payload field mapped for user identification is not present in the request. |
## Manage webhooks
Open the row menu to:
- **Edit settings:** opens the webhook configuration so you can change the name, event, field mapping, and user identification.
- **Copy URL:** opens the **Webhook URL** window with the **URL** and **Secret** so you can copy them again.
- **Activity log:** opens the request log for this webhook.
- **Delete:** removes the webhook from the list.
For an enabled webhook, click **Disable** to deactivate it without deleting the configuration. For a disabled webhook, click **Enable** to start accepting requests again.
### View the activity log
The activity log shows all incoming requests for the selected webhook.
**Summary panel**
At the top, review the summary for the last 24 hours:
- **Hits:** total number of incoming requests received.
- **Success:** requests where authentication passed, the user was found, and the event fired.
- **Failed:** requests that were not processed. A failed request does not stop the webhook. Pushwoosh continues to accept and process later requests.
| Failure reason | What it means |
| :---- | :---- |
| **Auth rejected** | The shared secret does not match the webhook configuration. If five consecutive requests fail with this error, Pushwoosh sends you a notification. Update the secret to resume. No reactivation needed. |
| **User identifier field missing** | The payload field mapped for user identification is not present in the request. |
 **Request entries**
Each entry shows the user identifier (for example, **User ID** or **Email**), a **Success** or **Failed** badge, the request timestamp, and a preview of the received JSON payload. Click **Show** to expand the full request details.
**Request entries**
Each entry shows the user identifier (for example, **User ID** or **Email**), a **Success** or **Failed** badge, the request timestamp, and a preview of the received JSON payload. Click **Show** to expand the full request details.
 ## View webhook-fired events in User Explorer
When a webhook request is processed successfully, Pushwoosh records the event in [User Explorer](/product/audience-data-and-segmentation/user-explorer/). Where it appears depends on how you identified the user:
- **User ID, Email, or Phone:** the event is recorded on the user profile. Open the user and go to **Events history**.
- **HWID:** the event is recorded on the matching device. Open the user, find the device in **Active user devices**, and go to its **Events history** tab.
Find the event by name and expand it to see the mapped attributes (for example, `price` or `products`) and the `__webhook` attribute with the webhook ID.
## View webhook-fired events in User Explorer
When a webhook request is processed successfully, Pushwoosh records the event in [User Explorer](/product/audience-data-and-segmentation/user-explorer/). Where it appears depends on how you identified the user:
- **User ID, Email, or Phone:** the event is recorded on the user profile. Open the user and go to **Events history**.
- **HWID:** the event is recorded on the matching device. Open the user, find the device in **Active user devices**, and go to its **Events history** tab.
Find the event by name and expand it to see the mapped attributes (for example, `price` or `products`) and the `__webhook` attribute with the webhook ID.
 ## Use inbound webhooks with journeys
After a webhook is enabled and firing events successfully, use the selected event as a [trigger-based journey entry](/product/customer-journey/journey-elements/entry-elements/trigger-based-entry/). When the webhook receives a valid request, Pushwoosh fires the mapped event. Any journey that uses this event as an entry trigger starts automatically for the matched user.
## Use inbound webhooks with journeys
After a webhook is enabled and firing events successfully, use the selected event as a [trigger-based journey entry](/product/customer-journey/journey-elements/entry-elements/trigger-based-entry/). When the webhook receives a valid request, Pushwoosh fires the mapped event. Any journey that uses this event as an entry trigger starts automatically for the matched user.